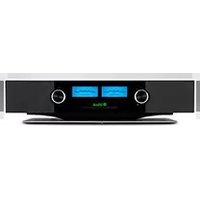
RS200 - Loudspeaker MCINTOSH - Free user manual and instructions
Find the device manual for free RS200 MCINTOSH in PDF.


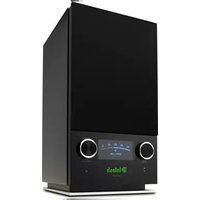
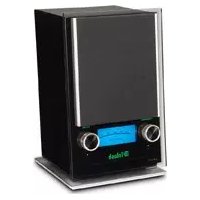
| Product Type | Wireless Speaker System |
| Brand | McIntosh |
| Model | RS200 |
| Dimensions (W x H x D) | 17.5 x 12.0 x 10.0 inches |
| Weight | 20.5 lbs |
| Power Supply | AC 100-240V, 50/60Hz |
| Wireless Connectivity | AirPlay 2, Bluetooth 5.0, Wi-Fi |
| Audio Inputs | Optical, Analog RCA, USB |
| Room Calibration | RoomPerfect |
| Supported Audio Formats | ALAC, FLAC, AAC, MP3, WAV |
| Frequency Response | 20 Hz - 20 kHz |
| Amplifier Power | 500W total |
| Drivers | 1 x 8” woofer, 2 x 1” tweeters |
| Control Method | Touch panel, Remote, App |
| Cleaning Instructions | Wipe with a soft, dry cloth |
| Safety Precautions | Do not expose to moisture or extreme temperatures |
| Spare Parts Availability | Contact McIntosh authorized service centers |
| Repair Service | Authorized McIntosh dealers provide repair |
Frequently Asked Questions - RS200 MCINTOSH
User questions about RS200 MCINTOSH
0 question about this device. Answer the ones you know or ask your own.
Ask a new question about this device
Download the instructions for your Loudspeaker in PDF format for free! Find your manual RS200 - MCINTOSH and take your electronic device back in hand. On this page are published all the documents necessary for the use of your device. RS200 by MCINTOSH.
USER MANUAL RS200 MCINTOSH
McIntosh Laboratory, Inc. 2 Chambers Street Binghamton, New York 13903-2699 Phone: 607-723-3512 www.mcintoshlabs.com
RS200
Wireless Loudspeaker System
Owner's Manual


Safety First
It is a smart idea to read all the enclosed RS200 SAFETY INFORMATION included in separate documents; even if you already know this stuff, you can't be too safe.
Here is some compliance information:
FCC Information (For US Customers)
1. IMPORTANT NOTICE: DO NOT MODIFY
THIS PRODUCT
This product, when installed as indicated in the instructions contained in this manual, meets FCC requirements. Modification not expressly approved by McIntosh may void your authority, granted by the FCC, to use the product.
2. CAUTION:
- To comply with FCC RF exposure compliance requirement, separation distance of at least 20cm must be maintained between this product and all persons.
- This product and its antenna must not be co-located or operating in conjunction with any other antenna or transmitter.
3. COMPLIANCE INFORMATION:
• Product Name: RS200 Wireless Loudspeaker System
• Model Number: RS200
• This product contains FCC ID:2AAWQ-CAPRICA2XL and XCO-HSBT075
McIntosh Laboratory, Inc.
2 Chambers Street
Binghamton, NY 13903
Tel. (607) 723-3512
IC Information (Canadian Customers)
1. PRODUCT:
This product contains IC: 11138A-CAPRICA2XL and
7756A-HSBT075.
This product complies with RSS-210 of Industry Canada. Operation is subject to the following two conditions: (1) this product may not cause harmful interference, and (2) this product must accept any interference received, including interference that may cause undesired operation. This Class B digital Apparatus complices with Canadian ICES-003.
2. CAUTION:
To reduce potential radio interference to other users, the antenna type and its gain should be so chosen that the equivalent isotropically radiated power (e.i.r.p.) is not more than that permitted for successful communication.
Canadian Customers: CAN ICES-3 (B)/NMB-3 (B)
RF Exposure Information
This equipment complies with FCC/IC radiation exposure limits set forth for an uncontrolled environment and meets
the FCC radio frequency (RF) Exposure Guidelines in Supplement C to OET65 and RSS-102 of the IC radio frequency (RF) Exposure rules. This equipment has very low levels of RF energy that are deemed to comply without testing of specific absorption ratio (SAR).
1. DECLARATION OF CONFORMITY
Our products follow the provisions of EC/EU directives:
LVD: 2014/35/EC
EMC: 2014/30/EU
RED: 2014/53/EU
ErP: EC regulation 1275/2008 and its frame work directive 2009/125/EC
RoHS: 2011/65/EU
2. IMPORTANT NOTICE: DO NOT MODIFY
THIS PRODUCT
This product, when installed as indicated in the instructions contained in this manual, meets RED directive requirements. Modification of the product could result in hazardous Radio and EMC radiation.
3. CAUTION:
Separation distance of at least 20cm must be maintained between this product and all persons.
This product and its antenna must not be co-located or operating in conjunction with any other antenna or transmitter.
Table of Contents
Safety First....2
FCC Information (For US Customers) ......2
IC Information (Canadian Customers)....2
Thank you from all of us at McIntosh....3
Make a Note....3
Power Connection....4
The Wi-Fi Connection....4
Get the Play-Fi App ....4
Wi-Fi Setup....4
More about Play-Fi....4
Play-Fi Line In Broadcast 5
Surround Sound 5
Works With Alexa™ 5
AirPlay 5
Multiroom Audio 5
Siri Voice Control 5
Other Wireless Connections....5
Bluetooth® 5
Qualcomm® aptX™ Audio......6
Buttons and the Switches on the Back ......6
Master Power Switch....6
EQ- The WFT Switch 6
CEC Button....6
Wi-Fi Reset 6
Inputs and Outputs on the Back 6
Optical....6
AUX....7
HDMI ARC (Connecting your TV) .....7
USB....7
Trig Out (Power Control)....7
Service 7
Subwoofer Output....7
The Knobs on the Front 8
The Left Knob 8
Input......8
Bluetooth Pairing 8
NET Wi-Fi Status LED....8
Meter Brightness....8
The Right Knob 8
Standby 8
Mute 8
Volume......8
Both Knobs....8
Resetting the Unit 8
The Grilles....8
Streaming Music....9
Amazon Music....9
Internet Radio 9
Pandora 9
SiriusXM 9
iHeartRadio 9
KKbox....9
DLNA 9
Tidal....9
Napster....9
QQ Music....10
NPR....10
Using Presets 10
Remote Learning....10
Changing the Remote's Battery ....10
Description of Remote Control Buttons....11
Play-Fi Presets 11
Trademark and License Information ....12
Technical Specifications....13
Re-packing the RS200....13
List of Figures
Figure 1- AC Power Inlet....4
Figure 2— Wi-Fi Button ....4
Figure 3- Rear Panel 6
Figure 4- 3.5mm Plug for AUX Input....7
Figure 5- USB Type B Connector....7
Figure 7- 3.5mm Plug for Power Control....7
Figure 6-3.5mm Plug for Data Output....7
Figure 8- Knob Locations....8
Figure 9— Sliding open the remote ..... 10
Figure 10- Remote control diagram....11
Figure 11— Packing Material ....13
Thank you from all of us at McIntosh
Your new RS200 Wireless Loudspeaker System is a precision instrument that will provide many years of enjoyment. Please take a few moments to familiarize yourself with the features and instructions to get the maximum performance from your equipment.
If you need further technical assistance, please contact your dealer who may be more familiar with your particular setup including other brands. You can also contact McIntosh with additional questions or in the unlikely event of needing service.
McIntosh Laboratory, Inc.
2 Chambers Street
Binghamton, New York 13903
Technical Assistance Phone: (607) 723-3512
Customer Service (for repairs)
Phone: (607) 723-3515
Fax: 607-724-1917
support@mcintoshlabs.com
Website: mcintoshlabs.com
Make a Note
For future reference, you can jot down your serial number and purchase information here. We can identify your purchase from this information if the occasion should arise.
| Serial Number: | |
| Purchase Date: | |
| Dealer Name: |

Power Connection
Before the RS200 can stream wireless music, one cable must be connected—the AC power cord. The supplied AC power cord connects to the AC Power inlet in the top right corner of the rear of the RS200 (looking at the back).

Connect AC Power Cord to AC Power Inlet
Figure 1- AC Power Inlet
The Wi-Fi Connection
Get the Play-Fi App
The Play-Fi App allows you to stream music from your Apple and Android devices as well as any sound from your Windows PC to your RS200 (as well as any other Play-fi speaker).
First, download the appropriate version of Play-Fi. For Android, go to the Google Play Store; for Apple, go to the Apple App Store, and the Windows version can be downloaded from https://play-fi.com/apps/windows/.
The next step is for Play-Fi to connect the RS200 with your wireless network. After initial setup, the RS200 will automatically link with your network.
Wi-Fi Setup
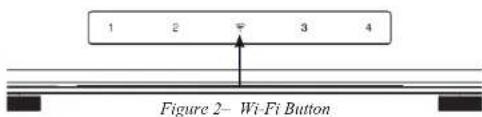
Place the RS200 in Setup Mode by pressing and holding the Wi-Fi symbol in the center of the LEDs on the top front of the RS200 for eight seconds. A tone will sound.
Install the Play-Fi App if you haven't already. If only using AirPlay™, skip to the next section iOS Connection Without Play-Fi.
For iOS users, open the Wi-Fi settings menu and select the available network option that contains "PlayFi2Device" in its name.
Run the Play-Fi App on your iOS, Windows or Android Device.
Play-Fi should search for Play-Fi devices that are in Setup mode (such as the RS200). If Play-Fi does not automatically search, click on the settings icon and then select "Set Up Play-Fi Device." Then select Search.
After a minute or so, the RS200 should be found. Enter the Wi-Fi password for the network. The RS200 will now be connected to the wireless network. If there are software updates for the RS200 available, it may take a few minutes.
Next, choose a name from the list or choose to create a custom name to identify the RS200.
iOS Connection without Play-Fi
With the NET LED pulsing slowly, open the Wi-Fi settings. Scroll to find Play-Fi device under "add AirPlay Speaker below."
Selecting the Play-Fi device will open a screen to add the RS200 to a selected Wi-Fi network.
After selecting the Wi-Fi network, it will take a moment and then a message should display that the AirPlay Speaker was successfully connected to the network.
WPS Setup
If your router supports Wi-Fi Protected Setup (WPS), then you can use this method for connecting the RS200 to your network. WPS allows for a secure network connection without needing to enter a password.
Place the RS200 near the router. It can be moved after setup.
Place the RS200 in WPS mode by pressing and holding the Wi-Fi symbol in the center of the LEDs on the top front of the RS200 for 3 seconds. The symbol should begin to blink twice and then pause every second.
Now push the WPS button on your router. Once the automatic connection has completed, the Wi-Fi symbol should now be a solid, non-blinking, green.
Launch the Play-PI App to complete the setup. The RS200 should be recognized and you will be able to name the unit.
More about Play-Fi
Play-Fi is a premium whole-home wireless audio system created by DTS and licensed by McIntosh. The goal of Play-Fi is to provide seamless interoperability between speakers in many locations with numerous streaming services. The streaming landscape is an everchanging ecosystem, and the folks at DTS are working hard to both maintain quality service as well as incorporate advances in streaming technology. Over time your Play-Fi App will change and improve. Play-Fi's features and function are completely in the hands of our friends at DTS. You can find the latest information in the knowledge base at play-fi.com.
Play-Fi Line In Broadcast
The RS200 allows you to use Play-Fi to feed audio inputs from the RS200 to other Play-Fi speakers. To do this:
- Choose the Line In option from the Play-Fi menu.
- Select a source device such as the RS200.
- Select an Input (OPT, AUX, HDMI or USB).
- Select Type of Content (Music or TV Audio).
- Select one or more Output Speakers. Include the RS200 in your choice if you want to hear the music from the RS200.
- Select Start Line In Broadcast to play to all selected devices.
Surround Sound
The RS200 can be part of a Play-Fi 5.1 surround configuration.
To utilize the surround capability of Play-Fi, the RS200 should be set up as the Surround Master which will be the front position of the setup. Two additional Play-Fi surround capable speakers are needed for the right and left rear.
All the products should be updated with the latest firmware and software. Nothing less than a 5GHz capable router is recommended.
To set up surround:
Choose settings icon in the Play-Fi App.
Then choose Surround Sound from the menu.
Then choose the plus sign + and follow the guided instruction for the setup of wireless speakers.
After setup, a 5.1 audio signal sent to the RS200 will be decoded and render discrete Surround Left and Surround Right channels to the rear speakers. Select signal input (HDMI, Optical or USB) using the RS200 Left Input Selector Knob.
To release the rear speakers from the surround setup:
- Go to Surround Sound under settings.
- Choose the three vertical dots to the right of the RS200 Surround Sound settings.
- Choose Delete. It will take a moment to reconfigure the rear speakers.
Works With Alexa™
Through the Play-Fi App and embedded hardware, the RS200 can be voice controlled through Alexa enabled devices. An increasing list of music services can be streamed by the RS200 as commanded by an Alexa enabled device.
To enable these features, open the settings page in the Play-Fi App and choose "Amazon Alexa." Then choose the RS200. Default names work better with Alexa for controlling devices (like "Bedroom" or "Kitchen"). You will be prompted to sign in to your Amazon account. After registering, you will be prompted to launch the Alexa App. Choose "Smart Home" from the settings menu of the Alexa App, and then choose to setup a speaker. For speaker brand choose "Other." Choose "Discover Devices." After a minute or so of searching, your RS200 will be found and added to Alexa's devices.
AirPlay
AirPlay is an Apple Technology designed to control home audio systems and speakers in any room – with a tap or by simply asking Siri – right from iPhone, iPod, HomePod or Apple TV. To control this AirPlay 2-enabled speaker, iOS 11.4 or later is required.
Multiroom Audio
AirPlay technology lets you play a song on every RS200 in your house at the same time or adjust the volume in any room – all in sync.
After installing your RS200, add it to the Apple Home App with a few simple steps using your iPhone or iPad.
Siri Voice Control
Use Siri on your iPhone, iPad, HomePod, or Apple TV to control your RS200 with just your voice.
Other Wireless Connections
Bluetooth®
With built-in Bluetooth capability, the RS200 can be connected to countless other devices such as phones.
To connect to a Bluetooth device:
Place the RS200 in pairing mode by pressing and holding in the Left Knob for two seconds. Release the Knob. The "BT" will blink green. You can now pair with a phone or other Bluetooth device by searching and selecting the RS200 (with additional characters in the name such as RS200-FF03). Follow your device's instructions to complete the paring.
Note that your paired device will take control of the unit any time it is paired. If the RS200 is streaming via Play-Fi and a phone that is automatically set to pair with the RS200 via Bluetooth comes in range, the RS200 will switch to the Bluetooth input.
When playing music from a phone over a Bluetooth connection, the phones EQ can greatly affect the sound quality. Check the phone's EQ if something sounds off.

Qualcomm® aptX™ Audio
AptX ^TM is a codec that can provide CD quality music over Bluetooth connections. The RS200 will automatically utilize aptX when connected to a source that supports aptX. Simply connect with Bluetooth as described in the previous section.
The RS200 also supports the higher resolution aptX HD (24-bit/48kHz). If your device utilizes aptX ^TM HD then that resolution will be utilized automatically.
The RS200 also features aptX Low Latency which automatically ensures Bluetooth can deliver sound in sync with visual media. It reduces delay and improves end-to-end speed of the audio transmission, resulting in a high quality, synchronized user experience.
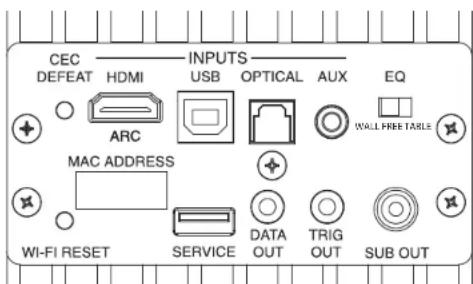
Figure 3- Rear Panel
Buttons and the Switches on the Back
Master Power Switch
Looking at the rear of the RS200, the Master Power Switch will be directly to the left of the AC Power Inlet (Figure 1 on page 4). This switch will toggle power to the RS200 ON (I) and OFF (O). With this switch in the ON position, the RS200 can be put in Power Save mode by pushing and holding the Front Right Knob for 2 seconds.
When the Master Power Switch is in the OFF position, the RS200 will consume no power. Power Save/Standby and the remote control will only function when the Master Power Switch is in the ON position.
EQ- The WFT Switch
Placement of a speaker can greatly affect the sound equalization (EQ). The EQ switch provides a quick and easy way to compensate for three typical RS200 placements with three EQ environmental settings named "WALL", "FREE" and "TABLE."
The WALL setting is for placement near a wall. The TABLE setting is to compensate for reflective surfaces that may be present if the unit is pushed back eight or more inches (20cm) from the edge of a flat surface (like a table). And the FREE setting is for placement without large obstructions. Ultimately, EQ is a matter of taste so feel free to experiment with these settings to determine your preference.
CEC Button
Consumer Electronics Control (CEC) is a feature of HDMI that theoretically allows users to control multiple connected devices through one remote control. This can work fine in some cases when you want to turn on the television and also power on other related devices, but there may be times when you do not want this or other connected events to happen. You can use the CEC Button to defeat this HDMI feature. Push in the button to defeat. Push again to enable. If you have a control system for your devices, you will want CEC defeated.
With CEC enabled, the RS200 can control a television's volume, mute and unmute as well as power functions with compatible televisions. CEC will also ensure correct decoding and lip syncing automatically.
To determine the current setting of CEC, press and hold the CEC button for 2 seconds. The red LED above the Right Knob will blink for 3 seconds if CEC is active or remain solid for 3 seconds if not active. Holding the CEC button for 4 seconds will toggle the setting as indicated by the red LED.
Wi-Fi Reset
If you need to reset the Wi-Fi module of the RS200, press the Wi-Fi reset button and hold it for 4 seconds. The NET LED will flash quickly at first and then more slowly. The unit is now in Play-Fi set-up mode and can be set up using the Play-Fi App as described previously in "The Wi-Fi Connection." All previous setup information for Play-Fi and AirPlay is erased when reset.
Inputs and Outputs on the Back
Optical
The Optical input allows a digital source to be connected using a TOSLINK cable also known as an "optical audio cable." The internal digital-to-analog converter (DAC) of the RS200 is able to process hires digital audio up to 192kHz/24-bit. The RS200 DAC will process standard format SPDIF PCM signals as well as Dolby Digital and DTS encoded multi-channel bit streams. Unsupported formats can result in strange and/or unpleasant sounds.
This input can be chosen by turning the Left Knob to the OPT position.(Figure 8 on page 8.)
AUX
The AUX input accepts a 3.5mm stereo male connector for analog signals. This is also known as an 1/8 inch stereo mini plug, and is the typical end used to connect headphones to phones or similar devices. This input can be used to provide a wired connection to various music sources.

This input can be chosen by turning the Left Knob to the AUX position. (Figure 8 on page 8.)
HDMI ARC (Connecting your TV)
The RS200 can receive audio via an HDMI cable from ARC enabled televisions. Audio Return Channel (ARC) can provide two way communication between units allowing for volume control and lip-syncing functions to ensure audio and video are perfectly matched. This allows for more intelligent operation between components as well as less cable clutter. Make sure this feature is enabled in your TV's setup menu.
The Lip Sync function is automatic with an ARC CEC connection. Lip Sync can be controlled with the RS200 remote control and will enable adjustments of audio to sync with accompanying video when CEC is defeated or with optical or USB input.
The HDMI ARC input is designed to be used exclusive with ARC compliant televisions. If the source is not ARC compliant, use the optical connection for digital sources.
USB
The RS200 can be connected to a computer using a USB connection. Connect the computer using a USB cable Type A to Type B cable.

Figure 5—USB Type B Connector
For Apple MacIntosh computers running OSX version 10.6.4 and above, connect using the above cable. USB Audio Class 2.0 is natively supported in these OSX versions so the RS200 is now connected.
For Windows 7, 8, 8.1, 10 (32 & 64 bit), a driver is needed. Download the driver from mcintoshlabs.com. The Driver will be found in the Products section of the website under the RS200. Download the McIntosh USB driver for the RS200.
- Go to the directory of the downloaded file.
- Right click on the file.
- Extract the files.
- Click on the XMOS USB file to run it.
- Install the driver by agreeing. Click “yes”, “next,” or “Install” to all questions. In other words, agree to all its terms.
- When asked to reconnect the Device, plug in the USB cable that is connected to the RS200.
- Finish the install.
When complete, the RS200 will be a speaker option.
To select, go to "Devices" or "Devices and Printers" depending on the version of Windows. Right click on the RS200 Icon.
Choose "Sound Settings."
Right click on the XMOS speaker option and choose "Set as Default."
If you choose USB with the left knob (or push INPUT on the remote until USB is chosen), sound from the computer should be heard.
Data Output
The Data Output uses a 3.5mm stereo male-to-male cable to send control signals to connected McIntosh source components. For instance, a PLAY command to a CD player can be sent using a single remote control.
Trig Out (Power Control)
Figure 6-3.5mm Plug for Data Output
Trig Out uses a 3.5mm stereo male to male cable to send on/off signals to other connected McIntosh components using a 12-volt trigger signal. This allows other components to automatically power on and off when the RS200 does the same.
Service
Figure 7-3.5mm Plug for Power Control
This blocked USB port is only for service by qualified persons, and is not intended for USB device support or playback.
Subwoofer Output
An external subwoofer can be connected using an RCA jack. The subwoofer will receive a line level mono signal. RS200 filters will automatically be optimized for integration with an external Subwoofer when connected and volume will track accordingly. Use the Subwoofer's sensitivity adjustment to set the initial level. A crossover setting of 100Hz is suggested.

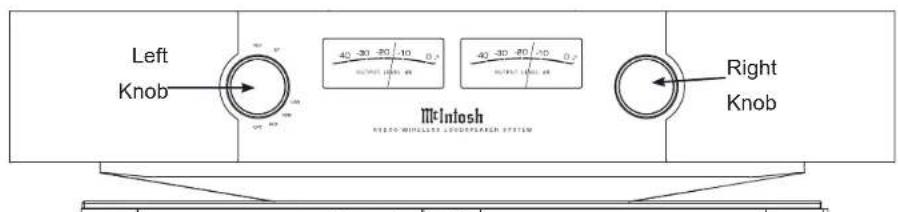
Figure 8 Knob Locations
The Knobs on the Front
The Left Knob
Input
Rotate the Left Knob to choose between non-wireless inputs: USB, HDMI, AUX and OPT. Turning the knob will stop wireless playback. Wireless inputs can only be accessed remotely. Current input will illuminate.
Bluetooth Pairing
Pressing and holding the Left Knob for two seconds will put the RS200 into Bluetooth Pairing Mode as described in "Other Wireless Connections" on page 5.
NET Wi-Fi Status LED
| Solid Light Connected to a wireless router | |
| Rapid Blinking Booting up | |
| Blinking Connecting to wireless router | |
| Two Blinks and a Pause | WPS- Wi-Fi Protected Mode setup |
| Slow Pulse Access Point set-up mode. | |
The green NET LED indicates the status of the network connection. If you hold the Wi-Fi symbol for 8 seconds as described in the Play-Fi Setup section, the NET LED will progress through Rapid Blinking and Blinking before reaching the Slow Pulse indicating that it is in set-up mode.
Meter Brightness
Pressing and turning the Left Knob will adjust meter brightness. Clockwise for brighter and counterclockwise for less bright or off.
The Night button on the remote will toggle the meter lights on and off. In this Night Mode, when the input changes, the input LED will remain lit for 5 seconds and then shut off.
The Right Knob
Standby
When the RS200 is in operating mode, pressing and holding the Right Knob for two seconds will place the unit into Power Save Mode. Press the Right Knob to return to operating mode. When the unit is in the Power Save Mode, the RS200 still works With Alexa™. The RS200 will also enter Power Save Mode if no signal or restart command occurs after 30 minutes. If no signal or restart command occurs after 60 minutes in Power Save Mode, the RS200 will enter Standby Mode. Standby Mode power consumption is less than 0.5 W. Startup from Standby Mode requires extra time to re-establish the Wi-Fi connection. The Standby function can be enabled in the Play-Fi app under Power Sleep Timer in the Advanced Settings menu. The default is disabled.
Mute
A short press of the Right Knob for a half second or less will toggle the Mute function. The Red LED below the knob will flash for about 5 seconds when muted or volume is reduced to zero with the Right Knob as described below.
Volume
Turn the Right Knob clockwise to raise the volume and counterclockwise to lower it. Turning the knob either way will unmute the sound. Lowering the volume to silent will mute the sound (by definition).
When maximum volume is reached, a Red LED above the knob will flash for about 5 seconds.
Both Knobs
Resetting the Unit
Pressing both knobs for 10 seconds will restore the unit to factory settings. Holding the knobs in for 5 seconds will produce a test tone and erase Bluetooth pairing info as well as stored Presets.
The Grilles
The two Grilles covering the Speaker Array on the left and right of the front of the RS200 can be removed by pulling straight out from the unit. The Grilles are held in place by 6 Grille Mounting Pins. To reattach the Grille, line up the 6 Mounting Pins with the 6 holes and press
evenly.
To avoid damage, take care not to press in on the speakers.
Streaming Music
The RS200 supports many of the top streaming services available. Since many are premium services that charge a fee, you will probably wish to research some of them to see which will best suit your needs. Though many share much of the same music, there are individual strengths, focuses and approaches that distinguish the services from each other. Keep in mind the streaming landscape is ever-changing so offerings may have changed or soon will. And not all services are available in all countries (yet).
Play-Fi will stream soundtracks up to 48kHz/16-bit (CD Quality) with bit-for-bit accuracy and zero compression or transcoding. Many services offer different levels of quality of streaming. Check that you are receiving the quality you desire in the Setup of the streaming service. Play-Fi offers an even higher resolution playback called Critical Listening Mode which can play audio files in high resolution (24-bit/192kHz) rendered accurately to one Play-Fi product (such as this RS200) with no compression, down-sampling or network distortion.
Amazon Music
With Amazon Music, over two million songs are available as part of their Prime membership. Premium memberships offer access to tens of millions of songs.
Spotify
Spotify Premium provides ad-free access to millions of songs as well as many ready-made playlists created by fans and experts. Spotify has the added feature of Spotify Connect. With the Spotify Connect App streaming can occur directly to the RS200 without needing the device that is running the Play-Fi App to be part of the streaming chain.
Using the Spotify App:
- Click a bottom-right.
- Select the device (RS200) you'd like to play on.
MOBILE AND TABLET
- Play a song.
- Tap "Devices Available" at the bottom of the screen.
- Tap the device (RS200) you want to play on.
Internet Radio
Internet Radio is a free service that gives you access to thousands of radio stations and podcasts from around the world.
Pandora
Pandora works like a personalized radio station with a proprietary algorithm designed to stream music you will like both old and new. There are several levels of subscription available: from a free version, to an ad-free and searchable version with higher quality audio available.
SiriusXM
SiriusXM is a subscription service with over 200 channels of music, entertainment, comedy, news, and talk radio. Over 80 stations provide a variety of music in many categories all commercial free. They offer a great deal of original and exclusive content.
iHeartRadio
With iHeartRadio, you can stream unlimited music, thousands of radio stations and podcasts. It is free with a premium upgrade available that eliminates ads and includes search and repeat functions.
KKbox
KKbox is a streaming service with over 20 million tunes focusing on the Asian market.
DLNA
The Play-Fi App is capable of recognizing any Media Server or NAS (Network Attached Storage) device that is broadcasting over your home network, so long as it is set up for open access utilizing standard DLNA profile and protocol. Some DLNA servers that make use of advanced streaming conversion or protection will not be compatible with Play-Fi. All of the currently supported Play-Fi file formats can be played from a compatible media server.
Tidal
Tidal is a subscription service with over 48 million available tracks. Tidal offers a premium subscription which offers Tidal HIFI which has Lossless quality FLAC.
Napster
In 2016, Rhapsody streaming service rebranded as Napster. It offers over 30 million songs ad-free for a monthly fee.

QQ Music
QQ Music is China's largest music streaming service and offers tens of millions of tracks and thousands of radio stations. QQ Music has free and premium tiers, and both local and international content.
NPR
The NPR service provides access to vast amounts of NPR's programming.
DEEZER
Deezer offers over 53 million tracks and millions of playlists. You can browse curated collections by genre and explore everything from Top 40 to unsigned acts.
Using Presets
Presets are a new feature of the Play-Fi operating experience. Four presets (1, 2, 3, 4) can be stored for one button access. The preset numbers can be accessed from the top front of the RS200 or from the remote control. Currently, these presets can be Internet Radio, iHeartRadio, Tidal, Spotify and Pandora but more services will be added to the preset feature.
To store a preset, push and hold the desired number for 5 seconds. A new preset will be stored and any existing preset in that spot will be overwritten. To recall the preset simply push the button.
Remote Learning
The RS200 is capable of learning some commands from most television IR remotes. This is handy to control the volume of the RS200 that is optically connected to a television with only the television remote.
To teach the RS200 the other remote's commands:
| Press Result | |
| Press and hold the Left Knob for 10 seconds. | Power Meter lights will blink twice. Max Volume LED will blink twice per second. |
| Press the remote button to be learned for volume increase. | Power Meter lights will blink twice. Min Volume LED will blink twice per second. |
| Press the remote button to be learned for volume decrease. | Power Meter lights will blink twice. Min Volume LED will blink twice every 4 four seconds. |
| Press the remote button to be learned for mute. | Power Meter lights will blink twice. The Max Volume LED will glow steady. |
| Press the remote button to be learned for standby toggle. | Power Meter lights blink three times, LED state changes from steady to off indicating learning session has ended. |
Changing the Remote's Battery
Someday, the AAA battery in the remote will need to be replaced. This is how to do it.
The back of the remote control is held in place by magnets. To remove the back of the remote to reveal the battery, slide the front of the remote up while sliding the back of the remote down. The goal is to move the back 3/16 of an inch from the top of the remote and then lift it off. There are many ways do to this, as far as positioning your fingers. To open the remote:
- Hold the remote upsidedown and backwards with
McIntosh name upsidedown and facing away from you. The thicker end will now be the top and you should be staring at the back of the remote.
- Pinch the remote with your index finger resting on the Trim/Select button and your thumb on the backside (facing you) opposite your index finger's position. Your thumb and remote should both be pointing away from you (see Figure 9).
- Use your thumb to slide the back open 3/16 of an inch. Slide your thumb away from you towards the thicker end of the remote, while your index finger goes in the opposite direction (towards you). As if snapping your fingers in slow motion. For added strength, you can use your other hand in a similar position above your first hand using the same technique. Make sure you do not hold the side edge with either hand.
- Lift the back off with your other hand before it snaps closed again. You can grab the now exposed top edge.
- It gets easier after the first time.
Remove and replace the battery noting the polarity (printed below the battery if you forget).
To replace the back: Place the back in position 3/16 of an inch from the edge. The magnets will help you snap it back into place.

natural_image
Close-up of a hand holding a black remote control knife with two arrows pointing to the blade (no text or symbols visible)Figure 9- Sliding open the remote
Description of Remote Control Buttons
Figure 10— Remote control diagram


Trademark and License Information
The McIntosh RS200 incorporates copyright protected technology that is protected by U.S. patents and other intellectual property rights. The RS200 uses the following Technologies:
| Trademark Logo License Information | |
 Works with Apple AirPlay Works with Apple AirPlay | Use of the Works with Apple badge means that an accessory has been designed to work specifically with the technology identified in the badge and has been certified by the developer to meet Apple performance standards. Apple, iPad, iPad Air, iPad Pro, iPhone and AirPlay are trademarks of Apple Inc., registered in the U.S. and other countries. To control this AirPlay 2-enabled speaker, iOS 11.4 or later is required. |
 Bluetooth® Bluetooth® | The Bluetooth® word mark and logos are registered trademarks owned by Bluetooth SIG, Inc. and any use of such marks by McIntosh Group, Inc. is under license. Other trademarks and trade names are those of their respective owners. |
 Qualcomm® aptX™ HD Qualcomm® aptX™ HD | Qualcomm aptX is a product of Qualcomm Technologies, Inc. and/or its subsidiaries. Qualcomm is a trademark of Qualcomm Incorporated, registered in the United States and other countries. aptX is a trademark of Qualcomm Technologies International, Ltd., registered in the United States and other countries. |
 | The Wi-Fi CERTIFIED logo is a registered trademark of the Wi-Fi Alliance. Wi-Fi Certification provides assurance that the device has passed the interoperability test conducted by the Wi-Fi Alliance, a group that certifies interoperability among wireless LAN devices. |
| Trademark Logo License Information | |
 | The terms HDMI, HDMI High-Definition Multimedia Interface, and the HDMI Logo are trademarks or registered trademarks of HDMI Licensing Administrator, Inc. |
  | For DTS patents, see http://patents.dts.com.Manufactured under license from DTS, Inc. DTS, the Symbol, DTS and the Symbol together, and Digital Surround are registered trademarks and/or trademarks of DTS, Inc. in the United States and/or other countries. DTS, Inc. All Rights Reserved. |
  | Amazon, Alexa and all related logos are trademarks of Amazon.com, Inc. or its affiliates. |
  | The Spotify software is subject to third party licenses found here: https://devcloper.spotify.com/csdk-third-party-licenses. |
 | License Notice and Trademark Acknowledgment: Manufactured under license from Dolby Laboratories. Dolby, Dolby Audio, and the double-D symbol are trademarks of Dolby Laboratories. |
Technical Specifications
Power Output
650W - 400W Tweeter/Mids, 250W Woofers
Speakers
Two 20mm Titanium Dome Fluid-filled Tweeters Four 50mm Titanium Inverted Dome Midranges Two 4 x 6 inch Long Throw Woofers
HDMI/Coaxial/Optical Digital Input Rate
32kHz to 192kHz, 24-Bit, Dolby Digital, DTS
Input Sensitivity (for rated output)
2Vrms Analog
Maximum Analog Input Signal
2.2Vrms
Crossover Frequencies
275Hz and 4,000Hz
Sub out Frequencies
20Hz to 500Hz
100Hz Acoustic Crossover
Overall Frequency Range
40Hz to 20,000Hz
Play-Fi Supported Audio Formats
.mp3 (MPEG Layer III)
.m4a, aac, ALAC (Advanced Audio Coding / Apple Lossless)
.flac (Free Lossless Audio Codec)
.wav (Waveform Audio File)
.aiff (Audio Interchange File Format)
Apple Audio Formats
.aiff, ALAC, .aac, .mp3, .mp4, .wav
Wi-Fi Connectivity
802.11 a, b, g, n 2.4/5 GHz, WPS, WPA, WPA2, WMM
Bluetooth 5.0
AVRCP, A2DP, aptX, aptX HD, aptX LL
Rated Power
100-120V/220-240V \~ 50/60Hz 400 Watts
Dimensions
Width 24.8 inches (62.99cm)
Height 5.7 inches (14.48cm)
Depth 12.6 inches (32cm)
Shipping Carton Dimensions:
Width 29.4 inches (74.68cm)
Height 10.8 inches (27.43cm)
Depth 16.5 inches (41.91cm)
Weight
29.5 pounds (13.3kg) net
35 pounds (15.8kg) in shipping carton
Re-packing the RS200
When shipping the RS200, it is highly recommended that the unit be packed as it was originally shipped to avoid damage. Failure to properly pack the unit will likely result in damage. If you need any of the packing material, you can contact McIntosh Customer Service.
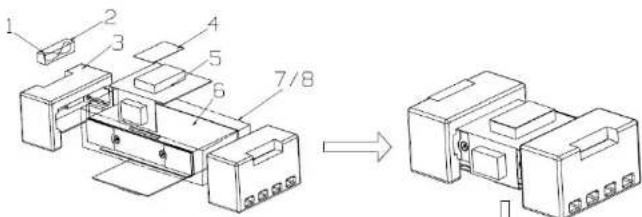
| Item QTY Description Part # | ||
| 1 1 Power Cord (US) 310625SP | ||
| 2 1 Non Woven Bag 310626SP | ||
| 3 1 | Molded Foam 310627SP | |
| 4 1 | Manual 04193000 | |
| 5 2 | Molded Foam 310628SP | |
| 6 1 | RS200 32067000 | |
| 7 1 | Plastic Bag 301629SP | |
| 8 1 Non Woven Bag 310630SP | ||
| 9 1 | Carton 310631SP | |
Figure 11- Packing Material


The continuous improvement of its products is the policy of McIntosh Laboratory Incorporated who reserve the right to improve design without notice. The RS200 is designed to employ non-McIntosh-provided services (including but not limited to Play-Fi®), some of which require separate customer subscriptions and some of which do not, as part of the Products' functionality. Because McIntosh cannot control the providers of such services or the services themselves, the owner of the Product therefore assumes all risks related to the use of services provided by anyone other than McIntosh itself. McIntosh cannot and does not warrant against, and shall have no liability of any kind for any of the following that are attributable to non-McIntosh providers or services: (i) interruption, discontinuance, or other unsatisfactory performance of service; (ii) reduced Product functionality that is so attributable; or (iii) any other loss or damage of any kind that is so attributable.
Mcintosh Part Number 04193000

- RS200
- Safety First
- FCC Information (For US Customers)
- IMPORTANT NOTICE: DO NOT MODIFY
- THIS PRODUCT
- CAUTION:
- COMPLIANCE INFORMATION:
- IC Information (Canadian Customers)
- PRODUCT:
- 7756A-HSBT075.
- Canadian Customers: CAN ICES-3 (B)/NMB-3 (B)
- RF Exposure Information
- DECLARATION OF CONFORMITY
- IMPORTANT NOTICE: DO NOT MODIFY
- CAUTION:
- Table of Contents
- List of Figures
- Thank you from all of us at McIntosh
- McIntosh Laboratory, Inc.
- Make a Note
- Power Connection
- The Wi-Fi Connection
- Get the Play-Fi App
- Wi-Fi Setup
- iOS Connection without Play-Fi
- WPS Setup
- More about Play-Fi
- Play-Fi Line In Broadcast
- Surround Sound
- Works With Alexa™
- AirPlay
- Multiroom Audio
- Siri Voice Control
- Other Wireless Connections
- Bluetooth®
- Qualcomm® aptX™ Audio
- Buttons and the Switches on the Back
- Master Power Switch
- EQ- The WFT Switch
- CEC Button
- Wi-Fi Reset
- Inputs and Outputs on the Back
- Optical
- AUX
- HDMI ARC (Connecting your TV)
- USB
- Data Output
- Trig Out (Power Control)
- Service
- Subwoofer Output
- The Knobs on the Front
- The Left Knob
- Input
- Bluetooth Pairing
- Meter Brightness
- The Right Knob
- Standby
- Mute
- Volume
- Both Knobs
- Resetting the Unit
- The Grilles
- Streaming Music
- Amazon Music
- Spotify
- MOBILE AND TABLET
- Internet Radio
- Pandora
- SiriusXM
- iHeartRadio
- KKbox
- DLNA
- Tidal
- Napster
- QQ Music
- NPR
- DEEZER
- Using Presets
- Remote Learning
- Changing the Remote's Battery
- Description of Remote Control Buttons
- Trademark and License Information
- Technical Specifications
- Power Output
- Speakers
- HDMI/Coaxial/Optical Digital Input Rate
- Input Sensitivity (for rated output)
- Maximum Analog Input Signal
- Crossover Frequencies
- Sub out Frequencies
- Overall Frequency Range
- Play-Fi Supported Audio Formats
- Apple Audio Formats
- Wi-Fi Connectivity
- Bluetooth 5.0
- Rated Power
- Dimensions
- Shipping Carton Dimensions:
- Weight
- Re-packing the RS200
Brand : MCINTOSH
Model : RS200
Category : Loudspeaker