
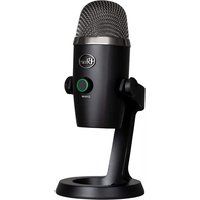
Snowball - Microphone LOGITECH - Free user manual and instructions
Find the device manual for free Snowball LOGITECH in PDF.


| Product Type | USB Condenser Microphone |
| Brand | Logitech |
| Model | Snowball |
| Dimensions (H x W x D) | 10.2 x 4.3 x 4.3 in (25.9 x 10.9 x 10.9 cm) |
| Weight | 1.5 lb (0.68 kg) |
| Power Source | USB bus-powered |
| Connectivity | USB-A (cable included) |
| Pickup Patterns | Cardioid, Omni-directional, Cardioid with -10 dB pad |
| Frequency Response | 40 Hz – 18 kHz |
| Sample Rate | 44.1 kHz / 48 kHz |
| Bit Depth | 16-bit |
| Maximum SPL | 120 dB |
| Controls | Mute button, pickup pattern switch |
| Indicators | Blue LED (active), red LED (muted) |
| Materials | Metal grille, plastic body |
| Compatibility | Windows, macOS, PlayStation, Xbox (USB audio) |
| Included Accessories | Microphone, USB cable, stand |
| Color | White or Black |
| Warranty | 2 years (standard) |
| Certifications | RoHS compliant |
Frequently Asked Questions - Snowball LOGITECH
User questions about Snowball LOGITECH
0 question about this device. Answer the ones you know or ask your own.
Ask a new question about this device
Download the instructions for your Microphone in PDF format for free! Find your manual Snowball - LOGITECH and take your electronic device back in hand. On this page are published all the documents necessary for the use of your device. Snowball by LOGITECH.
USER MANUAL Snowball LOGITECH

Congratulations.
You have just purchased the world's most unique and innovative USB professional condenser microphone —the Snowball™! Here at Blue, we are known for designing and building the finest microphones available for studio, stage, film, broadcast — and now — you guessed it — computer use. Our microphones unite the heritage of the world's most respected classics with leading-edge technology, innovative engineering and inimitable styling. The Snowball is the product of our unrestrained imagination and our years of microphone and capsule manufacturing experience. There is simply nothing else like it. But don't just take our word for it . . .
"This thing will make me immortal!"
— Frosty (lead singer of The Snowmen)
"The next best thing to plugging a USB connector into your neck" — Rodney Petersburg, President, North Platte Star Trek Fan Club
"Thanks to the Snowball, I can now actually record ON the Matterhorn!"
— Lars Jürgensbourger, Winner, 1981 World Yodeling Competition
"Finally, something to plug into my laptop on those long, winter nights!"
— The Abominable Snowman

We know you hate to read manuals. So do we! But because the Snowball is such a unique recording tool, we really hope you take the time to familiarize yourself with its features and try the suggested application tips that are designed to help you get the most out of the Snowball. You might just learn something too! With proper care and feeding, the Snowball will reward you with many years of recording and performance enjoyment and it won't end up as a pool of water on your desktop! Now on with the show. (No refrigeration necessary.)
What's that on the back?
Well, we're glad you asked. You will find the USB output port and a three-position switch on the rear of the Snowball. You can probably figure out what the USB port is for, but in case you can't, this is the place where you connect the boxy end of the USB cable — with the other end going into, you guessed it, your computer. Now for the fun part. Just above the USB output port, you will find a three-position switch. Viewed from left to right, the positions are as follows:
1 First position: Activates the cardioid capsule. Second position: Activates the cardioid capsule with a -10dB PAD (more geek talk for a device that reduces the output of the mic for use with loud sound sources that could cause distortion of the signal). 3 Third position: Activates the omni capsule.
Snowball suggested applications
The Snowball was designed for convenient studio use without the necessity for a lot of signal processing — or even a mic pre! Because you just connect it to your USB port, it offers a wide range
![graph LR A["Baseball: Baseball"] --> B["Sugar Bowl: Sugar Bowl"] B --> C["Sugar Bowl: Black Powder Bowl"] C --> D["Sugar Bowl: Pink Powder Bowl"] D --> E["Chocolate: Orange Box"] E --> F["Cold: Chocolate Box"]](/content/2026/06/1348957/images/9ec535ab6994ca73485816c0bae160169edf9445921cde7c09685beb5ce9535d.jpg)
Frequency Response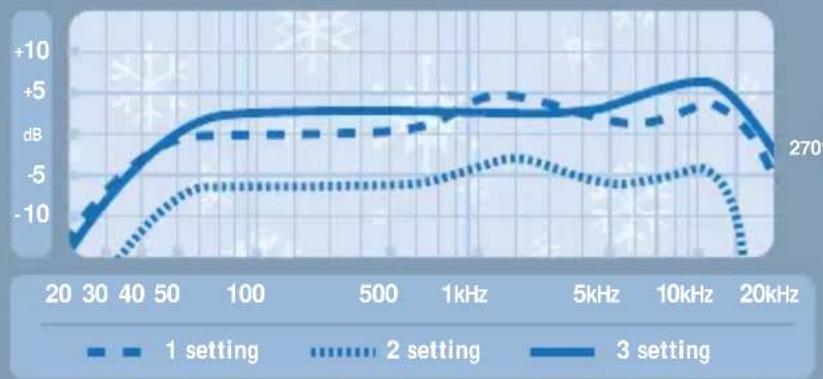

This frequency chart is only a start. It gives the recordist a basis of the sound provided. How the microphone reacts in a particular application will differ greatly because of many variables. Room acoustics, distance from sound source (proximity), tuning of the instrument, and mic cabling are only a few of the interacting issues. For an artist or an engineer, how the microphones are used creates the basis of the sound.
of applications coupled with an ease of use never before offered in a studio microphone. Because of its rugged construction, dual-capsule design, and high-spl specification, you can use the Snowball virtually anywhere — including the Arctic Circle!
Why TWO capsules? (well, of course, two capsules are better than one!)
The Snowball uses two separate capsules to offer you a wide variety of applications. The first capsule generally “hears” what’s right in front of it in a fixed cardioid pattern with a neutral sonic signature (engineering geeks call this unidirectional). The second capsule generally “hears” everything around it with a brighter overall sound (engineering geeks call this omnidirectional).
![graph LR A["Walnut"] --> B["Blue"] B --> C["Orange"] C --> D["Mango"] D --> E["Earth"] E --> F["Coconut"] F --> G["Tennis"] G --> H["Coin"]](/content/2026/06/1348957/images/3fca991a6d73f874b67dd198938dd8327e966c239a0262c59c740b833f252b7a.jpg)
Where do you put it?
The Snowball features a unique swivel mount located on the bottom center of the mic body. Be sure to mount the Snowball on the Blue Snowball desktop tripod or on a standard-thread counter-weighted tripod mic stand. And for reduction of low-frequency rumble and additional positioning options, mount the Snowball in the Blue Ringer, available from your authorized Blue dealer. Though the Snowball is extremely durable, we would hate to see it fall due to an inadequate stand. Also, be sure to position the Snowball over the center leg of the tripod to further prevent tipping. Once mounted, you can gently pivot the Snowball back and forth for optimum positioning in front of the sound source.

Snowball mounted on The Ringer

HEADS UP!: Forceful positioning of the swivel mount can result in damage not covered by the warranty, so there.
What do you connect it to?
Once safely mounted, connect the Snowball to the USB port on your Macintosh or Windows computer (the Snowball is USB 2.0 compatible—see the right sidebar for full system requirements). Make sure that the active, on-axis side of the diaphragm (the side with the BLUE logo) is facing the desired source. When connected, the LED just above the
System Requirements*
Macintosh
Mac OSX
USB 1.0 or 2.0
64 MB RAM (minimum)
Windows
XP Home Edition or
XP Professional
USB 1.0 or 2.0
64 MB RAM (minimum)
The blue logo will glow red, indicating that power has reached the Snowball and it is ready to use. For additional setup information and FAQs about the Snowball, visit the Blue Microphones website at www.bluemic.com, then click on the Snowball link at the top of the home page.
![graph LR A["Green Christmas ornament"] --> B["Red fruit ornament"] B --> C["Green snowflake ornament"] C --> D["White balloon ornament"] D --> E["Orange apple ornament"] E --> F["Blue eye ornament"]](/content/2026/06/1348957/images/7d2b6a40d868c0f8b1b54b37e70d93a498dc405060a2b5ff4a2e03657823f051.jpg)
Macintosh Setup Procedure:
- In Mac OS X: in the Apple menu, open SYSTEM PREFERENCES.
- Double-click the sound preference file.
- Click on the INPUT tab.
- Double-click BLUE USB BALL MIC under the CHOOSE A DEVICE FOR SOUND INPUT dialog box.
- Set input volume to the appropriate level. The mic is sensitive and may require a very low volume setting.
- Exit SYSTEM PREFERENCES.
Windows Setup Procedure:
- In Windows XP Home Edition or XP Professional: Under START MENU open SOUNDS AND AUDIO DEVICES control panel.
- Select AUDIO tab; insure BLUE BALL USB MIC is selected as DEFAULT DEVICE.
- Click on volume; select appropriate volume level. The mic is sensitive and may require a very low volume setting.
- Exit control panel.
Great, so now I'm ready to go! How do I get the most out of my Snowball?
The following application hints are intended to give you a good starting point to get the most out of this unique audio tool. As with all applications however, there are no rules, only guidelines. Trust your gear and trust your ears. If it sounds good, it is good!
Experiment with each capsule once you have the Snowball set up. You'll find that the omni capsule captures more of the room sound, while the cardioid capsule is more focused on what's right in front of it.
![graph LR A["Beach"] --> B["Soccer"] B --> C["Basket"] C --> D["Irrigation Wheel"] D --> E["Blood"] E --> F["Molecular Structure"]](/content/2026/06/1348957/images/8fd751a3a46e9eaaf779ab5d58109d8efe4db418c6d7c396c405314803418271.jpg)
Vocals
Here's a little-known secret: vocalists love singing into unique and impressive mics like the Snowball. Put it in front of any singer and you're sure to get an inspired performance. For a "big" vocal sound, position the vocalist within one to four inches of the diaphragm. With the input volume properly adjusted in your computer's settings, there is no need to worry about overloading the

microphone, but be sure to use a high-quality sonically neutral pop filter, such as the Blue Pop, to control plosives and protect the diaphragm.
Tilt the microphone slightly upward (toward the forehead) for more projection and head tone, straight on at the mouth for maximum brightness and intelligibility, or down toward the chest for more robust full lows and smoother highs. We recommend starting out in position one — or position two, which activates the -10dB PAD for real screamers.
Electric Guitar
Because of its neutral response and solid bottom end, the Snowball is an excellent mic for any clean or distorted guitar amp. Position the diaphragm toward the center of the speaker or dust cap to capture more highs, or toward the edge of the speaker cone for a fuller sound with more low end. For overdriven or distorted tones, move the mic towards the outer edge of the speaker cone, or back it away from the amp a foot or more to blend room tone with direct pickup and soften high frequencies.
Give the Snowball a try on electric bass, blues harmonica, and organ too!
Acoustic Guitar
Microphones require careful placement when used on acoustic guitar, but the Snowball's neutral tone is well-suited to this task. For a balanced sound with plenty of sparkling high end, position the diaphragm facing the neck where it joins the body (usually between the 12th and 14th frets).
![graph LR A["Global"] --> B["Global"] B --> C["Fruit"] C --> D["Snowflake"] D --> E["Grid"] E --> F["Cactus"] F --> G["Basket"]](/content/2026/06/1348957/images/21532570405739b8c875667a3b8df7e43ce2d355758eb0cf62d0bb78a20d103c.jpg)

Initially, keep the mic as close to the instrument as possible, tilting the diaphragm toward the soundhole to capture a blend of low frequencies and pick sound. If you need more low frequencies, move the Snowball closer to the soundhole. For more high frequency detail, move the Snowball farther away from the guitar, either at the same neck position, or above the instrument near the guitarist's head.
Strings
The Snowball is an excellent choice for miking all members of the bowed string family. In general, the diaphragm should be angled toward the instrument's bridge to pick up a blend of body resonance and bow sound. On bass and cello, placement from 3 to 6 inches in front of the bridge is usually ideal. For violin and viola, it is preferable to position the microphone 1 to 2 feet above the instrument. Angle the diaphragm toward the bridge for more bow sound and low tones, or toward the tuning pegs to capture a more diffuse, brighter sound.
Drums
The Snowball's excellent transient response offers numerous advantages when miking drums. For kit and hand drums, begin by placing the microphone two to four inches above the rim or hoop (where the head is secured to the shell). Angle the mic toward the player's stick or hand to pick up more attack and definition. Orienting the diaphragm toward the shell will soften the sharp attack of a hand drum, or pick up more of the bright, crackling buzz from a snare drum. Moving the microphone closer to a drum generally increases the low end, shell resonance, and separation from other sound sources, while more distant placement emphasizes the interaction of the drum and the environment, producing a blended, airier sound. If you have multiple USB inputs available, try a pair of Snowballs as drum overheads!
![graph LR A["Baseball: Baseball"] --> B["Material: Wood"] B --> C["Product: Earth"] C --> D["Final Product: Orange and Brown"]](/content/2026/06/1348957/images/258b9a8533dc3b669353455c10e063ea011247aded0f6ea9412e641ce939b4cd.jpg)
Saxophones, Flutes, and Reeds
For soprano sax, clarinet, oboe and related instruments, position the Snowball directly above and in front of the keys between the middle of the horn and the lowest pads. Try moving the Snowball

up or down along the length of the body to adjust the balance of airy highs (toward the mouthpiece) and cutting midrange (toward the bell). On flute, start by placing the Snowball above the middle of the instrument, and move the diaphragm closer to the mouthpiece if more high frequencies and breath sounds are desired. For other members of the saxophone family, start by placing the Snowball two to six inches in front of the lip of the bell. Angle the Snowball upward toward the mouthpiece to capture more air, brightness, and high notes. For a mellower sound, orienting the diaphragm toward the floor will emphasize the low range of the sax, and will tame the biting upper midrange that projects straight out of the bell.
Additional Applications
The Snowball is an ideal desktop microphone for applications such as dictation, voice recording and internet telephony, and of course, PODCASTING! You'll also love it for looping dialog over your professional or home movies.
Now, go get the Snowball connected and see how cool it really is.
| Technical Specifications | Position 1 | Position 2 Position 3 | |
| Acoustical Operating Principal | Pressure Gradient | Pressure Gradient | Pressure Gradient |
| Polar Pattern | Cardioid | Cardioid | Omnidirectional |
| Frequency Response | 40-18000Hz | 40-18000Hz | 40-18000Hz |
Optional Accessories
① The Ringer — Universal shockmount ② The Pop — Custom-designed pop filter
For more information on Blue Microphones and our complete line of award-winning mics, visit us on the web at www.bluemic.com

SNOWBALL™
©2005 Blue Microphones
5706 Corsa Avenue, Suite 102
Westlake Village, CA 91362
www.bluemic.com
In keeping with our policy of continued product improvement,
Baltic Latvian Universal Electronics (BLUE) reserves the right
to alter specifications without prior notice.
Blue Microphones, Snowball, Ball, 8-Ball, Kickball, The Pop and The Ringer
are trademarks or registered trademarks of Blue Microphones, Inc.
All other trademarks contained herein are the property
of their respective owners.
Do not store your Snowball in the freezer.
Made in Latvia.
CE

Microphones
Step up to the mic. 159

- CONGRATULATIONS
- WHAT'S THAT ON THE BACK
- SNOWBALL SUGGESTED APPLICATIONS
- WHY TWO CAPSULES? (WELL, OF COURSE, TWO CAPSULES ARE BETTER THAN ONE!)
- WHERE DO YOU PUT IT
- WHAT DO YOU CONNECT IT TO
- SYSTEM REQUIREMENTS
- MACINTOSH
- WINDOWS
- MACINTOSH SETUP PROCEDURE
- WINDOWS SETUP PROCEDURE
- GREAT, SO NOW I'M READY TO GO! HOW DO I GET THE MOST OUT OF MY SNOWBALL
- VOCALS
- ELECTRIC GUITAR
- ACOUSTIC GUITAR
- STRINGS
- DRUMS
- SAXOPHONES, FLUTES, AND REEDS
- ADDITIONAL APPLICATIONS
- OPTIONAL ACCESSORIES
- SNOWBALL™
- MICROPHONES
Brand : LOGITECH
Model : Snowball
Category : Microphone