
Yeti Nano - Microphone LOGITECH - Free user manual and instructions
Find the device manual for free Yeti Nano LOGITECH in PDF.
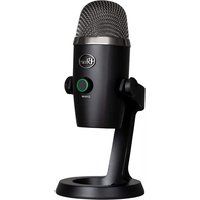


| Product Type | USB Condenser Microphone |
| Brand | Logitech (Blue) |
| Model | Yeti Nano |
| Dimensions (Height) | 10.8 cm (4.25 inches) |
| Dimensions (Width) | 9.6 cm (3.78 inches) |
| Weight | 268 g (9.5 oz) |
| Power Source | USB (5V, 500mA) |
| Polar Pattern | Cardioid |
| Frequency Response | 20 Hz - 20 kHz |
| Sample Rate | 48 kHz |
| Bit Depth | 16-bit |
| Max SPL | 120 dB |
| Headphone Output | 3.5mm stereo jack (impedance: 16 ohms) |
| Controls | Mute button, volume knob (headphone), mute indicator LED |
| Connectivity | USB-C (cable included) |
| Compatibility | Windows (7 or later), macOS (10.10 or later), plug-and-play |
| Mounting | Integrated desktop stand (adjustable tilt) |
| Maintenance | Wipe with a soft, dry cloth; avoid liquids |
| Safety | Keep away from moisture and extreme temperatures |
| Spare Parts / Repairability | Not user-serviceable; contact Logitech support |
Frequently Asked Questions - Yeti Nano LOGITECH
User questions about Yeti Nano LOGITECH
0 question about this device. Answer the ones you know or ask your own.
Ask a new question about this device
Download the instructions for your Microphone in PDF format for free! Find your manual Yeti Nano - LOGITECH and take your electronic device back in hand. On this page are published all the documents necessary for the use of your device. Yeti Nano by LOGITECH.
USER MANUAL Yeti Nano LOGITECH
Advanced Blue VO!CE for Yeti Nano, Yeti and Yeti X
Blue VO!CE is a powerful suite of broadcast vocal effects built for creators, making it easier than ever to achieve professional on-stream sound quality and have more ways to entertain their audiences.
With the latest update (2021.8.792), Blue VO!CE:
- Is now available for Yeti, Yeti Nano and Yeti X professional USB microphones, accessible through Logitech G HUB software
- Includes new features such as enhanced broadcast filters and effects, advanced voice modulation effects and a library of HD audio samples

GETTING STARTED:
Download or open Logitech G HUB software.
*If you need to download the program, please restart your computer after install.

MIC PLACEMENT:
The capsules in Yeti, Yeti Nano & Yeti X capture audio from the sides of the mic, not the top. For this reason, our microphones are "side-address" mics. See image below for reference.

1. RECORD A SAMPLE:
The first thing most people do when they get a new mic is go into Discord or their favorite game and ask their friends, "Hey, I got a new mic, how do I sound?" To solve this, we developed a record and playback tool to allow creators to listen as they apply the

different presets and filters to hear exactly how their voice sounds before going to the outside world. Once you have found the preset or custom settings that work best for your voice and environment, you are good to go!
Set your Yeti, Yeti Nano or Yeti X as your input device on your computer/program
Yeti X Only: Make sure the LED meter on the front of the mic isn't peaking into the red when speaking loudly as this can cause distortion
Yeti/Yeti Nano: Make sure your Input Gain readout in the software isn't peaking.
Once your input/output levels are set, press the "record" button and start speaking to record up to 30 seconds of your voice (or anything else for that matter).
Press "play" to hear it back (it will loop until you press stop) and verify that everything is set and ready to go.

2 ENABLE A BLUE VO!CE PRESET
Now that we've recorded our sample, let's play with it a little.
Now, it could be that one of the Presets in the library will perfectly enhance your voice before the next meeting, stream, or battle raid.
If that's not the case, downloading a vocal Preset from the G HUB Community, or creating your own perfect voice enhancement is right at your fingertips as well.
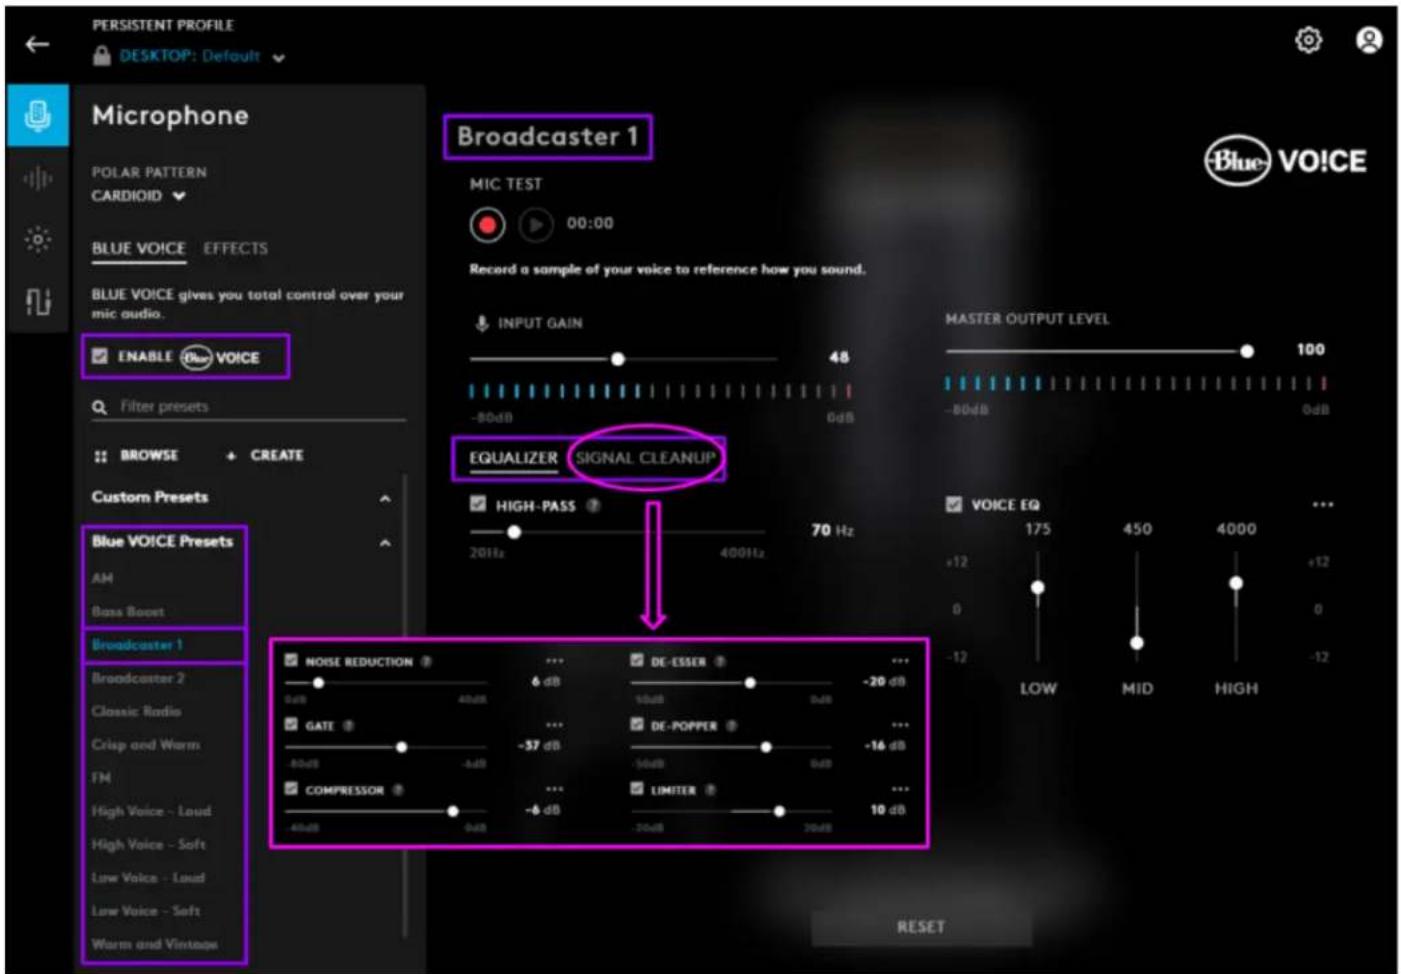
To use an existing Preset as your first building block, select a Preset and make your adjustments as desired in the EQUALIZER and SIGNAL CLEANUP tabs.
To download content from the G HUB Community, click "BROWSE" at the top of the Preset menu. These downloaded Presets will be automatically downloaded to your Custom Presets library, where you can further edit, rename, share back to the G HUB Community, or delete when no longer needed.
To create your own voice enhancement, click "+ CREATE" at the top of the Preset menu, name your new Preset, and get started!
Maybe you really like the rich undertones and smooth output of the Warm and Vintage Preset, but think the low end of your voice is now too low, you can hear too much ambient noise in the background, and your "S" sounds are too pronounced.
Easy fix! Staying on the EQUALIZER tab, make a quick edit to the LOW setting of the VOICE EQ feature, and you've solved your low end.
Moving on over to the SIGNAL CLEANUP tab, adjust your NOISE REDUCTION and DE-ESSER to the desired result.
For even finer refinement, you can make even deeper edits by clicking an ellipsis next to the feature setting, and you're all set!
3 APPLY VOICE EFFECTS
Select the "EFFECTS" tab to check out some voice effects that you can apply to your voice.
Feel free to revisit the BLUE VO!CE tab and adjust your Preset to best suit the VOICE EFFECT you'd like to test/use - they don't always match up!
Broadcaster 2 might be a great start for an alien voice effect, but Bass Boost might better suit a monster effect.
To view or download VOICE EFFECTS from the G HUB Community, click "■ BROWSE" and download content directly to your EFFECTS Custom Samples library.
You can use these EFFECTS, or those included with the software as a great starting point for your very own custom EFFECT, to then further edit, rename, share back to the G HUB Community, or delete when no longer wanted.
To start from scratch, you can either click "+ CREATE", or simply select the "Off" option in the library, and go from there. Let's try this together!
Starting with the PITCH tab, set your PRIMARY VOICE to SUBBY, and your SECONDARY VOICE to ETHER to create a variation alien VOICE EFFECT.
Next, check the box to enable your FLANGER/PHASER and set to OSCILLATE to see how a crazy-voice sounds.
Then, enable your CHORUS and your one voice becomes many.
Moving on to the AMBIENCE tab, we can provide your EFFECT with its environment.
Enable your REVERB, and adjust to your vocal range & preference to see what being in a cave sounds like.
Then, enable and adjust your RING MODULATOR to add some depth to your EFFECT.
Finally, enable and adjust your TIME DELAY, to add some delay to that deep, echoing alien voice.
Make any deeper edits by clicking the ellipses next to the feature, and you've created your very first VOICE EFFECT!
See your new creation in the Custom Samples library, where you can further edit, rename, share to the G HUB Community, or delete when no longer needed!

4 USE HD AUDIO SAMPLES
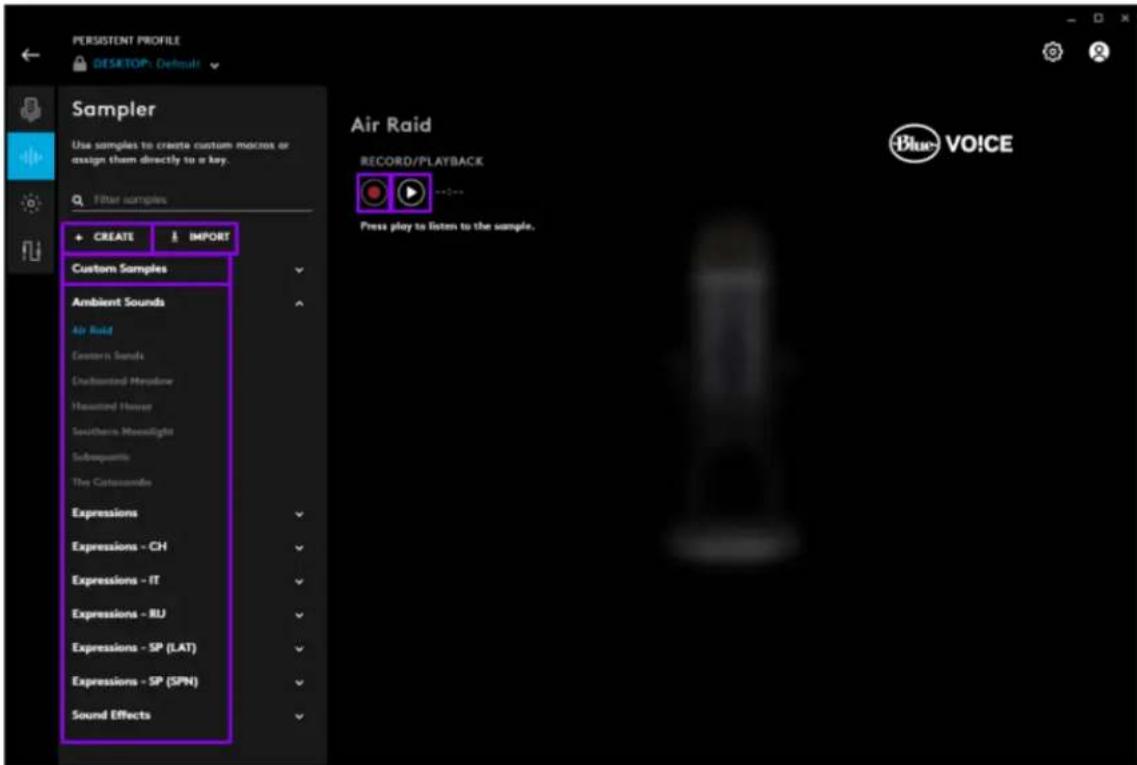
With the new HD Audio Sample library, you can choose from 16 soundbites, 6 localized expressions (in 6 different languages!), or 7 different ambient sounds to make your next on-camera appearance an immersive experience!
To test a sample, you can either select the sample from the categorized library on the left, and click the button in the RECORD/PLAYBACK section, or simply just double-click the sample to hear a one-shot preview.
But, let's say you found the perfect sound effect for your next game stream online, or even that you want to create your very own sound effect - good news! You can import downloaded samples or use your Yeti, Yeti Nano or Yeti X to create the sound, and establish your own Custom Samples library.
To add downloaded samples, click ↓ IMPORT at the top of the sample library.
To create your own, click + CREATE, name your new sample, and click the ● button in the RECORD/PLAYBACK section at the top.
When you are finished recording your sample, click pause and play back to hear how it sounds. Experiment with the different pickup patterns on your Yeti, Yeti Nano or Yeti X.
Yeti/Yeti X: Select the STEREO polar/pickup pattern on the back of your microphone.
All Devices: Select the OMNI polar/pickup pattern
5 USE A LOGITECH MOUSE, KEYBOARD OR HEADSET TO CREATE A ONE-CLICK ASSIGNMENTS
If you want to assign the perfect broadcast preset for your next meeting, use voice effects to surprise and entertain your stream audience or fire off an explosion to punctuate victory in a boss fight – all without the multi-step process of accessing each content library – we've got you covered!
With any compatible Logitech G keyboard, mouse or headset, you can assign Presets, Effects and Samples to hotkeys for a quick one-click use/assignment.
Select your Logitech G device from the G HUB product carousel
Drag the PRESET, EFFECT and/or SAMPLE you'd like to assign to an assignable button
PRESETS - Blue VO!CE Presets to enhance your voice EFFECTS - Voice modulation effects to change your voice TOGGLE - Enables the PRESET or EFFECT until you press the button again to disable MOMENTARY - Enables the PRESET or EFFECT for a short time SAMPLES - HD audio samples for a more immersive experience ONE SHOT - Plays the SAMPLES once through, then stops LOOP ON HOLD - Continuously plays the SAMPLE while holding the button down CONTINUOUS LOOP - Plays on a loop until you press the button again

6 YETI X: CUSTOMIZE YOUR LED'S
Whether you're a streamer with a dedicated color scheme to your setup or an everyday professional who enjoys personalizing their workspace, our customizable LED's make it easy to match your desktop to your personality.
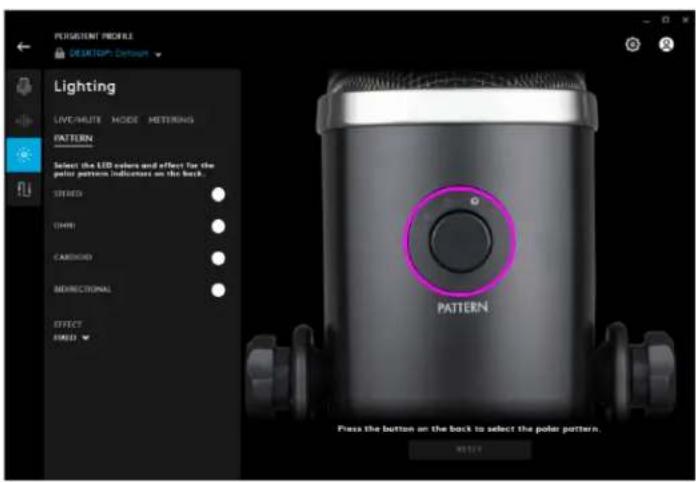
PRESS & HOLD THE FRONT KNOB TO SWITCH BETWEEN EACH SETTING
LIVE/MUTE - Customize the knob ring LED for when your mic is LIVE or on MUTE MODE - Customize LED's to help differentiate between each MODE METERING - Customize the METERING LED's that help keep your GAIN in check
QUICK PRESS BUTTON ON BACK
PATTERN - Polar/pickup pattern LED's on the back of the Yeti X


7 DOWNLOAD, SHARE, EDIT, COPY OR DELETE CUSTOM PRESETS
As you create your perfect Custom Presets, you may think to yourself that others could benefit from all of your hard work ... and you'd probably be right!
To share your content to the community, click the "share" icon, enter the required information about what you're sharing, and add any optional tags for easier search assistance. If you'd like to allow other users to download your creation, you can check the box to make it public. Should you choose to keep your content private, it will only be available on machines already logged in to your G HUB account.
To make a simple edit to the name of your Custom Preset, click the "EDIT" icon. To further adjust your Custom Preset, without losing your hard work on this one, click the "COPY" icon, and make your adjustments to the newly created "...Copy 1".
When you no longer want or need a Custom Preset, click the "DELETE" icon, and follow the on screen prompts.

###


- ADVANCED BLUE VO!CE FOR YETI NANO, YETI AND YETI X
- GETTING STARTED
- MIC PLACEMENT
- RECORD A SAMPLE
- ENABLE A BLUE VO!CE PRESET
- APPLY VOICE EFFECTS
- USE HD AUDIO SAMPLES
- USE A LOGITECH MOUSE, KEYBOARD OR HEADSET TO CREATE A ONE-CLICK ASSIGNMENTS
- YETI X: CUSTOMIZE YOUR LED'S
- DOWNLOAD, SHARE, EDIT, COPY OR DELETE CUSTOM PRESETS
Brand : LOGITECH
Model : Yeti Nano
Category : Microphone