
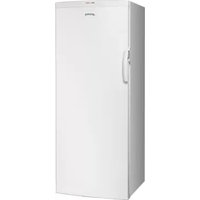
SAB4604NR - Freezer SMEG - Free user manual and instructions
Find the device manual for free SAB4604NR SMEG in PDF.


| Product Type | Chest Freezer |
| Brand | Smeg |
| Model | SAB4604NR |
| Total Net Capacity | 200 Liters |
| Dimensions (H x W x D) | 85 cm x 60 cm x 85 cm |
| Weight | 40 kg |
| Power Supply | 220-240 V, 50 Hz |
| Energy Class | E |
| Annual Energy Consumption | 200 kWh |
| Noise Level | 40 dB |
| Defrost Type | Manual |
| Temperature Range | -18°C to -24°C |
| Control Type | Mechanical Thermostat |
| Fast Freeze Function | Yes |
| Adjustable Baskets | 2 Baskets |
| Door Lock | Yes |
| Removable Gasket | Yes |
| Low Frost Coating | Yes |
| Climate Class | N-ST |
| Maintenance | Defrost when ice >5mm; clean interior with mild detergent |
| Safety Features | Thermal overload protection, door lock |
| Spare Parts Availability | Up to 7 years after production |
| Warranty | 2 years |
| Country of Origin | Italy |
Frequently Asked Questions - SAB4604NR SMEG
User questions about SAB4604NR SMEG
0 question about this device. Answer the ones you know or ask your own.
Ask a new question about this device
Download the instructions for your Freezer in PDF format for free! Find your manual SAB4604NR - SMEG and take your electronic device back in hand. On this page are published all the documents necessary for the use of your device. SAB4604NR by SMEG.
USER MANUAL SAB4604NR SMEG
1.1 General safety instructions 52 1.2 Appliance purpose 55 1.3 Manufacturer liability 56 1.4 This user manual 56 1.5 Identification plate 56 1.6 Disposal 56 1.7 How to read the user manual 57
2 Description 58
2.1 General Description 58 2.2 Control panel 59 2.3 Other parts 60 2.4 Available accessories 60 2.5 Blast Chiller Advantages 62
3 Use 63
3.1 Instructions 63 3.2 Preliminary operations 64 3.3 Using the accessories 64 3.4 Using the Blast Chiller 65 3.5 Cooling functions 67 3.6 Automatic programs 78 3.7 Special functions 80 3.8 History 90 3.9 Settings 90
4 Cleaning and maintenance 93
4.1 Instructions 93 4.2 Cleaning the surfaces 93 4.3 Extraordinary maintenance 96
5 Installation
5.1 Electrical connection 97 5.2 Positioning 97
We advise you to read this manual carefully, as it contains all the instructions for maintaining the appliance's aesthetic and functional qualities.
For further information on the product: www.smeg.com
1 Instructions
1.1 General safety instructions
Risk of personal injury
- Do not touch the interior walls during use of hot functions.
- Do not touch the appliance with damp or wet hands or feet.
- Keep children under the age of eight at a safe distance unless they are constantly supervised. Children must not play with the appliance.
- This appliance may be used by children aged at least 8 and by people of reduced physical, sensory or mental capacity, or lacking in experience in the use of electrical appliances, provided that they are supervised or instructed by adults who are responsible for their safety.
- Switch off the appliance immediately after use.
- Wear oven gloves when handling hot trays or other containers to prevent burns.
- Never try to put out a fire or flames with water: Turn off the appliance and smother the flames with a fire blanket or other appropriate cover.
- Cleaning and maintenance must not be carried out by unsupervised children.
- Have qualified personnel carry out installation and assistance interventions according to the standards in force. DO NOT USE OR STORE FLAMMABLE MATERIALS NEAR THE APPLIANCE.
- DO NOT USE AEROSOLS IN THE VICINITY OF THIS APPLIANCE WHILST IT IS IN USE.
- Switch off the appliance immediately after use. DO NOT MODIFY THIS APPLIANCE. Always use any necessary/required personal protective equipment (PPE) before performing any work on the appliance (installation, maintenance, positioning or movement).
- Before performing any work on the appliance, switch off the power supply.
- Do not insert pointed metal objects (cutlery or utensils) into the slots in the appliance.
- Do not try to repair the appliance yourself or without the intervention of a qualified technician.
- If the power supply cable is damaged, contact technical support immediately and they will replace it.
- Do not touch frozen foods (especially with wet hands), or place them in your mouth.
Risk of damaging the appliance
- Do not damage the refrigerant circuit.
- Do not use mechanical devices or other means to speed up the defrosting process other than those recommended by the manufacturer.
- To prevent hazards due to instability of the appliance, this must be fastened in accordance with the instructions.
- Never rest sharp metal objects such as knives, forks, spoons and lids on the appliance during use.
- Do not use abrasive or corrosive detergents (e.g. scouring powders, stain removers and metallic sponges) on glass parts.
- Do not sit on the appliance.
- Do not use steam jets for cleaning the appliance.
- Keep the appliance's ventilation openings and slots free from obstructions.
- Do not place trays or other containers directly on the base of the appliance.
- Do not use electrical equipment inside the appliance.
- Do not use the appliance to cool rooms for any reason.
- Always disconnect the appliance from the power grid in the event of a breakdown, maintenance, when replacing the light bulb or during cleaning.
- The appliance is able to guarantee optimum performance at ambient temperatures not exceeding 32°C.
- Do not use rough or abrasive materials or sharp metal scrapers.
- Never use the oven door to lever the appliance into place when fitting.
- Avoid exerting too much pressure on the oven door when open.
- Do not use the handle to lift or move the appliance.
Installation
- THIS APPLIANCE MUST NOT BE INSTALLED IN BOATS OR CARAVANS.
- Position the appliance into the cabinet cut-out with the help of a second person.
- Do not install the appliance in potentially explosive environments.
- Do not install the appliance in closed environments without sufficient air exchange.
- To avoid potential overheating, the appliance must not be installed behind a decorative door or a panel.
- Have the electrical connection performed by authorized technical personnel.
- The appliance must be connected to earth in compliance with electrical system safety standards.
- Use cables withstanding a temperature of at least 90 °C.
- The tightening torque of the screws of the terminal supply wires must be 1.5 - 2 Nm.
For this appliance
- Do not damage the refrigeration circuit (if this is accessible).
- Follow applicable legislation on the consumption of raw foodstuffs. Raw fish should be frozen to -18°C and kept at that temperature for at least 96 hours.
- Carefully clean the parts of the appliance which come into direct or indirect contact with foodstuffs to prevent any kind of contamination.
- Use food-safe detergents.
- Do not use flammable or harmful products.
- Use only the temperature probe supplied with the appliance.
- Keep the appliance door closed during all operations.
- Do not stack food items on top of each other, but rather arrange them so that the air is able to circulate correctly inside the appliance.
- Use aluminium or stainless-steel containers.
- Do not cover trays with insulating covers or films.
- Do not rest any weight or sit on the open door of the appliance. • Take care that no objects are stuck in the doors.
- If the appliance is to remain unused for an extended period of time, unplug it and clean the interior and exterior.
- The electrical cable and socket must remain easily accessible once the appliance is installed.
1.2 Appliance purpose
- This appliance is designed for blast chilling, freezing, conservation and proving of foodstuffs, and for chilling drinks, in a residential environment. It may be used to rapidly lower the temperature of cooked or raw foods in order to retain their nutritional properties. It also allows foodstuffs to be cooked at low temperatures in order to enhance their quality, flavours and aromas, and dishes to be warmed up to serving temperature. Every other use is considered improper.
• This appliance may also be used:
• In kitchenettes in shops, offices and other workplaces • In farms/farm stay facilities - By guests in hotels, motels and residential environments • In bed and breakfasts.
- The appliance is not designed to operate with external timers or with remote-control systems.
1.3 Manufacturer liability
The manufacturer shall bear no liability for damage to persons or property caused by:
- Use of the appliance other than that specified
- Failure to comply with the instructions in the user manual
- Failure to comply with applicable legislation regarding the consumption of raw foodstuffs
- Tampering with any part of the appliance
- The use of non-original spare parts
1.4 This user manual
This user manual is an integral part of the appliance and must therefore be kept in its entirety and within the user's reach for the whole working life of the appliance.
Read this user manual carefully before using the appliance.
1.5 Identification plate
The identification plate bears the technical data, serial number and brand name of the appliance. Do not remove the identification plate for any reason.

This appliance is not subject to the energy labelling requirements of Article 1, point E of Regulation (EC) 643/2009.
1.6 Disposal

This appliance complies with the European Union WEEE directive (2012/19/EU) and bears the symbol for waste electrical and electronic products. This appliance must be disposed of separately from other household waste (Directives 2002/95/EC, 2002/96/EC, 2003/108/EC). The appliance does not contain substances in quantities sufficient to be considered hazardous to health and the environment, in accordance with current European directives. To dispose of the appliance:
- Cut the power supply cable and remove it along with the plug.

Power voltage Danger of electrocution
- Disconnect the mains power supply.
- Unplug the appliance.
- Deliver the appliance to the appropriate recycling centre for electrical and electronic equipment waste, or return it to the retailer when purchasing an equivalent product, on a like-for-like basis.
Instructions
Our appliances are packaged in non-polluting and recyclable materials.
• Take the packing materials to an appropriate recycling centre.

Plastic packaging Danger of suffocation
- Do not leave the packaging or any part of it unattended.
- Do not let children play with the plastic bags.
1.7 How to read the user manual
This user manual uses the following reading conventions:
Instructions

General information on this user manual, on safety and final disposal.
Description

Description of the appliance and its accessories.
Use

Information on the use of the appliance and its accessories.
Cleaning and maintenance

Information for proper cleaning and maintenance of the appliance.
Installation

Information for the qualified technician: installation, operation and testing.

Safety instructions

Information

Advice
- Sequence of instructions for use.
- Standalone instruction.
2 Description
2.1 General Description

1 Control panel 2 Probe support 3 Oven light 4 Door 5 Fan 6 Temperature probe 7 Rack support frames
1,2,3... Frame shelf
2.2 Control panel


Display
The touchscreen display allows you to interact with the appliance. Press the icons to access the various available functions. The display will show all operational parameters, such as selected function, time/temperature settings or pre-set program settings.
Press the symbol to return to the previous menu or end a function. Press the symbol to confirm the selected options.

Press and hold the return symbol
for a few seconds to interrupt the current function and switch off the appliance.

2.3 Other parts
Interior lighting
The appliance's interior lighting comes on only when the door is opened.

When the door is open, it is not possible to turn off the interior lighting.
Shelves
The appliance features shelves to position racks at different heights. The insertion heights are indicated from the bottom upwards (see 2.1 General Description).
Cooling fan
The cooling fan distributes the air evenly inside the appliance, helping it reach the set temperature more quickly.
2.4 Available accessories
Rack
For supporting containers.
Multi-purpose bottle rack (on some models only)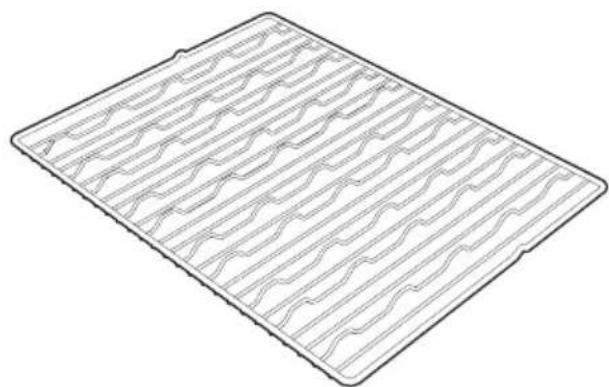
For supporting bottles, or containers if turned when inserted.
Temperature probe

To be inserted in the middle of foodstuffs to measure their internal temperature when blast chilling by probe and during slow cooking.

The appliance accessories intended to come into contact with food are made of materials that comply with the provisions of current legislation.

Original supplied and optional accessories can be requested to Authorised Assistance Centres. Use only original accessories supplied by the manufacturer.
2.5 Blast Chiller Advantages
Your blast chiller allows you to quickly cool foodstuffs and to freeze them rapidly in order to retain their freshness and guarantee them a long lifetime.
Blast chilling and rapid freezing help preserve the flavour, aroma, colour and nutritional properties of foodstuffs.
- Blast chilling cooked foods to an internal temperature of +3°C minimises bacterial proliferation, which is at its maximum between 65°C and 8°C.
- Rapid freezing to -18°C allows frozen food to be preserved for a longer period – usually several months more. It also prevents the formation of "freezer burn" (large ice crystals which damage and break the cell walls of the foodstuffs). When defrosted, the foodstuffs will not lose liquid and will retain their consistency and taste.
| Without blast chiller With blast chiller | |
| Bacteriological risk | Food safety |
| Evaporation and dehydration | Retention of original consistency |
| Loss of weight No loss of weight | |
| Loss of flavours, aromas, colours | Retention of original properties |
| Rapid spoiling | Longer preservation time |
| Formation of freezer burn (large ice crystals which damage the fibres of the foodstuffs) | Formation of micro-crystals of ice which do not damage the food, allowing its properties to be preserved |
3 Use
3.1 Instructions

Improper use
Danger of personal injury or damage to the appliance
- Keep the door closed when performing any operation on the appliance.
- Protect your hands by wearing oven gloves when moving food inside the appliance.
- Do not touch the heating elements.
- Do not allow children to approach the appliance when it is in operation.
- Do not place trays or containers on the bottom of the appliance.
- Ensure that the containers are suitable for use at low temperatures.
- Avoid using plastic containers, we recommended using silicone containers.
- Arrange the food carefully inside the appliance so that air can circulate correctly.
- Do not stack the foods on top of each other.
- Handle the temperature probe with care as it has a sharp point.
- Do not use or leave flammable materials near the appliance.

Improper use
Bacteriological contamination hazard
• Take great care when handling and consuming raw foodstuffs, in particular fresh fish and cephalopods, as there is the risk of contamination from Anisakis, a parasite which is hazardous to human health. This risk can be eliminated by cooking to a minimum temperature of 65°C, or by freezing to -18°C and then holding at -18°C for at least 96 hours. - In order to retain the properties of hot foods, do not allow them to remain at room temperature before blast chilling or freezing them.

The formation of water or condensate inside the appliance is a natural phenomenon and does not indicate a malfunction.
3.2 Preliminary operations
- Remove any protective film from the outside or inside of the appliance, including accessories.
- Remove any labels (apart from the technical data plate) from the accessories and inside of the appliance.
- Remove and wash all the appliance accessories (see 4 Cleaning and maintenance).
- To remove any manufacturing residue, clean the inside of the appliance thoroughly with a soft cloth and neutral, non-abrasive detergent (see "Cleaning the inside of the appliance.").
- You must set the current time in order to start using the appliance (see "First use").
3.3 Using the accessories
Rack
The racks must be inserted into the side guides until they come to a complete stop.
- The mechanical safety locks that prevent the racks from being removed accidentally must face downwards and towards the back of the appliance.

Multi-purpose bottle rack (on some models only)
Bottles to be cooled can be arranged on this rack as follows:


If it is turned when inserted, it can be used as a normal rack for supporting containers.
Temperature probe

Sharp point injury hazard
- Handle the probe with care and do not touch its tip.
Insert the probe into the food before starting the blast chill by probe cycle or hot functions.
- The temperature probe must be inserted into the middle of the food without going through it.
- For different sized pieces or irregular foodstuffs, the probe should be placed in the largest piece/thickest area.
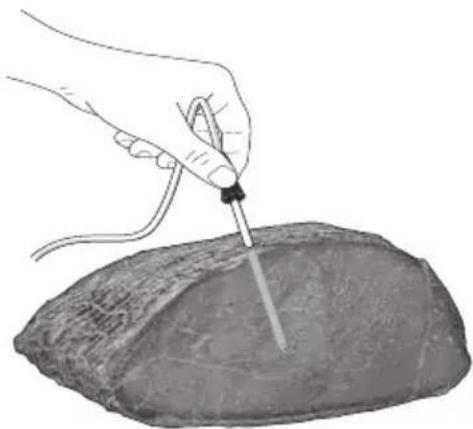

Insert the probe transversely, ensuring at least 3/4 of its length is inside the foodstuff.
When you have finished using the probe, clean it with a soft cloth and warm water, dry it carefully and return it to its housing.
3.4 Using the Blast Chiller
First use
Z
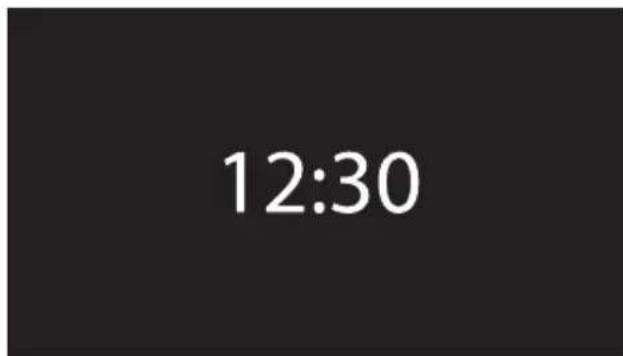
When using the appliance for the first time, or after a power failure, the 00:00 symbol will flash on the display. In order to be able to start any cooking function, the current time must be set (if the oven is being turned on for the first time, it is also recommended you set the required language).

The appliance language is set to "English" by default.

When first connecting or after the power has been cut for a time it will be necessary to wait a few seconds before you can interact with the appliance.
Arranging Foodstuffs
Arrange the foods evenly inside the appliance, ensuring you do not stack them or place them on top of each other in order to allow air to circulate.

Use the rack for improved air circulation.

Target Temperature
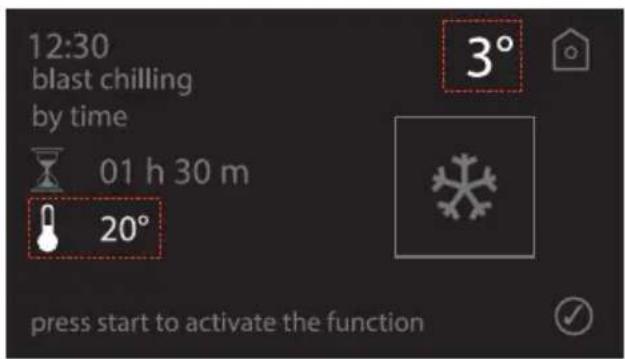
The temperature shown on the display (3°) indicates the target temperature that the foodstuffs must reach.
Home screen
Press the time on the display.
It is now possible to select the various available functions on the home screen of the appliance.

1 Settings 2 Automatic programs 3 Cooling functions 4 Special functions 5 History
3.5 Cooling functions
Press the symbol on the appliance's main screen to select the cooling functions. The screen will display the symbols for the various cooling functions:

The available cooling functions are:

Pre-cooling
Conservation
Blast Chilling
Freezing
Drinks cooling
Press the symbol of the required function to activate it.
Press the button to return to the main screen.
Pre-cooling
The pre-cooling function cools the interior of the appliance before performing a blast chilling or freezing cycle.

Perform a pre-cooling cycle of at least 15 minutes before introducing foodstuffs to obtain the best results during blast chilling or freezing.
- To start the pre-cooling function, press

symbol.
- The following screen will be displayed:

- If you wish to modify the default temperature (-30°C), press on the temperature value: the setting screen will be displayed, allowing you to set the required value using the button.
- Press to confirm.


The temperature can also be modified when the appliance is in operation.
- The display shows the progress of the function.

- When the set temperature is reached, the appliance will beep, and the function progress bar and set temperature will no longer be displayed.
Conservation
This function keeps foodstuffs at the required temperature (-35°C to +20°C).
- Press the control from the cooling functions screen.
- Select the required conservation type.

- Press the button to start the function.

- The screen showing the progress of the function will be displayed.

- The appliance will beep when the temperature is reached.
- In the case of manual conservation, choose the required temperature using
the

buttons

Press
to

confirm.

- Press to start the function.


- The display will show the progress of the function.

- When the function has finished, the appliance will beep, and the function progress bar and set temperature will no longer be displayed.
Blast Chilling

Blast chilling stops bacteriological proliferation and retains the qualities of the foodstuffs.
This function allows you to quickly chill raw or recently cooked foods to +3°C.
After blast chilling, foodstuffs can be kept in the refrigerator (+4°C).

• Perform a pre-cooling cycle of a minimum of 15 minutes with the appliance empty before placing the food to be chilled inside. • Perform a pre-cooling function to reduce power consumption and the time taken. - Do not cover trays or containers with insulating films or covers. - Ensure that the containers are suitable for use at low temperatures. - Arrange the trays or containers evenly inside the appliance, ensuring you do not stack them or place them on top of each other in order to allow air to circulate. - Do not allow hot food to sit at ambient temperature before blast chilling or freezing in order to retain its desirable properties.
- Press the 2 of from the cooling functions screen.
- Select the type of blast chilling required: blast chill by time or blast chill by probe.

Blast chilling by time
- If you select the "blast chill by time" option, set the required duration. In the example, a duration of 1 hour 30 minutes has been set: first press the hours field and enter 0 and 1, then press the minutes field and enter 3 and 0. Press to confirm.

- The appliance will ask the user to choose whether or not to perform pre-cooling.


It is recommended to perform pre-cooling of the appliance interior to attain the best results.
The recommended temperature for pre-cooling is -30°C.
Pre-cooling should be performed with the appliance empty.
- Pre-cool the appliance and set the pre-cooling temperature to -30°C.
Press

to
confirm.

- Upon confirmation, the display will show that appliance pre-cooling is in progress.
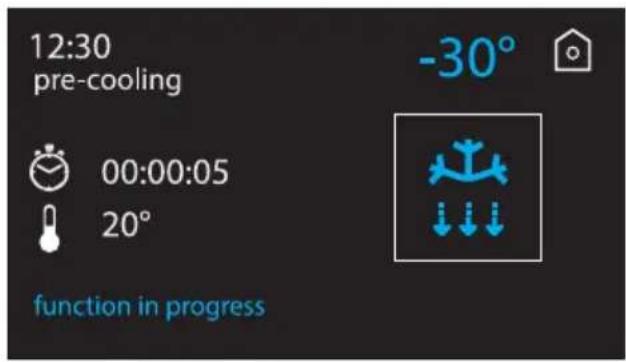

- Once pre-cooling is complete, press "ok".
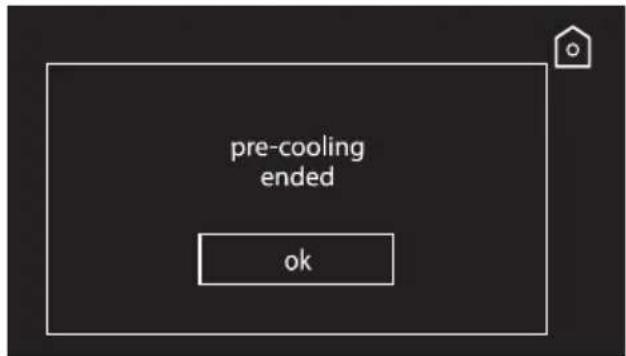
- Place the foods for blast chilling into the appliance, and press to start the function.

- The display will show the progress of the function.

- When the function has finished, the appliance will beep, and the function progress bar and set temperature will no longer be displayed.
Blast chill by probe
When the blast chill by probe option is selected, the appliance prompts the user to choose whether or not to perform pre-cooling.
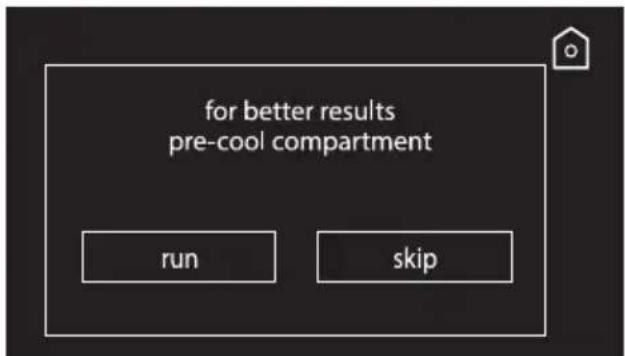

It is recommended to perform pre-cooling of the appliance interior to attain the best results. The recommended temperature for pre-cooling is -30°C.

Pre-cooling should be performed with the appliance empty.
- Pre-cool the appliance. Press confirm.


- Upon confirmation, the display will show that appliance pre-cooling is in progress.

- Once pre-cooling is complete, press "ok".


Sharp point Injury hazard
- Handle the probe with care and do not touch its tip.

Insert the probe transversely, ensuring at least 3/4 of its length is inside the foodstuff.
- Insert the probe into the food without going all the way through, then press the button to start the function.
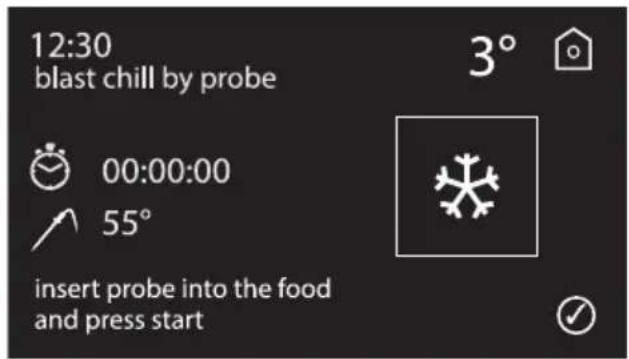
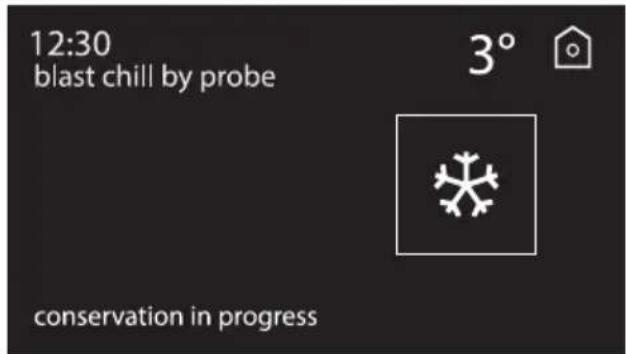
- Once the function has started, the following screen will appear. The screen remains active until the temperature displayed next to the probe symbol (55°C) is the same as the temperature above the function symbol (3°C).

- As soon as the temperature of 3°C is reached, the appliance will beep, and the function progress bar and the temperature will no longer be displayed.
- The appliance automatically switches to the conservation function and will remain in this state until the user interrupts it with

button.
- If the function is started without the probe being inserted, the following screen will appear:

- Press "ok" and insert the probe. If the probe has not been (correctly) inserted, the following screen will be displayed:

- Open the door and check that the probe is correctly inserted.
- If the probe is not inserted, the appliance will automatically perform the blast chill by time function for the set duration.
Freezing
Freezing allows the temperature of foodstuffs to be rapidly brought down to a temperature of -18°C.
- Press the symbol from the cooling functions screen.
- Setting the required duration. In the example, a duration of 3 hours 30 minutes has been set: first press the hours field and enter 0 and 3, then press the minutes field and enter 3 and 0.
Press

to
confirm.

- The appliance will ask the user to choose whether or not to perform pre-cooling.


It is recommended to perform pre-cooling of the appliance interior to attain the best results. The recommended temperature for pre-cooling is -30°C.

Pre-cooling should be performed with the appliance empty.
- Pre-cool the appliance. Press confirm.


- Upon confirmation, the display will show that appliance pre-cooling is in progress.

- Once pre-cooling is complete, press "ok".

- Place the foods for freezing into the appliance, and press the button to start the function.

- Once the function has started, the following screen will remain active until the previously set time has elapsed.
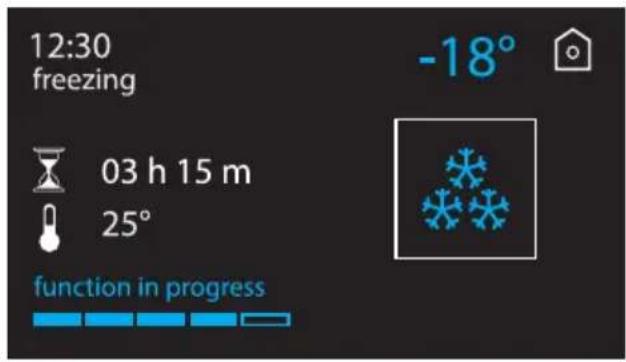

- When the time has elapsed, the appliance will beep and the function progress bar and the temperature will no longer be displayed.
- The appliance automatically switches to the conservation function and will remain in this state until the user interrupts it with the 🔊 ton.

Preserving Foodstuffs
- Chilled or frozen foodstuffs must not be stored inside the appliance.
- Cover and protect foodstuffs with cling film, hermetic covers or vacuum storage products in the fridge or freezer.
- Label frozen foodstuffs to be stored in the freezer for 6-12 months with their content, date of preparation and expiry date.
- Blast chilled foodstuffs should be kept in the refrigerator at a constant temperature of +4°C.
- Frozen foodstuffs should be kept in the freezer at a constant temperature of -18°C.
Drinks cooling
This function allows you to chill different kinds of beverages down to the perfect drinking temperature.
- Press the
button from the cooling
functions screen.
- Press on the name of the drink, for example red wine.

- Select the number of bottles to be chilled, from a minimum of 1 to a maximum of
16, using the


Press

to
confirm.

| Setting Suitable for | |
| White wines | Young white winesComplex, mat winesStraw wines (white)White fortified winesYoung rosé winesYoung grappa |
| Sparkling drinks | ChampagneSparkling winesLightly sparkling wines |
| Red wines | Young red winesMature rosé winesCask - mature wines |
| Beer/soft drinks | Eau devieGinVodkaRumTequilaLiqueurs to be served cold |
- The screen shows the preset cooling temperature. Press to start the function.

- Once the function has started, the following screen will remain active until the preset temperature is reached.

- As soon as the time has passed and the set temperature is reached, the appliance will beep, and the function progress bar and the temperature will no longer be displayed.
- The appliance automatically switches to the conservation function and will remain in this state until the user interrupts it with the button.

3.6 Automatic programs
The automatic programs allow you to start up the blast chilling and freezing functions for a series of foods at a preset temperature for a predefined time.
- Press the symbol on the
appliance's main screen to select the automatic programs.
- Select the type of operation – blast chilling or freezing – by pressing the name of the required function.
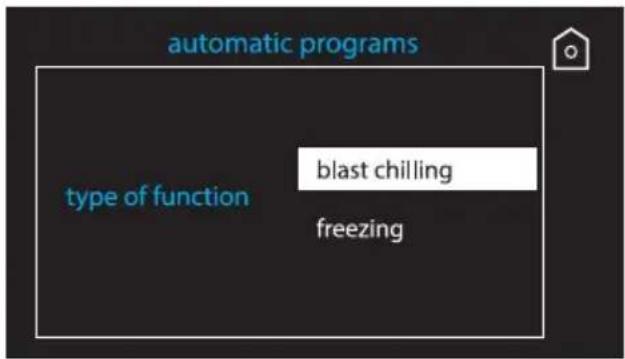
- Once you have selected the function, use the 🔒 buttons to scroll through the list of foodstuffs and select the one required by pressing directly on its name.

- Press on the name of the subcategory.

- Pre-cool the appliance.


Perform appliance pre-cooling to optimise the results of the recipes suggested by Smeg.
The recommended temperature for pre-cooling is -30°C.

Pre-cooling should be performed with the appliance empty.
- Press to confirm.
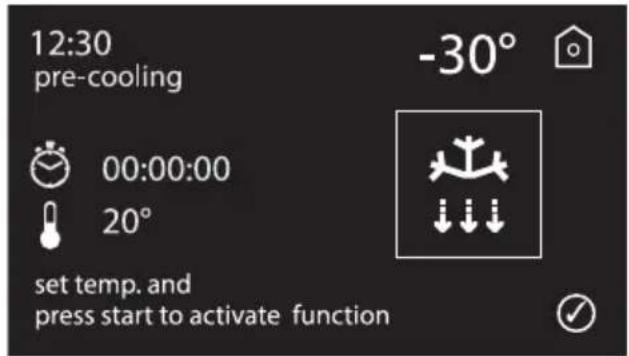
- Upon confirmation, the display will show that appliance pre-cooling is in progress.

- Once pre-cooling is complete, press "ok".

- Place the food into the appliance, and press the button to start the function.

- Once the function has started, the following screen will appear. The screen remains active until the temperature displayed next to the thermometer symbol (25°C) is the same as the temperature above the function symbol (3°C).


Insert the temperature probe if you have selected a foodstuff which requires use of the probe to perform the function.
- As soon as the temperature of 3°C is reached, the appliance will beep, and the function progress bar and the temperature will no longer be displayed.
- The appliance automatically switches to the conservation function and will remain in this state until the user interrupts it with the button.

3.7 Special functions
Press the symbol on the appliance's main screen to select the special functions. The screen will display the symbols for the special functions:

The available special functions are:

Defrost by weight
Defrost by time
Proving
Hot functions
Ready to eat
Automatic cleaning
Press the symbol of the required function to activate it.
Press the 📄 button to return to the main screen.
Defrost by weight
This function allows you to defrost food on the basis of a selectable weight.
- Press the snowpool to select the "defrost by weight" function from the main special functions screen.
- Select the type of food to defrost. Press on the name of the foodstuff to proceed.

- Set the required weight using the + or - button. press to
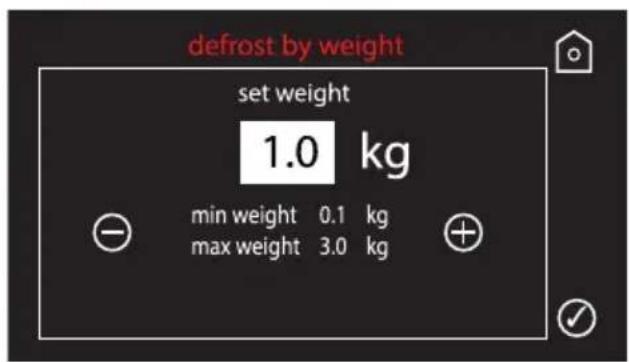
- Press to start the function.

- Once the function has been started, the screen will show the remaining time until the function completes.

- When the function has finished, the appliance emits a beep and automatically switches to conservation mode; it remains in this mode until the user interrupts it with the button.
Defrost by time
This function allows you to defrost food on the basis of a selectable time.
- Press the 🎯 symbol to select the "defrost by time" function from the main special functions screen.
- Setting the required duration. In the example, a duration of 1 hour 30 minutes has been set: first press the hours field and enter 0 and 1, then press the minutes field and enter 3 and 0.
Press

to
confirm.

- Press to start the function.
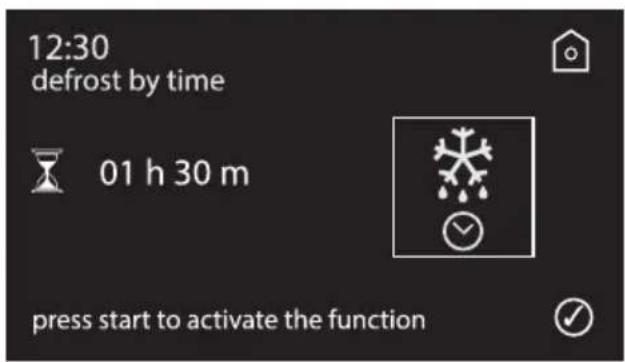
- Once the function has been started, the screen indicating that the function is in progress will be displayed.

- When the function has finished, the appliance emits a beep and automatically switches to conservation mode; it remains in this mode until the user interrupts it with the button.

Proving
The proving function allows you to leaven any kind of dough or batter, offering perfect results in shorter times.
The proving process can be performed in a single step, or in three stages with different temperatures and durations, according to requirements.

- Use metal or ceramic containers, or other materials suitable for temperatures up to 80°C.
- For flours with a high W index, use a smaller quantity of dough and set a longer proving time.
- Use smaller quantities of yeast, for example 4 grams in 1 kg of dough and prove the dough for longer to make it more fragrant and digestible. • Cover the dough with cling film.
- Use a sourdough starter to obtain fluffier, lighter and more digestible doughs.
- Reduce the quantity of yeast used and prove at a constant temperature for the best dough proving results.
- Press the symbol to select the "proving" function from the main special functions screen.
- Set the required temperature and time using the and buttons.

- At this point it is only possible to confirm step 1 with the button or button in order to move on to setting the two subsequent steps, setting the temperature and time in the same manner.
- When you have completed the settings, press the button to confirm.
- The following screen will be displayed; press √ to start the function.

- If a function end time has been set, the following screen will be shown giving all information. The appliance will change to cooling mode while waiting for the function to be started. In this condition it is still possible to modify the function end time by pressing the button.


When setting the function end time, take into account the duration of the function itself.
If, for example, you set the function at 22:00 with an end time of 23:30 for a function duration set to 2 hours, the appliance will start the function with a delay of 24 hours, and the appliance will show the conservation at 3°C screen while it waits for the set time to start up the function.

- Press to start the function.

- The appliance will enter conservation mode at 3°C while it waits for the function start time.

- If no function end time is set, press the button to start proving. The screen will be displayed to show that the function is in progress.

- When the function has finished, the appliance emits a beep and automatically switches to conservation mode; it remains in this mode until the user interrupts it with the button.

Example 24-hour 3-step proving:
| Time Temperature | |
| 8 hours | 3°C |
| 8 hours | 18°C |
| 8 hours | 28°C |
Hot functions
This function allows you to perform slow, low-temperature cooking of foods.

The dish should be browned on both sides before slow cooking it.

- Press the ,sss vol to select "hot
functions" from the main special functions screen.
- Select the type of food you wish to cook from the list (for example "roast beef").

The display indicates that the appliance should be sanitized at a temperature of 65° C.
- Press the "run" button.

- Then press the button to start the sanitization and pre-heating function.
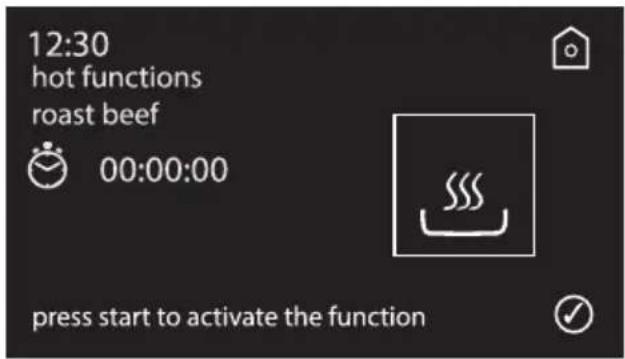

The sanitization ad pre-heating function should be used with the appliance empty.
The display indicates that the sanitization and pre-heating function is in progress.

- When pre-heating is complete, press "ok".

The following screen appears on the display prompting you to insert the temperature probe.


Sharp point Injury hazard
- Handle the probe with care and do not touch its tip.

Insert the probe transversely, ensuring at least 3/4 of its length is inside the foodstuff.

When cooking variously sized pieces of food, place the probe in the largest piece.
- Insert the temperature probe into the food.

- Place the food into the appliance.
- Press the button to start cooking.
The following screen appears on the display:

When the actual temperature inside the food (shown next to the probe symbol, 25° C in the example) reaches the target
temperature (shown above the

symbol and which is different depending on the type of food, 55°C in the example) the appliance emits a beep and the target temperature will no longer be displayed.
When cooking has finished, the appliance will automatically switch to keep warm mode for a maximum of 10 hours.

- To stop the function, press the button.
If cooking is started without the probe being inserted in the food, the following screen will appear:
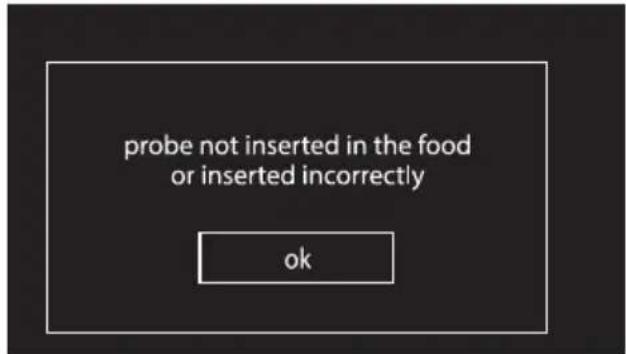
- Insert the probe into the food and press "ok" on the display.

If the probe has not been (correctly) inserted, the following screen will be displayed:

- Open the door
- Check that the probe has been inserted correctly into the food.
- Close the door.
- Press "ok" on the display.

If the probe is not inserted, the appliance will automatically perform slow cooking for a pre-set duration.
"Ready to eat" function
This function allows you to bring ready-cooked food to serving temperature at a set time.
The appliance will keep the dish at a conservation temperature of 3°C before starting to slowly warm it up 2h 30min before the function end time so that it will be warm at the required time.

It is recommended to only warm pre-sliced or portioned food with a maximum weight of 1 kg.

The time taken to warm the dish is 2h 30min; as such, it is recommended to set the function end time no sooner than the one suggested by the appliance (which already takes the 2h 30min into account).
- Press the symbol to select the "Ready to eat" function from the main special functions screen.
- Place the food in the appliance and close the door.
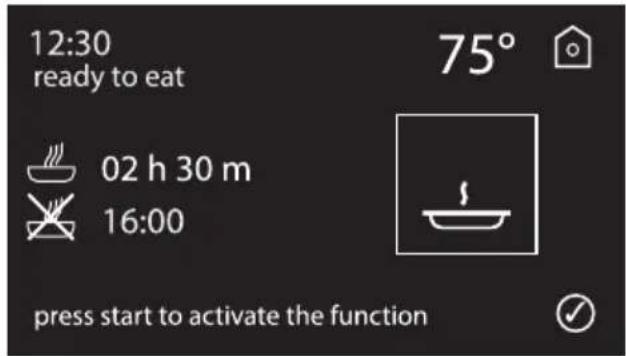
- Press the ⬤ button to switch to setting the function end time.
- Set the time at which you wish the function to end and press the button to confirm.


When setting the function end time, take into account the duration of the function itself.
If, for example, you set the function at 22:00 with an end time of 23:30 for a function duration set to 2 hours, the appliance will start the function with a delay of 24 hours, and the appliance will show the conservation at 3°C screen while it waits for the set time to start up the function.

- Press the button to start the function.
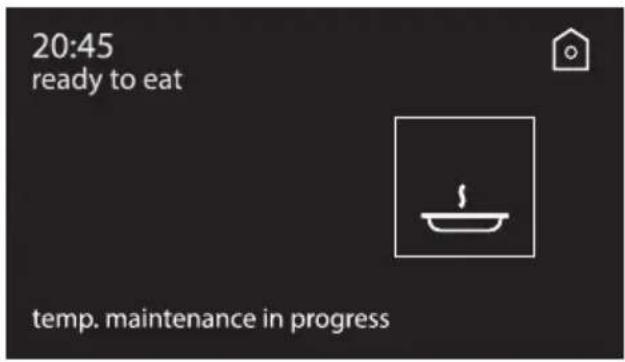
- The appliance will enter conservation mode at 3°C while it waits for the function start time.

- Once the function has started, the following screen will appear. The screen will remain active until the duration set by the user has passed.


- When the function ends, the appliance emits a beep and automatically switches to keep warm mode.
3.8 History
On the appliance's "main screen", press
the symbol to view the list of the last
10 functions used.

Press the waste basket symbol to delete the history.
3.9 Settings
Select the settings symbol on the main screen.

- Press the button and select clock from the "settings" menu.

- Enter the current time: In the example, the current time corresponds to 20:30, press the hours field and type 2 and 0, then move to the minutes field and type 3 and 0.

- Press the button to confirm.
- Press the button to return to the main screen.
Language
Select the language from the "settings" menu.

- Use the and buttons to scroll through the list of available languages and select the required language.
- Press on the name of the required language.
- Press the button to confirm.
- A selection confirmation screen will be displayed: press yes to confirm or no to cancel.

Controls lock
Allows the appliance to automatically lock the controls after one minute of normal operation without any intervention from the user.

- Press yes to confirm or no to cancel.
- The following screen is displayed when the controls lock is activated.
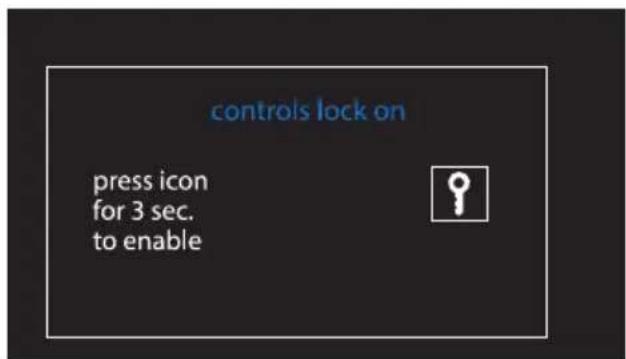
- To temporarily exit controls lock mode, press and hold the button for 3 seconds: an audible warning will sound.

It is also possible to shut off the appliance with the controls lock active: press the button for 3 seconds.

Demo mode (for showrooms)
This mode disables all the appliance's heating elements, while keeping its user interface operational.

- Press yes to confirm or no to cancel.
- When demo mode is activated, the following screen will be displayed for 3 seconds every 10 minutes.


If the mode is active, "demo mode" will be shown on the display.

To use the appliance normally, set this mode to OFF.
Sound
The appliance beeps whenever the controls are pressed. This setting disables these sounds.

Digital clock
Displays the time in digital format.


From any screen of the settings menu, the appliance will switch to stand-by mode after 15 seconds of inactivity.
After two minutes in stand-by mode, the appliance will switch to power saving mode.
4 Cleaning and maintenance
4.1 Instructions

Improper use Risk of damage to surfaces
- Do not use steam jets for cleaning the appliance.
- Do not use cleaning products containing chlorine, ammonia or bleach on parts made of steel or that have metallic surface finishes (e.g. anodizing, nickel- or chromium-plating).
- Do not use abrasive or corrosive detergents (e.g. scouring powders, stain removers and metallic sponges) on glass parts.
- Do not use rough or abrasive materials or sharp metal scrapers.

Improper use Danger of personal injury or damage to the appliance
- Isolate the electricity supply before performing cleaning.
- Do not touch the appliance with bare, damp or wet hands or feet.
- Do not remove the seal on the face of the appliance.
- Do not use mechanical devices or other means to speed up the defrosting process other than those recommended by the manufacturer.
- Do not damage the refrigerant circuit.
4.2 Cleaning the surfaces
To keep the surfaces in good condition, they should be cleaned regularly after use. Let them cool first.
Ordinary daily cleaning

To prevent the excessive build-up of condensation, we recommend you perform the automatic cleaning function after each use.
Use neutral detergents that do not contain abrasives or chlorine-based acids.
Pour the product onto a soft, damp cloth and wipe the surface; rinse thoroughly and dry with a soft cloth or a microfibre cloth.
Clean the touchscreen panel with glass-cleaning products.
Use a soft cloth with a small amount of detergent and dry thoroughly.
Cleaning and maintenance
Cleaning the inside of the appliance.
To ensure that foodstuffs remain uncontaminated, the interior of the appliance should be cleaned and dried after each use.
Cleaning and drying the interior of the appliance is particularly important after blast chilling and freezing functions in order to prevent the build-up of unpleasant odours, which could contaminate the foods. Use a neutral detergent and a soft cloth. Avoid using abrasive sponges or scourers which could damage the internal surface. Rinse and dry thoroughly.
Cleaning the rack
The grid can be washed in a dishwasher.
Removing rack support frames
Removing the guide frames enables the sides to be cleaned more easily.
To remove the guide frames:
- Unscrew the frame fastening pins.
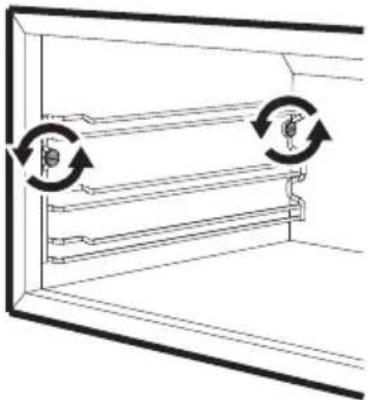
- Pull the frame towards the inside of the oven to free it from the fastening pins.

- When cleaning is complete, repeat the above procedures to put the guide frames back in.
Cleaning and maintenance
Cleaning the guide frames
The frames can be removed as described in the previous section and washed in a dishwasher.
Automatic cleaning

Automatic cleaning can only be performed with the blast chiller's door open.
- Press the symbol on the main special functions screen.
- The following message will be displayed, requesting that you open the door.


If you press the button without opening the door, automatic cleaning will not start up.
- Open the door and press the button. The following screen will be displayed:


If you accidentally close the door during automatic cleaning, the function will not stop and the appliance will beep once a minute while displaying the following message:

- Once the automatic cleaning cycle has finished, dry the inside of the appliance thoroughly.

4.3 Extraordinary maintenance
What to do if...
The display is completely off:
- Check the mains power supply.
- Check whether an all-pole switch upstream of the appliance supply line is in the "ON" position.
The appliance does not cool:
- Check whether it has been set to "demo" mode (for further details see "Demo mode (for showrooms)").
The controls do not respond:
- Check whether it has been set to "controls lock" mode (for further details see "Controls lock").
If the problem has not been resolved or in the case of other types of fault, contact your local technical support centre.
Malfunction Alarms

Blast chilling function

Conservation or Keep warm function
Take note of the error, switch off the appliance and call Technical Support.
Fault Alarms
An error message is displayed on the screen, from "error 1" to "error 7".

This indicates a fault with the appliance.
- Press the reset button to turn the buzzer off.
- Take note of the error, switch off the appliance and call Technical Support.
5 Installation
5.1 Electrical connection

Power voltage Danger of electrocution
• Have the electrical connection performed by authorized technical personnel. - The appliance must be connected to earth in compliance with electrical system safety standards. - Disconnect the mains power supply.
General information
Check the grid characteristics against the data indicated on the plate.
The identification plate bearing the technical data, serial number and brand name is visibly positioned on the appliance.
Do not remove this plate for any reason. The appliance operates at 220-240 V~.
Plug the appliance into a power socket located around 1 - 1.5 metres from the appliance.
Fixed connection
Fit the power line with an all-pole circuit breaker in compliance with installation regulations.
The all-pole circuit breaker should be located near the appliance and in an easily reachable position, according to applicable electrical codes.
Connection with plug and socket
Make sure that the plug and socket are of the same type. Avoid using adapters and shunts as these could cause overheating and a risk of burns.
5.2 Positioning

Heavy appliance Crushing hazard
- Position the appliance into the cabinet cut-out with the help of a second person. • To prevent hazards due to instability of the appliance, this must be fastened in accordance with the instructions.

Pressure on the open door Risk of damage to the appliance.
- Never use the oven door to lever the appliance into place when fitting.
- Avoid exerting too much pressure on the oven door when open.

Heat production during appliance operation Risk of fire
- Check that the carcase material is heat resistant.
- Check that the carcase has the required openings.
- Do not install the appliance in a recess which can be closed with a door, or in a cupboard.
Position of the power cable
(rear view)
Fastening bushings
After positioning the appliance in the recess.
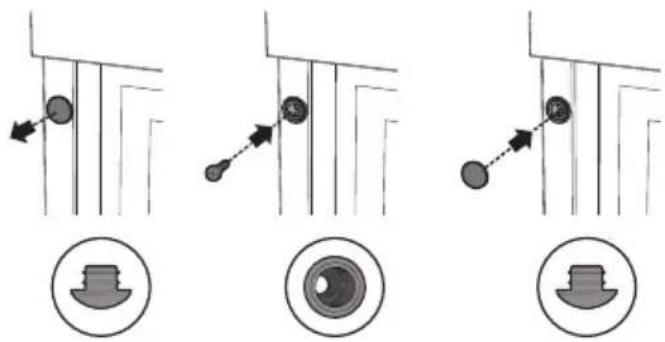
- Remove the bushing covers on the front of the appliance.
- Secure the appliance to the carcase using the screws.
- Cover the bushings with the previously removed covers.
Appliance overall dimensions (mm)
Mounting into a column (mm)
- DESCRIPTION
- USE
- CLEANING AND MAINTENANCE
- INSTALLATION
- INSTRUCTIONS
- GENERAL SAFETY INSTRUCTIONS
- RISK OF PERSONAL INJURY
- RISK OF DAMAGING THE APPLIANCE
- FOR THIS APPLIANCE
- APPLIANCE PURPOSE
- MANUFACTURER LIABILITY
- THIS USER MANUAL
- IDENTIFICATION PLATE
- DISPOSAL
- POWER VOLTAGE DANGER OF ELECTROCUTION
- PLASTIC PACKAGING DANGER OF SUFFOCATION
- HOW TO READ THE USER MANUAL
- SAFETY INSTRUCTIONS
- INFORMATION
- ADVICE
- GENERAL DESCRIPTION
- CONTROL PANEL
- DISPLAY
- OTHER PARTS
- INTERIOR LIGHTING
- SHELVES
- AVAILABLE ACCESSORIES
- TEMPERATURE PROBE
- BLAST CHILLER ADVANTAGES
- DANGER OF PERSONAL INJURY OR DAMAGE TO THE APPLIANCE
- BACTERIOLOGICAL CONTAMINATION HAZARD
- PRELIMINARY OPERATIONS
- USING THE ACCESSORIES
- RACK
- MULTI-PURPOSE BOTTLE RACK (ON SOME MODELS ONLY)
- SHARP POINT INJURY HAZARD
- USING THE BLAST CHILLER
- FIRST USE
- ARRANGING FOODSTUFFS
- TARGET TEMPERATURE
- HOME SCREEN
- COOLING FUNCTIONS
- PRE-COOLING
- CONSERVATION
- BLAST CHILLING
- BLAST CHILLING BY TIME
- BLAST CHILL BY PROBE
- FREEZING
- PRESERVING FOODSTUFFS
- DRINKS COOLING
- AUTOMATIC PROGRAMS
- SPECIAL FUNCTIONS
- DEFROST BY WEIGHT
- DEFROST BY TIME
- PROVING
- HOT FUNCTIONS
- READY TO EAT" FUNCTION
- HISTORY
- SETTINGS
- LANGUAGE
- CONTROLS LOCK
- DEMO MODE (FOR SHOWROOMS)
- SOUND
- DIGITAL CLOCK
- IMPROPER USE RISK OF DAMAGE TO SURFACES
- IMPROPER USE DANGER OF PERSONAL INJURY OR DAMAGE TO THE APPLIANCE
- CLEANING THE SURFACES
- ORDINARY DAILY CLEANING
- CLEANING THE INSIDE OF THE APPLIANCE
- CLEANING THE RACK
- REMOVING RACK SUPPORT FRAMES
- CLEANING THE GUIDE FRAMES
- AUTOMATIC CLEANING
- EXTRAORDINARY MAINTENANCE
- WHAT TO DO IF
- MALFUNCTION ALARMS
- FAULT ALARMS
- ELECTRICAL CONNECTION
- GENERAL INFORMATION
- FIXED CONNECTION
- CONNECTION WITH PLUG AND SOCKET
- POSITIONING
- HEAVY APPLIANCE CRUSHING HAZARD
- PRESSURE ON THE OPEN DOOR RISK OF DAMAGE TO THE APPLIANCE
- HEAT PRODUCTION DURING APPLIANCE OPERATION RISK OF FIRE
- FASTENING BUSHINGS
Brand : SMEG
Model : SAB4604NR
Category : Freezer