
VH-SB300BK - Hi-Fi System VIETA - Free user manual and instructions
Find the device manual for free VH-SB300BK VIETA in PDF.


| Product Type | Hi-Fi System |
| Brand | Vieta |
| Model | VH-SB300BK |
| Dimensions (W x H x D) | 400 x 200 x 300 mm |
| Weight | 5 kg |
| Power Supply | AC 230V, 50Hz |
| Power Consumption | 60 W |
| Output Power (RMS) | 2 x 30 W |
| Supported Media | CD, CD-R/RW, MP3 via USB |
| Radio Bands | FM, AM |
| Bluetooth Version | 5.0 |
| USB Port | Yes, for MP3 playback |
| AUX Input | 3.5 mm stereo jack |
| Speaker Configuration | 2-way bass reflex |
| Remote Control | Included |
| Display | LCD with backlight |
| Maintenance | Clean with a dry soft cloth; avoid liquids |
| Safety | Keep away from water and heat sources |
| Spare Parts & Repairability | Contact Vieta service center for parts |
Frequently Asked Questions - VH-SB300BK VIETA
User questions about VH-SB300BK VIETA
0 question about this device. Answer the ones you know or ask your own.
Ask a new question about this device
Download the instructions for your Hi-Fi System in PDF format for free! Find your manual VH-SB300BK - VIETA and take your electronic device back in hand. On this page are published all the documents necessary for the use of your device. VH-SB300BK by VIETA.
USER MANUAL VH-SB300BK VIETA
natural_image
Black long-handled guitar with curved body and four legs (no text or symbols visible)
1 Terminales OPTICAL
natural_image
Pure technical diagram of a rectangular device with internal spring-like structures and mounting holes, no text or symbols present.1 Pair
1 ON/OFF
natural_image
Line drawing of a wall-mounted power plug connecting to a socket (no text or symbols)Important Safety Instructions....2
Safety 2
Identifying the Parts....3
Main Unit....3
Subwoofer Bottom....4
Smart Remote Control ....4
Connections....5
Connect Power....5
Connect to TV or External Audio Device ....5
Connect to an External Audio Device 5
Basic Operations....6
Turn On....6
Set up wireless connection manually ....6
Adjust Volume Level....6
Super Bass Boost ....6
Mute Sound....6
Program Smart Remote Control to Control TV....6
Troubleshooting....7
Specifications ....8
Important Safety Instructions

WARNING
RISK OF ELECTRIC SHOCK DO NOT OPEN

CAUTION: TO REDUCE THE RISK OF ELECTRIC SHOCK, DO NOT REMOVE COVER (OR BACK). NO USER-SERVICEABLE PARTS INSIDE. REFER SERVICING TO QUALIFIED SERVICE PERSONNEL.
The lightning flash with arrowhead symbol, within an equilateral triangle, is intended to alert the user to the presence of uninsulated “dangerous voltage” within the product’s enclosure that may be of sufficient magnitude to constitute a risk of electric shock to persons.
The exclamation point within an equilateral triangle is intended to alert the user to the presence of important operating and maintenance (servicing) instructions in the literature accompanying the appliance.
Safety
- Read these instructions.
- Keep these instructions.
- Heed all warnings.
- Follow all instructions.
- Do not use this apparatus near water.
- Clean only with dry cloth.
- Do not block any ventilation openings. Install in accordance with the manufacturer's instructions.
- Do not install near any heat sources such as radiators, heat registers, stoves, or other apparatus (including amplifiers) that produce heat.
- Do not override the safety purpose of the polarized or grounding-type plug. A polarized
plug has two blades - one wider than the other. A grounding plug has two blades and a third grounding prong. The wide blade or the third prong is provided for your safety. If the provided plug does not fit into your outlet, consult electrician for replacement of the obsolete outlet.
-
Protect the power cord from being walked on or pinched particularly at plugs, convenience receptacles, and the point where it exit from the apparatus.
-
Only use attachment/accessories specified by the manufacturer.
-
Use only with a cart, stand, tripod, bracket or.

table specified by the manufacturer, or sold with the apparatus. When a cart is used, use caution when moving the cart/ apparatus combination to avoid injury from tip-over.
-
Unplug this apparatus during lightning storms or when unused for long periods of time.
-
Refer all servicing to qualified service personnel. Servicing is required when the apparatus has been damaged in any way, such as power-supply cord or plug is damaged, liquid has been spilled or objects have fallen into the apparatus, the apparatus has been exposed to rain or moisture, does not operate normally, or has been dropped.
-
Do not expose this equipment to dripping or splashing and ensure that no objects filled with liquids, such as vases, are placed on the equipment.
-
☐ This is CLASS II apparatus with double insulation, and no protective earth provided.
-
Warning: to reduce the risk of electric shock, do not expose this apparatus near moisture.
-
Warning: the battery (battery or batteries or battery pack) shall not be exposed to excessive heat such as sunshine, fire or the lick.
-
The mains plug is used as the disconnect device, the disconnect device shall remain readily operable.
-
Don't put more than 30kg loading on top of this apparatus.
Identifying the Parts
Main Unit: Top View

1 MP3 LINK
Connect to an external audio device.
2 POWER indicator Light
3 STANDBY
Press this button to turn on this product or switch to the Eco Power standby mode.
4 + VOLUME -
Increase or decrease the volume level.
5 FUNCTION
Press this button repeatedly to select a source.
6 MP3 LINK indicator Light
7 AUX IN indicator Light
8 OPTICAL indicator Light
Rear View

1 OPTICAL Terminals
Connect to a digital amplifier.
3 DC
Power supply socket.
2 AUX IN Terminals
Connect to TV or an external audio device.
Smart Remote ControlSubwoofer Bottom View
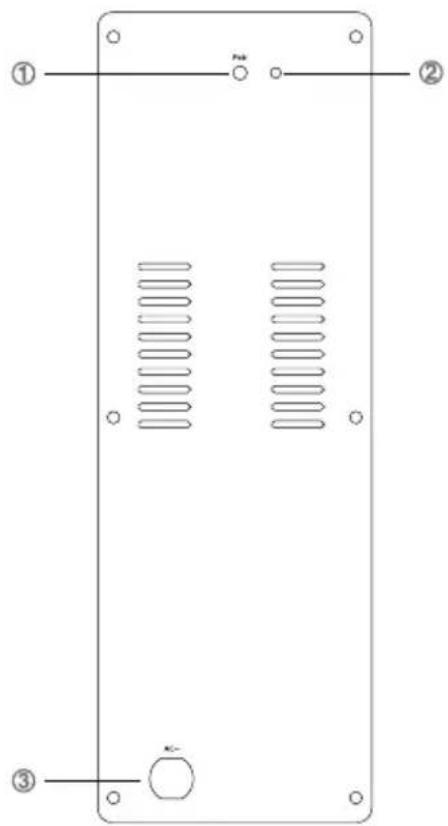
natural_image
Pure technical diagram of a rectangular device with internal spring-like structures and mounting holes, no text or symbols present.1 Pair
Setup wireless connection between main unit and subwoofer manually.
2 Pair indicator Light
3 AC\~ Power Cord
Connect to power.

1 ON/OFF
Turn on or turn off the unit.
2 SOURCE

Select a source.
3 Learning indication light.
4 LEARN
Activate learning mode to setup commands from TV's remote control, in order to control basic TV functions.
5 MUTE
Mute or resume sound of unit.
6 VOL+/VOL-
Increase or decrease volume level.
7 RS-BASS
Boost low end bass.
8 TV(Learning Zone)
You can store some functions of TV in TV (learning zone) on smart remote control.
Connections
Connect Power
Caution:
- Risk of product damage!
- Ensure that the power supply voltage corresponds to the voltage printed on the back or the underside of the unit.
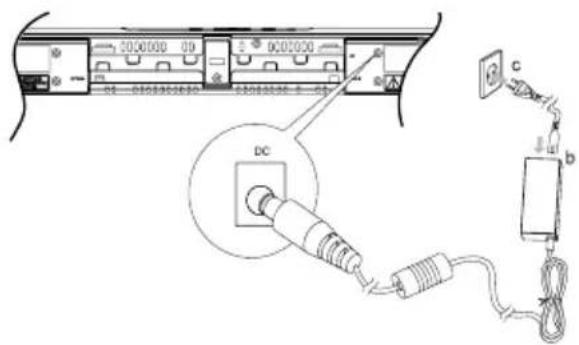
- Connect the power adaptor to the DC socket on the unit and a wall outlet.
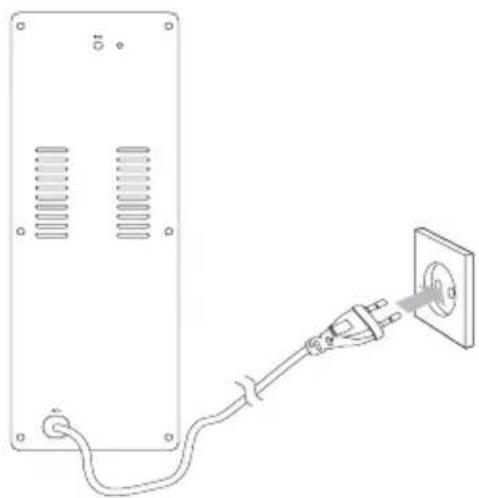
natural_image
Line drawing of a wall-mounted power plug connecting a socket to a wall-mounted socket (no text or symbols)- Connect the power plug of the digital wireless subwoofer to a wall outlet.
Connect to TV or External Audio Device
You can also listen to an external audio device through this unit.

- Using AUX IN socket
Connect audio cables to:
- The AUX IN sockets on this unit.
- The audio output sockets on the TV or external audio device.
- Using OPTICAL socket
Connect a optical cable to:
- The OPTICAL socket
- The digital input socket on the digital recorder
Note: Mute function is invalid in this mode.
Connect to External Audio Device

Connect the audio cable to:
- MP3 LINK socket on the unit. - HEADPHONE socket on an external audio device.
Tip:
You can also use the Smart Remote
Control to adjust Vol+/Vol-.
Basic Operations
Turn On
- Press "Standby" button on main unit or remote control to turn on the main unit.
-
Wait for automatic setup of wireless connection between main unit and sub-woofer.
-
Power indicator flashes
- if the connection succeeds, the power indicator of main unit turns BLUE and the pair indicator of subwoofer turns BLUE too.
- if the connection fails, the power indicator turns PURPLE, and the pair indicator stays RED or PURPLE.
- if the connection fails, set up the connection manually.
Note:
- If a TV or external device is connected to this unit, it will turn on automatically when the TV or external device start working.
- If TV/external device is disconnected with this unit or turned off, main unit will turned off automatically after one minute.
- If the volume of TV/external device is too low, main unit will turned off automatically after one minute also.
Set up wireless connection manually
- In standby mode, press and hold "VOLUME+" button on main unit for 3 seconds.
- Power indicator blinks (RED)
- Press and hold "PAIR" button on subwoofer for 3 seconds
- Pair indicator blinks alternately (BLUE & PURPLE)
- If both indicators flash at a high frequency, then both indicators turns red, the connection succeed.
- If both indicators are keep on blinking, it means connections fails.
Note: if the wireless connection fails again, check if there's a conflict or strong interference (for example, interference from electronic device) around your location, after remove those conflict or strong interference, repeat above procedures.
Adjust Volume Level
During play, press the VOLUME+/- buttons to increase/decrease the volume level.
Super Bass Boost
Press the RS-BASS button to turn on the bass, the indicator flashes for a longer time (abouts 1s-2s). Press this button again to turn off the bass, the indicator flashes for a shorter time (about 0.5s-1s).
Mute Sound
During play, press the MUTE button to mute or restore sound. Press this button again or VOL+/VOL - buttos to cancel the effect.
Program Smart Remote Control to Control TV
You can store a total of 7 most frequently used function of you TV in the TV (learning zone) of smart remote control. This feature allows you to use only one remote control to operate all of your TV.
By default, the remote control codes of a TV are stored in the smart remote control. The available preset buttons are ON/OFF, FUNCTION, ENTER, TV VOL+/VOL-, TV CH+/CH-.
Note: During the learning process, the normal remote control functions are disabled.

- Place the smart remote control (A) within 5mm-50mm distance from TV remote control (B).
- Press and hold LEARN button for 2 seconds to activate the learning mode. A red indicator on the smart remote control (A) lights up.
Specifications
- Press one of the TV (learning zone) buttons on the smart remote control(A), the red indicator flashes.
- Press the button on TV remote control (B) that is to be stored on the smart remote control (A). When the code is received successfully, the red indicator flashes 3 times, then turns red again. If the red indicator flashes but not turn red, code received is not successfully.
- Repeat steps 3-4 to program more buttons on the smart remote control (A).
- Press LEARN to save the learning and then to exit the learning mode.
Troubleshooting
To keep the warranty valid, never try to repair the system yourself. If you encounter problems when using this unit, check the following points before requesting service.
No power
- Ensure that the AC cord of the apparatus is connected properly.
- Ensure that there is power at the AC outlet.
- Press standby button to turn the unit on.
Remote control does not work
- Before you press any function button, first select the correct source.
- Reduce the distance between the remote control and the unit.
- Insert the battery with its polarities (+/-) aligned as indicated.
- Replace the battery.
- Aim the remote control directly at the sensor on the front of the unit.
No Response From the Unit
- Disconnect and reconnect the AC power plug, then turn on the unit again.
No audio output from subwoofer
- Set wireless connection manually.
General
Power Requirements.....AC 230V\~50Hz
Power Consumption....18 W
Output Power....20W x 2 +40W
Total Harmonic Distortion....1% (1kHz, 1W)
Audio Input Sensitivity/Impedance.....500mV/47k Ω
Frequency Response....40Hz–20kHz (±3dB)
Unit Dimensions (W x H x D)
Main Unit....800 x 73.5 x 64 mm
Subwoofer....465 x 94 x 255 mm
Speaker Front
Impedance....60
Rate Power....25 W
Woofer
Impedance....80
Rate Power....50 W
Remote
Distance....6 m
Angle....30

Correct Disposal of this product. This marking indicates that this product should not be disposed with other household wastes throughout the EU. To prevent possible harm to the environment or human health from uncontrolled waste disposal, recycle it responsibly to promote the sustainable reuse of material resources. To return your used device, please use the return and collection systems or contact the retailer where the product was purchased. They can take this product for environmental safe recycling.
No naked flame sources, such as lighted candles, should be placed on the apparatus.
- Important Safety Instructions
- WARNING
- Safety
- Identifying the Parts
- Smart Remote ControlSubwoofer Bottom View
- Connections
- Connect Power
- Caution:
- Connect to TV or External Audio Device
- Connect to External Audio Device
- Tip:
- Basic Operations
- Turn On
- Note:
- Set up wireless connection manually
- Adjust Volume Level
- Super Bass Boost
- Mute Sound
- Program Smart Remote Control to Control TV
- Specifications
- Troubleshooting
- No power
- Remote control does not work
- No Response From the Unit
- No audio output from subwoofer
- General
- Unit Dimensions (W x H x D)
- Speaker Front
- Woofer
- Remote
Brand : VIETA
Model : VH-SB300BK
Category : Hi-Fi System