
HW-Q86R - Soundbar SAMSUNG - Free user manual and instructions
Find the device manual for free HW-Q86R SAMSUNG in PDF.



| Product Type | Soundbar with Wireless Subwoofer |
| Model | HW-Q86R |
| Brand | Samsung |
| Total Power Output | 400W (Soundbar: 200W, Subwoofer: 200W) |
| Channels | 5.1.2 (including up-firing speakers) |
| Dimensions (Main Unit) | 1226 x 83 x 136 mm (W x H x D) |
| Weight (Main Unit) | 7.3 kg |
| Subwoofer Dimensions | 205 x 403 x 403 mm (W x H x D) |
| Subwoofer Weight | 9.8 kg |
| Power Supply | AC 100-240V, 50/60Hz |
| Power Consumption | 40W (Soundbar), 25W (Subwoofer) |
| Standby Power Consumption | < 0.5W |
| Audio Decoding | Dolby Atmos, Dolby Digital Plus, Dolby TrueHD, DTS:X, DTS-HD HRA |
| Connectivity | HDMI (eARC), Optical, Bluetooth 4.2, Wi-Fi, USB |
| Smart Features | Alexa built-in, Samsung SmartThings, Adaptive Sound, Game Mode |
| Remote Control | Included (battery type: AAA) |
| Wall Mountable | Yes (bracket included) |
| Cleaning Instructions | Wipe with soft, dry cloth. Do not use liquids or aerosols. |
| Safety Warnings | Do not expose to rain, moisture, or excessive heat. Ensure proper ventilation. |
| Spare Parts & Repairability | Contact Samsung support or authorized service centers. Refer to user manual for replaceable parts. |
| General Information | Year: 2019. Suitable for TVs 55" and larger. For detailed setup, see user manual. |
Frequently Asked Questions - HW-Q86R SAMSUNG
User questions about HW-Q86R SAMSUNG
0 question about this device. Answer the ones you know or ask your own.
Ask a new question about this device
Download the instructions for your Soundbar in PDF format for free! Find your manual HW-Q86R - SAMSUNG and take your electronic device back in hand. On this page are published all the documents necessary for the use of your device. HW-Q86R by SAMSUNG.
USER MANUAL HW-Q86R SAMSUNG
Thank you for purchasing this Samsung product.
To receive more complete service, please register
your product at www.samsung.com/register
SAFETY INFORMATION
SAFETY WARNINGS
TO REDUCE THE RISK OF ELECTRIC SHOCK, DO NOT REMOVE THE COVER (OR BACK).
NO USER-SERVICEABLE PARTS ARE INSIDE.
REFER SERVICING TO QUALIFIED SERVICE PERSONNEL.
Refer to the table below for an explanation of symbols which may be on your Samsung product.
 | CAUTIONRISK OF ELECTRIC SHOCK.DO NOT OPEN. |  |
 | This symbol indicates that high voltage is present inside. It is dangerous to make any kind of contact with any internal part of this product. | |
 | This symbol indicates that this product has included important literature concerning operation and maintenance. | |
 | Class II product: This symbol indicates that it does not require a safety connection to electrical earth (ground). If this symbol is not present on a product with a power cord, the product MUST have a reliable connection to protective earth (ground). | |
 | AC voltage: This symbol indicates that the rated voltage marked with the symbol is AC voltage. | |
 | DC voltage: This symbol indicates that the rated voltage marked with the symbol is DC voltage. | |
 | Caution, Consult instructions for use: This symbol instructs the user to consult the user manual for further safety related information. | |
CAUTION
WARNING
- To reduce the risk of fire or electric shock, do not expose this appliance to rain or moisture.
CAUTION
- TO PREVENT ELECTRIC SHOCK, MATCH WIDE BLADE OF PLUG TO WIDE SLOT, FULLY INSERT.
- This apparatus shall always be connected to a AC outlet with a protective grounding connection.
- To disconnect the apparatus from the mains, the plug must be pulled out from the mains socket, therefore the mains plug shall be readily operable.
- Do not expose this apparatus to dripping or splashing. Do not put objects filled with liquids, such as vases, on the apparatus.
- To turn this apparatus off completely, you must pull the power plug out of the wall socket. Consequently, the power plug must be easily and readily accessible at all times.
PRECAUTIONS
- Ensure that the AC power supply in your house complies with the power requirements listed on the identification sticker located on the bottom of your product. Install your product horizontally, on a suitable base (furniture), with enough space around it for ventilation (7-10 cm). Make sure the ventilation slots are not covered. Do not place the unit on amplifiers or other equipment which may become hot. This unit is designed for continuous use. To fully turn off the unit, disconnect the AC plug from the wall outlet. Unplug the unit if you intend to leave it unused for a long period of time.
- During thunderstorms, disconnect the AC plug from the wall outlet. Voltage peaks due to lightning could damage the unit.
- Do not expose the unit to direct sunlight or other heat sources. This could lead to overheating and cause the unit to malfunction.
- Protect the product from moisture (i.e. vases), and excess heat (e.g. a fireplace) or equipment creating strong magnetic or electric fields. Unplug the power cable from the AC wall socket if the unit malfunctions. Your product is not intended for industrial use. It is for personal use only. Condensation may occur if your product has been stored in cold temperatures. If transporting the unit during the winter, wait approximately 2 hours until the unit has reached room temperature before using.
- The battery used with this product contains chemicals that are harmful to the environment. Do not dispose of the battery in the general household trash. Do not expose the battery to excess heat, direct sunlight, or fire. Do not short circuit, disassemble, or overheat the battery. Danger of explosion if the battery is replaced incorrectly. Replace only with the same or equivalent type.
ABOUT THIS MANUAL
The user manual has two parts: this simple paper USER MANUAL and a detailed FULL MANUAL you can download.

USER MANUAL
See this manual for safety instructions, product installation, components, connections, and product specifications.


FULL MANUAL
You can access the FULL MANUAL on Samsung's on-line customer support centre by scanning the QR code. To see the manual on your PC or mobile device, download the manual in document format from Samsung's website. (http://www.samsung.com/support)
Design, specifications, and App screen are subject to change without prior notice.
CONTENTS
01 Checking the Components 2
Inserting Batteries before using the Remote Control (AA batteries X 2) ____ 2
02 Product Overview 3
Front Panel / Top Panel of the Soundbar 3
Bottom Panel of the Soundbar ____ 4
03 Connecting the Soundbar 5
Connecting Electrical Power ____ 5
Connecting the Soundbar to the Subwoofer 6
- Automatic connection between the Subwoofer and the Soundbar 6
- Manually connecting the Subwoofer if automatic connection fails ____ 7
Connecting an SWA-9000S (Sold Separately) to your Soundbar 8
04 Connecting to your TV 10
Method 1. Connecting with a Cable ____ 10
- Connecting a TV using an HDMI Cable 10
- Connecting using an Optical Cable 11
Method 2. Connecting Wirelessly ____ 12
- Connecting a TV via Bluetooth 12
- Connecting via Wi-Fi 14
05 Connecting an External Device 16
Connecting using an HDMI Cable (Capable of Dolby Atmos decoding and playback) 16
Connecting using an HDMI Cable 17
Connecting using an Optical Cable 18
06 Connecting a Mobile Device 19
Connecting via Bluetooth 19
Connecting via Wi-Fi (Wireless Network) 22
07 Connecting an Amazon product 24
Connect and use with an Amazon product (Amazon Echo) 24
Use voice commands to control the Soundbar 26
08 Using the Remote Control 27
How to Use the Remote Control 27
Adjusting the Soundbar volume with a TV remote control 30
Using the Hidden Buttons (Buttons with more than one function) 31
Output specifications for the different sound effect modes 31
09 Installing the Wall Mount 32
Installation Precautions 32
Wallmount Components 32
10 Installing the Soundbar above a TV Stand 34
Component 34
11 Software Update 35
12 Troubleshooting 36
13 Licence 37
14 Open Source Licence Notice 38
15 Important Notes About Service 38
16 Specifications and Guide 39
Specifications 39
01 CHECKING THE COMPONENTS

Soundbar Main Unit Remote Control / Batteries Subwoofer
Power Cord (Subwoofer)

Power Cord (Main Unit)

HDMI Cable Bracket-Wall Mount

Wall Mount Guide Holder-Screw Screw Rubber-Foot
- For more information about the power supply and power consumption, refer to the label attached to the product. (Label: Bottom of the Soundbar Main Unit)
- The power components are labelled (1, 2). For more information about power connections, see page 5.
- To purchase additional components or optional cables, contact a Samsung Service Centre or Samsung Customer Care.
- The appearance of the accessories may differ slightly from the illustrations above.
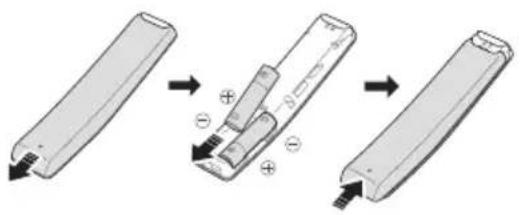
Inserting Batteries before using the Remote Control (AA batteries X 2)
Slide the battery cover in the direction of the arrow until it is completely removed. Insert 2 AA batteries (1.5V) oriented so that their polarity is correct. Slide the battery cover back into position.
02 PRODUCT OVERVIEW
Front Panel / Top Panel of the Soundbar
| 1 | (Power) ButtonTurns the power on and off.Auto Power Down FunctionThe unit turns off automatically in the following situations:– In D.IN / HDMI 1 / HDMI 2 / WIFI / BT mode if there is no audio signal for 18 minutes. | |
| 2 | (Source) ButtonSelects the source input mode. | |
| Input mode Display | ||
| Optical Digital input D.IN | ||
| ARC (HDMI OUT) input | D.IN → TV ARC (Auto conversion) | |
| HDMI input HDMI 1 / HDMI 2 | ||
| Wi-Fi mode WIFI | ||
| BLUETOOTH mode | BT | |
| 3 | -/+ (Volume) ButtonAdjusts the volume.When adjusted, the volume level appears on the Soundbar's front display. | |
| 4 | DisplayDisplays the product's status and current mode. | |
- When you plug in the AC cord, the power button will begin working in 4 to 6 seconds.
- When you turn on this unit, there will be a 4 to 5 second delay before it produces sound.
- If you want to enjoy sound only from the Soundbar, you must turn off the TV's speakers in the Audio Setup menu of your TV. Refer to the owner's manual supplied with your TV.
Bottom Panel of the Soundbar
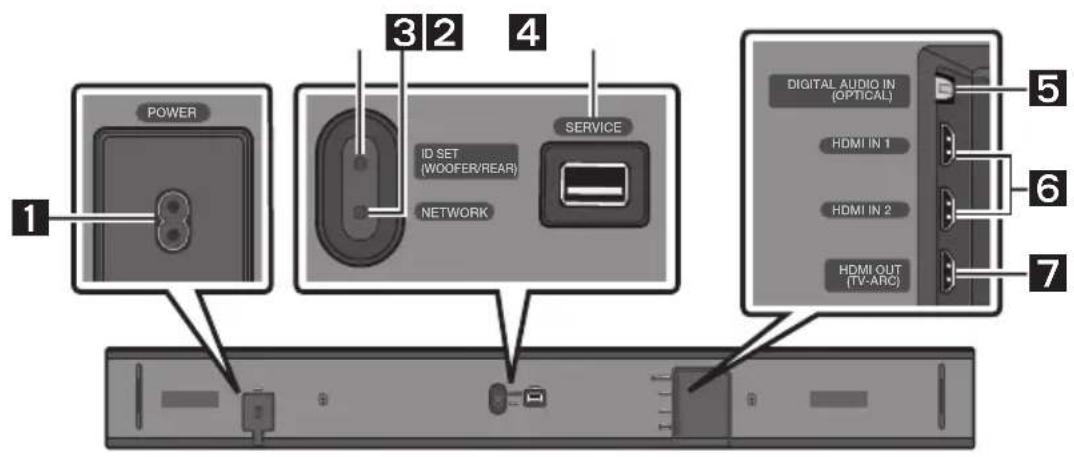
| 1 | POWERConnect the Soundbar's AC power cord. |
| 2 | ID SET (WOOFER/REAR)Press to connect the Soundbar to surround speakers and a subwoofer wirelessly.• Press and hold theUpbutton on the remote for 5 seconds to complete ID SET. |
| 3 | NETWORKPress to connect to a wireless network (Wi-Fi) via theSmartThingsapp. |
| 4 | SERVICEConnect a USB storage device to upgrade the product's software. |
| 5 | DIGITAL AUDIO IN (OPTICAL)Connect to the digital (optical) output of an external device. |
| 6 | HDMI IN 1 / HDMI IN 2Inputs digital video and audio signals simultaneously using an HDMI cable.Connect to the HDMI output of an external device. |
| 7 | HDMI OUT (TV-ARC)Connect to the HDMI (ARC) jack on a TV. |
- When disconnecting the power cord from a wall outlet, pull the plug. Do not pull the cable.
- Do not connect this unit or other components to an AC outlet until all connections between components are complete.
03 CONNECTING THE SOUNDBAR
Connecting Electrical Power
Use the power components (1, 2) to connect the Subwoofer and Soundbar to an electrical outlet in the following order:
1. Connect the power cord to the Subwoofer. 2. Connect the power cord to the Soundbar.
See the illustrations below.
- For more information about the required electrical power and power consumption, refer to the label attached to the product. (Label: Bottom of the Soundbar Main Unit)
![graph TD A["Power Cord"] --> B["Rear of Subwoofer"] B --> C["Connecting Electrical Power"] C --> D["Bottom of the Soundbar Main Unit"] D --> E["Power Cord"] E --> F["Connecting Electrical Power"]](/content/2026/06/1340748/images/439d202de8e03f9176923a1504925a2ba2fd7cf54f68bc0bb9df87bd56a8f2fc.jpg)
Connecting the Soundbar to the Subwoofer
When the subwoofer is connected, you can enjoy rich bass sound.
Automatic connection between the Subwoofer and the Soundbar
When you turn the power on after connecting the power cables to the Soundbar and subwoofer, the subwoofer is automatically connected to the Soundbar.
- When auto pairing is complete, the blue indicators at the rear of the subwoofer turn on.
LED Indicator Lights on the Rear of Subwoofer
| LED Status Description Resolution | |||
| Blue | On | Successfully connected (normal operation) | - |
| Blinking Re | recovering the connection | Check if the power cable attached to the main Soundbar unit is connected properly or wait about 5 minutes. If blinking persists, try manually connecting the subwoofer. See page 7. | |
| Red On | Standby (with the Soundbar main unit turned off) | Check if the power cable attached to the main Soundbar unit is connected properly. | |
| Connection failed | Connect again. See the instructions for manual connection on page 7. | ||
| Red and blue | Blinking Malfunction | See the contact information for the Samsung Service Centre in this manual. | |
Manually connecting the Subwoofer if automatic connection fails
Before performing the manual connection procedure below:
- Check whether the power cables for the Soundbar and subwoofer are connected properly.
- Make sure that the Soundbar is turned on.
- Press and hold ID SET on the rear of the subwoofer for at least 5 seconds.
The red indicator on the rear of the subwoofer turns off and the blue indicator blinks.

Rear of Subwoofer
- Press and hold the Up button on the remote control for at least 5 seconds.
- The ID SET message appears on the display of the Soundbar for a moment, and then it disappears.
- The Soundbar will automatically power on when ID SET is complete.

- Check if the LINK LED is solid blue (connection complete).

The LINK LED indicator stops blinking and glows a solid blue when a connection is established between the Soundbar and the Wireless Subwoofer.
NOTES
- Do not connect the power cord of this product or your TV to a wall outlet until all connections between components are complete.
- Before moving or installing this product, be sure to turn off the power and disconnect the power cord.
- If the main unit is powered off, the wireless subwoofer will go into stand-by mode and the STANDBY LED on the rear of the subwoofer will turn red after blinking in blue several times.
- If you use a device that uses the same frequency (5.8GHz) as the Soundbar near the Soundbar, interference may cause some sound interruption.
- The maximum transmission distance of the main unit's wireless signal is about 10 meters, but may vary depending on your operating environment. If a steel-concrete or metallic wall is between the main unit and the wireless subwoofer, the system may not operate at all because the wireless signal cannot penetrate metal.
PRECAUTIONS
- Wireless receiving antennas are built into the wireless subwoofer. Keep the unit away from water and moisture.
- For optimal listening performance, make sure that the area around the wireless subwoofer and the Wireless Receiver Module (sold separately) is clear of any obstructions.
Connecting an SWA-9000S (Sold Separately) to your Soundbar
Expand to true wireless surround sound by connecting the Samsung Wireless Rear Speaker Kit (SWA-9000S, sold separately) to your Soundbar.
- Connect the Wireless Receiver Module to 2 Surround Speakers.
- The speaker cables are colour coded.

- Check the standby status of the Wireless Receiver Module after plugging it into an electrical outlet.
- The LINK LED indicator (blue LED) on the Wireless Receiver Module blinks. If the LED does not blink, press the ID SET button on the back of the Wireless Receiver Module with a pen tip for 5~6 seconds until the LINK LED indicator blinks (in Blue). For more about the LED, please refer to the SWA-9000S user manual.
![graph LR A["Power"] --> B["IO"] B --> C["ID SET"] C --> D["Blue blinking"] style A fill:#f9f,stroke:#333 style D fill:#bbf,stroke:#333](/content/2026/06/1340748/images/b2ef919f1daa9b0d8824a9d5096d5f505725246aa067374321c549caa44bff99.jpg)
- Press and hold the Up button on the remote control for at least 5 seconds.
- The IDSET message appears on the display of the Soundbar for a moment, and then it disappears.
- The Soundbar will automatically power on when ID SET is complete.


CAUTION
- If your Soundbar was playing music when it connects to the SWA-9000S, you may hear some stuttering from the woofer as the connection finalises.
- Check if the LINK LED is solid blue (connection complete).

The LINK LED indicator stops blinking and glows a solid blue when a connection is established between the Soundbar and the Wireless Receiver Module.
- If the SWA-9000S is not connected, repeat the procedure from Step 2.
04 CONNECTING TO YOUR TV
Hear TV sound from your Soundbar through wired or wireless connections.
- When the Soundbar is connected to selected Samsung TVs, the Soundbar can be controlled using the TV's remote control.
- This feature is available on 2017 and later Samsung Smart TVs that support Bluetooth when the Soundbar is connected to the TV using an optical cable.
- This function also allows you to use the TV menu to adjust the sound field and various settings as well as the volume and mute.
Method 1. Connecting with a Cable
When the audio in a broadcast is encoded in Dolby Digital and the “Digital Output Audio Format” on your TV is set to PCM, we recommend that you change the setting to Dolby Digital. When the setting on the TV is changed, you will experience better sound quality. (The TV menu may use different words for Dolby Digital and PCM depending on the TV manufacturer.)
Connecting a TV using an HDMI Cable![graph LR A["TV"] --> B["HDMI IN (ARC)"] B --> C["HDMI Cable"] C --> D["Bottom of the Soundbar"] D --> E["HDMI OUT (TV-ARC)"] E --> F["Top of the Soundbar"] F --> G["TV ARC"] style A fill:#f9f,stroke:#333 style B fill:#ccf,stroke:#333 style C fill:#cfc,stroke:#333 style D fill:#fcc,stroke:#333 style…](/content/2026/06/1340748/images/d39ab5c5cbec2b1c1cbdd373223c697ab5f3ee1a8e7ca7ab9910f22c86617825.jpg)
- With the Soundbar and TV turned on, connect the HDMI cable as shown in the figure.
- "TV ARC" appears in the display window of the Soundbar main unit and the Soundbar plays TV sound.
- If TV sound is inaudible, press the → (Source) button on the remote control or on the top of the Soundbar to switch to "D.IN" mode. The screen displays "D.IN" and "TV ARC" in sequence, and TV sound is played.
- If "TV ARC" does not appear in the display window of the Soundbar main unit, confirm that the HDMI cable is connected to the correct port.
- Use the volume buttons on the TV's remote control to change the volume on the Soundbar.
NOTES
- HDMI is an interface that enables the digital transmission of video and audio data with just a single connector.
- If the TV provides an ARC port, connect the HDMI cable to the HDMI IN (ARC) port.
- We recommend you use a coreless HDMI cable if possible. If you use a cored HDMI cable, use one whose diameter is less than 14 mm.
- Anynet+ must be turned on.
- This function is not available if the HDMI cable does not support ARC.
Connecting using an Optical Cable
![graph LR A["TV"] --> B["OPTICAL OUT"] B --> C["1"] C --> D["Bottom of the Soundbar"] D --> E["D.IN"] F["Top of the Soundbar"] --> G["2"] G --> H["Digital Audio IN (OPTICAL)"]](/content/2026/06/1340748/images/ed94a6542bccf11a9f45dbe79673afb0f801cdf37071cf7e6bf33bbbcd1c79c9.jpg)
- Connect the DIGITAL AUDIO IN (OPTICAL) jack on the Soundbar to the OPTICAL OUT jack of the TV with a digital optical cable (not supplied).
- Press the → (Source) button on the top panel or on the remote control, and then select the "D.IN" mode.
Auto Power Link
Auto Power Link automatically turns on the Soundbar when the TV is turned on.
- Connect the Soundbar and a TV with a digital optical cable (not supplied).
- Press the Left button on the remote control for 5 seconds to turn Auto Power Link on or off.
• Auto Power Link is set to ON by default.
(To turn off this function, press the Left button on the remote for 5 seconds.)
- Depending on the connected device, Auto Power Link may not function.
- This function is only available in the "D.IN" mode.

Method 2. Connecting Wirelessly
Connecting a TV via Bluetooth
When a TV is connected using Bluetooth, you can hear stereo sound without the hassle of cabling.
- Only one TV can be connected at a time.
![graph LR A["TV"] -->|Wireless Signal| B["Top of the Soundbar"] B --> C["OR"]](/content/2026/06/1340748/images/86336ddc104b656542d209e9c4d75355d406741619577ff387b604cb9448cfec.jpg)
The initial connection
- Press the ✝ PAIR button on the remote control to enter the "BT PAIRING" mode.
(OR) a. Press the → (Source) button on the top panel and then select "BT".
"BT" changes to "BT READY" in a few seconds automatically if there is no Bluetooth device connected to the Soundbar.
b. When "BT READY" appears, press and hold the → (Source) button on the top panel of the Soundbar for more than 5 seconds to display "BT PAIRING".
- Select Bluetooth mode on the TV. (For more information, see the TV's manual.)
- Select "[AV] Samsung Soundbar Q80R" from the list on TV's screen.
An available Soundbar is indicated with "Need Pairing" or "Paired" on the TV's Bluetooth device list. To connect the TV to the Soundbar, select the message, and then establish a connection.
- When the TV is connected, [TV Name] → "BT" appears on the Soundbar's front display.
- You can now hear TV sound from the Soundbar.
If the device fails to connect
- If a previously connected Soundbar (e.g. "[AV] Samsung Soundbar Q80R") appears in the list, delete it.
- Then repeat steps 1 through 3.
NOTE
- After you have connected the Soundbar to your TV the first time, use the "BT READY" mode to reconnect.
Disconnecting the Soundbar from the TV
Press the → (Source) button on the top panel or on the remote control and switch to any mode but "BT".
- Disconnecting takes time because the TV must receive a response from the Soundbar. (The time required may differ, depending on the TV model.)
- To cancel the automatic Bluetooth connection between the Soundbar and TV, press the ▶II (Play/Pause) button on the remote control for 5 seconds with the Soundbar in "BT READY" status. (Toggle On → Off)
What is the difference between BT READY and BT PAIRING?
- BT READY : In this mode, you can search for previously connected TVs or connect a previously connected mobile device to the Soundbar.
- BT PAIRING : In this mode, you can connect a new device to the Soundbar. (Press the ✗ PAIR button on the remote control or press and hold the → (Source) button on the top of the Soundbar for more than 5 seconds while the Soundbar is in "BT" mode.)
NOTES
- If asked for a PIN code when connecting a Bluetooth device, enter <0000>.
- In Bluetooth connection mode, the Bluetooth connection will be lost if the distance between the Soundbar and the Bluetooth device exceeds 10 meters.
- The Soundbar automatically turns off after 18 minutes in the Ready state.
- The Soundbar may not perform Bluetooth search or connection correctly under the following circumstances:
- If there is a strong electrical field around the Soundbar.
- If several Bluetooth devices are simultaneously paired with the Soundbar.
- If the Bluetooth device is turned off, not in place, or malfunctions.
- Electronic devices may cause radio interference. Devices that generate electromagnetic waves must be kept away from the Soundbar main unit - e.g., microwaves, wireless LAN devices, etc.
Connecting via Wi-Fi
Pre-connection Checklist
- Confirm that your Samsung Smart TV was released after 2013. This function is compatible only with Samsung Smart TVs released after 2013.
- Make sure your Wireless router (Wi-Fi) is ready and working.
- Make sure that the TV is connected to the Wireless router (your Wi-Fi network).

Step 1: Connecting the Soundbar to Wi-Fi
- Press the → (Source) button on the top of the Soundbar or on the remote control to select "WIFI" mode.
- When using selected Samsung TVs (2016 ~ 2018 Samsung Smart TVs that support Bluetooth.) - If you select "WIFI" mode when the TV is turned on, the TV screen displays a pop-up window providing instructions on how to automatically connect the Soundbar to a wireless router (Wi-Fi). Refer to the instructions in the pop-up window of the TV.

- Connect your mobile device (smartphone, tablet, etc.) to the Wi-Fi network the TV is connected to.
- Install and launch the SmartThings app on your mobile device (smartphone, tablet, etc.).
![graph LR A["手机下载"] --> B["GET IT ON Google Play"] B --> C["iOS Android"] C --> D["Download on the App Store"] D --> E["SmartThings app"]](/content/2026/06/1340748/images/9a0cca2f54c69e7e440953e481de2e13c39b3186d4ce57e23f438a9aa1adbc6b.jpg)
- Follow the instructions in the app screen on the mobile device to connect the Soundbar to your Wi-Fi network.
Step 2: Configuring Settings on the TV
- If the TV disconnects from your wireless network after you change the input source to the Soundbar, use the TV menu to connect the TV to the network again.
For TVs released in 2019
Home (☐) → Settings (☐) → Sound → Sound Output → [AV] Samsung Soundbar Q80R (Wi-Fi)
For TVs released in 2018
Home (☐) → Settings (☐) → Sound → Sound Output → [AV] Samsung Soundbar Q80R (Wi-Fi)
For TVs released in 2017
Home (☐) → Settings (☐) → Sound → Sound Output → [AV] Samsung Soundbar Q80R (Wi-Fi)
For TVs released in 2016
Home (☐) → Settings (☒) → Sound → Select Speaker → [AV] Samsung Soundbar Q80R (Wi-Fi)
For TVs released in 2015
Menu → Sound → Speaker List
For TVs released in 2014
Menu → Sound → Speaker Settings → Multiroom Link - Settings
NOTES
- The TV and Soundbar must be connected to the same wireless network (Wi-Fi).
- If your wireless router (Wi-Fi) uses a DFS channel, you will not be able to establish a Wi-Fi connection between the TV and Soundbar. Contact your Internet service provider for details.
- If the 5GHz Wi-Fi connection is not smooth, use the 2.4GHz bandwidth.
- Because the menus may differ depending on the year of manufacture, refer to your TV manual.
05 CONNECTING AN EXTERNAL DEVICE
Connect to an external device via a wired or wireless network to play the external device's sound through the Soundbar.
Connecting using an HDMI Cable (Capable of Dolby Atmos decoding and playback)
- When you use Dolby Atmos®: If the input source is Dolby Atmos®, 5.1.2 channels are outputted. When Dolby Atmos® is active, the Soundbar's sound effect modes controlled by the SOUND MODE button are not available.
- Important: This product supports Dolby Atmos® only in HDMI mode.
![graph TD A["External Device"] --> B["HDMI OUT"] B --> C["HDMI Cable 1"] C --> D["Bottom of the Soundbar"] E["TV"] --> F["HDMI IN (ARC)"] F --> G["HDMI Cable 2"] G --> H["HDMI OUT (TV-ARC)"] I["Top of the Soundbar"] --> J["HDMI 1 OR HDMI 2"] K["Bottom of the Soundbar"] --> L["HDMI IN 1"] M["Bottom of…](/content/2026/06/1340748/images/e10dc555fd42ad3c9202612d1b721e42cd4313bd889a8057270be644d4f983de.jpg)
- Connect an HDMI cable from the HDMI IN 1 or HDMI IN 2 jack on the bottom of the Soundbar to the HDMI OUT jack on your digital device.
- Connect an HDMI cable from the HDMI OUT (TV-ARC) jack on the bottom of the Soundbar to the HDMI IN jack on your TV.
- Press the (Source) button on the top panel or on the remote control, and then select "HDMI1" or "HDMI2".
- "HDMI1" or "HDMI2" mode is displayed on the Soundbar display panel and sound plays.
NOTE
- When Dolby Atmos® is activated, "DOLBY ATMOS" appears in the front display.
Configuring Dolby Atmos® on your BD player or other device.
- Open the audio output options on the settings menu of your BD player or other device and make sure that "No Encoding" is selected for Bitstream. For example, on a Samsung BD Player, go to Home Menu → Sound → Digital Output and then select Bitstream (unprocessed).
- If the Audio Output options include Secondary Audio, make sure Secondary Audio is set to Off.
- Make sure that the content supports Dolby Atmos®.
Connecting using an HDMI Cable
![graph TD A["External Device"] --> B["HDMI OUT"] B --> C["HDMI Cable 1"] C --> D["OR"] D --> E["HDMI IN 1"] D --> F["HDMI IN 2"] G["TV"] --> H["HDMI IN (ARC)"] H --> I["HDMI Cable 2"] I --> J["HDMI OUT (TV-ARC)"] K["Top of the Soundbar"] --> L["HDMI 1 OR HDMI 2"] M["Bottom of the Soundbar"] --> N["HD…](/content/2026/06/1340748/images/724cd470ea0354317070026d24ea6c2ca53529c68ea22842aa1ee05923a6a3a8.jpg)
- Connect an HDMI cable from the HDMI IN 1 or HDMI IN 2 jack on the bottom of the Soundbar to the HDMI OUT jack on your digital device.
- Connect an HDMI cable from the HDMI OUT (TV-ARC) jack on the bottom of the Soundbar to the HDMI IN jack on your TV.
- Press the → (Source) button on the top panel or on the remote control, and then select "HDMI1" or "HDMI2".
- "HDMI1" or "HDMI2" mode is displayed on the Soundbar display panel and sound plays.
Connecting using an Optical Cable
![graph TD A["Game console"] --> B["Top of the Soundbar"] B --> C["D.IN"] D["Optical OUT"] --> E["Optical Cable (not supplied)"] E --> F["Digital Audio IN (OPTICAL)"] F --> G["Bottom of the Soundbar"]](/content/2026/06/1340748/images/bbf9a3944842aece83ccb2e491785f4c353704779916c61af9a665b9dba0a72a.jpg)
- Connect DIGITAL AUDIO IN (OPTICAL) on the main unit to the OPTICAL OUT jack of the Source Device using a digital optical cable (not supplied).
- Select "D.IN" mode by pressing the → (Source) button on the top panel or on the remote control.
06 CONNECTING A MOBILE DEVICE
Connecting via Bluetooth
When a mobile device is connected using Bluetooth, you can hear stereo sound without the hassle of cabling.
- You cannot connect more than one Bluetooth device at a time.
![graph LR A["Bluetooth device"] --> B["Top of the Soundbar"] B --> C["Right-hand Interface"]](/content/2026/06/1340748/images/6608c7fb10e146548c9d20ad7ebb4eed42b3e09541e1365ad0823a315a054dca.jpg)
The initial connection
- Press the ✗PAIR button on the remote control to enter the "BT PAIRING" mode.
(OR) a. Press the → (Source) button on the top panel and then select "BT". "BT" changes to "BT READY" in a few seconds automatically if there is no Bluetooth device connected to the Soundbar. b. When "BT READY" appears, press and hold the → (Source) button on the top panel of the Soundbar for more than 5 seconds to display "BT PAIRING".
- On your device, select "[AV] Samsung Soundbar Q80R" from the list that appears.
- When the Soundbar is connected to the Bluetooth device, [Bluetooth Device Name] → "BT" appears in the front display.
- Play music files from the device connected via Bluetooth through the Soundbar.
If the device fails to connect
- If a previously connected Soundbar (e.g. “[AV] Samsung Soundbar Q80R”) appears in the list, delete it.
- Then repeat steps 1 and 2.
NOTE
- After you have connected the Soundbar to your mobile device the first time, use the "BT READY" mode to reconnect.
What is the difference between BT READY and BT PAIRING?
- BT READY: In this mode, you can search for previously connected TVs or connect a previously connected mobile device to the Soundbar.
- BT PAIRING: In this mode, you can connect a new device to the Soundbar. (Press the PAIR button on the remote control or press and hold the (Source) button on the top of the Soundbar for more than 5 seconds while the Soundbar is in "BT" mode.)
NOTES
- If asked for a PIN code when connecting a Bluetooth device, enter <0000>.
- In Bluetooth connection mode, the Bluetooth connection will be lost if the distance between the Soundbar and the Bluetooth device exceeds 10 meters.
- The Soundbar automatically turns off after 18 minutes in the Ready state.
- The Soundbar may not perform Bluetooth search or connection correctly under the following circumstances:
- If there is a strong electrical field around the Soundbar.
- If several Bluetooth devices are simultaneously paired with the Soundbar.
- If the Bluetooth device is turned off, not in place, or malfunctions.
- Electronic devices may cause radio interference. Devices that generate electromagnetic waves must be kept away from the Soundbar main unit - e.g., microwaves, wireless LAN devices, etc. • The Soundbar supports SBC data (44.1kHz, 48kHz).
- Connect only to a Bluetooth device that supports the A2DP (AV) function.
- You cannot connect the Soundbar to a Bluetooth device that supports only the HF (Hands Free) function.
- Once you have paired the Soundbar to a Bluetooth device, selecting “[AV] Samsung Soundbar Q80R” from the device’s scanned devices list will automatically change the Soundbar to “BT” mode.
- Available only if the Soundbar is listed among the Bluetooth device's paired devices.
(The Bluetooth device and the Soundbar must have been previously paired at least once.)
- The Soundbar will appear in the Bluetooth device's searched devices list only when the Soundbar is displaying "BT READY".
- The Soundbar cannot be paired to another Bluetooth device if already in Bluetooth mode and paired to a Bluetooth device.
Disconnecting the Bluetooth device from a Soundbar
You can disconnect a Bluetooth device from the Soundbar. For instructions, see the Bluetooth device's user manual.
• The Soundbar will be disconnected. - When the Soundbar is disconnected from the Bluetooth device, the Soundbar will display "BT DISCONNECTED" on the front display.
Disconnecting the Soundbar from the Bluetooth device
Press the → (Source) button on the top panel or on the remote control, and then change to any mode except "BT".
- Disconnecting takes time because the Bluetooth device must receive a response from the Soundbar. (Disconnection time may differ, depending on the Bluetooth device)
- When the Soundbar is disconnected from the Bluetooth device, the Soundbar will display "BT DISCONNECTED" on the front display.
NOTES
- In Bluetooth connection mode, the Bluetooth connection will be lost if the distance between the Soundbar and the Bluetooth device exceeds 10 meters.
- The Soundbar automatically turns off after 18 minutes in the Ready state.
More About Bluetooth
Bluetooth is a technology that enables Bluetooth-compliant devices to interconnect easily with each other using a short wireless connection.
- A Bluetooth device may cause noise or malfunction, depending on usage, if:
- A part of your body is in contact with the receiving/transmitting system of the Bluetooth device or the Soundbar. – It is subject to electrical variation from obstructions caused by a wall, corner, or office partition.
- It is exposed to electrical interference from same frequency-band devices including medical equipment, microwave ovens, and wireless LANs.
- Pair the Soundbar with the Bluetooth device while they are close together.
- The further the distance between the Soundbar and Bluetooth device, the worse the quality is. If the distance exceeds the Bluetooth operational range, the connection is lost.
- In poor reception areas, the Bluetooth connection may not work properly.
- The Bluetooth connection only works when it is close to the unit. The connection will be automatically cut off if the Bluetooth device is out of range. Even within range, the sound quality may be degraded by obstacles such as walls or doors.
- This wireless device may cause electric interference during its operation.
Connecting via Wi-Fi (Wireless Network)
- Connect a single Soundbar to Wi-Fi to access a variety of music streaming services and Internet radio. Connect multiple Soundbars to Wi-Fi to use grouped playback or the stereo sound mode.
- To connect a Soundbar to a mobile device via a wireless network (Wi-Fi), the SmartThings app is required.


The initial connection
- Press the → (Source) button on the top of the Soundbar or on the remote control to select "WIFI" mode.

- Install and launch the SmartThings app on your mobile device (e.g. smartphone or tablet).
![graph LR A["手机"] --> B["GET IT ON Google Play"] B --> C["iOSAndroid"] C --> D["Download on the App Store"] D --> E["SmartThings app"]](/content/2026/06/1340748/images/09c9726756adb945886ed011a8a0c98472eab10adace87b8217d5e0bf46750a2.jpg)
- Launch the app, and then follow the instructions on the screen to register (add) your Soundbar in the app.
- The automatic pop-up (the third illustration below) may not be available on some mobile devices.
If this is the case, select and complete "Add device" from the app menu. Your Soundbar is now added to the app.
![graph LR A["Connect"] --> B["Add device"] B --> C{Start building your connected world by asking TV4, appliances, and other devices.} C --> D["SUPPORTED DEVICES"] D --> E["Now to use Developer startup features"] E --> F["Connect"] F --> G["[AV"] SAMSUNG SOUNDBAR] G --> H["A new device has been found.…](/content/2026/06/1340748/images/538799b7fef2ae257557c7916bf83d7526bf52606686c2e9488e4c79f735a963.jpg)
Launch App Add speakers Auto pop-up
NOTE
- To connect an additional SWA-9000S wireless rear speaker kit (not supplied), disconnect the Samsung wireless speakers from the Soundbar to disable the surround sound system. (If you connect the surround speakers without disconnecting the SWA-9000S speakers, sound is played via both the Samsung wireless speaker and the Surround speaker.)
07 CONNECTING AN AMAZON PRODUCT
• This feature may not be available in some countries. - This service is provided by Amazon and can be terminated at any time. Samsung does not assume responsibility for service availability. - Amazon Alexa app screen is subject to change without prior notice.
Connect and use with an Amazon product (Amazon Echo)
Use an Amazon Echo product to control your Soundbar and enjoy music services provided by Amazon Echo.
NOTE
- Confirm that the Soundbar is connected to Wi-Fi. (Refer to "Connecting via Wi-Fi (Wireless Network)")
- In the SmartThings app, change your Soundbar's name to one that can be recognized by your Amazon device.
(Example: Samsung, Soundbar, Living Room, Family Room, Bedroom, Office, etc.)

CAUTION
- Amazon devices may not recognize names that contain elements such as special characters.
![graph LR A["Input Image"] --> B["Add Scene"] B --> C["Select Speakers"] C --> D["Change Name"] D --> E["Save Select Edit"]](/content/2026/06/1340748/images/11097881dbaa0b4b7ea34c484c1dba5a12a5c4b560fec3f0133498da1d335f13.jpg)
- In the Alexa app, search "Samsung Wireless Audio" in Skills, and then select "ENABLE".
- Skip this step if you have Skills set up already.
![graph LR A["Amazon Alexa app"] --> B["Select Skills"] B --> C["Search"] C --> D["Enable"]](/content/2026/06/1340748/images/c299ca1edf52ccf7861e24f75ec394993b3f426988ea920079c8c5b9226045c7.jpg)
Use voice commands to control the Soundbar
- The Amazon Echo service you can use with your Soundbar is limited to music. Other services provided by Amazon Echo, such as news and weather, can only be accessed through your Amazon Echo product.

Trigger + Command + Speaker name
Use the Speaker name you changed in the SmartThings app. (Refer to "Connect and use with an Amazon product (Amazon Echo)")
| Action Voice Command | |
| To search an audio device added to theSmartThings account connected to theAmazon Alexa account | "Alexa Discover devices" |
* To use voice commands for the Soundbar named "Living room"
| Action Voice Command | |
| To set the volume level to 5 | "Alexa Set the volume to 5 on Living room" |
| To increase the volume level | "Alexa Volume up on Living room" |
| To mute the sound "Alexa Mute on Living room" | |
| To listen to a radio station named KISS FM | "Alexa Play Kiss FM on Living room" |
| To play the next song | "Alexa Next song on Living room" |
| To stop the audio | "Alexa Stop on Living room" |
| To turn the audio on "Alexa Turn on Living room" | |
| To turn the audio off "Alexa Turn off Living room" | |
| To change the input source | "Alexa Switch to Bluetooth on Living room" |
08 USING THE REMOTE CONTROL
How to Use the Remote Control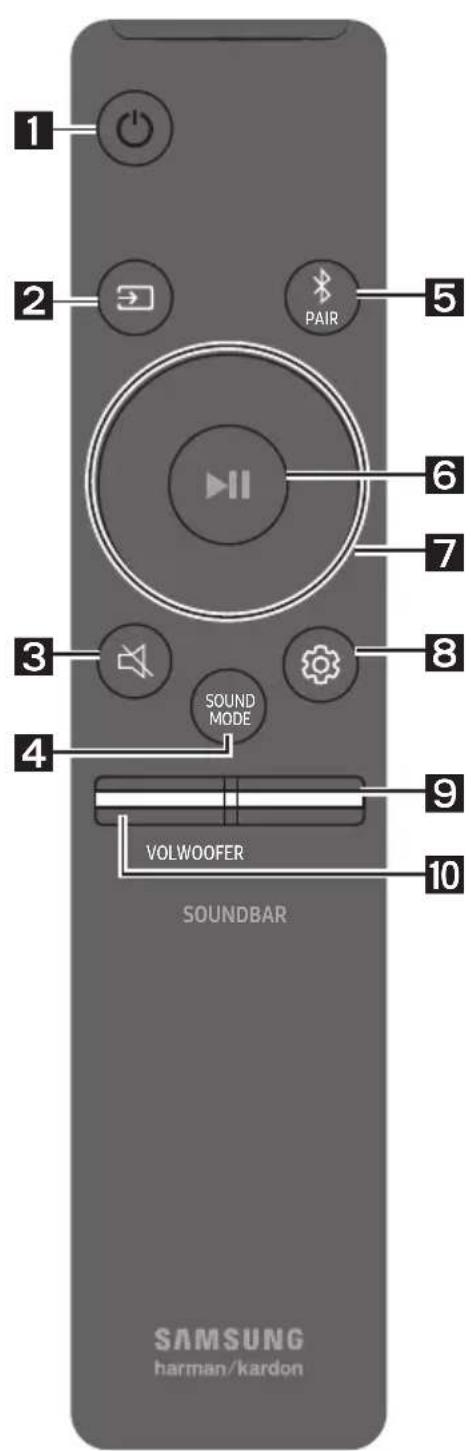
| 1 |  Power Power | Turns the Soundbar on and off. |
| 2 |  Source Source | Press to select a source connected to the Soundbar. |
| 3 |  Mute Mute | Press the (Mute) button to mute the sound. Press it again to unmute the sound. |
| 4 |  SOUND MODE SOUND MODE | You can select the desired sound mode by choosing STANDARD, SURROUND, GAME PRO, or ADAPTIVE SOUND.Select the “STANDARD” mode if you want to enjoy the original sound.GAME PRO modeImmerse yourself in the scene with a dedicated setting that optimizes sounds specifically for gaming.ADAPTIVE SOUND modeAutomatically analyzes content and gives you optimized sound and automatically enhances voice clarity on low volumes. |
| 5 |  BluetoothPAIR BluetoothPAIR | Press the ✗ PAIR button. “BT PAIRING” appears in the Soundbar’s display.You can connect the Soundbar to a new Bluetooth device in this mode by selecting the Soundbar from the Bluetooth device’s search list. |
| 6 |  Play / Pause(BT/Wi-Fi) Play / Pause(BT/Wi-Fi) | Press the ▶I button to pause a music file temporarily.When you press the button again, the music file plays. |
| 7 |  Up/Down/Left/Right Up/Down/Left/Right |  Press the indicated areas to select Up/Down/Left/Right.Press Up/Down/Left/Right on the button to select or set functions.Music SkipPress the Right button to select the next music file. Press the Left button to select the previous music file.Anynet+ / Auto Power LinkYou can turn Anynet+ and Auto Power Link on or off.Anynet+ and Auto Power Link are turned on and turned off by the Right and Left buttons respectively.- Anynet+ : If the Soundbar is connected to a Samsung TV through an HDMI cable, you can control your Soundbar with a Samsung TV remote control.Press and hold the Right button for 5 seconds to toggle Anynet+ ON and OFF.- Auto Power Link : If the Soundbar is connected to your TV through a digital optical cable, the Soundbar can automatically turn on when you turn on your TV. Press and hold the Left button for 5 seconds to toggle Auto Power Link ON and OFF.- Anynet+ / Auto Power Link are set to ON by default.ID SETPress and hold the Up button for 5 seconds to complete ID SET (when connecting to an accessory item). Press the indicated areas to select Up/Down/Left/Right.Press Up/Down/Left/Right on the button to select or set functions.Music SkipPress the Right button to select the next music file. Press the Left button to select the previous music file.Anynet+ / Auto Power LinkYou can turn Anynet+ and Auto Power Link on or off.Anynet+ and Auto Power Link are turned on and turned off by the Right and Left buttons respectively.- Anynet+ : If the Soundbar is connected to a Samsung TV through an HDMI cable, you can control your Soundbar with a Samsung TV remote control.Press and hold the Right button for 5 seconds to toggle Anynet+ ON and OFF.- Auto Power Link : If the Soundbar is connected to your TV through a digital optical cable, the Soundbar can automatically turn on when you turn on your TV. Press and hold the Left button for 5 seconds to toggle Auto Power Link ON and OFF.- Anynet+ / Auto Power Link are set to ON by default.ID SETPress and hold the Up button for 5 seconds to complete ID SET (when connecting to an accessory item). |
| 8 |  Sound Control Sound Control | You can select TREBLE, BASS, SYNC, CENTER LEVEL, SIDE LEVEL, FRONT TOP LEVEL, REAR LEVEL, and VIRTUAL ON/OFF.- To control the volume of the treble or bass sound, select TREBLE or BASS in Sound Settings, and then adjust the volume between -6~+6 by using the Up/Down buttons.- Press and hold the (Sound Control) button for about 5 seconds to adjust the sound for each frequency band. 150Hz, 300Hz, 600Hz, 1.2kHz, 2.5kHz, 5kHz, and 10kHz are selectable using the Left/Right buttons and each can be adjusted to a setting between -6 to +6 using the Up/Down buttons.- To control the volume of the each speaker select CENTER LEVEL, SIDE LEVEL or FRONT TOP LEVEL in Sound Settings, and then adjust the volume between -6~+6 by using the Up/Down buttons.- If the video on the TV and audio from the Soundbar are not synchronised, select SYNC in Sound Control, and then set the audio delay between 0~300 milliseconds by using the Up/Down buttons.- If Surround Speakers are connected, select REAR LEVEL and then use the Up/Down buttons to adjust the volume within a -6 to +6 range. The VIRTUAL Speaker function can be turned ON/OFF by using the Up/Down buttons.- SYNC is only supported for some functions.• InitialiseWith the Soundbar turned off, press and hold the (Sound Control) button for more than 5 seconds until the speaker turns on. “INIT” appears on the display and the Soundbar is initialised. |
| 9 |  WOOFER WOOFER |  Push the button up or down to adjust the volume of the subwoofer to -12 or between -6 to +6. To set the subwoofer volume level to 0, press the button. Push the button up or down to adjust the volume of the subwoofer to -12 or between -6 to +6. To set the subwoofer volume level to 0, press the button. |
| 10 |  VOL VOL |  Push the button up or down to adjust the volume.• MutePress the VOL button to mute the sound. Press it again to unmute the sound. Push the button up or down to adjust the volume.• MutePress the VOL button to mute the sound. Press it again to unmute the sound. |
Adjusting the Soundbar volume with a TV remote control
If you have a Samsung TV, you can adjust the Soundbar's volume using the IR remote control that came with your Samsung TV.
First use the TV menu to set the TV audio on your Samsung TV to external speakers, then use your Samsung remote to control the Soundbar's volume. For more information, see the TV's user manual. The default mode for this function is control by a Samsung TV remote. If your TV is not a Samsung TV, follow the directions below to change the settings of this function.
- Turn Off the Soundbar.

- If you do not want to use this function, push up and hold the WOOFER button for 5 seconds repeatedly until "OFF-TV REMOTE" appears in the display.

- If you want to control the Soundbar with your TV's remote, push up and hold the WOOFER button for 5 seconds repeatedly until "ALL-TV REMOTE" appears in the display. Then, use your TV's menu to select external speakers.

- If you want to return the Soundbar to the default mode (control by a Samsung TV remote), push up and hold the WOOFER button for 5 seconds repeatedly until "SAMSUNG-TV REMOTE" appears in the display.
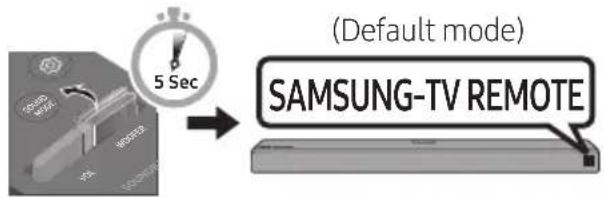
- Each time you push the WOOFER button up and hold it for 5 seconds, the mode switches in the following order: "SAMSUNG-TV REMOTE" (Default mode) → "OFF-TV REMOTE" → "ALL-TV REMOTE". - This function may not be available, depending on the remote control. - Manufacturers supporting this function: VIZIO, LG, Sony, Sharp, PHILIPS, PANASONIC, TOSHIBA, GRUNDIG, Hisense, RCA
Using the Hidden Buttons (Buttons with more than one function)
| Hidden Button | Reference page | |
| Remote Control Button Function | ||
| WOOFER | TV remote control On/Off (Standby) | page 30 |
| Left | Auto Power Link ON/OFF | page 28 |
| Right Anynet+ ON/OFF page 28 | ||
| Up ID SET page 28 | ||
| (Sound Control) | 7 Band EQ page 29 | |
| Initialise (Standby) page 29 | ||
Output specifications for the different sound effect modes
- If the input source is Dolby Atmos®, 5.1.2 channels are outputted. The sound effect modes controlled by the SOUND MODE button and listed above are not available.
- The Samsung Wireless Rear Speaker Kit can be purchased separately. To purchase a Kit, contact the vendor you purchased the Soundbar from.
09 INSTALLING THE WALL MOUNT
Installation Precautions
• Install on a vertical wall only. - Do not install in a place with high temperature or humidity. - Verify whether the wall is strong enough to support the product's weight. If not, reinforce the wall or choose another installation point. • Purchase and use the fixing screws or anchors appropriate for the kind of wall you have (plaster board, iron board, wood, etc.). If possible, fix the support screws into wall studs.
• Purchase wall mounting screws according to the type and thickness of the wall you want to mount the Soundbar on.
- Diameter: M5
- Length: 35 mm or longer recommended.
- Connect cables from the unit to external devices before you install the Soundbar on the wall.
- Make sure the unit is turned off and unplugged before you install it. Otherwise, it may cause an electric shock.
Wallmount Components

Wall Mount Guide

Holder-Screw Screw
Bracket-Wall Mount
- Place the Wall Mount Guide against the wall surface.
• The Wall Mount Guide must be level. - If your TV is mounted on the wall, install the Soundbar at least 5 cm below the TV.

- Align the Wall Mount Guide's Centre Line with the centre of your TV (if you are mounting the Soundbar below your TV), and then fix the Wall Mount Guide to the wall using tape.
- If you are not mounting below a TV, place the Centre Line in the centre of the installation area.

- Push a pen tip or sharpened pencil tip through the centre of the A-TYPE images on each end of the Guide to mark the holes for the supporting screws, and then remove the Wall Mount Guide.

- Using an appropriately sized drill bit, drill a hole in the wall at each marking.
If the markings do not correspond to the positions of studs, make sure you insert appropriate anchors or mollies into the holes before you insert the support screws. If you use anchors or mollies, make sure the holes you drill are large enough for the anchors or mollies you use.
- Push a screw (not supplied) through each Holder-Screw, and then screw each screw firmly into a support screw hole.

- Install the 2 Bracket-Wall Mounts in the correct orientation on the bottom of the Soundbar using 2 Screws.

When assembling, make sure the hanger part of the Bracket-Wall Mounts are located behind the rear of the Soundbar.
Rear of Soundbar
Right end of Soundbar
- Install the Soundbar with the attached Bracket-Wall Mounts by hanging the Bracket-Wall Mounts on the Holder-Screws on the wall.

- Slide the Soundbar down as shown below so that the Bracket-Wall Mounts rest securely on the Holder-Screws.
Insert the Holder-Screws into the wide (bottom) part of the Bracket-Wall Mounts, and then slide the Bracket-Wall Mounts down so that the Bracket-Wall Mounts rest securely on the Holder-Screws.
![graph TD A["Top: Process Step 1"] --> B["Bottom: Process Step 2"] B --> C["Downward Arrow"] C --> D["Bottom: Process Step 3"]](/content/2026/06/1340748/images/4f9b68f1efa9b89bb64b008f99e4842405f1ba20b1233983e65cc0cb22ab26b4.jpg)
10 INSTALLING THE SOUNDBAR ABOVE A TV STAND
Component
Rubber-Foot
You can install the Soundbar above TV stands that are less than 7.6 cm in height. To install, attach the Rubber-Feet to the bottom of the Soundbar before placing it in position above the TV stand. Make sure you attach the Rubber-Feet so that they are beyond the outside edges of the TV stand. Refer to the figure below.
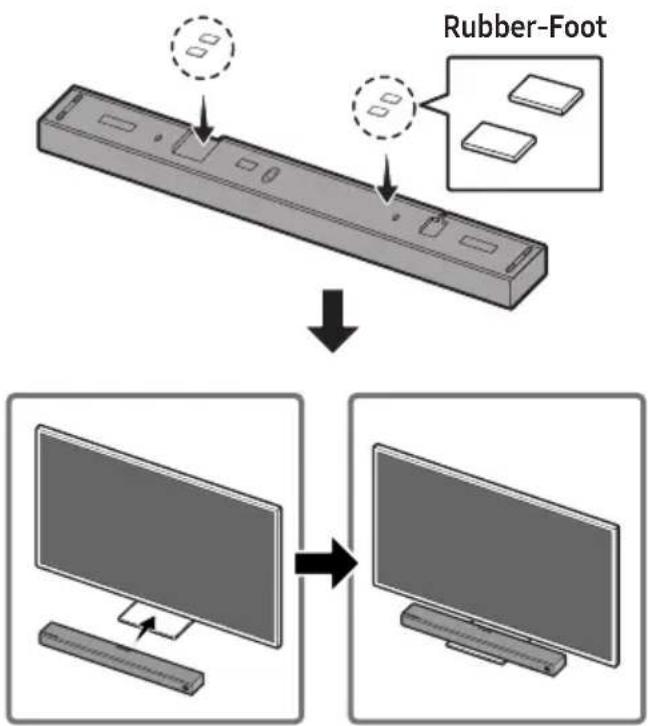
11 SOFTWARE UPDATE
When the Soundbar is connected to the Internet, software updates occur automatically even when the Soundbar is turned off.
- To use the Auto Update function, the Soundbar must be connected to the Internet. The Wi-Fi connection to the Soundbar will be terminated if the Soundbar's power cord is disconnected or the power is cut off. If the power is cut off, when the power comes back on or you reconnect the power cord, turn on the Soundbar, and then reconnect it to the Internet.
12 TROUBLESHOOTING
Before seeking assistance, check the following.
The unit will not turn on.
Is the power cord plugged into the outlet?
→Connect the power plug to the outlet.
A function does not work when the button is pressed.
Is there static electricity in the air?
→Disconnect the power plug and connect it again.
Sound dropouts occur in BT mode.
→See the Bluetooth connection sections on pages 12 and 19.
Sound is not produced.
Is the Mute function on?
→ Press the ⚫ (Mute) button to cancel the mute function.
Is the volume set to minimum?
→ Adjust the Volume.
The remote control does not work.
Are the batteries drained?
→ Replace with new batteries.
Is the distance between the remote control and Soundbar main unit too far?
→ Move the remote control closer to the Soundbar main unit.
The red LED on the subwoofer blinks and the subwoofer is not producing sound.
This issue can occur if the subwoofer is not connected to the Soundbar main unit.
→ Try to connect your subwoofer again. (See page 6.)
The subwoofer drones and vibrates noticeably.
Try to adjust the vibration of your subwoofer.
→ Push the WOOFER button on your remote control up or down to adjust the subwoofer volume. (to -12, or between -6 \~ +6).
Cannot connect to the TV.
If connected via a wired network
→ Check if the cable is connected correctly. – Check the port name to make sure that the cable is connected to the correct port. For instructions, see the page explaining each connection method.
→ Press the → (Source) button on the top panel of the Soundbar or on the remote control to check if the mode is correct.
If connected via a wireless network → Connected via Bluetooth
- Switch the Soundbar to "BT PAIRING" mode, and then use the TV to search again. (See page 12 for details.)
→ Connected via Wi-Fi
- Check if the TV is a compatible model.
- Only Samsung Smart TVs released after 2013 are supported.
- Check if the TV is connected to Wi-Fi.
- If the TV is not connected to Wi-Fi, use the network menu on the TV to establish a connection. (See the TV user manual.)
- Check if the Soundbar is connected to Wi-Fi.
- When the Soundbar is connected, you can find it in the list of speakers on your mobile device when you run the SmartThings app. See page 22 for details.
- Check for a DFS channel.
- If your wireless router (Wi-Fi) is using a DFS channel, you cannot establish a Wi-Fi connection between the TV and Soundbar. Contact your Internet service provider for details.
13 LICENCE

Manufactured under license from Dolby Laboratories. Dolby, Dolby Atmos, Dolby Audio, Dolby Digital Plus, Pro Logic, and the double-D symbol are trademarks of Dolby Laboratories.

For DTS patents, see http://patents.dts.com. Manufactured under license from DTS Licensing Limited. DTS, the Symbol, & DTS and the Symbol together, DTS:X, and the DTS:X logo are registered trademarks and/or trademarks of DTS, Inc. in the United States and/or other countries. © DTS, Inc. All Rights Reserved.

The terms HDMI and HDMI High-Definition Multimedia Interface, and the HDMI Logo are trademarks or registered trademarks of HDMI Licensing LLC in the United States and other countries.

Spotify®
- The Spotify Software is subject to third party licences found here: www.spotify.com/connect/third-party-licenses.
- For more information about Spotify Connect, please visit www.spotify.com/connect
14 OPEN SOURCE LICENCE NOTICE
For further information on Open Sources used in this product, please visit the website:
http://opensource.samsung.com
15 IMPORTANT NOTES ABOUT SERVICE
- Figures and illustrations in this User Manual are provided for reference only and may differ from actual product appearance.
- An administration fee may be charged if either
(a) an engineer is called out at your request and there is no defect with the product (i.e. where the user manual has not been read).
(b) you bring the unit to a repair centre and there is no defect with the product (i.e. where the user manual has not been read).
- You will be informed of the administration fee amount before a technician visits.
16 SPECIFICATIONS AND GUIDE
Specifications
| Model Name HW-Q86R | |
| Weight 8.8 kg | |
| Dimensions (W x H x D) 1226.0 x 83.0 x 136.0 mm | |
| Operating Temperature Range +5°C to +35°C | |
| Operating Humidity Range 10 % ~ 75 % | |
| AMPLIFIERRated Output power 18W x 10 + 10W x 3, 4ohm | |
| Supported play formats | LPCM 8ch, Dolby Digital,Dolby Atmos (True HD / Digital Plus), DTS:X |
| WIRELESS DEVICE OUTPUT POWERWi-Fi max transmitter power | 100mW at 2.4GHz – 2.4835GHz,5.15GHz – 5.35GHz & 5.47GHz – 5.725GHz |
| WIRELESS DEVICE OUTPUT POWERBT max transmitter power | 100mW at 2.4GHz – 2.4835GHz |
| WIRELESS DEVICE OUTPUT POWERSRD max transmitter power | 25mW at 5.725GHz – 5.825GHz |
| Subwoofer Name PS-WR75B | |
| Weight 9.8 kg | |
| Dimensions (W x H x D) 205.0 x 403.0 x 403.0 mm | |
| AMPLIFIERRated Output power 160W | |
| WIRELESS DEVICE OUTPUT POWERSRD max transmitter power | 25mW at 5.725GHz – 5.825GHz |
NOTES
• Samsung Electronics Co., Ltd reserves the right to change the specifications without notice. • Weight and dimensions are approximate.
Precaution: The Soundbar will restart automatically if you turn on/turn off Wi-Fi.
| Overall Standby Power Consumption (W) | 4.5W |
| Wi-FiPort deactivation method | Press the ID SET button on the bottom panel of the Soundbar for 30 seconds to turn Wi-Fi On / Off. |
| BluetoothPort deactivation method | Press the NETWORK button on the bottom panel of the Soundbar for 30 seconds to turn Bluetooth On / Off. |
Hereby, Samsung Electronics declares that this equipment is in compliance with Directive 2014/53/EU.
The full text of the EU declaration of conformity is available at the following internet address: http://www.samsung.com go to Support > Search Product Support and enter the model name.
This equipment may be operated in all EU countries.
The 5GHz WLAN (Wi-Fi or SRD) function of this equipment may only be operated indoors.


[Correct disposal of batteries in this product]
(Applicable in countries with separate collection systems)
This marking on the battery, manual or packaging indicates that the batteries in this product should not be disposed of with other household waste at the end of their working life. Where marked, the chemical symbols Hg, Cd or Pb indicate that the battery contains mercury, cadmium or lead above the reference levels in EC Directive 2006/66.
If batteries are not properly disposed of, these substances can cause harm to human health or the environment.
To protect natural resources and to promote material reuse, please separate batteries from other types of waste and recycle them through your local, free battery return system.

Correct Disposal of This Product
(Waste Electrical & Electronic Equipment)
(Applicable in countries with separate collection systems)
This marking on the product, accessories or literature indicates that the product and its electronic accessories (e.g. charger, headset, USB cable) should not be disposed of with other household waste at the end of their working life. To prevent possible harm to the environment or human health from uncontrolled waste disposal, please separate these items from other types of waste and recycle them responsibly to promote the sustainable reuse of material resources.
Household users should contact either the retailer where they purchased this product, or their local government office, for details of where and how they can take these items for environmentally safe recycling.
Business users should contact their supplier and check the terms and conditions of the purchase contract. This product and its electronic accessories should not be mixed with other commercial wastes for disposal.
For information on Samsung's environmental commitments and product specific regulatory obligations e.g. REACH, WEEE, Batteries, visit:
http://www.samsung.com/uk/aboutsamsung/samsungelectronics/corporatecitizenship/data_corner.html
SAFETY INFORMATION
SAFETY INFORMATION
TO REDUCE THE RISK OF ELECTRIC SHOCK, DO NOT REMOVE THE COVER (OR BACK).
NO USER-SERVICEABLE PARTS INSIDE. REFER ALL SERVICING TO QUALIFIED SERVICE PERSONNEL.
REFER ALL SERVICING TO QUALIFIED SERVICE PERSONNEL.
USER MANUAL

COMPLETE USER MANUAL
02 PRODUCT OVERVIEW
Soundbar front panel / top panel
04 CONNECTING TO YOUR TV
Method 2. Wireless connection
10 INSTALLING THE SOUNDBAR DIRECTLY ABOVE A TV STAND
Component

Rubber foot
Manufactured under license from Dolby Laboratories. Dolby, Dolby Atmos, Dolby Audio, Dolby Digital Plus, Pro Logic, and the double-D symbol are trademarks of Dolby Laboratories.

For DTS patents, see http://patents.dts.com. Manufactured under license from DTS Licensing Limited. DTS, the Symbol, & DTS and the Symbol together, DTS:X, and the DTS:X logo are registered trademarks and/or trademarks of DTS, Inc. in the United States and/or other countries. © DTS, Inc. All Rights Reserved.

The terms HDMI and HDMI High-Definition Multimedia Interface, and the HDMI Logo are trademarks or registered trademarks of HDMI Licensing LLC in the United States and other countries.

Spotify®
- The Spotify software is subject to third-party licenses found here: www.spotify.com/connect/third-party-licenses.
- For more information about Spotify Connect, visit www.spotify.com/connect
14 NOTE REGARDING OPEN SOURCE LICENSE
USER GUIDE

COMPLETE USER GUIDE
02 DEVICE OVERVIEW
Soundbar front panel / top panel
Wall mount brackets
10 INSTALLING THE SOUNDBAR ON A TV STAND
Part
Rubber foot
11 UPDATING THE SOFTWARE
Manufactured under license from Dolby Laboratories. Dolby, Dolby Atmos, Dolby Audio, Dolby Digital Plus, Pro Logic, and the double-D symbol are trademarks of Dolby Laboratories.

For DTS patents, see http://patents.dts.com. Manufactured under license from DTS Licensing Limited. DTS, the Symbol, & DTS and the Symbol together, DTS:X, and the DTS:X logo are registered trademarks and/or trademarks of DTS, Inc. in the United States and/or other countries. © DTS, Inc. All Rights Reserved.

The terms HDMI and HDMI High-Definition Multimedia Interface, and the HDMI Logo are trademarks or registered trademarks of HDMI Licensing LLC in the United States and other countries.

Spotify®
USER MANUAL

COMPLETE USER MANUAL
02 PRODUCT OVERVIEW
Soundbar front panel / top panel
03 CONNECT TO SOUNDBAR
Connect to power

"SAMSUNG-TV REMOTE" (standard mode) → "OFF-TV REMOTE" → "ALL-TV REMOTE".
Mounting screw Screw
Wall mount bracket
- Place the wall mount guide against the wall surface.
10 MOUNTING THE SOUNDBAR OVER A TV STAND
Component

Rubber foot
Manufactured under license from Dolby Laboratories. Dolby, Dolby Atmos, Dolby Audio, Dolby Digital Plus, Pro Logic, and the double-D symbol are trademarks of Dolby Laboratories.

For DTS patents, see http://patents.dts.com. Manufactured under license from DTS Licensing Limited. DTS, the Symbol, & DTS and the Symbol together, DTS:X, and the DTS:X logo are registered trademarks and/or trademarks of DTS, Inc. in the United States and/or other countries. © DTS, Inc. All Rights Reserved.

The terms HDMI and HDMI High-Definition Multimedia Interface, and the HDMI Logo are trademarks or registered trademarks of HDMI Licensing LLC in the United States and other countries.

Spotify®
USER MANUAL

FULL MANUAL
TABLE OF CONTENTS
01 Check the components 2
02 PRODUCT OVERVIEW
Wall Mount Guide

Mounting Screw Screw
Wall Mount
10 INSTALL THE SOUNDBAR ON TOP OF A TV STAND
Component

Rubber Foot
Manufactured under license from Dolby Laboratories. Dolby, Dolby Atmos, Dolby Audio, Dolby Digital Plus, Pro Logic, and the double-D symbol are trademarks of Dolby Laboratories.

For DTS patents, see http://patents.dts.com. Manufactured under license from DTS Licensing Limited. DTS, the Symbol, & DTS and the Symbol together, DTS:X, and the DTS:X logo are registered trademarks and/or trademarks of DTS, Inc. in the United States and/or other countries. © DTS, Inc. All Rights Reserved.

The terms HDMI and HDMI High-Definition Multimedia Interface, and the HDMI Logo are trademarks or registered trademarks of HDMI Licensing LLC in the United States and other countries.

Spotify®
14 OPEN SOURCE LICENSE NOTICE
© 2019 Samsung Electronics Co., Ltd. All rights reserved.
Contact SAMSUNG WORLD WIDE
If you have any questions or comments relating to Samsung products, please contact the SAMSUNG customer care Centre.
| Country | Contact Centre | Web Site |
| ▪Europe | ||
| UK 0330 SAMSUNG (7267864) | www.samsung.com/uk/support | |
| IRELAND (EIRE) 0818 717100 | www.samsung.com/ie/support | |
| GERMANY 06196 77 555 77 | www.samsung.com/de/support | |
| FRANCE 01 48 63 00 00 | www.samsung.com/fr/support | |
| ITALIA 800-SAMSUNG (800.7267864) | www.samsung.com/it/support | |
| SPAIN 0034902172678 | www.samsung.com/es/support | |
| PORTUGAL 808 207 267 | www.samsung.com/pt/support | |
| LUXEMBURG 261 03 710 | www.samsung.com/be_fr/support | |
| NETHERLANDS 088 90 90 100 | www.samsung.com/nl/support | |
| BELGIUM 02-201-24-18 | www.samsung.com/be/support (Dutch)www.samsung.com/be_fr/support (French) | |
| NORWAY 21629099 | www.samsung.com/no/support | |
| DENMARK 707 019 70 | www.samsung.com/dk/support | |
| FINLAND 030-6227 515 | www.samsung.com/fi/support | |
| SWEDEN | 0771 726 786 | www.samsung.com/se/support |
| POLAND | 801-172-678* lub +48 22 607-93-33** (oplata wedlug taryfy operatora) | http://www.samsung.com/pl/support/ |
| HUNGARY | 0680SAMSUNG (0680-726-7864) | www.samsung.com/hu/support |
| AUSTRIA 0800-SAMSUNG (0800-7267864) | www.samsung.com/at/support | |
| Country | Contact Centre | Web Site |
| SWITZERLAND | 0800 726 78 64 (0800-SAMSUNG) | www.samsung.com/ch/support (German)www.samsung.com/ch_fr/support (French) |
| CZECH | 800 - SAMSUNG (800-726786) | www.samsung.com/cz/support |
| SLOVAKIA | 0800 - SAMSUNG (0800-726 786) | www.samsung.com/sk/support |
| CROATIA | 072 726 786 | www.samsung.com/hr/support |
| BOSNIA | 055 233 999 | www.samsung.com/support |
| MONTENEGRO | 020 405 888 | |
| SLOVENIA | 080 697 267 (brezplačna številka) | www.samsung.com/si/support |
| SERBIA | 011 321 6899 | www.samsung.com/rs/support |
| ALBANIA 045 620 202 | www.samsung.com/al/support | |
| BULGARIA | *3000 Цена в мрежата0800 111 31, Безплатна телефонна линия | www.samsung.com/bg/support |
| ROMANIA | *8000 (apel in retea)08008-726-78-64 (08008-SAMSUNG)Apel GRATUIT | www.samsung.com/ro/support |
| CYPRUS | 8009 4000 only from landline, toll free | www.samsung.com/gr/support |
| GREECE | 80111-SAMSUNG (80111 726 7864) only from land line(+30) 210 6897691 from mobile and land line | |
| LITHUANIA 8-800-77777 | www.samsung.com/lt/support | |
| LATVIA | 8000-7267 | www.samsung.com/lv/support |
| ESTONIA | 800-7267 | www.samsung.com/ee/support |
- SAFETY INFORMATION
- SAFETY WARNINGS
- CAUTION
- WARNING
- PRECAUTIONS
- ABOUT THIS MANUAL
- USER MANUAL
- FULL MANUAL
- CONTENTS
- CHECKING THE COMPONENTS
- PRODUCT OVERVIEW
- CONNECTING THE SOUNDBAR
- CONNECTING TO YOUR TV
- CONNECTING AN EXTERNAL DEVICE
- CONNECTING A MOBILE DEVICE
- CONNECTING AN AMAZON PRODUCT
- USING THE REMOTE CONTROL
- INSTALLING THE WALL MOUNT
- INSTALLING THE SOUNDBAR ABOVE A TV STAND
- SOFTWARE UPDATE
- TROUBLESHOOTING
- LICENCE
- OPEN SOURCE LICENCE NOTICE
- IMPORTANT NOTES ABOUT SERVICE
- SPECIFICATIONS AND GUIDE
- INSERTING BATTERIES BEFORE USING THE REMOTE CONTROL (AA BATTERIES X 2)
- BOTTOM PANEL OF THE SOUNDBAR
- CONNECTING ELECTRICAL POWER
- CONNECTING THE SOUNDBAR TO THE SUBWOOFER
- AUTOMATIC CONNECTION BETWEEN THE SUBWOOFER AND THE SOUNDBAR
- MANUALLY CONNECTING THE SUBWOOFER IF AUTOMATIC CONNECTION FAILS
- BEFORE PERFORMING THE MANUAL CONNECTION PROCEDURE BELOW
- NOTES
- CONNECTING AN SWA-9000S (SOLD SEPARATELY) TO YOUR SOUNDBAR
- METHOD 1. CONNECTING WITH A CABLE
- CONNECTING USING AN OPTICAL CABLE
- AUTO POWER LINK
- METHOD 2. CONNECTING WIRELESSLY
- CONNECTING A TV VIA BLUETOOTH
- THE INITIAL CONNECTION
- IF THE DEVICE FAILS TO CONNECT
- NOTE
- DISCONNECTING THE SOUNDBAR FROM THE TV
- WHAT IS THE DIFFERENCE BETWEEN BT READY AND BT PAIRING
- CONNECTING VIA WI-FI
- PRE-CONNECTION CHECKLIST
- STEP 1: CONNECTING THE SOUNDBAR TO WI-FI
- STEP 2: CONFIGURING SETTINGS ON THE TV
- FOR TVS RELEASED IN
- CONNECTING USING AN HDMI CABLE (CAPABLE OF DOLBY ATMOS DECODING AND PLAYBACK)
- CONFIGURING DOLBY ATMOS® ON YOUR BD PLAYER OR OTHER DEVICE
- CONNECTING USING AN HDMI CABLE
- CONNECTING VIA BLUETOOTH
- DISCONNECTING THE BLUETOOTH DEVICE FROM A SOUNDBAR
- DISCONNECTING THE SOUNDBAR FROM THE BLUETOOTH DEVICE
- MORE ABOUT BLUETOOTH
- CONNECTING VIA WI-FI (WIRELESS NETWORK)
- CONNECT AND USE WITH AN AMAZON PRODUCT (AMAZON ECHO)
- USE VOICE COMMANDS TO CONTROL THE SOUNDBAR
- ADJUSTING THE SOUNDBAR VOLUME WITH A TV REMOTE CONTROL
- INSTALLATION PRECAUTIONS
- WALLMOUNT COMPONENTS
- COMPONENT
- THE UNIT WILL NOT TURN ON
- A FUNCTION DOES NOT WORK WHEN THE BUTTON IS PRESSED
- SOUND DROPOUTS OCCUR IN BT MODE
- SOUND IS NOT PRODUCED
- THE REMOTE CONTROL DOES NOT WORK
- THE RED LED ON THE SUBWOOFER BLINKS AND THE SUBWOOFER IS NOT PRODUCING SOUND
- THE SUBWOOFER DRONES AND VIBRATES NOTICEABLY
- CANNOT CONNECT TO THE TV
- IF CONNECTED VIA A WIRELESS NETWORK → CONNECTED VIA BLUETOOTH
- → CONNECTED VIA WI-FI
- SPOTIFY®
- [CORRECT DISPOSAL OF BATTERIES IN THIS PRODUCT]
- (APPLICABLE IN COUNTRIES WITH SEPARATE COLLECTION SYSTEMS)
- CORRECT DISPOSAL OF THIS PRODUCT
- (WASTE ELECTRICAL & ELECTRONIC EQUIPMENT)
- COMPLETE USER MANUAL
- METHOD 2. WIRELESS CONNECTION
- INSTALLING THE SOUNDBAR DIRECTLY ABOVE A TV STAND
- RUBBER FOOT
- NOTE REGARDING OPEN SOURCE LICENSE
- USER GUIDE
- COMPLETE USER GUIDE
- DEVICE OVERVIEW
- INSTALLING THE SOUNDBAR ON A TV STAND
- PART
- UPDATING THE SOFTWARE
- CONNECT TO SOUNDBAR
- CONNECT TO POWER
- MOUNTING THE SOUNDBAR OVER A TV STAND
- TABLE OF CONTENTS
- CHECK THE COMPONENTS
- INSTALL THE SOUNDBAR ON TOP OF A TV STAND
- OPEN SOURCE LICENSE NOTICE
- CONTACT SAMSUNG WORLD WIDE
Brand : SAMSUNG
Model : HW-Q86R
Category : Soundbar