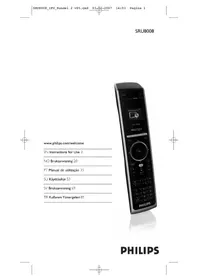
Pretigo SRU8008 - Remote control PHILIPS - Free user manual and instructions
Find the device manual for free Pretigo SRU8008 PHILIPS in PDF.


| Product Type | Universal Remote Control |
| Brand | Philips |
| Model | Pretigo SRU8008 |
| Dimensions (H x W x D) | Approx. 21.0 x 5.5 x 2.5 cm |
| Weight | Approx. 150 g (including batteries) |
| Power Supply | 2 x AAA batteries (not included) |
| Battery Life | Up to 12 months with normal use |
| Control Range | Up to 10 meters |
| Number of Devices Controlled | Up to 8 |
| Learning Function | Yes, via infrared learning |
| Macro Function | Yes, programmable macros |
| Backlit Keys | Yes, with adjustable duration |
| Compatible Devices | TV, DVD, Blu-ray, SAT, Cable, Audio, etc. |
| Cleaning Instruction | Wipe with a soft, dry cloth |
| Storage Temperature | -10°C to 50°C |
| Humidity Tolerance | 20% to 80% non-condensing |
| Safety Warning | Do not expose to liquids or extreme heat |
| Spare Parts Available | Batteries only (AAA) |
| Repairability | Not user-serviceable; contact Philips support |
| Certifications | CE, RoHS |
Frequently Asked Questions - Pretigo SRU8008 PHILIPS
User questions about Pretigo SRU8008 PHILIPS
0 question about this device. Answer the ones you know or ask your own.
Ask a new question about this device
Download the instructions for your Remote control in PDF format for free! Find your manual Pretigo SRU8008 - PHILIPS and take your electronic device back in hand. On this page are published all the documents necessary for the use of your device. Pretigo SRU8008 by PHILIPS.
USER MANUAL Pretigo SRU8008 PHILIPS
EN Instructions for Use 3
NO Bruksanvisning 20
1.1 What's in the Box 4
1.2 Overview SRU8008 4
2 Getting Started 5
2.1 Prepare 5
2.2 Install 6
3 Using Your SRU8008 7
3.1 Selecting a Device 8
3.2 Selecting an Activity 8
3.3 Selecting More Functions 9
4 Getting the Most out of Your SRU8008 9
4.1 Devices 10
4.2 Activities 13
4.3 More Functions 14
4.4 System Settings 15
4.5 Language 16
5 Frequently Asked Questions 16
6 Need help? 18
1 Your Philips Prestigo SRU8008
Welcome to the growing family of owners of Philips products. The Philips Prestigo SRU8008 universal remote control has been designed to control your equipment. You can install up to 8 devices, and up to 8 activities.
Select a device and operate the device with the SRU8008's keys.
Select an activity and automatically start a sequence of key presses, for instance, to watch a DVD or listen to a CD.
Select more functions and assign more advanced functions to your remote control.
1.1 What's in the Box
• The SRU8008
- Quick Start Guide
- Instructions for Use in diverse languages
• Philips Alkaline batteries
Philips recommends Philips Alkaline batteries.
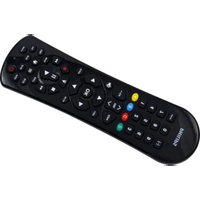
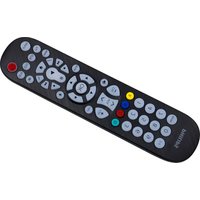
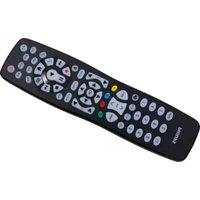
1.2 Overview SRU8008
The image on page 2 gives you a main overview of the SRU8008.
To prepare the SRU8008 for use, see 'Getting Started' on page 5.
Black keys for sending signals to your equipment
A Power key
B OK key
C Up, Down, Left and Right keys
D Transport keys
E Alphanumeric keys
F * -. / Clear key
G AV key
H Enter key
Keys for controlling the SRU8008
1 More key
2 Activities key
3 Devices/Setup key
4 OK key
5 Rotary wheel
6 Back key
4 Your Philips Prestigo SRU8008
2 Getting Started
2.1 Prepare
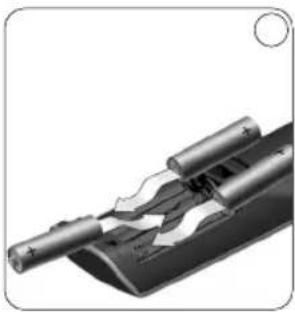
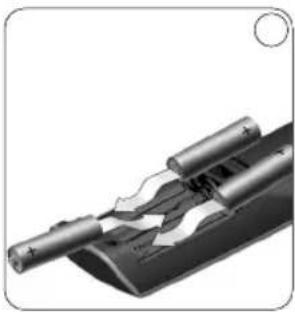
To insert the batteries in the SRU8008:
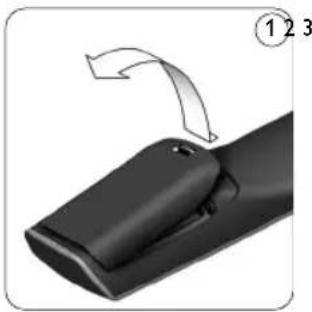
1Press the latch down and lift the cover up. ①
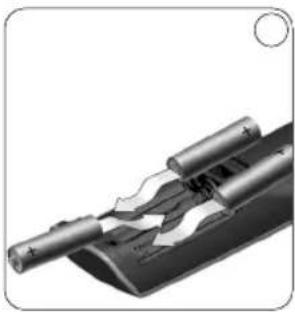
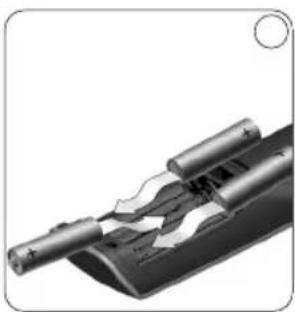
2 Place the three LR6 AA type alkaline batteries into the battery compartment, as shown. ②
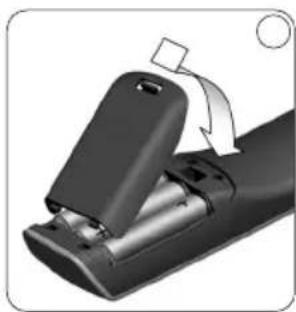
3 Position the cover and press firmly until you hear a click. ③


The SRU8008 displays the Philips logo for 3 seconds and continues with the Installation Wizard to guide you through the installation.

Installation wizard – Language selection
When the batteries are almost empty, the Battery Low icon blinks. This indicates a critical battery level. You can still operate the SRU8008 control for a short period.
Replace the batteries with new LR6 AA type alkaline batteries and follow the local regulations for disposal of the empty batteries.

Note
If the Battery Low icon blinks, you are not able to enter the Setup menu anymore.
2.2 Install
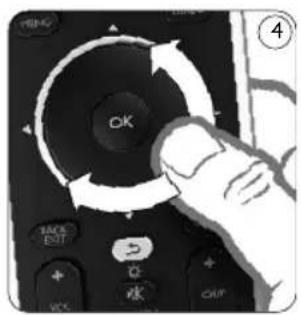
1 In the Installation Wizard, select your preferred language with the rotary wheel. ④
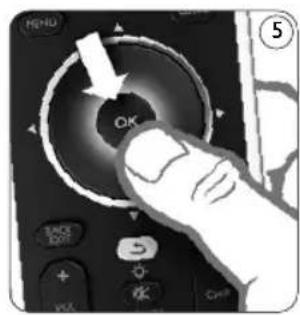
2 Press to confirm the selected language. ⑤
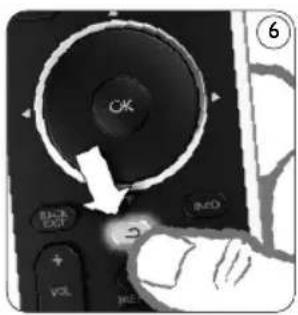
The SRU8008 guides you through the remainder of the setup process. You can always go back in the setup process to change a previous selection:
Press to go back to the previous screen. 6
3 Follow the instructions on the SRU8008 to add devices. You can add up to 8 devices to your SRU8008 from the following list.
| Device Name Description | |
| TV Traditional and flat TVs | |
| DVD DVD player and recorder | |
| DVDR DVD player and recorder | |
| VCR Video Cassette player and recorder | |
| SAT Satellite set-top box with or without Hard Disk Drive (HDD) | |
| DSS/DTT Satellite set-top box with or without Hard Disk Drive (HDD) | |
| Cable Cable set-top box with or without Hard Disk Drive (HDD) | |
| DVB-T/S | Digital Video Broadcast - Terrestrial (T) or Satellite (S) with or without Hard Disk Drive (HDD) |
| AMP | Amplifier |
| AudioSet | Receiver = Amplifier + Tuner |
| HTS Home Theater System = Amplifier + DVD + Tuner + Surround Sound Speakers | |
| Tuner Radio Tuner | |
| CD | CD player and recorder |
| MD | Mini Disk player and recorder |
| Tape | Audio Cassette Tape player and recorder |
| DVR | Digital Video Recorder = Analog TV Tuner + Hard Disk Drive (HDD) |
| Tivo | Digital Video Recorder = Analog TV Tuner + Hard Disk Drive (HDD) |
| DMR | Digital Media Receiver = device streaming media content from a PC to a TV or Audio Receiver |
| TV-DVD combo | TV with integrated DVD |
| TV-VCR combo | TV with integrated VCR |
| TV-VCR-DVD combo | TV with integrated DVD and VCR |
| DVD-VCR combo | DVD and VCR combination |
Device Name Description
| DVDR-HDD combo DVD recorder and Hard Disk Drive (HDD) combination |
| VCD, Laser Disk Video Compact Disk, Laser Disk, Karaoke |
| Projector Video Projector |
| Camera and Camcorder Camera and Camcorder |
| PC PC (infrared only) |
| Game DVD player function of Game Console (Infrared only) |
| Satellite Radio Satellite Radio Receiver |
| PVR/DVR Personal Video Recorder / Hard disc Recorder |
ENGLISH

Note
You can change the settings that you made during this initial installation or install more function afterwards via the Setup menu. See 'Getting the Most out of Your SRU8008' on page 9.
3 Using Your SRU8008
The SRU8008 has been designed to control your equipment with one remote control. Simply add your devices, your activities and your extra functions to start enjoying the SRU8008.
A device is a part of your equipment. As soon as you have installed your devices, you can control them with the keys on the SRU8008.
Devices can have extra functions in addition to the keys on the SRU8008. You can select more functions on the display.
An activity is a sequence of key presses you can install. For example, to watch a DVD you normally would have to:
- Turn on the TV;
- Turn on the DVD;
• Turn on the surround sound system; - Select the right input on your TV and surround sound system;
- Press the Play button to start the DVD.
With an activity the SRU8008 executes all these steps with just one press.
The rotary wheel is an easy-to-use, multifunctional control on your SRU8008:
- When turning the rotary wheel, you scroll through the different options on your remote control's display. ⑦
- When pushing the rotary wheel at the top, at the bottom, at the left or at the right ⑧you navigate through the onscreen menu of the device (TV, DVD, VCR, etc) you are controlling at that moment.


3.1 Selecting a Device
To select your installed devices:
1 Press DEVICES.
2 Select a device with the rotary wheel and press OK to confirm.
The SRU8008 is set to operate the selected device. You can now control that device with the black keys on the SRU8008.
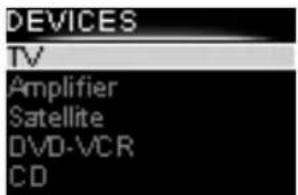
List of installed devices
To setup your devices, see 'Add a Device' on page 10.
3.2 Selecting an Activity
To select your installed activities:
1 Press . ACTIVITIES
2 Select an activity with the rotary wheel and press OK confirm your choice.
The SRU8008 sends out a sequence of key presses for the selected activity.
The SRU8008 is set to operate the device you selected for this activity.
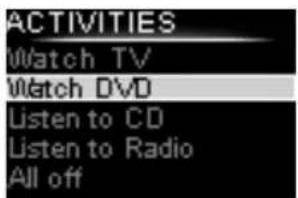
List of installed activities
To setup your activities, see 'Add an Activity' on page 13.
3.3 Selecting More Functions
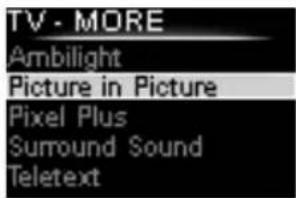
Devices can have extra functions in addition to the keys on the SRU8008.
To select more installed functions:
1 Press MORE.
2 Select a function with the rotary wheel and press 📄 confirm your choice. The SRU8008 sends out the signal for the selected function.
To setup more functions for your devices, see 'Add a Function' on page 14.
List of installed functions
4 Getting the Most out of Your SRU8008
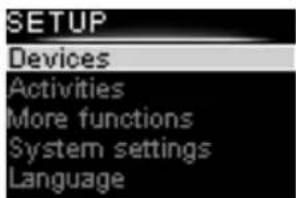
Via the Setup menu you have access to the various advanced features of the SRU8008.
To enter the Setup menu:
■ Press and hold for 3 seconds.
Note
You cannot enter the Setup menu if the Battery Low icon blinks.
To navigate through the Setup menu:
■ Select an option in the Setup menu with the rotary wheel and press OK to confirm your choice.
-or-
Press to go back to the previous screen.
To exit the Setup menu:
■ Select Exit in the Setup menu and press OK.
-or-
Press SETUP DEVICES again.
The following table gives you an overview of the options in the Setup menu and the pages where you find more information about these options.
Setup menu Submenu Description Page
| Devices | Add Device Adds a new device 10 | ||
| Fix Key Fixes a key that is not working correctly 11 | |||
| Copy Volume Copies the volume keys from one device to another 12 | |||
| Rename Device Renames a device 12 | |||
| Delete Device Deletes an installed device 12 | |||
| Activities | Add Activity | Adds a sequence of key presses to operate different devices with one press | 13 |
| Rename Activity | Renames an activity | 13 | |
| Delete Activity | Deletes an installed activity | 14 | |
| More Functions | Add Function | Adds an extra function by learning it from your original remote control | 14 |
| Rename Function | Renames a function | 14 | |
| Delete Function | Deletes an installed function | 14 | |
| System Settings | Backlight Time-Out | Changes the time-out of the backlight on the SRU8008 | 15 |
| Key Backlight | Turns the key backlight on or off | 15 | |
| Full Reset | Deletes all your personal settings on SRU8008 | 15 | |
| Language | Changes the language of the instructions on the SRU8008 | 16 | |
| Exit | Leave the Setup menu | 9 | |
4.1 Devices
4.1.1 Add a Device
To operate your specific devices with the SRU8008, you have to add those devices. You can add up to 8 devices. For a list of all devices, see page 6.
Note
You can add a device more than once. A second TV will automatically be named TV2. You can enter a different name if your wish to. See 'Rename a Device' on page 12.
1 Go to Setup - Devices, select Add Device and press

2 Select the device you want to add.
3 Follow the instructions on the SRU8008.
The selected device is installed and added to the SRU8008.
You can now operate your device with the SRU8008:
■ Press DEVICES, select the device with the rotary wheel
and press OK.
4.1.2 Fix a Key
If a key or extra function is not working properly with your device, you can first of all try to assign that key's signal to the SRU8008. In case that does not work, you can copy that key's signal from your original remote to the SRU8008.

Note
When you use the 'Fix a Key' option, new data overwrites the data that is currently stored for that key.
1 Go to Setup - Devices, select Fix a key and press OK.
2 Select the device for which you want to fix a key.
The SRU8008 automatically checks if the brand of this device is known in its database.
3 If the brand of your device is known, press and hold the key for which you want to assign the signal.
The SRU8008 sends out different signals to your device.
4 When the device reacts, immediately release the key and follow the instructions on the SRU8008.
The key is assigned and fixed.
-or-
If the brand of your device is unknown or the device does not react to any of the signals, copy the key's signal from the original remote:
3 Confirm you have the original working remote ready.
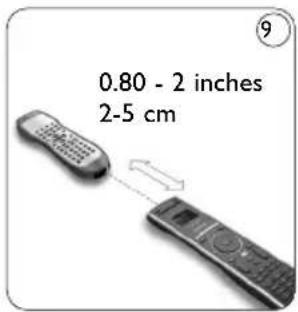
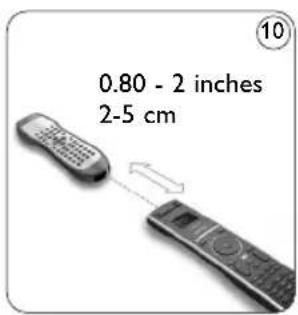
4 Position the SRU8008 and your original remote control as shown. ⑨
5 Select the key or extra function you want to fix.
6 To select extra functions:
1 Press MORE.
2 Select the function with the rotary wheel and press OK
7 Follow the instructions on the SRU8008. The key is copied and fixed.

Note
All keys can be fixed except:

4.1.3 Copy the Volume
After you add devices, the SRU8008 automatically copies the volume settings as follows:
- Video devices, like DVD, DVDR, VCR and Satellite box, use the volume keys of the TV (provided that you have installed a TV).
- Audio devices, like CD, MD, Tape and Tuner, use the volume keys of the Amplifier or Receiver (provided that you have installed an Amplifier or Receiver).
You can change which volume keys are used, for instance when you want to use the volume keys of the Amplifier for the DVD.
Notes
- The Copy Volume function overwrites the default volume settings of the SRU8008.
- Previous volume settings you installed using Copy Volume or Fix a Key are gone.
- The volume settings are automatically deleted when you delete the volume source device.
To copy the volume settings:
1 Go to Setup - Devices, select Copy Volume and press OK.
2 Select the device you want to copy the volume keys from (e.g. TV or Amp).
3 Select the device you want to copy the volume keys to (e.g. DVD or SAT box).
4 Confirm you want to copy the volume keys from one device to the other.
The volume keys are copied.
4.1.4 Rename a Device
To rename a device:
1 Go to Setup - Devices, select Rename Device and press OK.
2 Enter the new label with the alphanumeric keys.
Note
You can delete characters with the Clear key and the left cursor.
3 Confirm the new label.
The device is renamed.
4.1.5 Delete a Device
To delete a device:
1 Go to Setup - Devices, select Delete Device and press OK.
2 Select the device you want to delete.
3 Confirm you want to delete the device.
The device is deleted.
12 Getting the Most out of Your SRU8008

Note
Keys of the deleted device that are used elsewhere, e.g. in an activity or the volume keys you copied, will be deleted as well.
Check the activities you installed and reinstall them if necessary.
See 'Add an Activity' on page 13.
Check the volume keys for your devices and reinstall them if necessary. See 'Copy the Volume' on page 12.
4.2 Activities
4.2.1 Add an Activity
You can add activities to the SRU8008. An activity consists of several key presses that the SRU8008 sends out with just one press.
By default the SRU8008 inserts a delay of 600ms between every key press to make sure your devices are responding correctly to the IR signals. You can overwrite this default delay.
- If one of your devices needs a longer delay before receiving the next IR signal, you can insert a delay of 1, 3, 5, 10 or 15 seconds.
- If an activity needs a long key press, e.g. turn up the volume, you can select the option Hold last key.
To add an activity:
1 Go to Setup - Activities, select Add Activity and press OK.
2 Select the label you want to use for the activity. -or-
Select Not in list to create a new label.
3 Follow the instructions on the SRU8008.
- Select a device with the rotary wheel, press OK and press a key to add it to the activity.
- Select 1, 3, 5, 10 or 15 seconds delay with the rotary wheel and press OK.
-or-
Select Hold last key with the rotary wheel and press OK.
4 Repeat step 3 to create another activity.
The activity is added to the SRU8008.
You can now run the activity with the SRU8008:
■ Press ACTIVITIES select the activity with the rotary wheel and
press OK.
4.2.2 Rename an Activity
To rename an activity:
1 Go to Setup - Activities, select Rename Activity and press OK.
2 Enter the text for the new label with the alphanumeric keys.

Note
You can delete characters with the Clear key and the left cursor.
3 Confirm the new label.
The activity is renamed.
4.2.3 Delete an Activity
To delete an activity:
1 Go to Setup - Activities, select Delete Activity and press OK.
2 Select the activity you want to delete.
3 Confirm you want to delete the activity.
The activity is deleted.
4.3 More Functions
4.3.1 Add a Function
To add more functions:
1 Go to Setup - More Functions, select Add Function and press OK.
2 Position the SRU8008 and your original remote control as shown. ⑩
3 Select the device you want to add a function to.
4 Select the label you want to use for the extra function.
5 Follow the instructions on the SRU8008 to copy the function from your original remote. The function is added to the SRU8008.
4.3.2 Rename a Function
To rename an extra function:
1 Go to Setup - More Functions, select Rename Function and press OK.
2 Enter the text for the new label with the alphanumeric keys.

Note
You can delete characters with the Clear key and the left cursor.
3 Confirm the new label.
The function is renamed.
4.3.3 Delete a Function
To delete an extra function:
1 Go to Setup - More Functions, select Delete Function and press OK.
2 Select the device from which you want to delete a function.
3 Select the function you want to delete.
4 Confirm you want to delete the function. The function is deleted.
4.4 System Settings
4.4.1 Backlight Time-Out
When you use the SRU8008, the backlight turns on. After 5 seconds it turns off again.
To change this time out:
1 Go to Setup - System Settings, select Backlight Time-Out and press OK.
2 Select the preferred backlight time-out with the rotary wheel: 3 seconds, 5 seconds, 10 seconds, 20 seconds.
3 Confirm the new time-out setting. The backlight time-out is changed.
Note
The backlight time-out has an impact on the lifetime of the batteries, the longer the backlight stays on, the faster the batteries drain.
4.4.2 Key Backlight
To turn on and off the key backlight:
1 Go to Setup - System Settings, select Key Backlight and press OK.
2 Select On or Off with the rotary wheel.
3 Confirm the new key backlight setting. The key backlight is turned on or off.
4.4.3 Full Reset
When resetting the SRU8008 completely, all installed devices, activities and other settings are deleted. After the reset, the SRU8008 needs to be installed again.
To reset the SRU8008:
1 Go to Setup - System Settings, select Full Reset and press OK
2 Select Yes with the rotary wheel and press OK
3 Press POWER to reconfirm.
The SRU8008 deletes all settings and restarts with the Installation Wizard. This can take up to one minute.
4.5 Language
To change the language of the SRU8008:
1 Go to Setup - Language and press OK.
2 Select the preferred language with the rotary wheel: English, Français, Deutsch, Español, Italiano, Nederlands, Русский.
3 Confirm the new language.
The language used in the Setup menu is changed.
5 Frequently Asked Questions
Keys
Why are one or more keys not working with my device?
Not all functions are available in the database of the SRU8008 or the code behind the key is defect.
You can fix a key by copying the signal from your original remote.
See 'Fix a key' on page 11.
How do I operate the Up, Down, Left, Right cursor keys for the onscreen menu?
The rotary wheel is an easy-to-use, multifunctional control on your SRU8008:
- When turning the rotary wheel, you scroll through the different options on your remote control's display.
- When pushing the rotary wheel at the top, at the bottom, at the left or at the right, you navigate through the onscreen menu of the device (TV, DVD, VCR, etc) you are controlling at that moment.
How can I add extra functions to the SRU8008?
See 'Add a Function' on page 14.
Brand
Why can I not find the brand of my device in the SRU8008?
Not all brands are available in the database of the SRU8008. When your brand is not in the list:
- You can copy the keys from your original remote. See 'Fix a key' on page 11. -Or-
- You can select Not in list to perform a full database search. The SRU8008 tests all available codes. This can take up to 25 minutes.
Activity
Can I go from one activity to another?
No, when an activity is selected you cannot select the same or another activity once more. You have to switch off all devices before selecting a new activity from the list.
Volume
Why are the volume keys not working properly?
After adding devices, the SRU8008 automatically copies the volume keys and Mute key, as follows:
- Video devices, like DVD, DVDR, VCR and Satellite box, use the volume keys of the TV.
- Audio devices, like CD, DMR and Tuner; use the volume keys of the Amplifier or Receiver.
If you did not install the source device (TV, Amplifier or Receiver), the volume keys and the Mute key will not work. To define the volume keys:
- You can install the source device on the SRU8008.
See 'Add a Device' on page 11. -Or- - You can copy the volume keys of another source device.
See 'Copy the Volume' on page 12.
Batteries
Why can I not enter the Setup menu?
When the battery level is too low, you cannot enter the Setup menu. Replace the batteries with new alkaline batteries.
Why does the SRU8008 not wake up anymore?
The battery level is too low. Replace the batteries with new alkaline batteries.
Do I loose my data when I replace the batteries?
No. Your data will be saved.
Can I use rechargeable batteries with my SRU8008?
Yes you certainly can. However, bear in mind that rechargeable batteries tend to drain faster than alkaline batteries.
6 Need help?
First of all, read this Instruction for Use carefully.
When you have additional questions about the usage, setup or warranty of the SRU8008, see www.philips.com/support
For contact details, see www.philips.com/support
Make sure the SRU8008 is at hand when you call our helpline so that our operators can help you determine whether it is working properly.
The model number of your Philips universal remote control is SRU8008. For the correct device codes for your remote, see www.philips.com/URC.
Date of purchase: ..../..../..... (day/month/year)
Innhold
1 Din Philips Prestigo SRU8008 20
1.1 Innholdet i esken 20
1.2 Oversikt, SRU8008 20
2 Komme i gang 21
2.1 Klargjøre 21
2.2 Installere 22
4.4 Systeminnstillinger 31
4.5 Språk 32

Installeringsveiledning – språkvalg
Når batteriene er nesten utladet, blinker symbolet Lavt batteri Dette indikerer at batteriene er nesten helt utladet. Du kan fremdeles betjene SRU8008 i en kort periode.

Liste over installerte aktiviteter
Merk
4.4 Systeminnstillinger


3.1 Seleccionar um Dispositivo
Para seleccionar os dispositivos instalados :
1Prima
DEVICES
Lista de actividades instaladas
Note


Huomautus


3.1 Välja en enhet
Obs!
4.1 Devices (Cihazlar) 92
4.2 Activities (Aktiviteler) 95


3.1 Cihaz seçme
Kurulu aktiviteler listesi
Not
4.1 Devices (Cihazlar)
4.1.1 Add Device (Cihaz ekle)
Delete Device (Cihazı sil)
Cihaz silmek için:
4.3.3 Delete Function (Fonksiyon sil)
English Disposal of your old product
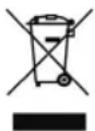
Your product is designed and manufactured with high quality materials and components, which can be recycled and reused.
When this crossed-out wheeled bin symbol is attached to a product it means the product is covered by the European Directive 2002/96/EC.
Please inform yourself about the local separate collection system for electrical and electronic products.
Please act according to your local rules and do not dispose of your old products with your normal household waste. The correct disposal of your old product will help prevent potential negative consequences for the environment and human health.
For warranty information and product support please visit http://www.philips.com/welcome.


- 2 GETTING STARTED 5
- 3 USING YOUR SRU8008 7
- 4 GETTING THE MOST OUT OF YOUR SRU8008 9
- 5 FREQUENTLY ASKED QUESTIONS 16
- 1 YOUR PHILIPS PRESTIGO SRU8008
- 1.1 WHAT'S IN THE BOX
- 1.2 OVERVIEW SRU8008
- BLACK KEYS FOR SENDING SIGNALS TO YOUR EQUIPMENT
- KEYS FOR CONTROLLING THE SRU8008
- 2 GETTING STARTED
- 2.1 PREPARE
- NOTE
- 2.2 INSTALL
- 3 USING YOUR SRU8008
- 3.1 SELECTING A DEVICE
- 3.2 SELECTING AN ACTIVITY
- 3.3 SELECTING MORE FUNCTIONS
- 4 GETTING THE MOST OUT OF YOUR SRU8008
- 4.1 DEVICES
- 4.1.1 ADD A DEVICE
- 4.1.2 FIX A KEY
- 4.1.3 COPY THE VOLUME
- NOTES
- 4.1.4 RENAME A DEVICE
- 4.1.5 DELETE A DEVICE
- 4.2 ACTIVITIES
- 4.2.1 ADD AN ACTIVITY
- 4.2.2 RENAME AN ACTIVITY
- 4.2.3 DELETE AN ACTIVITY
- 4.3 MORE FUNCTIONS
- 4.3.1 ADD A FUNCTION
- 4.3.2 RENAME A FUNCTION
- 4.3.3 DELETE A FUNCTION
- 4.4 SYSTEM SETTINGS
- 4.4.1 BACKLIGHT TIME-OUT
- 4.4.2 KEY BACKLIGHT
- 4.4.3 FULL RESET
- 4.5 LANGUAGE
- 5 FREQUENTLY ASKED QUESTIONS
- KEYS
- HOW DO I OPERATE THE UP, DOWN, LEFT, RIGHT CURSOR KEYS FOR THE ONSCREEN MENU
- HOW CAN I ADD EXTRA FUNCTIONS TO THE SRU8008
- BRAND
- ACTIVITY
- CAN I GO FROM ONE ACTIVITY TO ANOTHER
- VOLUME
- WHY ARE THE VOLUME KEYS NOT WORKING PROPERLY
- BATTERIES
- WHY CAN I NOT ENTER THE SETUP MENU
- WHY DOES THE SRU8008 NOT WAKE UP ANYMORE
- DO I LOOSE MY DATA WHEN I REPLACE THE BATTERIES
- CAN I USE RECHARGEABLE BATTERIES WITH MY SRU8008
- 6 NEED HELP
- INNHOLD
- 1 DIN PHILIPS PRESTIGO SRU8008 20
- 2 KOMME I GANG 21
- 4.4 SYSTEMINNSTILLINGER
- 3.1 SELECCIONAR UM DISPOSITIVO
- 3.1 VÄLJA EN ENHET
- 3.1 CIHAZ SEÇME
- NOT
- 4.1 DEVICES (CIHAZLAR)
- 4.1.1 ADD DEVICE (CIHAZ EKLE)
- DELETE DEVICE (CIHAZI SIL)
- 4.3.3 DELETE FUNCTION (FONKSIYON SIL)
- ENGLISH DISPOSAL OF YOUR OLD PRODUCT
Brand : PHILIPS
Model : Pretigo SRU8008
Category : Remote control