
STEAM VAC DUAL V - Carpet Cleaner HOOVER - Free user manual and instructions
Find the device manual for free STEAM VAC DUAL V HOOVER in PDF.



| Product Type | Carpet Cleaner |
| Brand | HOOVER |
| Model | STEAM VAC DUAL V |
| Power Supply | 120 V ~, 60 Hz |
| Clean Water Tank Capacity | 3.78 L (1 gal) |
| Detergent Tank Capacity | 473 ml (16 oz) |
| Brush Type | Removable brush rolls with speed selector (ON/OFF) |
| Main Functions | Cleaning and rinsing carpets and hard floors |
| Included Accessories | Hose, stair/furniture nozzle, hard surface tool, SpinScrub hand tool (model dependent) |
| Warranty | 1 year (household use) |
| Safety | Automatic shut-off when tank full, mandatory grounding, do not immerse |
| Maintenance | Washable removable brushes, regular filter screen cleaning |
| Usage | Indoor only, on carpets and hard floors (with specific accessory) |
| Recommended Cleaners | HOOVER detergents exclusively, do not use wax |
Frequently Asked Questions - STEAM VAC DUAL V HOOVER
User questions about STEAM VAC DUAL V HOOVER
0 question about this device. Answer the ones you know or ask your own.
Ask a new question about this device
Download the instructions for your Carpet Cleaner in PDF format for free! Find your manual STEAM VAC DUAL V - HOOVER and take your electronic device back in hand. On this page are published all the documents necessary for the use of your device. STEAM VAC DUAL V by HOOVER.
USER MANUAL STEAM VAC DUAL V HOOVER
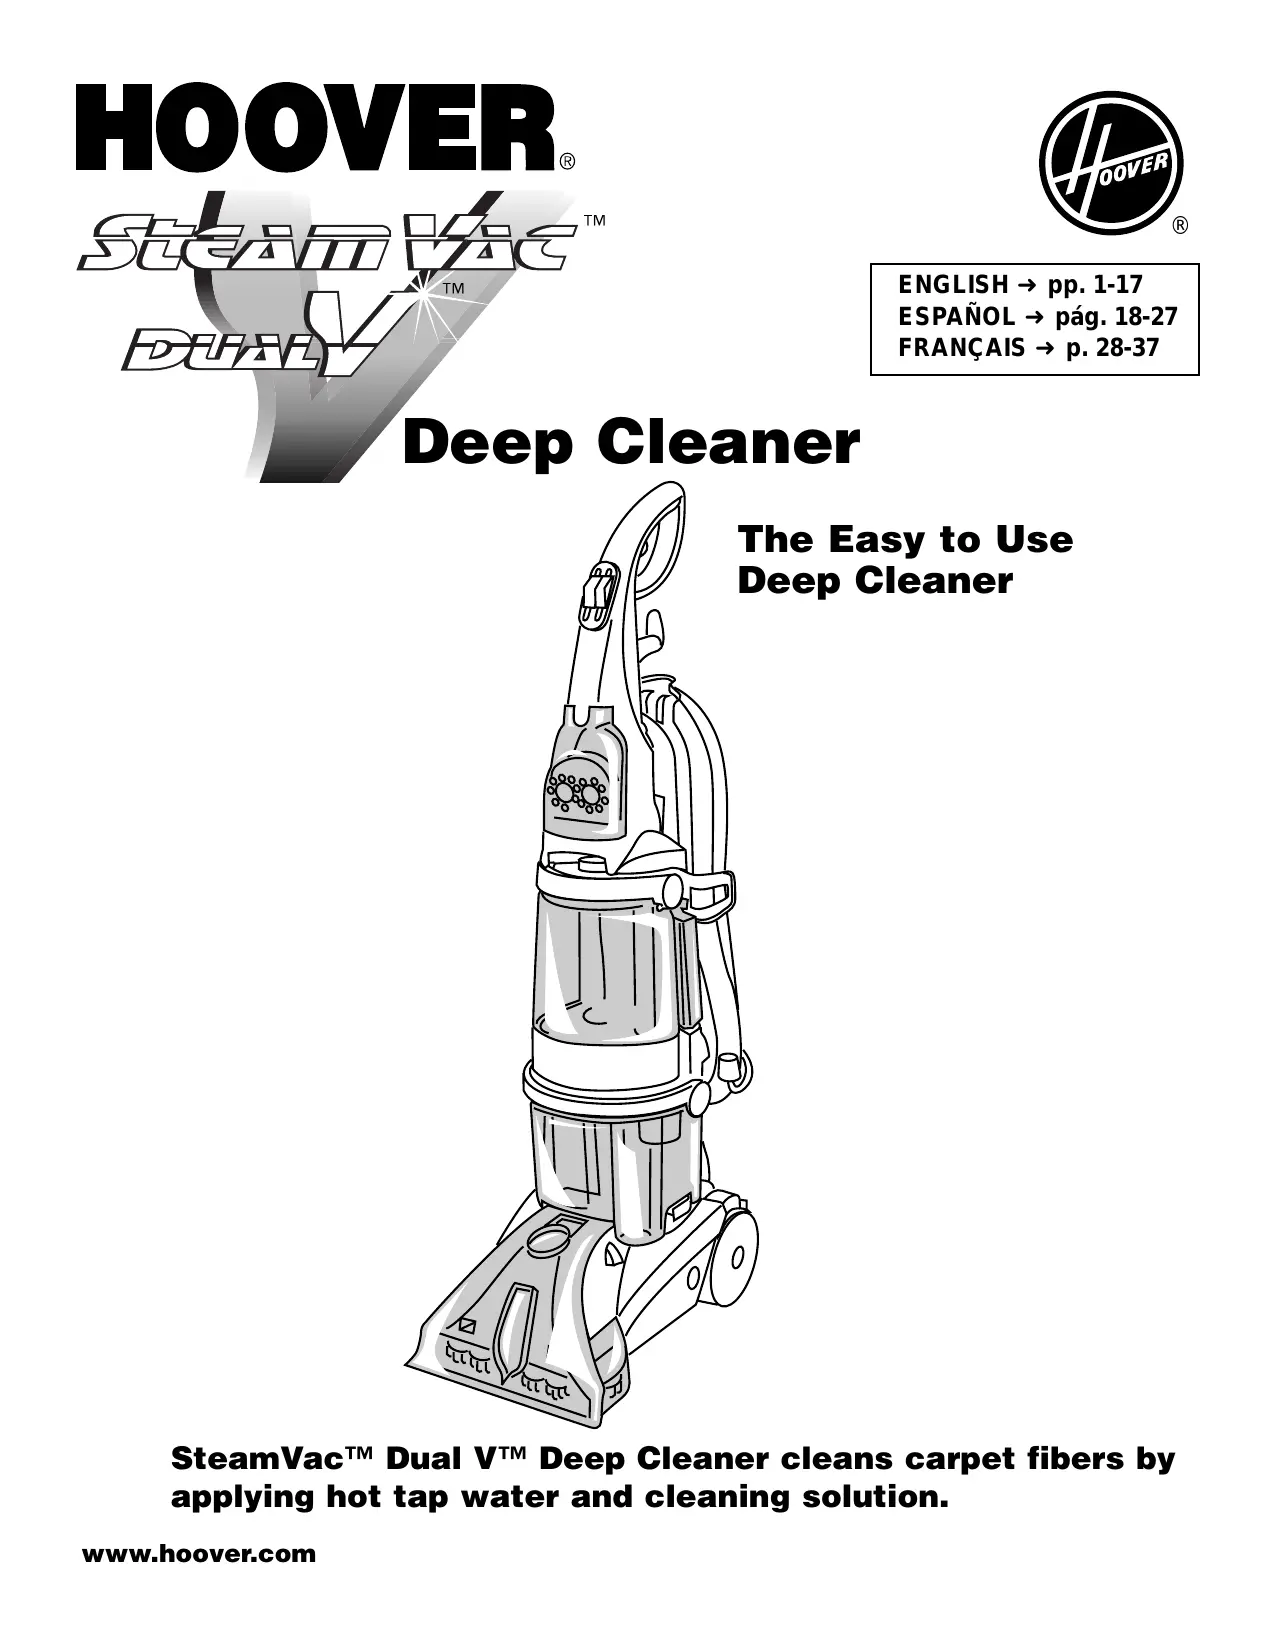
The Easy to Use Deep Cleaner
The SteamVac™ Dual V™ Deep Cleaner cleans carpet fibers by applying hot tap water and cleaning solution.
Important Safeguards!
When using an electrical appliance, always follow basic precautions, including the following:
READ ALL INSTRUCTIONS BEFORE USING APPLIANCE.
WARNING:
To reduce the risk of fire, electric shock, or injury:
- Use indoors only.
- Use only on surfaces moistened by the cleaning process. Do not immerse product.
Connect to a properly grounded outlet only. See “Grounding Instructions”.
Do not clean over floor electrical outlets.
Do not use without tanks in place.
Do not fill with water above 140°F (60°C).
Use extra care when cleaning on stairs. Do not place deep cleaner on stairs.
Use deep cleaner only for its intended use as described in the instructions.
- Use only attachments recommended by Hoover; others may cause hazards.
- The use of an extension cord is not recommended. If an extension cord is absolutely necessary, use at least a 16 gauge 3-wire cord which has a 3-prong grounding type plug and a 3-pole receptacle that accepts the machine plug.
- Unplug deep cleaner when not in use. Turn off all controls before unplugging.
- Unplug before connecting the powered hand tool.
• Always disconnect cord from electrical outlet before servicing the deep cleaner.
- Do not unplug by pulling on cord. To unplug, grasp the plug, not the cord.
- Never handle plug or appliance with wet hands.
- Do not pull or carry by cord, use cord as a handle, close door on cord or pull cord around sharp edges or corners. Do not run appliance over cord. Keep cord away from heated surfaces.
- Do not use with damaged cord or plug. If appliance is not working as it should, has been dropped, damaged, left outdoors, or dropped into water, take it to a Hoover Sales and Service Center or Authorized Hoover Warranty Service Dealer.
- Close supervision is necessary when any appliance is used by or near children. Do not allow deep cleaner to be used as a toy or to run unattended at any time.
- Do not point tools toward people or pets.
- Use only commercially available Hoover SteamVac™ cleaners intended for machine application. Do not use any type of wax with deep cleaner.
- When using recommended chemicals with this machine, be certain area is well ventilated.
- Keep detergents and other cleaners out of children's reach.
- Do not use to pick up flammable or combustible liquids such as gasoline or use in areas where they may be present.
- Do not pick up chlorine bleach, drain cleaner, gasoline or any other toxic material with this appliance.
- Do not pick up anything that is burning or smoking, such as cigarettes, matches, or hot ashes.
- Avoid picking up hard, sharp objects with the deep cleaner. They may damage the machine.
- Keep hair, loose clothing, fingers, feet and all parts of body away from openings and moving parts.
- Do not put any object into openings. Do not use with any opening blocked; keep free of dust, lint, hair, and anything that may reduce air flow.
- To help prevent matting and resoiling, avoid contact with carpets until they are dry. Keep children and pets away from carpets until they are completely dry.
- Store in a dry place. Do not expose machine to freezing temperatures.
Grounding Instructions
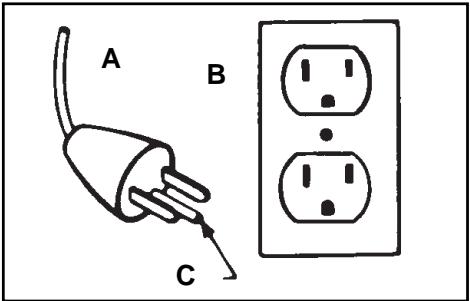
This appliance must be grounded. If it should malfunction or breakdown, grounding provides a path of least resistance for electrical current to reduce the risk of electric shock. This appliance is equipped with a cord having an equipment-grounding conductor (C) and grounding plug (A). The plug must be plugged into an appropriate outlet (B) that is properly installed and grounded in accordance with all local codes and ordinances.
DANGER-
Improper connection of the equipment-grounding conductor can result in the risk of electric shock. Check with a qualified electrician or service person if you are in doubt as to whether the outlet is properly grounded. Do not modify the plug provided with the appliance - if it will not fit the outlet, have a proper outlet installed by a qualified electrician. This appliance is for use on a nominal 120 volt circuit and has a grounding plug that looks like the plug illustrated in sketch (A).
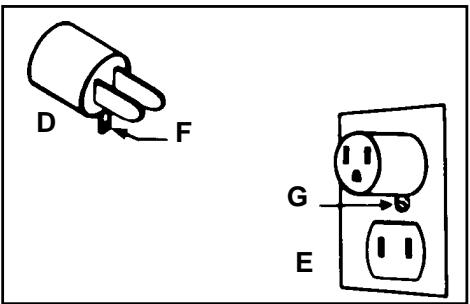
A temporary adapter (D) may be used to connect this plug to a 2-pole receptacle (E) if a properly grounded outlet is not available. The temporary adapter should be used only until a properly grounded outlet (B) can be installed by a qualified electrician. The green colored rigid ear, lug, or the like (F) extending from the adapter must be connected to a permanent ground (G) such as a properly grounded outlet box cover. Whenever the adapter is used, it must be held in place by a metal screw. NOTE: In Canada, the use of a temporary adapter is not permitted by the Canadian Electrical Code.
Save these instructions!
Thank you for choosing a HOOVER product.
If you need any assistance:
Visit our website at www.hoover.com. Click on the “Service” button to find the service outlet nearest you OR
Call 1-800-944-9200 for an automated referral of service outlet locations (U.S. only) OR
Call 1-330-499-9499 to speak with a representative in our Consumer Response Center.
PLEASE DO NOT RETURN THIS PRODUCT TO THE STORE.
Fill in and Save
Please enter the COMPLETE model and serial numbers in the spaces provided and save.
The model and serial numbers are located on the data label on the back of the handle.
Model No. ____
Serial No. ____
Hint: Attach your sales receipt to this owner's manual.
Verification of date of purchase may be required for warranty service of your Hoover product.
1. Assembly
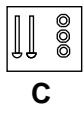
Parts needed for assembly
1-1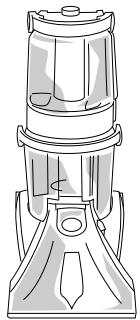
A
B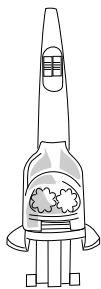
D
F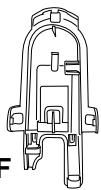
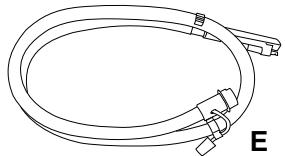
A. Deep cleaner B. Upper handle C. Handle bolts and nuts (in bag with hose) D. Hose/cord hook E. Hose F. Hose/tool caddy
duct. Contents
Important safeguards 2
Parts needed for assembly.....3
Assembling deep cleaner ..... 4-6
Deep cleaner description ..... 6
General operation 7-9
Filling the clean water tank ... 8-9
Emptying the recovery tank .... 9
Brush speed selector ..... 7
Automatic shut-off.....7
How to use
Before you begin ..... 10
After cleaning ..... 10-11
Cleaning carpet ..... 11
Cleaning bare floors ..... 12
Using the tools ..... 12-15
Cleaning carpeted stairs.....14
Cleaning upholstery ..... 15
If you have a problem ..... 16
Lubrication 16
Service 17
Storage 16
Warranty 17


© 2002 The Hoover Company
www.hoover.com
Accessories - vary by model
J
GHI K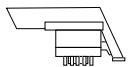
L
M
Not all accessories are included with every model.
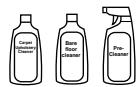
G. Carpet/Upholstery Detergent H. Hard Floor Cleaning Solution I. Spot and Stain Spray Cleaner J. Bare floor tool K. SpinScrub™ hand tool L. Utility tool M. Stair/upholstery nozzle
Accessories not included with your model may be purchased separately using the order form located at the center of this manual.
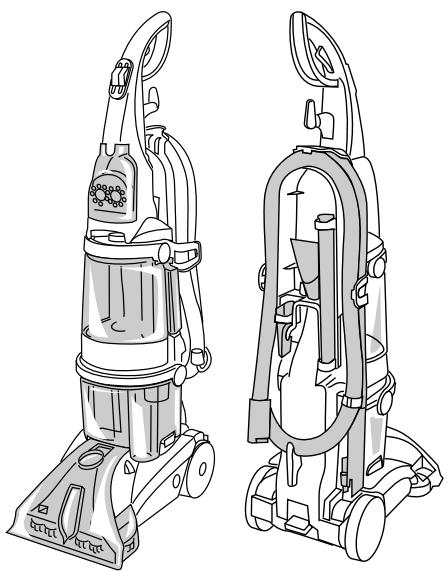
The assembled cleaner will look like this drawing. Model with SpinScrub™ hand tool is shown.
Attach upper handle
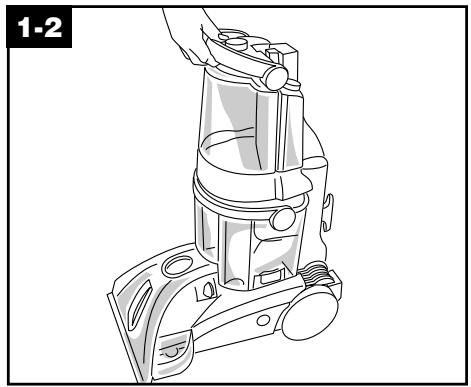
Remove clean water tank (upper tank) from deep cleaner.
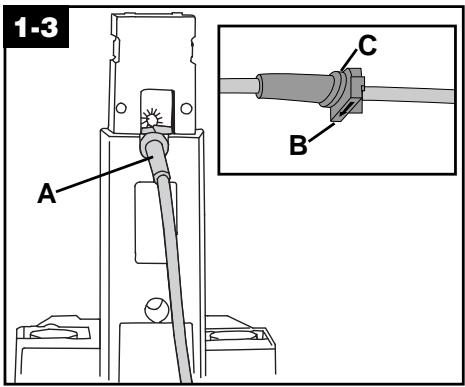
NOTE: If the cord protector (A) on back of handle should become dislodged during unpacking, make sure it is repositioned properly before continuing with assembly of your deep cleaner. With the arrow (B) on the cord protector pointing down, press groove (C) in the cord protector into slot in the lower handle.
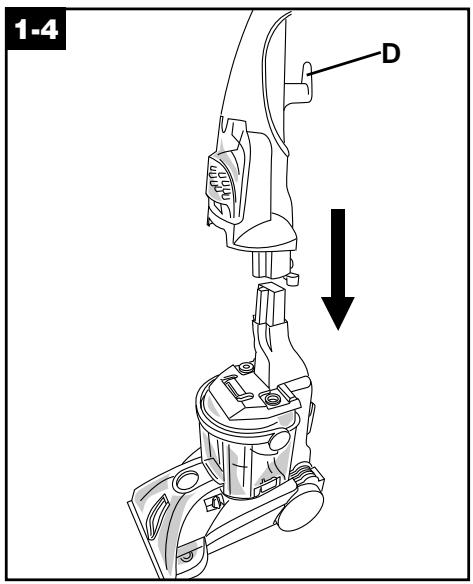
With cord hook (D) to back of deep cleaner, push upper handle down onto lower handle.
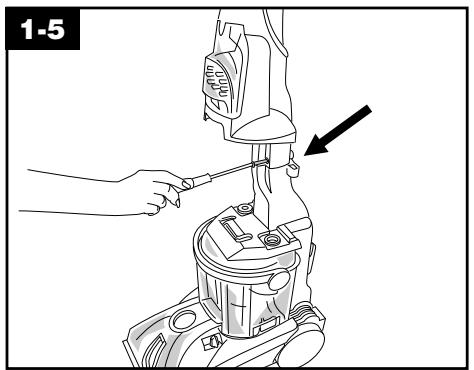
Push bolts into holes on front of handle. If bolts will not go through hole easily, handle is not pushed completely down.
Place nuts in recessed areas on back of the handle. Hold each nut in place while tightening each bolt securely (from the front of the handle) with a Phillips screw driver.
Only two nuts are needed on this model. The extra nut is not required but has been provided for your convenience.
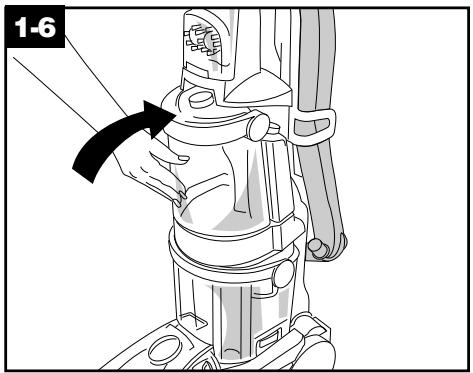
Replace the clean water tank (upper tank) by positioning the bottom first, then press the tank into place.
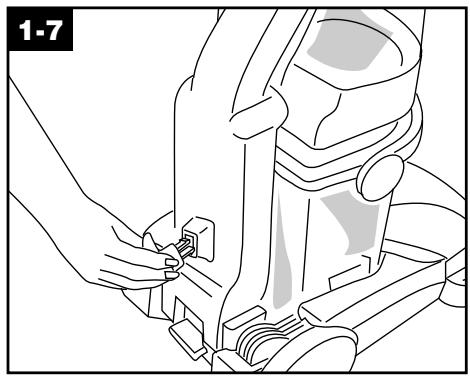
Attach the hose/cord hook.
Insert the tabs on the hook into the slots on the back of the cleaner, then snap the hook onto the cleaner.
Attach the hose/tool caddy.
The hose/tool caddy is designed to be used either on the cleaner for easy access to the tools and hose, or if the tools are not going to be used, it can be removed and hung for storage.
If you do not want to attach the caddy to the cleaner at this time, proceed to Fig. 1-10 for proper hose placement on the caddy.
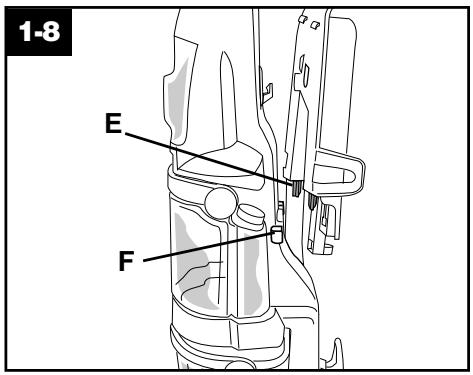
Slide the tabs (E) on the caddy into the slots (F) on the back of the cleaner.
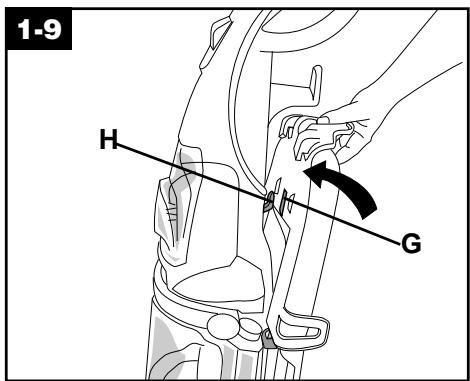
Rotate the top of the caddy toward the cleaner handle. Slide the caddy down so the notch (G) on the caddy rests in the hook (H) on the cleaner.
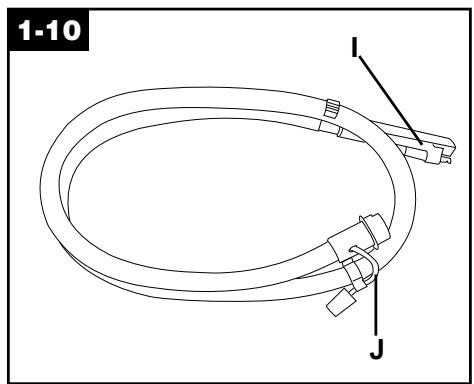
Identify the hose parts before storing the hose. I. Nozzle connector end J. Solution tube
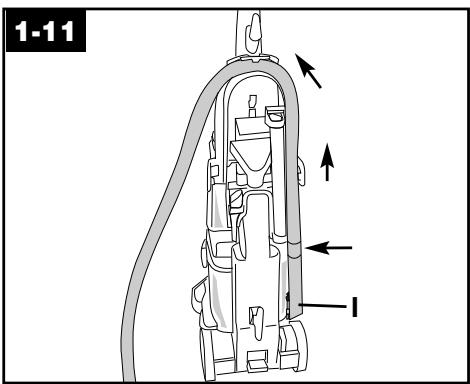
Storing hose and tools: Press the hose, a few inches from the nozzle connector end (I), into the caddy. Bring the hose up and over the top of the caddy.
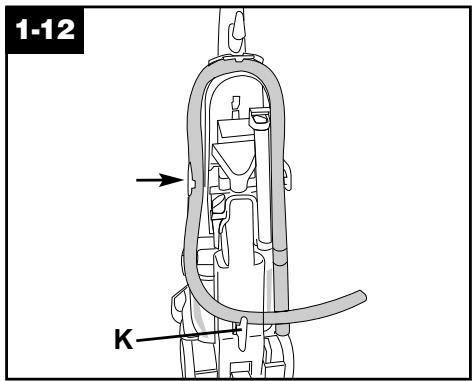
Press the hose into the opposite side of the caddy. Loop the hose at the bottom of the cleaner and press it into the top of the hook (K).
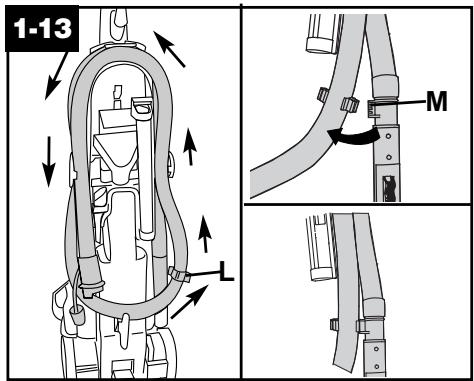
Loop the hose over the top of the caddy again. Slide the hose clip (L) toward the end of the hose. Snap the tab (M) on the hose connector into the hose clip.
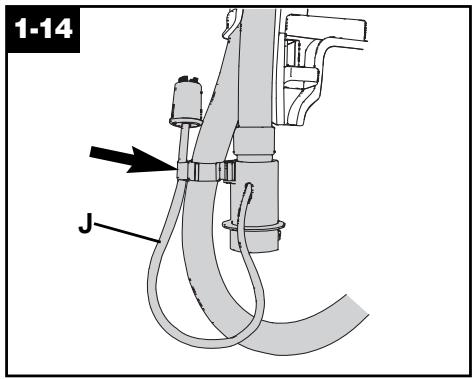
Repeat on the other end of the hose. Press the solution tube (J) into the opposite side of the clip.
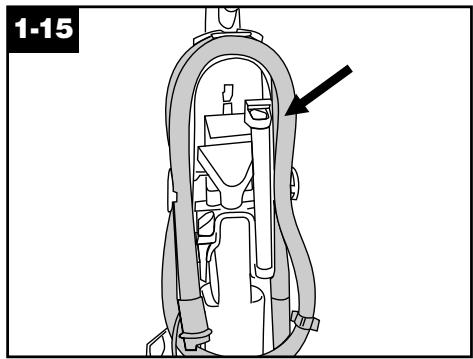
Insert the top of the bare floor tool (available at additional cost if not included with your cleaner) through the “loop” on the caddy. Slide the tool down into place.
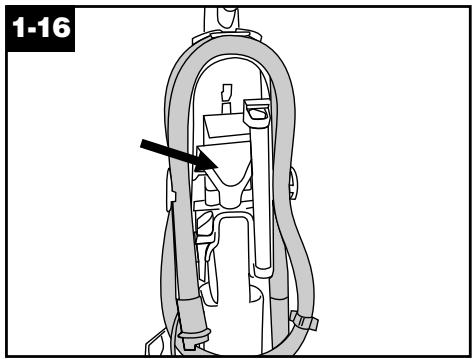
Snap the stair/upholstery nozzle onto the caddy.
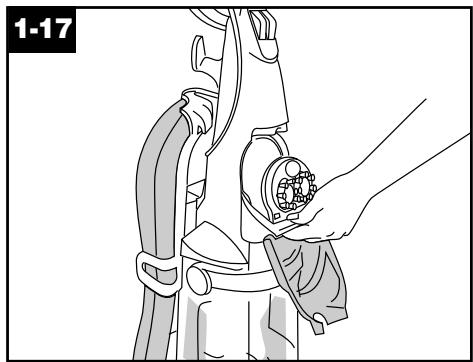
SpinScrub™ hand tool (not included with all models) The SpinScrub™ hand tool is shipped in a plastic bag for protection. To remove the bag before using the tool, open the tool door.
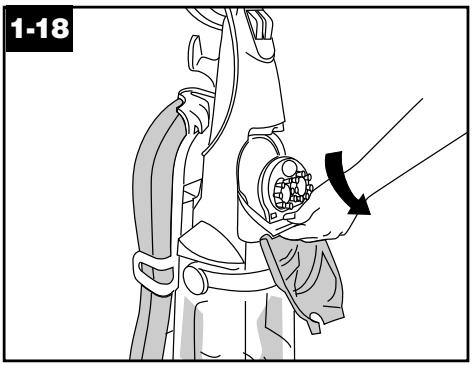
Pull the tool down and outward. To reposition the tool, reverse this procedure.
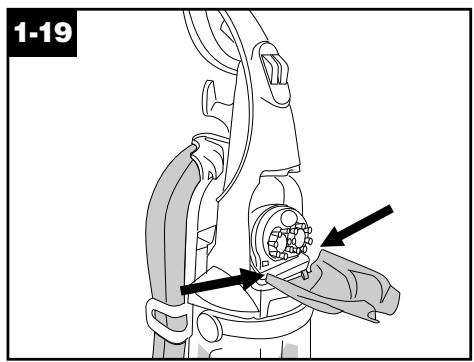
How to reattach the tool cover
The tool cover is designed with a break-away feature which allows it to snap free if it is pushed open too far.
To reattach, align the hinges of the cover with the holes on the sides of the tool storage area. Snap the door into place.
2. How to use
Deep Cleaner Description
2-1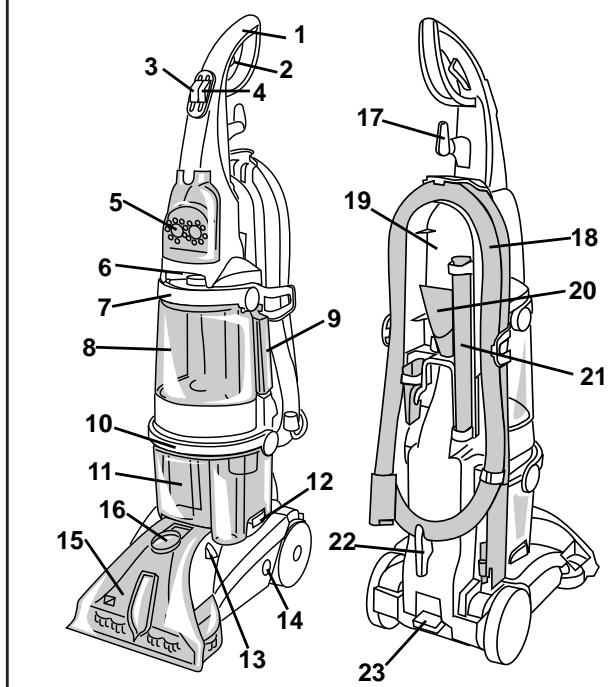
The assembled deep cleaner will look like the drawing. Model with SpinScrub™ hand tool is shown.
- Hand grip
- Solution trigger: press to release cleaning solution
- ON/OFF switch
- Wash/Rinse switch
- SpinScrub™ hand tool (not included with all models)
- Carrying handle
- Clean water tank handle
- Clean water tank
- Detergent container
- Recovery tank handle
- Recovery tank: holds dirty solution
- Recovery tank latches
- Brush setting selector
- Solution tube connection port
- Nozzle
- Hose connection port
- Cord hook: rotates for quick cord release
- Hose
- Hose/tool caddy
- Stair/upholstery nozzle
- Bare floor tool (available at additional cost if not included with your cleaner)
- Cord/hose hook
- Handle release pedal
This deep cleaner is intended for household use.
Operate deep cleaner only at voltage specified on data plate on back of cleaner. Plug deep cleaner into a properly grounded outlet.
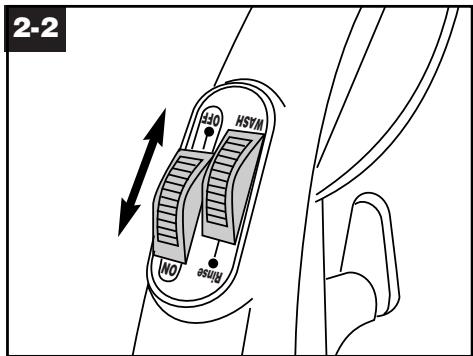
ON/OFF switch
To turn cleaner ON, push switch down.
To turn cleaner OFF, push switch up.
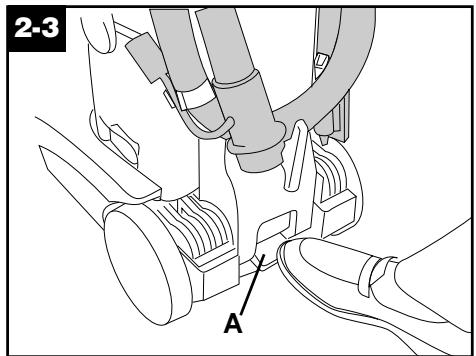
Handle release pedal
Step on pedal (A) to lower handle to operating position. Handle does not lock into a single position but “floats” to allow convenient operation.
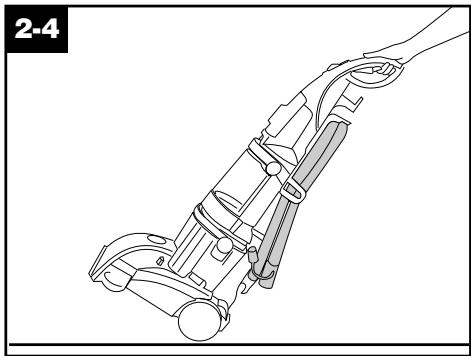
To transport
To move your deep cleaner from room to room, put handle in upright and locked position, tilt deep cleaner back on wheels and push forward.
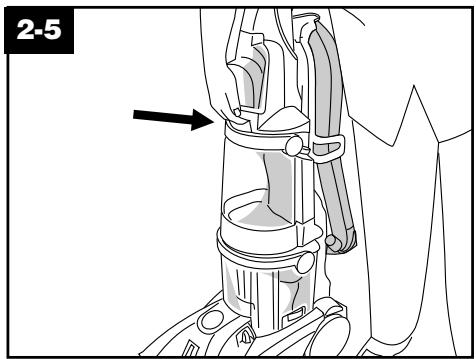
Carrying handle
The deep cleaner may also be lifted by placing a hand above the upper clean solution tank handle as shown.
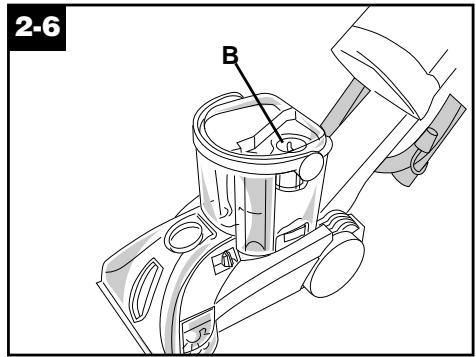
Automatic shut off
When the recovery tank (lower tank) is full the automatic shutoff mechanism will shut off the deep cleaner suction (suction will be noticeably reduced).
At that time, the yellow float disk will rise to the top of the recovery tank lid (B). The deep cleaner will no longer pick up dirty solution and the motor sound will become noticeably higher in pitch.
When this happens, turn deep cleaner off and empty recovery tank before continuing use.
Check clean water tank also; it may need to be refilled.
Do not use without float and float retainer in place. If broken or dislodged, take to an Authorized Hoover Service Center or Dealer for repair.
Brush setting selector
Your ‘SteamVac’ deep cleaner has two agitator brush settings.
ON - for cleaning of carpet and bare floors
OFF - for cleaning carpets and bare floors when brushing is not desired. Slide selector button to the desired setting before cleaning.
Wash/rinse switch
This switch allows you to easily change from cleaning your carpet or floor with a detergent/water mix to rinsing with water only.
Set the switch to WASH to clean the carpet or floor with detergent and water.
Set the switch to RINSE to use water only.
See “How to clean” section for more details.
The tanks
Clean water tank (upper tank)
The clean water tank (C) holds the water that will either be mixed with detergent for cleaning the carpet or floor, or used to rinse the carpet or floor.
The detergent container (D) is permanently attached to the water tank. It holds the detergent that mixes with the water.
2-10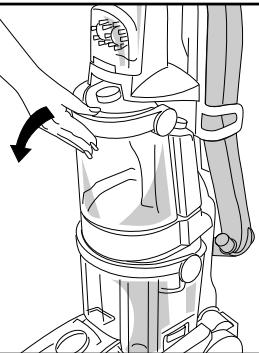
How to fill
Unplug deep cleaner from electrical outlet.
Place deep cleaner handle in the upright, locked position.
To remove tank, press down on tank handle and pull forward.
2-11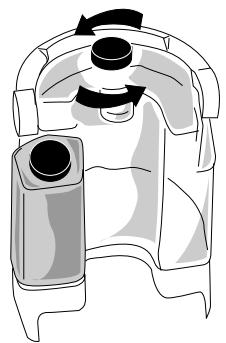
Carry tank to a sink.
Turn tank cap counterclockwise and remove cap.
2-12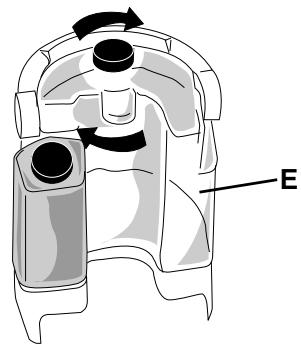
Fill tank (E) (1 gallon) with hot tap water. CAUTION: Do not fill with water above 140°F (60°C).
Replace tank cap and tighten.
2-13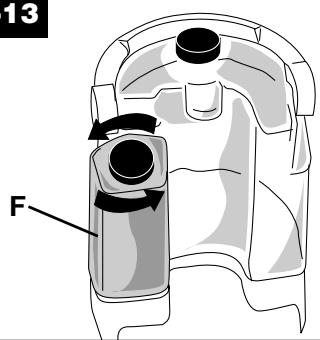
To fill detergent container (F), turn cap counterclockwise and remove cap.
Do not remove detergent container from tank.
2-14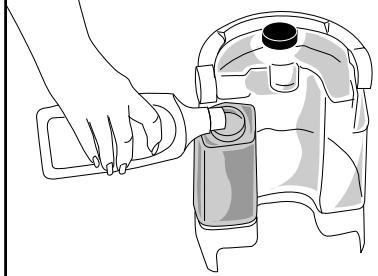
Fill container (16 oz.) with HOOVER Carpet/Upholstery Detergent or HOOVER Hard Floor Cleaning Solution
Do not use Hard Floor Cleaning Solution on carpet or upholstery. Do not use any type of wax with your 'SteamVac' deep cleaner.
To assure proper results, use only HOOVER detergent.
Replace container cap and tighten.
NOTE: Use only HOOVER detergents.
They are specially formulated for use with your 'SteamVac' deep cleaner.
CAUTION: Detergents contain Anionic and Nonionic Surfactants. Avoid contact with eyes and skin. In case of contact with eyes, flush with cold water for 15 minutes. In case of contact with skin, wash with water. If irritation persists, call a physician. For Medical Information (U.S.) call 1-800-752-7869.
2-15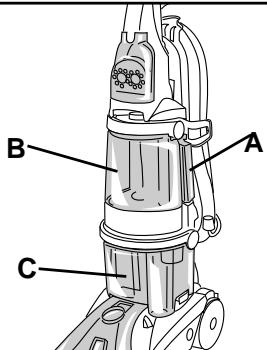
WARNING: Certain oxygenated-type cleaners, such as OxiClean* and TuffOxi** will damage your SteamVac™ detergent container (A), clean water tank (B) or recovery tank (C).
*OxiClean is a registered trademark of Orange Glo International, Inc.
**TuffOxi is a trademark of Tuff Products for Pets
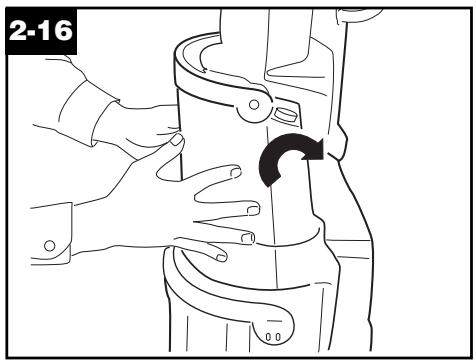
Position the bottom of the tank onto the cleaner, using one hand on each side of the tank to center it on the unit.
NOTE: The tank pivots towards the back of the unit.
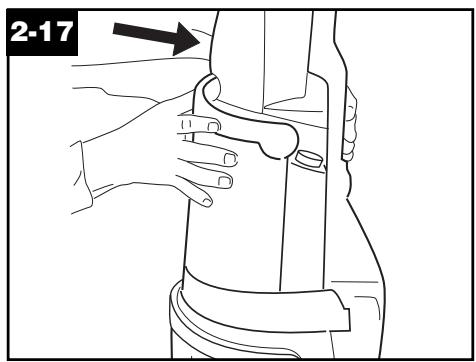
Push the top of the tank and the tank handle while supporting the back of the unit with your other hand.
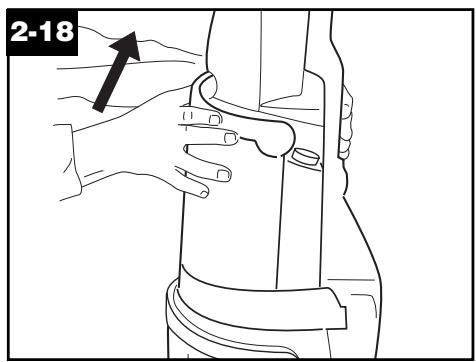
Push up on the handle once the tank is back to latch it to the unit.
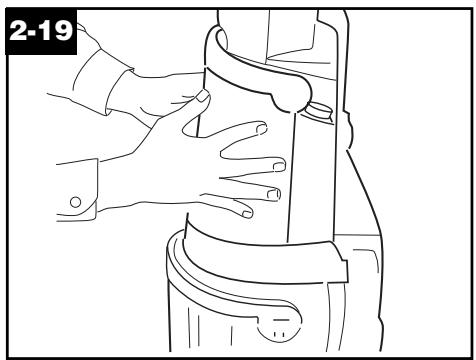
Check the tank to make sure it is securely latched.
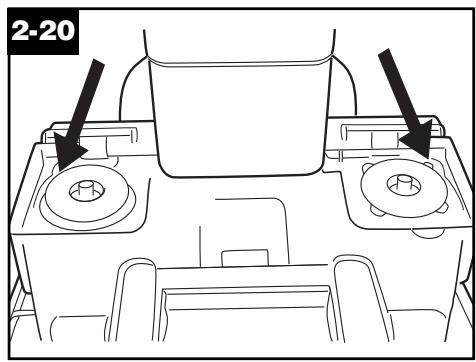
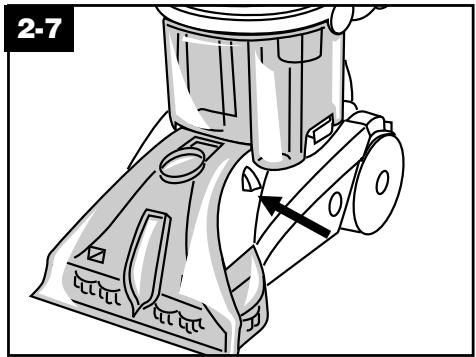
NOTE: There may be a small amount of water (indicated by arrows) on the base when the tank is removed from the unit. This is a normal condition.
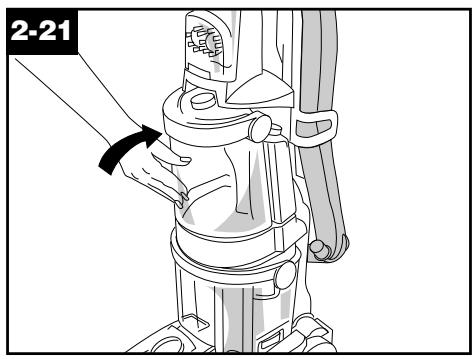
Position the bottom of the tank onto the cleaner and pivot the tank to snap it into place.
Recovery tank
(lower tank)
The recovery tank holds the dirty solution that is picked up from the surface being cleaned.
When the recovery tank is full, the automatic shut-off will engage, suction will stop (see page 7), and the tank must be emptied.
How to empty
Turn the deep cleaner off and unplug it from the electrical outlet.
To prevent possible leaking, remove the clean water tank (Fig. 2-10) by pressing down on the tank handle and pulling forward; set the tank aside (do not set the tank on furniture).
Step on the handle release pedal (Fig. 2-3) and lower the handle until it rests on the floor.
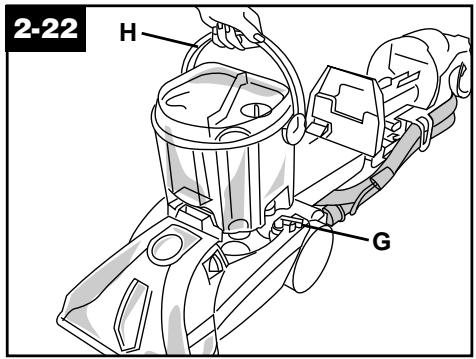
Turn recovery tank latches (G) outward (one on each side of tank).
Raise handle (H) straight up and lift tank off cleaner.
Carry tank to sink or drain.
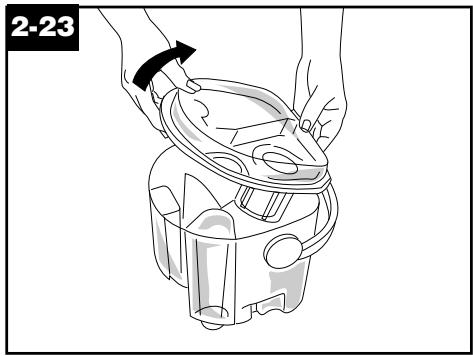
Lower handle toward back of tank to unlock lid. Lift lid off tank. Empty tank and reposition lid.
For full suction, it is important that the recovery tank lid is properly secured before cleaning.
Raise tank handle to carrying position and place it onto deep cleaner. Lower handle to front of tank.
Turn latches (one on each side of tank) inward to lock tank in place.
Raise handle of deep cleaner to upright position and reposition upper clean water tank.
3. How to clean
Before you begin cleaning
a. Vacuum thoroughly - For carpet, use a HOOVER vacuum cleaner with an agitator for best results. Vacuum upholstery with a vacuum cleaner with cleaning tool attachments. Use a crevice tool to reach into tufts and folds. Do not use the 'SteamVac' deep cleaner as a dry vacuum cleaner. b. For upholstery, check cleaning code - Use your HOOVER 'SteamVac' deep cleaner only if the upholstery fabric is marked with a "W" (for "wet" clean) or "S/W" (for "solvent/dry" or "wet" clean). Do not clean fabric marked "S" ("solvent/dry" clean only). If your upholstery does not have a code, seek professional assistance. c. Test for colorfastness - Wet a white absorbent cloth with the detergent. In a small, hidden area, gently rub the surface with the dampened cloth. Wait ten minutes and check for color removal or bleed with white paper towel or cloth. If surface has more than one color, check all colors.
d. When cleaning entire floor, move furniture out of area to be cleaned (may not be necessary if only high traffic areas are to be cleaned). For furniture too heavy to move, place aluminum foil or wax paper under legs. This will prevent wood finishes from staining carpet. Pin up furniture skirts and draperies.
e. Pretreat spots and heavy traffic areas with HOOVER® Spot & Stain Spray Cleaner* - Test Spot & Stain
Spray Cleaner for colorfastness by first spraying it on a hidden area; wait ten minutes and blot with white paper towels or cloth.
If no color change is visible, spray Spot & Stain Spray Cleaner onto spots and traffic areas. Wait at least ten minutes. Use your 'SteamVac' deep cleaner to pick up Spot & Stain Spray Cleaner and spot. Repeat until spot is removed; carefully scrub with a household scrub brush if necessary.
Do not saturate carpet or upholstery with Spot & Stain Spray Cleaner.
No cleaning solution removes all stains from all carpets. Stain removal varies with the type of spill, time elapsed before removal, carpet material, and carpet type.
f. To prevent staining, use plastic or aluminum foil to protect wood or metal surfaces from possible water spray.
g. To avoid wetting and possible damage to wood floors underneath area rugs/carpet, either move area rugs/carpet to a non-wood bare floor surface or place waterproof material (e.g., plastic) underneath them before cleaning.
See pages 10-14 for instructions on various cleaning tasks.
*Available at additional cost if not included with your model.
After cleaning
a. Allow carpet or upholstery to dry. To help prevent matting and resoiling the carpet, keep children and pets away from the surface until it is completely dry. If it is necessary to walk on damp carpet, place towels or white cloths on the traffic areas.
If furniture must be replaced before the carpet is dry, place plastic or aluminum foil under the legs of furniture so metal slides or wood finishes will not stain the carpet.
b. Empty tanks, rinse with clear water, and let air dry. Rinse the recovery tank lid and let air dry.
Any unused detergent may be left in the detergent container for future use.
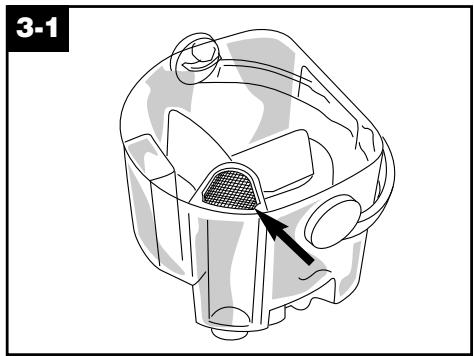
c. Remove lint from the filter screen located inside the recovery tank.
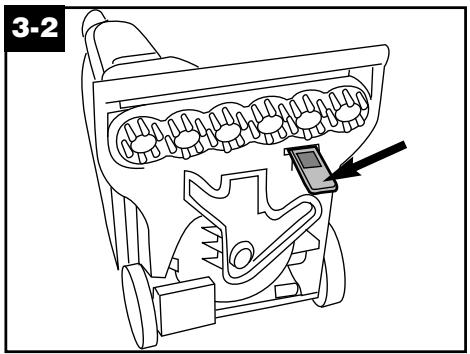
d. Remove lint from the filter screen located on the bottom of the cleaner as follows.
Note: When brushes seem to be rotating slowly, disconnect the deep cleaner from the electrical outlet and check and clean this screen.
Remove both tanks as described in Figs. 2-10 and 2-21. Tilt the cleaner back so the handle rests on the floor.
Squeeze the filter frame, lift it, and pull it out. Wipe off the screen and push the frame back into place.
Return the cleaner to the upright position.
e. If desired, vacuum thoroughly after the carpet has completely dried. This will help reduce any shading left by the deep cleaner's brushes.
To clean the nozzle
If lint or other debris becomes lodged in the nozzle, it can be removed for cleaning.
3-3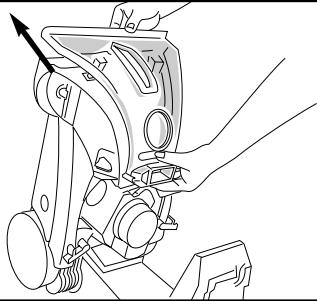
Unplug the deep cleaner from the electrical outlet.
Remove both tanks as described in Figs. 2-10 and 2-21. With the handle in the upright position, tilt the cleaner back so that the handle rests on the floor.
Lift up the rear edge of the nozzle. Slide the nozzle up and remove it from the cleaner.
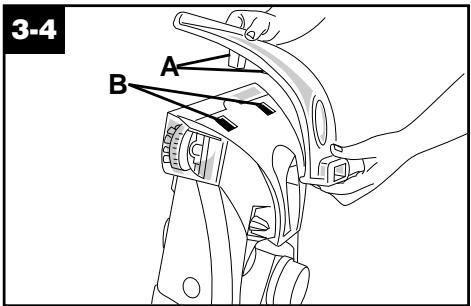
To replace the nozzle, line up the tabs (A) on the nozzle with the holes (B) in the cleaner. Slide the tabs into the holes.
Slide the nozzle completely onto the cleaner. Press down on the nozzle to secure it.
Replace the recovery tank (Figs. 2-21 and 2-22).
The nozzle must be in the proper position in order for the recovery tank to go on properly.
Raise the cleaner to the upright position and replace the clean water tank (Figs. 2-16 through 2-19).
Carpet Cleaning
Read "Before you begin cleaning" instructions on page 9.
- Fill clean water tank according to instructions for Figs. 2-9 to 2-12.
- Fill detergent container with HOOVER Carpet/Upholstery Detergent according to instructions for Figs. 2-13 to 2-14.
3. Turn brushes ON or OFF as desired.
- Dry hands and plug cord into a properly grounded outlet.
Do not clean over floor electrical outlets.
- To avoid walking on damp carpet, start at the end of the room farthest from the door or path to sink where tanks will be emptied and filled. Step on handle release pedal and lower handle to operating position.
- Set Wash/Rinse switch to WASH. Turn cleaner ON (Fig. 3-5).
3-5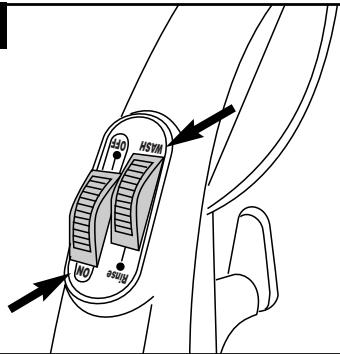
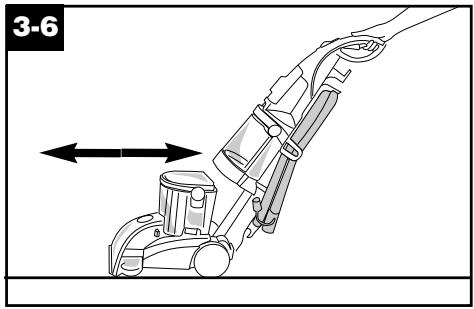
- Squeeze trigger to release cleaning solution and slowly push deep cleaner forward (equals one wet stroke).
- Continue to squeeze trigger and slowly pull deep cleaner back toward you (second wet stroke). Release trigger and slowly push deep cleaner forward over area just sprayed with solution (dry stroke). Then slowly pull deep cleaner back toward you without squeezing trigger (dry stroke). Continue using dry strokes until little water is visible passing through the recovery tank lid.
- Overlap strokes by 1 inch to help prevent streaking. Keep nozzle flat on floor for both forward and reverse strokes.
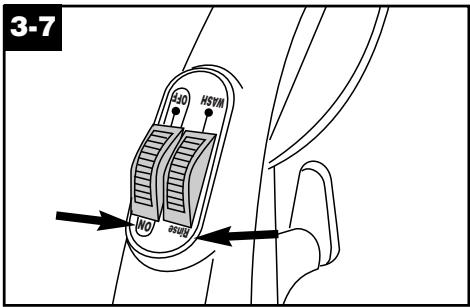
- If rinsing the carpet is desired, set Wash/Rinse switch to RINSE (Fig. 3-7). Repeat steps 7-9.
Rinsing is not necessary, but will help remove detergent residue and help your carpet look fresher.
- For heavily soiled areas, repeat steps 6-9. Avoid saturating carpet, as noted below.
Note: To avoid saturating carpet, do not use more than 4 wet strokes over one area. Always end with dry strokes.
It is best to alternate wet and dry strokes as described above.
For best cleaning results and to aid in faster drying of carpet, end with more dry strokes. (Continue using dry strokes until little water is visible passing through the recovery tank lid.) 12. Empty recovery tank when the motor sound becomes higher pitched and there is a loss in suction (see "Automatic shut-off", Fig. 2-6).
When finished cleaning, follow “After cleaning” instructions on pages 9 &10.
Cleaning bare floors
How to attach bare floor attachment
(Available at additional cost if not included with your cleaner.)
Unplug deep cleaner from electrical outlet.
To prevent possible leaking, remove clean water tank (Fig. 2-10) and recovery tank (Fig. 2-21) before positioning bare floor attachment.
Set tanks aside (do not set tank on furniture).
- With handle in upright position, tilt cleaner back so that handle rests on the floor.
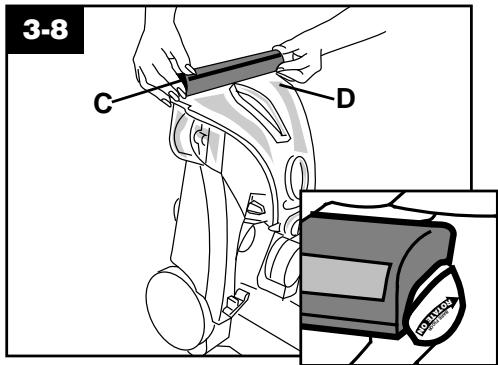
- With foam strip (C) (located under the netting) in position as shown, place attachment on front of nozzle (D).
Make sure arrow on end of attachment points in the direction as shown.
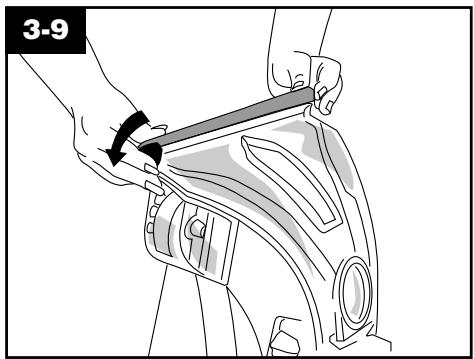
- Push attachment against nozzle while rotating attachment downward until both ends snap into place.
(Note: Some force may be required to rotate and snap attachment into place.)
- Return deep cleaner to upright position. Lower handle and replace recovery tank.
- Raise handle to upright position and reposition clean water tank.
To clean floor
Read "Before you begin cleaning" instructions on page 9.
Do not use the deep cleaner on hardwood floors.
- Fill clean water tank according to instructions for Figs. 2-9 to 2-12.
- Fill detergent container with HOOVER Hard Floor Cleaning Solution according to instructions for Figs. 2-13 to 2-14.
- Turn brushes ON for scrubbing or OFF if scrubbing is not desired.
- Dry hands and plug deep cleaner into a properly grounded outlet.
- Step on handle release pedal and lower handle to operating position.
- Set Wash/Rinse switch to WASH. Turn cleaner ON.
- To release solution, press trigger. Slowly move deep cleaner forward and backward over area to be cleaned.
- To pick up dirty solution, release trigger and slowly move deep cleaner over area where solution has just been dispersed. Use both forward and reverse strokes.
- If rinsing the floor is desired, set the Wash/Rinse switch to RINSE. Repeat steps 7 and 8.
Rinsing is not necessary, but it will help remove detergent residue from the floor.
- Empty the recovery tank when the motor sound becomes higher pitched and there is a loss of suction (see "Automatic shut-off", Fig. 2-6).
- When finished cleaning, follow the "After cleaning" instructions on pages 9 and 10.
Unplug the deep cleaner from the electrical outlet and remove the attachment from the nozzle. Rinse it in clear water. Do not remove the plastic screen or foam from the attachment.
Using the tools
Attach hose
Unplug the cleaner from the electrical outlet.
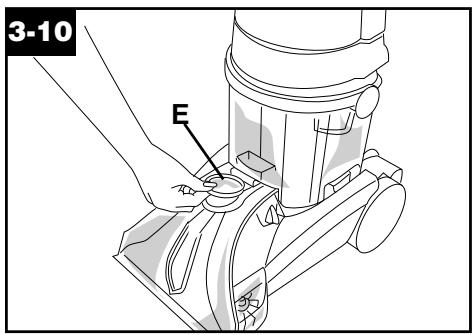
Open the hose connection port (E).
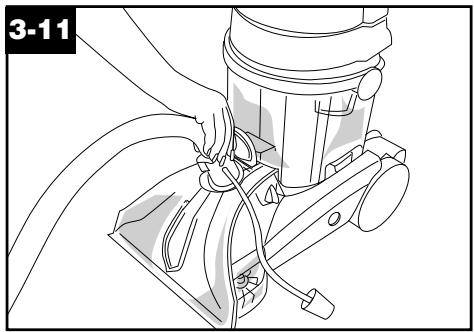
Insert the short hose end, matching the tabs on the hose with the same-sized slots in the port. Push the hose into the port and lock it in place.
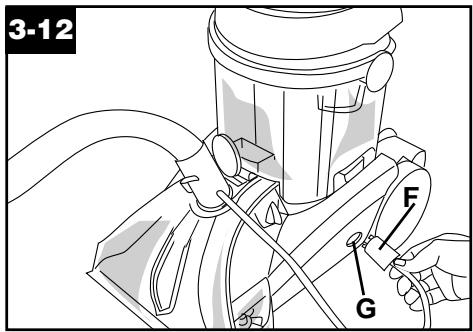
Plug the solution tube (F) firmly into the solution connection port (G).
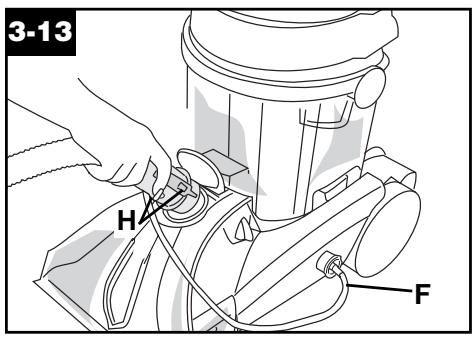
To remove the hose: Squeeze the latches (H) on the top and bottom of the hose. Remove the hose from the port. Close the door.
Remove the solution tube (F) from the solution connection port.
Select tool
Your model includes some combination of the following tools, but may not include them all.
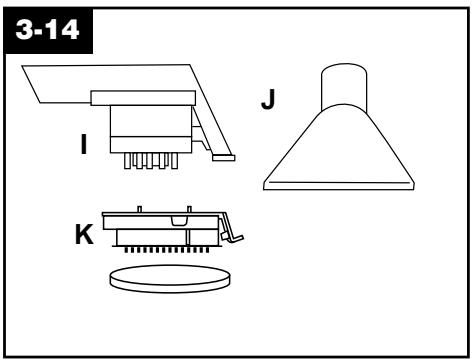
I. SpinScrub™ hand tool has rotating brushes for extra scrubbing action on small carpet areas, carpeted stairs and upholstery. For some models, the brushes can be removed for converting to the scrub module. J. Stair/upholstery nozzle has a built-in brush to help provide the scrubbing action some spots may need for removal. K. Scrub module with detachable scrub pad attaches to the base of the SpinScrub™ hand tool (in place of brush module). Can be used to scrub stubborn areas such as scuff marks, dried spills, and in hard to reach areas on hard surfaces.
How to attach tools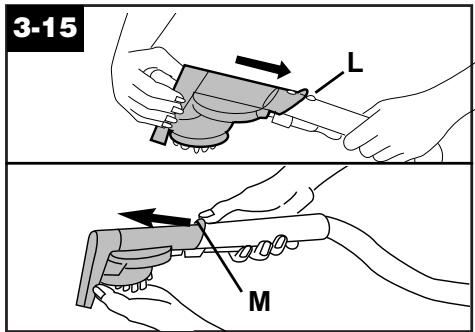
Unplug deep cleaner from electrical outlet.
- Place handle in upright position and remove hose from rack. All tools attach to the hose in the same manner:
- Connect tool to hose by sliding it onto connector until the tab (L) locks it securely.
Using your thumb, push forward and up on the latch (M) to remove tool.
After using tool
Drain suction hose by turning deep cleaner ON and holding nozzle up for several minutes. Do not press trigger. Unplug deep cleaner from electrical outlet.
Disconnect hose and solution tube from deep cleaner.
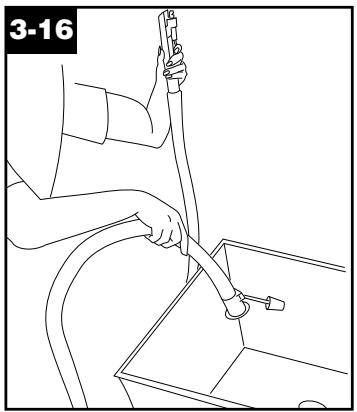
Drain solution tube by placing round end in sink and raising nozzle above your head. Press the trigger.
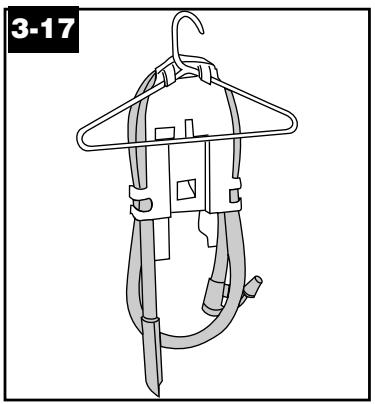
The tool caddy can be removed and hung on a coat hanger for storage.
Attaching scrub module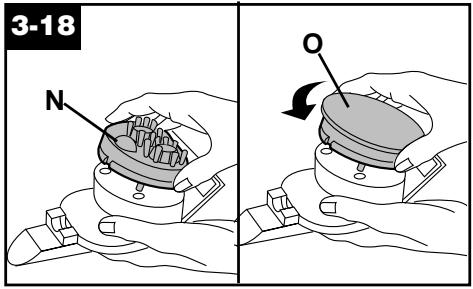
Available at additional cost if not included with your cleaner.
- Open the tool door and remove the SpinScrub™ hand tool.
- Grasp the sides of the brush module and lift it from the base (N).
- Snap scrub module onto the base.
Note: It may be necessary to rotate the scrub module (O) slightly so it will align properly to the base.
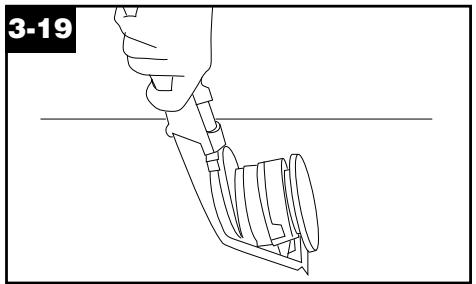
Using the scrub tool
With a little solution, test the scrub tool on a hidden area before using on the desired surface. If no surface change is visible, continue to use as described below.
- Attach hose and solution tube as instructed in Figs. 3-10 to 3-12.
- Place handle in upright position.
- Fill clean water tank according to instructions for Figs. 2-9 to 2-12.
- Fill detergent container with HOOVER Hard Floor Cleaning Solution according to instructions for Figs. 2-13 to 2-14.
- Attach tool to end of hose.
- Hold scrub tool above area to be cleaned and press trigger to dispense solution.
- Release trigger and scrub area with tool. Pick up dirty solution with squeegee as shown.
After using scrub tool
To clean scrub pad, pull it off module. Wash it in water with mild detergent. Rinse and let air dry. Pad must be completely dry before reattaching to module.
Replacement pads may also be purchased. Ask for HOOVER part no. 40308001.
Cleaning carpeted stairs
Read "Before you begin cleaning" instructions on page 9.
- Attach hose and solution tube as instructed in Figs. 3-10 to 3-12.
- Place handle in upright position. Agitator brushes will not rotate while handle is in upright position.
- Fill clean water tank according to instructions for Figs. 2-9 to 2-12.
- Fill detergent container with HOOVER Carpet/Upholstery Detergent according to instructions for Figs 2-13 to 2-14.
- Attach tool to end of hose.
- Hose length may require that machine be placed at the top of the stairs to clean upper half of stairway and at bottom of stairs to clean lower half.
To prevent machine from falling, use extra caution when cleaning on stairs. Do not place deep cleaner on stairs. Do not point tools toward people or pets.
- Dry hands and plug deep cleaner into a properly grounded outlet.
- Set Wash/Rinse switch to WASH. Turn cleaner ON.
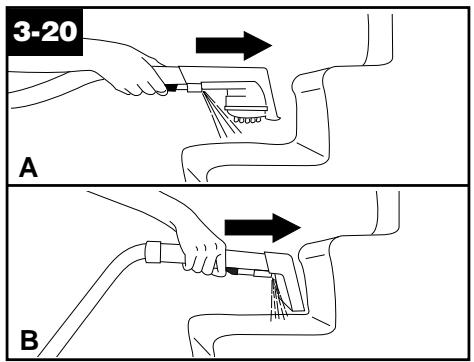
- Pre-spray the carpeted stair by holding the tool (A) or (B) about one inch above the carpet and push it forward while pressing the trigger (equals one wet stroke).
- Position tool against the riser and slightly press it into carpet pile. Press the trigger and pull the tool slowly over the carpet (second wet stroke). Release trigger at end of stroke.
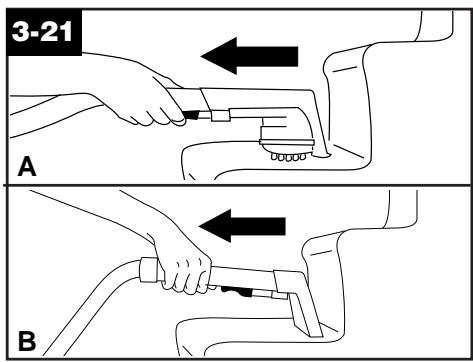
- Lift tool, and position it against riser. Pull tool slowly over carpet without pressing trigger (dry stroke).
- Overlap strokes by 1/2 inch to help prevent streaking.
It is best to alternate wet and dry strokes as described above. End with more dry strokes to aid in faster drying of carpet.
To avoid saturating carpet, do not use more than 4 wet strokes over any one area. Always end with dry strokes.
If additional cleaning is necessary, wait until the carpet is completely dry before using the tool again.
- Empty recovery tank when the motor sound becomes higher pitched and there is a loss in suction (see “Automatic shut-off”, Fig. 2-6).
When finished cleaning, follow “After cleaning” instructions on pages 9 & 10 and “After using tool” instructions on page 13.
Cleaning upholstery
Read "Before you begin cleaning" instructions on page 9.
Be sure to check the cleaning code on your upholstery. Use your deep cleaner only on upholstery marked "W" or "W/S".
- Attach hose and solution tube as instructed in Figs. 3-10 to 3-12.
- Place handle in upright position.
- Fill clean water tank according to instructions for Figs. 2-9 to 2-12.
- Fill detergent container with HOOVER Carpet/Upholstery Detergent according to instructions for Figs. 2-13 to 2-14.
- Attach tool to end of hose.
Agitator brushes will not rotate while handle is in upright position.
Do not point tools toward people or pets.
- Dry hands and plug deep cleaner into a properly grounded outlet.
- Set Wash/Rinse switch to WASH. Turn cleaner ON.
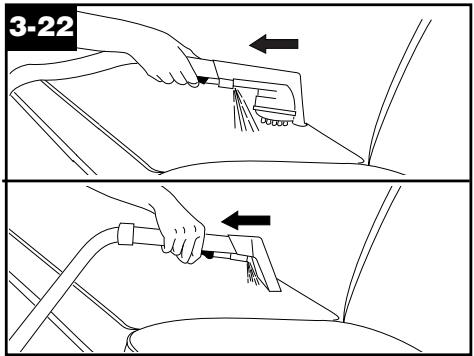
- Gently press the tool onto the fabric. Press the trigger and slowly pull the nozzle over the fabric.
- Overlap strokes by 1/2 inch to help prevent streaking.
Make additional strokes without pressing the trigger to remove more moisture.
- To clean in corners or creases, lift the tool one-half inch from the fabric and press the solution trigger.
- Vacuum up the solution with the tool without pressing the trigger.
- For heavily soiled areas, it may be necessary to repeat the cleaning process. Make crisscrossing strokes to the original pattern; overlap each pass (Fig. 3-23).
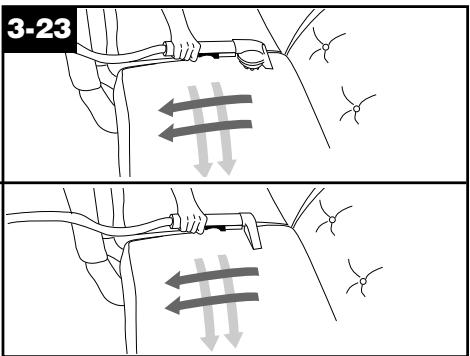
Make no more than 2 passes with the solution or rinse over any one area to prevent over-wetting and damage to fabric.
If additional cleaning is necessary, wait until the upholstery is completely dry before using the tool again. 13. Empty recovery tank when the motor sound becomes higher pitched and there is a loss in suction (see "Automatic shut-off", Fig. 2-6).
When finished cleaning, follow “After cleaning” instructions on pages 9 & 10 and “After using tool” instructions on page 12.
4. Maintenance
Removable brushes
Your deep cleaner is equipped with removable brushes for easy cleaning.
To remove brushes
Disconnect cleaner from electrical outlet.
To prevent possible leaking, remove clean water tank and recovery tank. Set tanks aside.
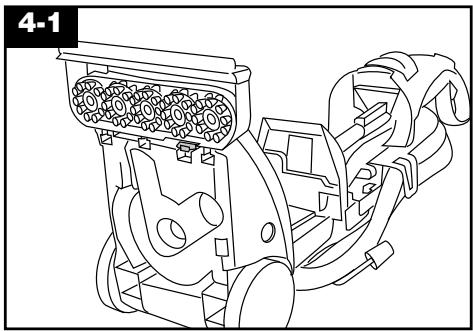
With handle in upright position, tilt cleaner back until handle rests on the floor.
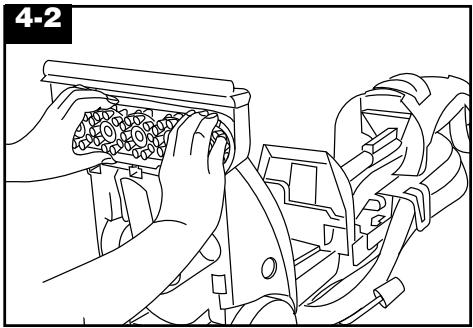
Grab brush assembly and pull firmly. The brushes can be cleaned under running water.
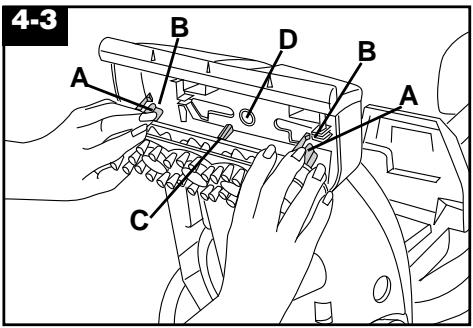
To replace brushes
Align posts (A) on both ends of brush assembly with slots (B) in cleaner housing.
Make sure that the square post (C) also aligns with the square hole (D). Turn brushes slightly until post fits easily into hole.
Press brush assembly firmly to snap into place.
Storage
Before storing:
- Empty clean water tank and let air dry. Replace on deep cleaner.
- Unused detergent can be stored in the detergent container.
- Empty recovery tank, rinse tank and lid thoroughly with clean water and let air dry.
Allow brushes and underside of deep cleaner to air dry thoroughly before storing deep cleaner on a carpeted or wood surface.
Do not store deep cleaner with a full clean water tank in place.
Lubrication
The motor is equipped with bearings which contain sufficient lubrication for the life of the motor. The addition of lubricant could cause damage. Do not add lubricant to motor bearings.
5. If you have a problem
If a minor problem occurs, it usually can be solved quite easily when the cause is found by using the check list below.
Problem: Machine won't run
Possible cause
Possible solution
- Not firmly plugged in
- Plug unit in firmly • No voltage in wall plug
- Check fuse or breaker
- Blown fuse/tripped breaker
- Replace fuse/reset breaker
Problem: Low solution pick-up
Possible cause
Possible solution
- Recovery tank full/automatic shut off engaged
- Remove and empty recovery tank • Blockage in tool on end of hose
- Remove tool and clear blockage • Recovery tank lid not on correctly • Make sure lid is on securely • Water tank empty, but detergent remains
- Fill water tank
Problem: Clean water won't dispense
Possible cause
Possible solution
- Clean water tank not firmly in place
- Make sure tank is securely locked in position
- Clean water tank or detergent container empty
- Refill container according to instructions for surface being cleaned • Recovery tank lid not on correctly • Make sure lid is firmly in place
Problem: Detergent won't dispense
Possible cause
Possible solution
- Valve cap clogged
- Remove and clean valve cap (see following instructions)
- Remove clean water tank.
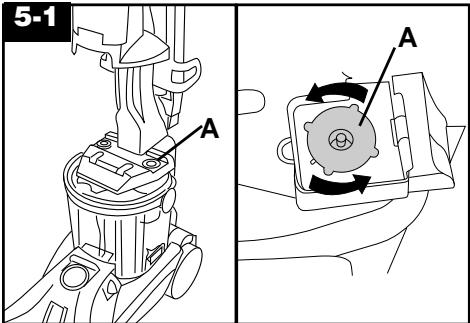
- Turn valve cap (A) counterclockwise and remove.
Soak valve cap in warm water for at least 15 minutes. Wipe cap dry.
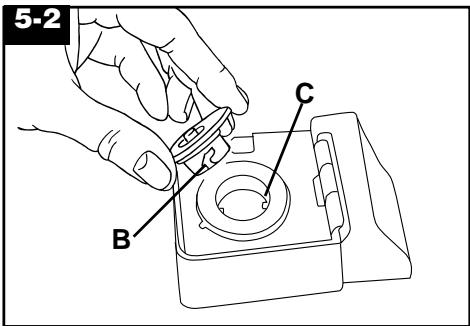
- Align slots (B) on cap with tabs (C) in opening.
Turn cap clockwise to tighten.
Problem: Brushes won't rotate during floor cleaning
Possible cause
Possible solution
- Dirty filter screen on bottom of unit
- Clean screen as shown in Fig. 3-2
- Setting selector on OFF
- Move setting selector to ON
Service
To obtain approved HOOVER service and genuine HOOVER parts, locate the nearest Hoover Sales and Service Center or Authorized Hoover Warranty Service Dealer (Depot) by:
- checking the Service section of Hoover on-line at www.hoover.com OR
- checking the list of Sales and Service Centers provided with this cleaner OR
- checking the Yellow Pages under "Vacuum Cleaners - Household" OR
- calling 1-800-944-9200 for an automated referral of authorized service outlet locations (U.S. only).
Do not send your cleaner to Hoover in Newton, Iowa for service, this will only result in delay.
If further assistance is needed, contact the Hoover Consumer Response Center, Phone: 330-499-9499.
In Canada, contact Hoover Canada, Burlington, Ontario L7R 4A8, Phone: 1-800-263-6376.
Always identify your cleaner by the complete model number when requesting information or ordering parts. (The model number appears on the bottom of the cleaner.)
Full One Year Warranty (Domestic Use)
Your HOOVER® appliance is warranted in normal household use, in accordance with the Owner's Manual against original defects in material and workmanship for a period of one full year from date of purchase. This warranty provides, at no cost to you, all labor and parts to place this appliance in correct operating condition during the warranted period. This warranty applies when the appliance is purchased in the United States including its territories and possessions, or in Canada or from a U. S. Military Exchange. Appliances purchased elsewhere are covered by a limited one year warranty which covers the cost of parts only. This warranty does not apply if the appliance is used in a commercial or rental application.
Warranty service can only be obtained by presenting the appliance to one of the following authorized warranty service outlets. Proof of purchase will be required before service is rendered.
- Hoover Sales and Service Centers.
- Hoover Authorized Warranty Service Dealers (Depots).
For an automated referral of authorized service outlets in the U.S.A., phone 1-800-944-9200 OR visit Hoover on-line at www.hoover.com
This warranty does not cover pick up, delivery, or house calls; however, if you mail your appliance to a Hoover Sales and Service Center for warranty service, transportation will be paid one way.
While this warranty gives you specific legal rights, you may also have other rights which vary from state to state.
If further assistance is needed, or if there are questions concerning this warranty or the availability of warranty service outlets, phone the Consumer Response Center, Phone 1-330-499-9499. In Canada, contact Hoover Canada, Burlington, Ontario L7R 4A8, 1-800-263-6376.
HOOVER®
© 2002 The Hoover Company
www.hoover.com
are registered trademarks

- IMPORTANT SAFEGUARDS
- WARNING
- GROUNDING INSTRUCTIONS
- DANGER
- SAVE THESE INSTRUCTIONS
- THANK YOU FOR CHOOSING A HOOVER PRODUCT
- PLEASE DO NOT RETURN THIS PRODUCT TO THE STORE
- FILL IN AND SAVE
- ASSEMBLY
- PARTS NEEDED FOR ASSEMBLY
- DUCT. CONTENTS
- ACCESSORIES - VARY BY MODEL
- HOW TO REATTACH THE TOOL COVER
- HOW TO USE
- DEEP CLEANER DESCRIPTION
- ON/OFF SWITCH
- HANDLE RELEASE PEDAL
- TO TRANSPORT
- CARRYING HANDLE
- AUTOMATIC SHUT OFF
- BRUSH SETTING SELECTOR
- WASH/RINSE SWITCH
- THE TANKS
- CLEAN WATER TANK (UPPER TANK)
- HOW TO FILL
- RECOVERY TANK
- (LOWER TANK)
- HOW TO EMPTY
- TURN THE DEEP CLEANER OFF AND UNPLUG IT FROM THE ELECTRICAL OUTLET
- FOR FULL SUCTION, IT IS IMPORTANT THAT THE RECOVERY TANK LID IS PROPERLY SECURED BEFORE CLEANING
- HOW TO CLEAN
- BEFORE YOU BEGIN CLEANING
- PRETREAT SPOTS AND HEAVY TRAFFIC AREAS WITH HOOVER® SPOT & STAIN SPRAY CLEANER* - TEST SPOT & STAIN
- AFTER CLEANING
- TO CLEAN THE NOZZLE
- UNPLUG THE DEEP CLEANER FROM THE ELECTRICAL OUTLET
- THE NOZZLE MUST BE IN THE PROPER POSITION IN ORDER FOR THE RECOVERY TANK TO GO ON PROPERLY
- CARPET CLEANING
- READ "BEFORE YOU BEGIN CLEANING" INSTRUCTIONS ON PAGE
- TURN BRUSHES ON OR OFF AS DESIRED
- DO NOT CLEAN OVER FLOOR ELECTRICAL OUTLETS
- NOTE: TO AVOID SATURATING CARPET, DO NOT USE MORE THAN 4 WET STROKES OVER ONE AREA. ALWAYS END WITH DRY STROKES
- CLEANING BARE FLOORS
- HOW TO ATTACH BARE FLOOR ATTACHMENT
- UNPLUG DEEP CLEANER FROM ELECTRICAL OUTLET
- (NOTE: SOME FORCE MAY BE REQUIRED TO ROTATE AND SNAP ATTACHMENT INTO PLACE.)
- TO CLEAN FLOOR
- USING THE TOOLS
- ATTACH HOSE
- SELECT TOOL
- AFTER USING TOOL
- USING THE SCRUB TOOL
- AFTER USING SCRUB TOOL
- CLEANING CARPETED STAIRS
- CLEANING UPHOLSTERY
- AGITATOR BRUSHES WILL NOT ROTATE WHILE HANDLE IS IN UPRIGHT POSITION
- DO NOT POINT TOOLS TOWARD PEOPLE OR PETS
- MAKE NO MORE THAN 2 PASSES WITH THE SOLUTION OR RINSE OVER ANY ONE AREA TO PREVENT OVER-WETTING AND DAMAGE TO FABRIC
- MAINTENANCE
- REMOVABLE BRUSHES
- TO REMOVE BRUSHES
- DISCONNECT CLEANER FROM ELECTRICAL OUTLET
- TO REPLACE BRUSHES
- STORAGE
- BEFORE STORING
- LUBRICATION
- IF YOU HAVE A PROBLEM
- PROBLEM: MACHINE WON'T RUN
- POSSIBLE CAUSE
- PROBLEM: LOW SOLUTION PICK-UP
- PROBLEM: CLEAN WATER WON'T DISPENSE
- PROBLEM: DETERGENT WON'T DISPENSE
- PROBLEM: BRUSHES WON'T ROTATE DURING FLOOR CLEANING
- SERVICE
- FULL ONE YEAR WARRANTY (DOMESTIC USE)
- FOR AN AUTOMATED REFERRAL OF AUTHORIZED SERVICE OUTLETS IN THE U.S.A., PHONE 1-800-944-9200 OR VISIT HOOVER ON-LINE AT WWW.HOOVER.COM
- HOOVER®
Brand : HOOVER
Model : STEAM VAC DUAL V
Category : Carpet Cleaner