
Fleet 10 - Browser Sygic - Free user manual and instructions
Find the device manual for free Fleet 10 Sygic in PDF.


| Type of Product | GPS Navigation Device for Fleet Management |
| Brand | Sygic |
| Model | Fleet 10 |
| Dimensions | 168 x 97 x 17 mm |
| Weight | 300 g |
| Power Supply | Rechargeable lithium-ion battery 2000 mAh, 3.7V |
| Display | 7-inch touchscreen |
| Operating System | Android |
| Connectivity | GPS, Wi-Fi, Bluetooth, USB, micro-SIM |
| Main Functions | Real-time GPS navigation, fleet tracking, route optimization, traffic updates, voice guidance |
| Maintenance & Cleaning | Clean with a soft, dry cloth; avoid liquids and abrasive agents |
| Safety | Use windshield mount for safe viewing; obey traffic laws |
| Spare Parts & Repairability | Contact Sygic support for replacement parts; device not user-serviceable |
| General Information | Includes power adapter, USB cable, suction mount; 1-year limited warranty |
Frequently Asked Questions - Fleet 10 Sygic
User questions about Fleet 10 Sygic
0 question about this device. Answer the ones you know or ask your own.
Ask a new question about this device
Download the instructions for your Browser in PDF format for free! Find your manual Fleet 10 - Sygic and take your electronic device back in hand. On this page are published all the documents necessary for the use of your device. Fleet 10 by Sygic.
USER MANUAL Fleet 10 Sygic
The Navigation Screen....1
Entering an Address....2
Turn by Turn Navigation....5
Acquiring GPS Position 6
II. Navigation with Truck Attributes....7
Change the road restrictions in the map 8
III. Planning the Route 9
Navigating to a Point of Interest....9
Navigating Home 11
Navigating to Recent Destinations.... 11
Navigating to Favourite Destinations.... 12
IV. Altering the Route....14
Route Menu....14
Modifying the Route.... 16
Map Browsing Mode 17
Multi-stop route planning....19
Driver's log 21
V. Online features....22
Connection....22
Trafic alerts.... 23
VI. Settings....25
Advanced settings.... 27
Disclaimer....28
I. Getting Started
The Navigation Screen

On startup, the application opens with the Navigation Screen, showing your position as a blue arrow. You can zoom in and out of the map by tapping the + and - buttons in the top corners of the screen.
For further functions, enter the Main menu by tapping the map area on the Navigation Screen.
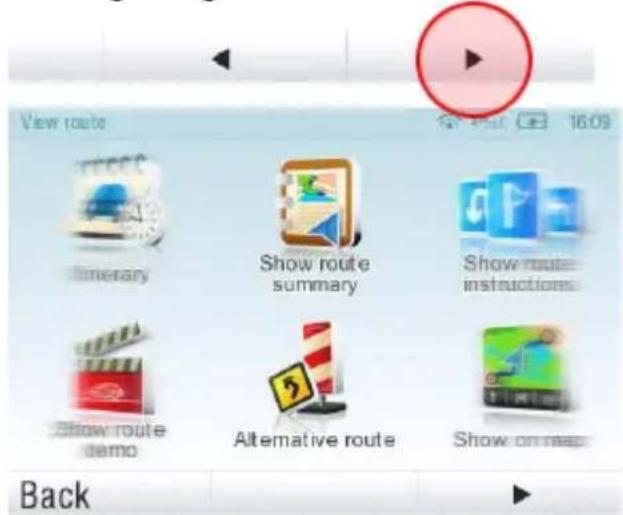
You can scroll between the menu pages by tapping the arrow buttons at the bottom of the screen or by sliding a inger across the screen.
Entering an Address
To set your destination by entering its address select
Main menu>

Navigate to...>
Address or Zip code.
Next, you will be asked to select a Country a City, Street and House number or Street crossing. Enter the required names and numbers.
Alternatively, just enter the irst few letters of the city/street name to see a list of similar names.

The list also features explanatory icons left to the city/street name:

City
Capital city
City center

Street

Street crossing
Select the desired city/street from the list.
When inished, a Conirmation Screen pops up showing the address entered.
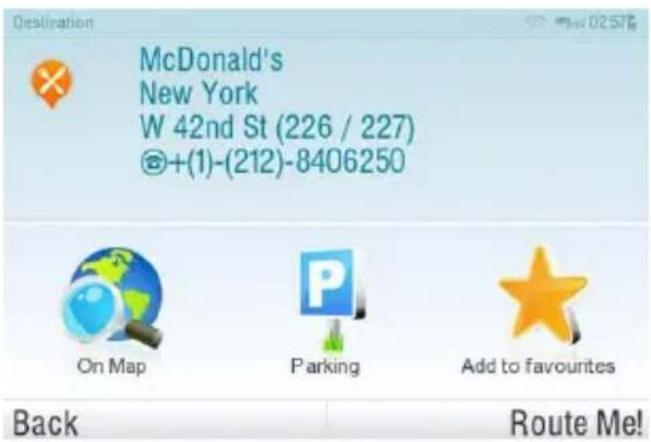
Tap "On Map" to see the exact location of the address, or tap "Add to favorites" to store it among your frequently used destinations (see "Navigating to Favourite Destinations" on page 12).
To set the address shown as your destination, tap the "Route Me!" button at the bottom of the screen.
If you would rather be directed to a parking lot nearby, tap "Parking" and select from the list shown.
To select a different address altogether, tap the "Back" button.
If your device can determine your current position, your route will be calculated immediately from that positon. If your current position cannot be determined, you will be offered the following options:

Wait for valid signal(Recommended)
Your route will be calculated from your current position as soon as a valid GPS signal is available (see “Acquiring GPS Position” on page 6).

Last valid position
Your route will be calculated from your last known position (i.e. where you were just before the device lost GPS signal).

Select from map
Allows you to select any starting point for the route calculation.
When route calculation is complete, the entire route is displayed on the
map (in blue) with total distance, estimated time of arrival (ETA), time left to destination and route calculation method (Fastest, Economic, Shortest, Pedestrian, Bicycle) shown below the map.
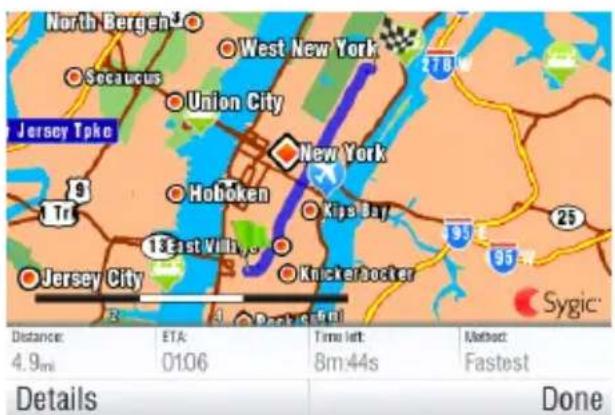
To accept the route and start turn by turn navigation, tap "Done". If the vehicle starts to move, the Route summary hides automatically.
For further information on the route, tap "Details".
NOTE: By default, the method of route calculation is set to "Fastest".
Turn by Turn Navigation
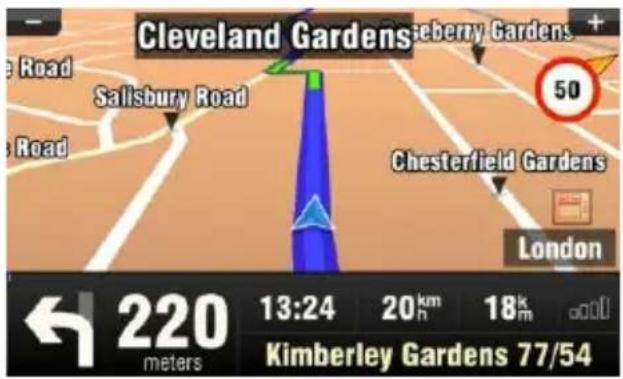
The Navigation Screen will show the map of your surrounding area with the calculated route highlighted in blue.
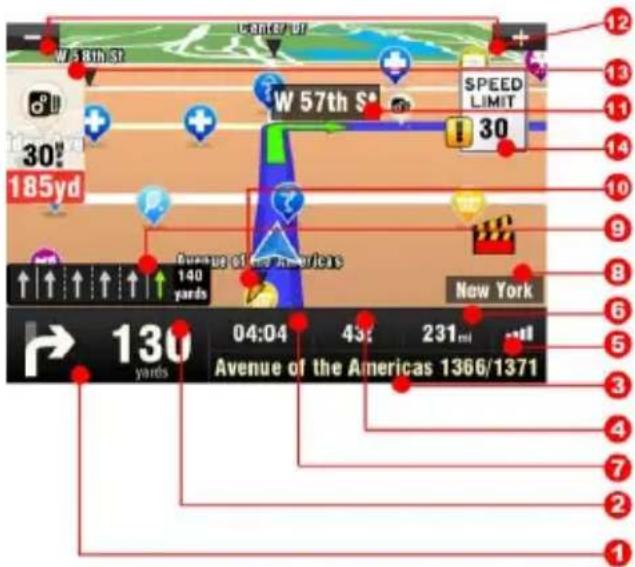
As you approach a junction, further directions are displayed to indicate which road to take.
In addition to turn by turn directions, the Navigation Screen also provides a range of further useful information:
1 Next maneuver
2 Distance to next change of direction
3 Current road/street
4 Distance to destination
5 GPS signal strength
6 Current speed
7 Estimated time of arrival at destination
8 Current city
9 Lane Assistant
10 Heading to destination
11 Next road/street to take
12 Map zoom in/out
13 Speed camera warning
14 Current speed limit
Acquiring GPS Position
If there is no GPS signal, the screen becomes grey. This can happen under any of the following conditions:
The device is in a tunnel or at a location where signals from the GPS satellites are obstructed by buildings, trees, electric cables or other objects.
■ Device system settings or Product Settings are set incorrectly.
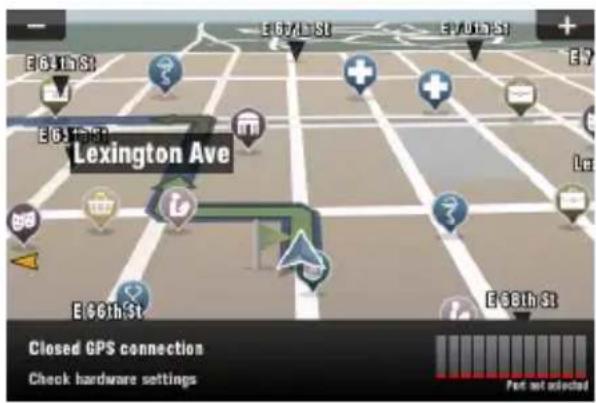

The information below is not available on Android.
The signal strength bars at the bottom of the screen provide additional information:
If the colour of the bars or the GPS port name/number turns red, re-check the GPS settings.
If the bars are grey, move the device to an outdoor location with good visibility of the sky until the signal is regained and the bars become green. Tap the signal bars or select
Main menu>

GPS
to see more detailed GPS information.
Once GPS signal is regainedturn by turn navigation resumes automatically.
II. Navigation with Truck Attributes
The truck attributes of the map allow setting up the dimensions of the truck and then the route is calculated avoiding the routes, where the truck is not allowed to drive.
To set up the truck dimensions, enter the Main menu, select Settings and then select Truck settings.
In the settings screen you can set:
Use truck attributes (Yes/No) Total weight Axle weight Length Width Height Max speed
After the parameters are set, they are used in route calculation from that time on.
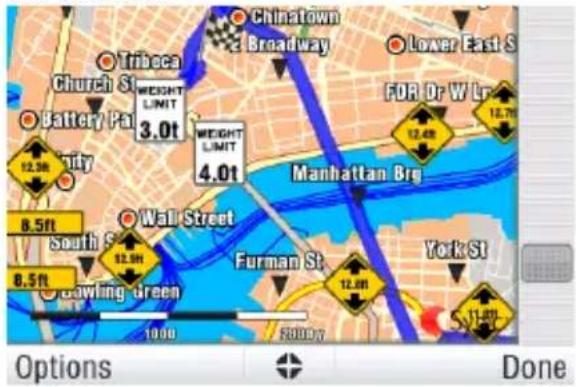
The calculated route will look like on the examples:
US version
European version
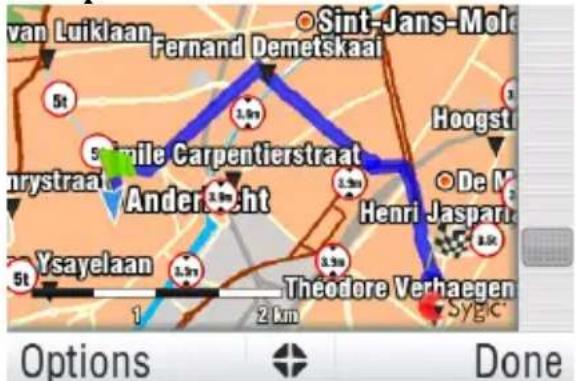
The truck attributes of the roads are also displayed during the navigation.
Change the road restrictions in the map
Some road restrictions for the trucks may not be set in the map. If this situation occurs, you can correct them manually. After correcting the road restrictions in the map, the computed routes will avoid the specific road in the future. You can also correct the maximum speed limit and the direction of the one-way-road.
Tap on the road where you want to change the restrictions in the Browse map. The road will be highlighted in violet color.

Tap and choose Change road
restrictions: The following screen will show up:
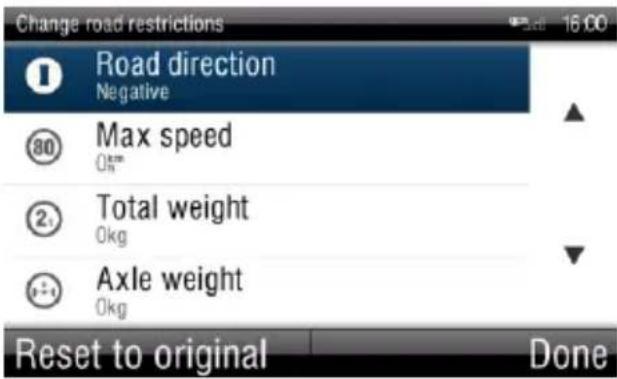
Here you can change the road restriction for the road you selected. With Road direction for example, you can set if the road is Closed, unidirectional, or Open.
When setting the one-way-road, please select the "Positive" or "Negative" direction. You can check the correct direction of one-way-road by looking at the arrow in the Browse map.
III. Planning the Route
Navigating to a Point of Interest
In addition to the road network, the map also stores the details of thousands of Points of Interest (POIs) such as gas stations, restaurants, hotels, tourist attractions and other facilities.
To set a POI as your destination, irst select
Main menu>

Navigate to...>
Point of Interest
Next, deine the area where you want to search for a POI. Select

Near my position
to search POIs around your current position;

Near address...
to search POIs near a particular address (to be entered in the next step);

Near destination
to search POIs near the current destination (if set);

In City...
to search POIs in a particular city (to be entered in the next step);
Searching POIs
POIs are arranged in groups (such as Food, Hotel or Motel etc.) to help ind a facility even when you do not know its name or address.
Once the search area is selected, a list of the POI groups is displayed.
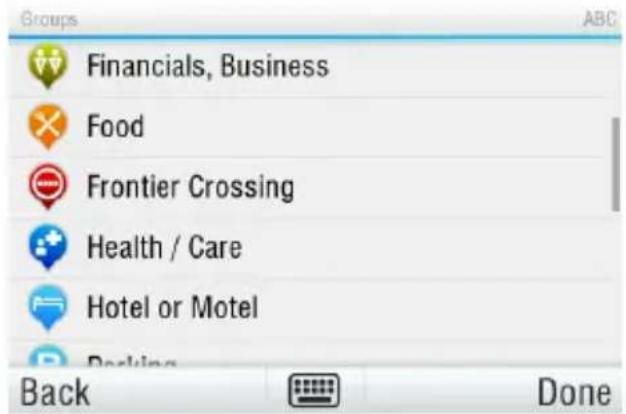
Tap on the POI group and you will see the list of all POIs that are nearby.
NOTE: The distances shown in the list are relative to the search location.
Scroll down the list and select your POI by tapping its name.

To reine your search results, tap the keyboard icon at the bottom of the screen and type the name of the POI you are looking for. You can also enter partial names.
When inished, a Confirmation Screen pops up showing the POI selected.
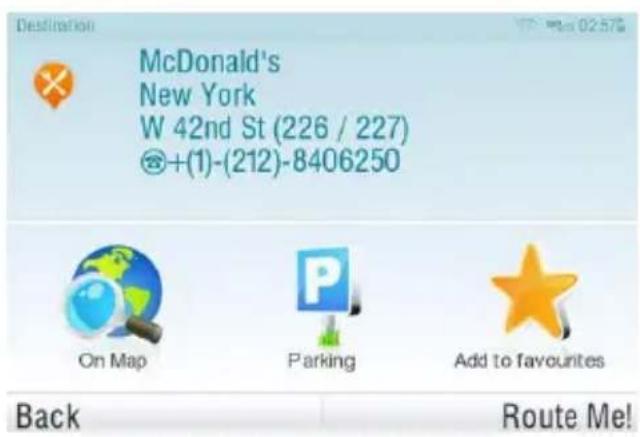
To set the selected POI as your destination, tap the "Route Me!" button.
Navigating Home
To start using this feature, you need to set your home location irst. Select
Main menu>

Settings>

Set home location
and enter your home address.
Once your home address is stored, you can navigate home by simply selecting
Main menu>

Navigate to...>

Home
Navigating to Recent Destinations
Sygic Mobile Maps keeps track of your recent destinations, making it easy to return to a previously set location.
When entering an address through
Main menu>

Navigate to...>

Address or Zip code
the list of previously selected Countries/Cities/Streets appears, as you go through the address details.
They are marked with icon.
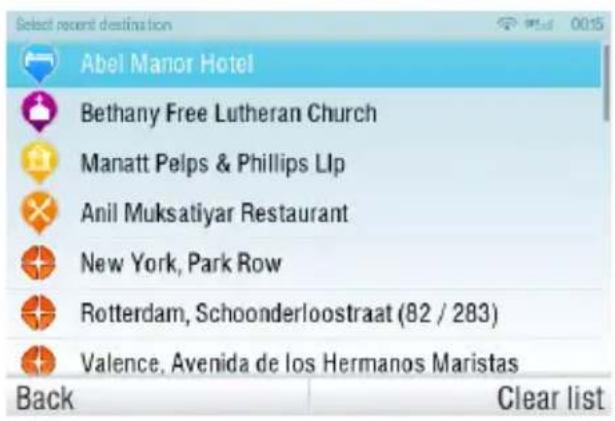
You can directly go to a list of recent destination by selecting
Main menu>

Navigate to...>

History
and start navigation by selecting a previous destination from the list shown.
Navigating to Favourite Destinations
To view a list of your Favourite destinations, select
Main menu>

Navigate to...>
Favourite
and start navigation by selecting a Favorite destination from the list shown.

Select the desired Favorite destination by tapping it and then select your next option from the Conirmation Screen.
Deining a new Favourite destination
To add a new address to your Favourites tap "Add to favourites" in the Conirmation Screen
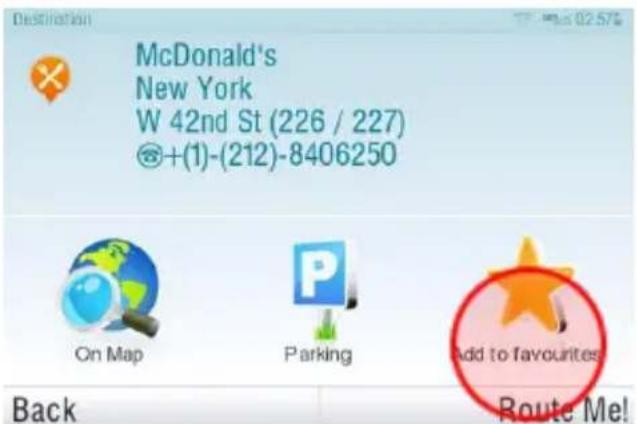
or select
Main menu>

Map>
Select point on map


Add as POI>Favorites
or select
Main menu>

Manage POI> Add POI
IV. Altering the Route
Route Menu
You can access detailed information about the calculated route from the Route menu. Select
Main menu>

Route

To get a schematic overview of the route, select

Show route summary>Details

The icons highlighted in blue indicate specific types of roads included in the route.
To avoid a specific road type (e.g. Highways), tap the blue highlighted button.
To get a detailed list of junctions and directions along the route, select
Show route instructions

To see the same junctions as a series of images, select Show route as images

To see the entire route on the map, select
Show on map

To see the calculated route as if you were driving along (ly over mode) select
Show route demo

Modifying the Route
To modify an existing route, irst open the Alternative route menu:
Main menu>

Route>

Alternative route
If you do not like the calculated route and wish to calculate an alternative option, select

Compute alternative
To calculate a detour (e.g. because the road ahead is closed), select

Avoid next...
If you wish to travel through a certain place on your trip, select

Travel via...
and add a waypoint the same way, as setting the destination in chapter "III. Planning the Route" on page 8.
You can also

Avoid trafic delays
on your route. See Trafic alerts on page 23 for more details.
If you want to cancel your modiifications to the route, select

Reset to original.
If you wish to cancel the calculated route entirely, and use the navigation system only as an indicator of your current position, select
Main menu>

Route>

Cancel route
NOTE: You can ind additional information about modification of calculated route in chapters "Error! Not a valid bookmark self-reference." and "Multi-stop route planning".
Map Browsing Mode
You can easily check and plan/modify your route in Map Browsing Mode. Select
Main menu>

Map
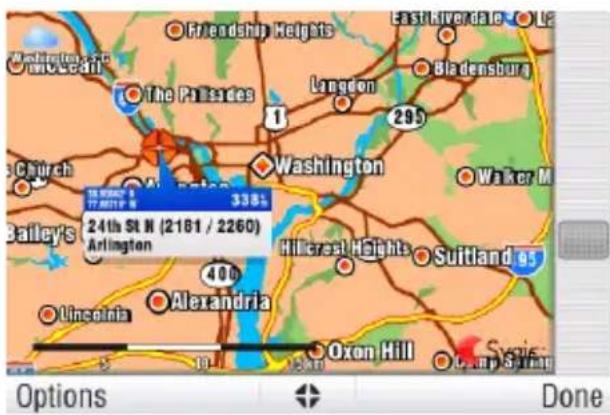
Drag the map by sliding your inger across the screen. Tap the map to select specific location.
For map display options and additional functions tap the "Options" button and select one of the following items.

Find...
You can ind a position by using one of the options described in chapter III. Planning the Route.

Show current position

Show entire route

Show city
Shows entire city on map screen.

Show/Hide POIs...
You can select, which types of POI types are displayed when browsing the map.
To plan/modify your route, tap on a location on the map, then tap the button marked as “” to choose what you want to do with the selected point.

Navigate there
Sets the location as destination. The previously selected route will be deleted.
asked to set the radius in the next step.

Change road restrictions

Travel via
Adds the location as a new waypoint to your existing route between start and finish.

Continue
Adds the location as a new waypoint after the existing destination.

Add as POI
Stores the location in Favorites or in other POI category.

Find nearby POI
Searches POIs around the location.

Avoid...
Recalculates the route avoiding a set radius around the location. You will be
Multi-stop route planning
If you have added some waypoints to your route via Map or Alternative route, you can edit them in Itinerary. It is also possible to optimize waypoints along the route, plan a new route or store it for future use.
To edit the current route, select
Main menu>

Route>

Itinerary
and select the[Current route] to see the list of waypoints.

The itinerary shows the starting point (marked with ), the numbered waypoints and the inal destination (marked with ). The waypoints that you have already passed are greyed out.
You can add a waypoint to the itinerary by taping the button.
Waypoint options
Tapping on any waypoint in the itinerary brings up the following list of options:

Set as visited
Stops navigating to the selected waypoint and recalculates the route to the next waypoint in the itinerary.

Set as inish point
Puts the waypoint to the end and moves others upwards in the itinerary.

Set as via point
Changes the inal destination to an intermediate waypoint.

Set as start
Stores the selected waypoint as the starting point of the route.

Add nearby POI
Use this option to search for a POI (e.g. a hotel) near the selected waypoint, and then add it to the itinerary.

Move up
Moves the selected waypoint up in the itinerary.

Move down
Moves the selected waypoint down in the itinerary.

Delete
Deletes the selected waypoint from the itinerary.
Itinerary options
For additional itinerary functions tap the "Options" button at the bottom of the Itinerary Screen and select one of the following items.
Optimize itinerary
Optimizes the waypoint sequence in the itinerary.
Save itinerary
Saves the itinerary for future use.
Delete itinerary
Deletes the itinerary.
Driver's log
In Driver's log you can keep a record of all driven routes. The Driver's log shows an overview of mileage on a particular day and tracks the driven route into a special ile.
You can turn the Driver's log on by clicking Main menu>Route>Driver's log>Start
route log

When the route log is turned on, the icon appears in the right bottom corner.
The route log stops when turning off
the navigation or clicking >Finish
route log

An overview of the recorded routes
can be seen in View logs


The routes are shown separated into months. In the list of routes, you can see the summary for the specific route. After you click the specific route, you will be able to see the details about stops on the route. Next to each stop you can see the duration of the stop and its distance from the start point.
V. Online features
Connection
In order to use online services (e.g. real time traffic and safety camera alerts) you will need to connect your device to the internet. Select
Main menu>

Settings>Online settings
The button shows the actual status of the connection. If it shows "Disconnected" tap the button to go online.

The window also shows the amount of data sent and received so that you can control data traffic.
NOTE: The cost of data transfer depends on your mobile phone tariff. Make sure you know the cost before you start using online features. The costs can be considerably higher when you are roaming abroad.
Trafic alerts

Availability of the traffic service depends on your product configuration.
For more options, including roaming preferences, tap the "Options" button.
To view real time alerts of traffic incidents along your calculated route, select
Main menu>
Trafic>Incidents on route.
The screen will show the incidents ordered by their distance from your current position. You can select which of them you want to avoid.

To select all the listed incidents, tap the "Avoid all" button.
To select individual incidents, irst tap the incident to show its extent on the map.
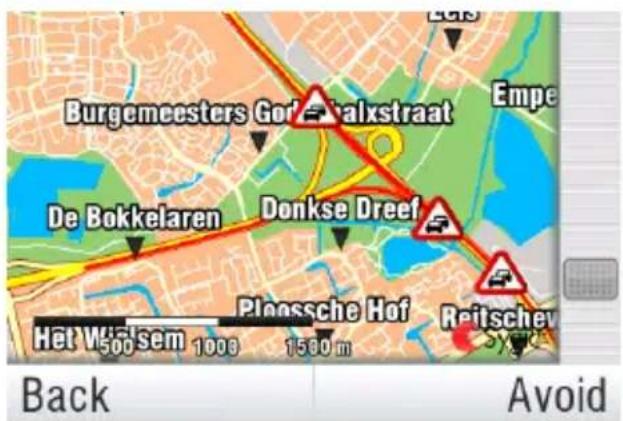
Tap "Avoid" to select it.
Incidents selected for avoidance are marked with a solid black circle.
To recalculate the route avoiding the selected traffic incidents, tap "Done" and from the Traffic menu select
Optimize route.
Trafic incidents are also shown on the map overview of your calculated route.
VI. Settings

IMPORTANT: Menu items marked with * are not available in all devices.
To change factory settings, select
Main menu

Settings
NOTE: Icons always display the setting that will be activated when they are tapped. E.g. means that voice output and sounds are currently enabled, and tapping this button will disable the sounds.

Set 2D/3D
Change between 2D and 3D map view

Dynamic control
Set the preference how to scroll within lists and menus.

Set Day/Night colors

Disable sounds

Enable sounds

Volume settings*
Set the sound intensity separately for low driving speed and for high speeds.

Online settings*
Connect or Disconnect your device from internet, check data transfers and set roaming preference.

Online services*
Activate / Deactivate Policetraps community service.

Advanced settings
(for advanced users only)
For more information, see 25.

Planning preferences
Set the routing algorithm: Fastest, Economic, Shortest, Pedestrian, Bicycle.

Toll charge settings
Set the preference of paid road segments: avoid them, do not avoid them, or always ask.

GPS hardware*
Detailed configuration of GPS and TMC hardware.

Signpost settings
Sets the number of signpost tables displayed at one time and the level of detail (Full, Simplified, Single line).

Preferred

Other

Rotate display*
Change the display orientation (landscape / portrait).

Keyboard settings
You can switch between preferred keyboard layouts using 📄 button, that is available in every keyboard.

Regional settings
Set kilometers/miles, format of time and GPS coordinates.

Set language - language of user interface.

Set voice - language of voice instructions.

Switch map
Load a different map data from your device.

Backlight*
Set backlight level for
Day/Night mode.

Set home location
About
Information about version, device code and available application memory. Please provide this information in communication with Sygic support.

Advanced settings
1 Avoid U-Turns

Enable lane assistant
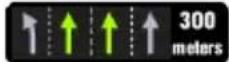
Enable Autozoom
Warn if Railway crossing
2 Backlight settings
3 Configuration of Information panel on the main screen

4 Notification settings of maximum speed limit
Disclaimer
The information contained in this document is the property of Sygic a.s. and may be used only for the purposes of operating and supporting the relevant software created by Sygic a.s.
Sygic a.s. reserves all rights concerning the information contained herein. This document or any part thereof may not be reproduced, distributed, or translated into other languages in any way or form except with the written approval of Sygic a.s.
This document is provided to the user on an ‘as is’ basis. Although maximum care was taken during preparation of this manual to provide accurate information and to avoid errors, some technical inaccuracies or editorial errors may occur, for which Sygic a.s. accepts no responsibility.
In the interest of improving the content of the document, Sygic a.s. reserves the right to modify, amend or delete any part of the document at any time without prior notice.
For more information and updates, visit www.sygic.com
- NAVIGATION WITH TRUCK ATTRIBUTES....7
- PLANNING THE ROUTE 9
- ALTERING THE ROUTE....14
- ONLINE FEATURES....22
- SETTINGS....25
- DISCLAIMER....28
- GETTING STARTED
- ENTERING AN ADDRESS
- MAIN MENU
- WAIT FOR VALID SIGNAL(RECOMMENDED)
- LAST VALID POSITION
- SELECT FROM MAP
- TURN BY TURN NAVIGATION
- ACQUIRING GPS POSITION
- GPS
- NAVIGATION WITH TRUCK ATTRIBUTES
- CHANGE THE ROAD RESTRICTIONS IN THE MAP
- PLANNING THE ROUTE
- NAVIGATING TO A POINT OF INTEREST
- NEAR MY POSITION
- NEAR ADDRESS
- NEAR DESTINATION
- IN CITY
- SEARCHING POIS
- NAVIGATING HOME
- NAVIGATING TO RECENT DESTINATIONS
- NAVIGATING TO FAVOURITE DESTINATIONS
- DEINING A NEW FAVOURITE DESTINATION
- ALTERING THE ROUTE
- ROUTE MENU
- MODIFYING THE ROUTE
- AVOID TRAFIC DELAYS
- MAP BROWSING MODE
- MAP
- FIND
- SHOW CURRENT POSITION
- SHOW ENTIRE ROUTE
- SHOW CITY
- SHOW/HIDE POIS
- NAVIGATE THERE
- CHANGE ROAD RESTRICTIONS
- TRAVEL VIA
- CONTINUE
- ADD AS POI
- FIND NEARBY POI
- AVOID
- MULTI-STOP ROUTE PLANNING
- WAYPOINT OPTIONS
- SET AS VISITED
- SET AS INISH POINT
- SET AS VIA POINT
- SET AS START
- ADD NEARBY POI
- MOVE UP
- MOVE DOWN
- DELETE
- ITINERARY OPTIONS
- OPTIMIZE ITINERARY
- SAVE ITINERARY
- DELETE ITINERARY
- DRIVER'S LOG
- ROUTE LOG
- ONLINE FEATURES
- CONNECTION
- SETTINGS>ONLINE SETTINGS
- TRAFIC ALERTS
- TRAFIC>INCIDENTS ON ROUTE
- OPTIMIZE ROUTE
- SETTINGS
- SET 2D/3D
- DYNAMIC CONTROL
- SET DAY/NIGHT COLORS
- DISABLE SOUNDS
- ENABLE SOUNDS
- VOLUME SETTINGS
- ONLINE SETTINGS
- ONLINE SERVICES
- ADVANCED SETTINGS
- PLANNING PREFERENCES
- TOLL CHARGE SETTINGS
- GPS HARDWARE
- SIGNPOST SETTINGS
- ROTATE DISPLAY
- KEYBOARD SETTINGS
- REGIONAL SETTINGS
- SWITCH MAP
- BACKLIGHT
- SET HOME LOCATION
- ABOUT
- WARN IF RAILWAY CROSSING
- DISCLAIMER
Brand : Sygic
Model : Fleet 10
Category : Browser