
E-09W - Arranger keyboard ROLAND - Free user manual and instructions
Find the device manual for free E-09W ROLAND in PDF.
User questions about E-09W ROLAND
0 question about this device. Answer the ones you know or ask your own.
Ask a new question about this device
Download the instructions for your Arranger keyboard in PDF format for free! Find your manual E-09W - ROLAND and take your electronic device back in hand. On this page are published all the documents necessary for the use of your device. E-09W by ROLAND.
USER MANUAL E-09W ROLAND
INTERACTIVE ARRANGER
E-09
Owner's Manual
Thank you, and congratulations on your choice of the Roland E-09.
Before using this unit, carefully read the sections entitled: "USING THE UNIT SAFELY" and "IMPORTANT NOTES" (pp. 2-3; p. 4). These sections provide important information concerning the proper operation of the unit. Additionally, in order to feel assured that you have gained a good grasp of every feature provided by your new unit, Owner's manual should be read in its entirety. The manual should be saved and kept on hand as a convenient reference.
Conventions Used in This Manual
Operating buttons are enclosed in square brackets; e.g., [PIANO].
Page references are given as (p. **).
The special symbols have the following meanings.
NOTE
This indicates an important note you must read.
MEMO
This indicates a memo regarding settings or functionality. Read it as necessary.
TIP
This indicates a hint for operation. Read it as necessary.
cf.
This indicates a reference to related information. Read it as necessary.
TERM
This explains a term that may be unfamiliar. Read it as necessary.
Glossary of Terms
TERM
"Tones" are the sounds you will normally play on the E-09. If we use the analogy of an orchestra, a "tone" corresponds to an instrument held by a musician. Each tone also includes parameters (settings) such as effects. (p. 10)
TERM
The "Arranger" is the E-09's automatic accompaniment function. (p. 13)
TERM
"Music Styles" are musical templates used by the arranger. The E-09 contains a variety of built-in music styles, such as rock, dance, Latin, and jazz. (p. 14)
TERM
"Music Assistant" settings specify the type of tone and music style, together with other settings such as the keyboard part and various additional parameters. The E-09 contains a variety of built-in music assistant settings. (p. 15)
TERM
"User Programs" specify the type of tone and music style, together with other settings such as the keyboard part and various additional parameters. You can edit the settings and save them as a user program. (p. 16)
TERM
"Songs" are recordings you make of your own performances using the 16-track recorder. You can create a song by adding the arranger to your own keyboard performance. (p. 19)
IMPORTANT: THE WIRES IN THIS MAINS LEAD ARE COLOURED IN ACCORDANCE WITH THE FOLLOWING CODE.
BLUE: NEUTRAL
BROWN: LIVE
As the colours of the wires in the mains lead of this apparatus may not correspond with the coloured markings identifying the terminals in your plug, proceed as follows:
The wire which is coloured BLUE must be connected to the terminal which is marked with the letter N or coloured BLACK.
The wire which is coloured BROWN must be connected to the terminal which is marked with the letter L or coloured RED.
Under no circumstances must either of the above wires be connected to the earth terminal of a three pin plug.
USING THE UNIT SAFELY
INSTRUCTIONS FOR THE PREVENTION OF FIRE, ELECTRIC SHOCK, OR INJURY TO PERSONS
About WARNING and CAUTION Notices
| ▲WARNING | Used for instructions intended to alert the user to the risk of death or severe injury should the unit be used improperly. |
| ▲CAUTION | Used for instructions intended to alert the user to the risk of injury or material damage should the unit be used improperly. * Material damage refers to damage or other adverse effects caused with respect to the home and all its furnishings, as well to domestic animals or pets. |
About the Symbols
| ▲ | The △ symbol alerts the user to important instructions or warnings. The specific meaning of the symbol is determined by the design contained within the triangle. In the case of the symbol at left, it is used for general cautions, warnings, or alerts to danger. |
| ◎ | The ⊙ symbol alerts the user to items that must never be carried out (are forbidden). The specific thing that must not be done is indicated by the design contained within the circle. In the case of the symbol at left, it means that the unit must never be disassembled. |
| ◆ | The ● symbol alerts the user to things that must be carried out. The specific thing that must be done is indicated by the design contained within the circle. In the case of the symbol at left, it means that the power-cord plug must be unplugged from the outlet. |
ALWAYS OBSERVE THE FOLLOWING
WARNING
- Before using this unit, make sure to read the instructions below, and the Owner's Manual.

- Do not open (or modify in any way) the unit or its AC adaptor.

- Do not attempt to repair the unit, or replace parts within it (except when this manual provides specific instructions directing you to do so). Refer all servicing to your retailer, the nearest Roland Service Center, or an authorized Roland distributor, as listed on the "Information" page.

-
Never use or store the unit in places that are:
-
Subject to temperature extremes (e.g., direct sunlight in an enclosed vehicle, near a heating duct, on top of heat-generating equipment); or are
- Damp (e.g., baths, washrooms, on wet floors); or are
- Humid; or are
- Exposed to rain; or are
Dusty; or are -
Subject to high levels of vibration.
-
This unit should be used only with a rack or stand that is recommended by Roland.

WARNING
- When using the unit with a rack or stand recommended by Roland, the rack or stand must be carefully placed so it is level and sure to remain stable. If not using a rack or stand, you still need to make sure that any location you choose for placing the unit provides a level surface that will properly support the unit, and keep it from wobbling.

- Be sure to use only the AC adaptor supplied with the unit. Also, make sure the line voltage at the installation matches the input voltage specified on the AC adaptor's body. Other AC adaptors may use a different polarity, or be designed for a different voltage, so their use could result in damage, malfunction, or electric shock.

- Use only the attached power-supply cord. Also, the supplied power cord must not be used with any other device.

- Do not excessively twist or bend the power cord, nor place heavy objects on it. Doing so can damage the cord, producing severed elements and short circuits. Damaged cords are fire and shock hazards!

- This unit, either alone or in combination with an amplifier and headphones or speakers, may be capable of producing sound levels that could cause permanent hearing loss. Do not operate for a long period of time at a high volume level, or at a level that is uncomfortable. If you experience any hearing loss or ringing in the ears, you should immediately stop using the unit, and consult an audiologist.

WARNING
- Do not allow any objects (e.g., flammable material, coins, pins); or liquids of any kind (water, soft drinks, etc.) to penetrate the unit.


-
Immediately turn the power off, remove the AC adaptor from the outlet, and request servicing by your retailer, the nearest Roland Service Center, or an authorized Roland distributor, as listed on the "Information" page when:
-
The AC adaptor, the power-supply cord, or the plug has been damaged; or
- If smoke or unusual odor occurs
- Objects have fallen into, or liquid has been spilled onto the unit; or
- The unit has been exposed to rain (or otherwise has become wet); or
-
The unit does not appear to operate normally or exhibits a marked change in performance.
-
In households with small children, an adult should provide supervision until the child is capable of following all the rules essential for the safe operation of the unit.

- Protect the unit from strong impact. (Do not drop it!)


- Do not force the unit's power-supply cord to share an outlet with an unreasonable number of other devices. Be especially careful when using extension cords—the total power used by all devices you have connected to the extension cord's outlet must never exceed the power rating (watts/amperes) for the extension cord. Excessive loads can cause the insulation on the cord to heat up and eventually melt through.

- Before using the unit in a foreign country, consult with your retailer, the nearest Roland Service Center, or an authorized Roland distributor, as listed on the "Information" page.

CAUTION
- The unit and the AC adaptor should be located so their location or position does not interfere with their proper ventilation.

- This (E-09) for use only with Roland stand KS-12. Use with other stands is capable of resulting in instability causing possible injury.

- Always grasp only the plug on the AC adaptor cord when plugging into, or unplugging from, an outlet or this unit.

- At regular intervals, you should unplug the AC adaptor and clean it by using a dry cloth to wipe all dust and other accumulations away from its prongs. Also, disconnect the power plug from the power outlet whenever the unit is to remain unused for an extended period of time. Any accumulation of dust between the power plug and the power outlet can result in poor insulation and lead to fire.

- Try to prevent cords and cables from becoming entangled. Also, all cords and cables should be placed so they are out of the reach of children.

- Never climb on top of, nor place heavy objects on the unit.

- Never handle the AC adaptor or its plugs with wet hands when plugging into, or unplugging from, an outlet or this unit.

- Before moving the unit, disconnect the AC adaptor and all cords coming from external devices.

- Before cleaning the unit, turn off the power and unplug the AC adaptor from the outlet (p. 9).

- Whenever you suspect the possibility of lightning in your area, disconnect the AC adaptor from the outlet.

In addition to the items listed under "USING THE UNIT SAFELY" on page 2-3, please read and observe the following:
Power Supply
- Do not connect this unit to same electrical outlet that is being used by an electrical appliance that is controlled by an inverter (such as a refrigerator, washing machine, microwave oven, or air conditioner), or that contains a motor. Depending on the way in which the electrical appliance is used, power supply noise may cause this unit to malfunction or may produce audible noise. If it is not practical to use a separate electrical outlet, connect a power supply noise filter between this unit and the electrical outlet.
- The AC adaptor will begin to generate heat after long hours of consecutive use. This is normal, and is not a cause for concern.
- Before connecting this unit to other devices, turn off the power to all units. This will help prevent malfunctions and/or damage to speakers or other devices.
Placement
- Using the unit near power amplifiers (or other equipment containing large power transformers) may induce hum. To alleviate the problem, change the orientation of this unit; or move it farther away from the source of interference.
- This device may interfere with radio and television reception. Do not use this device in the vicinity of such receivers.
- Noise may be produced if wireless communications devices, such as cell phones, are operated in the vicinity of this unit. Such noise could occur when receiving or initiating a call, or while conversing. Should you experience such problems, you should relocate such wireless devices so they are at a greater distance from this unit, or switch them off.
- Do not expose the unit to direct sunlight, place it near devices that radiate heat, leave it inside an enclosed vehicle, or otherwise subject it to temperature extremes. Excessive heat can deform or discolor the unit.
- When moved from one location to another where the temperature and/or humidity is very different, water droplets (condensation) may form inside the unit. Damage or malfunction may result if you attempt to use the unit in this condition. Therefore, before using the unit, you must allow it to stand for several hours, until the condensation has completely evaporated.
- Do not allow objects to remain on top of the keyboard. This can be the cause of malfunction, such as keys ceasing to produce sound.
- Depending on the material and temperature of the surface on which you place the unit, its rubber feet may discolor or mar the surface.
You can place a piece of felt or cloth under the rubber feet to prevent this from happening. If you do so, please make sure that the unit will not slip or move accidentally.
Maintenance
- For everyday cleaning wipe the unit with a soft, dry cloth or one that has been slightly dampened with water. To remove stubborn dirt, use a cloth impregnated with a mild, non-abrasive detergent. Afterwards, be sure to wipe the unit thoroughly with a soft, dry cloth.
- Never use benzine, thinners, alcohol or solvents of any kind, to avoid the possibility of discoloration and/or deformation.
Repairs and Data
- Please be aware that all data contained in the unit's memory may be lost when the unit is sent for repairs. Important data should always be backed up in another MIDI device (e.g., a sequencer), or written down on paper (when possible). During repairs, due care is taken to avoid the loss of data. However, in certain cases (such as when circuitry related to memory itself is out of order), we regret that it may not be possible to restore the data, and Roland assumes no liability concerning such loss of data.
Additional Precautions
- Please be aware that the contents of memory can be irretrievably lost as a result of a malfunction, or the improper operation of the unit. To protect yourself against the risk of loosing important data, we recommend that you periodically save a backup copy of important data you have stored in the unit's memory in another MIDI device (e.g., a sequencer).
- Unfortunately, it may be impossible to restore the contents of data that was stored in the unit's memory, or in another MIDI device (e.g., a sequencer) once it has been lost. Roland Corporation assumes no liability concerning such loss of data.
- Use a reasonable amount of care when using the unit's buttons, sliders, or other controls; and when using its jacks and connectors. Rough handling can lead to malfunctions.
- Never strike or apply strong pressure to the display.
- When connecting / disconnecting all cables, grasp the connector itself—never pull on the cable. This way you will avoid causing shorts, or damage to the cable's internal elements.
- To avoid disturbing your neighbors, try to keep the unit's volume at reasonable levels. You may prefer to use headphones, so you do not need to be concerned about those around you (especially when it is late at night).
- When you need to transport the unit, package it in the box (including padding) that it came in, if possible. Otherwise, you will need to use equivalent packaging materials.
- Do not apply undue force to the music stand while it is in use.
USING THE UNIT SAFELY 2
IMPORTANT NOTES 4
Introduction. 6
Top and Rear Panels. 6
Top Panel. 6
Rear Panel. 8
Making the Connections 8
Connecting an External Device or Foot Switch. 8
Connecting the AC Adaptor. 8
Turning the Power On/Off 8
Turning the Power On. 8
Turning the Power Off 9
Listening to the Demo Songs. 9
Adjusting the Display Contrast 9
Returning the E-09 to Its Factory-Set State 9
Playing the Sounds from the
Keyboard 10
Playing the Main Part. 10
Playing the Main Part and Split Part 10
Playing the Main Part and Dual Part 10
Selecting Tones 11
Using the Numeric Keys. 11
Using the TONE Category Buttons 11
Drum Sounds and Sound Effects (SFX) 11
Sounding the Metronome 11
Transposing. 12
Octave Setting 12
Changing the Keyboard Scale 12
Performing with an Accompaniment
(Arranger) 13
Using the Arranger 13
Changing the Arranger Ensemble. 13
Changing the Volume Balance of the Arranger Playback
and the Keyboard Performance 13
Changing the Tempo of the Arranger. 13
Arranger Sync Start 13
Stopping the Arranger. 13
Selecting a Music Style 14
Music Style Functions 14
One-Touch. 14
Melody Intelligence 14
Performance Functions and Effects.....15
Performance Functions. 15
Keyboard Touch 15
Pitch Bend and Modulation. 15
Foot Switch. 15
Music Assistant 15
User Program. 16
Effects. 16
Reverb 16
Chorus 17
Multi-Effects (MFX) 17
Song Functions 19
Recording Your Own Performance 19
All Recording Mode 19
Keyboard Recording Mode 19
Single Recording Mode 20
Punch-In/Out Recording Mode 20
Playing the Song. 21
Changing the Playback Location of the Song 21
Minus-OnePlayback 21
Function Menu 22
Setting a Function Menu Parameter. 22
KBD SET Parameters 22
METRONOME Parameters 23
Octave Parameters 23
Volume Parameters. 23
ARR SET Parameters 24
EFFECTS Parameters 24
KBD SCALE Parameters 25
MIDI Parameters 25
UTILITY Parameters 25
MIDI Functions 26
MIDI Channels. 26
MIDI Parameters 27
BulkDump 28
Bulk Load 28
Other Functions 29
Appendices 31
Troubleshooting 31
Tone List 32
Drum Set List. 37
Music Style List. 43
Specifying Chords 44
MIDI Implementation Chart. 46
Specifications 47
Index 48
Top and Rear Panels
Top Panel
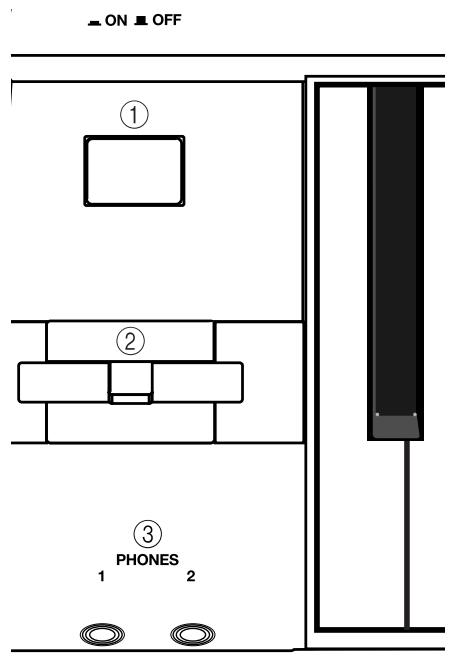
1. Power Button
Turns the power on/off. (p. 8)
2. Bender/Modulation Lever
Moving this lever to left or right changes the pitch of the sound. Pushing the lever away from yourself adds modulation (normally vibrato) to the sound. (p. 15)
3. PHONES 1/2 Jacks
You can connect two sets of headphones (sold separately) to these jacks. The internal speakers will be turned off if you connect headphones.
NOTE
The headphone volume may decrease if you connect two sets of headphones.
4. VOLUME Knob
Adjusts the overall volume of the E-09.
5. BALANCE (ARRANGER and KEYBOARD) Buttons
These buttons adjust the volume balance between the accompaniment (or song) and the part you're playing on the keyboard. (p. 13)
6. TAP TEMPO Button
You can use this button to adjust the tempo. (p. 13)
7. STYLE Section
Here you can select music styles for the displayed group.
8. METRONOME Button
Switches the metronome on/off. If you hold down this button, a screen will appear in which you can make settings, such as the time signature and volume of the metronome. (p. 11)

9. BAND ORCHESTRATOR Section
Press these buttons if you want to change the ensemble of the arranger (accompaniment) or if you want to use the minus-one function. (p. 13, p. 21)
10. KEYBOARD MODE Section
ARRANGER Button
Press this button when you want to use the arranger function (automatic accompaniment).
PIANO Button
If you press this button, you'll be able to play a piano sound using the entire keyboard.
11. ARRANGER & SONG CONTROLS Section
Press these buttons to play back the arranger or songs. (p. 13, p. 19)
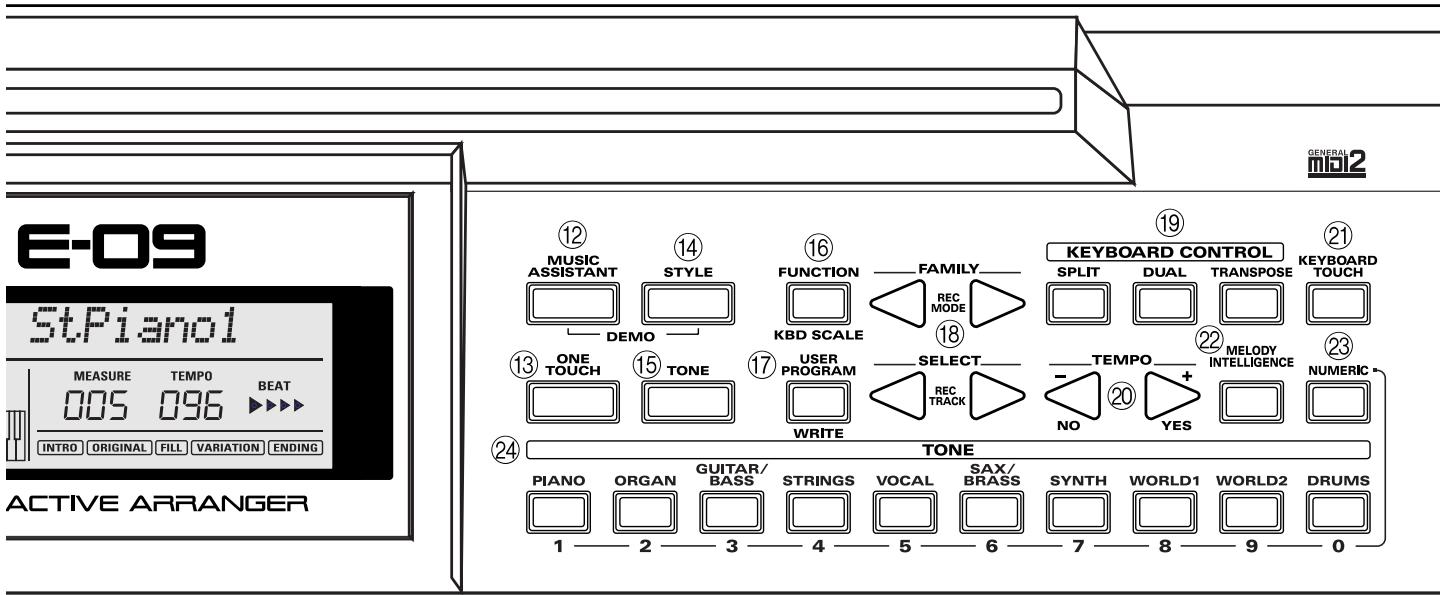
12. MUSIC ASSISTANT Button
Selects music assistants. (p. 15)
13. ONE TOUCH Button
Selects one-touch settings. This will recall settings that are appropriate for the selected music style. (p. 14)
14. STYLE Button
Selects music styles. (p. 14)
15. TONE Button
Selects tones. (p. 10)
16. FUNCTION Button
Accesses a screen where you can edit various parameters. (p. 22)
17. USER PROGRAM Button
Selects user programs. (p. 16)
18. FAMILY (REC MODE) [ ] [ ]
SELECT (REC TRACK) [ ] [ ]
Use these buttons to select tones, music styles, music assistants, songs, or functions. Use the FAMILY [ ][ ] buttons to select the group. To move more rapidly through the selections, hold down a button or press the other button while you hold down the one you pressed first. Use the SELECT [ ][ ] buttons to select an item within the selected group. Here too, you can move more rapidly through the selections by holding down a button or by pressing the other button while you continue holding down the first button.
19. KEYBOARD CONTROL Section
- SPLIT Button
- Divides the keyboard into left-hand and right-hand areas so that you can play different tones in each area. (p. 10)
DUAL Button Lets you play two tones simultaneously. (p. 10)
- Divides the keyboard into left-hand and right-hand areas so that you can play different tones in each area. (p. 10)
- TRANSPOSE Button
Transposes the keyboard. (p. 12)
20. TEMPO [ ](-/NO) / [ ] (+/YES)
These buttons adjust the tempo of the arranger. They are also used to edit the value of various parameters.
21. KEYBOARD TOUCH Button
Turns keyboard touch on/off. If this is off, all notes you play on the keyboard will sound at the same loudness (which you may specify). (p. 15)
22. MELODY INTELLIGENCE Button
Turns melody intelligence on/off. If you hold down this button, the melody intelligence harmony type editing screen will appear. (p. 14)
23. NUMERIC Button
Press this when you want to use the TONE category buttons as numeric buttons. (p. 11)
24. TONE Category Buttons
Use these buttons to select tones for the displayed category. (p. 11)
Attaching the Music Rest
Insert the included music rest into the groove located at the upper middle of the top panel.
Rear Panel
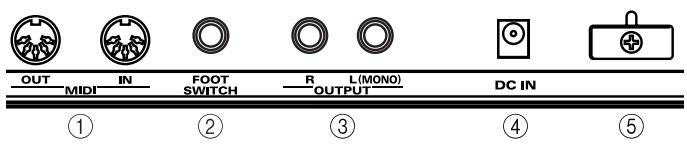
1. MIDI OUT/IN Connectors
Connect your MIDI equipment here. (p. 26)
2. FOOT SWITCH Jack
Connect a separately available foot switch (Roland DP series unit or BOSS FS-5U) here.
3. OUTPUT R/L (MONO) Jacks
Connect these jacks to your cassette deck, power amp, audio amp, keyboard amp, monitor speakers, etc.
4. DC IN Connector
Connect the supplied AC adaptor to this connector.
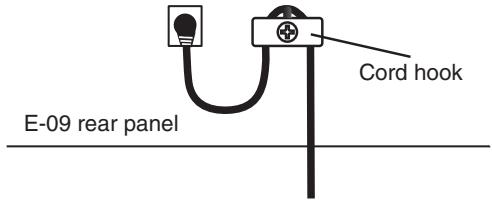
5. Cord Hook
Use this hook to fasten the cord of the AC adaptor.
Making the Connections
NOTE
To prevent malfunction and/or damage to speakers or other devices, always turn down the volume, and turn off the power on all devices before making any connections.
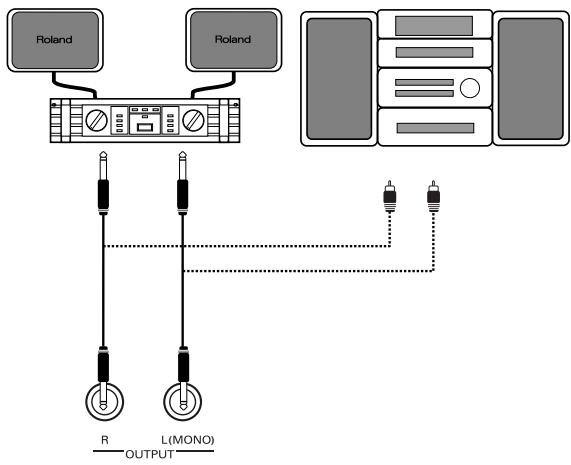
Connecting an External Device or Foot Switch
Connecting an External Device
If you want to record your performance (or a song recorded on the E-09) to a cassette tape or other media, connect the E-09's rear panel OUTPUT jacks to the input jacks of your external recording device.
MEMO
If you connect separately available stereo headphones to the PHONES 1 or 2 jack, the internal speakers will be muted.
Cassette deck, power amp, audio amp, keyboard amp, monitor speakers, etc.
Connecting a Foot Switch
NOTE
The E-09's power must be switched off when you connect a foot switch.
Connect the separately available foot switch (Roland DP series unit or BOSS FS-5U) to the rear panel FOOT SWITCH jack. You can use the foot switch to sustain the notes even after removing your fingers from the keyboard. Other functions can also be assigned to the foot switch. For details, refer to "FSW (Foot Switch Assign)" (p. 23).
Connecting the AC Adaptor
- Place the E-09 in a level location.
- Plug the supplied power cord into the supplied AC adaptor.
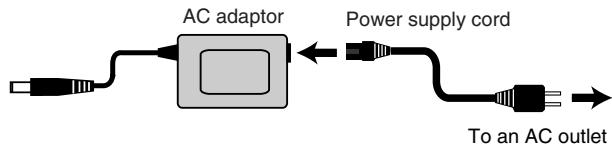
- Connect the AC adaptor to the rear panel DC IN connector, and then plug the power cord into an AC outlet.
NOTE
To prevent the inadvertent disruption of power to your unit (should the plug be pulled out accidentally), and to avoid applying undue stress to the AC adaptor jack, anchor the power cord using the cord hook, as shown in the illustration.
Turning the Power On/Off
Turning the Power On
NOTE
Once the connections have been completed, turn on power to your various devices in the order specified. By turning on devices in the wrong order, you risk causing malfunction and/ or damage to speakers and other devices.
- Before you turn on the power, set the VOLUME knob to the far left position to minimize the volume.
- Press the power button on the top panel to turn on the power.
NOTE
This unit is equipped with a protection circuit. A brief interval (a few seconds) after power up is required before the unit will operate normally.
NOTE
If you've connected the E-09 to a keyboard amp or audio amp, switch on the E-09's power before you switch on your amp.
- Turn the VOLUME knob to adjust the volume of the E-09.
Turning the Power Off
- Press the top panel power button once again to turn off the power.
NOTE
If you've connected the E-09 to a keyboard amp or audio amp, switch off the power to your amp before you switch off the E-09's power.
Listening to the Demo Songs
NOTE
All rights reserved. Unauthorized use of this material for purposes other than private, personal enjoyment is a violation of applicable laws.
NOTE
No data for the music that is played will be output from MIDI OUT.
- Simultaneously press [MUSIC ASSISTANT] and [STYLE] so both buttons are lit.
- Turn the VOLUME knob to adjust the volume.
- Press [START/STOP] so it's lit. The demo song starts playing.
- Press [START/STOP] so it goes out. The demo song stops playing.
- Press [MUSIC ASSISTANT] or [STYLE] to exit the demo mode.
Adjusting the Display Contrast
- Press [FUNCTION] so it's lit.
- Use FAMILY [ ][▶] to access the "UTILITY" screen.
- Use SELECT [ ] to access the "LCD Contrast" screen.
- Use TEMPO [ (-)][ (+)] to adjust the contrast of the characters in the screen.
- Press [FUNCTION] so it goes out.
TIP
Alternatively, you can adjust the display's contrast by holding down [NUMERIC] and using TEMPO [(-)][ (+)] .
Returning the E-09 to Its Factory-Set State
- Press [FUNCTION] so it's lit.
- Use FAMILY [ ] to access the "UTILITY" screen.
- Use SELECT [ ] to access the "Factory Reset" screen.
"Yes" begins blinking in the screen.
- Press TEMPO [ (YES)].
The screen prompts "Sure?"
- Press TEMPO [▶ (YES)] once again.
Immediately after you've turned on the power, the E-09 is set up so that you can play a piano sound across the full extent of the keyboard. The E-09's keyboard provides the following three "parts."
| MAIN | A single tone is assigned across the entire keyboard (Main part) |
| SPLIT | The keyboard area at the left of the split point is the "split part," and the area at the right is the "main part." Each part can play a different tone. |
| DUAL | The entire keyboard is assigned to simultaneously play two tones (the main part and the dual part). |
The E-09 contains 614 different tones. You can play these tones from the three keyboard parts (main, split, and dual).
MEMO
If you press the KEYBOARD MODE [PIANO] button so it's lit, the main part is assigned to the entire keyboard and a piano sound will be selected.
NOTE
You can't use the arranger (automatic accompaniment) if the KEYBOARD MODE [PIANO] button is lit.
Playing the Main Part
- Press [TONE] so it's lit.
- Use FAMILY [ ] to select a tone group.
- Use SELECT [ ] to select a tone from the group you selected in step 2.
- Play the keyboard.
Turn the VOLUME knob to adjust the volume.
5. Hold down [TONE], and adjust the volume of the main part by pressing BALANCE [ ] (to decrease the volume) or [ ] (to increase the volume).
Playing the Main Part and Split Part
- If you want to play different tones in the left and right hands, press [SPLIT] so it's lit.
A tone will automatically be selected for the split part according to the tone of the main part.
Selecting a Tone for the Main Part
- Press [TONE] so it's lit.
- Use FAMILY [ ] to select a tone group.
- Use SELECT [ ][ ] to select a tone for the main part from the group you selected in step 3.
Selecting a Tone for the Split Part
- Hold down [SPLIT], and use FAMILY [ ][▶] to select a tone group.
- Hold down [SPLIT], and use SELECT [][] to select a tone for the split part from the group you selected in step 5.
NOTE
You can't select a drum set for the split part.
TIP
You can add a monophonic bass part (Auto Bass) to the split part. For details, refer to p. 23.
- Play the keyboard.
Turn the VOLUME knob to adjust the volume.
MEMO
The tone of each part is automatically set to the appropriate octave.
MEMO
The split point is set to C4 (note number 60).
TIP
You can change the split point. For details, refer to "Split Point" (p. 22).
- Adjust the volume balance between the main part and the split part.
To adjust the volume of the main part, hold down [TONE] and press BALANCE [ ] (to decrease the volume) or [ ] (to increase the volume).
To adjust the volume of the split part, hold down [SPLIT] and press BALANCE [ ] (to decrease the volume) or [ ] (to increase the volume).
Playing the Main Part and Dual Part
- If you want to play two different tones simultaneously, press [DUAL] so it's lit.
A tone appropriate for layering on the main part will automatically be selected for the dual part.
Selecting a Tone for the Main Part
- Press [TONE] so it's lit.
- Use FAMILY [ ][ ] to select a tone group.
- Use SELECT [ ][ ] to select a tone for the main part from the group you selected in step 3.
Selecting a Tone for the Dual Part
- Hold down [DUAL], and use FAMILY [ ][▶] to select a tone group.
- Hold down [DUAL], and use SELECT [][] to select a tone for the dual part from the group you selected in step 5.
NOTE
You can't select a drum set for the dual part.
- Play the keyboard.
Turn the VOLUME knob to adjust the volume. - Adjust the volume balance between the main part and the dual part.
To adjust the volume of the main part, hold down [TONE] and
press BALANCE [ ] (to decrease the volume) or [ ] (to increase the volume).
To adjust the volume of the dual part, hold down [DUAL] and press BALANCE [ ] (to decrease the volume) or [ ] (to increase the volume).
Selecting Tones
As an alternative to using the FAMILY or SELECT [ ][ ] buttons, you can also select tones using the numeric keys or TONE category buttons.
Using the Numeric Keys
- Press [TONE] so it's lit.
- Press [NUMERIC] so it's lit.
- Use TONE category buttons [1]–[0] to enter a tone number. Example: To enter “12”
Press [1] -> [2] and wait a few moments until the number is confirmed. Alternatively, press [0] -> [1] -> [2].
To select the tone for the split part, hold down [SPLIT] while you enter the tone number.
To select the tone for the dual part, hold down [DUAL] while you enter the tone number.
TIP
To defeat the numeric key function, press [NUMERIC] so it goes out.
Using the TONE Category Buttons
You can use the TONE category buttons to select tones directly, without using [TONE], FAMILY [▲][▶], SELECT [▲][▶], or numeric keys. This method lets you select from nine melody sounds and one drum set.
You can assign a favorite tone to each button. This is convenient for live performance, since you can select a tone simply by pressing a single button.
Assigning other tones to the TONE category buttons
After selecting a tone, press the TONE category button for the group that includes the selected tone. The screen will briefly indicate "Memorized."
You can assign the following groups of tones to each of the category buttons.
| [PIANO] | Piano, ELECTRIC PIANO |
| [ORGAN] | ORGAN, ACCORDION, KEYBOARD, CHROMATIC PERC |
| [GUITAR/BASS] | ACOUSTIC GUITAR, ELECTRIC GUITAR, BASS |
| [STRINGS] | STRINGS |
| [VOCAL] | VOCAL |
| [SAX/BRASS] | SAX, WIND, ACOUSTIC BRASS |
| [SYNTH] | SYNTH BRASS, SYNTH LEAD, POLY SYNTHESIZER, PAD |
| [WORLD1] | WORLD 1 |
| [WORLD2] | WORLD 2, PERCUSSION, SFX |
| [DRUMS] | DRUMS |
Drum Sounds and Sound Effects (SFX)
Drum Sets
The last sixty-one tones (615-675) are called "drum sets." If you select a drum set, a different sound is assigned to each note of the keyboard. For example, you can use the leftmost key to play a bass drum (kick) sound, and another key to play a snare drum sound. A drum set is a collection of ninety or more sounds, each assigned to a different key.
NOTE
You can't assign a drum set to the split part or dual part.
Sound Effects (SFX)
The E-09 contains numerous sound effects, drum, and percussion tones (551-614). You can assign these tones to a keyboard part and play them. These tones can be assigned to the main, split, or dual part and played across the entire range of the keyboard.
TIP
If [SPLIT] is lit, you will probably want to set the split point near C6 if you want to use your right hand to play sound effects or percussion, or near C3 if you want to play these using your left hand. (p. 22)
Sounding the Metronome
It's convenient to sound the metronome while you're practicing a new song.
- Press [METRONOME] so it's lit. The metronome will sound.
-
Hold down [METRONOME] for a while until the "Metro TS" screen appears. In this screen you can set the time signature of the metronome.
-
Use TEMPO [ (-)][ (+)] to select a time signature. Range: 1/4, 2/4, 3/4, 4/4, 5/4, 6/4, 6/8, 9/8
- Use SELECT [ ] to access the "Metro Vol" screen.
- Use TEMPO [ (-)][ (+)] to adjust the volume. Range: 0-127
- When you press the [METRONOME] button so it goes out, the metronome will stop sounding.
Transposing
You can shift the pitch of your performance without changing the position at which you're playing the keyboard. For example, if a song is in a difficult key containing numerous sharps or flats, you can transpose it so that it's easier to play.
You can also use this function to transpose the playback of a song. If you're accompanying a singer, you can transpose the pitch to a comfortable range for the singer without having to change your keyboard fingering.
NOTE
Transpose is not applied to drum sets.
- Press [TRANSPOSE] so it's lit.
- Hold down [TRANSPOSE] for a while until the "Transpose" screen appears.
- Use TEMPO [ (-)][ (+)] to adjust the transposition.
Range: -12++12
MEMO
If you set this to "0," the transpose function will be off.
- To turn the transpose function off, press [TRANSPOSE] so it goes out.
Example: The song is in the key of E major, but you want to play it using the keyboard fingering of the key of C
The note E is four semitones (keys including the black keys) above the note C, so you would set the transposition value to "+"4."
MEMO
You can save this setting in a user program. (p. 16)
cf.
You can also specify where the transpose setting is to be applied. Refer to "Trans Mode" (p. 22).
Octave Setting
You can raise or lower the pitch of the tone for each keyboard part (main, split, dual) in steps of an octave, over a range of four octaves upward or downward.
Main Part
Hold down [TONE] and use TEMPO [(-)][ (+)] to change the octave of the main part.
Split Part
Hold down [SPLIT] and use TEMPO [(-)][ (+)] to change the octave of the split part.
Dual Part
Hold down [DUAL] and use TEMPO [ (-)][ (+)] to change the octave of the dual part.
Changing the Keyboard Scale
As an alternative to the equal tempered scale used in most Western music, you can adjust the pitch of each note to the scales used by other musical cultures or tuning systems.
You can independently adjust the pitch of each note in the octave (C, C#, D, Eb, E, F, F#, G, Ab, A, Bb, B).
For example, if you adjust the pitch of the "C" note, this adjustment will apply to the "C" note of each octave.
- Hold down [FUNCTION] and press the key whose note pitch you want to adjust.
The pitch will be lowered by 1 / 4 tone.
The keyboard in the center of the screen will indicate the notes whose pitch has been lowered.
TIP
To check the notes for which the pitch has been lowered, press and hold [FUNCTION]. While you continue holding down [FUNCTION], the keyboard in the center of the screen will indicate the state of the pitch.
TIP
To return a note to its original pitch, hold down [FUNCTION] and press the same key you pressed in step 1.
Performing with an Accompaniment (Arranger)
Using the Arranger
1. Press [ARRANGER] so it's lit.
The keyboard will be divided into left and right parts; "split" and "main." In the left-hand side, hold down notes to specify a chord. In the right-hand side, play along with the accompaniment.
MEMO
The C4 key (note number 60) is assigned as the split point.
2. Press [START/STOP] so it's blinking.
The arranger begins playing. The button begins blinking in time with the arranger's time signature.
TIP
If you play the left-hand area of the keyboard while [ARRANGER] is lit and the arranger playback is stopped, a stereo strings sound will play. You can also add a monophonic bass sound ( -> "Auto Bass," p. 23). If you don't want the strings sound or bass sound to be heard, turn off "Educational" (p. 24).
TIP
If you press [START/STOP] while [ARRANGER] is not lighted, only the drums will play, allowing you to add a rhythm accompaniment to your keyboard performance. The drums will be based on the currently selected music style. If you want to select a different music style, refer to p. 14.
3. With your left hand, play a chord (or a single note).
4. When you play a different chord (or single note), the arranger will also switch to a different chord.
5. Use the following buttons to select other patterns within the currently selected music style.
| [INTRO] | An accompaniment pattern used for the introduction. |
| [ORIGINAL] | A simple accompaniment pattern. |
| [FILL] | An accompaniment pattern used to transition between ORIGINAL and VARIATION. |
| [VARIATION] | A more complex accompaniment pattern, that's ideal for a break or similar section in the song. |
| [ENDING] | If you press this button instead of [START/STOP], an ending will play and then the arranger will stop playing. |
MEMO
The chord name is shown in the arranger chord area of the screen.
While using your left hand to play the arranger chord, use your right hand to play the melody.
Changing the Arranger Ensemble
By pressing one of the BAND ORCHESTRATOR buttons so it's lit, you can change the accompaniment patterns produced by the arranger while playback continues.
| DRUMS & BASS | Simple accompaniment patterns containing only drums and a bass line. |
| COMBO | Accompaniment patterns containing several instruments (a band). |
| FULL | Accompaniment patterns with a lavish arrangement (multiple instruments). |
Changing the Volume Balance of the Arranger Playback and the Keyboard Performance
To Increase the Volume of the Arranger (or Song Part)
Press BALANCE [ ] (ARRANGER).
To Increase the Volume of Your Keyboard Performance
Press BALANCE [ ] (KEYBOARD).
Changing the Tempo of the Arranger
Use TEMPO [ ] to slow down (-) or speed up (+) the tempo of the arranger.
TIP
By pressing TEMPO [ ] and [ ] simultaneously, you can reset the arranger tempo to the default tempo setting specified by the currently playing music style.
TIP
You can also enter the tempo by pressing [TAP TEMPO] three times or more at the desired interval. By holding down [TAP TEMPO], you can reset the arranger tempo to the default tempo setting.
Arranger Sync Start
1. Press [SYNC START] so it's lit.
TERM
Sync Start is a function that causes the arranger to start playing when you play a note to the left of the split point. This is convenient when you want the arranger to begin playing the moment you specify the chord with your left hand.
TIP
To cancel this function, press [SYNC START] so it goes out.
Stopping the Arranger
1. Press [START/STOP] once again so it goes out.
The arranger will stop playing.
TIP
If you press [ENDING], an ending phrase will play and then the arranger will stop.
Selecting a Music Style
- Press [ARRANGER] so it's lit.
- Press [STYLE] so it's lit.
- Use FAMILY [ ][ ] to select one of the following groups.
ROCK (001-006), DANCE (007-023), 8BEAT (024-036), 16BEAT (037-047), JAZZ (048-053), LATIN (054-063), TRADITIONAL (064-079), BALLROOM (080-097), WORLD (98-130)
- Use SELECT [ ] to select a music style from the group you selected in step 3.
TIP
As an alternative to using FAMILY or SELECT [ ][ ], you can use the numeric keys to select a music style.
- Press [NUMERIC] so it's lit.
- Use TONE category buttons [1]-[0] to enter a style number. Example: To enter "12"
Press [1] -> [2] and wait a few moments until the number is confirmed. Alternatively, press [0] -> [1] -> [2].
- To defeat the numeric keys, press [NUMERIC] so it goes out.
Music Style Functions
To access the following functions, you'll need to press [ARRANGER] so it's lit.
One-Touch
This function automatically sets the following items to the best setting for the selected music style.
- The tones of the main part, split part, and dual part
- Reverb and chorus settings
MEMO
You can choose from two different one-touch settings for each music style.
- Select the music style you want to use.
- Press [ONE TOUCH].
The upper left of the screen will indicate "OT1."
OT1 Piano 2
If [TONE] is lit, the screen will show the name of the tone. (In the above example, this is "Piano 2.")
- If you want to use "OT2" press [ONE TOUCH] once again.
Selecting a different music style will cancel the one-touch function.
Melody Intelligence
TERM
Melody Intelligence is a function that automatically adds harmony to the melody that you play in the right-hand side of the keyboard, as appropriate for the chord you hold down in the left-hand side of the keyboard.
- Press [MELODY INTELLIGENCE] so it's lit.
TIP
To turn off this setting, press [MELODY INTELLIGENCE] so it goes out.
Changing the Harmony Type for Melody Intelligence
You can choose one of eighteen different settings for the Melody Intelligence function.
- Press and hold [MELODY INTELLIGENCE] for a few moments.
The melody intelligence setting screen will appear.
- Press TEMPO [ ] to select the type you want to use.
1 Duet
4 Strings
7 BigBand
10 Broadway
13 Latin
16 WItzOrg
2 Organ
5Choir
8 Country
11 Gospel
14 CntrGuit
17 Octave1
3 Combo
6 Block
9 Traditional
12 Romance
15 CntrBald
18 Octave2
MEMO
You can save this setting in a user program. (p. 16)
Performance Functions
Keyboard Touch
The force or speed with which you play the keyboard will vary the volume or brightness of the main part, split part, and dual part. All of the acoustic instrument sounds (e.g., piano, violin, drum) will respond to your keyboard touch, allowing you to reproduce the musically expressive range of that instrument. The sound will be louder and more brilliant if you play strongly, and softer and more muted if you play softly.
1. Press [KEYBOARD TOUCH] so it's lit.
Keyboard touch is now turned on.
![ROLAND E-09W - Press [KEYBOARD TOUCH] so it's lit. - 1](/content/2025/01/131031/images/c90ab3f128b76fbb05ebc68fb70665bdbd32f3308d5698ef755d9b17baa5727f.jpg)
If you press [KEYBOARD TOUCH] once again so it goes out, the keyboard touch will be fixed; i.e., the sound will no longer vary in response to your keyboard playing touch.
Specifying a Fixed Keyboard Touch
Here's how to specify the uniform strength each note will have if [KEYBOARD TOUCH] is unlit.
1. Press [KEYBOARD TOUCH] until the screen indicates "KBD Touch."
[FUNCTION] lights.
2. Use TEMPO [ (-)][ (+)] to specify the "KBD Touch" setting. (Range: 1-127)
A setting of "1" will be extremely faint (normally inaudible), and a setting of "127" will be the maximum strength (very loud and bright).
3. Press [FUNCTION] so it goes out.
![ROLAND E-09W - Press [FUNCTION] so it goes out. - 1](/content/2025/01/131031/images/41b371dc17036a28231e20a6e81a812a005c5cec2851115cbac4048d8efa73a8.jpg)
Some of the internal tones switch between different sounds depending on your keyboard playing strength. For such tones, only one of these sounds will be heard if you specify a fixed keyboard touch.
![ROLAND E-09W - Press [FUNCTION] so it goes out. - 2](/content/2025/01/131031/images/dbb55cd4e827c0ab0d4de057b8d56417cad4c45fbe258c48852287c0d5b8f10f.jpg)
The keyboard touch setting can be saved in a user program. (p. 16)
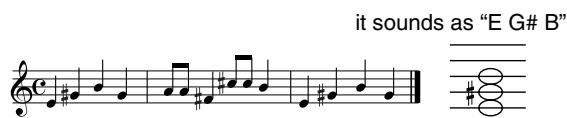
Pitch Bend and Modulation
You can use the BENDER/MODULATION lever located at the left of the keyboard to apply two types of effect to the sound of the keyboard part.

Pitch Bend lowers the pitch you're playing when you move the lever to the left, or raises it when you move the lever to the right.

Modulation applies vibrato to the sound when you push the lever away from yourself while playing.

If the MFX type is ROTARY, this will switch the speed of rotation instead of applying the modulation effect.
If you push the lever away from yourself while moving it to left or right, both effects will be applied.

You can specify the range of pitch bend that will occur. For details, refer to "PB Range" (p. 22).
Foot Switch

You must connect the foot switch while the E-09's power is switched off.
Connect a separately available foot switch (Roland DP series unit or BOSS FS-5U) to the rear panel FOOT SWITCH jack. By pressing the foot switch, you can sustain the sound even after taking your fingers off the keyboard. You can also assign other functions to the foot switch. For details, refer to "FSW (Foot Switch Assign)" (p. 23).
Music Assistant
Music assistant settings let you instantly recall settings that are appropriate for the song you're playing.

You can't use Music Assistant while a song is playing.
Selecting music assistant settings will recall settings for the following items.
Music style
- Tempo
- The tone of the main part, split part, and dual part
- Effects
- Band orchestrator
Keyboard touch
Selecting Music Assistant Settings
- Press [MUSIC ASSISTANT] so it's lit.
The screen will show the name of the music assistant setting.
- Use FAMILY [ ][▶] to select the group (musical style) that includes the music assistant settings you want to use.
You can choose from the following groups.
Ballad, Ballroom, Dancing, Easy List, Evergreen, JazzSwing, PopHit, General
- Use SELECT [ ][ ] to choose music assistant settings from the group you selected in step 2.

As an alternative to using the FAMILY or SELECT buttons, you can use the numeric keys to make your selection.
- Press [NUMERIC] so it's lit.
- Use TONE category buttons [1]-[0] to enter a music assistant number.
Example: To enter "12"
Press [1] -> [2] and wait a few moments until the number is confirmed. Alternatively, press [0] -> [1] -> [2].
TIP
When you're finished using the numeric keys, press [NUMERIC] so it goes out.
TIP
If you've edited the music assistant settings (for example by changing the tone of the main part), you can save the edited settings in a user program.
User Program
The E-09 provides 100 user programs (00-99). You can use these to store settings for most of the front panel operations and function menus (p. 22).
NOTE
MIDI settings (p. 26) are automatically stored in the E-09. They are not saved in a user program.
Saving Your Settings in a User Program
- Hold down [USER PROGRAM] for a few moments. The display will indicate "Write?"
- Continue holding down [USER PROGRAM], and press TONE category numeric buttons [1]-[0]. (00-99)
Example: To enter "6"
Press [6] and wait a few moments until the number is confirmed. Alternatively, press [0] -> [6].
- Press TEMPO [ (YES)], and then take your finger off [USER PROGRAM].
- Enter a name for the user program.
Use FAMILY [][] to move the cursor, and use SELECT
[ ]to change each character.
- Press TEMPO [ (YES)].
The screen will show "Complete," and the settings will be saved.
TIP
We recommend that you frequently store your settings to a user program even while you're in the process of editing.
MEMO
If the KEYBOARD MODE [ARRANGER] or [PIANO] button is lit, the state of that button will also be saved in the user program.
MEMO
The most recently selected music style is also saved in the user program.
Selecting a User Program
- Press [USER PROGRAM] so it's lit.
[NUMERIC] will automatically light.
The display will indicate the number of the most recently selected user program, or "1" if you have not selected a user program since turning on the power.
NOTE
If you hold down [USER PROGRAM], you will be saving (rather than selecting) a user program.
- Use TONE category numeric buttons [1]-[0] to enter a user program number. (00-99)
Example: To enter "6"
Press [6] and wait a few moments until the number is confirmed. Alternatively, press [0] -> [6].
TIP
When you're finished using the numeric keys, press [NUMERIC] so it goes out.
Effects
The E-09 provides reverb, chorus, and multi-effects (MFX). You can change the type of each effect.
You can also adjust the amount of reverb or chorus that is applied to the keyboard parts.
NOTE
You can't use chorus together with MFX.
Reverb
You can apply reverb (reverberation) to the sounds you're playing. Reverb simulates the ambience you experience when performing in a concert hall or other spacious location.
When you switch on the E-09's power, reverb will be applied to all keyboard parts (main, dual, split) as well as to the arranger and song parts.
If you don't need reverb, you can turn reverb off or set the reverb amount to "0" for the keyboard parts. You can't change the amount of reverb applied to the arranger or to the parts of an already-recorded song.
MEMO
If MFX (p. 17) is set to anything other than "Off," you can apply that MFX and reverb simultaneously to the tone of the main part.
Applying Reverb
- Press [FUNCTION] so it's lit.
- Use FAMILY [▲][▶] to select "EFFECTS."
-
Use SELECT [ ] to select "REVERB."
-
Use TEMPO [ (-)][ (+)] to select the type of reverb.
| Off | Reverb will not be applied. |
| Room 1–3 | These simulate the reverberation of a room. Higher numbers simulate larger rooms. |
| Hall 1, 2 | These simulate the reverberation of a concert hall. Higher numbers simulate a larger hall. These produce deeper reverberation than the Room settings. |
| Plate | This is a digital simulation of a metal plate re-verb unit. It is particularly suitable for percussion sounds. |
| Delay | This is a delay effect (without reverb) which produces echo-like repeats. |
| PanDelay | This repeats the sound while making it alternate between left and right. |
- Play the keyboard to hear the effect.
- Press [FUNCTION] so it goes out.
Adjusting the Amount of Reverb Applied to the Keyboard Parts
- Press [FUNCTION] so it's lit.
- Use FAMILY [ ] to select "EFFECTS."
- Use SELECT [ ] to select one of the following parameters.
| Parameter | Value | Explanation |
| Rev MAIN | 0–127 | Adjusts the amount of reverb applied to the tone of the main part. |
| Rev DUAL | 0–127 | Adjusts the amount of reverb applied to the tone of the dual part. |
| Rev SPLIT | 0–127 | Adjusts the amount of reverb applied to the tone of the split part. |
- Use TEMPO [ (-)][ (+)] to adjust the amount of reverb applied to the part you selected in step 3.
If you don't want reverb to be applied, set this to "0."
- Play the keyboard to hear the effect applied to each part.
- Press [FUNCTION] so it goes out.
MEMO
You can save these settings in a user program. (p. 16)
Chorus
You can apply a chorus effect to the sounds you play. The chorus effect adds a three-dimensional spaciousness and depth to the sound. You can choose from eight types of chorus effect.
When you switch on the E-09's power, the amount of chorus applied to the keyboard parts (main, dual, split) is set to "0," meaning that chorus will not be applied to the keyboard parts.
If you don't want to use chorus, you can turn it off or set the chorus amount to "0" for the keyboard parts. You can't change the amount of chorus applied to the arranger or to the parts of an already-recorded song.
MEMO
You can't use chorus if MFX is set to anything other than "Off."
Applying Chorus
- Press [FUNCTION] so it's lit.
- Use FAMILY [ ] to select "EFFECTS."
- Use SELECT [<][> to select "CHORUS."
- Use TEMPO [ (-)][ (+)] to select the type of chorus.
| Off | Chorus will not be applied. |
| Chorus 1–4 | These are typical chorus effects that give the sound spaciousness and depth. |
| FB Chorus | This chorus produces a flanger-like effect, softening the sound. |
| Flanger | This produces a metallic-sounding effect reminiscent of a jet airplane taking off and landing. |
| S-Delay | This delays the sound to create an echo effect. |
| S-DelayFb | This repeats the sound at short intervals. |
- Play the keyboard to hear the effect.
- Press [FUNCTION] so it goes out.
Adjusting the Amount of Chorus Applied to the Keyboard Parts
- Press [FUNCTION] so it's lit.
- Use FAMILY [▲][▶] to select "EFFECTS."
- Use SELECT [ ] to select one of the following parameters.
| Parameter | Value | Explanation |
| Chr MAIN | 0–127 | Adjusts the amount of chorus applied to the tone of the main part. |
| Chr DUAL | 0–127 | Adjusts the amount of chorus applied to the tone of the dual part. |
| Chr SPLIT | 0–127 | Adjusts the amount of chorus applied to the tone of the split part. |
- Use TEMPO [ (-)][ (+)] to adjust the amount of chorus applied to the part you selected in step 3.
If you don't want chorus to be applied, set this to "0." - Play the keyboard to hear the effect applied to each part.
- Press [FUNCTION] so it goes out.
MEMO
You can save these settings in a user program. (p. 16)
Multi-Effects (MFX)
There are 47 types of multi-effect (MFX) that you can apply to the main part. Some of these combine two effects.
NOTE
MFX are not applied to the following three types of tones.
The split part
The dual part
- Drum sets
- Press [FUNCTION] so it's lit.
- Use FAMILY [▲][▶] to select "EFFECTS."
- Use SELECT [ ] [ ] to select "MFX."
- Use TEMPO [ (-)][▶ (+)] to select the type of MFX.
MEMO
You can save these settings in a user program. (p. 16)
| Off | MFX will be off. |
| Enhancer | Controls the harmonic content of the high-frequency range to give the sound more definition and crispness. |
| Overdrive 1-4 | Produces a natural-sounding distortion similar to that of a vacuum tube amp. 1: Small amp 2: Built-in type 3: Large double stack amp 4: Large triple stack amp |
| Distortion 1-4 | Produces a more intense distortion than Overdrive. You can choose from four types. |
| Phaser | Combines the original sound with a phase-shifted sound, and modulates it to produce a twisting, swishing effect. |
| AutoWah | Cyclically moves a filter to create a repeating wah effect (cyclic change in tone). |
| Rotary | Simulates the sound of a classic rotary speaker. You can switch the rotational speed (slow/fast) by pushing the BEND-ER/MODULATION lever away from yourself, creating an authentic-sounding sense of modulation. This effect is ideal for organ sounds. |
| StFlanger(stereo flanger) | Produces a metallic resonance reminiscent of a jet airplane taking off and landing. |
| StepFlanger | Varies the sound of a flanger in pitched steps. |
| Compressor | Makes the volume more consistent by re-straining loud sounds and boosting soft sounds. |
| Limiter | Prevents distortion by compressing sounds that are above a specified volume level. |
| HexaChorus | Applies a six-phase chorus to add spaciously and depth to the sound. (Six chorus sounds with differing delays are layered together.) |
| TremChorus(tremolo chorus) | Applies a chorus effect with tremolo (cyclic change in volume). |
| StChorus(stereo chorus) | Applies a stereo chorus effect. |
| Space-D | Applies a multiple chorus with dual-phase stereo modulation. This creates a transparent chorus effect with no sense of modulation. |
| StDelay(stereo delay) | Creates an echo effect by repeating the input sound. |
| Mod Delay(modulation delay) | Modulates the delayed sound to create a flanger-like effect. |
| 3Tap Delay(tiple tap delay) | Produces delayed sound from three positions; center, left, and right. |
| 4Tap Delay(quadruple tap delay) | Produces four delayed sounds. |
| TmCtrDelay(time control delay) | Lets you control the delay time in real time while you push the modulation lever. |
| Reverb | Adds reverberation to the original sound, simulating an expansive space. |
| GateRevNr(gate reverber normal) | Reverb that cuts the reverberation during its decay. |
| GateRevRv(gate reverber reverse) | Gated reverb that gradually increases in volume. |
| GateRevS1(gate reverbsweep 1) | Moves the reverb sound from right to left. |
| GateRevS2(gate reverb sweep 2) | Moves the reverb sound from left to right. |
| 2PitchShift(2 voice pitch shifter) | Shifts the pitch of the original sound. Two pitch-shifted sounds can be layered with the original sound. |
| FbPitchShift(feedback pitch shifter) | Shifts the pitch of the original sound and returns the pitch-shifted sound to the input, producing an echo. |
| OD>Chorus | Connects overdrive and chorus in series. |
| OD>Flanger | Connects overdrive and flanger in series. |
| OD>Delay | Connects overdrive and delay in series. |
| DS>Chorus | Connects distortion and chorus in series. |
| DS>Flanger | Connects distortion and flanger in series. |
| DS>Delay | Connects distortion and delay in series. |
| EH>Chorus | Connects enhancer and chorus in series. |
| EH>Flanger | Connects enhancer and flanger in series. |
| EH>Delay | Connects enhancer and delay in series. |
| Cho>Delay | Connects chorus and delay in series. |
| FL>Delay | Connects flanger and delay in series. |
| Cho>Flanger | Connects chorus and flanger in series. |
| Cho/Delay | Connects chorus and delay in parallel. |
| FL/Delay | Connects flanger and delay in parallel. |
| Cho/Flanger | Connects chorus and flanger in parallel. |
MEMO
With the factory settings, the MFX type will automatically switch according to the tone you select. For details, refer to "Tone MFX" (p. 24).
- Play the keyboard to hear the sound of the effect.
- Press [FUNCTION] so it goes out.
NOTE
If MFX is set to anything other than "Off," you can't apply chorus to the tone of the main part.
Recording Your Own Performance
You can use the 16-track recorder to record your own performances. The E-09 provides the following four recording modes.
| Recording a new song | |
| Rec All | Simultaneously record your keyboard performance and the arranger accompaniment. |
| Rec Keyboard | Record only your keyboard performance. |
| Recording additional material into an existing song | |
| Rec Single | Record one track at a time. You can freely select the track to be recorded. |
| Rec PunchI/O (punch-in/out) | Re-record a specified region of a certain track. |
MEMO
The E-09 can handle only one song. This song will not be erased even if you turn off the power.
NOTE
"Single" will be automatically selected after you perform the first recording. Be aware that if you select "ALL" or "Keyboard," the previously recorded song will be erased. If you want to add new material to the song you recorded, you should choose "Single" or "Punch I/O." If you haven't recorded a song yet, you won't be able to select "Single" or "Punch I/O."
NOTE
You can't record a song if the E-09 is synchronized with an external MIDI device.
All Recording Mode
Here's how you can record what you play on the keyboard while the arranger accompaniment plays.
NOTE
The previously recorded song will be erased by the new recording.
- Press [ARRANGER] so it's lit. (p. 13)
- Press [STYLE] so it's lit, and select a music style (p. 14). Alternatively, press [MUSIC ASSISTANT] so it's lit, and select a music assistant (p. 15).
- Press [INTRO], [ORIGINAL], or [VARIATION] to select the arranger section you want to use.
- Press [START/STOP] so it's blinking. The arranger will start playing.
- Use TEMPO [ (-)][ (+)] to adjust the tempo of the arranger.
- Press [START/STOP] once again so it goes out. The arranger will stop playing.
- Press [SONG] so it's lit.
- Press [REC] so it's blinking.
-
Use REC MODE [ ][ ] to select "Rec All" as the recording mode.
-
Select the tone that you want to use in the right-hand side of the keyboard.
Press [TONE] so it's lit, and use the FAMILY and SELECT [][] buttons, the numeric keys, or the TONE category buttons to make your selection. For details, refer to pp. 10-11. - Use either of the following methods to start recording.
Press [▶/■].
[REC] lights, and [▶/■] begins blinking in time with the time signature of the arranger.
- Press [SYNC START] so it's lit, and play a chord with your left hand.
[REC] lights, and [▶/■] begins blinking in time with the time signature of the arranger.
- Perform.
-
Use either of the following methods to stop recording.
-
Press [▶/■] so it goes out.
[REC] also goes out.
Press [ENDING].
The ending phrase begins playing. When it ends, [ENDING], [▶/■], and [●REC] will all go out.
- When you stop recording, the screen prompts "Save Song?", asking you whether you want to save your performance.
To save your performance, press TEMPO [▶ (YES)].
If you don't want to save your performance, press TEMPO
[ (NO)].
Keyboard Recording Mode
Here's how you can record only your keyboard performance. The arranger is not used.
NOTE
The previously recorded song will be erased by your new recording.
- Select the keyboard part and tone you want to use for your performance. (pp. 10-11)
- Press [SONG] so it's lit.
- Press [REC] so it's blinking.
- Use REC MODE [ ] to select "Rec Keyboard" as the recording mode.
- Select the tone that you want to use in the right-hand side of the keyboard.
Press [TONE] so it's lit, and use the FAMILY and SELECT
[ ] [ ] buttons, the numeric keys, or the TONE category buttons to make your selection. For details, refer to pp. 10-11.
-
Use the metronome if desired. (p. 11)
-
Press [ / ] to start recording.
[REC] lights, and [▶/■] begins blinking in time with the time signature of the metronome.
- Perform.
MEMO
If you select a drum set for the main part and use the keyboard to play the drum sounds, your performance will be recorded on track 16.
- Press [ / ] to stop recording.
[ ] and [ REC] go out.
- When you stop recording, the screen prompts "Save Song?", asking you whether you want to save your performance.
To save your performance, press TEMPO [ (YES)].
If you don't want to save your performance, press TEMPO
[NO].
Single Recording Mode
In this mode you can layer a new performance onto the previously recorded notes, and record each track separately.
NOTE
You can't use this mode if no song has been recorded.
- Press [SONG] so it's lit.
- Press [REC] so it's blinking.
- Use REC MODE [ ][ ] to select "Rec Single" as the recording mode.
- Use REC TRACK [ ][▶] to select the track you want to record.
If you select a track that has already been recorded, the new recording will overwrite the existing recording.
- Select the tone that you want to use in the right-hand side of the keyboard.
Press [TONE] so it's lit, and use the FAMILY and SELECT
[ ] [ ] buttons, the numeric keys, or the TONE category buttons to make your selection. For details, refer to pp. 10-11.
- Press [ / ] to start recording.
[REC] lights. After a one-measure count-in, all previously recorded parts begin playing. - Perform.
- Press [ / ] to stop recording.
[▶■] and [●REC] go out.
If you want to record additional parts, return to step 2.
- When you stop recording, the screen prompts "Save Song?," asking you whether you want to save your performance.
To save your performance, press TEMPO [▶ (YES)].
If you don't want to save your performance, press TEMPO
[NO].
The performances of the keyboard and the arranger parts are recorded on the following tracks.
| Track | Part name | Description |
| 1 | Accomp 1 | - |
| 2 | Arranger bass | The bass part that sounds when the ar-ranger plays. |
| 3 | Accomp 2 | - |
| 4 | Main | This is the Main part. MFX (p. 17) can be applied only to track 4. |
| 5 | Accomp 3 | - |
| Track | Part name | Description |
| 6 | Dual | This is the Dual part. |
| 7 | Accomp 4 | - |
| 8 | Accomp 5 | - |
| 9 | Accomp 6 | - |
| 10 | Arranger drums | Since track 10 is restricted to the drum part, you can select a drum set for this track. |
| 11 | Split | This is the Split part. |
| 12 | Auto Bass | For details, refer to “Auto Bass” (p. 23). |
| 13 | - | - |
| 14 | - | - |
| 15 | Melody In-tell. | Melody intelligence (p. 14) |
| 16 | (Main) | If you select a drum set for the tone of the Main part, it will be recorded on track 16. |
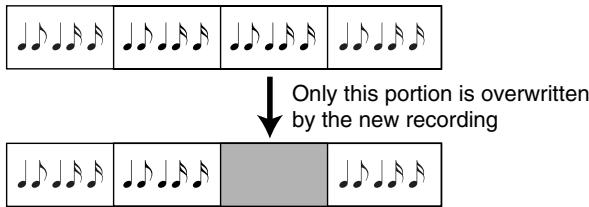
Punch-In/Out Recording Mode
This lets you "punch-in/out" to re-record a specified portion of a single track. The data before and after the newly recorded portion will not be erased.
NOTE
You can't use this if no song has been recorded.
Original track
- Press [SONG] so it's lit.
- Press [REC] so it's blinking.
- Use REC MODE [ ][▶] to select "Rec Punchl/O" as the recording mode.
- Use REC TRACK [ ][▶] to select the track you want to record.
- Press [▶/■] to start song playback.
- When you come to the point at which you want to begin rerecording, press [REC] once again.
[REC] lights, and recording begins.
- Perform.
- Press [REC] so it goes out.
Recording will stop.
- Press [▶/■] to stop song playback.
If you want to re-record again, return to step 2.
- When you stop recording, the screen prompts "Save Song?," asking you whether you want to save your performance.
To save your performance, press TEMPO [▶ (YES)].
If you don't want to save your performance, press TEMPO
[ (NO)].
Using a Foot Switch to Punch In/Out
You can use a separately available foot switch (Roland DP series unit or BOSS FS-5U) to start or stop recording. This lets you use both hands for your performance; for example, allowing you to use your left hand to operate the pitch bend/modulation lever while you use your right hand to play the melody.
- Connect the foot switch to the rear panel FOOT SWITCH jack.
- Press [FUNCTION] so it's lit.
- Use FAMILY [ ][▶] to select "KBD SET." (p. 22)
- Use SELECT [ ] to select the "FSW" parameter. (p. 23)
- Use TEMPO [ (-)][ (+)] to select "Punchl/O."
- Continue with step 1 and those that follow under "Punch-In/Out Recording Mode."
In steps 6 and 8 of "Punch-In/Out Recording Mode," press the foot switch instead of [●REC].
Playing the Song
- Press [SONG] so it's lit.
- Press [ ] to return to the beginning of the song.
- Press [▶/■] to start song playback.
- Press [▶/■] once again to stop song playback.
Changing the Playback Location of the Song
You can use the following buttons to change the playback location within the song.
·[1]
Moves to the beginning of the song.
- [ ]
Moves to the preceding measure.
- [▶▶]
Moves to the next measure.
Repeat Playback of a Specified Region
You can specify a region (A-B) and play it repeatedly. You can do this while the song is playing or while it is stopped.


- Use [][] to move to the measure at which you want to start repeating.
-
Press [MARKER A-B] to set marker “A” to the current location.
-
Use [ ] [ ] to move to the measure at which you want to stop repeating.
- Press [MARKER A-B] to set marker "B" to the current location.
- Press [REPEAT A-B] so it's lit.
- If the song was stopped, press [▶/■] at this point to begin repeat playback.
TIP
To cancel repeat playback, press [REPEAT A-B] so it goes out.
NOTE
Don't set the marker at the last measure of the song; repeat playback will not work correctly if you do this.
Minus-OnePlayback
Here's how you can mute (silence) a specific track of the song.
Muting a Track
- Press [DRUMS & BASS] (factory setting: track 10), [COMBO] (factory setting: track 1), or [FULL] (factory setting: track 2) to specify the track you want to mute.
- Press [▶/■]. The song begins playing, with the track you specified in step 1 muted.
Changing the Muted Tracks
You can change the track that is muted by each of the buttons [DRUMS & BASS], [COMBO], and [FULL].
- Hold down one of the buttons [DRUMS & BASS], [COMBO], or [FULL].
The mute track setting screen will appear. - Use TEMPO [ (-)][ (+)] to change the track that is muted by that button.
The Function menu lets you make a variety of different settings.
MEMO
Parameters marked by ** can be saved in a user program. (p. 16)
Setting a Function Menu Parameter
Here's the basic procedure for setting a parameter of the Function menu.
1. Press [FUNCTION] so it's lit.
- Use FAMILY [ ][ ] to select the function group that includes the parameter you want to set.
KBD SET: KBD Touch, MasterTune, Transpose, Trans Mode, PB Range, Split Point, Split Hold, Split Int, FSW
METRONOME: Metro TS, Metro Vol
- OCTAVE: Main Oct, Dual Oct, Split Oct
VOLUME: Main Vol, Dual Vol, Split Vol, Auto Bass, Acc Drum, Acc Bass, Accomp
ARR SET:ChordInt,Arr Hold, Educational,Bass Inv,MI
- EFFECTS: REVERB, CHORUS, MFX, Tone MFX, Rev MAIN, Chr MAIN, Pan MAIN, Rev DUAL, Chr DUAL, Pan DUAL, Rev SPLIT, Chr SPLIT, Pan SPLIT
KBD SCALE: Scale C/C#/D/Eb/E/F/F#/G/Ab/A/Bb/B, Scale Mode
- MIDI: Local, MIDI TxRx, Sync Rx, Style PC, NTA Rx14, Pitch Bend, Modulation, Prog Change, Velo Rx, Clock Tx, Start Stop
- UTILITY: LCD Contrast, Factory Reset, Bulk Dump
-
Use SELECT [ ] to select the parameter you want to adjust.
-
Use TEMPO [ (-)][ (+)] to adjust the selected parameter.
TIP
To reset the parameter to its default value, press TEMPO [ (-)] and [ (+)] simultaneously.
- If you want to adjust another parameter, return to step 2.
KBD SET Parameters
| Parameter | Value | Explanation |
| KBD Touch * | 1-127(default: 110) | Adjusts the strength of the notes when Keyboard Touch is turned “off” ([KEYBOARD TOUCH] unlit). For details, refer to p. 15.This screen will also appear if you hold down [KEYBOARD TOUCH] for a few moments. |
| MasterTune | 427.4-452.6(default: 440.0) | Adjusts the reference pitch.The reference pitch is usually expressed as the pitch of the middle “A” note. When playing together with other instruments, you must ensure that all instruments are set to the same reference pitch so that they will be in tune. The setting that adjusts the reference pitch is called “Master Tune.” |
| Transpose * | -12-12(default: 0) | Specifies the transposition that will occur when Transpose is turned on ([TRANSPOSE] lit), in units of semi-tones. For details, refer to p. 12.This screen will also appear if you hold down [TRANSPOSE] for a few moments. |
| Trans Mode * | INT,MIDI,I+M(default: INT) | Specifies the part(s) that will be affected by the Transpose setting.INT: The keyboard parts and arranger parts will be transposed. Notes received from the MIDI IN connector will play at their original pitch.MIDI: Only the notes received from the MIDI IN connector will be transposed.I+M: The keyboard parts, the arranger parts, and all notes received from the MIDI IN connector will be transposed. |
| PB Range | 0-24(default: 2) | Specifies the amount of change that will occur when you move the BENDER/MODULATION lever all the way to left or right. You can set this in semitone steps over a range of 24 semitones (2 octaves).Pitch bend can be used only with the Main part and Dual part. (p. 15) |
| Split Point * | 48-84(default: 60) | Specifies the split point (the key forming the boundary between tones) for the Arranger and the Split part. This specifies the lowest key that will play the Main part. “60” corresponds to “C4.”This screen will also appear if you hold down [ARRANGER] for a few moments. |
| Split Hold * | OFF, ON(default: OFF) | Makes the Split part continue sounding. A note you play on the Split part will continue sounding until you play the next note on that part. |
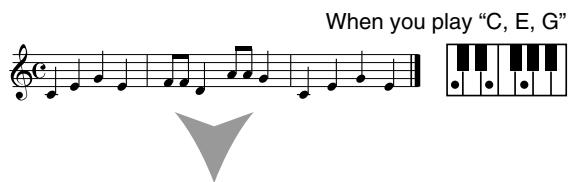
| Split Int * | OFF, ON(default: OFF) | Lets you produce a chord by holding down one key in the Split part.For example, to produce a “C” chord, you would normally need to hold down the three keys “C,” “E,” and “G.” However, the Split Int function lets you produce the “C” chord simply by holding down the “C” key alone. |
| FSW | Sustain, Sostenuto, Soft, Rotary S/F, Start/Stop, BassInv, PunchI/O (default: Sus-tain) | Assigns the function performed by a separately available foot switch connected to the rear panel FOOT SWITCH jack.Sustain: The foot switch will function as a sustain pedal (also called “hold” or “damper”). While you hold down the pedal, notes will be sustained even after you take your fingers off the keyboard.Sostenuto: The foot switch will function as a Sostenuto pedal, sustaining only the notes that had already been pressed at the moment you pressed the pedal. (Subsequently played notes will not be sustained.) This function is available only for the keyboard parts.Soft: The foot switch will function as a Soft pedal. Notes played while holding down the pedal will sound softer. This function is available only for the keyboard parts.Rotary S/F: The foot switch will switch the speed of the rotary effect. This is valid only if the “Rotary” type is set to MFX. (p. 18)Start/Stop: The foot switch will start/stop playback for the arranger or song. This is the same function as [START/STOP].BassInv: The foot switch will turn the Bass Inversion function on/off. (p. 24)PunchI/O: The foot switch will control punch-in and punch-out when you are using punch-in/out recording. (p. 21) |
METRONOME Parameters
| Parameter | Value | Explanation |
| Metro TS | 1/4–6/4, 6/8, 9/8 (default: 4/4) | Specifies the time signature of the metronome (the number of beats per measure). This setting will change automatically when you select a music style that has a different time signature. For details on using the metro-nome, refer to p. 11. This screen will also appear if you hold down [METRONOME] for a few moments. |
| Metro Vol | 0–127 (default: 100) | Specifies the volume of the metronome. |
Octave Parameters
| Parameter | Value | Explanation |
| Main Oct * | -4-0-4 (default: 0) | Raises or lowers the octave setting of the Main part in steps of one octave. * If a drum set is assigned to the Main part, this parameter does not transpose the pitch of the drum/percussion sounds, but instead changes the drum/percussion sounds that are assigned to the keys. |
| Dual Oct * | -4-0-4 (default: 0) | Raises or lowers the octave setting of the Dual part in steps of one octave. |
| Split Oct * | -4-0-4 (default: 0) | Raises or lowers the octave setting of the Split part in steps of one octave. |
Volume Parameters
| Parameter | Value | Explanation |
| Main Vol * | 0-127 (default: 127) | Adjusts the volume of the Main part. You can also adjust this by holding down [TONE] and using BALANCE [▲][▼]. (p. 10) |
| Dual Vol * | 0-127 (default: 110) | Adjusts the volume of the Dual part. You can also adjust this by holding down [DUAL] and using BALANCE [▲][▼]. (p. 10) |
| Split Vol * | 0-127 (default: 75) | Adjusts the volume of the Split part. You can also adjust this by holding down [SPLIT] and using BALANCE [▲][▼]. (p. 10) |
| Auto Bass | OFF, 0-127 (default: OFF) | When the Split part is on, this adjusts the volume of the Auto Bass part (which plays a monophonic bass ac-cording to the chord you play). Turn this OFF if you don’t need the Auto Bass part. If the Bass Inversion function (p. 24) is off, the root of the chord you play with your left hand (using the Split part) is sounded by the Auto Bass part. The Auto Bass part follows the Educational setting (p. 24). |
| Acc Drum * | 0-127 (default: 100) | Adjusts the volume of the arranger’s drum part. |
| Acc Bass * | 0-127 (default: 100) | Adjusts the volume of the arranger’s bass part. |
| Accomp * | 0-127 (default: 100) | Adjusts the volume of the arranger’s Accompart parts 1-6. |
ARR SET Parameters
| Parameter | Value | Explanation |
| ChordInt | OFF, MODE1, MODE2 (default: MODE1) | Allows the accompaniment chords to be detected using simplified fingering that does not require you to play all the notes in the chord. OFF: The chord will consist of only the notes you play in the Split part keyboard region. MODE1: You can specify chords using the method described in "Specifying Chords" (p. 44). MODE2: You can specify chords using the following four methods. Major chord: Play the root of the chord Minor chord: Play the root and the nearest black key to the left Seventh chord: Play the root and the nearest white key to the left Minor seventh chord: Play the root and the nearest black key and white key to the left |
| Arr Hold * | OFF, ON (default: ON) | Selects how the arranger parts will sound. OFF: When you take your hand off the left side of the keyboard, the arranger part instrumental sounds other than drums (i.e., A.Bass and Accomp) will stop, and only the rhythm part will continue sounding. ON: The chord you were playing in the left hand will be remembered. The arranger will continue playing using that chord until you play another chord. * This parameter will be turned on each time you switch on the E-09's power. |
| Educational | OFF, ON (default: ON) | This is a function provided for educational purposes. OFF: If [ARRANGER] is lit and the arranger playback is stopped, the left-hand side of the keyboard will be muted unless [SPLIT] is lit. ON: If [ARRANGER] is lit and the arranger playback is stopped, a stereo strings and a monophonic bass (if Auto Bass is on) will play. This lets you play chords (and bass line) with your left hand without using the E-09's accompaniment function. |
| Bass Inv * | OFF, ON (default: OFF) | Selects how chords will be detected by the arranger. Example: when you play "E G C" OFF: The bass will be sounded on the "C" note just as if you had played "C E G." The accompani-ment will use the "C" chord. ON: The bass will be sounded on the lowest note you played ("E"). The accompaniment will use the "C (on E)" chord. |
| MI * | -> p. 14 (default: Tradi-tional) | Selects the harmony type for the melody intelligence function. This screen will also appear if you hold down [MELODY INTELLIGENCE] for a few moments. (p. 14) |
EFFECTS Parameters
| Parameter | Value | Explanation |
| REVERB* | 8 types -> p. 16 (default: Hall 2) | Selects the type of reverb. (p. 16) |
| CHORUS* | 8 types -> p. 17 (default: Chorus 3) | Selects the type of chorus. (p. 17) |
| MFX* | 47 types -> p. 17 (default: Rotary) | Selects the type of multi-effects. (p. 17) |
| Tone MFX | OFF, ON (default: ON) | This lets you specify whether the MFX type will be automatically selected according to the Main part tone you select. For example, a distortion/overdrive effect will be selected for rock guitar tones, and a rotary effect will be selected for organ tones OFF: The MFX will not change when you switch the tone of the Main part. ON: The MFX will change when you switch the tone of the Main part. |
| Rev MAIN* | 0-127 (default: 100) | Adjusts the amount of reverb applied to the tone of the Main part. With a setting of “0” there will be no reverb. |
| Chr MAIN* | 0-127 (default: 100) | Adjusts the amount of chorus applied to the tone of the Main part. With a setting of “0” there will be no chorus. * You can’t apply chorus if MFX is set to anything other than “Off.” |
| Pan MAIN* | RND, L63-0-R63 (default: 0) | Adjusts the stereo location (the position between the left and right speakers) of the Main part. If you select “RND,” the stereo location will change randomly for each note you play. Values beginning with “L” position the sound toward the left speaker, a value of “0” is the center, and values beginning with “R” position the sound toward the right speaker. |
| Rev DUAL* | 0-127 (default: 100) | Adjusts the amount of reverb applied to the tone of the Dual part. With a setting of “0” there will be no reverb. |
| Chr DUAL* | 0-127 (default: 100) | Adjusts the amount of chorus applied to the tone of the Dual part. With a setting of “0” there will be no chorus. |
| Pan DUAL * | RND, L63-0-R63 (default: 0) | Adjusts the stereo location (the position between the left and right speakers) of the Dual part. If you select “RND,” the stereo location will change randomly for each note you play. Values beginning with “L” position the sound toward the left speaker, a value of “0” is the center, and values beginning with “R” position the sound toward the right speaker. |
| Rev SPLIT * | 0-127 (default: 100) | Adjusts the amount of reverb applied to the tone of the Split part. With a setting of “0” there will be no reverb. |
| Chr SPLIT * | 0-127 (default: 100) | Adjusts the amount of chorus applied to the tone of the Split part. With a setting of “0” there will be no chorus. |
| Pan SPLIT * | RND, L63-0-R63 (default: 0) | Adjusts the stereo location (the position between the left and right speakers) of the Split part. If you select “RND,” the stereo location will change randomly for each note you play. Values beginning with “L” position the sound toward the left speaker, a value of “0” is the center, and values beginning with “R” position the sound toward the right speaker. |
KBD SCALE Parameters
| Parameter | Value | Explanation |
| Scale C-B * | -64–63 (default: 0) | As an alternative to the equal tempered scale used in most Western music, you can adjust the pitch of each note to the scales used by other musical cultures or tuning systems (such as oriental or baroque music).You can independently adjust the pitch of each note in the octave (C, C#, D, Eb, E, F, F#, G, Ab, A, Bb, B).For example, if you adjust the pitch of the “C” note, this adjustment will apply to the “C” note of each octave.In most cases, a quarter tone upward or downward will be appropriate, so you should try settings of “50” or “-50.” |
| Scale Mode * | Main, All (default: Main) | Specifies the part(s) to which the above scale setting will apply.Main: Only the tone of the Main partAll: The tones of all parts |
MIDI Parameters
Refer to p. 27.
UTILITY Parameters

For details on "LCD Contrast" and "Factory Reset," refer to p. 9.
For details on "Bulk Dump," refer to p. 28.
You can connect the E-09 to an external MIDI device and control each device from the other by transmitting and receiving performance data. For example, you can use one device to select or play sounds on the other device.
The E-09 has MIDI connectors which allow it to transmit and receive performance data. By using these connectors to connect external devices to the E-09, you can enjoy an even wider range of possibilities.
TERM
MIDI stands for "Musical Instrument Digital Interface," and is a universal standard that allows electronic musical instruments and computers to exchange performance data.
Connection Example
NOTE
To prevent malfunction and/or damage to speakers or other devices, always turn down the volume, and turn off the power on all devices before making any connections.
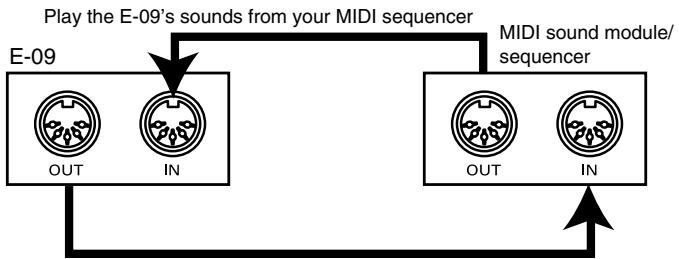
Use the E-09 to play your MIDI sound module
MIDI Channels
MIDI provides sixteen channels, numbered 1-16. Even if MIDI devices are connected, you won't be able to switch or play sounds unless the two devices are set to the same MIDI channel.
| MIDI channel | Part | Explanation |
| 1 | Accomp 1 | - |
| 2 | Arranger bass | This is the Bass part played by the arranger |
| 3 | Accomp 2 | - |
| 4 | Main | This is the Main part. MFX (p. 17) can be applied only to track 4. |
| 5 | Accomp 3 | - |
| 6 | Dual | This is the Dual part. |
| 7 | Accomp 4 | - |
| 8 | Accomp 5 | - |
| 9 | Accomp 6 | - |
| 10 | Arranger drums | Since track 10 is restricted to the Drum part, you can select a drum set here. |
| 11 | Split | This is the Split part. |
| 12 | Auto Bass | For details, refer to “Auto Bass” (p. 23). |
| 13 | - | - |
| 14 | - | - |
| 15 | Melody Intell. | Melody Intelligence. (p. 14) |
| 16 | (Main) | If you select a drum set for the Main part, it will be recorded on track 16. |
MIDI Parameters

For details on how to set these parameters, refer to "Setting a Function Menu Parameter" (p. 22).

MIDI parameters other than "Local" are saved as soon as you press [FUNCTION] and turn off its LED.
| Parameter | Value | Explanation |
| Local | OFF, ON (default: ON) | If the data generated when you play the keyboard is sent to the sound generator via two routes (1) and (2) as shown in the diagram, the notes will overlap or be cut off. To prevent this, you should turn “Local Off” to break route (1). Choose the “OFF” setting if you’ve connected the E-09 to a sequencer. (1) Local on Play a note once: it’s sounded twice * The setting of this parameter is cleared when you switch off the E-09’s power. |
| MIDI TxRx | ALL, KBD, STL, SNG, OFF (default: ALL) | Selects the part(s) that will transmit and receive MIDI. ALL: All parts KBD: Only the keyboard parts (Main, Dual, Split, Auto Bass) STL: Only the arranger parts (Backing 1-6, Backing bass, Backing drums) SNG: Only the song parts (1-16) OFF: None of the E-09’s parts will transmit or receive MIDI messages. |
| Sync Rx | OFF, ON (default: OFF) | Specifies whether or not the E-09 will synchronize to an external MIDI device. You can use synchronization when the MIDI OUT connector of an external device is connected to the E-09’s MIDI IN connector. (If you’ve connected the IN and OUT connectors in the opposite direction, refer to the owner’s manual of the external device you’ve connected.) OFF: The E-09 will not synchronize with the other MIDI device. ON: The E-09 will receive MIDI Start (or Continue) messages, and will begin song recording or playback in synchronization with the subsequently received MIDI Clock messages. When the E-09 receives a Start message, it will wait briefly for MIDI Clock messages. If the E-09 receives MIDI Clock messages, it will synchronize to them. If the E-09 does not receive MIDI Clock messages, it will use its own tempo. In either case, a MIDI Stop message will stop playback or recording. * The arranger does not receive MIDI Continue messages. |
| Style PC | OFF, 1-16 (default: 10) | Program change messages will be transmitted/received when you select a different music style within the E-09. |
| NTA Rx14 | OFF, ON (default: 10) | NTA stands for “Note-to-Arranger.” Notes you play in the left side of the keyboard are sent to the arranger together with the chord data. These notes can also be received via MIDI from an external MIDI keyboard controller or other device. If you want to use the arranger without playing the E-09’s keyboard, turn this setting “ON” and transmit these note messages (from your computer or external MIDI device) on MIDI channel 14 to the E-09. |
| Pitch Bend | OFF, ON (default: ON) | Turns transmission/reception of Pitch Bend messages on/off. These messages temporarily raise or lower the pitch of the tone. |
| Modulation | OFF, ON (default: ON) | Turns transmission/reception of Modulation messages on/off. These messages add vibrato to the sound. (Control Change CC01) |
| Prog Change | OFF, ON (default: ON) | Turns transmission/reception of Program Change messages on/off. These messages are used to select tones or music styles. |
| Velo Rx | ON, 1-127 (default: ON) | Turns transmission/reception of velocity data on/off. This applies only to note messages received via MIDI. If this is “ON,” the E-09 will use the velocity values that it receives. Otherwise, the E-09 will use the fixed velocity value (1-127) you specify here. |
| Clock Tx | OFF, ON (default: ON) | Specifies whether or not MIDI Clock messages are to be transmitted during arranger playback or song recording. Use this when you want to synchronize an external MIDI device with the E-09. |
| Start Stop | OFF, ON (default: ON) | Specifies whether or not Start/Stop/Continue messages are to be transmitted when arranger playback or song recording starts or stops. Turn this “Off” if you want to control a MIDI organ or other sound module without playing/stopping the arranger. |
Bulk Dump
You can use this procedure to transmit user programs and song data from the E-09 via MIDI to a sequencer or other external MIDI device, and save the data on that device. Prepare your external sequencer to record a conventional performance, and perform the following procedure on the E-09.
- Use a separately available MIDI cable to connect the E-09's MIDI OUT connector to the MIDI IN connector of your external sequencer.
- Press [FUNCTION] so it's lit.
- Use FAMILY [ ] to access the "UTILITY" screen.
- Use SELECT [ ][▶] to access the "Bulk Dump?" screen. "Yes" begins blinking in the screen.
- Press TEMPO [▶ (YES)]. The screen prompts "Sure?"
- Press TEMPO [▶ (YES)] once again.
Bulk Load
You can use this procedure to receive user programs and song data (previously saved as described above) from a sequencer or other external MIDI device back into the E-09 to restore (overwrite) the data via MIDI.
NOTE
Once you carry out the Bulk Load procedure, the user programs and song data in the E-09 will be overwritten. If there is any data in the E-09 that you want to keep, make sure to save it to an external MIDI device before you proceed.
- Switch on the E-09's power. (p. 8)
If the power is already turned on, switch it off, then turn it on again. - Use a separately available MIDI cable to connect the E-09's MIDI IN connector to the MIDI OUT of your external MIDI sequencer.
- Transmit the bulk data from your external MIDI sequencer to the E-09.
Transpose Lock
Hold down [NUMERIC] and press [TRANSPOSE].
Once locked this way, the set transposition will remain in effect no matter what you do on the instrument.
- To release the lock, once again hold down [NUMERIC] and press [TRANSPOSE].
Tempo Lock
Hold down [NUMERIC] and press [MELODY INTELLIGENCE].
Once locked this way, the set tempo will remain in effect no matter what you do on the instrument.
- To release the lock, once again hold down [NUMERIC] and press [MELODY INTELLIGENCE].
Style Lock
Hold down [NUMERIC] and press [SPLIT].
Thereafter, the style setting will be preserved even if you switch music assistants or user programs.
- To release the lock, once again hold down [NUMERIC] and press [SPLIT].
Tone Lock
Hold down [NUMERIC] and press [DUAL].
Thereafter, the tone setting will be preserved even if you switch music assistants or user programs.
- To release the lock, once again hold down [NUMERIC] and press [DUAL].
TIP
To determine whether a function is locked or not, hold down [NUMERIC] and note the buttons that are lighted (lit = locked).
MEMO
Troubleshooting
This page contains items for you to check if you experience problems, and the appropriate action to take. Refer to the section that corresponds to the problem you're having.
| Problem | Check/Action |
| Power does not turn on | Are the supplied AC adaptor and power cable correctly connected to the E-09 and to an electrical outlet? (p. 8) -> Use only the supplied AC adaptor and power cable. Use of any other adaptor or cable may cause malfunctions. |
| No sound from the E-09 | Could the VOLUME knob be turned down? |
| Could headphones be connected? -> If headphones are connected, there will be no sound from the E-09's speakers. | |
| If there is no sound when you play the keyboard, could Local Control be turned “OFF”? -> Turn “Local” ON. (p. 27) | |
| Could pedal operations or MIDI messages (Expression or Volume) received from an external MIDI device have low-ered the volume? | |
| No Sound from a Speci-cific Part | Could the volume of the part be turned down? -> Adjust the volume parameters (Main Vol, Dual Vol, Split Vol, Auto Bass, Acc Drum, Acc Bass, Accomp). (p. 23) |
| Could you have used the Minus-One function to mute (silence) a specific part? (p. 21) | |
| Does the MIDI receive channel of the part match the MIDI transmit channel of the connected MIDI device? -> Set the MIDI channel of the connected external MIDI device to match the E-09's receive channel. (p. 26) | |
| No sound from a con- nected MIDI device | Is the instrument set to send MIDI messages? -> Set “MIDI TxRx” to an appropriate setting, something other than “OFF.” (p. 27) |
| Does the MIDI transmit channel of the E-09's keyboard controller section match the MIDI receive channel of the con- nected MIDI device? -> Set the MIDI channel of the connected external device to match the E-09. (p. 26) | |
| No sound from a speci- ic region of the key- board | Some tones such as drum sets or bass sounds have a limited range. |
| Effect not applied | If reverb or chorus are set to an amount of “0” for the keyboard part, there will be no effect. -> Set “Rev MAIN, Chr MAIN, Rev DUAL, Chr DUAL, Rev SPLIT, Chr SPLIT” to values above “0.” (p. 24) |
| If “MFX” is set to anything other than “OFF,” chorus cannot be applied to the tone of the Main part. | |
| Effect sounds wrong | If “Tone MFX” is “OFF,” some combinations of tone and effect may sound strange in comparison to other tones. -> Turn “Tone MFX” ON. Alternatively, switch “MFX” to a different type. (p. 24) |
| Pitch does not change when you move the Pitch Bend lever | Could the pitch bend range be set to “0”? -> Change the “PB Range” to a value other than “0.” (p. 22) |
| Sound is moved (panned) to left or right each time you play a note | Some tones are randomly panned between left and right each time you play a note. -> You can't change the setting of such tones. |
| If Pan MAIN, Pan DUAL, or Pan SPLIT is set to “RND,” the sound will randomly move between left and right each time you play a note. (p. 24) | |
| Sound is distorted | The sound may be distorted depending on the effect or part volume settings. Try adjusting the following parameters. • Volume parameters: Main Vol, Dual Vol, Split Vol, Auto Bass, Acc Drum, Acc Bass, Accomp (p. 23) • Amount of reverb or chorus applied to the keyboard parts: Rev MAIN, Chr MAIN, Rev DUAL, Chr DUAL, Rev SPLIT, Chr SPLIT (p. 24) • Overall volume or volume balance |
| Could an effect such as overdrive or distortion (which intentionally distorts the sound) be applied? | |
| Tempo does not change | If [FUNCTION] is lit, pressing TEMPO [←(-)] [▶ (+)] will not change the tempo. |
| Pitch is wrong | Some tones may seem to have a different pitch in certain regions when compared to other tones. |
| Could the E-09's tuning be incorrect? -> Check the “MasterTune” setting. (p. 22) | |
| Could the pitch have been modified by pedal operations or pitch bend messages received from an external MIDI de- vice? | |
| Notes are interrupted | If more than 64 notes are played simultaneously, currently-sounding notes may be cut off. |
| Notes are “stuck” (con- tinue sounding) when you play the keyboard | Is the foot switch connected correctly? |
Tone List
| Button | No . | Tone | Category | PC | CC 00 | CC 32 |
| PIANO | 1 | St.Piano 1 | PIANO | 1 | 8 | 2 |
| 2 | EuropeanPf | PIANO | 1 | 16 | 2 | |
| 3 | Piano 2 | PIANO | 2 | 0 | 2 | |
| 4 | Honkytonk | PIANO | 4 | 0 | 2 | |
| 5 | Piano 1 | PIANO | 1 | 0 | 2 | |
| 6 | St.Piano 2 | PIANO | 2 | 8 | 2 | |
| 7 | Piano 3 | PIANO | 3 | 0 | 2 | |
| 8 | EG+EP 1 | PIANO | 3 | 1 | 2 | |
| 9 | EG+EP 2 | PIANO | 3 | 2 | 2 | |
| 10 | St.Piano 3 | PIANO | 3 | 8 | 2 | |
| 11 | OldUpright | PIANO | 4 | 8 | 2 | |
| 12 | E.Piano 1 | ELECTRIC PIANO | 5 | 0 | 2 | |
| 13 | St.Soft EP | ELECTRIC PIANO | 5 | 8 | 2 | |
| 14 | Dyno EP | ELECTRIC PIANO | 5 | 47 | 2 | |
| 15 | Wurly | ELECTRIC PIANO | 5 | 48 | 2 | |
| 16 | EP Legend | ELECTRIC PIANO | 6 | 10 | 2 | |
| 17 | Hard FM EP | ELECTRIC PIANO | 6 | 24 | 2 | |
| 18 | EP Phase | ELECTRIC PIANO | 6 | 32 | 2 | |
| 19 | FM+SA EP | ELECTRIC PIANO | 5 | 16 | 2 | |
| 20 | 60s EP | ELECTRIC PIANO | 5 | 24 | 2 | |
| 21 | Hard EP | ELECTRIC PIANO | 5 | 25 | 2 | |
| 22 | Mellow EP | ELECTRIC PIANO | 5 | 26 | 2 | |
| 23 | E.Piano 2 | ELECTRIC PIANO | 6 | 0 | 2 | |
| 24 | Detuned EP | ELECTRIC PIANO | 6 | 8 | 2 | |
| 25 | St.FM EP | ELECTRIC PIANO | 6 | 16 | 2 | |
| 26 | Nylon+EP | ELECTRIC PIANO | 100 | 5 | 2 | |
| ORGAN | 27 | Organ 2 | ORGAN | 18 | 0 | 2 |
| 28 | Organ 1 | ORGAN | 17 | 0 | 2 | |
| 29 | R&B Organ | ORGAN | 17 | 10 | 2 | |
| 30 | Cool Organ | ORGAN | 17 | 34 | 2 | |
| 31 | 60s Organ1 | ORGAN | 17 | 16 | 2 | |
| 32 | Cheese Org | ORGAN | 17 | 24 | 2 | |
| 33 | Org Oct 2 | ORGAN | 17 | 21 | 4 | |
| 34 | Org Oct 1 | ORGAN | 17 | 20 | 4 | |
| 35 | Perc Org 1 | ORGAN | 18 | 9 | 2 | |
| 36 | Organ 3 | ORGAN | 19 | 0 | 2 | |
| 37 | Rotary Org | ORGAN | 19 | 8 | 2 | |
| 38 | RotarySlow | ORGAN | 19 | 16 | 2 | |
| 39 | RotaryFast | ORGAN | 19 | 24 | 2 | |
| 40 | ChurchOrg1 | ORGAN | 20 | 0 | 2 | |
| 41 | ChurchOrg2 | ORGAN | 20 | 8 | 2 | |
| 42 | OrganFlute | ORGAN | 20 | 24 | 2 | |
| 43 | Trem Flute | ORGAN | 20 | 32 | 2 | |
| 44 | Reed Organ | ORGAN | 21 | 0 | 2 | |
| 45 | Organ 101 | ORGAN | 17 | 1 | 2 | |
| 46 | Dtd Org 1 | ORGAN | 17 | 7 | 2 | |
| 47 | Trem Organ | ORGAN | 17 | 8 | 2 | |
| 48 | Organ 109 | ORGAN | 17 | 9 | 2 | |
| 49 | 60s Organ2 | ORGAN | 17 | 17 | 2 | |
| 50 | 60s Organ3 | ORGAN | 17 | 18 | 2 | |
| 51 | Pop Organ | ORGAN | 17 | 31 | 2 | |
| 52 | Rock Organ | ORGAN | 17 | 32 | 2 | |
| 53 | Even Bar | ORGAN | 17 | 33 | 2 | |
| 54 | Organ Bass | ORGAN | 17 | 40 | 2 | |
| 55 | Organ 201 | ORGAN | 18 | 1 | 2 | |
| 56 | Chorus Org | ORGAN | 18 | 8 | 2 | |
| 57 | Dtd Org 2 | ORGAN | 18 | 10 | 2 | |
| 58 | Perc Org 2 | ORGAN | 18 | 32 | 2 | |
| 59 | ChurchOrg3 | ORGAN | 20 | 16 | 2 | |
| 60 | Puff Organ | ORGAN | 21 | 16 | 2 | |
| 61 | Squeeze Me | ACCORDION | 22 | 5 | 4 | |
| 62 | Oktober | ACCORDION | 22 | 6 | 4 | |
| 63 | Vint Accdn | ACCORDION | 22 | 10 | 4 | |
| 64 | Romance | ACCORDION | 22 | 11 | 4 | |
| 65 | La Seine | ACCORDION | 22 | 12 | 4 | |
| 66 | Accrdn 1 | ACCORDION | 22 | 1 | 4 | |
| 67 | Accrdn 2 | ACCORDION | 22 | 2 | 4 |
| Button | No. | Tone | Category | PC | CC 00 | CC 32 |
| ORGAN | 68 | Accrdn 3 | ACCORDION | 22 | 3 | 4 |
| 69 | AccrdnJuno | ACCORDION | 22 | 4 | 4 | |
| 70 | Accrdn It | ACCORDION | 22 | 8 | 2 | |
| 71 | Accrdn Fr | ACCORDION | 22 | 0 | 2 | |
| 72 | Bandoneon | ACCORDION | 24 | 0 | 2 | |
| 73 | SqueezeBox | ACCORDION | 24 | 24 | 4 | |
| 74 | Harmonica1 | ACCORDION | 23 | 0 | 2 | |
| 75 | Harmonica2 | ACCORDION | 23 | 1 | 2 | |
| 76 | Harpsi 2 | KEYBOARD | 7 | 24 | 2 | |
| 77 | St.Harpsi | KEYBOARD | 7 | 16 | 2 | |
| 78 | Harpsi 1 | KEYBOARD | 7 | 0 | 2 | |
| 79 | CoupledHps | KEYBOARD | 7 | 8 | 2 | |
| 80 | Clav | KEYBOARD | 8 | 0 | 2 | |
| 81 | Comp Clav | KEYBOARD | 8 | 8 | 2 | |
| 82 | Pulse Clav | KEYBOARD | 8 | 39 | 2 | |
| 83 | Celesta | CHROMATIC PERC | 9 | 0 | 2 | |
| 84 | Music Box | CHROMATIC PERC | 11 | 0 | 2 | |
| 85 | Vibraphone | CHROMATIC PERC | 12 | 0 | 2 | |
| 86 | Marimba | CHROMATIC PERC | 13 | 0 | 2 | |
| 87 | Xylophone | CHROMATIC PERC | 14 | 0 | 2 | |
| 88 | Tublr Bell | CHROMATIC PERC | 15 | 0 | 2 | |
| 89 | Sft Crystl | CHROMATIC PERC | 99 | 2 | 2 | |
| 90 | LoudGlockn | CHROMATIC PERC | 99 | 4 | 2 | |
| 91 | Choir&Bell | CHROMATIC PERC | 99 | 16 | 2 | |
| 92 | TinkleBell | CHROMATIC PERC | 113 | 0 | 2 | |
| 93 | Glocken | CHROMATIC PERC | 10 | 0 | 2 | |
| 94 | Hard Vibe | CHROMATIC PERC | 12 | 1 | 2 | |
| 95 | St.Vibe | CHROMATIC PERC | 12 | 8 | 2 | |
| 96 | St.Marimba | CHROMATIC PERC | 13 | 8 | 2 | |
| 97 | ChurchBell | CHROMATIC PERC | 15 | 8 | 2 | |
| 98 | Carillon | CHROMATIC PERC | 15 | 9 | 2 | |
| 99 | Crystal | CHROMATIC PERC | 99 | 0 | 2 | |
| 100 | Syn Mallet | CHROMATIC PERC | 99 | 1 | 2 | |
| 101 | RndGlocken | CHROMATIC PERC | 99 | 3 | 2 | |
| 102 | GlcknChime | CHROMATIC PERC | 99 | 5 | 2 | |
| 103 | Crl Bells | CHROMATIC PERC | 99 | 6 | 2 | |
| 104 | X'mas Bell | CHROMATIC PERC | 99 | 7 | 2 | |
| 105 | VibraBells | CHROMATIC PERC | 99 | 8 | 2 | |
| 106 | Digi Bell | CHROMATIC PERC | 99 | 9 | 2 | |
| 107 | Air Bells | CHROMATIC PERC | 99 | 17 | 2 | |
| 108 | Bell Harp | CHROMATIC PERC | 99 | 18 | 2 | |
| 109 | Gamelimba | CHROMATIC PERC | 99 | 19 | 2 | |
| GUITAR/ BASS | 110 | Nylon Gt 1 | ACOUSTIC GUITAR | 25 | 0 | 2 |
| 111 | Velo Harm | ACOUSTIC GUITAR | 25 | 24 | 2 | |
| 112 | Nyln+Steel | ACOUSTIC GUITAR | 26 | 9 | 2 | |
| 113 | Requint Gt | ACOUSTIC GUITAR | 25 | 40 | 2 | |
| 114 | FlamencoGt | ACOUSTIC GUITAR | 25 | 49 | 2 | |
| 115 | StlStr Gt1 | ACOUSTIC GUITAR | 26 | 0 | 2 | |
| 116 | 12 Str Gt | ACOUSTIC GUITAR | 26 | 8 | 2 | |
| 117 | Mandolin | ACOUSTIC GUITAR | 26 | 16 | 2 | |
| 118 | Ukulele | ACOUSTIC GUITAR | 25 | 8 | 2 | |
| 119 | Guitarron | ACOUSTIC GUITAR | 25 | 9 | 4 | |
| 120 | Nylon Gt 2 | ACOUSTIC GUITAR | 25 | 16 | 2 | |
| 121 | Nylon Gt 3 | ACOUSTIC GUITAR | 25 | 32 | 2 | |
| 122 | StlStr Gt2 | ACOUSTIC GUITAR | 26 | 32 | 2 | |
| 123 | Steel+Body | ACOUSTIC GUITAR | 26 | 33 | 2 | |
| 124 | E.Gt Harm | ACOUSTIC GUITAR | 32 | 0 | 2 | |
| 125 | Ac.Gt Harm | ACOUSTIC GUITAR | 32 | 16 | 2 | |
| 126 | Atmosphere | ACOUSTIC GUITAR | 100 | 0 | 2 | |
| 127 | Nylon Harp | ACOUSTIC GUITAR | 100 | 2 | 2 | |
| 128 | Gt Fret Nz | ACOUSTIC GUITAR | 121 | 0 | 2 | |
| 129 | Jazz Gt 1 | ELECTRIC GUITAR | 27 | 0 | 2 | |
| 130 | PedalSteel | ELECTRIC GUITAR | 27 | 8 | 2 | |
| 131 | Clean Gt 2 | ELECTRIC GUITAR | 28 | 1 | 2 | |
| 132 | JC CIn Gt | ELECTRIC GUITAR | 28 | 4 | 2 | |
| 133 | MidTune Gt | ELECTRIC GUITAR | 28 | 23 | 2 | |
| 134 | Muted Gt | ELECTRIC GUITAR | 29 | 0 | 2 | |
| 135 | Overdrive | ELECTRIC GUITAR | 30 | 0 | 2 | |
| 136 | Dist Gt 1 | ELECTRIC GUITAR | 31 | 0 | 2 | |
| 137 | Power Gt 1 | ELECTRIC GUITAR | 31 | 16 | 2 | |
| 138 | Mellow Gt | ELECTRIC GUITAR | 27 | 1 | 2 | |
| GUITAR/BASS | 139 | Jazz Gt 2 | ELECTRIC GUITAR | 27 | 2 | 2 |
| 140 | Clean Gt 1 | ELECTRIC GUITAR | 28 | 0 | 2 | |
| 141 | Open Hard | ELECTRIC GUITAR | 28 | 3 | 2 | |
| 142 | Chorus Gt | ELECTRIC GUITAR | 28 | 8 | 2 | |
| 143 | Clean Gt 3 | ELECTRIC GUITAR | 28 | 48 | 2 | |
| 144 | Mt Dist Bs | ELECTRIC GUITAR | 29 | 1 | 2 | |
| 145 | Funk Pop | ELECTRIC GUITAR | 29 | 8 | 2 | |
| 146 | Funk Gt | ELECTRIC GUITAR | 29 | 16 | 2 | |
| 147 | Jazz Man | ELECTRIC GUITAR | 29 | 24 | 2 | |
| 148 | Gt Pinch | ELECTRIC GUITAR | 30 | 4 | 2 | |
| 149 | Dist Gt 2 | ELECTRIC GUITAR | 31 | 1 | 2 | |
| 150 | Dazed Gt | ELECTRIC GUITAR | 31 | 2 | 2 | |
| 151 | Feedback 1 | ELECTRIC GUITAR | 31 | 8 | 2 | |
| 152 | Feedback 2 | ELECTRIC GUITAR | 31 | 9 | 2 | |
| 153 | Power Gt 2 | ELECTRIC GUITAR | 31 | 17 | 2 | |
| 154 | 5th Dist | ELECTRIC GUITAR | 31 | 18 | 2 | |
| 155 | Rock Rhy 1 | ELECTRIC GUITAR | 31 | 24 | 2 | |
| 156 | Rock Rhy 2 | ELECTRIC GUITAR | 31 | 25 | 2 | |
| 157 | Rock Rhy 3 | ELECTRIC GUITAR | 31 | 26 | 2 | |
| 158 | Feedback 3 | ELECTRIC GUITAR | 32 | 8 | 2 | |
| 159 | Gt CutNz 1 | ELECTRIC GUITAR | 121 | 1 | 2 | |
| 160 | Gt CutNz 2 | ELECTRIC GUITAR | 121 | 3 | 2 | |
| 161 | Dist CutNz | ELECTRIC GUITAR | 121 | 4 | 2 | |
| 162 | PickScrape | ELECTRIC GUITAR | 121 | 6 | 2 | |
| 163 | Ac.Bass 1 | BASS | 33 | 0 | 2 | |
| 164 | Ac.Bass 2 | BASS | 33 | 1 | 2 | |
| 165 | Fingrd Bs1 | BASS | 34 | 0 | 2 | |
| 166 | Jazz Bass | BASS | 34 | 2 | 2 | |
| 167 | Fingrd Bs3 | BASS | 34 | 3 | 2 | |
| 168 | Pick Bass1 | BASS | 35 | 0 | 2 | |
| 169 | Frtlss Bs1 | BASS | 36 | 0 | 2 | |
| 170 | Slap Bass1 | BASS | 37 | 0 | 2 | |
| 171 | Syn Bass 1 | BASS | 39 | 0 | 2 | |
| 172 | Reso SH Bs | BASS | 39 | 16 | 2 | |
| 173 | Square Bs | BASS | 39 | 22 | 2 | |
| 174 | Ac.Bass 3 | BASS | 33 | 2 | 2 | |
| 175 | Ac.Bass 4 | BASS | 33 | 3 | 2 | |
| 176 | Baby Bass | BASS | 33 | 4 | 4 | |
| 177 | Fingrd Bs2 | BASS | 34 | 1 | 2 | |
| 178 | Fingrd Bs4 | BASS | 34 | 4 | 2 | |
| 179 | FingerSlap | BASS | 34 | 7 | 2 | |
| 180 | Pick Bass2 | BASS | 35 | 3 | 2 | |
| 181 | Mt Pick Bs | BASS | 35 | 8 | 2 | |
| 182 | Frtlss Bs2 | BASS | 36 | 1 | 2 | |
| 183 | Frtlss Bs3 | BASS | 36 | 2 | 2 | |
| 184 | Frtlss Bs4 | BASS | 36 | 3 | 2 | |
| 185 | Syn Frtlss | BASS | 36 | 4 | 2 | |
| 186 | Mr.Smooth | BASS | 36 | 5 | 2 | |
| 187 | Frtlss Bs5 | BASS | 36 | 8 | 2 | |
| 188 | Fat Frtlss | BASS | 36 | 48 | 2 | |
| 189 | Reso Slap | BASS | 37 | 8 | 2 | |
| 190 | Slap Bass2 | BASS | 38 | 0 | 2 | |
| 191 | Syn Bs 101 | BASS | 39 | 1 | 2 | |
| 192 | Juno Bass | BASS | 39 | 2 | 2 | |
| 193 | 106 Bass | BASS | 39 | 3 | 2 | |
| 194 | Acid Bass | BASS | 39 | 8 | 2 | |
| 195 | TB303 Bass | BASS | 39 | 9 | 2 | |
| 196 | Techno Bs | BASS | 39 | 10 | 2 | |
| 197 | Clav Bass | BASS | 39 | 19 | 2 | |
| 198 | Hammer | BASS | 39 | 20 | 2 | |
| 199 | JungleBass | BASS | 39 | 21 | 2 | |
| 200 | Pop Syn Bs | BASS | 39 | 23 | 2 | |
| 201 | LightSynBs | BASS | 39 | 24 | 2 | |
| 202 | FatTB Bass | BASS | 39 | 25 | 2 | |
| 203 | Syn Bass 2 | BASS | 40 | 0 | 2 | |
| 204 | Syn Bs 201 | BASS | 40 | 1 | 2 | |
| 205 | Mod Bass | BASS | 40 | 2 | 2 | |
| 206 | Seq Bass | BASS | 40 | 3 | 2 | |
| 207 | Beef FM Bs | BASS | 40 | 8 | 2 | |
| 208 | X Wire Bs | BASS | 40 | 9 | 2 | |
| 209 | RubberBass | BASS | 40 | 16 | 2 |
| Button | No. | Tone | Category | PC | CC 00 | CC 32 |
| GUITAR/ BASS | 210 | SH101 Bs 1 | BASS | 40 | 17 | 2 |
| 211 | SH101 Bs 2 | BASS | 40 | 18 | 2 | |
| 212 | SmoothBass | BASS | 40 | 19 | 2 | |
| 213 | Mild Bass | BASS | 40 | 20 | 2 | |
| 214 | Detuned Bs | BASS | 40 | 21 | 2 | |
| 215 | Attack Pls | BASS | 40 | 29 | 2 | |
| 216 | Str Slap | BASS | 121 | 2 | 2 | |
| 217 | Bass Slide | BASS | 121 | 5 | 2 | |
| STRINGS | 218 | St.Strings | STRINGS | 49 | 16 | 2 |
| 219 | St.SlowStr | STRINGS | 50 | 10 | 2 | |
| 220 | Legato Str | STRINGS | 50 | 8 | 2 | |
| 221 | SynStrings | STRINGS | 51 | 0 | 2 | |
| 222 | SuspensStr | STRINGS | 45 | 9 | 2 | |
| 223 | Pizz Str | STRINGS | 46 | 0 | 2 | |
| 224 | XP Strings | STRINGS | 49 | 4 | 4 | |
| 225 | Str Oct | STRINGS | 49 | 32 | 4 | |
| 226 | OR Str Oct | STRINGS | 49 | 35 | 4 | |
| 227 | Violin 1 | STRINGS | 41 | 0 | 2 | |
| 228 | SlowVioln1 | STRINGS | 41 | 8 | 2 | |
| 229 | Viola 1 | STRINGS | 42 | 0 | 2 | |
| 230 | Cello 1 | STRINGS | 43 | 0 | 2 | |
| 231 | Contrabass | STRINGS | 44 | 0 | 2 | |
| 232 | Violin 2 | STRINGS | 41 | 1 | 2 | |
| 233 | SlowVioln2 | STRINGS | 41 | 9 | 2 | |
| 234 | Viola 2 | STRINGS | 42 | 1 | 2 | |
| 235 | Cello 2 | STRINGS | 43 | 1 | 2 | |
| 236 | Trem Str | STRINGS | 45 | 0 | 2 | |
| 237 | Slow Trem | STRINGS | 45 | 8 | 2 | |
| 238 | Strings 1 | STRINGS | 49 | 0 | 2 | |
| 239 | Strings 2 | STRINGS | 49 | 1 | 2 | |
| 240 | Orchestra1 | STRINGS | 49 | 8 | 2 | |
| 241 | Orchestra2 | STRINGS | 49 | 9 | 2 | |
| 242 | Trem Orch | STRINGS | 49 | 10 | 2 | |
| 243 | XP Orch | STRINGS | 49 | 21 | 4 | |
| 244 | Choir Str | STRINGS | 49 | 11 | 2 | |
| 245 | Velo Str | STRINGS | 49 | 24 | 2 | |
| 246 | 60s Str | STRINGS | 49 | 40 | 2 | |
| 247 | Slow Str 1 | STRINGS | 50 | 0 | 2 | |
| 248 | Slow Str 2 | STRINGS | 50 | 1 | 2 | |
| 249 | Warm Str | STRINGS | 50 | 9 | 2 | |
| 250 | OB Strings | STRINGS | 51 | 1 | 2 | |
| 251 | Syn Str 1 | STRINGS | 51 | 2 | 2 | |
| 252 | 70s Str 1 | STRINGS | 51 | 8 | 2 | |
| 253 | 70s Str 2 | STRINGS | 51 | 9 | 2 | |
| 254 | Syn Str 2 | STRINGS | 52 | 0 | 2 | |
| 255 | Syn Str 3 | STRINGS | 52 | 1 | 2 | |
| 256 | Double Hit | STRINGS | 56 | 10 | 2 | |
| 257 | Orch Hit | STRINGS | 56 | 0 | 2 | |
| 258 | Bass Hit | STRINGS | 56 | 1 | 2 | |
| 259 | 6th Hit | STRINGS | 56 | 2 | 2 | |
| 260 | Euro Hit | STRINGS | 56 | 3 | 2 | |
| 261 | Techno Hit | STRINGS | 56 | 4 | 2 | |
| 262 | Impact Hit | STRINGS | 56 | 8 | 2 | |
| 263 | Philly Hit | STRINGS | 56 | 9 | 2 | |
| 264 | Lo-Fi Rave | STRINGS | 56 | 16 | 2 | |
| VOCAL | 265 | St.Choir | VOCAL | 53 | 8 | 2 |
| 266 | Humming | VOCAL | 54 | 40 | 2 | |
| 267 | Voice Doos | VOCAL | 54 | 0 | 2 | |
| 268 | Syn Vox | VOCAL | 55 | 0 | 2 | |
| 269 | Solo Vox | VOCAL | 86 | 0 | 2 | |
| 270 | ChoirAahs1 | VOCAL | 53 | 0 | 2 | |
| 271 | Mellow Chr | VOCAL | 53 | 9 | 2 | |
| 272 | ChoirAahs2 | VOCAL | 53 | 32 | 2 | |
| 273 | Syn Voice | VOCAL | 55 | 8 | 2 | |
| 274 | Ana Voice | VOCAL | 55 | 19 | 2 | |
| 275 | Harp Vox | VOCAL | 100 | 3 | 2 | |
| 276 | HllwReleas | VOCAL | 100 | 4 | 2 | |
| SAX/BRASS | 277 | Blow Tenor | SAX | 67 | 8 | 2 |
| 278 | XP Breathy | SAX | 67 | 10 | 4 | |
| 279 | Sop Sax 1 | SAX | 65 | 0 | 2 | |
| 280 | Alto Sax 1 | SAX | 66 | 0 | 2 | |
| SAX/BRASS | 281 | XP AltoSax | SAX | 66 | 2 | 4 |
| 282 | Tenor Sax1 | SAX | 67 | 0 | 2 | |
| 283 | XP Tnr Sax | SAX | 67 | 2 | 4 | |
| 284 | Baritn Sax | SAX | 68 | 0 | 2 | |
| 285 | Sop Sax 2 | SAX | 65 | 8 | 2 | |
| 286 | Alto Sax 2 | SAX | 66 | 1 | 2 | |
| 287 | Hyper Alto | SAX | 66 | 8 | 2 | |
| 288 | Tenor Sax2 | SAX | 67 | 1 | 2 | |
| 289 | Velo Tenor | SAX | 67 | 9 | 2 | |
| 290 | Flute Vib | WIND | 74 | 48 | 2 | |
| 291 | Piccolo | WIND | 73 | 0 | 2 | |
| 292 | Oboe | WIND | 69 | 0 | 2 | |
| 293 | Bassoon | WIND | 71 | 0 | 2 | |
| 294 | Clarinet | WIND | 72 | 1 | 2 | |
| 295 | Pan Flute | WIND | 76 | 0 | 2 | |
| 296 | Sad Pipe | WIND | 76 | 40 | 4 | |
| 297 | Desert Fl | WIND | 76 | 41 | 4 | |
| 298 | Whistle | WIND | 79 | 0 | 2 | |
| 299 | English Horn | WIND | 70 | 0 | 2 | |
| 300 | JzClarinet | WIND | 72 | 0 | 2 | |
| 301 | BsClarinet | WIND | 72 | 8 | 2 | |
| 302 | Flute | WIND | 74 | 0 | 2 | |
| 303 | Recorder | WIND | 75 | 0 | 2 | |
| 304 | Ocarina | WIND | 80 | 0 | 2 | |
| 305 | BottleBlow | WIND | 77 | 0 | 2 | |
| 306 | Trumpet 1 | ACOUSTIC BRASS | 57 | 0 | 2 | |
| 307 | Latin Tp 1 | ACOUSTIC BRASS | 57 | 7 | 4 | |
| 308 | Latin Tp 2 | ACOUSTIC BRASS | 57 | 6 | 4 | |
| 309 | FlugelHorn | ACOUSTIC BRASS | 57 | 8 | 2 | |
| 310 | Trombone 1 | ACOUSTIC BRASS | 58 | 0 | 2 | |
| 311 | Tuba 1 | ACOUSTIC BRASS | 59 | 0 | 2 | |
| 312 | Mute Tp 1 | ACOUSTIC BRASS | 60 | 0 | 2 | |
| 313 | Fr.Horns 1 | ACOUSTIC BRASS | 61 | 0 | 2 | |
| 314 | Brass 1 | ACOUSTIC BRASS | 62 | 0 | 2 | |
| 315 | Brass Fall | ACOUSTIC BRASS | 62 | 16 | 2 | |
| 316 | Twin Tp | ACOUSTIC BRASS | 62 | 24 | 2 | |
| 317 | Tb Sect 1 | ACOUSTIC BRASS | 62 | 26 | 2 | |
| 318 | Brass Oct | ACOUSTIC BRASS | 62 | 30 | 4 | |
| 319 | Trumpet 2 | ACOUSTIC BRASS | 57 | 1 | 2 | |
| 320 | Trumpet 3 | ACOUSTIC BRASS | 57 | 2 | 2 | |
| 321 | Dark Tp | ACOUSTIC BRASS | 57 | 3 | 2 | |
| 322 | XP Trumpet | ACOUSTIC BRASS | 57 | 5 | 4 | |
| 323 | Bright Tp | ACOUSTIC BRASS | 57 | 24 | 2 | |
| 324 | Warm Tp | ACOUSTIC BRASS | 57 | 25 | 2 | |
| 325 | Trombone 2 | ACOUSTIC BRASS | 58 | 1 | 2 | |
| 326 | Trombone 3 | ACOUSTIC BRASS | 58 | 2 | 2 | |
| 327 | Bright Tb | ACOUSTIC BRASS | 58 | 4 | 2 | |
| 328 | Tuba 2 | ACOUSTIC BRASS | 59 | 1 | 2 | |
| 329 | Mute Tp 2 | ACOUSTIC BRASS | 60 | 2 | 2 | |
| 330 | Fr.Horns 2 | ACOUSTIC BRASS | 61 | 1 | 2 | |
| 331 | XP Horns | ACOUSTIC BRASS | 61 | 10 | 4 | |
| 332 | FrHornSolo | ACOUSTIC BRASS | 61 | 8 | 2 | |
| 333 | XP Horn | ACOUSTIC BRASS | 61 | 4 | 4 | |
| 334 | Horn Orch | ACOUSTIC BRASS | 61 | 16 | 2 | |
| 335 | Brass 2 | ACOUSTIC BRASS | 62 | 1 | 2 | |
| 336 | Brass 3 | ACOUSTIC BRASS | 62 | 8 | 2 | |
| 337 | XP Brass 1 | ACOUSTIC BRASS | 62 | 6 | 4 | |
| 338 | XP Brass 2 | ACOUSTIC BRASS | 62 | 11 | 4 | |
| 339 | XP Tp&Sax | ACOUSTIC BRASS | 62 | 15 | 4 | |
| 340 | Twin Bones | ACOUSTIC BRASS | 62 | 25 | 2 | |
| 341 | Tb Sect 2 | ACOUSTIC BRASS | 62 | 27 | 2 | |
| SYNTH | 342 | Syn Brass1 | SYNTH BRASS | 63 | 0 | 2 |
| 343 | Jump Brass | SYNTH BRASS | 63 | 5 | 2 | |
| 344 | OctSynBrss | SYNTH BRASS | 63 | 16 | 2 | |
| 345 | VeloBrass2 | SYNTH BRASS | 64 | 17 | 2 | |
| 346 | Poly Brass | SYNTH BRASS | 63 | 1 | 2 | |
| 347 | Syn Brass5 | SYNTH BRASS | 63 | 3 | 2 | |
| 348 | Juno Brass | SYNTH BRASS | 63 | 4 | 2 | |
| 349 | Syn Brass3 | SYNTH BRASS | 63 | 8 | 2 | |
| 350 | Quak Brass | SYNTH BRASS | 63 | 9 | 2 | |
| 351 | Oct Brass | SYNTH BRASS | 63 | 18 | 2 |
| Button | No. | Tone | Category | PC | CC 00 | CC 32 |
| SYNTH | 352 | Syn Brass2 | SYNTH BRASS | 64 | 0 | 2 |
| 353 | Soft Brass | SYNTH BRASS | 64 | 1 | 2 | |
| 354 | Syn Brass4 | SYNTH BRASS | 64 | 8 | 2 | |
| 355 | VeloBrass1 | SYNTH BRASS | 64 | 16 | 2 | |
| 356 | Big Lead | SYNTH LEAD | 82 | 4 | 2 | |
| 357 | SquareWave | SYNTH LEAD | 81 | 0 | 2 | |
| 358 | Mellow FM | SYNTH LEAD | 81 | 3 | 2 | |
| 359 | CC Solo | SYNTH LEAD | 81 | 4 | 2 | |
| 360 | 260 Sync | SYNTH LEAD | 81 | 17 | 2 | |
| 361 | Saw Wave 1 | SYNTH LEAD | 82 | 0 | 2 | |
| 362 | Pulse Saw | SYNTH LEAD | 82 | 2 | 2 | |
| 363 | GR-300 | SYNTH LEAD | 82 | 6 | 2 | |
| 364 | Waspy Syn | SYNTH LEAD | 82 | 16 | 2 | |
| 365 | Rhythm Saw | SYNTH LEAD | 82 | 45 | 4 | |
| 366 | Seq Saw | SYNTH LEAD | 82 | 46 | 2 | |
| 367 | SynCalliop | SYNTH LEAD | 83 | 0 | 2 | |
| 368 | PurePan Ld | SYNTH LEAD | 83 | 2 | 2 | |
| 369 | Charang | SYNTH LEAD | 85 | 0 | 2 | |
| 370 | Wire Lead | SYNTH LEAD | 85 | 1 | 2 | |
| 371 | Dist Lead | SYNTH LEAD | 85 | 8 | 2 | |
| 372 | Square | SYNTH LEAD | 81 | 1 | 2 | |
| 373 | Hollow Min | SYNTH LEAD | 81 | 2 | 2 | |
| 374 | Shmoog | SYNTH LEAD | 81 | 5 | 2 | |
| 375 | LM Square | SYNTH LEAD | 81 | 6 | 2 | |
| 376 | Sine Wave | SYNTH LEAD | 81 | 8 | 2 | |
| 377 | DistSquare | SYNTH LEAD | 81 | 16 | 2 | |
| 378 | P5 Saw | SYNTH LEAD | 82 | 1 | 2 | |
| 379 | Feline GR | SYNTH LEAD | 82 | 3 | 2 | |
| 380 | Velo Lead | SYNTH LEAD | 82 | 5 | 2 | |
| 381 | LA Saw | SYNTH LEAD | 82 | 7 | 2 | |
| 382 | Dr.Solo | SYNTH LEAD | 82 | 8 | 2 | |
| 383 | Saw Wave 2 | SYNTH LEAD | 82 | 9 | 2 | |
| 384 | Saw Wave 3 | SYNTH LEAD | 82 | 10 | 2 | |
| 385 | Natural Ld | SYNTH LEAD | 82 | 36 | 2 | |
| 386 | Vent Synth | SYNTH LEAD | 83 | 1 | 2 | |
| 387 | Chiffer Ld | SYNTH LEAD | 84 | 0 | 2 | |
| 388 | 5thSawWave | SYNTH LEAD | 87 | 0 | 2 | |
| 389 | Big Fives | SYNTH LEAD | 87 | 1 | 2 | |
| 390 | Bass&Lead | SYNTH LEAD | 88 | 0 | 2 | |
| 391 | Big&Raw | SYNTH LEAD | 88 | 1 | 2 | |
| 392 | Fat&Perky | SYNTH LEAD | 88 | 2 | 2 | |
| 393 | Delayed Ld | SYNTH LEAD | 88 | 7 | 2 | |
| 394 | Poly Syn | POLY SYNTHESIZER | 91 | 0 | 2 | |
| 395 | 80sPolySyn | POLY SYNTHESIZER | 91 | 1 | 2 | |
| 396 | Ice Rain | POLY SYNTHESIZER | 97 | 0 | 2 | |
| 397 | Warm Atoms | POLY SYNTHESIZER | 100 | 1 | 2 | |
| 398 | Brightness | POLY SYNTHESIZER | 101 | 0 | 2 | |
| 399 | Fantasia 1 | POLY SYNTHESIZER | 89 | 0 | 2 | |
| 400 | Fantasia 2 | POLY SYNTHESIZER | 89 | 1 | 2 | |
| 401 | Harm Rain | POLY SYNTHESIZER | 97 | 1 | 2 | |
| 402 | African wd | POLY SYNTHESIZER | 97 | 2 | 2 | |
| 403 | Clav Pad | POLY SYNTHESIZER | 97 | 8 | 2 | |
| 404 | Rave | POLY SYNTHESIZER | 98 | 8 | 2 | |
| 405 | Warm Pad | PAD | 90 | 0 | 2 | |
| 406 | Thick Pad | PAD | 90 | 1 | 2 | |
| 407 | Rotary Str | PAD | 90 | 3 | 2 | |
| 408 | Soft Pad | PAD | 90 | 4 | 2 | |
| 409 | SpaceVoice | PAD | 92 | 0 | 2 | |
| 410 | Heaven II | PAD | 92 | 1 | 2 | |
| 411 | Itopia | PAD | 92 | 3 | 2 | |
| 412 | Blow Pad | PAD | 92 | 13 | 4 | |
| 413 | Ethno Pad1 | PAD | 92 | 14 | 4 | |
| 414 | Ethno Pad2 | PAD | 92 | 15 | 4 | |
| 415 | Tine Pad | PAD | 94 | 1 | 2 | |
| 416 | Panner Pad | PAD | 94 | 2 | 2 | |
| 417 | Sweep Pad | PAD | 96 | 0 | 2 | |
| 418 | Polar Pad | PAD | 96 | 1 | 2 | |
| 419 | Shimmer | PAD | 96 | 9 | 2 | |
| 420 | Soundtrack | PAD | 98 | 0 | 2 | |
| 421 | AmbientPad | PAD | 100 | 6 | 2 | |
| 422 | Goblin Syn | PAD | 102 | 1 | 2 | |
| SYNTH | 423 | ResoPanner | PAD | 103 | 5 | 2 |
| 424 | StarTheme1 | PAD | 104 | 0 | 2 | |
| 425 | Horn Pad | PAD | 90 | 2 | 2 | |
| 426 | Sine Pad | PAD | 90 | 5 | 2 | |
| 427 | BowedGlass | PAD | 93 | 0 | 2 | |
| 428 | Metal Pad | PAD | 94 | 0 | 2 | |
| 429 | Halo Pad | PAD | 95 | 0 | 2 | |
| 430 | Converge | PAD | 96 | 8 | 2 | |
| 431 | CelestPad | PAD | 96 | 10 | 2 | |
| 432 | Ancestral | PAD | 98 | 1 | 2 | |
| 433 | Prologue | PAD | 98 | 2 | 2 | |
| 434 | Goblin | PAD | 102 | 0 | 2 | |
| 435 | 50s Sci-Fi | PAD | 102 | 2 | 2 | |
| 436 | Echo Drops | PAD | 103 | 0 | 2 | |
| 437 | Echo Bell | PAD | 103 | 1 | 2 | |
| 438 | Echo Pan 1 | PAD | 103 | 2 | 2 | |
| 439 | Echo Pan 2 | PAD | 103 | 3 | 2 | |
| 440 | Big Panner | PAD | 103 | 4 | 2 | |
| 441 | WaterPiano | PAD | 103 | 6 | 2 | |
| 442 | StarTheme2 | PAD | 104 | 1 | 2 | |
| WORLD 1 | 443 | SitarDrone | WORLD 1 | 105 | 4 | 4 |
| 444 | Sitar 3 | WORLD 1 | 105 | 3 | 4 | |
| 445 | Sarod | WORLD 1 | 105 | 24 | 4 | |
| 446 | Erhu | WORLD 1 | 111 | 8 | 4 | |
| 447 | Erhu/Vib | WORLD 1 | 111 | 10 | 4 | |
| 448 | Matouqin | WORLD 1 | 111 | 19 | 4 | |
| 449 | Shehnai 3 | WORLD 1 | 112 | 2 | 4 | |
| 450 | Bonang 2 | WORLD 1 | 113 | 26 | 4 | |
| 451 | Gender 2 | WORLD 1 | 113 | 27 | 4 | |
| 452 | Saron | WORLD 1 | 113 | 28 | 4 | |
| 453 | Yangqin | WORLD 1 | 47 | 32 | 4 | |
| 454 | Yanqin/Hrd | WORLD 1 | 47 | 33 | 4 | |
| 455 | Yanqin/Trm | WORLD 1 | 47 | 34 | 4 | |
| 456 | Yanqin Trm | WORLD 1 | 47 | 36 | 4 | |
| 457 | Guzheng | WORLD 1 | 108 | 1 | 4 | |
| 458 | Guzhng/Trm | WORLD 1 | 108 | 2 | 4 | |
| 459 | Guzhng Trm | WORLD 1 | 108 | 4 | 4 | |
| 460 | Sanxian | WORLD 1 | 107 | 16 | 4 | |
| 461 | Sanxn/Trem | WORLD 1 | 107 | 17 | 4 | |
| 462 | Pipa | WORLD 1 | 106 | 32 | 4 | |
| 463 | Pipa/Vib | WORLD 1 | 106 | 33 | 4 | |
| 464 | Pipa/Trem | WORLD 1 | 106 | 34 | 4 | |
| 465 | Pipa Trem | WORLD 1 | 106 | 37 | 4 | |
| 466 | Qudi | WORLD 1 | 74 | 24 | 4 | |
| 467 | Qudi/Orn | WORLD 1 | 74 | 25 | 4 | |
| 468 | Bangdi | WORLD 1 | 74 | 28 | 4 | |
| 469 | Bandi/Grwl | WORLD 1 | 74 | 29 | 4 | |
| 470 | Bandi Grwl | WORLD 1 | 74 | 30 | 4 | |
| 471 | Xiao | WORLD 1 | 78 | 8 | 4 | |
| 472 | Xiao/Orn | WORLD 1 | 78 | 9 | 4 | |
| 473 | Xun | WORLD 1 | 74 | 32 | 4 | |
| 474 | Xun/Orn | WORLD 1 | 74 | 33 | 4 | |
| 475 | Shakuhachi | WORLD 1 | 78 | 0 | 2 | |
| 476 | Hulusi 1 | WORLD 1 | 112 | 40 | 4 | |
| 477 | Hulusi 2 | WORLD 1 | 112 | 44 | 4 | |
| 478 | Shehnai 1 | WORLD 1 | 112 | 0 | 2 | |
| 479 | Shehnai 2 | WORLD 1 | 112 | 1 | 2 | |
| 480 | Pungi | WORLD 1 | 112 | 8 | 2 | |
| 481 | Suona | WORLD 1 | 112 | 32 | 4 | |
| 482 | Suona/Grwl | WORLD 1 | 112 | 33 | 4 | |
| 483 | Suona Grwl | WORLD 1 | 112 | 34 | 4 | |
| 484 | Hichiriki | WORLD 1 | 112 | 16 | 2 | |
| 485 | Bagpipe | WORLD 1 | 110 | 0 | 2 | |
| 486 | Shamisen | WORLD 1 | 107 | 0 | 2 | |
| 487 | Tsugaru | WORLD 1 | 107 | 1 | 2 | |
| 488 | Koto | WORLD 1 | 108 | 0 | 2 | |
| 489 | TaishoKoto | WORLD 1 | 108 | 8 | 2 | |
| 490 | Zither | WORLD 1 | 47 | 24 | 2 | |
| 491 | Harp | WORLD 1 | 47 | 0 | 2 | |
| 492 | Bonang 1 | WORLD 1 | 113 | 8 | 2 | |
| 493 | Gender 1 | WORLD 1 | 113 | 9 | 2 |
| Button | No. | Tone | Category | PC | CC 00 | CC 32 |
| WORLD 1 | 494 | GamIn Gong | WORLD 1 | 113 | 10 | 2 |
| 495 | St.Gamelan | WORLD 1 | 113 | 11 | 2 | |
| 496 | RamaCymbal | WORLD 1 | 113 | 16 | 2 | |
| 497 | Atarigane | WORLD 1 | 114 | 8 | 2 | |
| 498 | Gopichant | WORLD 1 | 106 | 16 | 2 | |
| 499 | Sitar 2 | WORLD 1 | 105 | 1 | 2 | |
| 500 | Sitar 1 | WORLD 1 | 105 | 0 | 2 | |
| 501 | Dtnd Sitar | WORLD 1 | 105 | 2 | 2 | |
| 502 | TamburaDrn | WORLD 1 | 105 | 17 | 4 | |
| WORLD 2 | 503 | SteelDrums | WORLD 2 | 115 | 0 | 2 |
| 504 | Quena | WORLD 2 | 75 | 8 | 4 | |
| 505 | Zampona | WORLD 2 | 76 | 16 | 4 | |
| 506 | Duduks | WORLD 2 | 112 | 41 | 4 | |
| 507 | Jerba | WORLD 2 | 112 | 43 | 4 | |
| 508 | Banjo 1 | WORLD 2 | 106 | 0 | 2 | |
| 509 | Banjo 2 | WORLD 2 | 106 | 2 | 4 | |
| 510 | Mute Banjo | WORLD 2 | 106 | 1 | 2 | |
| 511 | Bouzouki | WORLD 2 | 106 | 11 | 4 | |
| 512 | Saz | WORLD 2 | 106 | 13 | 4 | |
| 513 | Tar | WORLD 2 | 106 | 12 | 4 | |
| 514 | HurdyGurdy | WORLD 2 | 111 | 18 | 4 | |
| 515 | Fiddle | WORLD 2 | 111 | 0 | 2 | |
| 516 | Kamanche | WORLD 2 | 111 | 16 | 4 | |
| 517 | Gadulka | WORLD 2 | 111 | 17 | 4 | |
| 518 | Rabab 2 | WORLD 2 | 106 | 10 | 4 | |
| 519 | Rabab 1 | WORLD 2 | 106 | 8 | 2 | |
| 520 | Oud 1 | WORLD 2 | 106 | 24 | 2 | |
| 521 | Oud 2 | WORLD 2 | 106 | 25 | 4 | |
| 522 | Oud/Trem | WORLD 2 | 106 | 27 | 4 | |
| 523 | Oud Trem | WORLD 2 | 106 | 26 | 4 | |
| 524 | Oud&Str | WORLD 2 | 106 | 28 | 4 | |
| 525 | Tambura | WORLD 2 | 105 | 9 | 4 | |
| 526 | Kanoon 2 | WORLD 2 | 108 | 17 | 4 | |
| 527 | Kanoon Oct | WORLD 2 | 108 | 18 | 4 | |
| 528 | Kanoon&Chr | WORLD 2 | 108 | 19 | 4 | |
| 529 | Kanoon 1 | WORLD 2 | 108 | 16 | 2 | |
| 530 | Kawala 2 | WORLD 2 | 76 | 9 | 4 | |
| 531 | Kawala Oct | WORLD 2 | 76 | 10 | 4 | |
| 532 | Kawala 1 | WORLD 2 | 76 | 8 | 2 | |
| 533 | Kaval Duo | WORLD 2 | 76 | 32 | 4 | |
| 534 | Nay | WORLD 2 | 74 | 18 | 4 | |
| 535 | Nay Oct | WORLD 2 | 74 | 19 | 4 | |
| 536 | Mizmar | WORLD 2 | 112 | 24 | 4 | |
| 537 | Mizmar Oct | WORLD 2 | 112 | 25 | 4 | |
| 538 | MizmarDual | WORLD 2 | 112 | 26 | 4 | |
| 539 | Zourna | WORLD 2 | 112 | 42 | 4 | |
| 540 | Gaida | WORLD 2 | 110 | 16 | 4 | |
| 541 | Santur 3 | WORLD 2 | 16 | 2 | 4 | |
| 542 | Santur 2 | WORLD 2 | 16 | 1 | 2 | |
| 543 | Santur 1 | WORLD 2 | 16 | 0 | 2 | |
| 544 | Cimbalom | WORLD 2 | 16 | 8 | 2 | |
| 545 | Afro Harp | WORLD 2 | 16 | 32 | 4 | |
| 546 | Kalimba 1 | WORLD 2 | 109 | 0 | 2 | |
| 547 | Kalimba 2 | WORLD 2 | 109 | 1 | 4 | |
| 548 | Balafon 1 | WORLD 2 | 13 | 16 | 2 | |
| 549 | Balafon 2 | WORLD 2 | 13 | 17 | 2 | |
| 550 | Log Drum | WORLD 2 | 13 | 24 | 2 | |
| 551 | Timpani | PERCUSSION | 48 | 0 | 2 | |
| 552 | Castanets | PERCUSSION | 116 | 8 | 2 | |
| 553 | Agogo Bell | PERCUSSION | 114 | 0 | 2 | |
| 554 | Woodblock | PERCUSSION | 116 | 0 | 2 | |
| 555 | Taiko | PERCUSSION | 117 | 0 | 2 | |
| 556 | Concert BD | PERCUSSION | 117 | 8 | 2 | |
| 557 | Mt CnCRTBD | PERCUSSION | 117 | 9 | 2 | |
| 558 | Melo Tom 1 | PERCUSSION | 118 | 0 | 2 | |
| 559 | Real Tom | PERCUSSION | 118 | 1 | 2 | |
| 560 | Melo Tom 2 | PERCUSSION | 118 | 8 | 2 | |
| 561 | Rock Tom | PERCUSSION | 118 | 9 | 2 | |
| 562 | Synth Drum | PERCUSSION | 119 | 0 | 2 | |
| 563 | 808 Tom | PERCUSSION | 119 | 8 | 2 | |
| 564 | Elec Perc | PERCUSSION | 119 | 9 | 2 | |
| WORLD 2 | 565 | RevCymbal1 | PERCUSSION | 120 | 0 | 2 |
| 566 | RevCymbal2 | PERCUSSION | 120 | 1 | 2 | |
| 567 | Rev Snare1 | PERCUSSION | 120 | 8 | 2 | |
| 568 | Rev Snare2 | PERCUSSION | 120 | 9 | 2 | |
| 569 | Rev Kick | PERCUSSION | 120 | 16 | 2 | |
| 570 | RevCnctBD | PERCUSSION | 120 | 17 | 2 | |
| 571 | Rev Tom 1 | PERCUSSION | 120 | 24 | 2 | |
| 572 | Rev Tom 2 | PERCUSSION | 120 | 25 | 2 | |
| 573 | Thunder | SFX | 123 | 2 | 2 | |
| 574 | Wind | SFX | 123 | 3 | 2 | |
| 575 | Bird 1 | SFX | 124 | 0 | 2 | |
| 576 | Bird 2 | SFX | 124 | 3 | 2 | |
| 577 | HorseGallp | SFX | 124 | 2 | 2 | |
| 578 | Telephone2 | SFX | 125 | 1 | 2 | |
| 579 | Helicopter | SFX | 126 | 0 | 2 | |
| 580 | Car Engine | SFX | 126 | 1 | 2 | |
| 581 | Car-Pass | SFX | 126 | 3 | 2 | |
| 582 | Siren | SFX | 126 | 5 | 2 | |
| 583 | Train | SFX | 126 | 6 | 2 | |
| 584 | Applause 1 | SFX | 127 | 0 | 2 | |
| 585 | Laughing | SFX | 127 | 1 | 2 | |
| 586 | Screaming | SFX | 127 | 2 | 2 | |
| 587 | Explosion | SFX | 128 | 3 | 2 | |
| 588 | Breath Nz | SFX | 122 | 0 | 2 | |
| 589 | FIKeyClick | SFX | 122 | 1 | 2 | |
| 590 | Seashore | SFX | 123 | 0 | 2 | |
| 591 | Rain | SFX | 123 | 1 | 2 | |
| 592 | Stream | SFX | 123 | 4 | 2 | |
| 593 | Bubble | SFX | 123 | 5 | 2 | |
| 594 | Dog | SFX | 124 | 1 | 2 | |
| 595 | Kitty | SFX | 124 | 4 | 2 | |
| 596 | Growl | SFX | 124 | 5 | 2 | |
| 597 | Telephone1 | SFX | 125 | 0 | 2 | |
| 598 | Door Creak | SFX | 125 | 2 | 2 | |
| 599 | Door | SFX | 125 | 3 | 2 | |
| 600 | Scratch 1 | SFX | 125 | 4 | 2 | |
| 601 | Scratch 2 | SFX | 125 | 7 | 2 | |
| 602 | WindChimes | SFX | 125 | 5 | 2 | |
| 603 | Car-Stop | SFX | 126 | 2 | 2 | |
| 604 | Car-Crash | SFX | 126 | 4 | 2 | |
| 605 | Jetplane | SFX | 126 | 7 | 2 | |
| 606 | Starship | SFX | 126 | 8 | 2 | |
| 607 | Burst Nz | SFX | 126 | 9 | 2 | |
| 608 | Punch | SFX | 127 | 3 | 2 | |
| 609 | Heart Beat | SFX | 127 | 4 | 2 | |
| 610 | Footsteps | SFX | 127 | 5 | 2 | |
| 611 | Applause 2 | SFX | 127 | 6 | 2 | |
| 612 | Gun Shot | SFX | 128 | 0 | 2 | |
| 613 | MachineGun | SFX | 128 | 1 | 2 | |
| 614 | Laser Gun | SFX | 128 | 2 | 2 |
Drum Sets
| Button | No. | Rhythm | Category | PC | CC 00 | CC 32 |
| DRUMS | 615 | Standard 1 | DRUMS | 1 | 0 | 2 |
| 616 | Jazz Kit 1 | DRUMS | 33 | 0 | 2 | |
| 617 | New TR-909 | DRUMS | 31 | 0 | 2 | |
| 618 | Hip Hop | DRUMS | 10 | 0 | 2 | |
| 619 | R&B | DRUMS | 14 | 0 | 2 | |
| 620 | Tech&House | DRUMS | 12 | 0 | 2 | |
| 621 | Drum'n'Bss | DRUMS | 11 | 0 | 2 | |
| 622 | Latin Perc | DRUMS | 47 | 0 | 4 | |
| 623 | India Perc | DRUMS | 45 | 0 | 4 | |
| 624 | GamelanPrc | DRUMS | 46 | 0 | 4 | |
| 625 | OrientPerc | DRUMS | 95 | 0 | 4 | |
| 626 | China Perc | DRUMS | 44 | 0 | 4 | |
| 627 | India Kit | DRUMS | 94 | 0 | 4 | |
| 628 | Std Latin | DRUMS | 75 | 0 | 4 | |
| 629 | Jazz Latin | DRUMS | 76 | 0 | 4 | |
| 630 | TR909Latin | DRUMS | 77 | 0 | 4 | |
| 631 | HipHopLatn | DRUMS | 80 | 0 | 4 | |
| 632 | R&B Latin | DRUMS | 81 | 0 | 4 | |
| 633 | TechnoLatn | DRUMS | 78 | 0 | 4 | |
| 634 | D'n'B Latn | DRUMS | 79 | 0 | 4 | |
| 635 | Std Asia | DRUMS | 67 | 0 | 4 | |
| 636 | Jazz Asia | DRUMS | 68 | 0 | 4 | |
| 637 | TR909 Asia | DRUMS | 69 | 0 | 4 | |
| 638 | HipHopAsia | DRUMS | 70 | 0 | 4 | |
| 639 | R&B Asia | DRUMS | 71 | 0 | 4 | |
| 640 | TechnoAsia | DRUMS | 72 | 0 | 4 | |
| 641 | D'n'B Asia | DRUMS | 73 | 0 | 4 | |
| 642 | Std OR2 | DRUMS | 96 | 0 | 4 | |
| 643 | Jazz OR2 | DRUMS | 97 | 0 | 4 | |
| 644 | TR-909 OR2 | DRUMS | 98 | 0 | 4 | |
| 645 | HipHop OR2 | DRUMS | 99 | 0 | 4 | |
| 646 | R&B OR2 | DRUMS | 100 | 0 | 4 | |
| 647 | Techno OR2 | DRUMS | 101 | 0 | 4 | |
| 648 | D'n'B OR2 | DRUMS | 102 | 0 | 4 | |
| 649 | Std OR1 | DRUMS | 82 | 0 | 4 | |
| 650 | Jazz OR1 | DRUMS | 83 | 0 | 4 | |
| 651 | TR-909 OR1 | DRUMS | 84 | 0 | 4 | |
| 652 | HipHop OR1 | DRUMS | 87 | 0 | 4 | |
| 653 | R&B OR1 | DRUMS | 88 | 0 | 4 | |
| 654 | Techno OR1 | DRUMS | 85 | 0 | 4 | |
| 655 | D'n'B OR1 | DRUMS | 86 | 0 | 4 | |
| 656 | OR Kit 1 | DRUMS | 93 | 0 | 4 | |
| 657 | OR Kit 2 | DRUMS | 117 | 0 | 3 | |
| 658 | MxKit&Latn | DRUMS | 89 | 0 | 4 | |
| 659 | MxKit&India | DRUMS | 90 | 0 | 4 | |
| 660 | MxKit&OR2 | DRUMS | 103 | 0 | 4 | |
| 661 | MxKit&OR1 | DRUMS | 92 | 0 | 4 | |
| 662 | MxKit&Chin | DRUMS | 91 | 0 | 4 | |
| 663 | Standard 2 | DRUMS | 2 | 0 | 2 | |
| 664 | Standard 3 | DRUMS | 3 | 0 | 2 | |
| 665 | Room | DRUMS | 9 | 0 | 2 | |
| 666 | Power | DRUMS | 17 | 0 | 2 | |
| 667 | Jazz Kit 2 | DRUMS | 34 | 0 | 2 | |
| 668 | Brush Kit | DRUMS | 41 | 0 | 2 | |
| 669 | Orchestra | DRUMS | 49 | 0 | 2 | |
| 670 | Ethnic | DRUMS | 50 | 0 | 2 | |
| 671 | Electronic | DRUMS | 25 | 0 | 2 | |
| 672 | TR-808&909 | DRUMS | 26 | 0 | 2 | |
| 673 | Dance | DRUMS | 27 | 0 | 2 | |
| 674 | Kick&Snare | DRUMS | 51 | 0 | 2 | |
| 675 | SFX | DRUMS | 57 | 0 | 2 |
Drum Set List
| PC: 1 [CC32:2]Standard 1 | PC: 33 [CC32:2]Jazz Kit 1 | PC: 31 [CC32:2]New TR-909 | PC: 10 [CC32:2]Hip Hop | PC: 14 [CC32:2]R&B | PC: 12 [CC32:2]Tech&House | PC: 11 [CC32:2]Drum/Bss | PC: 47 [CC32:4]Latin Perc | PC: 45 [CC32:4]India Perc | PC: 46 [CC32:4]GamelanPrc | PC: 95 [CC32:4]OrientPerc | |
| 9 | 10 | 11 | 12 | 999 Kick 3 | 999 Kick 3 | 999 Kick | 999 Kick 3 | 999 Kick 3 | 10000000000000000000000000000000000000000000000000000000000000000000000000000000000000000000000000000 | 10000000000000000000000000000000000000000000000000000000000000000000000000000000000000000000000000 | |
| 10 | 11 | 12 | 13 | 999 Kick 3 | 999 Kick 3 | 999 Kick | 999 Kick 3 | 999 Kick 3 | 10000000000000000000000000000000000000000000000000000000000000000 | 1000000000000000000000000000000000 | |
| 11 | 12 | 13 | 14 | 999 Kick 3 | 999 Kick 3 | 999 Kick 3 | 999 Kick 3 | 999 Kick 3 | 100000000000000000000000000000000000000000000000000000000000000000000000000000000000 | ||
| 12 | 13 | 14 | 15 | 999 Kick 3 | 999 Kick 3 | 999 Kick 3 | 999 Kick 3 | 999 Kick 3 | 100000000000000000000000000000000000000000000000000000000000000 | ||
| 13 | 15 | 16 | 17 | 999 Kick 3 | 999 Kick 3 | 999 Kick 3 | 999 Kick 3 | 999 Kick 3 | 100000000000000000000000000000000000000000000000000000000000000 | 1000000000000000000000000000000000 | |
| 999 Kick 3 | 999 Kick 3 | 999 Kick 3 | 999 Kick 3 | 999 Kick 3 | 100000000000000000000000000000000000000000000000000000000000 | ||||||
| 14 | 15 | 16 | 17 | 999 Kick 3 | 999 Kick 3 | 999 Kick 3 | 999 Kick 3 | 999 Kick 3 | 10000000000000000000000000000000000000000000000000000 | ||
| 999 Kick 3 | 999 Kick 3 | 999 Kick 3 | 999 Kick 3 | 999 Kick 3 | 100000000000000000000000 | 1000000000000000000000 | |||||
| 15 | 16 | 17 | 18 | 999 Kick 3 | 999 Kick 3 | 999 Kick 3 | 999 Kick 3 | 999 Kick 3 | 1000000000000000000000 | 1000000000000000000000 | |
| 18 | 18 | 18 | 18 | 18 | 18 | 18 | 18 | ||||
| 22 | 22 | 22 | 22 | 22 | 22 | 22 | 22 | ||||
| 23 | 23 | 23 | 23 | 23 | 23 | 23 | 23 | ||||
| C1 | 24 | 25 | 26 | 999 Kick 3 | 999 Kick 3 | 999 Kick 3 | 999 Kick 3 | 999 Kick 3 | 100000000000000000000 | 100000000000000000000 | 100000000000000000000 |
| 24 | 24 | 24 | 24 | 24 | 24 | 24 | 24 | ||||
| 25 | 25 | 25 | 25 | 25 | 25 | 25 | 25 | ||||
| 26 | 26 | 26 | 26 | 26 | 26 | 26 | 26 | ||||
| 27 | 27 | 27 | 27 | 27 | 27 | 27 | 27 | ||||
| 28 | 28 | 28 | 28 | 28 | 28 | 28 | 28 | ||||
| 29 | 29 | 29 | 29 | 29 | 29 | 29 | 29 | ||||
| 30 | 30 | 31 | 31 | 31 | 31 | 31 | 31 | ||||
| 31 | 31 | 31 | 31 | 31 | 31 | 31 | 31 | ||||
| 32 | 32 | 32 | 32 | 32 | 32 | 32 | 32 | ||||
| 33 | 33 | 33 | 33 | 33 | 33 | 33 | 33 | ||||
| 34 | 34 | 34 | 34 | 34 | 34 | 34 | 34 | ||||
| 35 | 35 | 35 | 35 | 35 | 35 | 35 | 35 | ||||
| 36 | 36 | 36 | 36 | 36 | 36 | 36 | 36 | ||||
| 37 | 37 | 37 | 37 | 37 | 37 | 37 | 37 | ||||
| 38 | 38 | 38 | 38 | 38 | 38 | 38 | 38 | ||||
| 39 | 39 | 39 | 39 | 39 | 39 | 39 | 39 | ||||
| 40 | 40 | 41 | 41 | 41 | 41 | 41 | 41 | ||||
| 41 | 41 | 41 | 41 | 41 | 41 | 41 | 41 | ||||
| 42 | 42 | 42 | 42 | 42 | 42 | 42 | 42 | ||||
| 43 | 43 | 43 | 43 | 43 | 43 | 43 | 43 | ||||
| 44 | 44 | 44 | 44 | 44 | 44 | 44 | 44 | ||||
| 45 | 45 | 45 | 45 | 45 | 45 | 45 | 45 | ||||
| 46 | 46 | 46 | 46 | 46 | 46 | 46 | 46 | ||||
| 47 | 47 | 47 | 47 | 47 | 47 | 47 | 47 | ||||
| 48 | 48 | 48 | 48 | 48 | 48 | 48 | 48 | ||||
| 49 | 49 | 49 | 49 | 49 | 49 | 49 | 49 | ||||
| 50 | 50 | 51 | 51 | 51 | 51 | 51 | 51 | ||||
| 51 | 51 | 52 | 52 | 52 | 52 | 52 | 52 | ||||
| 52 | 52 | 53 | 53 | 53 | 53 | 53 | 53 | ||||
| 53 | 53 | 54 | 54 | 54 | 54 | 54 | 54 | ||||
| 54 | 54 | 55 | 55 | 55 | 55 | 55 | 55 | ||||
| 55 | 55 | 56 | 56 | 56 | 56 | 56 | 56 | ||||
| 56 | 56 | 57 | 57 | 57 | 57 | 57 | 57 | ||||
| 57 | 57 | 58 | 58 | 58 | 58 | 58 | 58 | ||||
| 58 | 58 | 59 | 59 | 59 | 59 | 59 | 59 | ||||
| 59 | 59 | 60 | 60 | 60 | 60 | 60 | 60 | ||||
| 61 | 61 | 62 | 62 | 62 | 62 | 62 | 62 | ||||
| 62 | 62 | 63 | 63 | 63 | 63 | 63 | 63 | ||||
| 63 | 63 | 64 | 64 | 64 | 64 | 64 | 64 | ||||
| 64 | 64 | 65 | 65 | 65 | 65 | 65 | 65 | ||||
| 65 | 65 | 66 | 66 | 66 | 66 | 66 | 66 | ||||
| 66 | 66 | 67 | 67 | 67 | 67 | 67 | 67 | ||||
| 67 | 67 | 68 | 68 | 68 | 68 | 68 | 68 | ||||
| 68 | 68 | 69 | 69 | 69 | 69 | 69 | 69 | ||||
| 69 | 69 | 70 | 71 | 71 | 71 | 71 | 71 | ||||
| 71 | 71 | 72 | 72 | 72 | 72 | 72 | 72 | ||||
| 72 | 72 | 73 | 73 | 73 | 73 | 73 | 73 | ||||
| 73 | 73 | 74 | 74 | 74 | 74 | 74 | 74 | ||||
| 74 | 74 | 75 | 75 | 75 | 75 | 75 | 75 | ||||
| 75 | 75 | 76 | 76 | 76 | 76 | 76 | 76 | ||||
| 76 | 76 | 77 | 77 | 77 | 77 | 77 | 77 | ||||
| 77 | 77 | 78 | 78 | 78 | 78 | 78 | 78 | ||||
| 78 | 78 | 79 | 79 | 79 | 79 | 79 | 79 | ||||
| 79 | 79 | 80 | 80 | 80 | 80 | 80 | 80 | ||||
| 80 | 80 | 81 | 81 | 81 | 81 | 81 | 81 | ||||
| 81 | 81 | 82 | 82 | 82 | 82 | 82 | 82 | ||||
| 82 | 82 | 83 | 83 | 83 | 83 | 83 | 83 | ||||
| 83 | 83 | 84 | 84 | 84 | 84 | 84 | 84 | ||||
| 84 | 84 | 85 | 85 | 85 | 85 | 85 | 85 | ||||
| 85 | 85 | 86 | 86 | 86 | 86 | 86 | 86 | ||||
| 86 | 86 | 87 | 87 | 87 | 87 | 87 | 87 | ||||
| 87 | 87 | 88 | 88 | 88 | 88 | 88 | 88 | ||||
| 88 | 88 | 89 | 89 | 89 | 89 | 89 | 89 | ||||
| 89 | 89 | 90 | 90 | 90 | 90 | 90 | 90 | ||||
| 91 | 91 | 92 | 92 | 92 | 92 | 92 | 92 | ||||
| 92 | 92 | 93 | 93 | 93 | 93 | 93 | 93 | ||||
| 93 | 93 | 94 | 94 | 94 | 94 | 94 | 94 | ||||
| 94 | 94 | 95 | 95 | 95 | 95 | 95 | 95 | ||||
| 95 | 95 | 96 | 96 | 96 | 96 | 96 | 96 | ||||
| 96 | 96 | 97 | 97 | 97 | 97 | 97 | 97 | ||||
| 97 | 97 | 98 | 98 | 98 | 98 | 98 | 98 | ||||
| 98 | 98 | 99 | 99 | 99 | 99 | 99 | 99 | ||||
| 99 | 99 | 100 | 100 | 100 | 100 | 100 | 100 | ||||
| 101 | 101 | 102 | 102 | 102 | 102 | 102 | 102 | ||||
| 102 | 102 | 103 | 103 | 103 | 103 | 103 | 103 | ||||
| 103 | 103 | 104 | 104 | 104 | 104 | 104 | 104 | ||||
| 104 | 104 | 105 | 105 | 105 | 105 | 105 | 105 | ||||
| 105 | 105 | 106 | 106 | 106 | 106 | 106 | 106 | ||||
| 106 | 106 | 107 | 107 | 107 | 107 | 107 | 107 | ||||
| PC: 44 [CC32: 4]China Perc | PC: 94 [CC32: 4]India Kit | PC: 75 [CC32: 4]Std Latin | PC: 76 [CC32: 4]Jazz Latin | PC: 77 [CC32: 4]TR908Latin | PC: 80 [CC32: 4]HiphOpLatin | PC: 81 [CC32: 4]R&B Latin | PC: 78 [CC32: 4]TechnoLat | PC: 79 [CC32: 4]D'N'B Latin | PC: 67 [CC32: 4]Std Asia | PC: 68 [CC32: 4]Jazz Asia | |
| 5 | 10 | - | - | - | 909 Kick 3 | 909 Kick 3 | 909 Kick | 909 Kick 3 | 909 Kick 3 | - | - |
| 11 | 10 | - | - | - | House Kick | House Kick | House Kick | House Kick | House Kick | - | - |
| C0 | 12 | - | - | - | TR-808 Kick | TR-808 Kick | TR-808 Kick | TR-808 Kick | 909 Kick | - | - |
| 13 | 13 | - | - | - | HipHop Kick | 909 Kick | HipHop Kick | HipHop Kick | HipHop Kick | - | - |
| 14 | 14 | - | - | - | SimpleKick | 909 Kick | 909 Kick | SimpleKick | SimpleKick | - | - |
| 15 | 15 | - | - | - | TR-909 OHHsh | TR-909 OHHsh | R&B OHHsh | TR-909 OHHsh | TR-909 OHHsh | - | - |
| 16 | 16 | - | - | - | TR-909 OHHsh | TR-909 OHHsh | R&B OHHsh | TR-909 OHHsh | TR-909 OHHsh | - | - |
| 17 | 17 | - | - | - | TR-909 OHHsh | TR-909 OHHsh | R&B OHHsh | TR-909 OHHsh | TR-909 OHHsh | - | - |
| 18 | 18 | - | - | - | Three | Three | Three | Three | Three | - | - |
| 19 | 19 | - | - | - | Four | Four | Four | Four | Four | - | - |
| 20 | 20 | - | - | - | Four | Four | Four | Four | Four | - | - |
| 21 | 21 | - | - | - | One | One | One | One | One | - | - |
| 22 | 22 | - | - | - | Two | Two | Two | Two | Two | - | - |
| 23 | 23 | - | - | - | Three | Three | Three | Three | Three | - | - |
| C1 | 24 | - | - | - | Four | Four | Four | Four | Four | - | - |
| 25 | 25 | - | - | - | Four | Four | Four | Four | Four | - | - |
| 26 | 26 | - | - | - | Four | Four | Four | Four | Four | - | - |
| 27 | 27 | - | - | - | Four | Four | Four | Four | Four | - | - |
| 28 | 28 | - | - | - | Four | Four | Four | Four | Four | - | - |
| 29 | 29 | - | - | - | Four | Four | Four | Four | Four | - | - |
| 30 | Gu Roll | - | - | - | Four | Four | Four | Four | Four | - | - |
| 31 | Gu Hi | - | - | - | Four | Four | Four | Four | Four | - | - |
| 32 | HuYinLuO. Op | - | - | - | Four | Four | Four | Four | Four | - | - |
| 33 | Changgo | - | - | - | Four | Four | Four | Four | Four | - | - |
| 34 | Asian Gong | Mute Surdo | Mute Roll | Mute Roll | Four | Four | Four | Four | Four | - | - |
| 35 | Tang Gu Mt | TR-707 BD Low | Kick 1 | Kick 2 | Nine | Nine | Nine | Nine | Nine | - | - |
| C26 | Tang Gu Op | TR-707 BD Low | Kick 2 | Kick 2 | Nine | Nine | Nine | Nine | Nine | - | - |
| 37 | Shu Gu Rlm | TR-707 BD Low | Kick 2 | Kick 2 | Nine | Nine | Nine | Nine | Nine | - | - |
| 38 | Shu Gu Rlm | TR-707 BD Low | Kick 2 | Kick 2 | Nine | Nine | Nine | Nine | Nine | - | - |
| 39 | Shu Ban 2 | 909Clap | 909Clap | 909Clap | Nine | Nine | Nine | Nine | Nine | - | - |
| 40 | Ban Gu 4 | TR-707 BD Low | Kick 2 | Kick 2 | Nine | Nine | Nine | Nine | Nine | - | - |
| 41 | Tang Gu Op | Real Tom 6 | Real Tom 6 | Real Tom 6 | Nine | Nine | Nine | Nine | Nine | - | - |
| 42 | Nao Bo | TR-707 HHc | Close Hlat | Close Hlat | Nine | Nine | Nine | Nine | Nine | - | - |
| 43 | Tang Gu Mt | TR-707 HHc | Real Tom 6 | Real Tom 6 | Nine | Nine | Nine | Nine | Nine | - | - |
| 44 | Xiao Bo | TR-707 HHc | Pedal Hlat | Pedal Hlat | Nine | Nine | Nine | Nine | Nine | - | - |
| 45 | Tang Gu Op | Real Tom 4 | Real Tom 4 | Real Tom 4 | Nine | Nine | Nine | Nine | Nine | - | - |
| 46 | HuYinLuOH Op | TR-707 HHc | Open Hlat | Open Hlat | Nine | Nine | Nine | Nine | Nine | - | - |
| 47 | Tang Gu Mt | Real Tom 4 | Real Tom 4 | Real Tom 4 | Nine | Nine | Nine | Nine | Nine | - | - |
| C28 | Tang Gu Op | Real Tom 1 | Real Tom 1 | Real Tom 1 | Nine | Nine | Nine | Nine | Nine | - | - |
| 36 | HuYinLuOH Op | TR-707 CRash Cym.1 | CRash Cym.1 | CRash Cym.1 | Nine | Nine | Nine | Nine | Nine | - | - |
| 37 | Shu Gu Rlm | TR-707 CRash Cym.1 | CRash Cym.1 | CRash Cym.1 | Nine | Nine | Nine | Nine | Nine | - | - |
| 38 | Shu Gu Rlm | Real Tom 1 | Real Tom 1 | Real Tom 1 | Nine | Nine | Nine | Nine | Nine | - | - |
| 39 | Shu Ban 2 | 909Clap | 909Clap | 909Clap | Nine | Nine | Nine | Nine | Nine | - | - |
| 40 | Ban Gu 4 | TR-707 BD Low | Kick 2 | Kick 2 | Nine | Nine | Nine | Nine | Nine | - | - |
| PC: 69 [CC32.4] TR90 Asia | PC: 70 [CC32.4] HigHopAsia | PC: 71 [CC32.4] R&Asia | PC: 72 [CC32.4] TechnoAsia | PC: 73 [CC32.4] DnB Asia | PC: 96 [CC32.4] Std OR2 | PC: 97 [CC32.4] Jazz OR2 | PC: 98 [CC32.4] TR-90OR2 | PC: 99 [CC32.4] HipHop OR2 | PC: 100 [CC32.4] R&BR2 | PC: 101 [CC32.4] TechnoOR2 | |
| 9 | 10 | 909 Kick 3 | 909 Kick 3 | 909 Kick 3 | 909 Kick 3 | 909 Kick 3 | 909 Kick 3 | 909 Kick 3 | 909 Kick 3 | 909 Kick 3 | 909 Kick 3 |
| 11 | House Kick | House Kick | House Kick | House Kick | 909 Kick2 | House Kick | Mix HH CI 4 | Mix HH CI 4 | House Kick | House Kick | House Kick |
| 10 | TR-808 Kick | TR-808 Kick | TR-808 Kick | TR-808 Kick | TR-808 Kick | 909 Kick | Mix HH CI 4 | Mix HH CI 4 | TR-808 Kick | TR-808 Kick | TR-808 Kick |
| 13 | HipHop Kick | 909 Kick | HipHop Kick | HipHop Kick | HipHop Kick | Mix HH CI 4 | Mix HH CI 4 | HipHop Kick | 909 Kick | HipHop Kick | HipHop Kick |
| 14 | SimpleKick | 909 Kick2 | SimpleKick | SimpleKick | Mix HH CI 3 | Mix HH CI 3 | Mix HH CI 3 | SimpleKick | 909 Kick2 | 909 Kick2 | SimpleKick |
| 15 | TR-909 OHHsh | TR-909 OHHsh | RB& OHHsh | TR-909 OHHsh | TR-909 OHHsh | Mix HH Op 1 | Mix HH Op 1 | TR-909 OHHsh | TR-909 OHHsh | R& OHHsh | TR-909 OHHsh |
| 16 | TR-909 OHH | TR-909 OHH | RB& OHH | TR-909 OHH | TR-909 OHH | Mix HH Op 2 | Mix HH Op 2 | TR-909 OHH | TR-909 OHH | R& OHH | TR-909 OHH |
| 17 | Ah | Ah | Ah | Ah | Mix Snare 1 | Mix Snare 1 | Mix Snare 1 | Ah | Ah | Ah | Ah |
| 18 | Ha | Ha | Ha | Ha | Mix Snare 2 | Mix Snare 2 | Ha | Ha | Ha | Ha | Ha |
| 19 | ShuHa | ShuHa | ShuHa | ShuHa | ShuHa | Mix Snare 3 | Mix Snare 3 | ShuHa | ShuHa | ShuHa | ShuHa |
| 20 | ShuHi | ShuHi | ShuHi | ShuHi | ShuHi | Mix Snare 4 | Mix Snare 4 | ShuHi | ShuHi | ShuHi | ShuHi |
| 21 | One | One | One | One | One | Mix Kick 2 | Mix Kick 2 | One | One | One | One |
| 22 | Two | Two | Two | Two | Two | Mix Kick 3 | Mix Kick 3 | Two | Two | Two | Two |
| 23 | Three | Three | Three | Three | Three | Mix Kick 4 | Mix Kick 4 | Three | Three | Three | Three |
| C1 | Four | Four | Four | Four | Four | Mix Kick 1 | Mix Kick 1 | Four | Four | Four | Four |
| 25 | Snare Roll | Snare Roll | Snare Roll | Snare Roll | Snare Roll | Snare Roll | Snare Roll | Snare Roll | Snare Roll | Snare Roll | Snare Roll |
| 26 | Snap | Snap | Snap | Snap | Snap | Finger Snap | Finger Snap | Snap | Snap | Snap | Snap |
| 27 | High-Q | High-Q | High-Q | High-Q | High-Q | High-Q | High-Q | High-Q | High-Q | High-Q | High-Q |
| 28 | Slap | Slap | Slap | Slap | Slap | Slap | Slap | Slap | Slap | Slap | Slap |
| 29 | Scratch Push2 | Scratch Push2 | Scratch Push2 | Scratch Push2 | Scratch Push2 | ScratchPush2 | ScratchPush2 | Scratch Push2 | Scratch Push2 | Scratch Push2 | Scratch Push2 |
| 30 | Scratch Pull2 | Scratch Pull2 | Scratch Pull2 | Scratch Pull2 | Scratch Pull2 | Scratch Pull2 | Scratch Pull2 | Scratch Pull2 | Scratch Pull2 | Scratch Pull2 | Scratch Pull2 |
| 31 | Sticks | Sticks | Sticks | Sticks | Sticks | Sticks | Sticks | Sticks | Sticks | Sticks | Sticks |
| 32 | SquareClick | SquareClick | SquareClick | SquareClick | SquareClick | SquareClick | SquareClick | SquareClick | SquareClick | SquareClick | SquareClick |
| 33 | Mmm Click | Mmm Click | Mmm Click | Mmm Click | Mmm Click | Mmm Click | Mmm Click | Mmm Click | Mmm Click | Mmm Click | Mmm Click |
| 34 | Mmm. Click | Mmm. Click | Mmm. Click | Mmm. Click | Mmm. Click | Mmm. Click | Mmm. Click | Mmm. Click | Mmm. Click | Mmm. Click | Mmm. Click |
| 35 | Mmm. Bell | Mmm. Bell | Mmm. Bell | Mmm. Bell | Mmm. Bell | Mmm. Bell | Mmm. Bell | Mmm. Bell | Mmm. Bell | Mmm. Bell | Mmm. Bell |
| 36 | 909 Kick | 909 Kick | 909 Kick | TR-808 Kick | 909 Kick | Kick 1 | Jazz Kick 2 | 909 Kick | HipHop Kick | 909 Kick | 909 Kick |
| 37 | 909 Kick | 909 Kick | 909 Kick | 909 Kick | 909 Kick | Kick 2 | Jazz Kick 2 | 909 Kick | SimpleKick | SimpleKick | SimpleKick |
| 38 | 909 Kick | 909 Kick | 909 Kick | 909 Kick | 909 Kick | Kick 2 | Jazz Kick 2 | 909 Kick | SimpleKick | SimpleKick | SimpleKick |
| 39 | 909 Kick | 909 Kick | 909 Kick | 909 Kick | 909 Kick | Kick 2 | Jazz Kick 2 | 909 Kick | SimpleKick | SimpleKick | SimpleKick |
| 40 | 909Snare2 | 909Snare2 | 909Snare2 | 909Snare2 | 909Snare2 | Snare 1 | Jazz Snare 2 | 909Snare2 | HipHopSnare2 | 909Snare2 | HipHopSnare2 |
| 41 | 808 Tom 2 | Real Tom 6 | Symm Drum 2 | 808 Tom 2 | Real Tom 6 | Real Tom 6 | 808 Tom 2 | Real Tom 6 | Real Tom 6 | Real Tom 6 | Symm Drum 2 |
| 42 | TR-909 CHH | HipHopCHH | RB& CHH | TR-909 CHH | RB& CHH | Close HiHat | Jazz CisLH | TR-909 CHH | HipHopCHH | RB& CHH | TR-909 CHH |
| 43 | 808 Tom 2 | Real Tom 6 | Symm Drum 2 | 808 Tom 2 | Real Tom 6 | Real Tom 6 | 808 Tom 2 | Real Tom 6 | Real Tom 6 | Real Tom 6 | Symm Drum 2 |
| 44 | TR-909 CHH | HipHopCHH | RB& CHH | TR-909 CHH | RB& CHH | Pedal HiHat | Jazz Ped LH | TR-909 CHH | HipHopCHH | RB& CHH | TR-909 CHH |
| 45 | 808 Tom 2 | Real Tom 4 | Symm Drum 2 | 808 Tom 2 | Real Tom 4 | Real Tom 4 | 808 Tom 2 | Real Tom 4 | Real Tom 4 | Real Tom 4 | Symm Drum 2 |
| 46 | TR-909 OHH | HipHopOHH | RB& OHH | TR-909 OHH | HipHopOHH | Open HiHat | Open HiHat | TR-909 OHH | HipHopOHH | RB& OHH | TR-909 OHH |
| 47 | 808 Tom 2 | Real Tom 4 | Symm Drum 2 | 808 Tom 2 | Real Tom 4 | Real Tom 4 | 808 Tom 2 | Real Tom 4 | Real Tom 4 | Real Tom 4 | Symm Drum 2 |
| 48 | 808 Tom 2 | Real Tom 1 | Symm Drum 2 | 808 Tom 2 | Symm Drum 2 | Real Tom 1 | Real Tom 1 | 808 Tom 2 | Real Tom 1 | Real Tom 1 | Symm Drum 2 |
| 49 | 909 Crack | Crash Cym.1 | 909 Crack | 909 Crack | Crash Cym.1 | Crash Cym.1 | Crash Cym.1 | Crash Cym.1 | Crash Cym.1 | Crash Cym.1 | Crash Cym.1 |
| 50 | 808 Tom 2 | Real Tom 1 | Symm Drum 2 | Symm Drum 2 | Symm Drum 2 | Real Tom 1 | Real Tom 1 | 808 Tom 2 | Real Tom 1 | Real Tom 1 | Symm Drum 2 |
| 51 | Ride Cymbal | Ride Cymbal | Ride Cymbal | Ride Cymbal | Ride Cymbal | Ride Cymbal | Ride Cymbal | Ride Cymbal | Ride Cymbal | Ride Cymbal | Ride Cymbal |
| 52 | China Cymbal | ReverseCymbal | ReverseCymbal | ReverseCymbal | China Cymbal | China Cymbal | China Cymbal | China Cymbal | China Cymbal | ReverseCymbal | ReverseCymbal |
| 53 | Ride Bell | Ride Bell | Ride Bell | Ride Bell | Ride Bell | Ride Bell | Ride Bell | Ride Bell | Ride Bell | Ride Bell | Ride Bell |
| 54 | Tambourine | Tambourine | Tambourine | Tambourine | Tambourine | Tambourine | Tambourine | Tambourine | Tambourine | Tambourine | Tambourine |
| 55 | Splash Cym. | Splash Cym. | Splash Cym. | Splash Cym. | Splash Cym. | Splash Cym. | Splash Cym. | Splash Cym. | Splash Cym. | Splash Cym. | Splash Cym. |
| 56 | 808Cowbe | Cowbell | Cowbell | Cowbell | 808Cowbe | Cowbell | Cowbell | 808Cowbe | Cowbell | Cowbell | Cowbell |
| 57 | Crash Cym.2 | Crash Cym.2 | Crash Cym.2 | Crash Cym.2 | Crash Cym.2 | Crash Cym.2 | Crash Cym.2 | Crash Cym.2 | Crash Cym.2 | Crash Cym.2 | Crash Cym.2 |
| 58 | Vibrasilap | Vibrasilap | Vibrasilap | Vibrasilap | Vibrasilap | Vibrasilap | Vibrasilap | Vibrasilap | Vibrasilap | Vibrasilap | Vibrasilap |
| 59 | Ride Cymbal | Ride Cymbal | Ride Cymbal | Ride Cymbal | Ride Cymbal | Ride Cymbal | Ride Cymbal | Ride Cymbal | Ride Cymbal | Ride Cymbal | Ride Cymbal |
| 60 | Tablea Ge | Tablea Ge | Tablea Ge | Tablea Ge | Tablea Ge | Marjal dom | Marjal dom | Marjal dom | Marjal dom | Marjal dom | Marjal dom |
| 61 | Tablea Ge | Tablea Ge | Tablea Ge | Tablea Ge | Tablea Ge | Marjal dom | Marjal dom | Marjal dom | Marjal dom | Marjal dom | Marjal dom |
| 62 | Tablea Ge Hi | Tablea Ge Hi | Tablea Ge Hi | Tablea Ge Hi | Tablea Ge Hi | Marjal tak | Marjal tak | Marjal tak | Marjal tak | Marjal tak | Marjal tak |
| 63 | Hand Cap2 | Hand Cap2 | Hand Cap2 | Hand Cap2 | Hand Cap2 | FarMag dom | FarMag dom | FarMag dom | FarMag dom | FarMag dom | FarMag dom |
| 64 | Tablea Na | Tablea Na | Tablea Na | Tablea Na | Tablea Na | FarMag sak | FarMag sak | FarMag sak | FarMag sak | FarMag sak | FarMag sak |
| 65 | Tablea Tum | Tablea Tum | Tablea Tum | Tablea Tum | Tablea Tum | FarMag tak | FarMag tak | FarMag tak | FarMag tak | FarMag tak | FarMag tak |
| 66 | Tambourine1 | Tambourine1 | Tambourine1 | Tambourine1 | Tambourine1 | FarMag tak | FarMag tak | FarMag tak | FarMag tak | FarMag tak | FarMag tak |
| 67 | Conga Slap | Conga Slap | Conga Slap | Conga Slap | Conga Slap | FarMag sak | FarMag sak | FarMag sak | FarMag sak | FarMag sak | FarMag sak |
| 68 | Conga Slap | Conga Slap | Conga Slap | Conga Slap | Conga Slap | FarMag sak | FarMag sak | FarMag sak | FarMag sak | FarMag sak | FarMag sak |
| 69 | Tambourine2 | Tambourine2 | Tambourine2 | Tambourine2 | Tambourine2 | FarMag sak | FarMag sak | FarMag sak | FarMag sak | FarMag sak | FarMag sak |
| 70 | CingGengCengCengCengCengCengCengCengCengCengCengCengCengCengCengCengCengCengCengCengCengCengCengCengCengCengCengCengCengCengCengCengCengCengCengCengCengCengCengCengCengCengCengCengCengCengCengCengCengCengCeng CengCengCengCengCengCengCengCengCengCengCengCengCengCengCengCengCengCengCengCengCengCengCengCengCengCengCengCengCengCengCengCengCengCengCengCengCengCengCengCengCengCengCengCengCengCengCengCengCengCeng | ||||||||||
| 71 | Udo Short | Udo Short | Udo Short | Udo Short | Udo Short | Udo Short | Udo Short | Udo Short | |||
| 72 | CingTik | CingTik | CingTik | CingTik | CingTik | CingTik | |||||
| 73 | Xiao Bo | Xiao Bo | Xiao Bo | Xiao Bo | Xiao Bo | ||||||
| 74 | Timbai Palia | Timbai Palia | Timbai Palia | Timbai Palia | Timbai Palia | ||||||
| 75 | Kwaengwai p | Kwaengwai p | Kwaengwai p | Kwaengwai p | Kwaengwai p | ||||||
| 76 | Gamelan Gong | Gamelan Gong | Gamelan Gong | Gamelan Gong | Gamelan Gong | ||||||
| 77 | Ride Bell | Ride Bell | Ride Bell | Ride Bell | Ride Bell | ||||||
| 78 | Cing Ceng | Cing Ceng | Cing Ceng | Cing Ceng | Cing Ceng | ||||||
| 79 | Mut Panderoi | Mut Panderoi | Mut Panderoi | Mut Panderoi | Mut Panderoi | ||||||
| 80 | Nao Bo | Nao Bo | Nao Bo | Nao Bo | Nao Bo | ||||||
| 81 | Op Panderoi | Op Panderoi | Op Panderoi | Op Panderoi | Op Panderoi | ||||||
| 82 | Reg Dum | Reg Dum | Reg Dum | Reg Dum | Reg Dum | ||||||
| 83 | Reg Tikh | Reg Tikh | Reg Tikh | Reg Tikh | Reg Tikh | ||||||
| 84 | Wadon 3 | Wadon 3 | Wadon 3 | Wadon 3 | Wadon 3 | ||||||
| 85 | Wadon 4 | Wadon 4 | Wadon 4 | Wadon 4 | Wadon 4 | ||||||
| 86 | Wadon 2 | Wadon 2 | Wadon 2 | Wadon 2 | Wadon 2 | ||||||
| 87 | Wadon 5 | Wadon 5 | Wadon 5 | Wadon 5 | Wadon 5 | ||||||
| 88 | Wadon 7 | Wadon 7 | Wadon 7 | Wadon 7 | Wadon 7 | ||||||
| 89 | Wadon 4 | Wadon 4 | Wadon 4 | Wadon 4 | Wadon 4 | ||||||
| 90 | Kane Side | Kane Side | Kane Side | Kane Side | Kane Side | ||||||
| 91 | Wadon 1 | Wadon 1 | Wadon 1 | Wadon 1 | Wadon 1 | ||||||
| 92 | Kane Side | Kane Side | Kane Side | Kane Side | Kane Side | ||||||
| 93 | Kane Side | Kane Side | Kane Side | Kane Side | Kane Side | ||||||
| PC: 102 [CC32-4] D' N/OR2 | PC: 82 [CC32-4] Std OR1 | PC: 83 [CC32-4] Jazz OR1 | PC: 84 [CC32-4] T-R99-09 OR1 | PC: 87 [CC32-4] HipHop OR1 | PC: 88 [CC32-4] R&R OR1 | PC: 85 [CC32-4] Techno OR1 | PC: 86 [CC32-4] D' N/OR1 | PC: 93 [CC32-4] OR KI1 | PC: 117 [CC32-3] D' KI1 | PC: 89 [CC32-4] MxKII&Latin | |
| 9 | 10 | 909 Kick 3 | 10 | 909 Kick 3 | 909 Kick 3 | 909 Kick 3 | 909 Kick 3 | 909 Kick 3 | 10 | 10 | 10 |
| 11 | House Kick | Mix HH CI 4 | Mix HH CI 4 | House Kick | House Kick | House Kick | 909 Kick 2 | House Kick | 10 | 10 | 10 |
| C0 | 10 | 909 Kick | Mix HH CI 1 | T-R98-09 Kick | T-R98-09 Kick | T-R98-09 Kick | T-R98-09 Kick | T-R98-09 Kick | 10 | 10 | 10 |
| 13 | HipHop Kick | Mix HH CI 2 | Mix HH CI 2 | HipHop Kick | HipHop Kick | HipHop Kick | HipHop Kick | HipHop Kick | 10 | 10 | 10 |
| 14 | SimpleKick | Mix HH CI 3 | Mix HH CI 3 | SimpleKick | 909 Kick2 | 909 Kick2 | SimpleKick | SimpleKick | 10 | 10 | 10 |
| 15 | TR-909 OHhh | Mix HH Op 1 | Mix HH Op 1 | TR-909 OHhh | TR-909 OHhh | R&B OHhh | TR-909 OHhh | TR-909 OHhh | 10 | 10 | 10 |
| 16 | TR-909 OHh | Mix HH Op 2 | Mix HH Op 2 | TR-909 OHhh | TR-909 OHhh | R&B OHhh | TR-909 OHhh | TR-909 OHhh | 10 | 10 | 10 |
| 17 | Ah | Mix Snare 1 | Mix Snare 1 | Ah | Ah | Ah | Ah | Ah | 10 | 10 | 10 |
| 18 | Ha | Mix Snare 2 | Mix Snare 2 | Ha | Ha | Ha | Ha | Ha | 10 | 10 | 10 |
| 19 | ShuHa | Mix Snare 3 | Mix Snare 3 | ShuHa | ShuHa | ShuHa | ShuHa | ShuHa | 10 | 10 | 10 |
| 20 | ShuHa | Mix Snare 4 | Mix Snare 4 | ShuHa | ShuHa | ShuHa | ShuHa | ShuHa | 10 | 10 | 10 |
| 21 | One | Mix Kick 2 | Mix Kick 2 | One | One | One | One | One | 10 | 10 | 10 |
| 22 | Two | Mix Kick 3 | Mix Kick 3 | Two | Two | Two | Two | Two | 10 | 10 | 10 |
| 23 | Three | Mix Kick 4 | Mix Kick 4 | Three | Three | Three | Three | Three | 10 | 10 | 10 |
| C1 | Four | Mix Kick 1 | Mix Kick 1 | Four | Four | Four | Four | Four | 10 | 10 | 10 |
| 25 | Snare Roll | Snare Roll | Snare Roll | Snare Roll | Snare Roll | Snare Roll | Snare Roll | Snare Roll | 10 | 10 | 10 |
| 26 | Snap | Finger Snap | Finger Snap | Snap | Snap | Snap | Snap | Snap | 10 | 10 | 10 |
| 27 | High-Q | High-Q | High-Q | High-Q | High-Q | High-Q | High-Q | High-Q | 10 | 10 | 10 |
| 28 | Slap | Slap | Slap | Slap | Slap | Slap | Slap | Slap | 10 | 10 | 10 |
| 29 | Scratch Push2 | ScratchPush2 | ScratchPush2 | Scratch Push2 | Scratch Push2 | Scratch Push2 | Scratch Push2 | Scratch Push2 | 10 | 10 | 10 |
| 30 | Scratch Pull2 | ScratchPull2 | Scratch Pull2 | Scratch Pull2 | Scratch Pull2 | Scratch Pull2 | Scratch Pull2 | Scratch Pull2 | 10 | 10 | 10 |
| 31 | Sticks | Sticks | Sticks | Sticks | Sticks | Sticks | Sticks | Sticks | 10 | 10 | 10 |
| 32 | SquareClick | SquareClick | SquareClick | SquareClick | SquareClick | SquareClick | SquareClick | SquareClick | 10 | 10 | 10 |
| 33 | MimM. Click | MimM. Click | MimM. Click | MimM. Click | MimM. Click | MimM. Click | MimM. Click | MimM. Click | 10 | 10 | 10 |
| 34 | MimM. Click | MimM. Click | MimM. Click | MimM. Click | MimM. Click | MimM. Click | MimM. Click | MimM. Click | 10 | 10 | 10 |
| 35 | MimM. Click | MimM. Click | MimM. Click | MimM. Click | MimM. Click | MimM. Click | MimM. Click | MimM. Click | 10 | 10 | 10 |
| 36 | TR-808 Kick | Kick 1 | Kick 2 | Kick 3 | Kick 4 | Kick 5 | Kick 6 | Kick 7 | 10 | 10 | 10 |
| C2 | Four | Four | Four | Four | Four | Four | Four | Four | 10 | 10 | 10 |
| 25 | Snare Roll | Snare Roll | Snare Roll | Snare Roll | Snare Roll | Snare Roll | Snare Roll | Snare Roll | 10 | 10 | 10 |
| 26 | Snap | Finger Snap | Finger Snap | Snap | Snap | Snap | Snap | Snap | 10 | 10 | 10; |
| 27 | High-Q | High-Q | High-Q | High-Q | High-Q | High-Q | High-Q | High-Q | 10 | 10 | 10 |
| 28 | Slap | Slap | Slap | Slap | Slap | Slap | Slap | Slap | 10 | 10 | 10 |
| 29 | Scratch Push2 | ScratchPush2 | ScratchPush2 | Scratch push2 | Scratch Push2 | Scratch Push2 | Scratch Push2 | Scratch Push2 | 10 | 10 | 10 |
| 30 | Scratch Pull2 | Scratch Pull2 | Scratch Pull2 | Scratch Pull2 | Scratch Pull2 | Scratch Pull2 | Scratch Pull2 | Scratch Pull2 | 10 | 10 | 10 |
| 31 | Sticks | Sticks | Sticks | Sticks | Sticks | Sticks | Sticks | Sticks | 10 | 10 | 10 |
| 32 | SquareClick | SquareClick | SquareClick | SquareClick | SquareClick | SquareClick | SquareClick | SquareClick | 10 | 10 | 10 |
| 33 | MimM. Click | MimM. Click | MimM. Click | MimM. Click | MimM. Click | MimM. Click | MimM. Click | MimM. Click | 10 | 10 | 10 |
| 34 | MimM. Click | MimM. Click | MimM, Bell | MimM. Bell | MimM. Bell | MimM. Bell | MimM. Bell | MimM. Bell | 10 | 10 | 10 |
| 35 | TR-808 Kick | Kick 1 | Kick 2 | Kick 3 | Kick 4 | Kick 5 | Kick 6 | Kick 7 | 10 | 10 | 10 |
| C3 | Four | Four | Four | Four | Four | Four | Four | Four | 10 | 10 | 10 |
| 25 | Snare Roll | Snare Roll | Snare Roll | Snare Roll | Snare Roll | Snare Roll | Snare Roll | Snare Roll | 10 | 10 | 10 |
| 26 | Snap | Finger Snap | Finger Snap | Snap | Snap | Snap | Snap | Snap | 10 | ||
| 27 | High-Q | High-Q | High-Q | High-Q | High-Q | High-Q | High-Q | High-Q | 10 | ||
| 28 | Slap | Slap | Slap | Slap | Slap | Slap | Slap | Slap | 10 | ||
| 29 | Scratch Push2 | ScratchPush2 | ScratchPush2 | Scratch Push2 | Scratch Push2 | Scratch Push2 | Scratch Push2 | Scratch Push2 | 10 | ||
| 30 | Scratch Pull2 | Scratch Pull2 | Scratch Pull2 | Scratch Pull2 | Scratch Pull2 | Scratch Pull2 | Scratch Pull2 | Scratch Pull2 | 10 | ||
| 31 | Sticks | Sticks | Sticks | Sticks | Sticks | Sticks | Sticks | Sticks | 10 | ||
| 32 | SquareClick | SquareClick | SquareClick | SquareClick | SquareClick | SquareClick | SquareClick | SquareClick | 10 | ||
| 33 | MimM. Click | MimM. Click | MimM. Click | MimM. Click | MimM. Click | MimM. Click | MimM. Click | MimM. Click | 10 | ||
| 34 | MimM. Click | MimM. Click | MimM. Click | MimM. Click | MimM. Click | MimM. Click | MimM. Click | MimM. Click | 10 | ||
| 35 | MimM. Click | MimM. Click | MimM. Click | MimM. Click | MimM. Click | MimM. Click | MimM. Click | MimM. Click | 10 | ||
| 36 | TR-808 Kick | Kick 1 | Kick 2 | Kick 3 | Kick 4 | Kick 5 | Kick 6 | Kick 7 | 10 | ||
| C4 | Four | Four | Four | Four | Four | Four | Four | Four | 10 | ||
| 25 | Snare Roll | Snare 1 | Snare 1 | Snare 1 | Snare 1 | Snare 1 | Snare 1 | Snare 1 | 10 | ||
| 26 | Jacking 1 | Jacking 1 | Jacking 1 | Jacking 1 | Jacking 1 | Jacking 1 | Jacking 1 | Jacking 1 | 10 | ||
| 27 | High-Q | High-Q | High-Q | High-Q | High-Q | High-Q | High-Q | High-Q | 10 | ||
| 28 | Slap | Slap | Slap | Slap | Slap | Slap | Slap | Slap | 10 | ||
| 29 | Scratch Push2 | Scratch Push2 | Scratch Push2 | Scratch Push2 | Scratch Push2 | Scratch Push2 | Scratch Push2 | Scratch Push2 | 10 | ||
| 30 | Scratch Pull2 | Scratch Pull2 | Scratch Pull2 | Scratch Pull2 | Scratch Pull2 | Scratch Pull2 | Scratch Pull2 | Scratch Pull2 | 10 | ||
| 31 | Sticks | Sticks | Sticks | Sticks | STick 10 | STick 10 | STick 10 | STick 10 | 10 | ||
| 32 | SquareClick | SquareClick | SquareClick | SquareClick | SquareClick | SquareClick | SquareClick | SquareClick | 10 | ||
| 33 | MimM. Click | MimM. Click | MimM. Click | MimM. Click | MimM. Click | MimM. Click | MimM. Click | MimM. Click | 10 | ||
| PC: 90 [CC32-4] | PC: 103 [CC32-4] | PC: 92 [CC32-4] | PC: 91 [CC32-4] | PC: 2 [CC32-4] | PC: 3 [CC32-4] | PC: 9 [CC32-4] | PC: 17 [CC32-2] | PC: 34 [CC32-2] | PC: 41 [CC32-2] | PC: 49 [CC32-2] | |
| MXK&India | MXK&OR | MXK&OR | MXK&OR | Standard 2 | Room | Room | Power | Jazz KH 2 | Brush KH | Orchestra | |
| 19 | Mix Rev 5 | Mix Rev 5 | Mix Rev 5 | Mix Rev 5 | |||||||
| 20 | Mix Rev 4 | Mix Rev 4 | Mix Rev 4 | Mix Rev 4 | |||||||
| 21 | Mix Rev 3 | Mix Rev 3 | Mix Rev 3 | Mix Rev 3 | |||||||
| 22 | Mix Rev 2 | Mix Rev 2 | Mix Rev 2 | Mix Rev 2 | |||||||
| 23 | Mix Rev 1 | Mix Rev 1 | Mix Rev 1 | Mix Rev 1 | |||||||
| 24 | TR-808 Kick | TR-808 Kick | TR-808 Kick | TR-808 Kick | |||||||
| 25 | Mix Sand 1 | Mix Sand 1 | Mix Sand 1 | Mix Sand 1 | Snare Roll | Snare Roll | Snare Roll | Snare Roll | Snare Roll | Snare Roll | Snare Roll |
| 26 | Mix Sand 2 | Mix Sand 2 | Mix Sand 2 | Mix Sand 2 | High-Q | High-Q | High-Q | High-Q | High-Q | High-Q | High-Q |
| 27 | Mix Sand 3 | Mix Sand 3 | Mix Sand 3 | Mix Sand 3 | Slap | Slap | Slap | Slap | Slap | Slap | Pedal Hike |
| 28 | House Kick | House Kick | House Kick | House Kick | ScratchPush | ScratchPush | ScratchPush | ScratchPush | ScratchPush | ScratchPush | Jazz Open HH |
| 29 | Mix Sand 3 | Mix Sand 3 | Mix Sand 3 | Mix Sand 3 | ScratchPull | ScratchPull | ScratchPull | ScratchPull | ScratchPull | ScratchPull | Ride Cymbal |
| 30 | Mix Sand 4 | Mix Sand 4 | Mix Sand 4 | Mix Sand 4 | SqueezeClick | SqueezeClick | SqueezeClick | SqueezeClick | SqueezeClick | SqueezeClick | SqueezeClick |
| 31 | Mix Sand 4 | Mix Sand 4 | Mix Sand 4 | Mix Sand 4 | MmmClick | MmmClick | MmmClick | MmmClick | MmmClick | MmmClick | SqueezeClick |
| 32 | Mix Sand 2 | Mix Sand 2 | Mix Sand 2 | Mix Sand 2 | MmmBell | MmmBell | MmmBell | MmmBell | MmmBell | MmmBell | MmmBell |
| 33 | Mix Sand 5 | Mix Sand 5 | Mix Sand 5 | Mix Sand 5 | Std. Kick2 | Std. Kick2 | Rook Kick2 | Power Kick2 | Jazz Kick 2 | Jazz Kick 2 | Jazz Kick 1 |
| 34 | Mix Sand 5 | Mix Sand 5 | Mix Sand 5 | Mix Sand 5 | Std. Kick2 | Std. Kick2 | Room Kick2 | Power Kick2 | Jazz Kick 2 | Jazz Kick 2 | Jazz Kick 1 |
| 35 | Mix Sand 5 | Mix Sand 5 | Mix Sand 5 | Mix Sand 5 | Std. Kick2 | Std. Kick2 | Room Kick2 | Power Kick2 | Jazz Open HH | Bride Hike | Bride Hike |
| 36 | Mix Sand 6 | Mix Sand 6 | Mix Sand 6 | Mix Sand 6 | Std. Kick2 | Std. Kick2 | Room Kick2 | Power Kick2 | Jazz Kick 2 | Jazz Kick 2 | Concert CD |
| 37 | TR-707 RIM | TR-707 RIM | TR-707 RIM | TR-707 RIM | Std. Kick2 | Std. Kick2 | Room Rain 2 | Side Stick | Side Stick | Side Stick | Side Stick |
| 38 | Mix Snare 1 | Mix Snare 1 | Mix Snare 1 | Mix Snare 1 | 808lap | 808lap | 808lap | 808lap | 808lap | Hand Clap2 | Bluff Sizzle |
| 39 | Mix Snare 2 | Mix Snare 2 | Mix Snare 2 | Mix Snare 2 | 808lap | 808lap | 808lap | 808lap | 808lap | Hand Clap2 | Bluff Sizzle |
| 40 | Mix Snare 3 | Mix Snare 3 | Mix Snare 3 | Mix Snare 3 | Std. Kick2 | Std. Kick2 | Room Rain 2 | Side Stick | Side Stick | Side Stick | Side Stick |
| 41 | Mix Snare 4 | Mix Snare 4 | Mix Snare 4 | Mix Snare 4 | Std. Kick2 | Std. Kick2 | Room Rain 2 | Side Stick | Side Stick | Side Stick | Side Stick |
| 42 | Norm HCl | Norm HCl | Norm HCl | Norm HCl | Jazz Clst HH | Jazz Clst HH | Jazz Clst HH | Room Chst | Room Chst | Real Tom 6 | Lite Tom 4 |
| 43 | Norm HCl | Norm HCl | Norm HCl | Norm HCl | Real Tom 6 | Real Tom 6 | Real Tom 6 | Room Chst | Room Chst | Real Tom 6 | Lite Tom 4 |
| 44 | Norm HCl Pd | Norm HCl Pd | Norm HCl Pd | Norm HCl Pd | Real Tom 6 | Real Tom 6 | Real Tom 6 | Room Chst | Room Chst | Real Tom 6 | Lite Tom 4 |
| 45 | Norm HCl Np | Norm HCl Np | Norm HCl Np | Norm HCl Np | Real Tom 6 | Real Tom 6 | Real Tom 6 | Room Chst | Room Chst | Real Tom 6 | Lite Tom 4 |
| 46 | Norm HCl Op | Norm HCl Op | Norm HCl Op | Norm HCl Op | Real Tom 6 | Real Tom 6 | Real Tom 6 | Room Chst | Room Chst | Real Tom 6 | Lite Tom 4 |
| 47 | Mix Snare 3 | Mix Snare 3 | Mix Snare 3 | Mix Snare 3 | Real Tom 6 | Real Tom 6 | Real Tom 6 | Room Chst | Room Chst | Real Tom 6 | Lite Tom 4 |
| 48 | Jungle Snare | Jungle Snare | Jungle Snare | Jungle Snare | Real Tom 1 | Real Tom 1 | Real Tom 1 | Real Tom 1 | Real Tom 1 | Real Tom 1 | Trimpian |
| 49 | Jungle Snare | Jungle Snare | Jungle Snare | Jungle Snare | Real Tom 1 | Real Tom 1 | Real Tom 1 | Real Tom 1 | Real Tom 1 | Real Tom 1 | Trimpian |
| 50 | TR-707 SD | TR-707 SD | TR-707 SD | TR-707 SD | Real Tom 1 | Real Tom 1 | Real Tom 1 | Real Tom 1 | Real Tom 1 | Real Tom 1 | Trimpian |
| 51 | Mix Snare 1 | Mix Snare 1 | Mix Snare 1 | Mix Snare 1 | Riding Cym.1 | Riding Cym.1 | Riding Cym.1 | Riding Cym.1 | Riding Cym.1 | Riding Cym.1 | Trimpian |
| 52 | Snare 1 | Snare 1 | Snare 1 | Snare 1 | Riding Cym.1 | Riding Cym.1 | Riding Cym.1 | Riding Cym.1 | Riding Cym.1 | Riding Cym.1 | Trimpian |
| 53 | Snare Roll | Snare Roll | Snare Roll | Snare Roll | Riding Cym.1 | Riding Cym.1 | Riding Cym.1 | Riding Cym.1 | Riding Cym.1 | Riding Cym.1 | Trimpian |
| 54 | Mix HCl 2 | Mix HCl 2 | Mix HCl 2 | Mix HCl 2 | Tambourine | Tambourine | Tambourine | Tambourine | Tambourine | Tambourine | Tambourine |
| 55 | Mix HCl 3 | Mix HCl 3 | Mix HCl 3 | Mix HCl 3 | Sham Gail | Sham Gail | Sham Gail | Sham Gail | Sham Gail | Sham Gail | Tambourine |
| 56 | Mix HCl 4 | Mix HCl 4 | Mix HCl 4 | Mix HCl 4 | Cheett | Cheett | Cheett | Cheett | Cheett | Cheett | Tambourine |
| 57 | Side Stick | Side Stick | Side Stick | Side Stick | Crash Cym.2 | Crash Cym.2 | Crash Cym.2 | Crash Cym.2 | Crash Cym.2 | Crash Cym.2 | Tambourine |
| 58 | Mix HCl Op | Mix HCl Op | Mix HCl Op | Mix HCl Op | Open Hal | Open Hal | Open Hal | Open Hal | Open Hal | Open Hal | Tambourine |
| 59 | Mix HCl Op 2 | Mix HCl Op 2 | Mix HCl Op 2 | Mix HCl Op 2 | Vibrasilap | Vibrasilap | Vibrasilap | Vibrasilap | Vibrasilap | Vibrasilap | Vibrasilap |
| 60 | Table Go | Merjat dom | Duff Dom | Tang Gu Op | Bongo High | Bongo High | Bongo High | Bongo High | Bongo High | Bongo High | Bongo High |
| 61 | Table Go T | Merjat taq | Duff Taq T | Shu Rim | Bongo High | Bongo High | Bongo High | Bongo High | Bongo High | Bongo High | Bongo High |
| 62 | Table Go Hi | Merjat taq | Duff Taq II | Shu Rim | Hua Hong Cym.2 | Hua Hong Cym.2 | Hua Hong Cym.2 | Hua Hong Cym.2 | Hua Hong Cym.2 | Hua Hong Cym.2 | Hua Hong Cym.2 |
| 63 | Table Cap2 | Merjat taq | Duff Taq II | Shu Rim | Hua Hong Cym.2 | Hua Hong Cym.2 | Hua Hong Cym.2 | Hua Hong Cym.2 | Hua Hong Cym.2 | Hua Hong Cym.2 | Hua Hong Cym.2 |
| 64 | Table Na | Merjat taq | Low Bongo | Ban Gu 4 | Conga Lo Op | Conga Lo Op | Conga Lo Op | Conga Lo Op | Conga Lo Op | Conga Lo Op | Conga Lo Op |
| 65 | Table Taq 1 | Merjat taq | Duff Taq 1 | Nao Chi 2 | Nao Chi 2 | Low Bristle | Low Bristle | Low Bristle | Low Bristle | Low Bristle | Low Bristle |
| 66 | Tablecap 1 | Merjat taq | Duff Taq 1 | Nao Chi 2 | Nao Chi 2 | Low Bristle | Low Bristle | Low Bristle | Low Bristle | Low Bristle | Low Bristle |
| 67 | Cragg Slap | Snare Roll | Duff Slap | Snare Roll | Agogo | Agogo | Agogo | Agogo | Agogo | Agogo | Agogo |
| 68 | Cragg Slap | Snare Roll | Duff Slap | Snare Roll | Agogo | Agogo | Agogo | Agogo | Agogo | Agogo | Agogo |
| 69 | Cragg Slap | Snare Roll | Duff Slap | Snare Roll | Agogo | Agogo | Agogo | Agogo | Agogo | Agogo | Agogo |
| 70 | Cragg Slap | Snare Roll | Duff Slap | Snare Roll | Agogo | Agogo | Agogo | Agogo | Agogo | Agogo | Agogo |
| 71 | Cragg Slap | Snare Roll | Duff Slap | Snare Roll | Agogo | Agogo | Agogo | Agogo | Agogo | Agogo | Agogo |
| 72 | Cragg Slap | Snare Roll | Duff Slap | Snare Roll | Agogo | Agogo | Agogo | Agogo | Agogo | Agogo | Agogo |
| 73 | Cragg Slap | Snare Roll | Duff Slap | Snare Roll | Agogo | Agogo | Agogo | Agogo | Agogo | Agogo | Agogo |
| 74 | Cragg Slap | Snare Roll | Duff Slap | Snare Roll | Agogo | Agogo | Agogo | Agogo | Agogo | Agogo | Agogo |
| 75 | Cragg Slap | Snare Roll | Duff Slap | Snare Roll | Agogo | Agogo | Agogo | Agogo | Agogo | Agogo | Agogo |
| 76 | Cragg Slap | Snare Roll | Duff Slap | Snare Roll | Agogo | Agogo | Agogo | Agogo | Agogo | Agogo | Agogo |
| 77 | Cragg Slap | Snare Roll | Duff Slap | Snare Roll | Agogo | Agogo | Agogo | Agogo | Agogo | Agogo | Agogo |
| 78 | Cragg Slap | Snare Roll | Duff Slap | Snare Roll | Agogo | Agogo | Agogo | Agogo | Agogo | Agogo | Agogo |
| 79 | Cragg Slap | Snare Roll | Duff Slap | Snare Roll | Agogo | Agogo | Agogo | Agogo | Agogo | Agogo | Agogo |
| 80 | Cragg Slap | Snare Roll | Duff Slap | Snare Roll | Agogo | Agogo | Agogo | Agogo | Agogo | Agogo | Agogo |
| 81 | Cragg Slap | Snare Roll | Duff Slap | Snare Roll | Agogo | Agogo | Agogo | Agogo | Agogo | Agogo | Agogo |
| 82 | Cragg Slap | Snare Roll | Duff Slap | Snare Roll | Agogo | Agogo | Agogo | Agogo | Agogo | Agogo | Agogo |
| 83 | Cragg Slap | Snare Roll | Duff Slap | Snare Roll | Agogo | Agogo | Agogo | Agogo | Agogo | Agogo | Agogo |
| 84 | Cragg Slap | Snare Roll | Duff Slap | Snare Roll | Agogo | Agogo | Agogo | Agogo | Agogo | Agogo | Agogo |
| 85 | Cragg Slap | Snare Roll | Duff Slap | Snare Roll | Agogo | Agogo | Agogo | Agogo | Agogo | Agogo | Agogo |
| 86 | Cragg Slap | Snare Roll | Duff Slap | Snare Roll | Agogo | Agogo | Agogo | Agogo | Agogo | Agogo | Agogo |
| 87 | Cragg Slap | Snare Roll | Duff Slap | Snare Roll | Agogo | Agogo | Agogo | Agogo | Agogo | Agogo | Agogo |
| 88 | Cragg Slap | Snare Roll | Duff Slap | Snare Roll | Agogo | Agogo | Agogo | Agogo | Agogo | Agogo | Agogo |
| 89 | Cragg Slap | Snare Roll | Duff Slap | Snare Roll | Agogo | Agogo | Agogo | Agogo | Agogo | Agogo | Agogo |
| 90 | Cragg Slap | Snare Roll | Duff Slap | Snare Roll | Agogo | Agogo | Agogo | Agogo | Agogo | Agogo | Agogo |
| 91 | Cragg Slap | Snare Roll | Duff Slap | Snare Roll | Agogo | Agogo | Agogo | Agogo | Agogo | Agogo | Agogo |
| 92 | Cragg Slap | Snare Roll | Duff Slap | Snare Roll | Agogo | Agogo | Agogo | Agogo | Agogo | Agogo | Agogo |
| 93 | Cragg Slap | Snare Roll | Duff Slap | Snare Roll | Agogo | Agogo | Agogo | Agogo | Agogo | Agogo | Agogo |
| 94 | Cragg Slap | Snare Roll | Duff Slap | Snare Roll | Agogo | Agogo | Agogo | Agogo | Agogo | Agogo | Agogo |
| 95 | Cragg Slap | Snare Roll | Duff Slap | Snare Roll | Agogo | Agogo | Agogo | Agogo | Agogo | Agogo | Agogo |
| 96 | Cragg Slap | Snare Roll | Duff Slap | Snare Roll | Agogo | Agogo | Agogo | Agogo | Agogo | Agogo | Agogo |
| PC: 50 [CC32: 2]Ethnic | PC: 25 [CC32: 2]Electronic | PC: 26 [CC32: 2]TR-808&909 | PC: 27 [CC32: 2]Dance | PC: 51 [CC32: 2]Kick&Snare | PC: 57 [CC32: 2]SFX | |
| C1 | 24 | Finger Snap | Snare Roll | Snare Roll | Snare Roll | Dist.CutNoiz |
| 25 | Tambourine | Finger Snap | Finger Snap | Finger Snap | Bass Slide | |
| 26 | Castanets | High-Q | High-Q | High-Q | Scratch Pull2 | |
| 27 | Crash Cym.1 | Slap | Slap | Scratch Pull2 | Gt.CutNoise2 | |
| 29 | Snare Roll | Scratch Push2 | Scratch Push2 | Scratch Push2 | Gt.CutNoise2 | |
| 30 | Concert Snr | Scratch Pull2 | Scratch Pull2 | Scratch Pull2 | Dist.CutNoiz | |
| 31 | Concert Cym. | Sticks | Sticks | Scratch Pull2 | High-Q | |
| 32 | Concert BD | SquareClick | SquareClick | SquareClick | Scratch Pull2 | |
| 33 | Jingle Bell | Mtrmm. Click | Mtrmm. Click | Mtrmm. Click | Gt.CutNoise2 | |
| 34 | Bell Tree | Mtrmm. Bell | Mtrmm. Bell | Mtrmm. Bell | Gt.CutNoise2 | |
| 35 | Bar Chimes | Elec Kick 2 | TR-909 Kick | Dance Kick 2 | Dist.CutNoiz | |
| C2 | 36 | Wadaiko | Elec Kick 1 | TR-808 Kick | Elec Kick 2 | Dist.CutNoiz |
| 37 | Wadaiko Rim | Side Stick | 808 Rimshot | Side Stick | Bass Slide | |
| 38 | Shimedaiko | Elec. Snare | 808 Snare 1 | Power Snare2 | Pick Scrap | |
| 39 | Atarigane | 808clap | 808clap | 808clap | High-Q | |
| 40 | Hyoushigi | Elec Snare 2 | 909 Snare 1 | Elec Snare 1 | Std.1 Kick1 | |
| 41 | Ohkawa | Synth Drum 2 | 808 Tom 2 | Synth Drum 2 | Std.1 Kick2 | |
| 42 | H kotsuzumi | Jazz Clsd.HH | 808 chh | CR-78 chh | Std.2 Kick1 | |
| 43 | L Kotsuzumi | Synth Drum 2 | 808 Tom 2 | Synth Drum 2 | Std2 Kick2 | |
| 44 | Ban Gu | Pedal HiHat | 808 chh | 808 chh | Kick 1 | |
| 45 | Big Gong | Synth Drum 2 | 808 Tom 2 | Synth Drum 2 | Kick 2 | |
| 46 | Small Gong | Jazz Open HH | 808 ohh | CR-78 ohh | Soft Kick | |
| 47 | Bend Gong | Synth Drum 2 | 808 Tom 2 | Synth Drum 2 | Jazz Kick 1 | |
| C3 | 48 | Rama Cymbal | Synth Drum 2 | 808 Tom 2 | Synth Drum 2 | Jazz Kick 2 |
| 49 | Rama Cymbal | Crash Cym.1 | 808 Crash | Crash Cym.1 | Gt.Cut Noise | |
| 50 | Gamelan Gong | Synth Drum 2 | 808 Tom 2 | Synth Drum 2 | String Slap | |
| 51 | Udo Short | Ride Cymbal | Ride Cymbal | Ride Cymbal | Room Kick 2 | |
| 52 | Udo Long | ReverseCymbal | China Cymbal | ReverseCymbal | Power Kick1 | |
| 53 | Udo Slap | Ride Bell | Ride Bell | Ride Bell | Power Kick2 | |
| 54 | Bendir | Tambourine | Tambourine | Tambourine | Elec Kick 2 | |
| 55 | Req Dum | Splash Cym. | Splash Cym. | Splash Cym. | Elec Kick 1 | |
| 56 | Req Tik | Cowbell | 808cowbe | Cowbell | Elec Kick | |
| 57 | Tabla Te | Crash Cym.2 | Crash Cym.2 | Crash Cym.2 | TR-808 Kick | |
| 58 | Tabla Na | Vibraslap | Vibraslap | Vibraslap | TR-909 Kick | |
| 59 | Tabla Tun | Ride Cymbal | Ride Cymbal | Ride Cymbal | Door Creaking | |
| C4 | 60 | Tabla Ge | Bongo High | Bongo High | Bongo High | Door |
| 61 | Tabla Ge Hi | Bongo Lo | Bongo Lo | Bongo Lo | Scratch | |
| 62 | Talking Drum | Mute H.Conga | 808 Conga | Mute H.Conga | Wind Chimes | |
| 63 | Bend Tikh Drm | Conga Hi Opn | 808 Conga | Conga Hi Opn | Car-Engine | |
| 64 | Caxixi | Conga Lo Opn | 808 Conga | Conga Lo Opn | Car-Stop | |
| 65 | Djembe | High Timbale | High Timbale | High Timbale | Concert Snr | |
| 66 | Djembe rim | Low Timbale | Low Timbale | Low Timbale | Jazz Snare 1 | |
| 67 | Low Timbale | Agogo | Agogo | Agogo | Jazz Snare 2 | |
| 68 | Timbl Paila | Agogo | Agogo | Agogo | Room Snare 1 | |
| 69 | High Timbale | Cabasa | Cabasa | Cabasa | Room Snare 2 | |
| 70 | Cowbell | Maracas | 808marac | Maracas | Dance Snare1 | |
| 71 | Bongo High | ShrlWhistle | ShrlWhistle | ShrlWhistle | Starship | |
| C5 | 72 | Bongo Lo | LongWhistle | LongWhistle | LongWhistle | Rev.Snare |
| 73 | Mute H.Conga | Short Guiro | Short Guiro | Short Guiro | Power Snare2 | |
| 74 | Conga Hi Opn | Long Guiro | Long Guiro | Long Guiro | Elec Snare 1 | |
| 75 | Conga MtLow | Claves | 808clave | Claves | Dance Snare2 | |
| 76 | Conga Slap | Woodblock | Woodblock | Woodblock | Elec Snare 2 | |
| 77 | Conga Lo Opn | Woodblock | Woodblock | Woodblock | House Snare | |
| 78 | Conga Slide | Mute Cuica | Mute Cuica | Hoo | Elec Snare | |
| 79 | Mut Pandiero | Open Cuica | Open Cuica | Hoo | Elec Snare 3 | |
| 80 | Opn Pandiero | Mute Triangl | Mute Triangl | Mute Triangl | Thunder | |
| 81 | Open Surdo | Open Triangl | Open Triangl | Open Triangl | Wind | |
| 82 | Mute Surdo | Shaker | Shaker | Shaker | Seashore | |
| 83 | Tamborim | Jingle Bell | Jingle Bell | Jingle Bell | Stream | |
| C6 | 84 | Agogo | Bell Tree | Bell Tree | Bell Tree | Bubble |
| 85 | Agogo | Castanets | Castanets | Castanets | Kitty | |
| 86 | Shaker | Mute Surdo | Mute Surdo | Mute Surdo | Bird 2 | |
| 87 | Low Whistle | Open Surdo | Open Surdo | Open Surdo | Growl | |
| 88 | Low Whistle | ----- | ----- | ----- | Applause 2 | |
| 89 | Mute Cuica | ----- | ----- | ----- | Telephone 1 | |
| 90 | Open Cuica | ----- | ----- | ----- | Telephone 2 | |
| 91 | Mute Triangle | ----- | ----- | ----- | ||
| 92 | Open Triangle | ----- | ----- | ----- | ||
| 93 | Short Guiro | ----- | ----- | ----- | ||
| 94 | Long Guiro | ----- | ----- | ----- | ||
| 95 | Cabasa Up | ----- | ----- | ----- | ||
| C7 | 96 | Cabasa Down | ----- | ----- | ----- | |
| 97 | Claves | ----- | ----- | ----- | ||
| 98 | Woodblock | ----- | ----- | ----- | ||
| 99 | Woodblock | ----- | ----- | ----- | ||
| 100 | ----- | ----- | ----- | ----- |
Music Style List
| Category | No. | Name | Tempo | Time Sign. |
| ROCK | 1 | SteadyRk | 73 | 4/4 |
| 2 | PowerRck | 132 | 4/4 | |
| 3 | ElecRock | 124 | 4/4 | |
| 4 | DynoRock | 76 | 4/4 | |
| 5 | ThumpRck | 104 | 4/4 | |
| 6 | USBallad | 88 | 4/4 | |
| DANCE | 7 | DJ_Grove | 105 | 4/4 |
| 8 | SmothDnc | 121 | 4/4 | |
| 9 | FeverDnc | 113 | 4/4 | |
| 10 | 80sTekno | 134 | 4/4 | |
| 11 | EuroDnce | 138 | 4/4 | |
| 12 | IbizaDnc | 138 | 4/4 | |
| 13 | KeepOnDc | 140 | 4/4 | |
| 14 | 90sTekno | 140 | 4/4 | |
| 15 | HrdTekno | 140 | 4/4 | |
| 16 | 90sHouse | 132 | 4/4 | |
| 17 | ClubHous | 130 | 4/4 | |
| 18 | Hip'nHop | 102 | 4/4 | |
| 19 | NowHipHp | 87 | 4/4 | |
| 20 | Cool Rap | 94 | 4/4 | |
| 21 | PianoRap | 94 | 4/4 | |
| 22 | 70sDance | 108 | 4/4 | |
| 23 | EasyHop | 88 | 4/4 | |
| 8BEAT | 24 | Time_Pop | 130 | 4/4 |
| 25 | FriendBt | 60 | 4/4 | |
| 26 | PianoBal | 56 | 4/4 | |
| 27 | Soul Bal | 58 | 4/4 | |
| 28 | ClassBal | 62 | 4/4 | |
| 29 | SimpleBl | 80 | 4/4 | |
| 30 | AlClapBl | 80 | 4/4 | |
| 31 | LayBakBl | 83 | 4/4 | |
| 32 | PoppinBl | 92 | 4/4 | |
| 33 | UKLiteBl | 104 | 4/4 | |
| 34 | UpTempBl | 110 | 4/4 | |
| 35 | SmilePop | 118 | 4/4 | |
| 36 | German P | 120 | 4/4 | |
| 16BEAT | 37 | Groovin' | 116 | 4/4 |
| 38 | FateBeat | 78 | 4/4 | |
| 39 | Easy Pop | 64 | 4/4 | |
| 40 | Soul Pop | 75 | 4/4 | |
| 41 | NightPop | 78 | 4/4 | |
| 42 | Guitar P | 86 | 4/4 | |
| 43 | LatinPop | 92 | 4/4 | |
| 44 | LightPop | 94 | 4/4 | |
| 45 | FeelGood | 98 | 4/4 | |
| 46 | Groovy P | 100 | 4/4 | |
| 47 | SunnyPop | 104 | 4/4 | |
| JAZZ | 48 | SwingPop | 128 | 4/4 |
| 49 | JzBallad | 70 | 4/4 | |
| 50 | BigBand | 144 | 4/4 | |
| 51 | JazzClub | 150 | 4/4 | |
| 52 | BgBndBld | 82 | 4/4 | |
| 53 | JazzWltz | 100 | 3/4 | |
| LATIN | 54 | LuvBossa | 136 | 4/4 |
| 55 | MidBossa | 150 | 4/4 | |
| 56 | UpBossa | 168 | 4/4 | |
| 57 | UpSamba | 103 | 4/4 | |
| 58 | Discsamb | 117 | 4/4 | |
| 59 | Salsa | 100 | 4/4 | |
| 60 | Merengue | 124 | 4/4 | |
| 61 | Bachata | 128 | 2/4 | |
| 62 | Jogetmly | 114 | 4/4 | |
| 63 | Guarach | 181 | 4/4 |
| Category | No. | Name | Tempo | Time Sign. |
| TRADITIONAL | 64 | SlyBlues | 116 | 4/4 |
| 65 | CntryKng | 120 | 4/4 | |
| 66 | Ska | 125 | 4/4 | |
| 67 | Blues | 61 | 4/4 | |
| 68 | 70s R&B | 117 | 4/4 | |
| 69 | FunkSoul | 105 | 4/4 | |
| 70 | Reggae | 140 | 4/4 | |
| 71 | Country | 130 | 4/4 | |
| 72 | CntryPop | 105 | 4/4 | |
| 73 | Cajun | 114 | 4/4 | |
| 74 | Cool6_8 | 64 | 6/8 | |
| 75 | Oldie6_8 | 92 | 6/8 | |
| 76 | Schlager | 127 | 4/4 | |
| 77 | March4_4 | 125 | 4/4 | |
| 78 | Polka | 130 | 4/4 | |
| 79 | PolkaPop | 127 | 4/4 | |
| BALLROOM | 80 | 70sDisco | 126 | 4/4 |
| 81 | BigSamba | 116 | 4/4 | |
| 82 | Rockin' | 185 | 4/4 | |
| 83 | Boogie | 150 | 4/4 | |
| 84 | Twist | 162 | 4/4 | |
| 85 | EngWltz | 91 | 3/4 | |
| 86 | W'Waltz | 180 | 3/4 | |
| 87 | SIWaltz | 90 | 3/4 | |
| 88 | Tango | 120 | 4/4 | |
| 89 | Musette | 175 | 3/4 | |
| 90 | Cha-Cha | 130 | 4/4 | |
| 91 | Mambo | 102 | 4/4 | |
| 92 | Beguine | 110 | 4/4 | |
| 93 | Rhumba | 100 | 4/4 | |
| 94 | Shuffle | 145 | 4/4 | |
| 95 | Foxtrot | 185 | 4/4 | |
| 96 | Charlest | 205 | 4/4 | |
| 97 | PasDoble | 122 | 4/4 | |
| WORLD | 98 | Vahde | 80 | 4/4 |
| 99 | Bayon | 100 | 4/4 | |
| 100 | Roman_98 | 130 | 9/8 | |
| 101 | Funk-OR | 100 | 4/4 | |
| 102 | Wehda-Kb | 120 | 4/4 | |
| 103 | WehdaKb2 | 135 | 4/4 | |
| 104 | Masmoudi | 120 | 8/4 | |
| 105 | Dabkah-T | 113 | 6/4 | |
| 106 | Saidi | 110 | 4/4 | |
| 107 | Saidi-EG | 95 | 4/4 | |
| 108 | Progmks | 119 | 4/4 | |
| 109 | Disco-OR | 102 | 4/4 | |
| 110 | Cmprsari | 132 | 4/4 | |
| 111 | Minang | 82 | 4/4 | |
| 112 | Popsunda | 98 | 4/4 | |
| 113 | Kromong | 128 | 4/4 | |
| 114 | Raja Bha | 89 | 4/4 | |
| 115 | Dadra | 70 | 6/8 | |
| 116 | Kehrva A | 110 | 4/4 | |
| 117 | Bhangra | 109 | 4/4 | |
| 118 | Bangla | 110 | 4/4 | |
| 119 | LookTung | 68 | 4/4 | |
| 120 | RumWong | 88 | 4/4 | |
| 121 | Sam-Cha | 130 | 4/4 | |
| 122 | Armenian | 101 | 3/4 | |
| 123 | Povorot | 128 | 4/4 | |
| 124 | Kazak | 69 | 3/4 | |
| 125 | ChinaPop | 89 | 4/4 | |
| 126 | JiangNan | 72 | 4/4 | |
| 127 | ChnOpera | 120 | 4/4 | |
| 128 | JingJu | 136 | 4/4 | |
| 129 | Korean | 100 | 4/4 | |
| 130 | K_latin | 134 | 4/4 |
Specifying Chords
= Constituent notes of this chord.
= Keys you need to press to hear this chord.
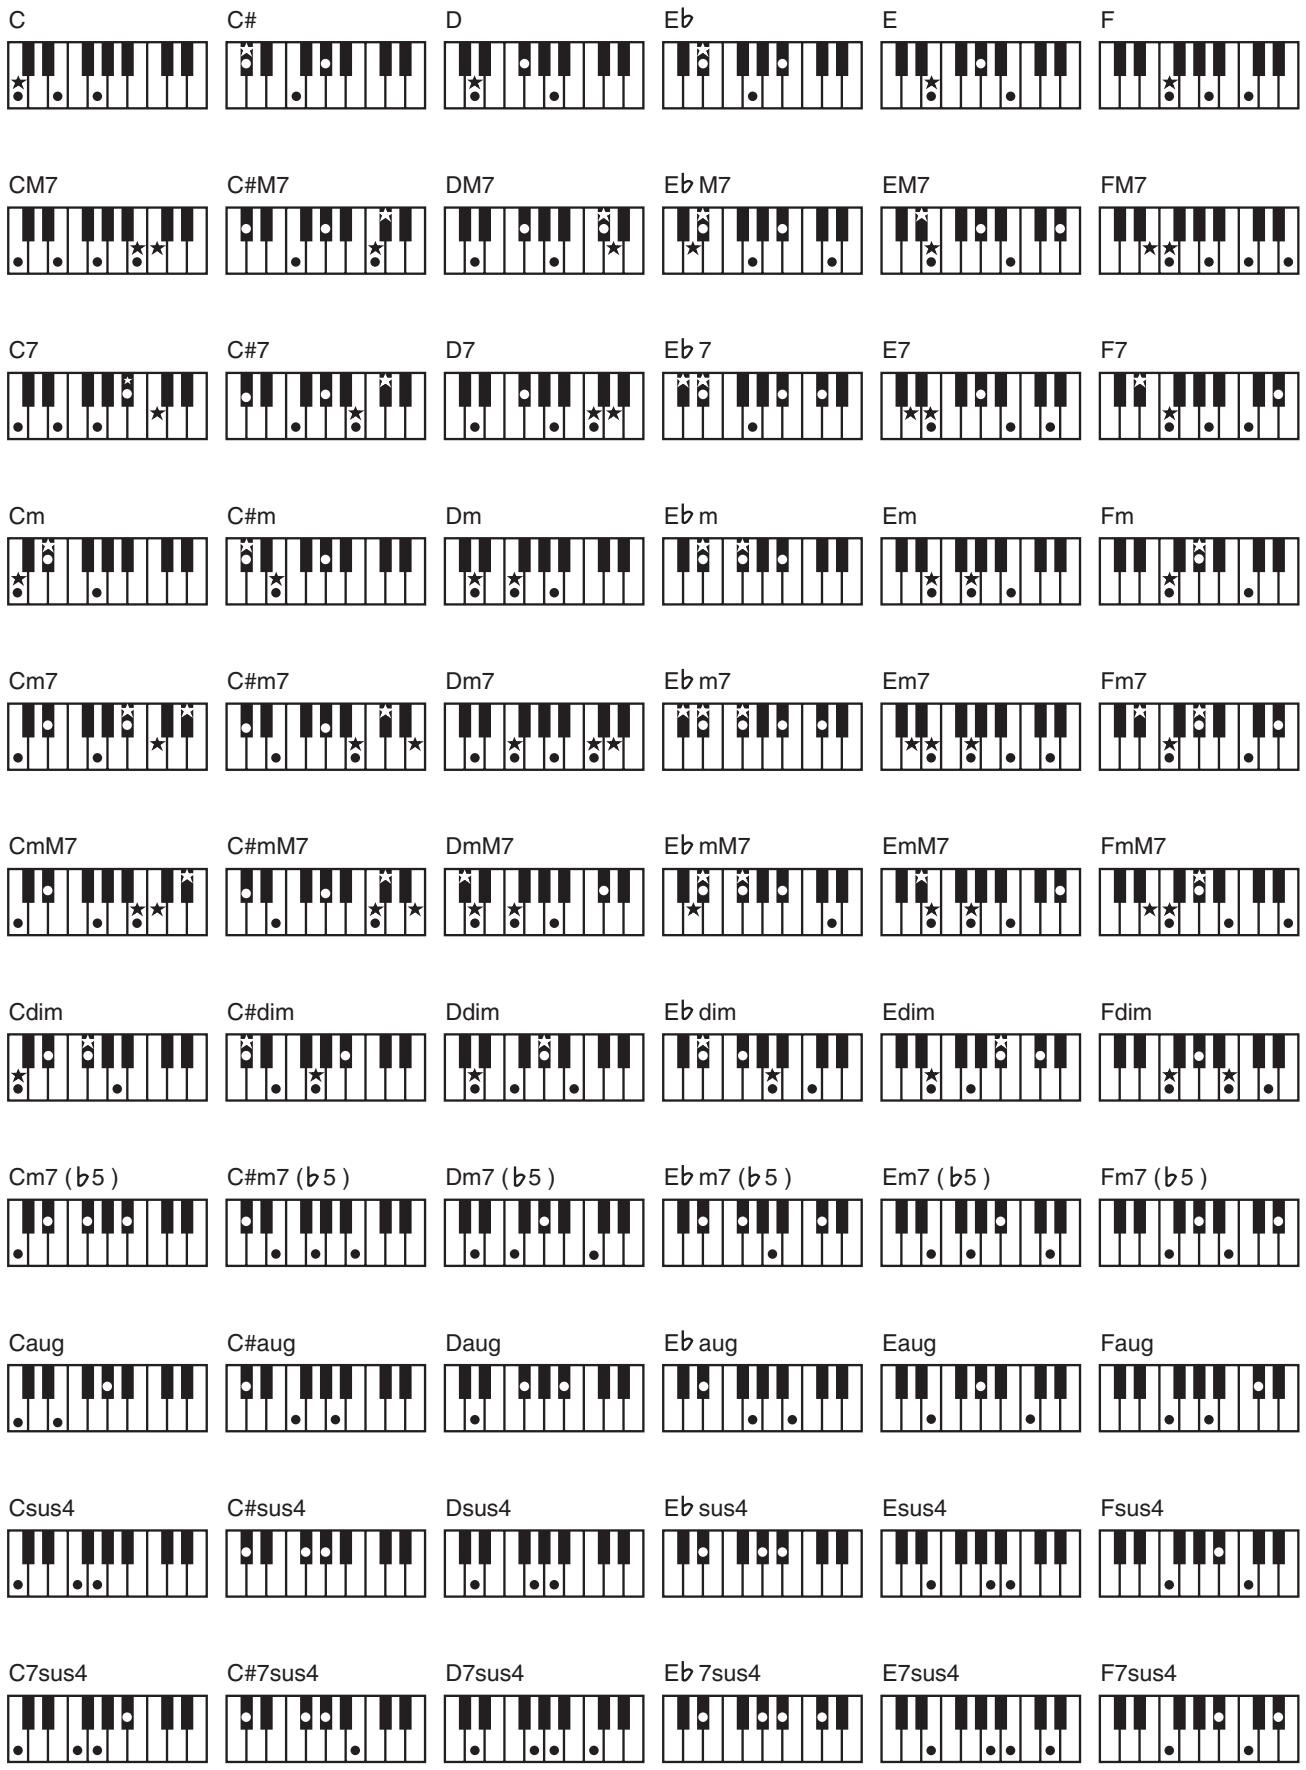
= Constituent notes of this chord.
= Keys you need to press to hear this chord.
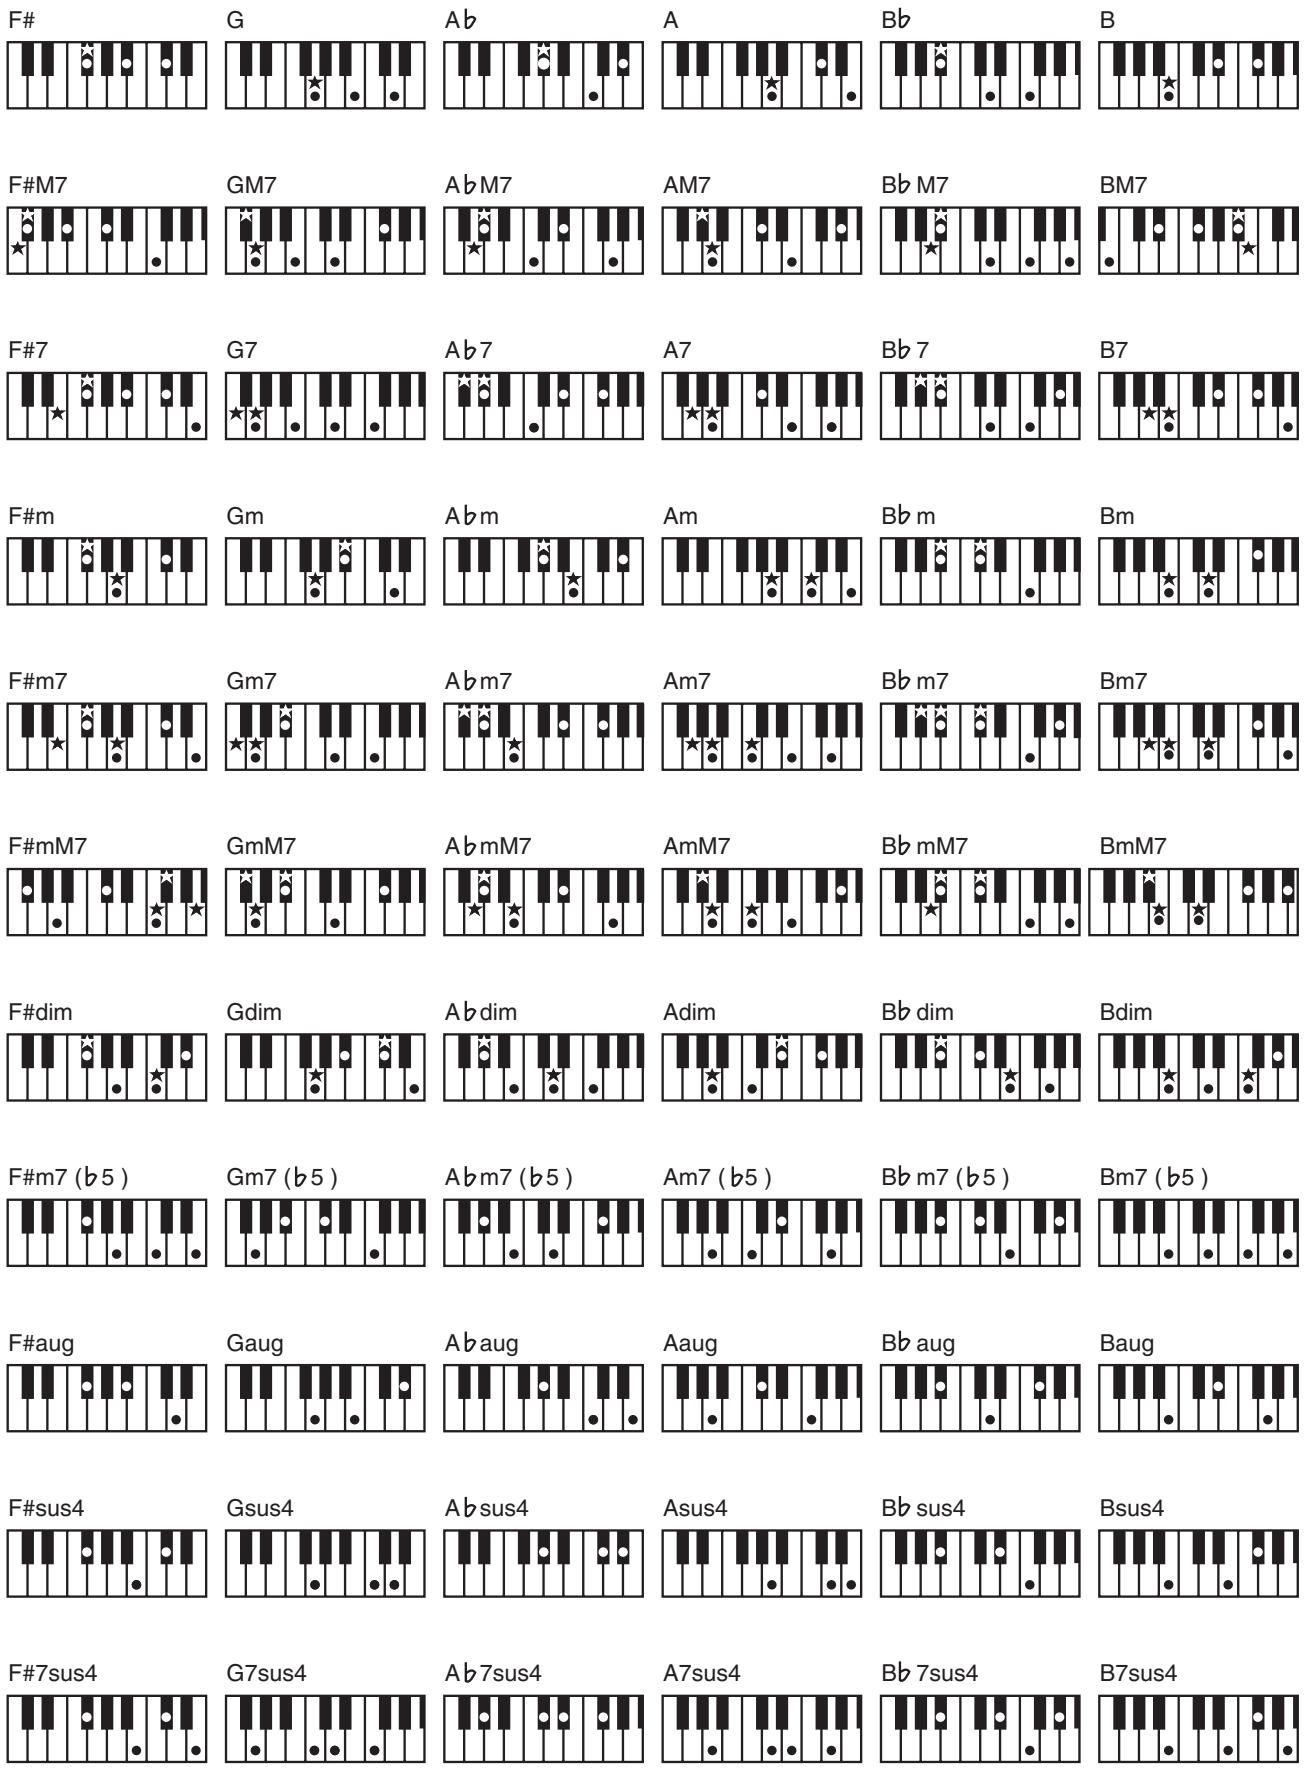
Interactive Arranger
Model E-09
Date: Sep. 30, 2005
Version : 1.00
MIDI Implementation Chart
Mode 1: OMNI ON, POLY
Mode 2: OMNI ON, MONO
Mode 3:OMNI OFF,POLY
Mode 4: OMNI OFF, MONO
O:Yes
X:No
Specifications
E-09: Interactive Arranger
Keyboard
61 keys (with velocity)
[Sound Generator]
Maximum Polyphony
64 voices
Parts
16 parts + Keyboard part
Wave Memory
32 M bytes (16-bit linear equivalent)
Tones
Tones: 614 + 256 (GM2)
Drum Sets: 61 + 9 (GM2)
Effects
MFX: 47 types
Reverb: 8 types
Chorus: 8 types
Transpose
-12 to +12 (in semitones)
[Arranger]
Tempo
20 to 250
Styles
130 styles
Band Orchestrator
3 types: Drum & Bass, Combo, Full Band
User Program
100 programs
One Touch Setting
2 settings/styles
Control
start/stop, sync start, intro original, fill in, variation, ending, tap tempo,
Melody Intelligence
18 types
Music Assistant
130 types
[Metronome]
Signature
1/4,2/4,3/4,4/4,5/4,6/4,6/8,9/8
[Song Controls]
Tracks
16
16-track Recorder Mode
4 easy modes (ALL, Keyboard, Single, Punch In/Out)
Control
start/stop, recording, reset, rewind, forward, marker A-B, repeat A-B
[Others]
Rated Power Output
7.5W + 7.5W
Speakers
10cm× 2
Controller
Pitch Bend/Modulation Lever
Display
Large backlit custom LCD
Connectors
Output Jacks (L/MONO, R)
Headphones Jack 1/2
MIDI Connectors (IN, OUT)
Foot Switch Jack
Power Supply
DC 9 V (AC Adaptor)
Current Draw
2,000 mA
Dimensions
7.3kg / 16 lbs 2 oz (excluding AC adaptor)
Accessories
Music rest
Owner's Manual
AC Adaptor (PSB-1U)
Options
Keyboard Stand: KS-12
Pedal Switch: DP series
Foot Switch: BOSS FS-5U
- In the interest of product improvement, the specifications and/or appearance of this unit are subject to change without prior notice.
Numerics
2PitchShift 18
3Tap Delay 18
4Tap Delay 18
A
AC Adaptor 8
Acc Bass 23
Acc Drum 23
Accomp 20, 23, 26
All 19
Arr Hold 24
ARR SET 24
ARRANGER 13
Arranger bass 20, 26
Arrangerdrums 20,26
Auto Bass 20, 23, 26
AutoWah 18
B
BAND ORCHESTRATOR 13
Bass Inv 24
BulkDump? 28
Bulk Load 28
C
Cho/Delay 18
Cho/Flanger 18
Cho>Delay 18
Cho>Flanger 18
ChordInt 24
CHORUS 17,24
ChrDUAL 17,24
Chr MAIN 17,24
Chr SPLIT 17,25
Clock Tx 27
COMBO 13,21
Compressor 18
Contrast 9
Cord Hook 8
D
DCIN 8
Delay 16
Demo 9
Display 9
Distortion 18
Drum Sets 11
DRUMS & BASS 13, 21
DS>Chorus 18
DS>Delay 18
DS>Flanger 18
Dual 20, 26
Dual Oct 23
Dual Part 10
Dual Vol 23
E
Educational 24
EFFECTS 16-17,24
EH>Chorus 18
EH>Delay 18
EH>Flanger 18
ENDING 13, 19
Enhancer 17
Ensemble 13
F
Factory Reset 9
FB Chorus 17
FbPitchShift 18
FILL 13
FL/Delay 18
FL>Delay 18
Flanger 17
FOOT SWITCH 8,15,21
FSW 21, 23
FULL 13,21
FUNCTION 9,15-17,21-22,27-28
G
GateRevNr 18
GateRevRv 18
GateRevS1 18
GateRevS2 18
H
Hall 16
Harmony 14
HexaChorus 18
1
INTRO 13, 19
K
KBD SET 21-22
KBD Touch 15, 22
Keyboard 10, 19
Keyboard Scale 12
Keyboard Touch 15
L
LCD Contrast 9
Limiter 18
Local 27
M
Main 20, 26
Main Oct 23
Main Part 10
Main Vol 23
MARKER A-B 21
MasterTune 22
Melody Intell. 20, 26
Melody Intelligence 14
Metro TS 11, 23
Metro Vol 11,23
Metronome 11, 23
MFX 17,24
MI 24
MIDI 26-27
MIDI cable 28
MIDI channel 26
MIDI TxRx 27
Minus-One 21
Mod Delay 18
Modulation 15, 27
Multi-Effects 17
Music Assistant 15
Music Rest 7
Music Style 14
Muted Track 21
N
NTARx14 27
Numeric 11
0
Octave 12, 23
OD>Chorus 18
OD>Delay 18
OD>Flanger 18
One-Touch 14
ORIGINAL 13, 19
OT1 14
OT2 14
OUTPUT 8
Overdrive 17
P
PanDUAL 25
Pan MAIN 24
Pan SPLIT 25
PanDelay 16
Part 20, 26
PB Range 22
Performance 15
Phaser 18
PHONES 8
PIANO 10
Pitch Bend 15, 27
Plate 16
Power 8
Prog Change 27
PunchI/O 21
Punch-In/Out 20-21
R
REC 19-20
Rec All 19
Rec Keyboard 19
REC MODE 19-20
Rec PunchI/O 20
Rec Single 20
REC TRACK 20
Recording 19
REPEAT A-B 21
RepeatPlayback 21
RevDUAL 17,24
Rev MAIN 17,24
RevSPLIT 17,25
REVERB 16, 18, 24
Room 16
Rotary 18
s
Scale C-B 25
Scale Mode 25
S-Delay 17
S-DelayFb 17
SFX 11
SONG 19-21
Sound Effects 11
Space-D 18
Split 20, 26
Split Hold 22
Split Int 22
Split Oct 23
Split Part 10
Split Point 22
Split Vol 23
Start Stop 27
START/STOP 13, 19
StChorus 18
StDelay 18
StepFlanger 18
StFlanger 18
STYLE 14
Style Lock 29
Style PC 27
Sync Rx 27
Sync Start 13, 19
T
TAP TEMPO 13
Tempo 13, 19
Tempo Lock 29
TmCtrDelay 18
TONE 10-11
TONE Category 11
Tone Lock 29
Tone MFX 24
Track 20
Trans Mode 22
Transpose 12, 22
Transpose Lock 29
TremChorus 18
U
User Program 16
UTILITY 9,28
V
VARIATION 13, 19
Velo Rx 27
Volume 10,23
Volume Balance 13

This symbol indicates that in EU countries, this product must be collected separately from household waste, as defined in each region. Products bearing this symbol must not be discarded together with household waste.
DE Dieses Symbol beweutet, dass ces Product in EU-Landern getrennt vom Hausmull gesammelt werden muss gemaB den regionalen Bestimmungen. Mit thisem Symbol gekennzeichnete Produkte durren nicht zusammen mit den Hausmull entsorgt werden.
Ce symbole indique que dans les pays de l'Union europeenne, ce produit doit etre collecte séparation des ordures menagères selon les directives en vigueur dans chacun de ces pays. Les produits portant ce symbole ne doivent pas etre mis au rebut avec les ordures menagères.
Qesto symbolo indica che nei paesi della Comunita europea losto prodotto deve essere smaltito separamente dai normali rifiuti domestici, secondo la legislazione in vigore in ciascun paese. I prodotti che riportano losto symbolo non devono essere smaltiti insieme ai rifiuti domestici.
This equipment has been tested and found to comply with the limits for a Class B digital device, pursuant to Part 15 of the FCC Rules. These limits are designed to provide reasonable protection against harmful interference in a residential installation. This equipment generates, uses, and can radiate radio frequency energy and, if not installed and used in accordance with the instructions, may cause harmful interference to radio communications. However, there is no guarantee that interference will not occur in a particular installation. If this equipment does cause harmful interference to radio or television reception, which can be determined by turning the equipment off and on, the user is encouraged to try to correct the interference by one or more of the following measures:
- Reorient or relocate the receiving antenna.
- Increase the separation between the equipment and receiver.
- Connect the equipment into an outlet on a circuit different from that to which the receiver is connected.
- Consult the dealer or an experienced radio/TV technician for help.
This device complies with Part 15 of the FCC Rules. Operation is subject to the following two conditions:
(1) This device may not cause harmful interference, and
(2) This device must accept any interference received, including interference that may cause undesired operation.
Unauthorized changes or modification to this system can void the users authority to operate this equipment. This equipment requires shielded interface cables in order to meet FCC class B Limit.
For Canada
NOTICE
This Class B digital apparatus meets all requirements of the Canadian Interference-Caising Equipment Regulations.
AVIS
Royal Cape Park, Unit 24
Londonderry Road, Ottery 7800
Cape Town, SOUTH AFRICA
TEL: (021) 7994900
ASIA
CHINA
Roland Shanghai Electronics
Co., Ltd.
5F.No.1500 Pingliang Road
Shanghai 200090, CHINA
TEL: (021) 5580-0800
Roland Shanghai Electronics
Co., Ltd.
(BEIJING OFFICE)
10E No 18 3 Section Anhuaxili
Chaoyang District Beijing
100011 CHINA
TEL: (010) 6426-5050
HONG KONG
Tom Lee Music Co., Ltd.
Service Division
22-32 Pun Shan Street, Tsuen
Wan, New Territories,
HONG KONG
TEL: 2415 0911
Parsons Music Ltd.
8th Floor, Railway Plaza, 39
Chatham Road South, T.S.T.
Kowloon, HONG KONG
TEL: 2333 1863
INDIA
Rivera Digitec (India) Pvt. Ltd.
411, Nirman Kendra
Mahalaxmi Flats Compound
Off. Dr. Edwin Moses Road,
Mumbai-400011, INDIA
TEL: (022) 2493 9051
INDONESIA
PT Citra IntiRama
Suoi Nhae Company, Ltd
370 Cach Mang Thang Tam St.
Dist.3, Ho Chi Minh City,
VIET NAM
TEL: 9316540
PHILIPPINES
G.A. Yupangco & Co. Inc.
339 Gil J. Puyat Avenue
Makati, Metro Manila 1200,
PHILIPPINES
TEL: (02) 899 9801
SINGAPORE
SWEE LEE MUSIC
COMPANY PTE. LTD.
150 Sims Drive,
SINGAPORE 387381
TEL: 6846-3676
TAIWAN
ROLAND TAIWAN
ENTERPRISE CO.,LTD.
Room 5, 9fl. No. 112 Chung
Shan N.Road Sec.2, Taipei,
TAIWAN, R.O.C.
TEL: (02) 2561 3339
THAILAND
Theera Music Co., Ltd.
330 Soi Verng NakornKa
New Road, Sumpantawongse,
Bangkok 10100, THAILAND
TEL: (02) 224-8821
AUSTRALIA/ NEW ZEALAND
AUSTRALIA/
NEW ZEALAND
Roland Corporation
Australia Pty.,Ltd
38 Campbell Avenue
Dee Why West. NSW 2099
AUSTRALIA
For Australia
Tel: (02) 9982 8266
For New Zealand
Tel: (09) 3098 715
CENTRAL/LATIN AMERICA
ARGENTINA
Instrumentos Musicales S.A.
Av.Santa Fe 2055
(1123) Buenos Aires
ARGENTINA
TEL: (011) 4508-2700
BARBADOS
A&B Music Supplies LTD
12 Webster Industrial Park
Wildey, St. Michael, Barbara
TEL: (246)430-1100
BRAZIL
Roland Brasil Ltda.
Rua San Jose, 780 Sala B
Parque Industrial San Jose
Cotia - Sao Paulo - SP, BRAZIL
TEL: (011) 4615 5666
CHILE
Comercial Fancy II S.A.
Rut.: 96.919.420-1
Nataniel Cox #739, 4th Floor
Santiago - Centro, CHIL
TEL: (02) 688-9540
COLOMBIA
Centro Musical Ltda. 12000 Bredenstraße, 37
Cra 43 B No 25 A 41 Bododega 9
Medellin, Colombia
TEL: (574)3812529
COSTA RICA
JUAN Bansbach Instrumentos
Musicales
Ave.1.Calle 11, Apartado
10237,
San Jose, COSTA RICA
TEL: 258-0211
CURACAO
Zeelandia Music Center Inc.
Orionweg 30
Curacao, Netherland Antilles
TEL:(305)5926866
DOMINICAN REPUBLIC
Instrumentos Fernando Giraldez
Boulevard Andrews, Albrook,
Panama City, REP. DE
PANAMA
TEL: 315-0101
PARAGUAY
Distribuidora De
Instrumentos Musicales
J.E. Olear y ESQ. Manduvira
Asuncion PARAGUAY
TEL: (595) 21 492147
PERU
Audionet
155, New National Road
Patras 26442, GE
TEL: 2610 435400
HUNGARY
Roland East Europe Ltd.
Warehouse Area 'DEPO'
H-2046 Torokbalint,
HUNGARY
TEL: (23) 511011
IRELAND
Roland Ireland
G2 Calmount Park, Calmout
Avenue, Dublin 12
Republic of IRELAND
TEL: (01) 4294444
ITALY
Roland Italy S. p. A.
Danvik Center 28, 2 tr.
S-131 30 Nacka SWEDEN
TEL: (0)8702 00 20
SWITZERLAND
Roland (Switzerland) AG
Kolanda (U.K.) Ltd.
Atlantic Class, Sur
Atlantic Close, Swansea Enterprise Park, SWANSEA
Enterprise Park, SWANSEA SA7 9FL.
UNITED KINGDOM
TEL: (01792) 702701
MIDDLE EAST
BAHRAIN
Moon Stores
No.1231&1249 Rumaytha
Building Road 3931, Manama
339 BAHRAIN
TEL: 17 813 942
IRAN
MOCO INC.
No.41 Nike St., Dr.Shariyati Ave.,
Roberoye Cerahe Mirdamad
Tehran, IRAN
TEL: (021) 285-4169
ISRAEL
Halilit P. Greenspoon & Sons
Ltd.
8 Retzif Ha'alia Hashnia St.
Tel-Aviv-Yafo ISRAEL
TEL: (03) 6823666
JORDAN
Abdullah Salem Street,
Safat, KUWAIT
TEL: 243-6399
LEBANON
Chahine S.A.L.
George Zeidan St., Chahine
Bldg., Achrafieh, P.O.Box: 16-
5857
Beirut,LEBANON
TEL: (01) 20-1441
OMAN
TALENTZ CENTRE L.L.C.
Malatan House No.1
Al Noor Street, Ruwi
SULTANATE OF OMAN
TEL: 2478 3443
QATAR
Al Emadi Co. (Badie Studio &
Stores)
P.O.Box 62, Doha, QATAR
TEL: 4423-554
SAUDI ARABIA
aDaw利亚h Universal
Electronics APL
Corniche Road, Aldossary
Bldg., 1st Floor, Alkhobar,
31952 SAUDI ARABIA
P.O.Box 2154,Alkhobar 31952
SAUDI ARABIA
TEL: (03) 898 2081
SYRIA
Technical Light & Sound
Center
Rawda, Abdul Qader Jazairi St.
Bldg. No. 21, P.O.BOX 13520,
Damascus, SYRIA
TEL: (011) 223-538
TURKEY
ZUHAL DIS TICARET A.S.
Galip Dede Cad. No.37
Beyoglu - Istanbul / TURKEY
TEL: (0212) 249 85
U.A.E.
Zak Electronics & Musical
Instruments Co. L.L.C.
Zabeel Road, Al Sherooq Bldg.,
No. 14, Ground Floor, Dubai,
U.A.E.
TEL: (04) 3360715
NORTH AMERICA
CANADA
Roland Canada Ltd.
(Head Office)
5480 Parkwood Way
Richmond B.C., V6V 2M4
CANADA
TEL: (604) 270 6626
Roland Canada Ltd.
(Toronto Office)
170 Admiral Boulevard
Mississauga On L5T 2N6
CANADA
TEL: (905) 362 9707
U. S. A.
Roland Corporation U.S.
5100 S. Eastern Avenue
Los Angeles, CA 90040-2938
U.S.A
TEL: (323) 890 3700