
TDW-20 - V electronic drum ROLAND - Free user manual and instructions
Find the device manual for free TDW-20 ROLAND in PDF.

| Product type | Expansion card for V-Drums electronic drum module |
| Brand | Roland |
| Model | TDW-20 |
| Compatibility | TD-20 module (original version) |
| Main functions | Adds new sounds, kits and features to the TD-20; requires firmware update via included CompactFlash card |
| Package contents | TDW-20 expansion card, screwdriver, locking tool, CompactFlash update card, installation manual |
| Dimensions (card) | Approx. 10 x 6 cm (estimate) |
| Weight (card) | Approx. 50 g (estimate) |
| Power | Powered by the TD-20 module (no external power required) |
| Installation | Requires opening the TD-20 module, inserting into the internal connector and locking with the provided tool; prior data backup mandatory |
| Data backup | Mandatory before installation: use the CompactFlash card to back up TD-20 kits and settings |
| Firmware update | Performed with the included CompactFlash card; procedure takes about 3 minutes; do not turn off power during update |
| Data compatibility | Original TD-20 kits and settings remain compatible after expansion; data created with the expansion is not compatible with the original TD-20 |
| Maintenance and cleaning | Avoid static electricity; handle the card by its edges; use the original bag for storage/transport |
| Safety | Do not touch printed circuits or connectors; do not force insertion; if an object falls inside, contact a Roland authorized center |
| Spare parts and repairability | Expansion card not user-serviceable; contact Roland or an authorized center for repairs |
| General information | Manufactured by Roland; designed to expand the capabilities of the TD-20 module |
Frequently Asked Questions - TDW-20 ROLAND
User questions about TDW-20 ROLAND
0 question about this device. Answer the ones you know or ask your own.
Ask a new question about this device
Download the instructions for your V electronic drum in PDF format for free! Find your manual TDW-20 - ROLAND and take your electronic device back in hand. On this page are published all the documents necessary for the use of your device. TDW-20 by ROLAND.
USER MANUAL TDW-20 ROLAND
Expansion Board for TD-20
Owner's Manual
取説說明書
TDW-20
Expansion Board for TD-20
Owner's Manual
Before using this product, carefully read the sections entitled: "Using the Unit Safely" and "Important Notes" (p. 4–p. 7). These sections provide important information concerning the proper operation of the product.
Additionally, in order to feel assured that you have gained a good grasp of every feature provided by your new product, Owner's manual should be read in its entirety.
The manual should be saved and kept on hand as a convenient reference.
In the interest of product improvement, the specifications and/or contents of this package are subject to change without prior notice.
Copyright © 2008 ROLAND CORPORATION
All rights reserved. No part of this publication may be reproduced in any form without the written permission of ROLAND CORPORATION.
INSTRUCTIONS FOR THE PREVENTION OF FIRE, ELECTRIC SHOCK, OR INJURY TO PERSONS
About WARNING and CAUTION Notices
| ▲WARNING | Used for instructions intended to alert the user to the risk of death or severe injury should the unit be used improperly. |
| ▲CAUTION | Used for instructions intended to alert the user to the risk of injury or material damage should the unit be used improperly. * Material damage refers to damage or other adverse effects caused with respect to the home and all its furnishings, as well to domestic animals or pets. |
About the Symbols
| A | The △symbol alerts the user to important instructions or warnings.The specific meaning of the symbol is determined by the design contained within the triangle. In the case of the symbol at left, it is used for general cautions, warnings, or alerts to danger. |
| B | The ○symbol alerts the user to items that must never be carried out (are forbidden). The specific thing that must not be done is indicated by the design contained within the circle. In the case of the symbol at left, it means that the unit must never be disassembled. |
| C | The ●symbol alerts the user to things that must be carried out. The specific thing that must be done is indicated by the design contained within the circle. In the case of the symbol at left, it means that the power-cord plug must be unplugged from the outlet. |
ALWAYS OBSERVE THE FOLLOWING

WARNING
- Do not open or perform any internal modifications on the product. (The only exception would be where this manual provides specific instructions which should be followed in order to put in place user-installable options; see p. 13.)

- Do not attempt to repair the product, or replace parts within it (except when this manual provides specific instructions directing you to do so). Refer all servicing to your retailer, the nearest Roland Service Center, or an authorized Roland distributor, as listed on the "Information" page.

- Do not allow any objects (e.g., flammable material, coins, pins); or liquids of any kind (water, soft drinks, etc.) to penetrate the TD-20.


WARNING
- Never install the product in any of the following locations.
- Subject to temperature extremes (e.g., direct sunlight in an enclosed vehicle, near a heating duct, on top of heat-generating equipment); or are
- Damp (e.g., baths, washrooms, on wet floors); or are
- Exposed to steam or smoke; or are
- Subject to salt exposure; or are
- Humid; or are
- Exposed to rain; or are
- Dusty or sandy; or are
-
Subject to high levels of vibration and shakiness.
-
In households with small children, an adult should provide supervision until the child is capable of following all the rules essential for the safe operation of the product.


WARNING
- Protect the product from strong impact. (Do not drop it!)

- Before installing the TDW-20, you must first always turn off the TD-20 and unplug its power cord.


CAUTION
- Never step on, nor place heavy objects on the product.

Install the circuit board only into the specified product (TD20). Remove only the specified screws during the installation.

- Keep any screws you may remove and the included installation tool in a safe place out of children's reach, so there is no chance of them being swallowed accidentally.

Important Notes
Placement
- Do not expose the product to direct sunlight, place it near devices that radiate heat, leave it inside an enclosed vehicle, or otherwise subject it to temperature extremes. Excessive heat can deform or discolor the product.
- When moved from one location to another where the temperature and/or humidity is very different, water droplets (condensation) may form. Damage or malfunction may result if you attempt to use the product in this condition. Therefore, before using the product, you must allow it to stand for several hours, until the condensation has completely evaporated.
Repairs and Data
- Please be aware that all data contained in the product's memory may be lost when the product is sent for repairs. Important data should always be backed up on a memory card, or written down on paper (when possible). During repairs, due care is taken to avoid the loss of data. However, in certain cases (such as when circuitry related to memory itself is out of order), we regret that it may not be possible to restore the data, and Roland assumes no liability concerning such loss of data.
Additional Precautions
Unfortunately, it may be impossible to restore the contents of data that was stored on a CompactFlash card once it has been lost. Roland Corporation assumes no liability concerning such loss of data.
- When you need to transport the product, package it in the box (including padding) that it came in, if possible. Otherwise, you will need to use equivalent packaging materials.
Before Using Cards
Using CompactFlash Cards
-
CompactFlash cards are constructed using precision components; handle the cards carefully, paying particular note to the following.
-
To prevent damage to the cards from static electricity, be sure to discharge any static electricity from your own body before handling the cards.
- Do not touch or allow metal to come into contact with the contact portion of the cards.
- Do not bend, drop, or subject cards to strong shock or vibration.
- Do not keep cards in direct sunlight, in closed vehicles, or other such locations (storage temperature: -25 to 85^ C).
- Do not allow cards to become wet.
-
Do not disassemble or modify the cards.
-
CompactFlash and

are trademarks of SanDisk
Corporation and licensed by CompactFlash association.
- Roland Corporation is an authorized licensee of the
CompactFlash™ and CF logo (CF™) trademarks.
Copyright
- When you purchase the TDW-20 expansion board for TD-20 from an authorized Roland dealer, the included sounds are licensed, not sold, to you by Roland Corporation, for commercial use in music production, public performance, broadcast, etc.
You may use any of the included sounds in a commercial or noncommercial recording without paying any additional license fees. However, you must strictly adhere to the following crediting guidelines on any music recording that utilize material from TDW-20.
Reproduction or duplication of any of the sound contained in the TDW-20, either as they exist on this sound module or by any means of reformating, mixing, filtering, re-synthesizing, processing or otherwise editing for use in another product or for re-sale, is strictly prohibited without the express written consent of Roland. All unauthorized giving, trading, lending, renting, re-issue, re-distribution or re-sale of the sounds included in the TDW-20 are expressly prohibited.
In Plain English: Be creative and respectful in your application of the TDW-20 sounds. These sounds are for your use only. DO NOT COPY THEM.
Contents
Using the Unit Safely 4
Important Notes 6
Installing the TDW-20 in the TD-20 10
IMPORTANT! Please Read
before Beginning the Installation Process 10
IMPORTANT! Backing Up Your Data 12
How To Install the TDW-20 Expansion Board. 13
Updating the TD-20 with the CompactFlash Card. 15
About the Drum Kits. 24
New Functions 26
Drum Instruments Parameters [INST] 26
Instrument Selection 26
About V-EDIT Parameters 26
Mixer Settings 29
Minimum Volume of Each Trigger Input. 29
Pad Compressor 30
Parameter Improvements. 30
Ambience 30
New Room Types (15) 30
New Wall Types (3) 31
Mic Positions (9) 31
New Output Gain Parameter 32
Ambience Monitor ("solo" mode) 32
Multi-Effects 32
New Output Gain Parameter 32
Multi-Effects Monitor ("solo" mode) 32
Master Compressor 33
Gain Reduction (GR) Meter 33
Drum Kit Parameters [KIT] 33
Pad Pattern ON/OFF Switch 33
Trigger Settings 34
Advanced Trigger Parameter Function 34
Checking the Trigger Information 34
Copy Functions 35
Trigger Bank Copy 36
Copying an Instrument Set 36
Copying an Instrument 37
Quick Jump Functions to the Copy Screen 37
Settings for the Entire TD-20 38
Master Output 38
Output Assign (OTHER) 38
Using Foot Switches and Pad Switches 39
MIX IN new Function 39
Importing Original TD-20 Data into the Expanded TD-20....40
Other Functions 41
The Kit Selection Function. 41
Choosing a Drum Kit from a CompactFlash. 41
Appendices 42
Drum Instrument List. 42
Preset Drum Kit List 46
Information 53
IMPORTANT! Please Read before Beginning the Installation Process
Installation Procedure
- Check the package contents to be sure you have the expansion board, screwdriver (for removing the cover on the back of the TD-20), locking key (for securing the expansion board into place) and CompactFlash card. Please leave the expansion board in its package until it is time to install it.
- Back up your data (carefully read p. 12).
- Install the TDW-20 expansion board (p. 13).
- Update the TD-20 (p. 15).
Enclosed CompactFlash Card
- Do NOT use with a computer BEFORE executing the update process.
Backup Your Original TD-20 Data!
- Save your current data to your CompactFlash card before you install the TDW-20.
When executing an update, all data and settings in the TD-20 are lost. That's why it is important to back up your data and settings on a CompactFlash card before updating. If you are using the CompactFlash card included with your TDW-20, insert the card ONLY AFTER turning the power on. Otherwise the " updater" on the card will automatically open.
Data Compatibility
- Data created on the original TD-20 and backups stored on a CompactFlash card can be used with an expanded TD-20 (p. 40).
- The original TD-20's factory preset drum kits can be used with an expanded TD-20.
Data created with an expanded TD-20 is not compatible with original TD-20. - The TD-20 will not function if you remove the TDW-20 after performing the update.
Caution when Handling the TDW-20
-
Components of the TDW-20 can be damaged by static electricity. Please observe the following precautions when handling it.
-
Before touching the TDW-20, you must touch some other metal object to safely discharge any static electricity that might be in your body or clothing.
- When holding the TDW-20, grasp the edges of the circuit board and DO NOT touch the components on the circuit board or the connectors.
-
If you need to store or ship the TDW-20, place it in the original bag (conductive bag for electrostatic protection).
-
DO NOT touch the circuitry or connectors inside the TD-20.
- When inserting the TDW-20, do not force it into the slot. If insertion is difficult, take the TDW-20 out and then try again. Use the provided tool to lock it in place.
- When you've finished installing the TDW-20, double-check your work.
- If a foreign object should get inside the TD-20, request servicing by your retailer, the nearest Roland Service Center, or an authorized Roland distributor, as listed on the "Information" page.
IMPORTANT! Backing Up Your Data

If you are using the CompactFlash card included with your TDW-20, insert the card ONLY AFTER turning the power on. Otherwise the " updater" on the card will automatically open.
-
Insert a CompactFlash card into the TD-20's front panel memory card slot.
-
Carefully insert the CompactFlash card all the way in—until it is firmly in place.
-
Press [CARD].
The [CARD] and CompactFlash indicators light up. The "CARD MENU" screen appears.
-
If you insert a card that has never been used with the TD-20, the screen will indicate "Unformatted!" Press [CARD] and [F4 (FORMAT)] to format.
-
Then press [F1 (SAVE)].
- In the "CARD SAVE" screen, use [+/-] or [VALUE] to select the backup destination for the data you are saving.
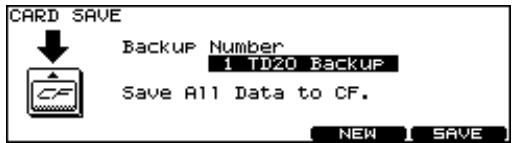
- Press [F5 (SAVE)].
If you want to rename the backup, press [F4 (NAME)].
- The confirmation screen appears, press [F5 (EXECUTE)] to save the data.
If you decide not to proceed with the backup, press [F1 (CANCEL)].
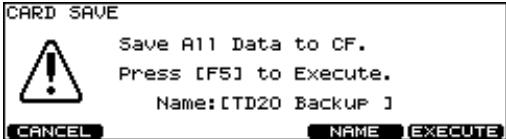
- Press [F5 (EXECUTE)] to save the data.
If You Have BULK DUMP Data Stored on Your Computer
If you have individual kit data or your entire kit's data stored on a computer, in order for it to be compatible with the expanded version, you must load it into the TD-20, and save the data to a CompactFlash card BEFORE updating with the TDW-20.
How To Install the TDW-20 Expansion Board
- Power-off the TD-20, and unplug the power cord from the AC outlet.
-
Turn the TD-20 over on its back.
-
When turning the TD-20 on its back, take care not to damage the buttons and knobs. To protect them, spread a cushion or towel over your work surface.
-
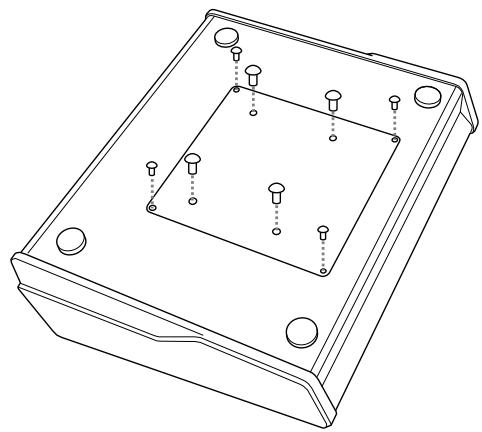
Remove the eight screws (marked by arrows) on the bottom panel. Take off the cover.
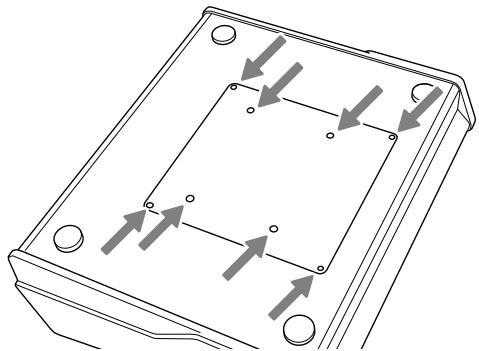
* Do not remove any screws other than those marked by arrows.
- Orient the circuit board holder as shown in the illustration.
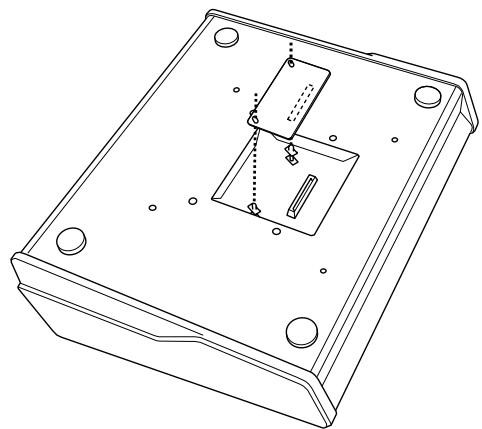
-
Insert the connector of the expansion board all the way into the connector of the TD-20. Make sure that the tip of each circuit board holder protrudes through the holes in the TDW-20.
-
Using the tool included with the TDW-20, turn the circuit board holders in the LOCK direction to fasten the TDW-20 in place.
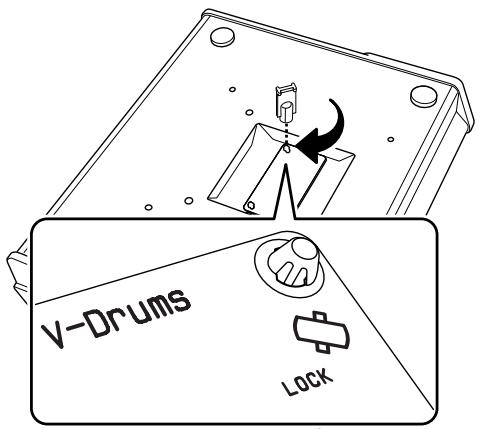
- Reattach the cover using the eight screws you removed in step 3.

When you've finished installing the TDW-20, double-check to make sure that it is installed correctly and that the circuit board holders are in the LOCK position.
Updating the TD-20 with the CompactFlash Card
- With the power off, insert the CompactFlash Card provided in this package.
- Turn the power on and the following screen appears.
| TD-20 | UPDATERS | (requires TDW-20) | Ver1.00 |
| Ver1.04 | → | Ver2.00 | |
| 02/11/04 | 07/07/08 | ||
| R0050 EBC1 | R0082 8009 | ||
| F1=CANCEL | F5=UPDATE | ||
-
To execute the update, press the [F5=UPDATE] button.
-
It may take 3 minutes before update is finished.
-
Do not turn the power off during the update process.
-
When the screen shows "Update Completed.", turn off the TD-20 and remove the CompactFlash card.
-
Turn the power back on and execute the system initialize.
- To initialize, press the [F5 (EXECUTE)] button.
| SYSTEM INITIALIZE |
| Clear All Data and Load Factory Preset Data. Press [F5] to Execute. |
French language
for Canadian Safety Standard
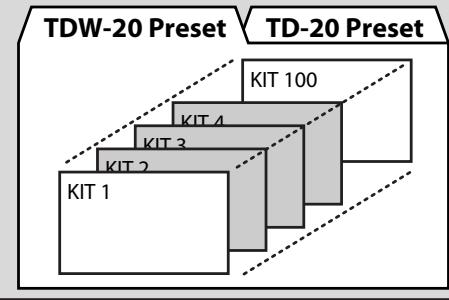
New Sounds and 50 New Drum Kits (100 total)
The new acoustic sounds have more punch, expressiveness, stereo presence and dynamic range. The Processed and Electronic sounds give you lots of new choices for everything from Alternative Pop, Hip Hop or Club music. The USER memory is now 100 kits, including 50 NEW kits, and the TD-20's original preset kits.
New Editing and Performance Power
- A new, Large "Mic Size" choice for the kick drum enhances low frequency attack (p. 26).
- More "Mic Position" choices for more precise microphone placement (p. 30).
- Full "Kit Resonance" function, triggered by the bass drum, adds overall kit depth and presence (p. 30).
- New Snare Drum Rim function allows selected layering choices (p. 27).
- Electronic sounds now have a new Dynamic pitch bend feature (p. 28).
- Turn the snares on or off, or change from a normal Hi-Hat to "Fixed Hi-Hat" using foot or pad switches (p. 39).
- "Dynamic Interval Control" results in a more accurate response to your playing dynamics and speed (p. 34).
-
"Enhanced HH Control" improves the feel and response of the V-Hi-Hat (p. 23).
-
"Enhanced Snare Buzz Control" gives more dynamic response and presence when adding "snare buzz" to the toms or kick (p. 26).
Ambience — User Interface, New functions
Not only has the interface has been improved, but new algorithms offer high resolution definition and stereo presence. New functions include 15 new room types, 3 new wall material choices and 7 new mic positions (p. 30).
Improved Memory Storage on a CompactFlash Card
Up to 99 full backups on the CompactFlash Card. Your current CompactFlash Card stays compatible on the new, expanded version, as well as the original version (p. 24).
Directly "audition" a kit on the CompactFlash card.
You can choose between preset kits: TD-20/TDW-20 and kits saved on CompactFlash card (p. 41).
You can play the kit before loading it into the USER area. (however, pad patterns will not work when being played from the CompactFlash card)
Sequencer
Additional Preset Patterns
- 50 new Preset Patterns have been added (P 101 - 150).
KD-120 Users
If you have imported your own trigger bank settings from the original TD-20 version, we advise you to double check the trigger parameters for the KD-120. As dynamic response has been improved, re-adjusting those parameters will make you feel even more comfortable while playing.
Important notes about the Hi-Hat
We strongly recommend that you spend time adjusting the Hi-Hat parameters to adapt to your performance techniques.
- The most important is correctly setting the "offset" before you play each time.
ACCESS: [KIT] + [TRIGGER]
- The "Foot Splash Sens" parameter is also important. Spend some time testing this setting.
ACCESS: [TRIGGER]-[F3 (HI-HAT)]
- Also remember that for each kit, there is a separate control for the sound level of the "Foot Closed (Pedal HH)" sound.
ACCESS: [KIT]-[F2 (FUNC)]-[F1 (VOLUME)]
- Keep in mind that for the sound level of the Hi-Hat that setting different levels for the "Head" and "Rim" can help you get a good sound balance. When in the MIXER screen, Press [F5] so you can adjust the levels separately.
About the Drum Kits
After you have completed the upgrade process, you will find that the user memory has expanded to 100 Kits: 50 NEW kits from 1-50 and the original TD-20 pre-set Kits from 51-100. These 100 factory preset kits are always available via the "copy" function, or when totally re-setting the TD-20. So you have 100 USER kits to work with.
CompactFlash Card Data
- All user drum kits can be backed up to the CompactFlash card for a total of 99 full back-ups.
- Kit data on the CompactFlash card can be played (but not edited) without loading it into the TD-20 (p. 41).
- The Import function allows you to load data saved prior to updating (p. 40).

When importing a previously saved "backup" the kits will appear from kit No.51.
Backup File Names
This is important for those who might want to organise their data in their computers or share data with other TD-20 users.
How Names appear
Though you can give a name to your backup file that you can see when loading/saving with a CompactFlash card in the TD-20, the
name that appears when looking at it in your computer is different. Here we will explain the difference between "original" TD-20 data, and data after upgrading with the TDW-20.
Original TD-20
Backup 1 appears like "TD20BK01.TD0."
"TD20" indicates the original version.
The "BK01" means Backup No.1, "BK08" would mean backup No.08.
Expanded TD-20
Backup 1 appears like "TDW2BK01.TD0."
"TDW2" indicates the upgraded version.
The "BK01" means Backup No.1, "BK99" would mean backup No.99.
Pattern Files
This refers to patterns saved independently on the CompactFlash Card.
Pattern No.1 (on the card) will appear as "TD20P001.TD0."
The "P001" means pattern No.1. Pattern No.100 appears as "TD20P100.TD0."
PRESET

[CARD]-[F3 (IMPORT)]
CARD
(Original TD-20)
Backup 1\2\3--/Backup 8
Drum Instruments Parameters [INST]
Instrument Selection
After pressing the [INST], the [F4 (INT<>EXP)] allows you to choose from the TD-20's internal sounds or those on the TDW-20 expansion board.

The prefix "EXP" is attached to TDW-20's Inst Group name.
About V-EDIT Parameters
To restore an instrument to a non v-edited state press [SHIFT] and [F4] while in the INST EDIT screen. This was previously referred to as "default" in the original TD-20 version.
- Not all sounds have full V-Edit parameters.
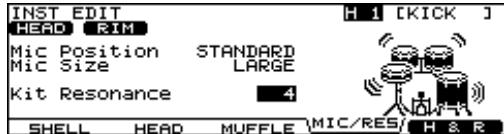
For the KICK
- Snare Buzz: The dynamic response of this function is improved.
- Mic Position: New positions allow even more realistic microphone placement.
- Mic Size: Improvement in sub-low frequency attack for the KICK.
- Kit Resonance: Accurately reproduces the whole kit resonating when the kick is played.
For the SNARE
- Mic Position: New positions allow even more realistic microphone placement.
- Add Rim Sound: You can layer a tambourine, 909 claps or Gate Hit sound to the RIM only.
- Level: Adjusts level of the added sound.
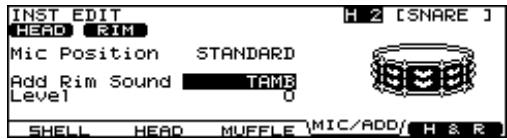

Not all sounds have full V-Edit parameters.

You can turn the "Snare Strainer Off" by pressing an optional foot switch or hitting a "Pad Switch." Please refer to "Using Foot Switches and Pad Switches" (p. 39).
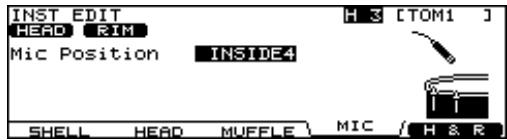
For the TOMs
- Snare Buzz: The dynamic response of this function is improved.
- Mic Position: New positions allow even more realistic microphone placement.
For the HI-HAT
- Add Sound: You can layer a tambourine, cabasa or cowbell on the Hi-Hat (Head and/or Rim)
- Level: Adjusts the volume of the layered sound.
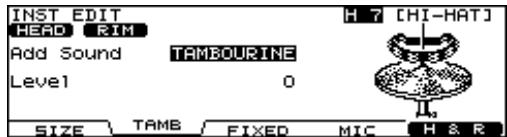

The "Fixed Hi-Hat" position can be enabled by pressing an optional foot switch or hitting a pad switch. Please refer to "Using Foot Switches and Pad Switches" (p. 39).
Additional Sizzle for All Cymbals
- Sizzle Type: New "BEADS" sizzle type.
- Sizzle Amount: Adjusts the amount (size) of the chosen sizzles.

Dynamic Pitch Bend (only for NEW Electronic Sounds on the TDW-20)
Before accessing this function, be sure there is an electronic sound assigned to the pad.
Then press [F2 (EDIT)] and the following screen appears. Adjust the parameters as you wish.
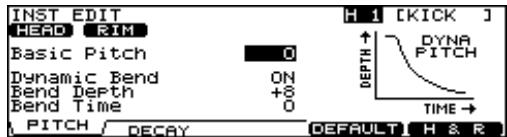
The pitch of the sound can be controlled by your playing dynamics.
The following parameters are available.
| Parameter | Value |
| [F1 (PITCH)] | |
| Basic Pitch | -480 – +480 |
| Dynamic Bend | OFF, ON |
| Bend Depth | -24 – +24 |
| Bend Time | -31 – +31 |
| [F2 (DECAY)] | |
| Decay Time | -31 – +31 |
Mixer Settings
Minimum Volume of Each Trigger Input
The "MINIMUM VOLUME" function has new and improved dynamic resolution, helping you to maintain a desired sound level for specific pads and depending on your playing style. Also helping you to capture ghost notes,
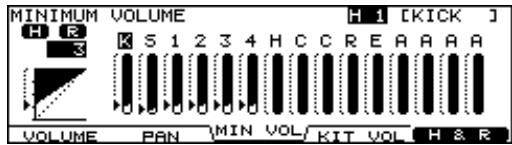
Access:
Press [MIXER]-[F3 (MIN VOL)]
Use The Group Faders
Adjust the "MINIMUM VOLUME" parameters with the group faders.
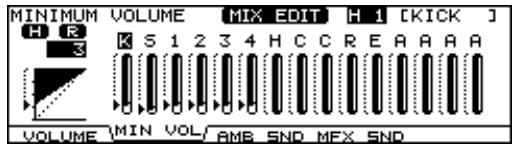
Access:
Press [MIXER] + [FADER]–[F2 (MIN VOL)]
- You can also use them for adjusting Volume, Ambience or MFX send levels.
Pad Compressor
Parameter Improvements
New Individual Compressor Templates are improved.
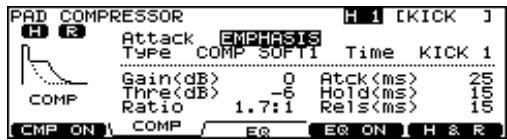
| Parameter | Value | Description |
| Attack | EMPHASIS, CRUSH | EMPHASIS: Emphasizes the attack of the sound. CRUSH: Press the attack. |
| Type | COMP SOFT 1 – 2, COMP MED, COMP HARD, LIMITER, EXPANDER | These change Threshold and ratio values. |
| Time | KICK 1 – 3, SNARE1 – 3, TOM 1 – 3, CYM 1 – 2, OTHER1 – 3 | These change Attack, Hold, and Release values. |
Ambience
A lot of research went into creating new Ambience functions. The result is a new collection of 15 Room Types, 3 new Wall Types, and 7 new Ambience Mic Positions. High density resolution of these new algorithms, including enhanced stereo presence give you more choices to create your own. personalized drum sound "character."
New Room Types (15)
| Booth A | Booth B | Studio A |
| Studio B | Basement | Jazz Club |
Rock Club
Ballroom
Gate
Concert Hall
Sports Arena
Expo Hall
[FX] Bottle

[FX] City
[FX] Spiral
New Wall Types (3)
Three new wall types are: "Curtain", "Cloth", and "Concrete"
Curtain
Cloth
Concrete
Mic Positions (9)
Taking into consideration the importance of Ambience Mic positions, the following have been added.
Next Door
Low Floor
Low
Mid Low
Mid
Mid High
High
Ceiling A
Ceiling B

When in the ROOM screen, pressing [SHIFT] plus [F4] resets all the parameters
New Output Gain Parameter
A gain parameter has been added for the ambience output level. You can boost the signal by +6 dB
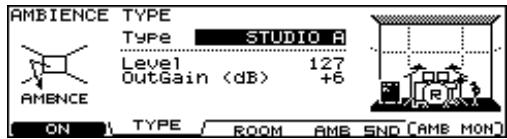
Ambience Monitor ("solo" mode)
When in the AMBIENCE screen pressing [F5 (AMB MON)] allows you to listen to JUST the ambience from the MASTER OUTPUT and/or PHONES jacks.
Multi-Effects
New Output Gain Parameter
A gain parameter has been added for the multi-effects output level.
You can boost the signal by +6 dB.
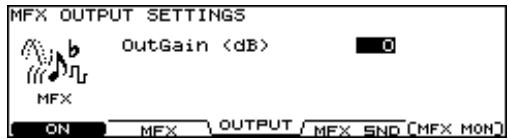
Multi-Effects Monitor ("solo" mode)
When in the MULTI EFFECTS screen, pressing the [F5 (MFX MON)] allows you to listen to JUST the multi-effects from the MASTER OUTPUT and/or PHONES jacks.
Master Compressor
Gain Reduction (GR) Meter
A gain reduction meter has been added to this screen, allowing you to monitor the MASTER COMP as it is functioning.

Access:
Press [MASTER COMP/EQ]
Drum Kit Parameters [KIT]
Pad Pattern ON/OFF Switch
This function allows you to turn off all the patterns that may be assigned to a kit.
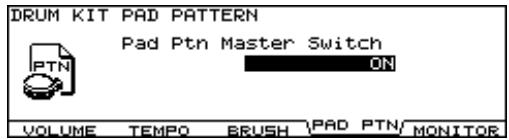
Access:
Press [KIT]-[F2 (FUNC)]-[F4 (PAD PTN)]
Trigger Settings
Additional pad/trigger choices have been added to the trigger list.
CY-5
- RT-10 series
Advanced Trigger Parameter Function
This screen allows you to monitor the positional sensing for the following pads/Input:
SNARE (Head, Rim), TOM (Rim), RIDE (Bow), and AUX (Rim).
You can turn the position detection ON or OFF here.
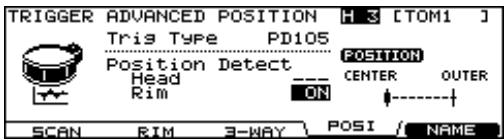
- If you select a non-positional sensing pad, "---" appears.
Access:
Press [TRIGGER]-[F5 (ADVANCE)]-[F4 (POSI)]-Pad Select
Checking the Trigger Information
You can visually confirm each trigger's velocity as well as the Hi-Hat open/close gaps and positional sensing on the Snare Drum and Ride Cymbal, and RIMS of the TOMS and AUX.
The "interval meter" shows the intervals between strokes.

Interval control functions to create smooth rolls on cymbals or the snare drum.
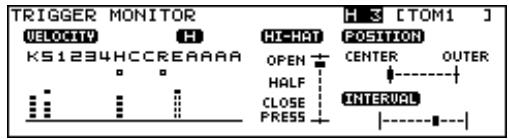
Access:
Press [TOOLS]-[F3 (TRG MON)]
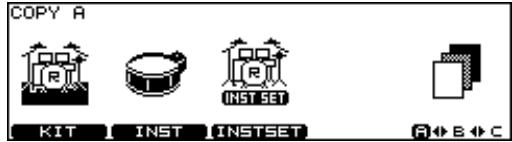
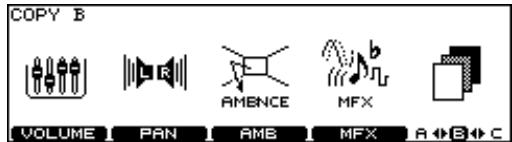
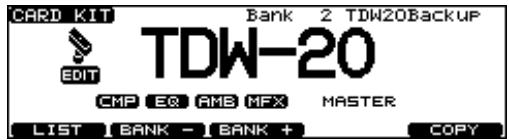
Copy Functions
Now you can copy inst sets (with or without COMP/EQ), ambience, multi-effects, volume, panning and Trigger Banks from one kit to another, between the internal memory and the CompactFlash card or from the original, factory pre-set data.

Copying overwrites the data that exists in the new destination. Be careful.
In this Screen, the [F5] is used to change the 3 pages of copy options.
COPY A screen
COPYBscreen
COPYCscreen
Access:
Press [COPY]–[F1]–[F5]–Select the source with these buttons.
Trigger Bank Copy
If you want to copy trigger bank data from your original TD-20, do the following:
- Import the backup into the expanded TD-20 (upgraded version).
- Then save once to the CompactFlash card.
- Now you can copy individual trigger bank settings back into the TD-20.
Copying an Instrument Set
An instrument set consists of all instruments (every instrument assigned to a trigger input).
| Parameter | ICON | Inst |
| KICK/SNR | RITTKEENR | Kick and Snare |
| Parameter | ICON | Inst |
| TOMS 1-4 | TOME | Tom 1, 2, 3, 4 |
| CYM SET | CVM SET | Hi-Hat, Crash1, 2, Ride, Edge |
| AUX 1-4 | AUX | AUX 1, 2, 3, 4 |
When Selecting the Copy Target
In this screen, you have the choice to copy all instruments with, without or JUST the COMP/EQ settings.
Copying an Instrument
In this screen, you have the choice to copy the instrument and it's edited parameters with, without or JUST the COMP/EQ settings.
Quick Jump Functions to the Copy Screen
For Copying Drum Kit Settings
In the DRUM KIT screen, press [SHIFT] and [COPY] simultaneously.
For Copying Instrument Settings
In the INST screen, press [SHIFT] and [COPY] simultaneously.
For Copying Mixer Settings
In the MIXER screen, press [SHIFT] and [COPY] simultaneously.
For Copying Ambience Settings
In the AMBIENCE screen, press [SHIFT] and [COPY] simultaneously.
For Copying Multi-Effect Settings
In the MULTI EFFECTS screen, press [SHIFT] and [COPY] simultaneously.
Settings for the Entire TD-20
Master Output
Now, when using multi-output configurations, the entire kit's sound will remain in the headphones, even the sounds NOT sent to the MASTER OUTPUT jacks.
Access:
Press [SETUP]-[F2 (OUTPUT)]-[F1 (MASTER)]

When in this screen, pressing [F5 (DEFAULT)] will reset the parameters of that specific page. A confirmation screen will appear before you execute.
Output Assign (OTHER)
You can assign the sequencer parts, the Metronome click sound & MIX IN source to the MASTER OUT, PHONES and/or DIRECT OUT 5 to 8.

Using Foot Switches and Pad Switches
One or two optional foot switches (BOSS FS-5U: sold separately) can be used with an optional cable (PCS-31: sold separately) to allow switching to a "Fixed Hi-Hat" or to turn the snare strainer "off" on the snare drum. You can also turn the ambience or multi-effects on/off. The same can be done with Pad Switches.
The "FIXED HH" and "STRAINER" status are displayed on the "DRUM KIT" screen
Access for Foot Switch Functions:
Press [SETUP]-[F3 (CONTROL)]-[F1 (FOOT SW)]
Access for Pad Switch Function:
Press [SETUP]-[F3 (CONTROL)]-[F2 (PAD SW)]

Pad switch functions are available only when using AUX 3 and AUX 4 inputs.
MIX IN new Function
The MIX IN jacks can handle mono or stereo signal.
If it occurs that the audio signal going to the MIX IN Jack has a click on the Right side, and the backing track on the Left side, you can use this function to merge the signals.
| Parameter | Value |
| Input | L + R, L ONLY, R ONLY |
| Mode | STEREO, MONO |
| Gain | 0 – +12 |
Access:
Press [SETUP] - [F4 (OPTION)] - [F3 (MIX IN)]
Importing Original TD-20 Data into the Expanded TD-20
You can import your original TD-20 setting to the expanded TD-20.
- Insert your CompactFlash Card.
- Press [CARD]–[F3 (IMPORT)].
- Select the backup.
- Press [F5 (IMPORT)].
Notes about importing data:
- Your drum kit data will be loaded to Kits No.51 to No.100. The TDW-20 preset kit will be loaded to No.1 to No.50
- The Program Change Number for Drum Kits is reset to the default value.
Other Functions
The Kit Selection Function
You can play preset drum kits and kits from the internal memory and also those saved on a CompactFlash card without loading to a user drum kit destination. When accessing kits in this manner, Pad Patterns assigned to that particular kit will NOT function. And no editing is possible. You can immediately copy the selected kit to any user destination. When in this page, just push "copy."
Access:
- Press [TOOLS]-[F1 (KIT SEL)].
- Press [F1]–[F3] to choose kit.
[F1 (TD-20)]: TD-20 preset kits
[F2 (TDW-20)]: TDW-20 preset kits
[F3 (CARD)]: Backup kit saved in CompactFlash
Choosing a Drum Kit from a CompactFlash
You can play a kit directly from the CompactFlash memory card.
Access:
Press [SHIFT] and [KIT] simultaneously.
Drum Instrument List
| No. | Name |
| EXP KICK | |
| 562 | 22"BirchLo K |
| 563 | 22"BirchHi K |
| 564 | 23"D-Maple K |
| 565 | 22"NCMaple K |
| 566 | 22"LwgVntg K |
| 567 | 22"RokVntg K |
| 568 | 22"PKMaple K |
| 569 | 22"SnrVntg K |
| 570 | 24"VLite K |
| 571 | 22"Premium K |
| 572 | 22"BirchWetK |
| 573 | 22"GT Vntg K |
| 574 | 22"LooseHd K |
| 575 | 20"TightHd K |
| 576 | 20"GT Open K |
| 577 | 20"BigBand K |
| 578 | 18"Combo K |
| 579 | 18"BeBopLo K |
| 580 | 18"BeBopHi K |
| 581 | Ambience K |
| EXP KICK PROCESSED | |
| 582 | Tight1 K |
| 583 | Tight2 K |
| No. | Name |
| 584 | Tight3 K |
| 585 | Tight4 K |
| 586 | Tight5 K |
| 587 | Tight6 K |
| 588 | Solid1 K |
| 589 | Solid2 K |
| 590 | Solid3 K |
| 591 | Wild K |
| 592 | Mondo K |
| 593 | Reverb K |
| 594 | Distorted K |
| 595 | BreakBeats K |
| 596 | Woofer K |
| 597 | FX Stomp K |
| 598 | FX Chest K |
| 599 | FX Handle K |
| 600 | FX Door K |
| EXP KICK ELEC | |
| 601 | ClscElec7 K |
| 602 | ClscElec8 K |
| 603 | ClscElec9 K |
| 604 | 808Attack K |
| 605 | 808Low K |
| 606 | 909Power K |
| 607 | 909Low K |
| No. | Name |
| 608 | AnalogQ1 K |
| 609 | AnalogQ2 K |
| 610 | AnalogQ3 K |
| 611 | Synth K |
| 612 | Filter1 K |
| 613 | Filter2 K |
| 614 | Filter3 K |
| 615 | Filter4 K |
| 616 | Jungle K |
| 617 | FX Elec1 K |
| 618 | FX Elec2 K |
| 619 | FX Elec3 K |
| 620 | FX Elec4 K |
| EXP SNARE | |
| 621 | CustomWoodS |
| 622 | CustomWoodSR |
| 623 | 80s Metal S |
| 624 | 80s Metal SR |
| 625 | Bronze S |
| 626 | Bronze SR |
| 627 | CraftStl S |
| 628 | CraftStl SR |
| 629 | OpenBrass S |
| 630 | OpenBrass SR |
| 631 | 50s King S |
| No. | Name |
| 632 | 50s King SR |
| 633 | GT Maple S |
| 634 | GT Maple SR |
| 635 | Piccolo S |
| 636 | Piccolo SR |
| 637 | 12"Cmpact S |
| 638 | 12"Cmpact SR |
| 639 | 10"Cmpact S |
| 640 | 10"Cmpact SR |
| 641 | Skanky2 S |
| 642 | Skanky2 SR |
| 643 | StlPhonic S |
| 644 | StlPhonic SR |
| 645 | 50sKingMt S |
| 646 | 50sKingMt SR |
| 647 | WhiteAsh S |
| 648 | WhiteAsh SR |
| 649 | Popcorn S |
| 650 | Popcorn SR |
| EXP SNARE PROCESSED | |
| 651 | PrcsWood S |
| 652 | PrcsWood SR |
| 653 | PrcsMetal S |
| 654 | PrcsMetal SR |
| 655 | PrcsElec1 S |
| No. | Name |
| 656 | PrcsElec1 SR |
| 657 | PrcsElec2 S |
| 658 | PrcsElec2 SR |
| 659 | PrcsXStik S |
| 660 | PrcsNoise S |
| 661 | DynaFilter S |
| 662 | ClscFat1 S |
| 663 | ClscFat1 SR |
| 664 | ClscFat2 S |
| 665 | ClscFat2 SR |
| 666 | SoundFX1 S |
| 667 | SoundFX2 S |
| 668 | SoundFX3 S |
| 669 | SoundFX4 S |
| 670 | SoundFX5 S |
| 671 | Distorted1 S |
| 672 | Distorted2 S |
| 673 | Wood XStik |
| 674 | Steel XStik |
| 675 | Brass XStik |
| 676 | 80sMtl XStik |
| 677 | 50sKingXStik |
| 678 | WhtAsh XStik |
| 679 | Light XStik |
| 680 | Lo-Fi XStik |
| No. | Name | No. | Name | No. | Name | No. | Name |
| EXP SNARE ELEC | 709 | 16"PKJaz T5 | 740 | 16"Antiq T5R | 768 | 13"P-Crsp HE | |
| 681 | ClscElec6 S | 710 | 16"PKJaz T5R | EXP TOM ELEC | 769 | Distorted HB | |
| 682 | ClscElec7 S | 711 | 10"Rock T1 | 741 | ClscElec5 T1 | 770 | Distorted HE |
| 683 | ClscElec8 S | 712 | 10"Rock T1R | 742 | ClscElec5 T2 | 771 | Lo-Fi HH |
| 684 | ClscElec9 S | 713 | 12"Rock T2 | 743 | ClscElec5 T3 | 772 | 808Chick HH |
| 685 | 808Power S | 714 | 12"Rock T2R | 744 | ClscElec5 T4 | 773 | 909Power HH |
| 686 | 808Power SR | 715 | 14"Rock T3 | 745 | ClscElec6 T1 | 774 | Impulse HH |
| 687 | 909Power S | 716 | 14"Rock T3R | 746 | ClscElec6 T2 | 775 | Super-Q HH |
| 688 | 909Power SR | 717 | 16"Rock T4 | 747 | ClscElec6 T3 | 776 | DistJingleHH |
| 689 | 909Dist S | 718 | 16"Rock T4R | 748 | ClscElec6 T4 | 777 | MtlCrasherHH |
| 690 | 909Reverb S | 719 | 18"Rock T5 | 749 | ClscElec7 T1 | 778 | Jingle HH |
| 720 | 18"Rock T5R | 750 | ClscElec7 T2 | 779 | Beads HH | ||
| 721 | 8"Pop T1 | 751 | ClscElec7 T3 | 780 | Ratchet HH | ||
| EXP TOM | 722 | 8"Pop T1R | EXP CRASH | 781 | 15"PaperCrBw | ||
| 691 | 8"NCmpl T1 | 723 | 10"Pop T2 | 752 | ClscElec7 T4 | 782 | 15"PaperCrEg |
| 692 | 8"NCmpl T1R | 724 | 12"Pop T2R | 754 | ClscElec8 T2 | 783 | 16"PoP CrBw |
| 693 | 10"NCmpl T2 | 725 | 12"Pop T3 | 755 | ClscElec8 T3 | 784 | 16"PoP CrEg |
| 694 | 10"NCmpl T2R | 726 | 12"Pop T3R | 756 | ClscElec8 T4 | 785 | 18"PoP CrBw |
| 695 | 12"NCmpl T3 | 727 | 13"Pop T4 | 757 | ClscElec9 T1 | 786 | 18"PoP CrEg |
| 696 | 12"NCmpl T3R | 728 | 13"Pop T4R | 758 | ClscElec9 T2 | 787 | 17"DarkK CrBw |
| 697 | 14"NCmpl T4 | 729 | 16"Pop T5 | 759 | ClscElec9 T3 | 788 | 17"DarkK CrEg |
| 698 | 14"NCmpl T4R | 730 | 16"Pop T5R | 760 | ClscElec9 T4 | 789 | 18"DarkK CrBw |
| 699 | 16"NCmpl T5 | 731 | 8"Antiq T1 | EXP HI-HAT | 790 | 18"DarkK CrEg | |
| 700 | 16"NCmpl T5R | 732 | 8"Antiq T1R | 761 | 14"CstmDK HB | 791 | 18"JazzZ CrBw |
| 701 | 8"PKJaz T1 | 733 | 10"Antiq T2 | 762 | 14"CstmDK HE | 792 | 18"JazzZ CrEg |
| 702 | 8"PKJaz T1R | 734 | 10"Antiq T2R | 763 | 14"Medium HB | EXP SPLASH | |
| 703 | 10"PKJaz T2 | 735 | 12"Antiq T3 | 764 | 14"Medium HE | 793 | 4"Paper SpBw |
| 704 | 10"PKJaz T2R | 736 | 12"Antiq T3R | 765 | 13"KZComb HB | 794 | 4"Paper SpEg |
| 705 | 12"PKJaz T3 | 737 | 13"Antiq T4 | 766 | 13"KZComb HE | 795 | 6"Splaz SpBw |
| 706 | 12"PKJaz T3R | 738 | 13"Antiq T4R | 766 | 13"KZComb HE | 796 | 6"Splaz SpBw |
| 707 | 13"PKJaz T4 | 739 | 16"Antiq T5 | 767 | 13"P-Crsp HB | 797 | 6"Splaz SpBw |
| No. | Name | No. | Name | No. | Name |
| 823 | 20"VntZ Rd | 853 | AnkleBeads | 883 | CosmicWater |
| 824 | 20"VntZ RdBI | 854 | AfricaJingle | 884 | CosmicDrip |
| 825 | 20"VntZ RdEg | 855 | Cabasa2 | 885 | CosmicClaps |
| 826 | 19"JzCrsRd | 856 | Tambourine4 | 886 | CosmicChirp |
| 827 | 19"JzCrsRdBI | 857 | TambStick | 887 | Falling |
| 828 | 19"JzCrsRdEg | 858 | TambShake | 888 | FlyAway |
| 829 | 19"P-CrsRd | 859 | Sagat Close | 889 | BounceDown |
| 830 | 19"P-CrsRdBI | 860 | Sagat Open | 890 | TimeTunnel1 |
| 831 | 19"P-CrsRdEg | 861 | MetalCrasher | 891 | TimeTunnel2 |
| 862 | ConcertBD2 | 892 | SpaceTrip | ||
| EXP PERCUSSION | 863 | ConcertBD2mt | 893 | Growl | |
| 832 | Timbale2Hi | 864 | LargeGong | 894 | Ripping |
| 833 | Timbale2HiRm | 865 | Timpani2 C | 895 | SpaceAlien |
| 834 | Timb2HiPaila | 866 | Timpani2 G | 896 | SpaceWarp |
| 835 | Timbale2Lo | 867 | HiraTaiko | 897 | Shake |
| 836 | Timbale2LoRm | 868 | HiraTaikoRim | 898 | ShakeDown |
| 837 | Timb2LoPaila | 869 | YaguraTaiko | 899 | Gear |
| 838 | Pandeiro2 | 870 | YaguraTaikoR | 900 | GearLong |
| 839 | Pande2 Slap | 871 | NagodoTaiko | EXP OTHER | |
| 840 | Pande2 Close | 872 | NagadoTaikoR | 901 | Group Claps |
| 841 | Pande2 Edge | EXP SFX | 902 | High Claps | |
| 842 | Pande2 Roll1 | 903 | Mid Claps | ||
| 843 | Pande2 Roll2 | 873 | Tick | 904 | Low Claps |
| 844 | Caixa | 874 | Chick | 905 | Hi-Q Claps |
| 845 | Caixa Rim | 875 | Random | 906 | Reverb Claps |
| 846 | Cajon2 Bass | 876 | ReverbSlap | 907 | IronWhip |
| 847 | Cajon2 Close | 877 | Hammer | 908 | Ratchet |
| 848 | Cajon2 Open | 878 | Anvil | 909 | Drawer |
| 849 | Cajon2 Slap | 879 | MetalDoor | 910 | Explosion |
| 850 | Bendir | 880 | MetalPhase | 911 | ElecRide |
| 851 | Darabuka Dom | 881 | RvsMtIfaze | 912 | ElecRide BI |
| 852 | Darabuka Tak | 882 | WhiteLazer | ||
About Snare/Tom Instruments
The last letter of each instrument name means the sound of head shot, or rim shot.
(Example)
S: head sound of Snare
SR: rim sound of Snare
T1: head sound of Tom 1
T1R: rim sound of Tom 1
About Cymbal Instruments
The last letter of each instrument name means the sound of bow shot, edge shot, or bell shot.
(Example)
HB: bow sound of hi-hat
HE: edge sound of hi-hat
CrBw: bow sound of crash
CrEg: edge sound of crash
Rd: bow sound of ride
RdBl: bell sound of ride
RdEg: edge sound of ride
About Electronic Instruments
Electronic sounds can produce VERY low-frequencies when using the Dynamic Pitch Bend function.
Please be careful about the volume of your sound system, speakers or headphones when using this function.
Preset Drum Kit List
| No. | Kit Name | Remark | Pad Pattern |
| 1 | TDW-20 | ||
| 2 | 50s King | ||
| 3 | ControlRoom | ||
| 4 | Metal Core | ||
| 5 | FunkGroove | ||
| 6 | 40s BeBop | ||
| 7 | >processed>> | ||
| 8 | Cajon | ||
| 9 | Melodious | *1 | Tap |
| 10 | Premium | ||
| 11 | SwingJazz | ||
| 12 | BluesRock | ||
| 13 | Dry Studio | ||
| 14 | 2HH House | ||
| 15 | TechFusion | ||
| 16 | LetItBeat | ||
| 17 | neotype | *1 | 1Shot, Tap |
| 18 | JazzBop | ||
| 19 | RawBeat | ||
| 20 | VintageRock | ||
| 21 | D-N-B | *1 | Loop |
| 22 | GarageRock | ||
| 23 | 80s Funk | ||
| 24 | Cashmirror | ||
| 25 | BREAKs |
| No. | Kit Name | Remark | Pad Pattern |
| 26 | 90s Rock | ||
| 27 | JazzClub | ||
| 28 | Jive | ||
| 29 | AmbientRock | ||
| 30 | Cosmic | ||
| 31 | Crossover | ||
| 32 | VintageJazz | ||
| 33 | Coolth | ||
| 34 | BulletBlue | ||
| 35 | FunkyJungle | *1 | Loop |
| 36 | Natural | ||
| 37 | LA BeBop | ||
| 38 | MBs House | ||
| 39 | Bronze Dry | ||
| 40 | DarkComper | ||
| 41 | DRUMS vs DJ | ||
| 42 | Gated | ||
| 43 | RotoFxCity | ||
| 44 | PopDelay | ||
| 45 | 1985 | ||
| 46 | Spaced Out | ||
| 47 | BrazilPerc | ||
| 48 | LatinDrums | ||
| 49 | InVasian | ||
| 50 | FLA>n<GER | *1 | 1Shot, Tap |
| 51 | VPro | ||
| 52 | Slamin' | *1 | Loop |
| 53 | METAL | ||
| 54 | JazzCombo | ||
| 55 | OverDrive | *1 | Tap |
| 56 | Titanium | ||
| 57 | RotoKit | *1 | Loop |
| 58 | UNIVERSE | ||
| 59 | Skanky | ||
| 60 | Brushes | *2 | |
| 61 | Spark! | ||
| 62 | >>GT>> | ||
| 63 | Antique | ||
| 64 | =BreakBeats= | ||
| 65 | Studio | ||
| 66 | Groover | *1 | Loop |
| 67 | Mallet | ||
| 68 | Drumline | ||
| 69 | JazzGig | *1 | Loop |
| 70 | Airtime | ||
| 71 | Sploink! | ||
| 72 | Boogaloo | ||
| 73 | Zeppy | ||
| 74 | Arena | ||
| 75 | Maple |
| No. | Kit Name | Remark | Pad Pattern |
| 76 | Shallow | ||
| 77 | Ballad | *1 | Loop |
| 78 | Raspy | ||
| 79 | PopReggae | *1 | Loop |
| 80 | BrassBiggie | ||
| 81 | WetBooth | *1 | Loop |
| 82 | 70s Record | ||
| 83 | Lite | ||
| 84 | Mellow | ||
| 85 | Stadium | ||
| 86 | TiteOctas | ||
| 87 | 90s Power | ||
| 88 | FxJungle | *1 | Tap |
| 89 | Tekno | ||
| 90 | TR-808 | *1 | Loop |
| 91 | TR-909 | ||
| 92 | Hex< >Drum | *1 | Loop |
| 93 | Cosmosis | ||
| 94 | Technology | ||
| 95 | OrchPerc | *1 | Tap |
| 96 | Survivor | ||
| 97 | Latin Toys | ||
| 98 | African Perc | ||
| 99 | Tabla/Sitar | *1 | Loop, Tap |
| 100 | UserKit | *3 |
About the Pad Patterns
Loop: Loop Pattern: Playback starts when the pad to which the pattern is assigned is struck, and stops when hit again.
Tap: Tap Pattern: Chords or melodies are played once each time the pad to which the pattern is assigned is struck.
1Shot: One-Shot Pattern: Playback (one time only) starts when the pad to which the pattern is assigned is struck.
Remarks
*1: A Pattern is assigned (Loop, One-Shot, Tap).

- To stop a Loop pattern that is playing, either strike the pad used to play the Loop pattern once again, or press the TD-20's [STOP] button.
- To turn off all pad patterns assigned to a drum kit at one time, set the PadPtn Master SW setting to OFF. This is on a "per-kit" basis.
Procedure: Press [KIT] - [F2 (FUNC)] - [F4 (PAD PTN)], then set PadPtn Master SW to "ALL PADS OFF."
2: Brushes can be used.
3: Parameters including volume etc. are set to standard values. Use this when creating a kit from scratch.
MEMO
For C.A.US (Proposition 65)
WARNING
This product contains chemicals known to cause cancer, birth defects and other reproductive harm, including lead.
For EU Countries

This symbol indicates that in EU countries, this product must be collected separately from household waste, as defined in each region. Products bearing this symbol must not be discarded together with household waste.
DE Dieses Symbol bedeutet, dass这点es Produkt in EU-Ländern getrennt vom Hausmull gesammelt werden muss gemäß den regionalen Bestimmungen. Mit这点em Produkt gekenzeichne Produkte)duren nicht zusammen mit den Hausmull entsorgt werden.
FR Ce symbole indique que dans les pays de l'Union europeenne, ce produit doit être collecté séparément des ordures menagères selon les directives en vigueur dans chacun de ces pays. Les produits portant ce symbole ne doivent pas été mis au rebut avec les ordures menagères.
Quito symbolo indica che nei paesi della Comunita europea quello prodotto devesse essere smalitto separatamente dai normali rifiuti domestici, secondo la legislazione in vigore in ciascun paese. I prodotti che riportano quello symbologo non devono essere smalititi insieme ai rifiuti domestici. Ai sensi dell'art. 13 del D.Lgs. 25 luglio 2005 n. 151.
Es Este symbólico indica que en los pañes de la Unión Europea este producto debe recogerse除去 los residuos domesticos, tal como este regulado en cada zona. Los productos con este symbólico no se deben depositar con los residuos domesticos.
This esbolo indica que nos paises da UE, a recolha de sestudo deo.
devera se feita separamente do lixo domestico, de acordo com os
regulamentos de cada regia. Os produits que aparecem este symbolo
nao deverao ser eliminados jintamente com o lixo domestico.
NL Dit symboleel goeft aan dat in landen van de EU dit product geschieren van huishoudelijk afval moet worden aangeboden, zaals bepaal per gemeente of regio. Producten die van dit symboleel voor verzien, mogen Niet samen met huishoudelijk afval worden verwijderd.
Dette symbol angiver, at i EU-lande skal dette produit adskilt fra husholdningsaffald, som defineret i hier unkelt region. Produktker med dette symbol mä参加会议 udammen med hushholdningsaffald.
Dette symbolet indiker at produit t é behandles som spelzialavfall i EU-land, it. til rettingslinjer for den enkelle regionen, og ikke kastes sama n med vanlig hushholdningsavfall. Produktor som er merket med dette symbolet, ma «Ikke kastes sama n med vanlig hushholdningsavfall.
SE Symbolen angert at EU-länder maste den har Produkten kasseras separat frän hushlssavfall, i enlight med varie regions bestimmelse. Produktem med den har symbolen fär inte kasseras tillsammans med hushlssavfall.
Fi Tamä merkintä ilmaisee, etta tuote on EU-maissa kerattäv erillän kotitalousjäteiste kunkin alueen voimassa olevien märäysten mukaisesti. Talla merkinnäla varustetuja tuotteita saa havittä kotitalousjäteiden mukana.
Ez a szimbólum azt jalenti, hogy az Europai Unióban EZT a termeket a HAZIATTASI hulladétkol elkūñönte, az adott régbioban érvényes Szabályozás szerint kell gýjüti. Az ezzel a szimbóllumal ellattont termeket nem szabad a haztarás hulladék köze dobni.
PL Symbol oznaca, ze zgodnie z regulaçjam w odompowiednim regionia, w krajach EU produktu ne aleny wyrzuać z odpadami domywymi. Produktów opatrzonych tym symbolem no moins utlyżowac razem z odpadami domywymi.
Tento symbol udáva, ze v zemich EUU musty bétto vyrobek sbrán oddelené od mamóci o opadu, jak je urçeno pro kázdy region. Výrokyn esoucí tento symbol se nésmi vyhazovat spolu s domacém odypadem.
Tento symbol vyadrude, ze v krajinach EU sa musi zber toto produktu vykonáva oddelene od domoveho odpadu, podfa nariadeni platnych v konkrtenej krajine. Produktys tymto symbolom sa nesmuyvhadzovat' spolu s domovym odadom.
EE See smbol naitab, et EL-ia mades tuleb see toode olemprigist eraldi koguda, nii nagu on igas pirkonnas maaratletud. Selle smboliga margitud tooteid ei tohi ara visata koos olmeprugica.
Sis symbolis rodo, kad ES salyse sis produktas turi buti surenkamas atskirai nuo buitiniu atleky, kaip nustatyta kiekviename regione. Siuo simboliu paZenklinti prodktai neturi buti ismetami kartu su buitinemis atlekomis.
Sis symbils norada, ka ES valstí šo produktu jäievac atseviški no majsaimnecibas aktritumiem, kā noteiktis katra regiona. Produktur ar so simulbu nedrifik izmest kopar majsaimnecibas aktritumiem.
Ta simulb oznacuje, da je treba proizvod v državah EU zbirati loceno od gospodinjskih odpadkov, tak kot je doloceno v vsaki regiji. Proizvod s tem znakom ni dovoljeno odlagatia skupaj z gospodinjskimi od padki.
To ojolao auto vodniokovoi oti oicqos ng E.E. to ovzoykevo npov o joiyov ouiyai yuov ojiyov aotioa oiaov aotoojupma oipovova oia ojojltovatoe o kade poyouy. To ojiyov nov opeyov to ovzoykevo npov ojolao dev ojivao ato qoorttovatoe maie to oiaoxa ato qoorttouq.
有关产品中所含有害物质的说明
A Fanny Trading Office 9, EBN Hagar Al Askalany Street, ARD E1 Golf, Heliopolis, Cairo 11341,Egypt TEL: (022)-418-5331
REUNION
Maison FOY - YAM Marcel 25 Rue Jules Hermann, Chaudron - BP79 97491 Ste Clotilde Cedex, REUNION ISLAND TEL: (0262)218-429
SOUTH AFRICA
T.O.M.S. Sound & Music (Pty) Ltd.
2 ASTRON ROAD DEN JOHANESBURGZA 2
SOUTH AFRICA
TEL: (011)4173400
Paul Bothner(TPY) Ltd.
Royal Cape Park, Unit 24
South Africa
Tel: (021) 799 4900
Fax: (021) 799 4900
ASIA
CHINA
Roland Shanghai Electronics Co.,Ltd.
5F.No.1500 Pingliang Road 200000,CHINA TEL: (021) 5580-0800
Roland Shanghai Electronics Co., Ltd. (BEIJING OFFICE) 10F. No.183 Section Anhuaxil Chaoyang District Beijing 100011 CHINA TEL: (010)6426-5050
HONG KONG
Tom Lee Music Co., Ltd.
Service Division
22-32 Pun Shan Street, Tsuen Wan, New Territories, HONG KONG
TEL: 2415 0911
Persons Music Ltd.
8th Floor, Railway Plaza, 39 Chatham Road South, T.S.T., London WC1N 2JX, UK
TEL: 2331-1863
INDIA
Rivera Digitec (India) Pvt. Ltd. 411, Nirman Kendra
Mahalexami Flats Compound Off. Dr. Edwin Moses Road, Mumbai-400011, INDIA
TEL: (022) 2493 9051
INDONESIA
PT Citta IntiRama
Ji. Cideng Timur Noor 15J-150
Jakarta Prefecture
INDONESIA
TEL: (021) 63241770
KOREA
Cosmos Corporation 1461-9, Seoco-Dong, Seoco Hu, Seoul, KOREA TEL: (02) 3486-8855
MALAYSIA
Roland Asia Pacific Sdn. Bhd. 45-1, Block C2, Jalan PJU 1/39, Dataran Frima, 47301 Fetalang Berdgoro, Malaysia AYSAI TEL: (03) 7805-3263
VIET NAM
Suoi Nhc Company, Ltd 370Cach Mang Thang Tam St. Dist.3,Ho Chi Minh City, VIETNAM Tel:9316540
PHILIPPINES
G.A. Yupangco & Co. Inc. 339 Gil J. Puyat Avenue Masaki, Metro Manila 12001, PHILIPPINES 9801
SINGAPORE
SWEE LEE MUSIC COMPANY PTE. LTD. 150 Sins Drive, 20000, Singapore 687381; Tel: 6846-3676
TAIWAN
ROLAND TAIWAN ENTERPRISE CO.,LTD. Room 5,9F.No.112 Chang Shan N.Road Sec.2,Taipei, TAIWAN, R.O.C. Tel: (02) 2561 3339
THAILAND
Theera Music Co., Ltd. 100-108 Soi Vermakornassem, New Road,Sumpantawongse, Bangkok 10100 THAILAND TEL: (02) 224-8821
AUSTRALIA/ NEW ZEALAND
AUSTRALIA/ NEW ZEALAND
Roland Corporation Australia Pty.,Ltd. 38 Campbell Avenue, The Royal Commonwealth NSW 2099 AUSTRALIA
For Australia
Tel: (02) 9982 8266
Fax: (09) 3098 715
CENTRAL/LATINAMERICA
ARGENTINA
Instrumentos Musicals S.A.
Av.Santa Fe 2055
(1123) Buenos Aires
TEL: (011)4508-2700
TEL: (011)4508-2700
BARBADOS
A&b Music Supplies LTD 12 Webster Industrial Park Wildey,St.Michael,Barbados TEL:246)430-1100
BRAZIL
Roland Brasil Ltda.
Rua San Jose, 780 Sala B
Parque Industrial San Jose
São Paulo, 1200-1205, BRAZIL
TEL: (011) 4615 5666
CHILE
Commercial Fancia II S.A.
Rut.: 96,919,420-1
Mail: 19,358,498,4th Floor
Santiago - Centro, CHILSE
TEL: (02) 688-9540
COLOMBIA
Centro Musical Ltda
Cra 43 B No 25 A 41 Bododega 9
Medellin, Colombia
TEL: (574)3812529
COSTA RICA
JUAN Bansbach Instrumentos Musicals
Ave.1: Calle 11, Apartado 107
San Jose, COSTA RICA
TEL:258-0211
CURACAO
Zeelandia Music Center Inc.
Orienweg 30
Curacao, Netherland Antilles
TEL: (305)5926866
DOMINICAN REPUBLIC
Bansbach Instrumentos Musiques Nicaragua Altairdre D'Ese Calre Pte de la Farmacia Sta.Avena 1,2,3,4,5,6,7,8,9,10,11,12,13,14,15,16,17,18,19,20,21,22,23,24,25,26,27,28,29,30,31,32,33,34,35,36,37,38,39,40,41,42,43,44,45,46,47,48,49,50,51,52,53,54,55,56,57,58,59,60,61,62,63,64,65,66,67,68,69,70,71,72,73,74,75,76,77,78,79,80
PANAMA
SUPRO MUNDIAL, S.A.
Boulevard Andrews, Albrook,
New York City, REP. DE
PANAMA
TEL: 315-0101
PARAGUAY
Distribuidora De
Instrumentos Musicals
J.E. Oleary and EQ, Manduvi
R. M. Chakrabarty, ISAY
TEL: (595) 21 492147
PERU
Audionet
Distribuiones Musicas SAC
Juan Fanning 530
Miraflores
Lima - Peru
TEL: (511) 4461388
TRINIDAD
AMR Ltd
Ground Floor
Maritime Baza
Buenos Aires, Tl. Tzadid W.I.D.
TEL: (866) 638 6385
URUGUAY
Todo Musica S.A.
Francisco Acuna de Figueroa 1771
C.P.: 11.800
Montevideo, URUGUAY
TEL: (02) 924-2335
VENEZUELA
Instrumentos Musicales
Allegro,C.A.
Av.las industriias edf.Guitar import
7 zona Industrial de Turumo
Caracas, Venezuela
TEL: (212) 244-1122
EUROPE
AUSTRIA
155, New National Road
Patras 26442, GREECE
TEL:2610435400
HUNGARY
Roland East Europe Ltd.
Warehouse Area DEPO'Pf.83
H-2046 Torokbalint,
HUNGARY
TEL: (23) 511011
IRELAND
Roland Ireland
G2 Calmount Park, Calmount
Avenue, Dublin 12
Republic of IRELAND
TEL: (01) 4294444
ITALY
Roland Italy S. p. A.
Danvik Center 28, 2 tr.
S-131 30 Nacka SWEDEN
TEL: (0)8702 00 20
SWITZERLAND
Roland (Switzerland) AG
Atlantic Close, Swansea
Enterprise Park, SWANSEA
SA7 9FJ,
UNITED KINGDOM
TEL: (01792) 702701
MIDDLE EAST
BAHRAIN
Moon Stores
No.1231&1249 Rumaytha
Building Road 3931, Manama
339BAHRAIN
TEL: 17 813 942
IRAN
MOCO INC.
No.41 Nike St., Dr.Shariyati Ave.,
Roberoye Cerahe Mirdamad
Tehran, IRAN
TEL: (021)-2285-4169
ISRAEL
Halilit P. Greenspoon & Sons
Ltd.
8 Retzif Ha'alia Hashnia St.
Tel-Aviv-Yafo ISRAEL
TEL: (03) 6823666
JORDAN
Al-Yousifi Service Center
P.O.Box 126 (Safat) 13002
KUWAIT
TEL:00965802929
LEBANON
Chahine S.A.L.
George Zeidan St., Chahine
Bldg., Achrafieh, P.O.Box: 16
5857
Beirut,LEBANON
TEL: (01) 20-1441
OMAN
TALENTZ CENTRE L.L.C.
Malatan House No.1
Al Noor Street, Ruwi
SULTANATE OF OMAN
TEL:24783443
QATAR
Al Emadi Co. (Badie Studio &
Stores)
P.O.Box 62DohaQATAR
TEL:4423-554
SAUDI ARABIA
aDawliah Universal
Electronics APL
Behind Pizza Inn
Prince Turkey Street
aDawliah Building,
POBOX2154
Alkhobar 31952
SAUDI ARABIA
TEL: (03) 8643601
SYRIA
Technical Light & Sound
Center
Rawda, Abdul Qader Jazairi St.
Bldg.No.21,P.O.BOX 13520,
Damascus, SYRIA
TEL: (011) 223-5384
TURKEY
ZUHAL DIS TICARET A.S
Galip Dede Cad. No.37
Beyoglu - Istanbul / TURKEY
TEL: (0212) 249 85 10
U.A.E.
Zak Electronics & Musical
Instruments Co. L.L.C.
Zabeel Road, Al Sheroog Bldg.
No.14,Ground FloorDubai
U.A.E.
TEL: (04) 3360715
NORTH AMERICA
CANADA
Roland Canada Ltd.
(Head Office)
5480 Parkwood Way
Richmond B.C.,V6V 2M4
CANADA
TEL: (604) 270 6626
Roland Canada Ltd.
(Toronto Office)
170 Admiral Boulevard
Mississauga On L5T 2N6
CANADA
TEL: (905) 362 9707
U.S.A.
Roland Corporation U.S.
5100 S. Eastern Avenue
Los Angeles, CA 90040-2938
U.S.A.
TEL: (323) 890 3700
U.S.A.
Roland Corporation U.S.
5100 S. Eastern Avenue
Los Angeles, CA 90040-2938
U.S.A.
TEL: (323) 890 3700
TDW-20
Expansion Board for TD-20
取极説明書
操作:[KIT] - [F2 (FUNC)] - [F1 (VOLUME)]
PRESET
[CARD]-[F3 (IMPORT)]
CARD
(Original TD-20)

Backup 1\2\3--/Backup 8
インズトのバーマメーロー [INST]
インズトの選択
[KIT] - [F2 (FUNC)] - [F4 (PAD PTN)]
トリガ一・バラメ一夕一の設定
最新のパドに対応いたします。
CY-5
- RT-10 フリーナス
[SETUP] - [F2 (OUTPUT)] - [F1 (MASTER)]

[SETUP] - [F3 (CONTROL)] - [F1 (FOOT SW)]
VbD·SvI3Jn的设定:
[SETUP] - [F3 (CONTROL)] - [F2 (PAD SW)]

[SETUP] - [F4 (OPTION)] - [F3 (MIX IN)]
| 901 | Group Claps |
| 902 | High Claps |
| 903 | Mid Claps |
| 904 | Low Claps |
| 905 | Hi-Q Claps |
| 906 | Reverb Claps |
| 907 | IronWhip |
| 908 | Ratchet |
| 909 | Drawer |
| No. | インスト名 |
| 910 | Explosion |
| 911 | ElecRide |
| 912 | ElecRide BI |
| 913 | ElecRide Eg |
| 914 | Revrs Kick |
| 915 | Revs Snare |
| 916 | Revs Crash2 |
| 917 | Revs China2 |
| 918 | AcousGuitar |
| 919 | FingerBass |
| 920 | SlapBass |
| EXP OFF | |
| 921 | EXP Off |
スネア、夕ム音色にpine
設定方法:[KIT] - [F2 (FUNC)] - [F4 (PAD PTN)]、PadPtn Master SW = ALL PADS OFF