
LBL 16 RO - Washing machine SMEG - Free user manual and instructions
Find the device manual for free LBL 16 RO SMEG in PDF.
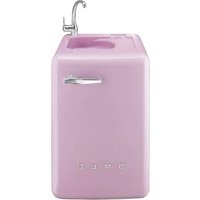


| Product Type | Freestanding Washing Machine |
| Brand | Smeg |
| Model | LBL 16 RO |
| Loading Type | Front-loading |
| Capacity | 7 kg |
| Dimensions (H x W x D) | 850 x 595 x 600 mm |
| Weight | 70 kg |
| Power Supply | 220-240 V, 50 Hz |
| Power Consumption | 2000 W |
| Spin Speed | 1600 rpm max |
| Energy Efficiency Class | A+++ |
| Number of Programs | 15 |
| Key Functions | Delay Start, Quick Wash, Eco, Anti-Allergy, Child Lock |
| Control Type | Electronic with LED display |
| Noise Level (Wash/Spin) | 52 dB / 76 dB |
| Water Connection | Cold water fill |
| Drum Material | Stainless steel |
| Door Opening | Left hinge, 180° opening |
| Maintenance | Clean pump filter monthly, descale every 3 months |
| Safety | Overload protection, foam control, water inflow protection |
| Spare Parts Availability | Genuine Smeg parts available for 10 years |
| Repairability Index | 8.0 / 10 |
Frequently Asked Questions - LBL 16 RO SMEG
User questions about LBL 16 RO SMEG
0 question about this device. Answer the ones you know or ask your own.
Ask a new question about this device
Download the instructions for your Washing machine in PDF format for free! Find your manual LBL 16 RO - SMEG and take your electronic device back in hand. On this page are published all the documents necessary for the use of your device. LBL 16 RO by SMEG.
USER MANUAL LBL 16 RO SMEG
Instructions for use of the LBL16
Washing Machine with integrated sink

Index
Page
- Instructions for unpacking and transport 2
- Plinth disassembly 3
- Rubber strap disassembly 4
- Rubber strap use 5
- Door disassembly 6
- Cleaning 7
- Caution 7
- Instructions for unpacking and transport

2. Plinth disassembly
1) With a screwdriver, press the lever on the points indicated, with a movement from the bottom to the top.
3) This will allow the plastic tooth on the plinth to come out of its housing. 4) After performing this operation on both sides, proceed with the plinth removal following the order shown in the picture.
5) To reassemble the plinth, follow the order shown in the picture. 6) Finish the operation with a light pressure on the points indicated in the picture. The "click" sound will indicate that the plinth is correctly assembled.
3. Rubber strap removal


3) ... with a light pressure... 4) and then extract them.
4. Rubber strap use

In the picture, you can see the possibility of inserting some products in the compartment.
ATTENTION:
Maximum weight: 4.0 kg

These products are for daily use, e.g., detergents, fabric softeners, etc.
ATTENTION
This appliance is intended for use by adults.
Do not allow children to tamper with the controls or play with the washing machine.
Do not allow children to approach the appliance.
Keep children away from the appliance.
5. Door dismount

1) To remove the door, unscrew the indicated screw

2) on both the hinges (cross screwdriver)

3) support the door and extract ... 4) .. the hinges from their sites.

6. Instruction for cleaning
ATTENTION !!
Only use non-abrasive sponges, soap and water to clean the washing machine!!
Never use the following:
- Abrasive sponges (e.g.: for washing dishes, etc.)
- Powder cleansers and detergents that could ruin the surface of the basin
To preserve the external appearance of the sink, never allow the following materials to come into contact with it:
- Nail varnish removers
- Stain removers
- Drain cleaners
- Ethanol
- Solvents • Acids at any concentration level
- Engine oil
- Chloroform
- Ether
- Formalin
- Iodine
7. Caution
The washbasin only works if the washing machine is powered (plug inserted).
Brand : SMEG
Model : LBL 16 RO
Category : Washing machine