
Bravia KDL-40S2010 - Television SONY - Free user manual and instructions
Find the device manual for free Bravia KDL-40S2010 SONY in PDF.


| Product Type | LCD Television |
| Brand | Sony |
| Model | Bravia KDL-40S2010 |
| Screen Size | 40 inches (101.6 cm) diagonal |
| Display Resolution | 1366 x 768 pixels (HD Ready) |
| Aspect Ratio | 16:9 |
| Panel Type | LCD with CCFL backlight |
| Contrast Ratio | 3000:1 (dynamic) |
| Brightness | 500 cd/m² |
| Viewing Angle | 178° horizontal / 178° vertical |
| Audio Output | 20 W (10 W x 2) |
| Power Consumption | 200 W (typical), less than 1 W in standby |
| Power Supply | AC 100-240 V, 50/60 Hz |
| Weight with Stand | Approx. 22 kg |
| Weight without Stand | Approx. 18 kg |
| Dimensions with Stand (W x H x D) | 996 x 684 x 265 mm |
| Dimensions without Stand (W x H x D) | 996 x 635 x 102 mm |
| Connectivity | 2 x HDMI, 1 x VGA (PC), 2 x SCART, Composite, S-Video, Component, RF antenna |
| Key Features | Bravia Engine, DRC, Cinema Mode, 24p True Cinema, Picture Freeze |
| Remote Control | RM-ED012 (typical) |
| Wall Mount VESA | 200 x 200 mm |
| Care Instructions | Clean with soft dry cloth; do not use solvents or liquids |
| Safety Notes | Do not block ventilation; use correct voltage; unplug during storms |
| Spare Parts | Remote control, stand, power cord, screws |
Frequently Asked Questions - Bravia KDL-40S2010 SONY
User questions about Bravia KDL-40S2010 SONY
0 question about this device. Answer the ones you know or ask your own.
Ask a new question about this device
Download the instructions for your Television in PDF format for free! Find your manual Bravia KDL-40S2010 - SONY and take your electronic device back in hand. On this page are published all the documents necessary for the use of your device. Bravia KDL-40S2010 by SONY.
USER MANUAL Bravia KDL-40S2010 SONY
LCD Digital Colour TV
Operating Instructions
GB
Before operating the TV, please read the "Safety information" section of this manual.
Information section of this manual. Retain this manual for future reference.
© 2006 Sony Corporation
For useful information about Sony products
http://www.sony-europe.com/myproduct
Introduction
Thank you for choosing this Sony product. Before operating the TV, please read this manual thoroughly and retain it for future reference.
Notice for Digital TV function
- Any functions related to Digital TV (DVB) only work in countries or areas where DVB-T (MPEG2) digital terrestrial signals are broadcast. Please confirm with your local dealer if you can receive a DVB-T signal where you live.
- Although this TV set follows DVB-T specifications, compatibility with future DVB-T digital terrestrial broadcasts cannot be guaranteed.
- Some Digital TV functions may not be available in some countries.
Trademark information
• is a registered trademark of the DVB Project - Manufactured under license from BBE Sound, Inc. Licensed by BBE Sound, Inc. under one or more of the following US patents: 5510752, 5736897. BBE and BBE symbol are registered trademarks of BBE Sound, Inc. - TruSurround XT, SRS and ( ●) symbol are trademarks of SRS Labs, Inc. TruSurround XT technology is incorporated under license from SRS Labs, Inc. • HDMI, the HDMI logo and HDMI High-Definition Multimedia Interface are trademarks or registered trademarks of HDMI Licensing, LLC.
- The illustrations used in this manual are of the KDL-32S2000 unless otherwise stated.
Table of Contents
Start-up Guide 4
Safety information 7
Precautions 10
Overview of the remote ....11
Overview of the TV buttons and indicators....12
Watching TV
Watching TV....13
Checking the Digital Electronic Programme Guide (EPG) DVB 15
Using the Favourite list DV3 17
Viewing pictures from connected equipment 18
Using MENU Functions
Navigating through menus 19
Picture menu....20
Sound menu....22
Screen menu....24
Set-up menu....25
PC Settings menu 27
Analogue Set-up menu (Analogue mode only) 28
Digital Set-up menu DVB 31
Using Optional Equipment
Connecting optional equipment....33
Additional Information
Specifications 36
Troubleshooting 38
Index 40
DV3 : for digital channels only
1: Checking the accessories
Remote RM-ED005 (1)
Size AA batteries (R6 type) (2)
Mains lead (Type C-6) (1)

Coaxial cable (1)

Cable holder (1)

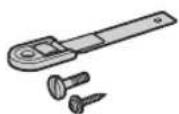
Support belt (1) and screws (2)
To insert batteries into the remote

Notes
- Observe the correct polarity when inserting batteries.
- Dispose of batteries in an environmentally friendly way. Certain regions may regulate disposal of the battery. Please consult your local authority.
- Do not use different types of batteries together or mix old and new batteries.
- Handle the remote with care. Do not drop or step on it, or spill liquid of any kind onto it.
- Do not place the remote in a location near a heat source, or in a place subject to direct sunlight, or in a damp room.
2: Connecting an aerial/VCR
Connecting an aerial only

Connecting an aerial and VCR

3: Bundling the cables

4: Preventing the TV from toppling over

5: Selecting the language and country/region


1 Connect the TV to your mains socket (220-240V AC, 50Hz). 2 Press ⏻ on the TV (top side). When you switch on the TV for the first time, the Language menu appears on the screen. When the TV is in standby mode (the ⏻ (standby) indicator on the TV (front) is red), press ⌊/♡ on the remote to switch on the TV.
Continued
3 Press ↙/▽ to select the language displayed on the menu screens, then press ⊕.

4 Press ⬇/⇨ to select the country/region in which you will operate the TV, then press ⊕.

If the country/region in which you want to use the TV does not appear in the list, select “-” instead of a country/region.
The message confirming the TV start auto-tuning appears on the screen, then go to "6: Auto-tuning the TV".
6: Auto-tuning the TV
The TV will now search for and store all available TV channels.

1 Before you start auto-tuning the TV, insert a pre-recorded tape into the VCR connected to the TV (page 4) and start play back.
The video channel will be located and stored on the TV during auto-tuning.
If no VCR is connected to the TV, this procedure is not required. Go to step 2.
2 Select "OK", then press

The TV starts searching for all available digital channels, followed by all available analogue channels. This may take some time, please be patient and do not press any buttons on the TV or remote.
If a message appears for you to confirm the aerial connections
No digital or analogue channels were found. Check all the aerial connections and press to start auto-tuning again.
3 When the Programme Sorting menu appears on the screen, follow the steps of "Programme Sorting" (page 28).
If you do not wish to change the order in which the analogue channels are stored on the TV, go to step 4.
4 Press MENU to exit.
The TV has now tuned in all the available channels.
Safety information
Mains lead
- Observe the following to prevent the mains lead being damaged. If the mains lead is damaged, it may result in a fire or an electric shock.

- Unplug the mains lead when moving the TV set.
- When you disconnect the mains lead, disconnect it from the mains socket first.
- Be sure to grasp the plug when disconnecting the mains lead. Do not pull on the mains lead itself.
- Do not pinch, bend, or twist the mains lead excessively. The core conductors may be exposed or broken.
- Do not modify the mains lead.
- Do not put anything heavy on the mains lead.
- Keep the mains lead away from heat sources.
- If you damage the mains lead, stop using it and ask your dealer or Sony service centre to exchange it.
- Do not use the supplied mains lead on any other equipment.
- Use only an original Sony mains lead, not other brands.
Mains socket
- The TV set with a three-wire grounding type mains plug must be connected to a mains socket with a protective earthing connection.
- Do not use a poor fitting mains socket. Insert the plug fully into the mains socket. A poor fit may cause arcing and result in a fire. Contact your electrician to have the mains socket changed.
Cleaning the mains plug
Unplug the mains plug and clean it regularly. If the plug is covered with dust and it picks up moisture, its insulation may deteriorate and result in a fire.


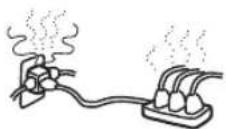
Overloading
This TV set is designed to operate on a 220–240 V AC supply only. Take care not to connect too many appliances to the same mains socket as this could result in fire or electric shock.
When not in use
- If you will not be using the TV set for several days, the TV set should be disconnected from the mains for environmental and safety reasons.
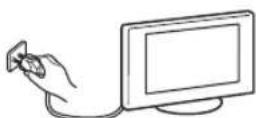
- The TV set is not disconnected from the mains when the TV set is switched off. To disconnect the TV set completely, pull the plug from the mains. However, some TV sets may have features which need the TV set to be left in standby to work correctly. The instructions in this manual will inform you if this applies.
Carrying
- Before carrying the TV set, disconnect all the cables from the TV set.
- Carrying the large size TV set requires two or more people.
- When you carry the TV set by hand, hold the TV set as illustrated on the right. When lifting the TV set or moving the panel of the TV set, hold it firmly from the bottom. If you do not do so, the TV set may fall and be damaged or cause serious injury.
- When transporting it, do not subject the TV set to jolts or excessive vibration. The TV set may fall and be damaged or cause serious injury.
- If the TV set has been dropped or damaged, have it checked immediately by qualified service personnel.
- When you carry the TV set in for repair or when you move it, pack it using the original carton and packing material.
Placement
- The TV set should be installed near an easily accessible mains socket.
- Place the TV set on a stable, level surface. Do not hang anything on the TV set. If you do, the TV set may fall from the stand, causing damage or serious injury.
- Do not install the TV set in places subject to extreme temperature, for example in direct sunlight, or near a radiator, or heating vent. If the TV set is exposed to extreme temperature, the TV set may overheat and cause deformation of the casing or cause the TV set to malfunction.
- Do not install the TV set in a place exposed to direct air conditioning. If the TV set is installed in such a location, moisture may condense inside and may cause a malfunction.
- Never place the TV set in hot, oily, humid or excessively dusty places.
- Do not install the TV set where insects may enter.
- Do not install the TV set where it may be exposed to mechanical vibration.
- Do not install the TV set in a location where it may protrude, such as on or behind a pillar, or where you might bump your head on it. Otherwise, it may result in injury.
- Do not allow children to climb on the TV set.
- If you use the TV set near the seashore, salt may corrode metal parts of the TV set and cause internal damage or fire.


Continued
Ventilation
- Never cover the ventilation holes or insert anything in the cabinet. It may cause overheating and result in a fire.

- Unless proper ventilation is provided, the TV set may gather dust and get dirty. For proper ventilation, observe the following:
- Do not install the TV set turned backwards or sideways. - Do not install the TV set turned over or upside down. - Do not install the TV set on a shelf or in a closet. - Do not place the TV set on a rug or bed. - Do not cover the TV set with cloth, such as curtains, or items such as newspapers, etc.
- Leave some space around the TV set as shown below. Otherwise, air-circulation may be inadequate and causing overheating, which may cause a fire or damage to the TV set.
Installed on the wall

Leave at least this space around the set.
Installed with stand

Leave at least this space around the set.
- Never install the TV set as follows:
Air circulation is blocked.

Air circulation is blocked.

Optional accessories
Observe the following when installing the TV set using a stand or wall-mount bracket. If you do not do so, the TV set may fall and cause serious injury.

- It is strongly recommended that you use Sony accessories for safety reasons: - KDL-46S2000/KDL-46S2010/KDL-46S2030/ KDL-40S2000/KDL-40S2010/KDL-40S2030: Wall-mount bracket SU-WL51.
- KDL-32S2000/KDL-32S2010/KDL-32S2020/KDL-32S2030/KDL-26S2000/KDL-26S2010/KDL-26S2020/KDL-26S2030: Wall-mount bracket SU-WL31.
- It is strongly recommended that you use the official Sony wall-mount bracket to allow adequate air circulation and to avoid accumulated dust on the TV.
- If the TV set is to be installed on a wall, have the installation carried out by qualified service personnel. Improper installation may render the TV set unsafe.
- Secure the TV set properly, following the instructions supplied with your stand when installing the TV set.
- Be sure to attach the brackets supplied with your stand.
Wiring
- When wiring cables, be sure to unplug the mains lead for your safety. • Take care not to catch your feet on the cables. It may damage the TV set.
Medical institutions
Do not place this TV set in a place where medical equipment is in use. It may cause a malfunction of medical instruments.

Outdoor use
- Do not install this TV set outdoors. If the TV set is exposed to rain, it may result in a fire or an electrical shock.
- If this TV set is exposed to direct sunlight, the TV set may heat up and it may damage the TV set.

Vehicle, Ships and other vessels
- Do not install this TV set in a vehicle. The motion of the vehicle may cause the TV set to fall down and cause injury.
- Do not install this TV set on a ship or other vessel. If the TV set is exposed to seawater, it may cause a fire or damage the TV set.


Water and moisture
- Do not use this TV set near water – for example, near a bathtub or shower room. Also do not expose to rain, moisture or smoke. This may result in a fire or an electric shock.

- Do not touch the mains lead and the TV set with wet hands. Doing so may cause an electric shock or damage to the TV set.

Moisture and flammable objects
- Do not place any objects on the TV set. The TV set shall not be exposed to dripping or splashing and that no objects filled with liquid, such as vases, shall be placed on the TV set.

• To prevent fire, keep flammable objects or naked lights (e.g. candles) away from the TV set.
- If any liquid or solid object does fall through openings in the cabinet, do not operate the TV set. It may result in an electric shock or damage to the TV set. Have it checked immediately by qualified service personnel.
Lightning storms
For your own safety, do not touch any part of the TV set, mains lead, or aerial lead during lightning storms.

Broken pieces
- Do not throw anything at the TV set. The screen glass may break by the impact and cause serious injury.
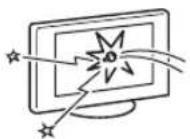
- If the surface of the TV set cracks, do not touch it until you have unplugged the mains lead. Otherwise electric shock may result.
Servicing
Dangerously high voltage is present inside the TV set. Do not open the cabinet. Entrust the TV set to qualified service personnel only.

Small accessories removal and fitting
Keep small accessories out of children's reach.
Precautions
Viewing the TV
- To view the TV comfortably, the recommended viewing position is from four to seven times the screen's vertical length away from the TV set.
- To obtain a clear picture, do not expose the screen to direct illumination or direct sunlight. If possible, use spot lighting directed down from the ceiling.
- View the TV in moderate light, as viewing the TV in poor light or during long periods of time strains your eyes.
Volume adjustment
- Adjust the volume so as not to trouble your neighbours. Sound carries very easily at night time. Therefore, closing the windows or using headphones is suggested.
- When using headphones, adjust the volume so as to avoid excessive levels, as hearing damage may result.
LCD Screen
- Although the LCD screen is made with high-precision technology and 99.99% or more of the pixels are effective, black dots may appear or bright points of light (red, blue, or green) may appear constantly on the LCD screen. This is a structural property of the LCD screen and is not a malfunction.
- Do not push or scratch the front filter, or place objects on top of this TV set. The image may be uneven or the LCD screen may be damaged.
- If this TV set is used in a cold place, a smear may occur in the picture or the picture may become dark. This does not indicate a failure. These phenomena disappear as the temperature rises.
- Ghosting may occur when still pictures are displayed continuously. It may disappear after a few moments.
- The screen and cabinet get warm when this TV set is in use. This is not a malfunction.
- The LCD screen contains a small amount of liquid crystal and mercury. The fluorescent tube used in this TV set also contains mercury. Follow your local ordinances and regulations for disposal.
Handling and cleaning the screen surface/cabinet of the TV set
Be sure to unplug the mains lead connected to the TV set from mains socket before cleaning. To avoid material degradation or screen coating degradation, observe the following precautions.
- Do not push on the screen, scratch it with a hard object, or throw anything at it. The screen may be damaged.
- Do not touch the display panel after operating the TV set continuously for a long period as the display panel becomes hot.
- We recommend that the screen surface be touched as little as possible.
- To remove dust from the screen surface/cabinet, wipe gently with a soft cloth. If dust is persistent, wipe with a soft cloth slightly moistened with a diluted mild detergent solution.
- Never use any type of abrasive pad, alkaline/acid cleaner, scouring powder, or volatile solvent, such as alcohol, benzene, thinner or insecticide. Using such materials or maintaining prolonged contact with rubber or vinyl
materials may result in damage to the screen surface and cabinet material.
- The ventilation holes can accumulate dust over time. To ensure proper ventilation, we recommend removing the dust periodically (once a month) using a vacuum cleaner.
- If the angle of the TV set is to be adjusted, steady the base of the stand with your hand to prevent the TV set from becoming separated from the stand. Be careful not to get your fingers caught between the TV set and the stand.
Optional Equipment
- Do not install optional components too close to the TV set. Keep optional components at least 30 cm away from the TV set. If a VCR is installed in front of the TV set or beside the TV set, the picture may become distorted.
- Picture distortion and/or noisy sound may occur if the TV set is positioned in close proximity to any equipment emitting electromagnetic radiation.
Disposal of the TV set

Disposal of Old Electrical & Electronic Equipment (Applicable in the European Union and other European countries with separate collection systems)
This symbol on the product or on its packaging indicates that this product shall not be treated as household waste. Instead it shall be handed over to the applicable collection point for the recycling

of electrical and electronic equipment. By ensuring this product is disposed of correctly, you will help prevent potential negative consequences for the environment and human health, which could otherwise be caused by inappropriate waste handling of this product. The recycling of materials will help to conserve natural resources. For more detailed information about recycling of this product, please contact your local Civic Office, your household waste disposal service or the shop where you purchased the product.
Overview of the remote

① I/⏻ - TV standby
Switches off the TV temporarily and on from standby mode.
② A/B - Dual Sound (page 23)
③ Coloured buttons
Selects the options at the bottom of the Favourite and EPG digital menus.
4/ +info/ Text reveal
- In digital mode: Displays brief details of the programme currently being watched.
- In analogue mode: Displays information such as current channel number and screen mode.
- In Text mode (page 14): Reveals hidden information (e.g., answers to a quiz).
⑤ ↗/▽/↔/⇨/⊕ (page 13, 19)
⑥TOOLS (page 14, 18, 35)
Enables you to access various viewing options and change/make adjustments according to the source and screen mode.
⑦MENU (page 19) ⑧ DIGITAL – Digital mode (page 13) 9Number buttons
- In TV mode: Selects channels. For channel numbers 10 and above, enter the second digit within two seconds.
- In Text mode: Enters the three digit page number to select the page.
10 - Previous channel
Returns to the previous channel watched (for more than five seconds).
⑪PROG +/- (page 13)
- In TV mode: Selects the next (+) or previous (-) channel.
- In Text mode: Selects the next (+) or previous (-) page.
12 △ +/- - Volume
13 ☐ - Mute (page 13) 14 - Text (page 14) ⑮ANALOG - Analogue mode (page 13) 16 /RETURN
Returns to the previous screen of any displayed menu.
17 - EPG (Digital Electronic Programme Guide) (page 15)
18 →Picture freeze (page 14)
Freezes the TV picture.
⑲ -Screen mode (page 14) 20/ -Input select / Text hold
- In TV mode (page 18): Selects the input source from equipment connected to the TV sockets.
- In Text mode (page 14): Holds the current page.
Tip
The A/B, PROG + and number 5 buttons have tactile dots. Use the tactile dots as references when operating the TV.
Overview of the TV buttons and indicators
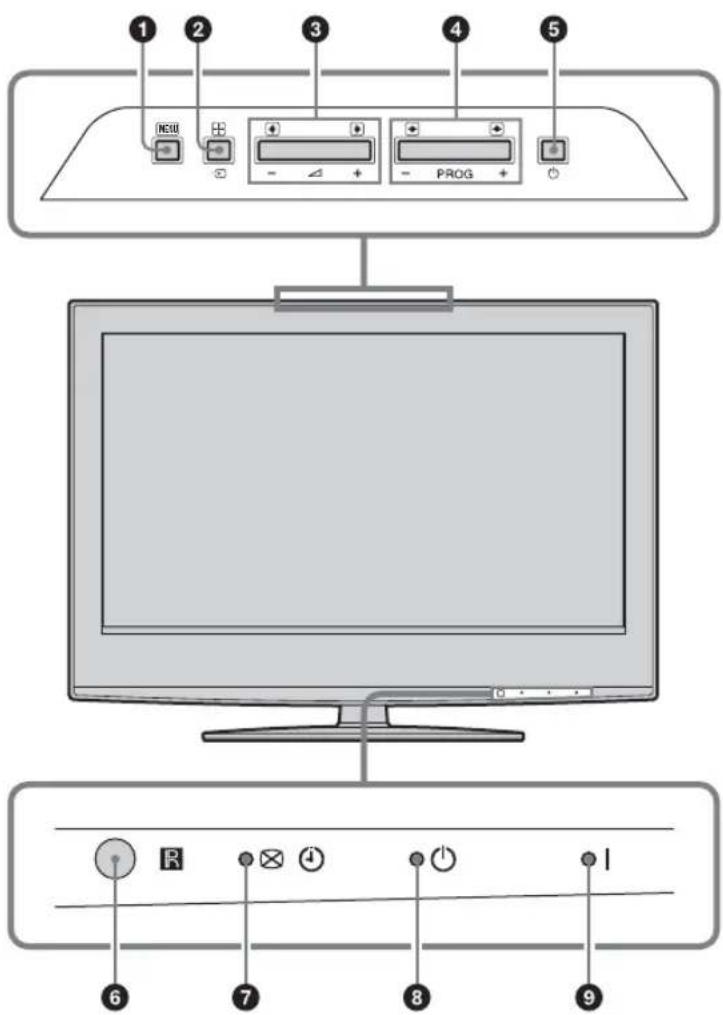
① (page19)
②/→Input select/OK
- In TV mode (page 18): Selects the input source from equipment connected to the TV sockets. - In TV menu: Selects the menu or option, and confirms the setting.
③ ∠+/-/ /← →
- Increases (+) or decreases (-) the volume. - In TV menu: Moves through the options left (or right ().
④PROG +/- / ↑ ↓
- In TV mode: Selects the next (+) or previous (-) channel. - In TV menu: Moves through the options up (▶ or down (). ↓
5 ⏻ - Power
Switches the TV on or off.
⑥ Remote control sensor
⑦ Picture Off/Timer indicator
- Lights up in green when the picture is switched off (page 26). - Lights up in orange when the timer is set (page 25).
8 ⏻ - Standby indicator
Lights up in red when the TV is in standby mode.
⑨I – Power indicator
Lights up in green when the TV is switched on.
Note
Make sure that the TV is completely switched off before unplugging the mains lead. Unplugging the mains lead while the TV is turned on may cause the indicator to remain lit or may cause the TV to malfunction.
Watching TV
Watching TV


1 Press ⏻ on the TV (top side) to switch on the TV.
When the TV is in standby mode (the ⏻ (standby) indicator on the TV (front) is red), press ⚠/⏻ on the remote to switch on the TV.
2 Press DIGITAL to switch to digital mode or ANALOG to switch to analogue mode.
The channels available vary depending on the mode.
3 Press the number buttons or PROG +/- to select a TV channel.
To select channel numbers 10 and above using the number buttons, enter the second and third digits within two seconds.
To select a digital channel using the Digital Electronic Programme Guide (EPG), see page 15.
In digital mode
An information banner appears briefly. The following icons may be indicated on the banner.
Radio service : Scrambled/Subscription service : Multiple audio languages available : Subtitles available 7: Subtitles available for the hearing impaired ⑱: Recommended minimum age for current programme (from 4 to 18 years) : Parental Lock : Current programme is being recorded
Additional operations
| To Do this | |
| Turn off the TV temporarily(Standby mode) | Press I/⏻. |
| Turn on the TV from Standby mode without sound | Press ⚙*. Press △+/- to set the volume level. |
| Turn off the TV completely | Press ⏻ on the TV (top side). |
| Adjust the volume Press △+ (increase)/- (decrease). | |
| Mute the sound Press ⚙*. Press again to restore. | |
| Access the Programme index table (in analogue mode only) | Press ⚙To select an analogue channel, press ⚗/⏻, then press ⚙.To access the Input signal index table, see page 18. |
Continued
To access Text
Press ☐. Each time you press ☐, the display changes cyclically as follows:
Text → Text over the TV picture (mix mode) → No Text (exit the Text service)
To select a page, press the number buttons or PROG +/-.
To hold a page, press /→
To reveal hidden information, press Ⓗ?
Tips
- Ensure that the TV is receiving a good signal, or some text errors may occur.
- Most TV channels broadcast a Text service. For information on the use of the service, select the index page.
- When four coloured items appear at the bottom of the Text page, Fastext is available. Fastext allows you to access pages quickly and easily. Press the corresponding coloured button to access the page.
Picture Freeze
Freezes the TV picture (e.g. to make a note of a telephone number or recipe).
1 Press on the remote control. 2 Press ↗/↙/↙/→ to adjust the position of the window. 3 Press to remove the window. 4 Press again to return to normal TV mode.
To change the screen mode manually to suit the broadcast
Press repeatedly to select Smart, 4:3, Wide, Zoom, or 14:9.
Smart*

Displays conventional 4:3 broadcasts with an imitation wide screen effect. The 4:3 picture is stretched to fill the screen.
4:3

Displays conventional 4:3 broadcasts (e.g., non-wide screen TV) in the correct proportions.
Wide

Displays wide screen (16:9) broadcasts in the correct proportions.
Zoom*

Displays cinemascopic (letter box format) broadcasts in the correct proportions.
14:9*
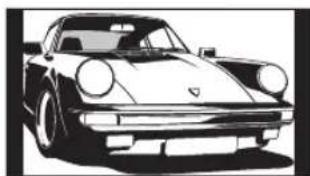
Displays 14:9 broadcasts in the correct proportions. As a result, black border areas are visible on the screen.
* Parts of the top and bottom of the picture may be cut off.
Tips
- Alternatively, you can set "Auto Format" to "On". The TV will automatically select the best mode to suit the broadcast (page 24).
- You can adjust the position of the picture when selecting 14:9 or Zoom. Press up/down arrows to move up or down (e.g., to read subtitles).
- Some characters and/or letters at the top and the bottom of the picture may not be visible in Smart mode. In such a case, you can select "Vertical Size" using the "Screen" menu and adjust vertical size to make it visible.
Using the Tools menu
Press TOOLS to display the following options when viewing the TV programme.
Options Description
Power Saving See page 26.
Subtitle Setting (in digital mode only) See page 32.
Digital Favourites (in digital mode only) See page 17.
Picture Mode See page 20.
Sound Mode See page 22.
Auto Clock Set (in analogue mode only) Allows you to switch to digital mode and obtain the time.
Sleep Timer See page 25.
Volume See page 23.
Checking the Digital Electronic Programme Guide (EPG) DVB

Digital Electronic Programme Guide (EPG)
1 In digital mode, press to display the Digital Electronic Programme Guide (EPG). 2 Perform the desired operation, as shown in the following table.
Note
Programme information will only be displayed if the TV station is transmitting it.
* Please note that this function may not be available in some countries.
| To Do this | |
| Turn off the EPG Press . | [IMAGE] |
| Move through the EPG Press | / / ⇐ / ⇒ . |
| Watch a current programme Press while the current programme is selected. | |
| Sort the programme information by category – Category list | 1 Press the blue button.2 Press / / ⇐ / ⇒ to select a category. The category name is displayed on the side.The categories available include:“Favourite”: Contains all the channels that have been stored in the Favourite list (page 17).“All Categories”: Contains all available channels.“News”: Contains all news channels.3 Press [IMAGE]The Digital Electronic Programme Guide (EPG) now only displays the current programmes from the category selected. |
| Set a programme to be recorded – Timer REC | 1 Press / / ⇐ / ⇒ to select the future programme you want to record.2 Press [IMAGE]3 Press / to select “Timer REC”.4 Press to set the TV and your VCR timers.A symbol appears by that programme’s information. The indicator on the TV (front) lights up.NotesYou can set VCR timer recording on the TV only for Smartlink compatible VCRs. If your VCR is not Smartlink compatible, a message will be displayed to remind you to set your VCR timer.Once a recording has begun, you can switch the TV to standby mode, but do not switch off the TV completely or the recording may be cancelled.If an age restriction for programmes has been selected, a message asking for pin code will appear on the screen. For more details refer to “Parental Lock” on page 32. |
Continued
To Do this
| Set a programme to be displayed automatically on the screen when it starts – Reminder | 1 Press ⇧/↓/←/→ to select the future programme you want to display.2 Press ⊕3 Press ⇧/↓ to select “Reminder”.4 Press to automatically display the selected programme when the programme starts.A ⊙ symbol appears by that programme’s information.NoteIf you switch the TV to standby mode, it will automatically turn itself on when the programme is about to start. |
| Set the time and date of a programme you want to record – Manual timer REC | 1 Press ⊕2 Press ⇧/↓ to select “Manual timer REC”, then press ⊕3 Press ⇧/↓ to select the date, then press ⇒.4 Set the start and stop time in the same way as in step 3.5 Press ⇧/↓ to select the programme, then press ⊕ to set the TV and your VCR timers.A Symbol appears by that programme’s information. The indicator on the TV (front) lights up.NotesYou can set VCR timer recording on the TV only for Smartlink compatible VCRs. If your VCR is not Smartlink compatible, a message will be displayed to remind you to set your VCR timer.Once a recording has begun, you can switch the TV to standby mode, but do not switch off the TV completely or the recording may be cancelled.If an age restriction for programmes has been selected, a message asking for pin code will appear on the screen. For more details refer to “Parental Lock” on page 32. |
| Cancel a recording/reminder – Timer list | 1 Press ⊕2 Press ⇧/↓ to select “Timer list”.3 Press ⇧/↓ to select the programme you want to cancel, then press ⊕. A display appears to confirm that you want to cancel the programme.4 Press → to select “Yes”, then press ⊕ to confirm. |
Tip
You can also display the Digital Electronic Programme Guide (EPG) by selecting “Digital EPG” in the “MENU” (page 19).
Using the Favourite list EVB

The Favourite feature allows you to select programs from a list of up to 8 channels you specify. To display the Favourite list, see “Navigating through menus” (page 19).
Favourite list
* Please note that this function may not be available in some countries.
To Do this
| Create your Favourite list for the first time | A message appears asking if you want to add channels to the Favourite list when you select “Digital Favourites” in the “MENU” for the first time.1 Press to select “Yes”.2 Press ↩/▽ to select the channel you want to add.If you know the channel number, you can use the number buttons to directly select a channel.3 Press ⊕Channels that are stored in the Favourite list are indicated by a ♥ symbol. |
Turn off the Favourite list Press RETURN.
See brief details on current programmes Press while selecting a channel. Press again to cancel.
Watch a channel Press while selecting a channel.
| Add or remove channels in the Favourite list | 1 Press the blue button. Channels that are stored in the Favourite list are indicated by a symbol.2 Press ↩/▽ to select the channel you want to add or remove. If you know the channel number, you can use the number buttons to directly select a channel.3 Press ⊕4 Press the blue button to return to the Favourite list. |
| Remove all channels from the Favourite list | 1 Press the blue button.2 Press the yellow button.A display appears to confirm that you want to delete all channels from the Favourite list.3 Press ⇌ to select “Yes”, then press ⊕ to confirm. |
Viewing pictures from connected equipment
Switch on the connected equipment, then perform one of the following operations.
For equipment connected to the SCART sockets using a fully-wired 21-pin SCART lead:
Start playback on the connected equipment.
The picture from the connected equipment appears on the screen.
For an auto-tuned VCR (page 6):
In analogue mode, press PROG +/- or the number buttons to select the video channel.
For other connected equipment:
Press / repeatedly until the correct input symbol (see below) appears on the screen.
Audio/video or RGB input signal through the SCART socket 1 or 2... appears only if an RGB source has been connected.
AV3:
Component input signal through the Y, PB/CB, PR/CR sockets 3; and audio input signal through the L, R sockets 3.
AV4:
Digital audio/video signal is input through the HDMI IN 4 socket. Audio input signal is analogue only if the equipment has been connected using the DVI and audio out socket.
→ AV5/AV5:
Video input signal through the video socket 5 and audio input signal through the L (MONO), R audio sockets 5. Appears only if the equipment is connected to the S-video socket 5 instead of the video socket 5, and S-video input signal is input through the S-video socket 5.
Additional operations
To Do this
| Return to the normal TV operation | Press DIGITAL or ANALOG. |
| Access the Input signal index table | Press ⓣ to access the Input signal index table. (Then, only in analogue mode, press ⇌.) To select an input source, press ⇌/↓, then press ⊕ |
Using the Tools menu
Press TOOLS to display the following options when viewing pictures from connected equipment other than PC.
Options Description
| Power Saving See page 26. | |
| Picture Mode See page 20. | |
| Sound Mode See page 22. | |
| Auto Clock Set (in analogue mode only) | Allows you to switch to digital mode and obtain the time. |
| Sleep Timer See page 25. | |
| Volume See page 23. | |
Navigating through menus
“MENU” allows you to enjoy various convenient features of this TV. You can easily select channels or external inputs with the remote. Also, settings for your TV can be changed easily using “MENU”.

1 Press MENU to display the menu.

2 Press ↩/▽ to select an option.
3 Press to confirm a selected option. To exit the menu, press MENU.
Menu Description
 | Digital Favourites(only in areas with digital broadcasting) | Launches the Favourite list. For details about settings, see page 17. |
 | Programme List(only in areas with analogue broadcasting) | Allows you to select TV programs from a list of channel labels.To watch the desired channel, select the channel, then pressTo assign a label to a program, see page 28. |
 | Analogue(only in areas with digital broadcasting) | Returns to the last viewed analogue channel. |
 | Digital(only in areas with digital broadcasting) | Returns to the last viewed digital channel. |
 | Digital EPG(only in areas with digital broadcasting) | Launches the Digital Electronic Programme Guide (EPG).For details about settings, see page 15. |
 | External Inputs | Selects equipment connected to your TV.To watch the desired external input, select the input source, then pressTo assign a label to an external input, see page 25. |
 | Settings | Opens the Settings menu screen where most of advanced settings and adjustments are performed. Select a menu icon, select an option and make the desired change or adjustment using For details about settings, see page 20 to 32. |
Picture menu

You can select the options listed below on the Picture menu. To select options in “Settings”, see “Navigating through menus” (page 19).
| Target Inputs | Selects whether to apply settings made in the Picture menu to all inputs, or only to the input currently being watched.“All”: Applies settings to all inputs.“Viewing Only”: Applies settings only to the current input. |
| Picture Mode | Selects the picture mode.“Vivid”: For enhanced picture contrast and sharpness.“Standard”: For standard picture. Recommended for home entertainment.“Custom”: Allows you to store your preferred settings. |
| Reset | Resets all picture settings except “Picture Mode” to the factory settings. |
| Backlight | Adjusts the brightness of the backlight. |
| Contrast | Increases or decreases picture contrast. |
| Brightness | Brightens or darkens the picture. |
| Colour | Increases or decreases colour intensity. |
| Hue | Increases or decreases the green tones.Tip“Hue” can only be adjusted for an NTSC colour signal (e.g., U.S.A. video tapes). |
| Colour Temperature | Adjusts the whiteness of the picture.“Cool”: Gives the white colours a blue tint.“Neutral”: Gives the white colours a neutral tint.“Warm1”/“Warm2”: Gives the white colours a red tint. “Warm2” gives a redder tint than “Warm1”.Tip“Warm1” and “Warm2” can only be selected when you set “Picture Mode” to “Custom”. |
| Sharpness | Sharpens or softens the picture. |
| Noise Reduction | Reduces the picture noise (snowy picture) in a weak broadcast signal.“Auto”: Automatically reduces the picture noise.“High”/“Medium”/“Low”: Modifies the effect of the noise reduction.“Off”: Turns off the Noise Reduction feature. |
| Advanced Settings | Customizes the Picture function in more detail. When you set “Picture Mode” to “Custom”, you can set/change these settings.“Reset”: Resets all the advanced video settings to the factory settings.“Black Corrector”: Enhances black areas of the picture for stronger contrast.“Contrast Enhancer”: Automatically adjusts “Contrast” to the most suitable settings judging from the brightness of the screen. This setting is especially effective for dark images, increasing vibrancy in the picture.“Gamma”: Adjusts the balance between bright and dark areas of the picture.“Clear White”: Emphasizes white colours.“Live Colour”: Makes colours more vivid.“MPEG Noise Reduction”: Reduces the picture noise in MPEG-compressed video (in digital mode only). |
Sound menu

You can select the options listed below on the Sound menu. To select options in “Settings”, see “Navigating through menus” (page 19).
| Target Inputs | Selects whether to apply settings made in the Sound menu to all inputs, or only to the input currently being watched.“All”: Applies settings to all inputs.“Viewing Only”: Applies settings only to the current input. |
| Sound Mode | Selects the sound mode.“Dynamic”: Enhances treble and bass.“Standard”: For standard sound. Recommended for home entertainment.“Custom”: Flat response. Also allows you to store your preferred settings. |
| Reset | Resets the sound settings except “Sound Mode”, “Dual Sound”, “ speaker Link” and “Volume” to the factory settings. |
| Treble | Adjusts higher-pitched sounds. |
| Bass | Adjusts lower-pitched sounds. |
| Balance | Emphasizes left or right speaker balance. |
| Auto Volume | Keeps a constant volume level even when volume level gaps occur (e.g., adverts tend to be louder than programmes). |
| Surround | Selects the surround mode.“TruSurround XT”: For surround sound (for stereo programmes only).“Simulated Stereo”: Adds a surround-like effect to mono programs.“Off”: For normal stereo or mono reception. |
| BBE | Gives sound more impact by compensating for phase effects in speakers using the “BBE High Definition Sound System”. |
| Dual Sound | Selects the sound from the speaker for a stereo or bilingual broadcast.“Stereo”, “Mono”: For a stereo broadcast.“A”/“B”/“Mono”: For a bilingual broadcast, select “A” for sound channel 1, “B” for sound channel 2, or “Mono” for a mono channel, if available.TipIf you select other equipment connected to the TV, set “Dual Sound” to “Stereo”, “A” or “B”. |
| Speaker Link(headphone speaker link) | Switches on/off the TV’s internal speakers when headphones are connected. |
| Volume(headphone volume) | Adjusts the volume of the headphones. |
Tip
"Treble", "Bass", "Balance", "Auto Volume", "Surround" and "BBE" cannot be used for headphones and audio output sockets.
Screen menu

You can select the options listed below on the Screen menu. To select options in "Settings", see "Navigating through menus" (page 19).
| Target Inputs | Selects whether to apply settings made in the Screen menu to all inputs, or only to the input currently being watched.“All”: Applies settings to all inputs.“Viewing Only”: Applies settings only to the current input. |
| Screen Format | For details about the screen format, see “To change the screen mode manually to suit the broadcast” (page 14). |
| Auto Format | Automatically changes the screen format according to the broadcast signal. To keep your setting, select “Off”.TipsEven if you have selected “On” or “Off” in “Auto Format”, you can always modify the format of the screen by pressing repeatedly.“Auto Format” is available for PAL and SECAM signals only. |
| 4:3 Default | Selects the default screen mode for use with 4:3 broadcasts.“Smart”: Displays conventional 4:3 broadcasts with an imitation wide screen effect.“4:3”: Displays conventional 4:3 broadcasts in the correct proportions.“Off”: Keeps the current “Screen Format” setting when the channel or input is changed.TipThis option is available only if “Auto Format” is set to “On”. |
| Display Area | Adjusts the screen area displaying the picture.“Normal”: Displays the picture in the original size.“-1”/“-2”: Enlarges the picture to hide the edge of the picture. |
| Horizontal Shift | Adjusts the horizontal position of the picture for each screen format. |
| Vertical Shift | Adjusts the vertical position of the picture when the screen format is set to Zoom or 14:9. |
| Vertical Size | Adjusts the vertical size of the picture when the screen format is set to Smart, Zoom or 14:9. |
Set-up menu

You can select the options listed below on the Set-up menu. To select options in "Settings", see "Navigating through menus" (page 19).
| Auto Start-up | Starts the “first time operation menu” to select the language and country/region, and tune in all available digital and analogue channels. Usually, you do not need to do this operation because the language and country/region will have been selected and channels already tuned when the TV was first installed (page 5, 6). However, this option allows you to repeat the process (e.g., to retune the TV after moving house, or to search for new channels that have been launched by broadcasters). |
| Language | Selects the language in which the menus are displayed. |
| AV Preset | Assigns a name to any equipment connected to the side and rear sockets. The name will be displayed briefly on the screen when the equipment is selected. You can skip an input source that is not connected to any equipment.1 Press ↗/▽ to select the desired input source, then press ⊕2 Press ↗/▽ to select the desired option below, then press ⊕Equipment labels: Uses one of the preset labels to assign a name to connected equipment.“Edit”: Creates your own label. Follow steps 2 to 4 of “Programme Labels” (page 28).“Skip”: Skips an input source that is not connected to any equipment when you press → to select the input source. |
| Auto S Video | Selects the input signal from S video sockets S→○5 when S→○/→5 sockets are both connected. |
| Timer Settings | Sets the timer to turn on/off the TV.Sleep TimerSets a period of time after which the TV automatically switches itself into standby mode.When the Sleep Timer is activated, the ⏻Timer) indicator on the TV (front) lights up in orange.TipsIf you switch off the TV and switch it on again, “Sleep Timer” is reset to “Off”.“TV will soon turn off by sleep timer.” appears on the screen one minute before the TV switches to standby mode. |
Continued
| On TimerSets the timer to turn on the TV.“Day”: Selects the day on which you want to activate the On Timer.“Time”: Sets the time to turn on the TV.“Duration”: Selects the time period after which the TV automatically switches to standby mode again.“Volume Set-up”: Sets the volume for when the timer turns on the TV.Clock SetAllows you to adjust the clock manually. When the TV is receiving digital channels, the clock cannot be adjusted manually since it is set to the time code of the broadcasted signal. | |
| Power Saving | Selects the power saving mode to reduce the power consumption of the TV.When “Picture Off” is selected, the picture is switched off and the (picture Off) indicator on the TV (front) lights up in green. The sound remains unchanged. |
| Light Sensor | Automatically optimizes the picture settings according to the ambient light in the room. |
| AV2 Output | Sets a signal to be output through the socket labelled ☐on-the rear of the TV. If you connect a VCR or other recording equipment to the ☐socket, you can then record from the equipment connected to other sockets of the TV.“TV”: Outputs a broadcast.“AV1”: Outputs signals from equipment connected to the ☐socket.“AV5”: Outputs signals from equipment connected to the 5-5 socket.“Auto”: Outputs whatever is being viewed on the screen (except signals from the 📄/3and HDMI IN 4 sockets). |
| Quiet Power On | Sets the volume control at a low level when the TV is first turned on, gradually increasing the sound to a preset level. |
| Speaker | Switches on/off the TV’s internal speakers.“On”: The TV speakers are turned on in order to listen to the TV’s sound through TV’s speakers.“Off”: The TV speakers are turned off in order to listen to the TV’s sound only through your external audio equipment connected to the audio output sockets. |
| Colour System | Selects the colour system (“Auto”, “PAL”, “SECAM”, “NTSC3.58”, “NTSC4.43”, or “PAL60”) according to the input signal from the input source. |
| Information | Displays your TV’s system information. |
| All Reset | Resets all the Set-up settings to the factory settings and then launches the Auto Start-up screen. |
PC Settings menu

You can select the options listed below on the PC Settings menu. To select options in "Settings", see "Navigating through menus" (page 19).
| Screen Format | Selects a screen mode for displaying input from your PC.“Normal”: Displays the picture in its original size.“Full1”: Enlarges the picture to fill the display area, keeping its original horizontal-to-vertical aspect ratio.“Full2”: Enlarges the picture to fill the display area. |
| Reset | Resets the PC settings except “Screen Format” and “Power Management” to the factory settings. |
| Auto Adjustment | Automatically adjusts the display position and phase of the picture when the TV receives an input signal from the connected PC.TipAuto Adjustment may not work well with certain input signals. In such cases, manually adjust “Phase”, “Pitch”, “Horizontal Shift” and “Vertical Shift”. |
| Phase | Adjusts the phase when the screen flickers. |
| Pitch | Adjusts the pitch when the picture has unwanted vertical stripes. |
| Horizontal Shift | Adjusts the horizontal position of the picture for each screen format. |
| Vertical Shift | Adjusts the vertical position of the picture for each screen format. |
| Power Management | Switches the TV to standby mode if no signal is received for 30 seconds. |
Analogue Set-up menu (Analogue mode only)

You can change/set the analogue settings using the Analogue Set-up menu. To select options in "Settings", see "Navigating through menus" (page 19).
| 1 Digit Direct | When “1 Digit Direct” is set to “On”, you can select an analogue channel using one preset number button (0 - 9) on the remote.NoteWhen “1 Digit Direct” is set to “On”, you cannot select channel numbers 10 and above entering two digits using the remote. |
| Auto Tuning | Tunes in all the available analogue channels.Usually you do not need to do this operation because the channels are already tuned when the TV was first installed (page 5, 6). However, this option allows you to repeat the process (e.g., to retune the TV after moving house, or to search for new channels that have been launched by broadcasters). |
| Programme Sorting | Changes the order in which the analogue channels are stored on the TV.1 Press ↗/▽ to select the channel you want to move to a new position, then press ⊕2 Press ↗/▽ to select the new position for your channel, then press ⊕. |
| Programme Labels | Assigns a channel name of your choice up to five letters or numbers. The name will be displayed briefly on the screen when the channel is selected. (Names for channels are usually taken automatically from Text (if available).)1 Press ↗/▽ to select the channel you want to name, then press ⊕.2 Press ↗/▽ to select the desired letter or number (“_” for a blank space), then press ⇒.If you input a wrong characterPress ⇌/⇔ to select the wrong character. Then, press ⇌/▽ to select the correct character.To delete all the charactersSelect “Reset”, then press ⊕3 Repeat the procedure in step 2 until the name is complete.4 Select “OK”, then press . ⊕ |
Manual Programme Preset
Before selecting "Label"/"AFT"/"Audio Filter"/"Skip"/"Decoder", press PROG +/- to select the programme number with the channel. You cannot select a programme number that is set to skip (page 30).
Programme/System/Channel
Presets programme channels manually.
1 Press ↑/↓ to select "Programme", then press ⊕. 2 Press ↑/↓ to select the programme number you want to manually tune (if tuning a VCR, select channel 00), then press RETURN.
3 Press ↑/↓ to select "System", then press ⊕.
4 Press ↑/↓ to select one of the following TV broadcast systems, then press ⇔.
B/G: For western European countries/regions. D/K: For eastern European countries/regions. L: For France. I: For the United Kingdom.
5 Press ↑/↓ to select "Channel", then press ⊕.
6 Press ↑/↓ to select "S" (for cable channels) or "C" (for terrestrial channels), then press ⇒.
7 Tune the channels as follows:
If you do not know the channel number (frequency):
Press ↑/↓ to search for the next available channel. When a channel has been found, the search will stop. To continue searching, press ↑/↓.
If you know the channel number (frequency):
Press the number buttons to enter the channel number of the broadcast you want or your VCR channel number.
8 Press to jump to "Confirm", then press.
9 Press ↓ to select "OK", then press ⊕.
Repeat the procedure above to preset other channels manually.
Assigns a name of your choice, up to five letters or numbers, to the selected channel. This name will be displayed briefly on the screen when the channel is selected. To input characters, follow steps 2 to 4 of “Programme Labels” (page 28).
AFT
Allows you to fine-tune the selected programme number manually if you feel that a slight tuning adjustment will improve the picture quality.
You can adjust the fine tuning over a range of -15 to +15. When “On” is selected, the fine tuning is performed automatically.
Audio Filter
Improves the sound for individual channels in the case of distortion in mono broadcasts. Sometimes a non-standard broadcast signal can cause sound distortion or intermittent sound muting when watching mono programmes.
If you do not experience any sound distortion, we recommend that you leave this option set to the factory setting “Off”.
Notes
- You cannot receive stereo or dual sound when "Low" or "High" is selected.
- “Audio Filter” is not available when “System” is set to “L”.
Continued
Skip
Skips unused analogue channels when you press PROG +/- to select channels. (You can still select a skipped channel using the number buttons.)
Decoder
Views and records the scrambled channel selected when using a decoder connected directly to scart connector /4 or to scart connector /2 via a VCR...
Note
Depending on the country/region selected for “Country” (page 6), this option may not be available.
Confirm
Saves changes made to the “Manual Programme Preset” settings.
Digital Set-up menu DVB

You can change/set the digital settings using the Digital Set-up menu. Select “Digital Set-up” and press ⊕ to display the following menus. To select options in “Settings”, see “Navigating through menus” (page 19).
Digital Tuning
Displays the "Digital Tuning" menu.
Digital Auto Tuning
Tunes in all the available digital channels.
Usually you do not need to do this operation because the channels are already tuned when the TV was first installed (page 6). However, this option allows you to repeat the process (e.g., to retune the TV after moving house, or to search for new channels that have been launched by broadcasters).
Programme List Edit
Removes any unwanted digital channels stored on the TV, and changes the order of the digital channels stored on the TV.
1 Press ☑/☑ to select the channel you want to remove or move to a new position.
If you know the programme number (frequency)
Press the number buttons to enter the three-digit programme number of the broadcast you want.
2 Remove or change the order of the digital channels as follows:
To remove the digital channel
Press ⏻. A message that confirms whether the selected digital channel is to be deleted appears. Press ⇔ to select "Yes", then press ⏻.
To change the order of the digital channels
Press ⇒, then press ↑↓/⇓ to select the new position for the channel and press ⇔.
Repeat the procedure in steps 1 and 2 to move other channels if required.
3 Press RETURN.
Digital Manual Tuning
Tunes the digital channels manually.
1 Press the number button to select the channel number you want to manually tune, then press ↩/▽ to tune the channel. 2 When the available channels are found, press ↩/▽ to select the channel you want to store, then press ⊕. 3 Press ⬤/♥ to select the programme number where you want to store the new channel, then press ⊕. Repeat the procedure above to tune other channels manually.
Continued
Digital Set-up
Displays the “Digital Set-up” menu.
Subtitle Setting*
Displays digital subtitles on the screen.
When “For Hard Of Hearing” is selected, some visual aids may also be displayed with the subtitles (if TV channels broadcast such information).
Subtitle Language*
Selects which language subtitles are displayed in.
Audio Language*
Selects the language used for a programme. Some digital channels may broadcast several audio languages for a programme.
Audio Type*
Increases the sound level when “For Hard Of Hearing” is selected.
Parental Lock*
Sets an age restriction for programmes. Any programme that exceeds the age restriction can only be watched after a PIN Code is entered correctly.
1 Press the number buttons to enter your existing PIN code.
If you have not previously set a PIN, a PIN code entry screen appears. Follow the instruction of "PIN Code" below.
2 Press ⏻/▽ to select the age restriction or "None" (for unrestricted watching), then press ⊙
3 Press RETURN.
PIN Code*
Sets a PIN code for the first time, or allows you to change your PIN code.
1 Enter a PIN as follows:
If you have previously set a PIN
Press the number buttons to enter your existing PIN.
If you have not set a PIN
Press the number buttons to enter the factory setting PIN of 9999.
2 Press the number buttons to enter the new PIN code.
A message appears to inform you that the new PIN has been accepted.
3 Press RETURN.
Tip
PIN code 9999 is always accepted.
Technical Set-up
Displays the Technical Set-up menu.
“Auto Service Update”: Enables the TV to detect and store new digital services as they become available.
“Software Download”: Enables the TV to automatically receive software updates, free through your existing aerial (when issued). Sony recommends that this option is set to “On” at all times. If you do not want your software to be updated, set this option to “Off”.
“System Information”: Displays the current software version and the signal level.
“Time Zone”: Allows you to manually select the time zone you are in, if it is not the same as the default time zone setting for your country.
CA Module Set-up
Allows you to access a Pay Per View service once you obtain a Conditional Access Module (CAM) and a view card. See page 33 for the location of the (RCMCIA) socket.
Using Optional Equipment
Connecting optional equipment
You can connect a wide range of optional equipment to your TV. Connecting cables are not supplied.
Connecting to the TV (side)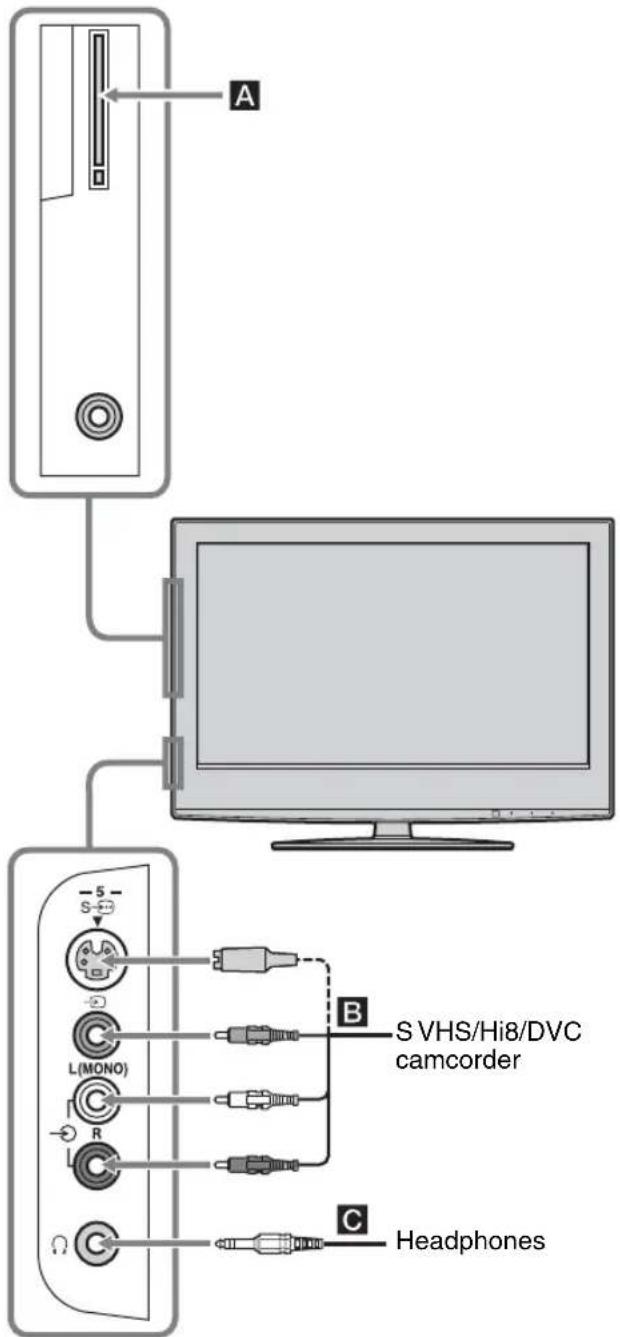
To connect Do this
| Conditional Access Module (CAM) A | To use Pay Per View services. For details, refer to the instruction manual supplied with your CAM. To use the CAM, remove the rubber cover from the CAM slot. Switch off the TV when inserting your CAM into the CAM slot. When you do not use the CAM, we recommend that you replace the cover on the CAM slot. NoteCAM is not supported in all countries. Please check with your authorized dealer. |
| S VHS/Hi8/DVC camcorder B | Connect to the S video socket S→5 or the video socket → and the audio sockets 5To avoid picture noise, do not connect the camcorder to the video socket →5 and the S video socket S→5 at the same time. If you connect mono equipment, connect to the L socket 5 |
| Headphones C | Connect to the ∩ socket to listen to sound from the TV on headphones. |
Continued
Connecting to the TV (rear)
To connect Do this
| PC DConnect to the PC / sockets. It is recommended to use a PC cable with ferrites. | |
| Digital satellite receiver or DVD player E | Connect to the HDMI IN 4 socket if the equipment has a HDMI socket. The digital video and audio signals are input from the equipment. If the equipment has a DVI socket, connect the DVI socket to the HDMI IN 4 socket through a DVI - HDMI adaptor interface (not supplied), and connect the equipment's audio out sockets to the audio in HDMI IN 4 sockets.NoteThe HDMI sockets only support the following video inputs: 480i, 480p, 576i, 576p, 720p and 1080i. To connect a PC, please use the PC input socket. |
| DVD player with component output F | Connect to the component sockets and the audio sockets +→→ |
| Video game equipment, DVD player or decoder G | Connect to the scart socket ↗→→1. When you connect the decoder, the scrambled signal from the TV tuner is output to the decoder, then the unscrambled signal is output from the decoder. |
| DVD recorder or VCR that supports SmartLink H | Connect to the scart socket ↗→→2. SmartLink is a direct link between the TV and a VCR/DVD recorder. |
| Hi-Fi audio equipment I | Connect to the audio output sockets to listen to the sound from the TV on Hi-Fi audio equipment. |
Using the Tools menu in PC input mode
Press TOOLS to display the following options when viewing pictures input from the connected PC.
Options Description
| Power Saving See page 26. | |
| Picture Mode See page 20. | |
| Sound Mode See page 22. | |
| Auto Adjustment See page 27. | |
| Horizontal Shift See page 27. | |
| Vertical Shift See page 27. | |
| Auto Clock Set (in analogue mode only) | Allows you to switch to digital mode and obtain the time. |
| Volume See page 23. | |
Additional Information
Specifications
Display Unit
Power Requirements:
220–240 V AC, 50 Hz
Screen Size:
KDL-46S2000/KDL-46S2010/KDL-46S2030:
46 inches (Approx. 116.9 cm measured diagonally)
KDL-40S2000/KDL-40S2010/KDL-40S2030:
40 inches (Approx. 101.6 cm measured diagonally)
32 inches (Approx. 80.1 cm measured diagonally)
26 inches (Approx. 66.1 cm measured diagonally)
Display Resolution:
1,366 dots (horizontal) × 768 lines (vertical)
Power Consumption:
KDL-46S2000/KDL-46S2010/KDL-46S2030: 249 W
KDL-40S2000/KDL-40S2010/KDL-40S2030: 180 W
Standby Power Consumption:
0.3 W
Dimensions (w × h × d):
KDL-46S2000/KDL-46S2010/KDL-46S2030:
Approx. 1,120 × 805 × 334 mm (with stand)
Approx. 1,120 × 755 × 116 mm (without stand)
KDL-40S2000/KDL-40S2010/KDL-40S2030:
Approx. 988 × 716 × 334 mm (with stand)
Approx. 988 × 664 × 103 mm (without stand)
KDL-32S2000/KDL-32S2010/KDL-32S2020/KDL-
32S2030:
Approx. 792 × 593 × 219 mm (with stand)
Approx. 792 × 546 × 99 mm (without stand)
Approx. 658 × 516 × 219 mm (with stand)
Approx. 658 × 470 × 94 mm (without stand)
Mass:
KDL-46S2000/KDL-46S2010/KDL-46S2030:
Approx. 34 kg (with stand)
Approx. 28 kg (without stand)
KDL-40S2000/KDL-40S2010/KDL-40S2030:
Approx. 27 kg (with stand)
Approx. 21 kg (without stand)
Approx. 17 kg (with stand)
Approx. 15 kg (without stand)
KDL-26S2000/KDL-26S2010/KDL-26S2020/KDL-26S2030:
Approx. 13 kg (with stand)
Approx. 11 kg (without stand)
Panel System
LCD (Liquid Crystal Display) Panel
TV System
Analogue: Depending on your country/region selection: B/G/H, D/K, L, I
Digital: DVB-T
Colour/Video System
Analogue: PAL, SECAM
NTSC 3.58, 4.43 (only Video In)
Digital: MPEG-2 MP@ML
Aerial
75 ohm external terminal for VHF/UHF
Channel Coverage
Analogue: VHF: E2–E12
UHF: E21–E69
CATV: S1–S20
HYPER: S21–S41
D/K: R1–R12, R21–R69
L: F2–F10, B–Q, F21–F69
I: UHF B21-B69
Digital: VHF/UHF
Terminals

21-pin Scart connector (CENELEC standard) including audio/video input, RGB input, and TV audio/video output.

21-pin Scart connector (CENELEC standard) including audio/video input, RGB input, selectable audio/video output, and SmartLink interface.

Supported formats: 1080i, 720p, 576p, 576i, 480p, 480i
Y: 1 Vp-p, 75 ohms, 0.3V negative sync
PB/CB: 0.7 Vp-p, 75 ohms
PR/CR: 0.7 Vp-p, 75 ohms

Audio input (phono jacks)
500 mVrms
Impedance: 47 kilo ohms
HDMI IN 4
Video: 1080i, 720p, 576p, 576i, 480p, 480i
Audio: Two channel linear PCM
32, 44.1 and 48 kHz, 16, 20 and 24 bits, or analogue audio input (phono jacks)
Audio output (Left/Right) (phono jacks)
PC -PC Input (15 Dsub) (see page 37)
G: 0.7 Vp-p, 75 ohms, non Sync on Green
B: 0.7 Vp-p, 75 ohms, non Sync on Green
R: 0.7 Vp-p, 75 ohms, non Sync on Green
HD: 1-5 Vp-p
VD: 1-5 Vp-p
→ PC audio input (minijack)
○ Headphones jack
CAM (Conditional Access Module) slot
Sound Output
10 W + 10 W
Supplied Accessories
Refer to "1: Checking the accessories" on page 4.
Optional Accessories
- Wall-Mount Bracket
Design and specifications are subject to change without notice.
PC Input Signal Reference Chart
| Signals Horizontal (Pixel) Vertical (Line) | Horizontal frequency (kHz) | Vertical frequency (Hz) | Standard | ||
| VGA 640 480 31.5 60 VGA | |||||
| 640 480 37.5 75 VESA | |||||
| 720 400 31.5 70 VGA-T | |||||
| SVGA 800 600 37.9 60 VESA Guidelines | |||||
| 800 600 46.9 75 VESA | |||||
| XGA 1024 768 48.4 60 VESA Guidelines | |||||
| 1024 768 56.5 70 VESA | |||||
| 1024 768 60 | 75 VESA | ||||
| WXGA | 1280 768 47.4 60 | VESA | |||
| 1280 768 47.8 60 | VESA | ||||
| 1360 768 47.7 60 | VESA | ||||
- This TV's PC input does not support Sync on Green or Composite Sync.
- This TV's PC input does not support interlaced signals.
- This TV's PC input supports the boldfaced signals in the above chart with a 60 Hz vertical frequency.
- For the best picture quality, it is recommended to use signals with a 60 Hz vertical frequency from a personal computer. In plug and play, signals with a 60 Hz vertical frequency will be selected automatically.
Troubleshooting
Check whether the ⏻ (standby) indicator is flashing in red.
When it is flashing
The self-diagnosis function is activated.
1 Measure how long the ⏻ (standby) indicator flashes and stops flashing. For example, the indicator flashes for two seconds, stops flashing for one second, and flashes for two seconds. 2 Press ⏻ on the TV (top side) to switch it off, disconnect the mains lead, and inform your dealer or Sony service centre of how the indicator flashes (duration and interval).
When it is not flashing
1 Check the items in the tables below.
2 If the problem still persists, have your TV serviced by qualified service personnel.
Picture
| Problem Cause/Remedy | |
| No picture (screen is dark) and no sound | Check the aerial connection.Connect the TV to the mains, and press ⏻ on the TV (top side).If the ⏻ (standby) indicator lights up in red, press ⏻. |
| No picture or no menu information from equipment connected to the scart connector | Check that the optional equipment is on and press / repeatedly until the correct input symbol is displayed on the screen.Check the connection between the optional equipment and the TV. |
| Double images or ghosting | Check aerial/cable connections.Check the aerial location and direction. |
| Only snow and noise appear on the screen | Check if the aerial is broken or bent.Check if the aerial has reached the end of its serviceable life (three to five years in normal use, one to two years at the seaside). |
| Distorted picture (dotted lines or stripes) | Keep the TV away from electrical noise sources such as cars, motorcycles, hair-dryers or optical equipment.When installing optional equipment, leave some space between the optional equipment and the TV.Make sure that the aerial is connected using the supplied coaxial cable.Keep the aerial cable away from other connecting cables. |
| Picture noise when viewing a TV channel | Select “Manual Programme Preset” in the “Analogue Set-up” menu and adjust “AFT” (Automatic Fine Tuning) to obtain better picture reception (page 29). |
| Some tiny black points and/or bright points on the screen | The picture of a display unit is composed of pixels. Tiny black points and/or bright points (pixels) on the screen do not indicate a malfunction. |
| No colour on programmes | Select “Reset” in the “Picture” menu to return to the factory settings (page 20). |
| No colour or irregular colour when viewing a signal from the Y, PB/CB, PR/CR jacks of 3 | Check the connection of the Y, PB/CB, PR/CR jacks of 3Make sure that the Y, PB/CB, PR/CR jacks of 3 are firmly seated in their respective sockets. |
Sound
Problem Cause/Remedy
| No sound, but good picture | Press +/ - or ※ (Mute).Check that “Speaker” is set to “On” in the “Set-up” menu (page 26). |
| Noisy sound | See the “Picture noise” causes/remedies on page 38. |
Channels
Problem Cause/Remedy
| The desired channel cannot be selected | Switch between digital and analogue mode and select the desired digital/ analogue channel. |
| Some channels are blank | Scrambled/Subscription only channel. Subscribe to the Pay Per View service.Channel is used only for data (no picture or sound).Contact the broadcaster for transmission details. |
| Digital channel is not displayed | Contact a local installer to find out if digital transmissions are provided in your area.Upgrade to a higher gain aerial. |
General
Problem Cause/Remedy
| The TV turns off automatically (the TV enters standby mode) | Check if the “Sleep Timer” is activated, or confirm the “Duration” setting of “On Timer” (page 25).If no signal is received and no operation is performed in the TV mode for 10 minutes, the TV automatically switches to standby mode. |
| The TV turns on automatically | Check if the “On Timer” is activated (page 26). |
| Some input sources cannot be selected | Select “AV Preset” in the “Set-up” menu and cancel “Skip” of the input source (page 25). |
| The remote does not function | Replace the batteries. |
Index
Numerics
1 Digit Direct 28
14:9 14
4:3 Default 24
4:3 14
A
Advanced Settings 21
Aerial, connecting 4
AFT 29
All Reset 26
Analogue Set-up menu 28
Audio Filter 29
Audio Language 32
Audio Type 32
Auto Adjustment 27
Auto Clock Set 14, 18, 35
Auto Format 24
Auto S Video 25
Auto Start-up 25
Auto Tuning analogue and digital channels 6 analogue channels only 28 digital channels only 31
Auto Volume 22
AV Preset 25
AV2 Output 26
B
Backlight 20
Balance 22
Bass 22
Batteries, inserting into the remote 4
BBE 22
Black Corrector 21
Brightness 20
C
CA Module Set-up 32
Category list 15
Channels auto-tuning 6 selecting 13 Skip 30
Clear White 21
Clock Set 26
Colour 20
Colour System 26
Colour Temperature 20
Confirm 30
Connecting an aerial/VCR 4 optional equipment 33
Contrast Enhancer 21
Contrast 20
Country 5
D
Digital Auto Tuning 31
Digital Manual Tuning 31
Digital Set-up 32
Digital Set-up menu 31
Digital Tuning 31
Display Area 24
Dual Sound 23
E
EPG (Digital Electronic Programme Guide) 15
Equipment labels 25
F
Fastext 14
Favourite list 17
G
Gamma 21
H
Headphones
Headphones
Connecting 33
Speaker Link 23
Volume 23
Horizontal Shift 24, 27
Hue 20
|
Information 26
Input signal index table 18
L
Label 29
Language 5, 25
Light Sensor 26
Live Colour 21
M
Manual Programme Preset 29
Manual timer REC 16
MENU 19
MPEG Noise Reduction 21
N
Noise Reduction 21
0
On Timer 26
P
Parental Lock 32
PC Settings menu 27
Phase 27
Picture menu 20
Picture Mode 20
Picture Off (Indicator 12
PIN Code 32
Pitch 27
Power (I) indicator 12
Power (1) switch 12
Power Management 27
Power Saving 26
Programme index table 13
Programme Labels 28
Programme List Edit 31
Programme Sorting 28
Q
Quiet Power On 26
R
Reminder 16
Remote control inserting batteries 4 overview 11 sensor 12
Reset
PC settings 27
picture 20
sound 22
s
Screen Format 24, 27
Screen menu 24
Screen mode 14
Set-up menu 25
Sharpness 20
Skip 25, 30
Sleep Timer 25
Smart 14
Sound menu 22
Sound Mode 22
Speaker 26
Specifications 36
Standby (⏻) indicator 12
Subtitle Language 32
Subtitle Setting 32
Surround 22
T
Target Inputs
picture 20
screen 24
sound 22
Technical Set-up 32
Text 14
Timer ( indicator 12
Timer list 16
Timer REC 15
Timer Settings 25
Tools 14, 18, 35
Treble 22
V
VCR
connecting 4
recording 15
Vertical Shift 24, 27
Vertical Size 24
W
Wide 14
Z
Zoom 14
Introduction
Notes


Continuation
Ventilation

L: F2–F10, B–Q, F21–F69
I: UHF B21-B69
Digital: VHF/UHF
Connectors

Notes


Water and moisture


Precautions
Watching TV

Using the Tools menu
Advanced Settings 22
- INTRODUCTION
- NOTICE FOR DIGITAL TV FUNCTION
- TRADEMARK INFORMATION
- TABLE OF CONTENTS
- START-UP GUIDE
- WATCHING TV
- USING MENU FUNCTIONS
- USING OPTIONAL EQUIPMENT
- ADDITIONAL INFORMATION
- CHECKING THE ACCESSORIES
- TO INSERT BATTERIES INTO THE REMOTE
- NOTES
- CONNECTING AN AERIAL/VCR
- BUNDLING THE CABLES
- PREVENTING THE TV FROM TOPPLING OVER
- SELECTING THE LANGUAGE AND COUNTRY/REGION
- AUTO-TUNING THE TV
- SAFETY INFORMATION
- MAINS LEAD
- MAINS SOCKET
- CLEANING THE MAINS PLUG
- OVERLOADING
- WHEN NOT IN USE
- CARRYING
- PLACEMENT
- VENTILATION
- OPTIONAL ACCESSORIES
- WIRING
- MEDICAL INSTITUTIONS
- OUTDOOR USE
- VEHICLE, SHIPS AND OTHER VESSELS
- WATER AND MOISTURE
- MOISTURE AND FLAMMABLE OBJECTS
- LIGHTNING STORMS
- BROKEN PIECES
- SERVICING
- SMALL ACCESSORIES REMOVAL AND FITTING
- PRECAUTIONS
- VIEWING THE TV
- VOLUME ADJUSTMENT
- LCD SCREEN
- HANDLING AND CLEANING THE SCREEN SURFACE/CABINET OF THE TV SET
- OPTIONAL EQUIPMENT
- DISPOSAL OF THE TV SET
- OVERVIEW OF THE REMOTE
- TIP
- OVERVIEW OF THE TV BUTTONS AND INDICATORS
- ① (PAGE19)
- ②/→INPUT SELECT/OK
- ③ ∠+/-/ /← →
- ④PROG +/- / ↑ ↓
- ⏻ - POWER
- ⑥ REMOTE CONTROL SENSOR
- ⑦ PICTURE OFF/TIMER INDICATOR
- ⏻ - STANDBY INDICATOR
- ⑨I – POWER INDICATOR
- NOTE
- IN DIGITAL MODE
- ADDITIONAL OPERATIONS
- TO ACCESS TEXT
- TIPS
- PICTURE FREEZE
- TO CHANGE THE SCREEN MODE MANUALLY TO SUIT THE BROADCAST
- SMART
- WIDE
- ZOOM
- USING THE TOOLS MENU
- OPTIONS DESCRIPTION
- CHECKING THE DIGITAL ELECTRONIC PROGRAMME GUIDE (EPG) DVB
- USING THE FAVOURITE LIST EVB
- VIEWING PICTURES FROM CONNECTED EQUIPMENT
- FOR EQUIPMENT CONNECTED TO THE SCART SOCKETS USING A FULLY-WIRED 21-PIN SCART LEAD
- FOR AN AUTO-TUNED VCR (PAGE 6)
- FOR OTHER CONNECTED EQUIPMENT
- NAVIGATING THROUGH MENUS
- PICTURE MENU
- SOUND MENU
- SCREEN MENU
- SET-UP MENU
- PC SETTINGS MENU
- ANALOGUE SET-UP MENU (ANALOGUE MODE ONLY)
- MANUAL PROGRAMME PRESET
- PROGRAMME/SYSTEM/CHANNEL
- IF YOU DO NOT KNOW THE CHANNEL NUMBER (FREQUENCY)
- IF YOU KNOW THE CHANNEL NUMBER (FREQUENCY)
- AFT
- AUDIO FILTER
- SKIP
- DECODER
- CONFIRM
- DIGITAL SET-UP MENU DVB
- DIGITAL TUNING
- DIGITAL AUTO TUNING
- PROGRAMME LIST EDIT
- TO REMOVE THE DIGITAL CHANNEL
- DIGITAL MANUAL TUNING
- DIGITAL SET-UP
- SUBTITLE SETTING
- SUBTITLE LANGUAGE
- AUDIO LANGUAGE
- AUDIO TYPE
- PARENTAL LOCK
- PIN CODE
- IF YOU HAVE PREVIOUSLY SET A PIN
- IF YOU HAVE NOT SET A PIN
- TECHNICAL SET-UP
- CA MODULE SET-UP
- CONNECTING OPTIONAL EQUIPMENT
- USING THE TOOLS MENU IN PC INPUT MODE
- SPECIFICATIONS
- DISPLAY UNIT
- PANEL SYSTEM
- TV SYSTEM
- COLOUR/VIDEO SYSTEM
- AERIAL
- CHANNEL COVERAGE
- TERMINALS
- SOUND OUTPUT
- SUPPLIED ACCESSORIES
- TROUBLESHOOTING
- WHEN IT IS FLASHING
- WHEN IT IS NOT FLASHING
- SOUND
- CHANNELS
- GENERAL
- INDEX
- NUMERICS
- A
- B
- C
- D
- E
- FASTEXT
- GAMMA
- HEADPHONES
- L
- M
- N
- P
- Q
- R
- S
- T
- V
- CONNECTORS
Brand : SONY
Model : Bravia KDL-40S2010
Category : Television