
HC5600 - Hair clippers REMINGTON - Free user manual and instructions
Find the device manual for free HC5600 REMINGTON in PDF.

| Product Type | Cordless Hair Clipper |
| Brand | REMINGTON |
| Model | HC5600 |
| Power Supply | Rechargeable via mains adapter or micro USB port |
| Mains Adapter | PA-4515E (EU) / PA-4515U (UK), output 4.5 V DC, 1500 mA |
| Full Charge Time | 4 to 5 hours |
| Runtime | Up to 120 minutes |
| Quick Charge | 10 min for 5 min use, 30 min for 15 min, 1 h for 30 min, 2 h for 40 min |
| Cutting System | Dual Boost: normal power (On) or maximum power (Boost) |
| Blades | High-quality steel, removable for cleaning |
| Hair Guides | 2 guides: 3-21 mm and 24-42 mm, adjustable in 3 mm steps |
| Beard Guide | Fixed 3-day beard guide 1.5 mm |
| Quick Wash System | Removable blades for cleaning under running water |
| Charge Indicator | LED indicator light |
| Corded Use | Possible via mains adapter (except on computer) |
| Dimensions (approx.) | 18 x 4 x 4 cm |
| Weight (approx.) | 200 g |
| Included Accessories | Mains adapter, micro USB cable, 2 hair guides, 1.5 mm beard guide, oil, cleaning brush |
| Care and Cleaning | Clean blades with brush; Quick Wash system for rinsing blades; do not immerse body |
| Safety | Do not use near water; always unplug before cleaning; keep out of reach of children |
Frequently Asked Questions - HC5600 REMINGTON
User questions about HC5600 REMINGTON
0 question about this device. Answer the ones you know or ask your own.
Ask a new question about this device
Download the instructions for your Hair clippers in PDF format for free! Find your manual HC5600 - REMINGTON and take your electronic device back in hand. On this page are published all the documents necessary for the use of your device. HC5600 by REMINGTON.
USER MANUAL HC5600 REMINGTON
Thank you for choosing Remington. Our products are designed to meet the highest standard of quality, functionality and design.
We hope you enjoy using your new Remington® product. Please read the instructions for use carefully and keep in a safe place for future reference.

IMPORTANT SAFETY INSTRUCTIONS
- WARNING - TO REDUCE THE RISK OF BURNS, ELECTROCUTION, FIRE, OR INJURY TO PERSONS:
2 This appliance can be used by children aged from 8 years and above and persons with reduced physical, sensory or mental capabilities or lack of experience and knowledge if they have been supervised/instructed and understand the hazards involved. Children shall not play with the appliance. Cleaning and user maintenance shall not be done by children unless they are older than 8 and supervised.
3 Do not use this product if it is not working correctly, if it has been dropped or damaged, or dropped in water.
4 Do not use accessories or attachments other than those we supply.
5 An appliance should never be left unattended when plugged in to a power outlet, except when charging.
6 Keep the power plug and cord away from heated surfaces.
7 Make sure the power plug and cord do not get wet.
8 Do not plug or unplug the appliance with wet hands.
9 Do not use the product with a damaged cord. A replacement can be obtained via our International Service Centres.
10 Do not twist or kink the cable, and don't wrap it around the appliance.
11 Store the product at a temperature between 15^ and 35^
12 Do not immerse the appliance in liquid; do not use it near water in a bath-tub, basin or other vessel; and don't use it outdoors.
13 Suitable for cleaning under an open water tap.

PROPOWER
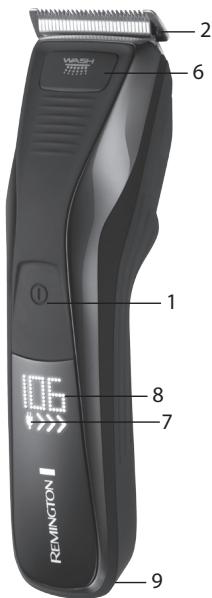


KEY FEATURES
1 On/Off Switch
2 Blade set
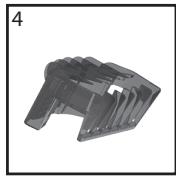
3 2 attachment guide combs 3-21mm and 24-42mm, 3mm adjustment
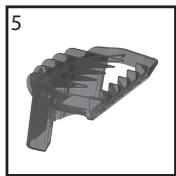
4 Adjustable stubble comb (HC5800) 1-13mm, 2mm adjustment
5 1.5mm Stubble comb (HC5600)
6 Quick wash release button
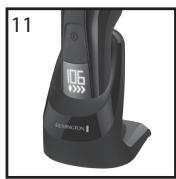
7 Charging indicator light (HC5400/HC5600)
8 LED display (HC5800)
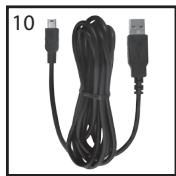
9 Micro USB port
10 Micro USB cable
11 Charging stand (HC5800)
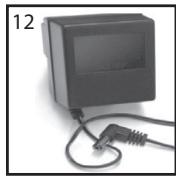
12 Adaptor

GETTING STARTED
CHARGING YOUR APPLIANCE
- Before using your hairclipper for the first time, charge for 16-20 hours.
- Ensure the product is switched off.
- Connect the charging adaptor to the product and then to the mains.
- If the product is not going to be used for an extended period time (2 - 3 months), unplug it from the mains and store.
- Fully recharge your product when you would like to use it again.
- Allow 16 hours for a full charge on the HC5400 and 4.5 hours on the HC5600 and HC5800.
- To preserve the life of your batteries, let them run out every 6 months then recharge for 16-20 hours.
This appliance should be charged by approved safety isolating adaptors PA-3215E (for HC5400 EU version) or PA-3215U (for HC5400 UK version) with the output capacity of 3.2V dc; 1500mA ; and should be charged by approved safety isolating adaptors PA-4515E (for HC5600, HC5800 EU version) or PA-4515U (for HC5600, HC5800 UK version) with the output capacity of 4.5V dc; 1500mA .
QUICK CHARGE (HC5600 & HC5800)
| Quick charge time | 10 minutes | 30 minutes | 1 hour | 2 hours |
| Run time | 5 minutes | 15 minutes | 30 minutes | 40 minutes |
CHARGING VIA CHARGING STAND (HC5800)
- Ensure the product is switched off.
- Connect the charging adaptor to the charging stand and then to the mains.
- Allow 4.5 hours for a full charge.
CHARGING VIA STANDARD ELECTRICAL SOCKET
- Ensure the product is switched off.
- Connect the charging adaptor to the product and then to the mains.
- Allow 16 hours for a full charge on the HC5400 and 4.5 hours on the HC5600 and HC5800.
\*USB
- Connect your USB cable to the USB port on your power source.
- Connect the USB cable to your appliance.
Note: charging may take longer when charging via USB.
CORDEDUSE
- Connect the charging adaptor to the product then to the mains.
- When the cord is connected to the mains, a digital display will be displayed on the appliance (HC5800).
CAUTION: Extended mains only use will result in the reduction of the battery life.
WARNING: The appliance can not be operated in corded mode while connected to a PC via the USB port.
CORDLESSUSE
When the unit is switched on and fully charged, the product can be used in cordless mode for up to 60 minutes for the HC5400 and up to 120 minutes for the HC5600 & HC5800.

INSTRUCTIONS FOR USE
BEFORE STARTING THE CUT
- Inspect the clipper making sure that it is free from hair and dirt.
- Seat the person so that their head is approximately at your eye level.
- Before cutting, always comb the hair so it is tangle free and dry.
| Comb position | Adjustable stubble comb (HC5800) | Short comb | Long comb |
| 1 | 1mm | 3mm | 24mm |
| 2 | 3mm | 6mm | 27mm |
| 3 | 5mm | 9mm | 30mm |
| 4 | 7mm | 12mm | 33mm |
| 5 | 9mm | 15mm | 36mm |
| 6 | 11mm | 18mm | 39mm |
| 7 | 13mm | 21mm | 42mm |
TO ATTACH A COMB
- Hold the comb with its teeth upward.
- Slide it onto and along the clipper blade until the front of the comb firmly sits against the clipper blade.
TO REMOVA THE COMB
- Holding the clipper with the blades facing away from you, firmly push the comb upward and away from the blades.
INSTRUCTIONS FOR CUTTING HAIR
For even cutting, allow the comb attachment/blade to cut its way through the hair. Do not force it through quickly. If you are cutting for the first time, start with the maximum comb attachment.
STEP 1 - Nape of the neck
- Set the comb to 3mm or 6mm.
- Hold the clipper with the blade teeth pointing upwards. Begin starting at the centre of the head at the base of the neck.
- Slowly lift the clipper, working upwards and outwards through the hair, trimming just a little at a time.
STEP2-Backofthehead
- With the comb set at 12 mm or 18 mm ,cut the hair at the back of the head.
STEP3-Side of the head
- Set the comb to 3mm or 6mm, trim sideburns. Then change the setting to 9mm and continue to cut the top of the head.
STEP4-Topofthehead
- Use the longer length comb attachment and set it to 24mm or 27mm then cut hair on top of the head against the direction in which the hair normally grows.
- For longer hair on top, use the longer length comb attachment (24 - 42mm) to achieve the desired style.
Always work from the back of the head.
STEP5-The finishing touches
- Use the clipper without an attachment comb for close trimming around the base and sides of the neck.
- To produce a clean straight line at the sideburns, reverse the hair clipper. Place the reversed clipper at right angles to the head, tips of the blades lightly touching the skin and then work downwards.
SHORT TAPERED STYLES - "FLAT TOPS" & SHORT CUTS
- Starting with the longest guide comb attached (24 - 42mm), cut from the back of the neck to the crown. Hold the guide comb flat against the head and slowly move the clipper through the hair.
- Use the same procedure from the lower side to the upper side of the head. Then cut the hair against the direction in which it grows and level with the sides.
- To give a "flat top" look, the hair on top of the head must be cut over the top of a flat comb.
- Use a closer guide comb to taper the hair down to the neckline as desired.
DUAL BOOST SYSTEM (HC5600)
- There are 3 settings for the Dual Boost system: Off, On, Boost.
If the clipper is set to on, it will run at regular power. - If the clipper is set to boost, it will provide maximum power.
AUTO BOOST SYSTEM (HC5800)
- There are 3 settings for the Auto Boost system: Off, Auto, Boost
- If the Clipper is set to Auto, it will run at regular power under low load conditions.
- When more power is needed, the clipper will automatically sense this and provide maximum boost.
- To activate the Boost setting, depress the power button for 2 seconds. The clipper will then constantly run at maximum power.
CARE FOR YOUR HAIRCLIPPER
Your clipper is fitted with high quality blades. To ensure long lasting performance of your clipper, clean the blades and unit regularly. Always keep the attachment guide comb on the trimmer blade.
AFTER EACH USE
- Ensure the clipper is switched off and disconnected from the mains before cleaning.
- Brush the accumulated hair from the blades. Do not submerge the clipper in water.
- To clean unit, wipe with damp cloth and dry immediately.
WASHABLE CLEANING
-
The QUICK WASH SYSTEM is designed to maximise the efficiency of washable cleaning.
-
Push the button that is located on the front of the hair clipper. The blades will slide out and the blade set can be easily cleaned under the tap.
- Once the blades are cleaned the blades are locked into place by pushing the blade set towards the hair clipper head and will snap into place.
- Do not run the entire unit under the tap, only the blade set is meant to be submerged in water.
Note: Ensure the clipper is turned off when cleaning.
EVERY SIX MONTHS
- At regular intervals the blade set should be removed and cleaned.
- Remove the 2 screws retaining the fixed blade with a screwdriver. Do not remove blade set.
- Brush out hairs from between the blades with soft cleaning brush. Do not remove the lubricating grease from the blades. It is not necessary to remove the small moving blade from the unit.
- If the moving blade has been removed this can be re-fitted by slotting the coated blade holder over the pin in the centre of the interior product head. The groove on the coated blade, just below the teeth, rests on a metal plate at the opposite side to the screw holes. The fixed blade is fitted with the raised profile pointing outwards and fixed with the 2 screws.
- Note that if the blades are not correctly aligned then cutting efficiency will be impaired.
- Place a few drops of cutter or sewing machine oil onto the blades. Wipe off excess oil.
CLEANING CAUTIONS
- Ensure the appliance is switched off and unplug from the main outlet before cleaning.
- Only the attachment guide combs and trimmer blade may be removed from the product for cleaning.
- Cleaning should be done with a soft brush, such as the brush supplied with the product.
- Do not rinse under water.
- Do not use harsh or corrosive cleaners on the units or their blades.

BATTERY REMOVAL
- The battery must be removed from the appliance before it is scrapped.
- The appliance must be disconnected from the supply mains when removing the battery.
- Ensure that the clipper is discharged of all power and disconnected from the mains.
- Remove the screw cover from back housing.
Using a small screwdriver, remove (1) screw from the bottom of the clipper. - Pry the front panel from the front housing and expose the inner housing.
Using a small screwdriver, remove (4) screws from inner housing - Pry the cover of inner housing and expose the PCB and batteries.
- Cut or break the wire stamps on the both end of the batteries and remove the batteries.
The battery is to be disposed of safely.

ENVIRONMENTAL PROTECTION
To avoid environmental and health problems due to hazardous substances in electrical and electronic goods, appliances marked with this symbol must not be disposed of with unsorted municipal waste, but recovered, reused or recycled.

KORTE GESTRUCTUREERDE KAPSELS - "FLAT TOPS" EN KORT HAAR
UW APPARAAT VERZORGEN
NABIJENI V NABJECIM STOJANKU (HC5800)
PPEOCTEPEXEHNA PN YNCTKE
Ipeed uicKoINpOBeBte, yTo6bI yCTpoiCTBO 6blIO BbIKIOueHO nOTcoeINHeO OT cTeN
ДлячNTКИСИЗдELЯ MOXHO CHIMaTb TOLbKO HappaBIAUOUIe HaCaIKNI 6LOKNe3Bn.
CHNTbMOKHO TOJIbKO PnN NOMOUs MRAKo JTeTK, KOTOPa NOCTABJAreTcBMECTe Cn3dEJIeM.
He npombyBaIte NOI BOIo.
He nCpOJIb3yIe IJn qIcTKn yCTpoIcTBA nIIN ne3Bn aIrpccmbHbIe IINI Bbl3bIbAIOJIe KoppO3NIO BeIeCTBa.

ИЗВLEЧЕНЕ БATAРЕ
- Pered ytniun3aueie 6atapeu cneyu t3Bleuy n3 yctpoiCTBa.
-ПииИЗВLEЧЕНСБаТApEиУСТРОДСТВОСЛДуETOTКЛЮЧИТБOTЭнКТРОСЕТИ. - y6eIntecb,уTO MaunHka nOlnHocTbO pa3pJxKeHa n OTKnIOUeHa O T cETN
OTBnHTnte KpbIshky C3aHneCteHKn. - MaJIeHbKOJ OTBepTKOJ OTKpyTInTe BnHT (1) C HIXHNeJ uACTn MaIINHKn dJa CTpNXKn.
- Пденистся поедно наень корпса, полунов достун К Витreneчукрпуну.
- Достою велов рыков
- Ростуншима.
MaJIeHbKOIOTBepTKoBbIKpyTInTe(4)BnHTbI IN3 BHyTpEnHeroKOpnyCa - Póndébte KpbIshky BByTpneHero KOpnyca, NoluyuB Doctyn K Neuathon nlaTe n 6aTapeym.
- OTPe nIOTnOMaTe pIOMbI npoBODC o6eHX cToPOH 6aTapei ydaJIte 6aTapei.
Batape npndexnT 6e3oanchoH ytnn3aun.

3koIoruuecka 3auita
KISA KESIMLI SAÇLAR – “DÜZ” VE KISA KESİMLER
PENTRU A INDEPARTA PIEPTENELE
BRIGA O VAŠEM ŠIŠACU ZA KOSU
Vasšišć je opremljen visokokvalitelnim ostricama. Kako biste osigurali dugotrajnu učinkovitost Vaseg Šišča, redovito cristite ostrice i jedinicu. Uvjiek držće stavavac Čěsija na ostrici trimera.
NAKON SVAKE UPORABE
- Prie ciscenja osiguraje da je uredaj isklujen i iskopcan iz uticnice elektricne mreje.
- Otresite nakupljene dlacice iz ostrica. Nemoite uranjati sišač u vodu.
Kako biste očistili Jedinicu, vlažnom krpom obrišite uredaj i odmah qa osušite.
MOKRO CIscenJE
SUSTAV BRZOG PRANJA osmišlen je za postizanje najveće moguce učinkovitosti mokroq čićenja.
- Pritisnite tipku koja se nalazi na prednjoi strani šišača kose. Štriceće kliznuti van, takto da cijeli komplet možete jegnestavno oprati pod tekúćom vodom.
- Nakon sto se oprali ostrice blokirajte ih na njihovo mesto gurajuci komplet prema glavi šišača dok ne sjednu na mesto.
Nemojte cijeli uredaj prati pod vodom; smo se ostrice moqu uranjati u vodu.
- Napomena: uvjerite se da je šišac iskligčen prise nego sto počnete s Čišćenjem.
SVAKIH SEST MJESECI
- U redovitim intervalima komplet ostrica treba skinuti očistiti.
- Pomocu odvijača uklonite 2 vijka koji pridržavaju fiksnu oštricu. Ne uklanjaje komplet oštrica.
- Mekom Četkom za Čišćenje išćetkajte dlacice izmedu ostrica. Ne uklanjaje ulje za podmazivanje s ostrica. Iz ureža(Some potrebno ukoliniti malu pomicnu ostricu.
- Ako je ostrica opcala, moze se popraviti postavljanem drzača obložene ostrice u unutarnji utor glave uredaj. Utor obloženih ostrica, odmah ispod zubaca, sjeda u metalnu pločicu na suprotnoj strani od rupica za vijke. Fiksna ostrica opremljana je izdignutim proflom kojiPokazuje prema van te je pričvršćena s 2 vijka.
Učinkovitost radaće biti umanjena ako oštrice nisu pravilno poděsene.
Stavite par kapi ulja za šišać ili šišać strojeve na oštrice. Obrisite visak ulja.
UPOZORENJE TIJEKOM CISCENJA
- Prijie cisćenja osiguraje da je urežaj iskljucen i iskopćan iz utićnice elektrîne mreze.
- Samo nastavci Češljeva i oštrica šišača mogu se skinuti s proizvoda radičićenja.
- Čiścenje treba vršiti samo mekanom Četkicom poput one koju ste dobili sa proizvodom.
Nemojte ispirati pod vodom. - Ne koristite gruba ili abrazivna sredstva za cisćenje na Jedinicama ili njihovim oštricama.

UKLANJANE BATERIJE
- Prije odlaganja uredaja baterija se mora ukloniti.
- Ure'daj mora biti iskopčan iz elektricne mreže kad se uklanja baterija.
- Osigurajte da je iz šišača izbačena sva elektrčna snaga i da je iskopćan iz mrežne utićnice.
- SkinitePoklopac pričvrsćen vijcima sa străznjeg kuciša.
- Pomócu malog odvijača, odvjte (1) vijak na dnu šišača.
- Skinite prednju plocu s prednjeg kuciša kako biste vidjeli unutrasnje kucište.
- Pomócu malog odvijača, odvijte (4) vija iz unutržnjeg kucišta.
- Skinite unutrasne kuciSTE kako bist e vidjeli tiskanu plociu i baterije.
Presijcite ili slomite zapeceni kraj zi na oba kraja i uklonite baterije.
Baterija se mora zbrinuti na siguran nacin.

ZASTITA OKOLISA
Kako bi se izbjegle štegne poslje dedice na okolíš i zdravlje zbog opasnih supstanci u elektrčinim i elektronskim proizvodima, svi uredaji obilježeni ovim simbolom ne smiju se zbrjinavati kao nerazvrstani komunalni oppad, već se moraju prikupiti, ponomovo koristiti ilr reciklarit.

-
-
-
-
-
-
-
-
-
-
-
-
-
-
-
-
-
-
-
-
-
-
-
-
-
-
-
-
-
-
-
-
-
- 2
-
-
-
-
-
-
-
-
-
-
-
-
-
-
-
-
-
-
-
-
-
-
-
-
-
-
-
-
-
-
-
-
yds 150 yds 111 yds 111 yds (4) dgs
aIyJbll aegabll oJdall aol gSgSall cull e bce jil
y
.

aaiy

gall 80211 gall ylll ylll lslal
jol joll jol jol jol jol jol jol jol jol jol jol
iiaai iip jslj 10 j j j j j glll llll llll
a1 = 30,2a3 = 43,b1 = 558,b_2 = 709
aai jy y lalit dll baaal y aai iai ball n ayol alia lii jss laie,
aall Jaa. jyblal aal ball j bial (jgill) Boost 12!
.5aaill 5aill 5e jyauily i
:
aall
aiaa aaii aai iiaai aiil bii 1sll ai jai ai bi
jie jie jie lai jia lai jia
12
aill jie 10
aell aell g 2, lss jy cll jall y
jellie glll aae baae ae eae
Jilll Jlll
Jall Jll 105
jGg jlll lal al aag . gaaa aag aag all jll
aaii i aiee eae
Jr J
g a baaal jaiyai jay jay ay jayaiyai y
.
iill iie 1
J
a a a a a a a a a a a a a a a a a a a a a a a a a a a
a 1 a a a a a a a a a a a a a a a a a a a a
gl aalboll o jaiill dala gaae y sji 1sakasrsaiai o jaiil
2gall 2gill jaiy. giall all wal baw gaiy gall jaiwll
y jlll llll g aiaa aagglg 1nlll aalall gale
Jy Jauuall yg jy g a y aai y aai y aai y
Jauu Jauu Jauu Jauu Jauu Jauu
iill jia iil jie jia jiall lal
eaaa aee ae yall sll jia bao lai jy jbiill
eall 12
.
.

.
.

.
.

.
.
.
.

.
.
.

.
.
.
18 12 12 12 12 12 12 12 12 12 12 12 12 12 12
jll -3 0 jll
laal Ua 6 1 3 2 aall lal 1 1 9 9 9
4 4
27 24 10000000000000000000000000000000000000000000000000000000000000000000000000
5 5
10
10
a a a a a a a a a a a a a a a a a a a a a a a a a a a a a a a a a a a a a a a a a a a a a a a a a a a a a a a a a a a a a aaa
(HC5600) 23 jall aygill pblb Boost (Jz) On (z) Off: zjall aygill pblal 13 dll (4)
(aj)
(aj)
(aj)
(aj)
(aj)
(aj)
(aj)
(HC5800) aiaaii iiaaii Aauto,(A) Off:(Auto Boost) aiaaii aiaii aiaii 3 d (A)Boost(At)
aiaaii aiaii aiaii aiaii aiaii aiaii aiaii aiaii aiaii aiaii aiaii aiaii aiaii aiaii aiaii aiaii aiaii aiaii aiaii aiaii aiaii aiaii aiaii aiaii aiaii aiaii aiaii aiaii aiaii aiaii aiaii aiaii aiaii aiaii ai
aalalalalalalalalalalalalalalalalalalal
(1)
slicc ic jll baw jno 12!
4
g d 1000000000000000000000000000000000000000
.0005
(HC5800)
aal
y
HC5600 5-4 HC5400 16
.HC5800
gulj 1y jia jia jia jai
iill
y 1
JalSll jaiil cie 5-4
USB
eJgSll Jusse USB JUs
JUB USB
USB 1
(
Lg
diall alalil) PA-3215U (HC5400
1500 3.2 (HC5400
J 4515E J
siall alal) PA-4515U (HC5800 HC5600
15004.5gHC5800HC5600
(HC5800, HC5600)


| \( \mu \) | \( {10}^{2.5}{\mathrm{\;s}}^{-1} \) | \( {30}^{2.5}{\mathrm{\;s}}^{-1} \) | \( 1{\mu }^{-1} \) | \( 2{\mu }^{-1} \) |
| \( \mu \) \( {\mu }_{\text{L }} \) | \( {5}^{2.5}{\mathrm{\;s}}^{-1} \) | \( {15}^{2.5}{\mathrm{\;s}}^{-1} \) | \( {30}^{2.5}{\mathrm{\;s}}^{-1} \) | \( {40}^{2.5}{\mathrm{\;s}}^{-1} \) |
Aremington
.
pIaiaai I aiaiil aiaaa
a a
y 1
:
Lag cal giv 8 ja a jiec jg y iayll Jalal y jalal y jalal y jalal y jalal y jalal y jalal y jalal y jalal y jalal y jalal y jalal y jalal y jalal y jalal y jalal y jalal y jalal y jalal y jalal y jalal y jalal y jalal y jalal y jalal y jalal y
8
jblaii la lla jy Jy Jy Jy jlll 3
clal glabla1
4
5
jiaallie 21!
aiaiil 6
alllll 7
aiia jiea Jaa 8
jla jz jz jz jz jz jz jz jz jz jz jz jz jz jz jz jz jz jz jz jz jz jz jz jz jz jz jz jz jz jz jz jz jz jz jz jz jz
ii aii iii aii jll aii jll
10
35 15 j 11
gj 12
.
13

a jllj all
(On/off)
2
3 42-24 21-3 2 3
102 2, p13-1 (HC5800) baii laii jaii jaii 4
(HC5600) 1.5
6
7
(HC5800)LED 8

Model No HC5400/HC5600/HC5800
Remington* is a Registered Trade Mark of Spectrum Brands, Inc., or one of its subsidiaries
VARTA Consumer Batteries GmbH & Co. KGaA, Alfred-Krupp-Str. 9, 73479 Ellwangen, Germany
www.remington-europe.com
© 2013 SBI