
Z 05895 - Vacuum Cleaner Cleanmaxx - Free user manual and instructions
Find the device manual for free Z 05895 Cleanmaxx in PDF.


| Brand | Cleanmaxx |
| Model | Z 05895 |
| Product type | Canister vacuum cleaner |
| Color | Black and red |
| Dimensions (L x W x H) | 40 x 25 x 30 cm |
| Weight | 4.5 kg |
| Power supply | 220-240 V ~ 50/60 Hz |
| Rated power | 800 W |
| Bag type | With bag (reusable) |
| Bag capacity | 2.5 L |
| Cable length | 6 m |
| Operating range | 8 m |
| Noise level | 75 dB(A) |
| Filtration | Washable HEPA filter |
| Water tank capacity | Not applicable |
| Main functions | Dry vacuuming for hard floors and carpets |
| Included accessories | Combination nozzle, furniture brush, crevice tool |
| Maintenance | Empty the bag regularly; wash the HEPA filter every 3 months |
| Safety | Automatic shut-off in case of overheating |
| Spare parts | Replacement bag, HEPA filter, belt |
| Repairability | Repairability index: 7.5/10 |
| General information | User manual available for free download |
Frequently Asked Questions - Z 05895 Cleanmaxx
User questions about Z 05895 Cleanmaxx
0 question about this device. Answer the ones you know or ask your own.
Ask a new question about this device
Download the instructions for your Vacuum Cleaner in PDF format for free! Find your manual Z 05895 - Cleanmaxx and take your electronic device back in hand. On this page are published all the documents necessary for the use of your device. Z 05895 by Cleanmaxx.
USER MANUAL Z 05895 Cleanmaxx
natural_image
Line drawing of a futuristic armored device with hexagonal top and rectangular base (no text or symbols)Z 05895
DE
Gebrauchsanleitung
ab Seite 3
GB
Instruction manual
starting on page 20
FR
Mode d'emploi
www.service-shopping.de
natural_image
Front view of a remote control device with circular button and four directional icons (no text or symbols)
natural_image
Illustration of a hand pressing down on a textured surface (no text or symbols)flowchart
graph TD
    A["Front Panel"] --> B["Assembly Step 1"]
    B --> C["Assembly Step 2"]
    C --> D["Assembly Step 3"]
flowchart
graph LR
    A["Container with cable"] --> B["Internal casing"]
    B --> C["Open case with internal box"]
    C --> D["Final package with pencil"]
natural_image
Pure mechanical component diagram without any text, numbers, or symbolsCleaning and maintenance 31
Storage 32
Troubleshooting 33
Technical data 34
Disposal 35
Symbols explanation

Safety instructions:
Please carefully read through and obey the safety notes in order to avoid injury to persons and damage to property.

Supplementary information
Dear customer,
We are delighted that you have decided on this robotic vacuum cleaner.
Before using the device for the first time, please carefully read through the instructions and store them for future reference. These instructions are to accompany the device when passed on to others.
The manufacturer and importer assume no liability in the event the data in these instructions have not been observed!
If you have questions about the device or spare parts/accessories, contact customer service via our website:
www.service-shopping.de
Proper use
- This device is designed for vacuuming up normal house dust. It is only intended for private indoor use and not suitable for commercial application.
- The device is not suitable for plush/deep-pile carpets.
- Do not in any case vacuum up the following:
–liquids or wet substances (e.g. wet carpet shampoo)
—smouldering ashes, cigarette butts, matches etc.
-chemical substances (e.g. acids, cleaners)
-fl ammable or ignitable materials
– very fine dust (e.g. cement dust) or toner
—pointy, hard objects such as larger glass shards
- Only use the device as described in the instruction manual. Any other use is deemed improper.
- Defects arising due to improper handling, damage or attempts at repair are excluded from the warranty. This also applies to normal wear and tear.

21 EN
Safety notes

Risks of injury
- Keep children and animals away from the device and packaging material. There is a danger of injury and suffocation!
This device may be used by children ages 8 and over as well as persons with impaired physical, sensory or mental capacities or those lacking experience and/or knowledge if they are supervised or have been instructed in how to safely use the device and have understood the risks associated with operating the device. - Cleaning and user maintenance must not be performed by unsupervised children.
■ The device is not a toy!
Children must be under supervision to ensure that they do not play with the device and/or injure themselves with the device. They may not sit on the device or use it as a push car. - Batteries can be life-threatening if swallowed. Therefore keep batteries and the remote control out of the reach of young children. If a battery has been swallowed, you must seek immediate medical attention.

Risk of electric shock and fi re
- Do not use the device if easily flammable gases are present in the air.
- Never immerse the device in water or other liquids. Otherwise there is a risk of electrical shock.
- Do not touch the device with wet hands. Do not use the device outdoors or in rooms with a high humidity.
■ Never vacuum up liquids. Do not fill the dust bin with liquids.
■ Only use the device in dry, indoor spaces.
- Immediately switch off the device in the event of damage/faults (e.g. unusual noises, odours or if smoke is emitted).
- Never carry or pull the mains adapter by the mains cord, always handle the mains cord with care. Avoid catching the cord on doors and pulling it across sharp edges or corners. Keep the cable away from hot surfaces.
EN
22
- Only connect the mains adapter to a socket, whose mains voltage complies with the data on the specification plate. The socket must also be easily accessible after the device has been connected.
- For your own safety, always check the device for damages prior to using it. Only use the device if the device, mains cord and the plug do not exhibit any damages!
- Do not make any modifications to the device. Also do not replace the mains cord yourself. Only have the device, cord and plug repaired by a qualified workshop. Contact customer service if necessary. Improper repairs could pose serious risks for the user.
- Turn the device off and pull the mains plug out of the socket –in the event of a storm,
– in the event of errors affecting the mains adapter/charging station, – if liquids or debris end up in the device,
-if you don't use the device for a prolonged period of time,
—when you clean the device,
—when you change the batteries,
—before you change the accessories.
If you wish to pull the mains plug out of the socket, never pull on the cable, but always on the plug. Only take hold of the mains plug when your hands are dry.

Danger associated with batteries
■ Before inserting the batteries, check that their contacts are clean and, if necessary, clean them.
■ Only use the battery type specified in the technical data.
■ Remove the battery from the remote control if it is used up or if you are not using the device for an extended period. This way, you can avoid damages attributed to leaking.
If a battery/the rechargeable battery has leaked, avoid contact between your skin, eyes, mucous membranes and the battery acid. In case of contact with battery acid, rinse the affected areas immediately with plenty of clean water and seek immediate medical attention.
- Immediately remove a leaky battery/rechargeable battery from the device. Clean the contacts before you insert a new battery/rechargeable battery.
23 EN
- Batteries may not be charged or reactivated with other means. The batteries and the rechargeable battery may not be disassembled, thrown on a fire, immersed in liquids or short circuited.

Avoiding damage to materials, property and the device
■ After being washed out, the dust bin must be completely dry before it can be reinserted.
- Only use the device if it has been completely assembled. The dust bin and filters must be inserted.
- For your own safety, check the device for damages each time before using it. In the event of defects, the device may not be used until it has been repaired by a qualified professional.
■ Connected cords may not pose a tripping hazard.
- Do not insert anything in the openings/nozzle of the device and make sure that they are not plugged.
- Do not let the device operate when unattended, particularly if there are children and/or animals in your home.
■ Only use original spare parts provided by the manufacturer.
Before you operate the device, you must ensure that any objects on the floor around the device, which could catch in the brushes or the nozzle or could block the device while cleaning, have been cleared away. Make sure that there is no risk of the device getting caught in cords or curtains. It could be caught e.g. in the cord of a table lamp and pull it off the table.
In the event of damages/malfunctions, immediately deactivate the device.
■ Before checking the device for blockages or removing them, make sure that it has switched off.
- Do not insert any objects into the device. There is a risk of contact with current-carrying parts.
If liquids or debris have penetrated the device, immediately switch it off. Have the device inspected before using it again.
- Store the device in a dry place at temperatures between 0 and 40 °C.
■ Never place heavy objects on the device.
■ Never cover the vents.
EN
24
- Protect the device against heat, open flames, direct sunlight, moisture and percussions. Make sure there is no risk device falling down.
- Do not attempt to grease the wheels with lubricants or oil. Otherwise, this may cause more dust or dirt to accumulate on the wheels.
Product contents
• 1 xRobotic vacuum cleaner
- 1 x Charging station
- 1 x Mains plug
- 1 x Remote control
- 1 x Cleaning brush
- 2 x 2 Side brushes
- 2 x Dust fi Iter
- 2 x HEPA fi Iter
- 1 x Rechargeable battery (locked in place)
- 2 x 1.5 V batteries, type AAA
Device overview
Upper side

1 Handle from the dust bin
2 Dust bin with filters
3 Sensor
4 Vent
5 Shock absorber
6 Start/pause switch
25 EN
Bottom side
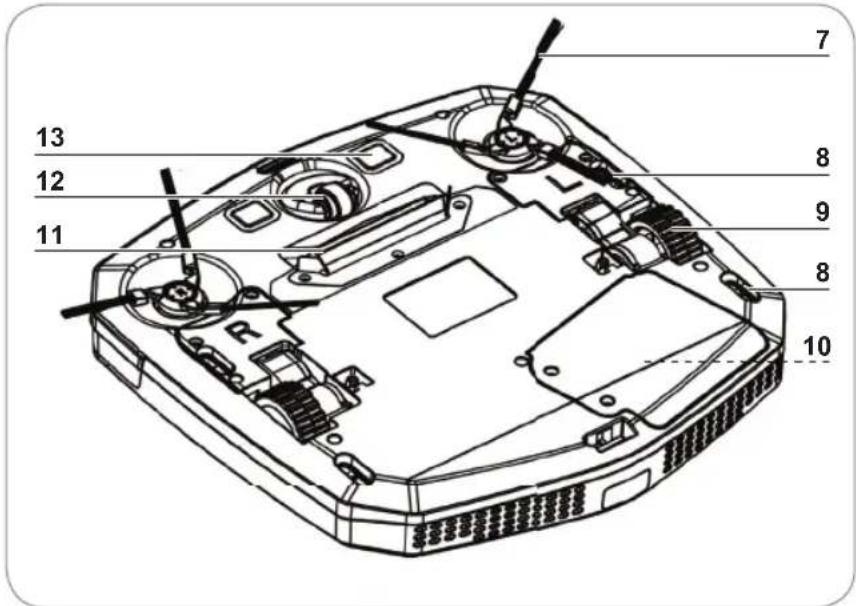
7 Side brush for cleaning along edges
8 Sensor
9 Drive wheels (right and left)
10 Rechargeable battery
11 Nozzle and rubber strip
12 Front wheel
13 Charging contacts
Remote control
natural_image
Pure electrical control panel outline without any text, numbers, or symbols
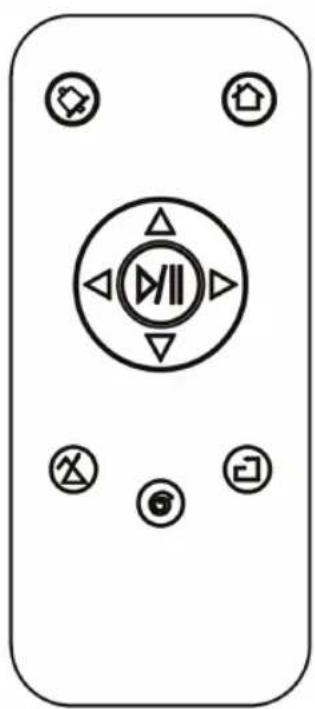
To use the remote control, you must first activate the device via start/pause switch (6) on the device.

Start/Pause – Push the button in the middle to start the device or to pause the device during the vacuuming process.
Directional buttons – You can use the directional buttons to steer the device manually.

Automatic charging – Push this button to tell the device to return to the charging station to recharge.

Timer – Push this button to set the time for the device to vacuum each day (24-hour mode).


Vacuuming mode – You can use these buttons to set the desired vacuuming mode. The vacuuming mode cannot be changed during operation. You must pause the device if you would like to switch the mode.
Basic functions
- This robotic vacuum cleaner vacuums up loose dirt through the nozzle (11). It comes with side brushes (7) to clean walls and furniture.
• The device cleans the floor by vacuuming in a variety of patterns. - You can also use the directional buttons to steer the robotic vacuum cleaner manually.
- The robotic vacuum cleaner has three cleaning modes and can be configured to automatically start vacuuming at a set time.
- Its sensors (3, 8) allow the device to detect walls or other obstacles and adjust its path accordingly.
- The sensors (3, 8) on the bottom side of the device detect steps or other depressions to prevent the device from falling.
- If the rechargeable battery is almost empty, the device will automatically start to look for the charging station.
Before fi rst use
Before you can use the device, you must:
- unpack the product contents and remove all transport and packaging elements,
- insert batteries in the remote control,
- fi tting the side brushes,
- set up the charging station,
- charge the device's rechargeable battery.
Unpacking the product contents

ATTENTION!
- Keep children and animals away from the packaging material. Danger of suffocation exists!
- Unpack all parts and make sure that the product contents are complete (see chapter "Product contents") and check for any damages from transport. If you identify damages to the components, do not use them (!), instead contact the customer service.
- Remove all transport guards if present and the protective foil from the display of the charging station.
Inserting batteries in the remote control
- Open the battery compartment cover on the back of the remote control by pressing the catch together with your thumb and fold up the cover.
- Insert the batteries in the battery compartment. Make sure that the polarity is correct as indicated in the compartment (+/-).
- Put the battery compartment cover back on the battery compartment and fold it into the closed position. It must audibly lock into place.
When the remote control starts to lose power, the batteries must be replaced.
27 EN
Fitting the side brushes
- Place the device upside down on the ground or a table.
- Fit the side brush (7) marked with R on the receptacle on the device that is marked with R.
- Fit the side brush (7) marked with L on the receptacle on the device that is marked with L.
- The side brushes (7) must audibly lock into place.
Set up the charging station

14 Indicator light
15 Connection for the mains plug
16 Charging contacts
17 Sensor

ATTENTION!
- Do not leave the mains adapter connected for a prolonged period of time. After every charge operation, disconnect it from the mains unless you have configured the timer to automatically start the device.
-
Keep the charging station and device away from radiators, other heat sources and direct sunlight.
The charging contacts on the device (13) and on the charging station (16) should always be free of dust and clean so that the rechargeable battery can be charged. Therefore, wipe it off regularly with a soft, dry cloth. -
Place the charging station on a clean, level floor with the back towards a wall near a socket. When selecting the location, keep in mind that once it has finished cleaning, the robotic vacuum cleaner must have an unobstructed path back to the charging station. There must be approx. 1.5 to 2m of free space in front of the charging station; there should be no furniture or other obstacles within this space. The sensor (17) must not be covered. No reflective objects (e.g. mirrors) should be behind or next to the charging station as they could confuse the sensor (17).
-
Connect the mains adapter cord to the charging station and then insert the mains plug of the mains adapter into an easily accessible socket. Make sure that none of the leftover cord is located in front of the charging station so that the device is not obstructed when docking and that the cord does not pose a tripping hazard!
Charge the rechargeable battery

- Do not charge the device's rechargeable battery in dirty or moist areas; make sure that the room temperature is between 15^ and 35^ .
- Discharge the rechargeable battery every few months and then recharge it. To discharge the rechargeable battery, use the device with the charging station disconnected from the mains so that it runs out of power. Then recharge the rechargeable battery.
- The device will indicate whether the rechargeable battery is fully charged, half charged or almost empty. When in operation, the start/pause switch (6) will either light up in blue (rechargeable battery fully charged), pink (rechargeable battery half charged) or red (rechargeable battery nearly empty).
You can determine the charge level of the rechargeable battery using the indicator light (14) on the charging station: If the indicator light (14) is red, the rechargeable battery is still charging; if it is flashing, the device is ready for use.
Before first use or if the device has not been used for a prolonged period of time, it will take approximately 6 to 8 hours for the empty rechargeable battery to recharge; subsequent charge times will then range from approx. 3 to 4 hours. The rechargeable battery will reach its full charge capacity after it has been fully discharged and recharged completely two to three times.
If the rechargeable battery is completely empty and the device is unable to travel to the charging station, it must be placed on the charging station.
Charging via the charging station
Once the charge level of the robotic vacuum cleaner's rechargeable battery is low, it will travel to the charging station where the rechargeable battery will be automatically recharged. For this, the charging station must be connected to the mains (see chapter "Charging station").
If the device fails to locate the charging station because e.g. the room is too large and it comes to a stop, you should “give it helping hand”. Use the directional buttons on the remote control to steer the device towards the charging station or place it directly on the charging station.
While the device is vacuuming, leave the charging station connected to the mains so that it can automatically dock and recharge for the next cleaning cycle. To ensure that the device is properly positioned on the charging contacts, check whether the indicator light (14) on the charging station is red after the device has docked.
Once the device has docked on the charging station, it will automatically start to recharge. The indicator light (14) on the charging station will switch from green to red. The start/pause switch (6) on the device will illuminate in blue-red. The device will automatically switch off after a few minutes, but the rechargeable battery will continue to charge. If the indicator light (14) is red, the rechargeable battery is still charging; if it is flashing, the device is ready for use.

With the ⏻ button on the remote control, you can tell the device to return to the charging station and recharge.
29 EN
Functions
The device has three different vacuuming modes. You can use the menu button on the device or the corresponding buttons on the remote control to select these modes.
You can also use the directional buttons to steer the robotic vacuum cleaner manually. In each mode, the device will vacuum until the rechargeable battery is low. It will then automatically locate the charging station.
The robotic vacuum cleaner has the following vacuuming modes:

Random cleaning mode: The robotic vacuum cleaner will travel straight ahead until it encounters an obstacle, it will then veer off and travel straight ahead in another direction.

Spiral cleaning mode: The robotic vacuum cleaner will begin by travelling from the inside to the outside in an increasingly large spiral. It will then travel from the outside inward in an increasingly small spiral. Once it has reached its starting position, it will look for a new area and begin the process again.

Edge cleaning mode: The robotic vacuum cleaner will move forward until it encounters an edge (e.g. wall, piece of furniture), it will then travel along this edge until it reaches the next edge.
Timer function

- If you do not deactivate the timer and the device is charged, it will always start cleaning at the set time.
- The device will vacuum in random mode with the timer function.
You can program the robotic vacuum cleaner so that it starts vacuuming at a desired time.
- With the start/pause switch (6) on the device, switch the device to standby mode.
- Push the button on the remote control to set the time at which you wish the device to vacuum each day.
- A signal tone will sound, the start/pause switch (6) will illuminate in red and the device will start vacuuming.
- If you now switch the device to standby outside of the timer setting, the start/pause switch (6) will illuminate in red.
- To deactivate the timer, switch the device to standby mode and push the ⏻ button on the remote control again. The timer has now been deactivated and the start/pause switch (6) will illuminate in blue.
Use
Preparing the room

ATTENTION!
- When using the device in a room for the first time, watch it so that you can remove any obstacles; this will ensure that the device is able to effectively clean the whole room.
■ The device is not suitable for plush/deep-pile carpets.
- Clear up all items lying around the room that could catch in the brushes or nozzle or which could obstruct the device while cleaning. Be particularly sure to not leave any plastic bags on the floor.

natural_image
Illustration of a hand pressing down on a textured surface (no text or symbols)- Make sure that the device is not able to come into contact with cables, cords or tassels, e.g. of curtains, table cloths or carpets. If necessary, fold the edges of carpets with tassels under the carpet.
- Remove all items that could be knocked over (e.g. vases, small lamps, decorative items).
- There should be at least 40 ~cm of distance between two objects (e.g. wall and shelf) in order for the device to pass through.
- The device could get stuck under pieces of furniture if it does not have the necessary clearance. Block the path e.g. with flower pots that are heavy enough to prevent being knocked off.
Operating the device/manual start

ATTENTION!
-
Do not disconnect the charging station from the mains while the device is operating so that it can return when the rechargeable battery power gets low.
If the device is unable to locate the charging station, it will stay still and switch to standby mode. In this case, it must be placed on the charging station. -
Make sure that the dust bin (2) is empty, that the device is free of dirt and debris (see chapter "Cleaning and maintenance") and that the rechargeable battery is charged.
- Switch the device on by pushing the start/pause switch (6) on the device. The start/pause switch (6) will illuminate in red - blue - red.
- Push the desired function button on the remote control (see chapter "Functions"). A signal tone will sound, the start/pause switch (6) will illuminate in blue. The robotic vacuum cleaner will then start cleaning in the selected vacuuming mode.
- Push the button Ⓜ to stop the robotic vacuum cleaner. A signal tone will sound, the start/pause switch (6) will illuminate in red again. The device will stop vacuuming and automatically switch to standby mode.
- If the rechargeable battery is too low, let the device recharge in the charging station.
31 EN
- With the ⏻ button, let the device return to the charging station or put it back to start charging the battery again.
- If no automatic start (timer) has been activated, pull the mains plug of the charging station out of the socket. The device will switch itself off after a few minutes and the start/pause switch (6) will go out.
- Empty the dust bin (2) after every use and, if necessary, remove any dirt (see chapter "Cleaning and maintenance").

- If you would like to use the remote control to configure the device, make sure that you are not in the direct vicinity of an infrared source (e.g. the charging station) as it could interfere with the remote control.
–The remote control only works within a radius of 4 m to the device.
Cleaning and maintenance

ATTENTION!
The device may not be connected to the mains and must be switched off for cleaning and maintenance!
Only the dust bin may be rinsed out. The device itself, the filters or the remote control may not be immersed in water or in other liquids. Make sure that all parts are completely dry before you place the dust bin back in the device!
■ None of the parts of the robotic vacuum cleaner are suitable for cleaning in the washing machine or dishwasher!
- When cleaning, do not use any corrosive or abrasive cleaners. They could damage the surface.
Before and after each use, make sure that
• the nozzle (11) and the vents (4) are unobstructed,
• the sensors (3, 8) on the device are free of dust or similar,
• the side brushes (7) are not entangled and are free of hair and threads,
• no hair, threads or similar are wrapped around the wheels (9, 12).

The side brushes may be cleaned with warm water.
Cleaning the housing
- Remove any coarse dirt from the device.
- Use a damp cloth to wipe the rubber lip on the nozzle (11).
- If necessary, wipe the housing off with a damp cloth only.
Emptying the dust bin and cleaning the filters
For proper operation of the device, you should empty the dust bin (2) and clean the filter after every use.
- You can knock out the filters and/or use the enclosed cleaning brush to brush them out.
• You can rinse the dust bin (2) out with water.

flowchart
graph TD
    A["Top Component"] --> B["Internal Component 1"]
    B --> C["Internal Component 2"]
    C --> D["Bottom Component"]
- Fold the handle on the dust bin (1) up and use it to pull the dust bin (2) out of the device.

flowchart
graph LR
    A["Container with cable"] --> B["Internal casing"]
    B --> C["Open case with internal box"]
    C --> D["Final package with internal box and cable"]
- Open the dust bin (2) by folding the catch forward and pushing it up.
- Empty the dust bin (2) into a waste bin.
- You should also clean the HEPA and dust filter after every use. They are located in the dust bin (2).
- Release both catches on the side and take the dust filter off of the HEPA filter.
- Empty out any coarse dirt over a waste bin.
- Insert both filters again. When inserting the filters, make sure that they are properly secured!
- If necessary, clean the dust bin (2) with clean, warm water. Then let it dry completely before putting it back in the device. When putting it back in the device, make sure that the dust bin (2) is properly seated in the dust bin compartment and that the handle (1) is folded down.
Replacing the side brushes
If the side brushes (7) are worn, they must be replaced. Two spare side brushes are contained in the product contents.
- Remove any coarse dirt from the bottom side of the device.
- Place the device upside down on the ground or a table.
- Pull the side brushes (7) off of the axles.
- If necessary, clean the brush compartments.
- Place the new side brushes (7) on the axles. They must audibly lock into place.
Storage
- Store the device and accessories in a cool, dry place that is out of the sun and out of the reach of children and animals.
• Take the batteries out of the remote control if you do not use the device for a prolonged period of time.
33 EN
Troubleshooting
If the device is not working properly, please check whether you are able to rectify the problem yourself first.

Do not attempt to repair a defective device yourself!
| Problem Possible cause/solution | |
| The device is not working. | Has the rechargeable battery been charged? |
| The device does not respond to the remote control. | Are you pointing the remote control directly at the device? Are there obstacles between the remote control and the robotic vacuum cleaner?Is the remote control too far away from the device?Are the batteries in the remote control too weak or improperly inserted?Has the rechargeable battery been charged? Check whether the device can be switched on. |
| The device's rechargeable battery does not charge. | Did the device correctly dock on the charging station?Are the contacts on the device and on the charging station clean?Is the indicator light on the charging station on? Is it being supplied with power? |
| The indicator light on the charging station is off. | Check whether it is correctly connected to the mains adapter and that the mains adapter is correctly connected to the socket.Is the socket defective? Try another socket.Check the fuse for your mains connection. |
| The suction power is weak. | Is the nozzle plugged, the dust bin full or are the filters dirty? |
| The device stops, but is still on. | Check whether the wheels or sidebrushes are obstructed.Is the nozzle plugged, the dust bin full or are the filters dirty? |
| The device turns around in circles. | Is one of the wheels obstructed? |
| The device constantly travels back to the charging station or changes direction. | Are the infrared sensor and the sensor at the front or the sensors on the bottom of the device dirty? Clean them. |
| The device is unable to locate the charging station. | Are the sensors on the charging station obstructed or dirty? Is there any furniture or other obstacles in front of the charging station? There must be at least 1.5 to 2 m of free space in front of the charging station so that the signal can reach the device.Make sure that the charging station is connected to the mains supply.Is the room so large that the signal is no longer able to reach the device? If this is the case, you must place the device on the charging station yourself. |
| The device does not leave the charging station at the preset time. | Has the rechargeable battery been charged? Check whether the device can be switched on. |
Device alarm
If you encounter an error while cleaning (e.g. a wheel is blocked or is no longer touching the floor, the sensors are no longer in contact with the floor etc.), a signal will sound and the device will stand still. Use the button ⏻ to switch the device to standby mode and resolve the error (remove the obstacle such as a cable or similar, clean the sensors, lift the device up and put it down somewhere else on the floor etc.).
Technical data
Device
Model number: VR301
Product number: Z 05895
Diameter: 30 cm
Height: 57 mm
Rechargeable battery: 10.8 V; Li-Ion
Capacity of the
rechargeable battery: 2200 mAh
Rechargeable battery
charging time: 3 – 4 hours
Operating time:
- approx. 80 - 100 minutes on hard floors
- approx. 40 - 50 minutes on carpeting
Voltage supply
- charging station: 14.0 V DC, 1.0 A
– the remote control: 3 V DC (2 x 1.5 V batteries, type AAA)
Mains adapter
Model number: GQ15-140100-AG
Voltage supply: 100 – 240 V\~ 50/60 Hz
Safety class: II
Customer service/importer:
DS Produkte GmbH
Am Heisterbusch 1
19258 Gallin
Germany
Tel.: +49 38851 314650
*) Calls to German landlines are subject to charges. The cost varies depending on the service provider.

35 EN
Disposal

The packaging material is recyclable. Dispose of the packaging in an environmentally-friendly manner and make it available to the collection service for recyclable materials.

Dispose of the device in an environmentally-friendly manner. It does not belong in the household garbage. Dispose of it at a recycling centre for old electrical and electronic devices.
For more information, please contact the administration in your community.
Rechargeable batteries and batteries must be removed and disposed of separately before disposing of the device. To protect the environment, batteries and rechargeable batteries may not be disposed of together with normal household waste. Instead they must be turned in at appropriate collection points. Please also observe applicable statutory provisions regulating the disposal of batteries.
Removing / inserting the rechargeable battery

ATTENTION!
- Do not in any case open the rechargeable battery pack!
To take the rechargeable battery out of the device, please follow the steps below:

natural_image
Pure mechanical component diagram without any text, numbers, or symbols- Loosen the two screws and fold the cover of the rechargeable battery compartment up.
- Pull the rechargeable battery pack up and disconnect the plugged connection by pushing on the catch.
- Dispose of the rechargeable battery in accordance with the legal regulation for battery disposal.
- If you would like to insert a new rechargeable battery in the device, connect the plugs and place it in the rechargeable battery compartment. Close the cover of the rechargeable battery compartment and turn the two screws back into place.
All rights reserved.
Contenu
www.service-shopping.de
natural_image
Front view of a remote control device with four buttons and a central play button (no text or symbols)
natural_image
Illustration of a hand pressing down on a textured surface with a computer mouse (no text or symbols)flowchart
graph LR
    A["Initial State"] --> B["Intermediate Stage"]
    B --> C["Final State"]
flowchart
graph LR
    A["Container with cable"] --> B["Internal box with internal part"]
    B --> C["Open container with internal part"]
    C --> D["Final package with internal part"]
natural_image
Pure mechanical component diagram without any text, numbers, or symbolswww.service-shopping.de
natural_image
Illustration of a hand pressing down on a textured surface (no text or symbols)natural_image
Line drawing of a vehicle's front view showing roof, door, and side panels (no text or symbols)→

natural_image
Line drawing of a car chassis with no text or symbols→

natural_image
Technical line drawing of a mechanical housing or enclosure with two views (top and side), no text or symbols present.natural_image
Pure mechanical component diagram without any text, numbers, or symbols


- Symbols explanation
- Proper use
- EN
- Safety notes
- Risks of injury
- Risk of electric shock and fi re
- EN
- 22
- Danger associated with batteries
- EN
- Avoiding damage to materials, property and the device
- 24
- Product contents
- Device overview
- Upper side
- EN
- Bottom side
- Remote control
- Basic functions
- Before fi rst use
- Unpacking the product contents
- ATTENTION!
- Inserting batteries in the remote control
- EN
- Fitting the side brushes
- Charge the rechargeable battery
- Charging via the charging station
- EN
- Functions
- Timer function
- Use
- Preparing the room
- Operating the device/manual start
- EN
- Cleaning and maintenance
- Cleaning the housing
- Emptying the dust bin and cleaning the filters
- Replacing the side brushes
- Storage
- EN
- Troubleshooting
- Device alarm
- Technical data
- Customer service/importer:
- EN
- Disposal
- Removing / inserting the rechargeable battery
- - Do not in any case open the rechargeable battery pack!
- Contenu
Brand : Cleanmaxx
Model : Z 05895
Category : Vacuum Cleaner