
GV-D200 - VCR SONY - Free user manual and instructions
Find the device manual for free GV-D200 SONY in PDF.


| Product Type | VCR (Video Cassette Recorder) |
| Brand | Sony |
| Model | GV-D200 |
| Dimensions (Approx.) | 180 x 80 x 200 mm (7.1 x 3.1 x 7.9 in) |
| Weight (Approx.) | 1.5 kg (3.3 lbs) |
| Power Supply | 12V DC or 100-240V AC adapter |
| Power Consumption | 10 W (typical) |
| Recording Format | VHS (standard play) |
| Playback | VHS tapes, includes search and slow motion |
| Recording Functions | Timer recording, one-touch recording, auto repeat |
| Audio | Hi-Fi stereo (simulated) |
| Input/Output | RCA composite video and audio, RF out |
| Tuner | Not available (external tuner required) |
| Remote Control | Included (IR) |
| Timer | Programmable up to 1 week |
| Head Cleaning | Automatic cleaning or use cleaning cassette |
| Maintenance | Clean tape path and heads periodically with non-abrasive cleaner |
| Safety | Avoid magnetic fields, moisture, and extreme temperatures |
| Spare Parts | Belts, pinch roller, video heads (professional servicing recommended) |
| Repairability | Moderate; skilled technician needed for head replacement |
Frequently Asked Questions - GV-D200 SONY
User questions about GV-D200 SONY
0 question about this device. Answer the ones you know or ask your own.
Ask a new question about this device
Download the instructions for your VCR in PDF format for free! Find your manual GV-D200 - SONY and take your electronic device back in hand. On this page are published all the documents necessary for the use of your device. GV-D200 by SONY.
USER MANUAL GV-D200 SONY
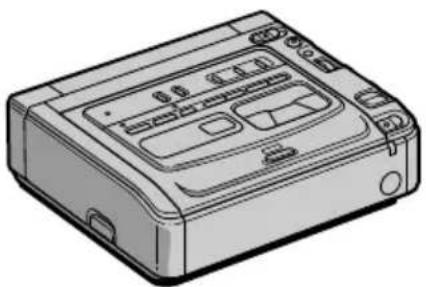
Digital Video Cassette Recorder B
Operating Instructions
Before operating the unit, please read this manual thoroughly, and retain it for future reference.
Owner's Record
The model and serial numbers are located on the bottom. Record the serial number in the space provided below. Refer to these numbers whenever you call upon your Sony dealer regarding this product.
Model No. GV-D200
Model No. AC-
Serial No. ____
Serial No. ____

InfoLITHIUM


WALKMAN

Digital 8
GV-D200
WARNING
To prevent fire or shock hazard, do not expose the unit to rain or moisture.

This symbol is intended to alert the user to the presence of uninsulated “dangerous voltage” within the product’s enclosure that may be of sufficient magnitude to constitute a risk of electric shock to persons.

This symbol is intended to alert the user to the presence of important operating and maintenance (servicing) instructions in the literature accompanying the appliance.
Never expose the battery pack to temperatures above 140°F (60°C) such as in a car parked in the sun or under direct sunlight.
For customers in the U.S.A. and CANADA
DISPOSAL OF LITHIUM ION BATTERY. LITHIUM ION BATTERY. DISPOSE OF PROPERLY.
You can return your unwanted lithium ion batteries to your nearest Sony Service Center or Factory Service Center.
Note: In some areas the disposal of lithium ion batteries in household or business trash may be prohibited.
For the Sony Service Center nearest you call
1-800-222-SONY (United States only)
For the Sony Factory Service Center nearest you call 416-499-SONY (Canada only)
Caution: Do not handle damaged or leaking lithium ion battery.
For customers in the U.S.A.
If you have any questions about this product, you may call:
Sony Customer Information Center 1-800-222-SONY (7669) or write to:
Sony Customer Information Center 1 Sony Drive, Mail Drop #T1-11, Park Ridge, NJ 07656
CAUTION
You are cautioned that any changes or modifications not expressly approved in this manual could void your authority to operate this equipment.
Declaration of Conformity
Trade Name: SONY
Model No.: GV-D200
Responsible Party: Sony Electronics Inc.
Address: 1 Sony Drive, Park
Ridge, NJ, 07656 USA
Telephone No.: 201-930-6972
This device complies with Part 15 of the FCC Rules. Operation is subject to the following two conditions: (1) This device may not cause harmful interference, and (2) this device must accept any interference received, including interference that may cause undesired operation.
Note:
This equipment has been tested and found to comply with the limits for a Class B digital device, pursuant to Part 15 of the FCC Rules. These limits are designed to provide reasonable protection against harmful interference in a residential installation. This equipment generates, uses, and can radiate radio frequency energy and, if not installed and used in accordance with the instructions, may cause harmful interference to radio communications. However, there is no guarantee that interference will not occur in a particular installation. If this equipment does cause harmful interference to radio or television reception, which can be determined by turning the equipment off and on, the user is encouraged to try to correct the interference by one or more of the following measures:
— Reorient or relocate the receiving antenna.
— Increase the separation between the equipment and receiver.
— Connect the equipment into an outlet on a circuit different from that to which the receiver is connected.
— Consult the dealer or an experienced radio/TV technician for help.
For customers in CANADA
CAUTION
TO PREVENT ELECTRIC SHOCK, MATCH WIDE BLADE OF PLUG TO WIDE SLOT, FULLY INSERT.
Getting started
Using this manual 4
Checking supplied accessories...... 6
Step 1 Connecting to a TV ...... 7
Step 2 Preparing the power supply ..... 8
Connecting to a wall outlet ...... 8
Using with a battery pack (not supplied) 9
Step 3 Inserting a cassette ...... 12
Basic Operations
Playing back a tape 13
Recording from the other VCR or TV .... 18
Advanced Operations
Enlarging playback images - PB ZOOM .... 20
Watching a tape with special effects – Picture effect.... 21
Watching a tape with special performances – Digital effect ...... 23
Quickly locating a scene - Zero set memory ...... 26
Searching with recording date – Date search ...... 27
Searching for a photo – Photo search/Photo scan ..... 28
Displaying recording data and screen indicators – Data code function .... 30
Superimposing a title 31
Making your own titles 33
Editing
Dubbing a tape 35
Dubbing only desired scenes – Digital program editing...... 37
Using with an analog video unit and a personal computer – Signal convert function...... 47
Inserting a scene from the other ( playback) VCR – Insert Editing .... 48
Customizing Your VCR
Changing the menu settings...... 50
Resetting the date and time 55
Additional Information
Digital8 System, recording, and playback.... 57
About i.LINK 59
Troubleshooting 61
Self-diagnosis display.... 63
Warning indicators and messages..... 64
Using your VCR abroad...... 66
Maintenance information and precautions 67
Specifications 71
Quick Reference
Identifying the parts and controls ..... 72
Index ...... Back cover
As you read through this manual, buttons and settings on your VCR are shown in capital letters.
e.g. Set the POWER switch to ON.
When you carry out an operation, you can hear a beep sound to indicate that the operation is being carried out.
Before using your VCR
With your VCR, you can use Hi8/HiDigital8 video cassettes. Your VCR records and plays back pictures in the Digital8 System. Also, your VCR plays back tapes recorded in the Hi8/HiStandard 8 (analog) system. However, you cannot use the functions in "Advanced Operations" on pages 20 to 34 for playback in the Hi8/Hi8 standard 8 System. To enable smooth transition, we recommend that you do not mix pictures recorded in Hi8/HiStandard 8 with the Digital8 system on a tape.
Note on TV color systems
TV color systems differ from country to country. To view your recordings on a TV, you need an NTSC system-based TV.
Copyright precautions
Television programs, films, video tapes, and other materials may be copyrighted. Unauthorized recording of such materials may be contrary to the provisions of the copyright laws.
Precautions on VCR care
- Do not let your VCR get wet. Keep your VCR away from rain and sea water. Letting your VCR get wet may cause your VCR to malfunction. Sometimes this malfunction cannot be repaired [a].
- Never leave your VCR exposed to temperatures above 140°F (60°C), such as in a car parked in the sun or under direct sunlight [b].
[a] [b]
Contents of the recording cannot be compensated if recording or playback is not made due to a malfunction of the VCR, video tape, etc.
Checking supplied accessories
Make sure that the following accessories are supplied with your VCR.

1 AC-L10A/L10B/L10C AC power adaptor (1), Power cord (1) (p. 7, 9) 2 A/V converting cable (1) (p. 18, 47) 3 A/V connecting cable (1) (p. 7, 18, 35, 47)
Step 1 Connecting to a TV
Connect your VCR to your TV or to the other VCR with the A/V connecting cable supplied with your VCR to watch the playback picture on the TV screen. Connect the plugs to the jacks of the same colors on your VCR and the TV or the other VCR. Refer to the operating instructions of your TV or the other VCR.
Open the jack cover. Connect your VCR to the TV using the A/V connecting cable. Then, set the TV/VCR selector on the TV to VCR.
![graph LR A["Input Signal Flow"] --> B["S VIDEO OUT"] A --> C["AUDIO OUT"] A --> D["VIDEO OUT"] B --> E["S video cable (not supplied)"] C --> E D --> E E --> F["IN"] F --> G["S VIDEO"] F --> H["VIDEO"] F --> I["AUDIO"] G --> J["TV"] H --> J I --> J style A fill:#f9f,stroke:#333 style J fill:#ccf,stro…](/content/2026/06/1301746/images/0428861707adff68196b126829a34fc3e67cbcc2a7073fca0b0a2a44ed279df1.jpg)
If your TV is already connected to the other VCR
Connect your VCR to the LINE IN input on the other VCR with the A/V connecting cable (supplied). Set the input selector on the VCR to LINE.
If your TV or the other VCR is a monaural type
Connect the yellow plug of the A/V connecting cable to the video input jack and the white plug to the audio input jack on the other VCR or the TV. You do not connect the red plug.
With this connection, the sound is monaural even in stereo mode.
To connect to a TV or the other VCR without Video/Audio jacks
Use an NTSC system RFU adaptor (not supplied).
Refer to the operating instructions of your TV or the other VCR and the RFU adaptor.
With an RFU adaptor, the sound is monaural even on stereo models.
If your TV or the other VCR has an S video jack
Connect using an S video cable (not supplied) to obtain high-quality pictures.
With this connection, you do not need to connect the yellow (video) plug of the A/V connecting cable.
Connect an S video cable (not supplied) to the S VIDEO OUT jack on your VCR and the S video jack on the TV or the other VCR.
Step 2 Preparing the power supply
Connecting to a wall outlet
When you use your VCR for an extended period, we recommend that you power it from a wall outlet using the AC power adaptor.
(1) Open the DC IN jack cover and connect the AC power adaptor to the DC IN jack on your VCR with the plug's ▲ mark facing right. (2) Connect the power cord to the AC power adaptor. (3) Connect the power cord to a wall outlet.

PRECAUTION
The set is not disconnected from the AC power source (house current) as long as it is connected to the wall outlet, even if the set itself has been turned off.
Notes
- The AC power adaptor can supply power even if the battery pack (not supplied) is attached to your VCR.
- The DC IN jack has "source priority." This means that the battery pack (not supplied) cannot supply any power if the power cord is connected to the DC IN jack, even when the power cord is not plugged into a wall outlet.
- Keep the AC power adaptor away from your VCR if the picture is disturbed.
When you use your VCR outdoors
Use the battery pack (not supplied) (p. 9).
Using a car battery
Use the Sony DC Adaptor/Charger (not supplied).
Using with a battery pack (not supplied)
Install the battery pack to use your VCR outdoors.
Your VCR operates only with the "InfoLITHIUM" battery pack (L series).
Installing the battery pack
Press and slide the battery pack in the direction of the arrow.

To remove the battery pack
While pressing BATT, slide the battery pack to the right.
After installing the battery pack
Do not carry your VCR by holding the battery pack. If you do so, the battery pack may slide off and cause damage to your VCR.
Remaining battery time indicator
When you use an InfoLITHIUM battery pack, the remaining battery time is displayed on the monitor screen. It may not be displayed properly, however, depending on the conditions and circumstances of use. The message appears when the battery is dead. After you set the POWER switch to ON, it takes about 1 minute for the correct remaining battery time to be displayed.
Charging the battery pack
Use the battery pack after charging it for your VCR.
You can charge the battery with your VCR.
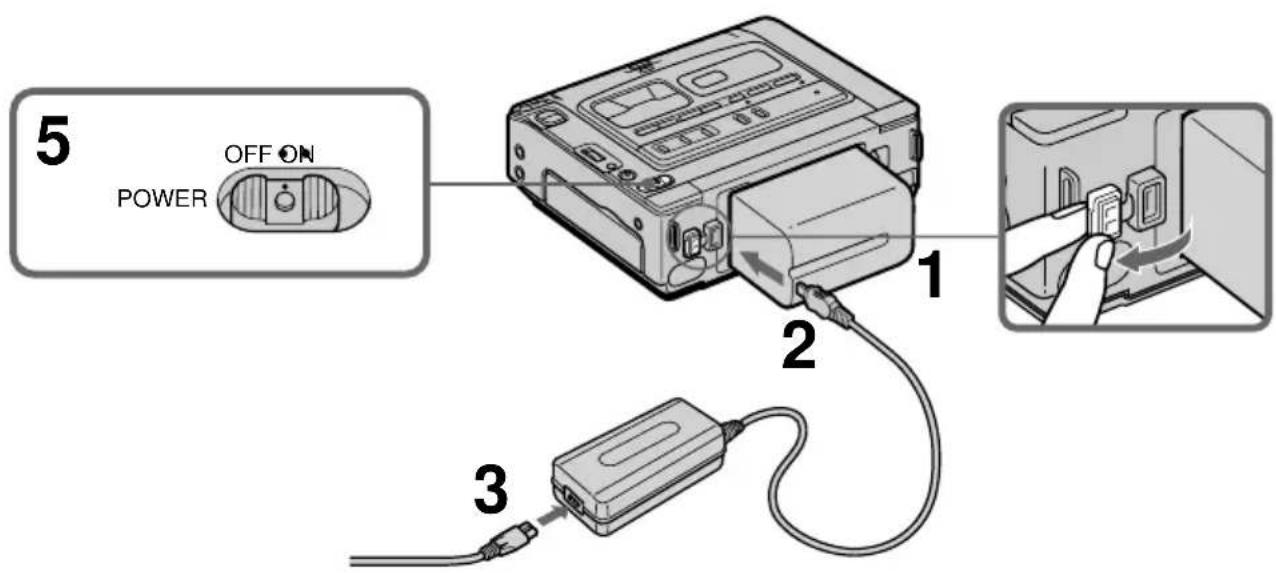
(1) Install the battery pack. (2) Open the DC IN jack cover and connect the AC power adaptor (supplied with your VCR) to the DC IN jack with the plug's ▲ mark facing right. (3) Connect the power cord to the AC power adaptor. (4) Connect the power cord to a wall outlet. (5) Set the POWER switch to OFF. When charging begins, the POWER ON/CHARGE lamp lights up orange.
After charging the battery pack
Disconnect the AC power adaptor from the DC IN jack on your VCR.
Notes
- Prevent metallic objects from coming into contact with the metal parts of the DC plug of the AC power adaptor. Otherwise, a short-circuit may occur and damage the AC power adaptor.
- Keep the battery pack dry.
- If the battery pack is not to be used for an extended period, charge the battery pack once fully, and then use it until it fully discharges again. Keep the battery pack in a cool place.
When the battery pack is charged fully
The POWER ON/CHARGE lamp goes off.
Charging time
| Battery pack Full charge (Normal charge) |
| NP-F330 150 (90) |
| NP-F530/F550 210 (150) |
| NP-F730/F730H/F750 300 (240) |
| NP-F930/F950 390 (330) |
| NP-F960 420 (360) |
Approximate number of minutes to charge an empty battery pack
Playing time
| Battery pack Playing time |
| NP-F330 105 (95) |
| NP-F530 175 (160) |
| NP-F550 210 (190) |
| NP-F730 365 (325) |
| NP-F730H/F750 440 (395) |
| NP-F930 575 (520) |
| NP-F950 675 (610) |
| NP-F960 790 (710) |
Approximate number of minutes when you use a fully charged battery pack
Numbers in parentheses “()” indicate the time using a normally charged battery pack. The battery life will be shorter if you use your VCR in a cold environment.
You can charge the battery pack abroad.
For details, refer to page 66.
If the power goes off even though the battery remaining indicator shows that the battery pack has enough power to operate,
charge the battery pack fully again so that the battery remaining indicator is corrected.
What is "InfoLITHIUM"?
The "InfoLITHIUM" is a lithium ion battery pack which can exchange data, such as battery consumption, with compatible electronic equipment. This VCR is compatible with the "InfoLITHIUM" battery pack (L series). Your VCR operates only with the "InfoLITHIUM" battery pack. The "InfoLITHIUM" battery pack has the InfoLITHIUM™ L MARK.
"InfoLITHIUM" is a trademark of Sony Corporation.
Step 3: Inserting a cassette
We recommend using Hi8 HiDigital8 video cassettes.
(1) Prepare the power supply (p. 8-11).
(2) While pressing the small blue button, slide EJECT in the direction of the arrow. The cassette compartment automatically lifts up and opens.
(3) Insert a cassette with the window facing up.
(4) Close the cassette compartment by pressing the PUSH mark on the cassette compartment.

To eject a cassette
Follow the procedure above, and eject the cassette in step 3.
Notes
- Do not insert your fingers or touch inside of the cassette compartment with your fingers when it is open. It may cause your VCR to malfunction.
- Your VCR records pictures in the Digital8 System.
- The recording time when you use your VCR is half of indicated time on Hi8 tape. If you select the LP mode in the menu settings, 3/4 of indicated time on Hi8 tape.
- If you use standard 8 tape, be sure to play back the tape on your VCR. Mosaic pattern noise may appear when you play back standard 8 tape on other VCRs.
To prevent accidental erasure
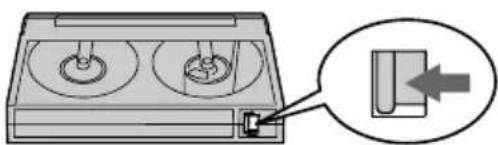
Slide the write-protect tab on the cassette to expose the red mark.
Playing back a tape
(1) Connect your VCR to a TV (p. 8). (2) Prepare the power supply and insert a cassette to play back (p. 8-12). (3) While pressing the small green button on the POWER switch, set it to ON. The POWER ON/CHARGE lamp (green) on the front lights up. (4) Press ▷ to start playback.
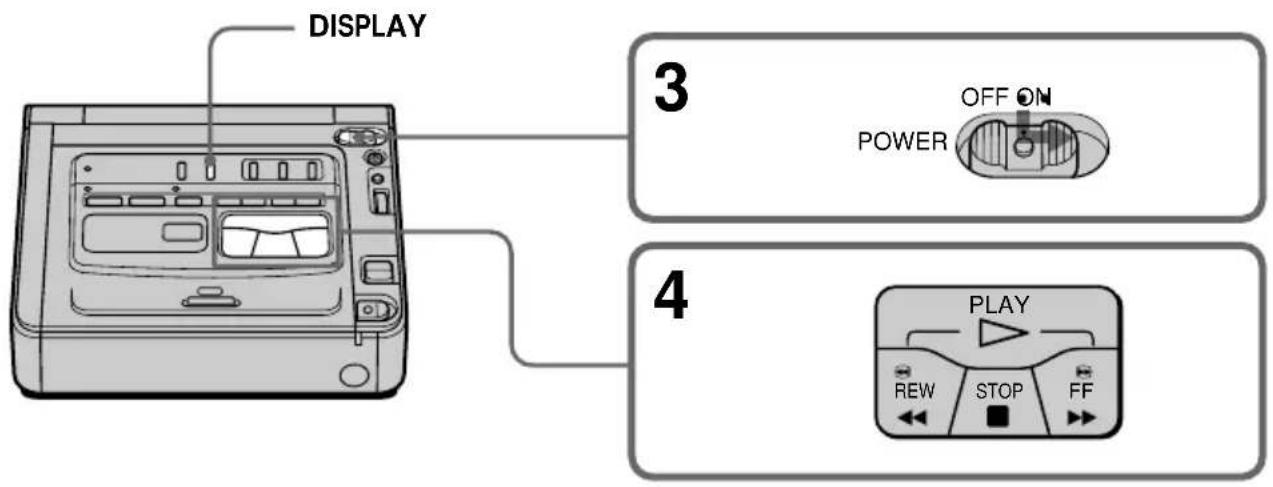
To stop playback
Press ■.
Notes on the DISPLAY button
- When you connect your VCR to a TV, you can confirm the screen indicators on the monitor screen.
- Press DISPLAY to display the screen indicators. To make the indicators disappear, press it again.
Various playback modes
To operate the video control buttons, set the POWER switch to ON.
To view a still image (playback pause)
Press || during playback. The PAUSE lamp (orange) lights up. To resume playback, press || or ▷.
To advance the tape
Press ▶▶ in stop mode. To resume normal playback, press ▷.
To rewind the tape
Press ◀◀ in stop mode. To resume normal playback, press ▷.
To change the playback direction
Press ◀ during playback to reverse the playback direction. To resume normal playback, press ▷.
To locate a scene while searching the picture (picture search)
Keep pressing ◀◀ or ▶▶ during playback. To resume normal playback, release the button.
To monitor the high-speed picture at high speed while advancing or rewinding the tape (skip scan)
Keep pressing ◀◀ while rewinding or ▶▶ while advancing the tape. To resume rewinding or advancing, release the button.
To view the picture at slow speed (slow playback)
Press ▶ during playback. For slow playback in the reverse direction, press ◀ll < during playback, then press ▶. To resume normal playback, press ▷.
To view the picture at double speed
Press · 2 during playback. For double speed playback in the reverse direction, press ◀ll < during playback, then press · 2. To resume normal playback, press ▷.
To view the picture frame-by-frame
Press ➕FRAME (+) in playback pause mode. For frame-by-frame playback in the reverse direction, press ◀FRAME (−) in playback pause mode. To resume normal playback, press ▷.
In these various playback modes
- Noise may appear when your VCR plays back tapes recorded in the Hi8/standard 8 system.
- Sound is muted.
- The previous recording may appear as a mosaic image when playing back in the Digital8 System.
- The VCR does not automatically detect Digital8 for Hi8/standard 8 system in the various playback modes.
Notes on the playback pause mode
- When playback pause mode lasts for 3 minutes, your VCR automatically enters the stop mode. To resume playback, press ▷. • The previous recording may appear.
Slow playback for tapes recorded in the Digital8 System
Slow playback mode can be performed smoothly on your VCR; however, this function does not work for an output signal from the DV IN/OUT jack.
When you play back a tape in reverse
Horizontal noise may appear at the center or top and bottom of the screen. This is not a malfunction.
Using headphones
Connect headphones (not supplied) to the ⏻ jack (p. 73). You can adjust the volume of the headphones by using the VOLUME +/- buttons.
Playing back a dual soundtrack tape
When you play back a dual soundtrack tape, select the desired sound in the menu settings.
(1) Press MENU to display the menu settings. (2) Turn the SEL/PUSH EXEC dial to select VCR, then press the dial. (3) Turn the SEL/PUSH EXEC dial to select HiFi SOUND, then press the dial. (4) Turn the SEL/PUSH EXEC dial to select the desired sound, then press the dial. For details about the sound mode, refer to page 50. (5) Press MENU to make the menu disappear.
![graph TD A["Camera"] --> B["1"] B --> C["3"] C --> D["4"] D --> E["4"] subgraph Section 1 B1["MENU"] --> B2["VCR SET P EFFECT HiFi SOUND TBC DNR AUDIO MIX PB MODE A/V→DV OUT [MENU"] : END] end subgraph Section 2 C1["VCR SET P EFFECT HiFi SOUND TBC DNR AUDIO MIX PB MODE A/V→DV OUT RETURN [MENU"] : EN…](/content/2026/06/1301746/images/568db01ad2f568b3c3bed56649b7485e1d9992b80a95b586dc0354ee244d3cba.jpg)
Using a Remote Commander
You can operate your VCR using the Remote Commander supplied with a Sony product. Set COMMANDER in the menu settings, according to the remote control code of the Sony product.
| Code Sony product |
| VTR 1 Betamax VCR |
| VTR 2 8mm video camera recorderDigital video camera recorder8mm VCR |
| VTR 3 VHS VCR |
| VTR 4 Digital VCRDigital video camera recorder |
| VTR 5 and 6 Digital VCR |
Note
You cannot set the POWER switch to ON or OFF, or eject the cassette with the Remote Commander.
Wide mode playback and recording
Pictures recorded with a Sony digital video camera that have an aspect ratio of 16:9 on your VCR can be played back. For details, refer to the operating instructions of your TV. The picture during playback on a normal TV [a] or a wide-screen TV [b] are compressed in the widthwise direction. If you set screen mode of the 16:9 wide-screen TV to the full mode, you can see normal images [c].
![graph LR A["[a"]] --> B["[b"]] B --> C["[c"]]](/content/2026/06/1301746/images/4a0afa4ffcf26b89ad48980d6dcd671ed69501c4236fc2e1c0d29fed6ffc740e.jpg)
Connection for a TV
Pictures recorded in 16:9 WIDE mode automatically appear on the TV screen at full size when
- you connect your VCR to a TV that is compatible with the video ID (ID-1/ID-2) system.
- you connect your VCR to the S video jack on the TV.
ID-2 system
The ID-2 system sends a copyright protection signal with ID-1 signals inserted between video signals when you connect your VCR to other equipment with the A/V connecting cable.
When recording a 16:9 screen
Your VCR automatically detects the wide mode signals and records in wide mode.
Using the AV cordless IR receiver
Once you connect the AV cordless IR receiver (not supplied) to your TV or the other VCR, you can easily view the picture on your TV. For details, refer to the operating instructions of the AV cordless IR receiver.

(1) After connecting your TV and the AV cordless IR receiver, set the POWER switch on the AV cordless IR receiver to ON. (2) Turn the TV on and set the TV/VCR selector on the TV to VCR. (3) Set the POWER switch on your VCR to ON. (4) Press SUPER LASER LINK. The lamp on the SUPER LASER LINK button lights up. (5) Press ▷ on your VCR to start playback. (6) Point your VCR at the AV cordless IR receiver. Adjust the position of your VCR and the AV cordless IR receiver to obtain clear playback pictures.

To cancel the super laser link function
Press SUPER LASER LINK. The lamp on the SUPER LASER LINK button goes off.
If you turn the power off
The super laser link function turns off automatically.
If you use a Sony TV
- You can turn on the TV automatically when you press SUPER LASER LINK. To do so, make sure you
- Turn the TV's main switch on.
- Set AUTO TV ON to ON in the menu settings.
- Point the infrared rays emitter at the TV's remote sensor.
- You can switch the video input of the TV automatically to the one which the AV cordless IR receiver is connected. To do so, set AUTO TV ON to ON and TV INPUT to the same video input (1, 2, 3) in the menu settings. With some models, however, the picture and sound may be interrupted momentarily when the video input is switched. • The above feature may not work on some TV models.
When the super laser link function is activated (the lamp on the SUPER LASER LINK button lights up)
Your VCR consumes power. Press SUPER LASER LINK to turn off the super laser link function when it is not needed.
is a trademark of Sony Corporation.
Using the A/V connecting cable
You can record a tape from the other VCR or a TV program that has audio/video outputs. Use your VCR as a recorder.
(1) Insert a blank tape (or a tape you want to record over) into your (recording) VCR. If you are recording a tape from the other (playback) VCR, insert a recorded tape into the other (playback) VCR.
(2) Set the POWER switch to ON.
(3) Press REC and the button on its right simultaneously on your (recording) VCR, then immediately press ■ on your (recording) VCR. The REC (red) and PAUSE (orange) lamps light up.
(4) Press ▷ on the other ( playback) VCR to start playback if you are recording a tape from the other ( playback) VCR. Select a TV program if you are recording from TV.
The picture from a TV or the other (playback) VCR appears on the TV screen or a monitor screen of the other (playback) VCR.
(5) Press ■ on your (recording) VCR at the scene where you want to start recording from.
The REC lamp remains on and the lamp on the Ⅱ PAUSE lamp goes off.
![graph LR A["REC"] --> B["→"] C["IIPAUSE"] --> B D["S VIDEO IN"] --> E["S video cable (not supplied)"] F["A/V connecting cable (supplied)"] --> G["A/V converting cable (supplied)"] H["VCR"] --> I["TV"] J["OUT"] --> K["S VIDEO"] J --> L["VIDEO"] J --> M["AUDIO"]](/content/2026/06/1301746/images/e26cae1e46256340a4f8fb00854b877fb54572f602c31c9b6c33f77297f1c64c.jpg)
AUDIO/VIDEO INPUT
When you have finished recording a tape
Press ■ on both your (recording) VCR and the other (playback) VCR.
Notes
• To enable smooth transition, we recommend that you do not mix pictures recorded in the Hi8/standard 8 with the Digital8 System on a tape.
- If you use fast-forward or slow-playback mode on the other (playback) VCR, the image being recorded may fluctuate. When you record from the other (playback) VCR, be sure to play back the original tape at normal speed.
If the other (playback) VCR or TV is a monaural type
Connect the yellow plug of the A/V connecting cable to the video output jack and the white plug to the audio output jack on the VCR or the TV. (Do not connect the red plug.) The sound is monaural.
If your TV or the other (playback) VCR has an S video jack
Connect using an S video cable (not supplied) to obtain high-quality pictures. With this connection, you do not need to connect the yellow (video) plug of the A/V connecting cable.
Connect an S video cable (not supplied) to the S video jacks of both your (recording) VCR and the TV or the other (playback) VCR.
Using the i.LINK cable (DV connecting cable)
Simply connect the i.LINK cable (DV connecting cable) (not supplied) to the DV IN/OUT or DV IN/OUT jack of the DV products. With digital-to-digital connection, video and audio signals are transmitted in digital form for high-quality editing.
(1) Insert a blank tape (or a tape you want to record over) into your (recording) VCR, and insert the recorded tape into the other (playback) VCR. (2) Set the POWER switch to ON. (3) Press REC and the button on its right simultaneously on your (recording) VCR, then immediately press ■ on your (recording) VCR. The REC (red) and PAUSE (orange) lamps light up. (4) Press ▷ on the other (playback) VCR to start playback. The picture from a TV or the other (playback) VCR appears on the TV screen or a monitor screen of the other (playback) VCR. (5) Press ■ on your (recording) VCR at the scene where you want to start recording from.
The REC lamp remains on and the PAUSE lamp goes off.
![graph TD A["DV IN/OUT"] -->|Signal flow| B["DV IN/OUT"] C["i.LINK cable (DV connecting cable) (not supplied)"] --> B D["REC"] --> E["→"] F["IPAUSE"] --> E style A fill:#f9f,stroke:#333 style B fill:#ccf,stroke:#333 style C fill:#cfc,stroke:#333 style D fill:#fcc,stroke:#333 style E fill:#ffc,stroke:…](/content/2026/06/1301746/images/21f41531de0b1f949cf15384a64ab911ac6a86efb3018bb5db7e09701c34286e.jpg)
When you have finished recording a tape
Press ■ on both your (recording) VCR and the other (playback) VCR.
Note
If the connected equipment has a different kind of i.LINK system, it is not compatible with your VCR.
You can connect one VCR only using the i.LINK cable (DV connecting cable).
During digital editing
The color of the display may be uneven. However, this does not affect the dubbed picture.
If you record a playback pause picture with the i.DV IN/OUT jack
The recorded picture becomes rough, and when you play back the picture using your VCR, the picture may jitter.
Before recording
Make sure that the DV IN indicator appears on the monitor screen by pressing the DISPLAY button.
Enlarging playback images – PB ZOOM
You can enlarge moving and still images played back on tape.
(1) Press PB ZOOM on your VCR while you are playing back. The image is enlarged, and ↑↓←→ appear on the monitor screen. (2) Turn the SEL/PUSH EXEC dial to move the enlarged image, then press the dial. ↑: The image moves downwards. ↓: The image moves upwards. (3) Turn the SEL/PUSH EXEC dial to move the enlarged image, then press the dial. ←: The image moves rightward (Turn the dial downwards.) →: The image moves leftward (Turn the dial upwards.)
![graph TD A["1 PB ZOOM"] --> B["2"] B --> C["3"]](/content/2026/06/1301746/images/91816134ded039ab20095811120492d3b14af984d30e4ae77c57cd5a6624f833.jpg)
To cancel the PB ZOOM function
Press PB ZOOM again.
Notes
• The PB ZOOM function works only for tapes recorded in the Digital8 System. - You cannot process externally input scenes using the PB ZOOM function. - You cannot record pictures that you have processed using the PB ZOOM function with your VCR. To record pictures that you have processed using the PB ZOOM function, record the pictures on the other VCR using your VCR as a player.
Pictures processed by the PB ZOOM function
Pictures processed by the PB ZOOM function are not output through the iDV IN/OUT jack.
When you set the POWER switch to OFF or stop playback
The PB ZOOM function is automatically canceled.
Watching a tape with special effects – Picture effect
You can digitally process playback images to obtain special effects like those in films or on TV.
NEG. ART [a]: The colors and brightness of the image are reversed.
SEPIA : The image is sepia.
B&W : The image is monochrome (black-and-white).
SOLARIZE [b]: The light intensity is clearer, and the image looks like an illustration.
[a] [b]
(1) Press MENU during playback. (2) Turn the SEL/PUSH EXEC dial to select VCR, then press the dial. (3) Turn the SEL/PUSH EXEC dial to select P EFFECT, then press the dial. (4) Turn the SEL/PUSH EXEC dial to select the desired picture effect mode, then press the dial.
The indicator changes as follows:
NEG.ART ↔ SEPIA ↔ B&W ↔ SOLARIZE
(5) Press MENU to make the menu settings disappear.
![graph TD A["Camera"] --> B["1"] B --> C["MENU"] C --> D["VCR SET"] D --> E["P EFFECT"] E --> F["Hifi SOUND"] E --> G["TBC"] E --> H["ETC"] E --> I["DNR"] E --> J["AUDIO MIX"] E --> K["PB MODE"] E --> L["A/V→DV OUT"] E --> M["A/V→DV OUT"] E --> N["A/V→DV OUT"] E --> O["A/V→DV OUT"] E --> P["A/V→DV OU…](/content/2026/06/1301746/images/5a8ff583c7060f349600921caae4b3309c2850f00b75ab92aa79cab11e2d91ab.jpg)
Notes
- The picture effect function works only for tapes recorded in the Digital8 System.
- You cannot process externally input scenes using the picture effect function.
- You cannot record pictures that you have processed using the picture effect function with your VCR. To record pictures that you have processed using the picture effect function, record the pictures on the other VCR using your VCR as a player.
Pictures processed by the picture effect function
Pictures processed by the picture effect function are not output through the iDV IN/OUT jack.
When you set the POWER switch to OFF or stop playback
The picture effect function is automatically canceled.
Watching a tape with special performances – Digital effect
You can add special effects on playback images using the various digital functions.
STILL
You can play back a still image so that it is superimposed on a moving image.
FLASH (FLASH MOTION)
You can play back still images successively at constant intervals.
LUMI. (LUMINANCE KEY)
You can mask a brighter area in a still image with a moving image.
TRAIL
You can play back the image so that an incidental trailing image is left.
![graph LR A["Still image Moving image"] --> B["Still image Moving image"] B --> C["LUMI."]](/content/2026/06/1301746/images/78f1f6a627977c9d313b08f6f0c32fe6e43fcb31f6073e1cbdff41b650fd854c.jpg)
(1) Press DIGITAL EFFECT during playback. The digital effect indicator appears.
(2) Turn the SEL/PUSH EXEC dial to select the desired digital effect mode.
The indicator changes as follows: STILL ↔ FLASH ↔ LUMI. ↔ TRAIL
(3) Press the SEL/PUSH EXEC dial. The indicator lights up and the bars appear. In the STILL and LUMI. modes, the still image is stored in memory.
(4) Turn the SEL/PUSH EXEC dial to adjust the effect as follows:
STILL – The rate of the still image you want to superimpose on the moving image
FLASH – The interval of flash motion
LUMI. – The color scheme of the area in the still image which is to be masked with a moving image
TRAIL – The vanishing time of the incidental image
When the number of bars on the monitor screen gets bigger, the digital effect will be getting bigger.
![graph TD A["1 DIGITAL EFFECT"] --> B["2 LUMI."] B --> C["3 LUMI."] C --> D["4"]](/content/2026/06/1301746/images/acedbb0782fecec638e7a05b275f5c4f45380b25005a29f23cc434f48e5620ba.jpg)
To cancel the digital effect function
Press DIGITAL EFFECT again.
Notes
- The digital effect function works only for tapes recorded in the Digital8 System.
- You cannot process externally input scenes using the digital effect function.
- You cannot record images that you have processed using the digital effect function with your VCR. To record images that you have processed using the digital effect function, record the images on the other VCR using your VCR as a player.
Pictures processed by the digital effect function
Pictures processed by the digital effect function are not output through the IDV IN/OUT jack.
When you set the POWER switch to OFF or stop playback
The digital effect function is automatically canceled.
Quickly locating a scene - Zero set memory
Your VCR goes forward or backward to stop automatically at a desired scene having a counter value of "0:00:00".
Use the Remote Commander supplied with a Sony digital video camera recorder for this operation.
For details, refer to the operating instructions of the digital video camera recorder.
Use this function, for example, to view a desired scene later on during playback.
(1) Press DISPLAY during playback. (2) Press ZERO SET MEMORY on the Remote Commander at the point you want to locate later. The counter shows "0:00:00" and the ZERO SET MEMORY indicator flashes. (3) Press ■ when you want to stop playback. (4) Press ◀◀ to rewind the tape to the counter's zero point. The tape stops automatically when the counter reaches approximately zero. The ZERO SET MEMORY indicator disappears and the time code appears. (5) Press ▶. Playback starts from the counter's zero point.

Notes
- The zero set memory function works only for tapes recorded in the Digital8 system.
- When you press ZERO SET MEMORY again before rewinding the tape, the zero set memory function is canceled. • There may be a discrepancy of several seconds from the time code.
If a tape has a blank portion between recorded portions
The zero set memory function may not work correctly.
Searching with recording date – Date search
You can automatically search for the point where the recording date changes and start playback from that point (Date search). Use the Remote Commander supplied with a Sony digital video camera recorder for this operation.
For details, refer to the operating instructions of the digital video camera recorder. Use this function to check where recording dates change or to edit the tape at each recording date.
![JUL 5 2001 JUL 4 2001 DEC 31 2001 [a] [b] [c]](/content/2026/06/1301746/images/ddbed8c4d5cc0e25a6fa096649a4dd866ca4a4df1d6c83d958152cb272f51122.jpg)
(1) Press SEARCH MODE on the Remote Commander repeatedly, until the date search indicator appears.
The indicator changes as follows:
DATE SEARCH → PHOTO SEARCH → PHOTO SCAN
(2) When the current position is [b], press ◀◀◀ to search towards [a] or press ▶▶◀ to search towards [c]. Your VCR automatically starts playback at the point where the date changes.
Each time you press ◀◀◀ or ▶▶▶, the VCR searches for the previous or next date.
![graph TD A["1 SEARCH MODE"] --> B["1 DATE 00 SEARCH"] C["2"] --> D["2 DATE 01 SEARCH"] B --> E["Device with date 00"] D --> F["Device with date 01"]](/content/2026/06/1301746/images/f7db987c712f279eac2545dbf7444d799c7a68b37e3b0756a79042e3fece4ea7.jpg)
To stop searching
Press ■.
Notes
• The date search works only for tapes recorded in the Digital8 System. • The date search works only for tapes recorded with the date and time set. - If one day's recording is less than two minutes, your VCR may not accurately find the point where the recording date changes.
If a tape has a blank portion between recorded portions
The date search function may not work correctly.
Searching for a photo - Photo search/Photo scan
You can search for the still image recorded on a tape with a Sony digital video camera recorder (photo search).
You can also search for still images one after another and display each image for five seconds automatically (photo scan). Use the Remote Commander supplied with a Sony digital video camera recorder for these operations.
For details, refer to the operating instructions of a Sony digital video camera recorder.
Use these functions to check the still images or to edit only still images.
Searching for a photo
(1) Press SEARCH MODE on the Remote Commander repeatedly, until the photo search indicator appears.
The indicator changes as follows: DATE SEARCH → PHOTO SEARCH → PHOTO SCAN
(2) Press ◀◀◀ or ▶▶◀ to select the photo for playback. Each time you press ◀◀◀ or ▶▶◀, your VCR searches for the previous or next photo. Your VCR automatically starts playback from the photo.
![graph TD A["1 SEARCH MODE"] --> B["2 PHOTO 01 SEARCH"] B --> C["Mobile Phone"] style A fill:#f9f,stroke:#333 style B fill:#ccf,stroke:#333 style C fill:#cfc,stroke:#333](/content/2026/06/1301746/images/2a7ef9c66516b5fcd35830f52825f990a27059c7e36f8dbe5e60535e034cc9c3.jpg)
To stop searching
Press ■.
Scanning photo
(1) Press SEARCH MODE on the Remote Commander repeatedly, until the photo scan indicator appears.
The indicator changes as follows:
DATE SEARCH → PHOTO SEARCH → PHOTO SCAN
(2) Press ◀◀◀ or ▶▶▶.
Each photo is played back for about 5 seconds automatically.
![graph TD A["1 SEARCH MODE"] --> B["PHOTO 00 SCAN"] C["2"] --> D["Remote"] D --> E["Radio Station"]](/content/2026/06/1301746/images/94b5ca85a3182b8b455c66dd2214db608e107fbda98e5edec5dd0f160a308148.jpg)
To stop scanning
Press ■.
Note
The photo search and photo scan functions work only for tapes recorded in the Digital8 B system.
If a tape has a blank portion between recorded portions
The photo search and photo scan functions may not work correctly.
Displaying recording data and screen indicators – Data code function
When you play back tapes recorded by your VCR, you can check the recording date/time.
Also, when you play back tapes recorded by a Digital8 System video camera recorder with the data code function, you can check the recording date/time and various settings at the time of recording.
Using the data code function
Your VCR automatically stores the date/time and the recording data used during recording in the tape's memory.
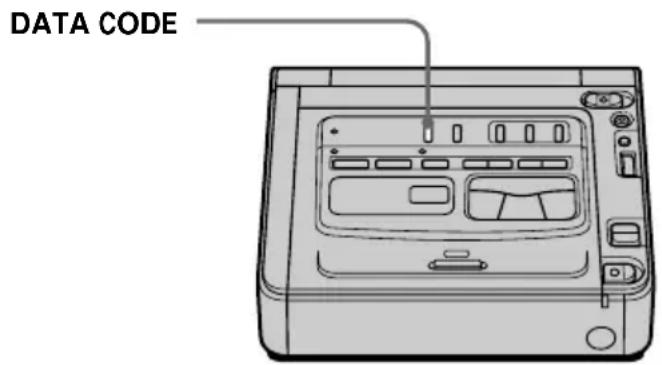
Press DATA CODE on your VCR.
The display changes as follows:
date/time → various settings (SteadyShot, exposure AUTO/MANUAL, white balance, gain, shutter speed, aperture value) → no indicator
Date/time Various settings![graph TD A["SteadyShot OFF indicator"] --> B["Exposure mode indicator"] B --> C["White balance indicator"] C --> D["Gain indicator"] D --> E["Shutter speed indicator"] E --> F["Aperture value"] G["AUTO 60 AWB F1.8 9dB"] --> C](/content/2026/06/1301746/images/a1164329b58eb72a4ed0c48b62ace950c9bff5e0b3fac1d544d6d2d6fb1ccc6b.jpg)
To not display various settings
Set DATA CODE to DATE in the menu settings (p. 50).
The display changes as follows:
date/time → no indicator
Note on the data code function
The data code function works only for tapes recorded in the Digital8 System.
Recording data
Recording data is the information of your VCR or camcorder at the time of recording.
When you use the data code function, bars (--- -- ---- and --:--:) appear if
– A blank section of the tape is being played back. – The tape is unreadable due to tape damage or noise. - The tape was recorded by a camcorder or your VCR without the date and time settings.
Data code
When you connect your VCR to the TV, the data code appears on the TV screen.
You can select one of eight preset titles and two custom titles (p. 33). You can also select the language, color, size, and position of titles.

(1) Press TITLE to display the title menu. (2) Turn the SEL/PUSH EXEC dial to select ☐, then press the dial. (3) Turn the SEL/PUSH EXEC dial to select the desired title, then press the dial. The titles are displayed in the language you selected. (4) Change the color, size, or position, if necessary.
① Turn the SEL/PUSH EXEC dial to select the color, size, or position, then press the dial. The item appears. ② Turn the SEL/PUSH EXEC dial to select the desired item, then press the dial. ③ Repeat steps ① and ② until the title is laid out as desired.
(5) Turn the SEL/PUSH EXEC dial to select TITLE, then press the SEL/PUSH EXEC dial again to complete the setting. (6) Press REC to start recording. (7) When you want to stop recording the title, press TITLE.
![graph TD A["1"] --> B["TITLE"] B --> C["2"] C --> D["PRESET TITLE HELLO! HAPPY BIRTHDAY HAPPY HOLIDAYS CONGRATULATIONS! OUR SWEET BABY WEDDING VACATION ON THE END [TITLE"]: END] C --> E["3"] E --> F["PRESET TITLE HELLO! HAPPY BIRTHDAY HAPPY HOLIDAYS CONGRATULATIONS! OUR SWEET BABY WEDDING VACATION O…](/content/2026/06/1301746/images/1244227f05a135bed831f3d14562e782caea84ce47690b5cf08806248eced06b.jpg)
To superimpose the title while you are recording
Press TITLE while you are recording, and carry out steps 2 to 5. When you press the SEL/PUSH EXEC dial at step 5, the title is recorded.
To select the language of a preset title
If you want to change the language, select ☑ before step 2. Then select the desired language and return to step 2.
To use the custom title
If you want to use the custom title, select in step 2.
Title setting
The title color changes as follows: WHITE ↔ YELLOW ↔ VIOLET ↔ RED ↔ CYAN ↔ GREEN ↔ BLUE
The title size changes as follows: SMALL ↔ LARGE You cannot input more than 12 characters in LARGE size.
The title position changes as follows: 1 ↔ 2 ↔ 3 ↔ 4 ↔ 5 ↔ 6 ↔ 7 ↔ 8 ↔ 9. When the number of the title position gets larger, the title is positioned lower on the monitor screen. When you select the title size to LARGE, you cannot choose position 9.
When you are selecting and setting the title
You cannot record the title displayed on the screen.
While you are playing back
You can superimpose a title. However, the title is not recorded on the tape. You can record a title when you dub a tape by connecting your VCR to the other VCR with the A/V connecting cable. If you use the i.LINK cable (DV connecting cable) (not supplied) instead of the A/V connecting cable, you cannot record the title.
You can make up to two titles and store them in your VCR. Each title can have up to 20 characters.
(1) Press TITLE. (2) Turn the SEL/PUSH EXEC dial to select ☐, then press the dial. (3) Turn the SEL/PUSH EXEC dial to select the first line (CUSTOM1) or second line (CUSTOM2), then press the dial. (4) Turn the SEL/PUSH EXEC dial to select the column of the desired character, then press the dial. (5) Turn the SEL/PUSH EXEC dial to select the desired character, then press the dial. (6) Repeat steps 4 and 5 until you have selected all characters and completed the title. (7) To finish making your own titles, turn the SEL/PUSH EXEC dial to select [SET], then press the dial. The title is stored in memory. (8) Press TITLE to make the title menu disappear.

To change a title you have stored
In step 3, select CUSTOM1 or CUSTOM2, depending on which title you want to change, then press the SEL/PUSH EXEC dial. Turn the SEL/PUSH EXEC dial to select [←], then press the dial to delete the title. The last character is erased. Enter the new title as desired.
If you select [▶P2
The menu for selecting alphabet and Russian characters appears. Select [ ] to return to the previous screen.
To erase a character
Select [←]. The last character is erased.
To enter a space
Select [Z&?!], then select the blank space.
Using the A/V connecting cable
Connect your VCR to the other (recording) VCR using the A/V connecting cable supplied with your VCR.
(1) Insert a blank tape (or a tape you want to record over) into the other (recording) VCR, and insert the recorded tape into your (playback) VCR. (2) Set the input selector on the other (recording) VCR to LINE. For details, refer to the operating instructions of the other (recording) VCR. (3) Set the POWER switch to ON. (4) Press ▷ PLAY to play back the recorded tape on your (playback) VCR. (5) Start recording on the other (recording) VCR. For details, refer to the operating instructions of the other (recording) VCR.
![graph LR A["Signal flow"] --> B["S VIDEO OUT"] A --> C["AUDIO OUT"] A --> D["VIDEO OUT"] B --> E["S video cable (not supplied)"] C --> F["A/V connecting cable (supplied)"] D --> G["VCR"] E --> H["IN"] F --> I["S VIDEO"] F --> J["VIDEO"] F --> K["AUDIO"]](/content/2026/06/1301746/images/811f7c98652c515d0c2874d7ed08da30d58b2a1bb5d08eaaf007a3f8a68b5618.jpg)
When you have finished dubbing a tape
Press ■ on both your (playback) VCR and the other (recording) VCR.
Be sure to clear the indicators from the screen
If they are displayed, press the following buttons to not record the indicators on the dubbed tape
- DISPLAY
- DATA CODE
You can edit on VCRs that support the following systems:
8mm, Hi8, VHS/S-VHS/WSVHS, S-VHS/C, Betamax,
ED Beta, ED Betamax, Mini DV, DV, Digital8
If the other (recording) VCR is a monaural type
Connect the yellow plug of the A/V connecting cable to the video input jack and the white plug to the audio input jack on the VCR. You do not need to connect the red plug. With this connection, the sound will be monaural.
If the other (recording) VCR has an S video jack
Connect using an S video cable (not supplied) to obtain high-quality pictures.
With this connection, you do not need to connect the yellow (video) plug of the A/V connecting cable.
Connect an S video cable (not supplied) to the S video jacks of both your (playback) VCR and the other (recording) VCR.
Using the i.LINK cable (DV connecting cable)
Simply connect the i.LINK cable (DV connecting cable) (not supplied) to DV IN/OUT and to DV IN/OUT of the DV products. With digital-to-digital connection, video and audio signals are transmitted in digital form for high-quality editing. You cannot dub the screen indicators.
(1) Insert a blank tape (or a tape you want to record over) into the other (recording) VCR, and insert the recorded tape into your (playback) VCR. (2) Set the input selector on the other (recording) VCR to DV IN if it is available. For details, refer to the operating instructions of the other (recording) VCR. (3) Set the POWER switch to ON. (4) Play back the recorded tape on your (playback) VCR. (5) Start recording on the other (recording) VCR. For details, refer to the operating instructions of the other (recording) VCR.
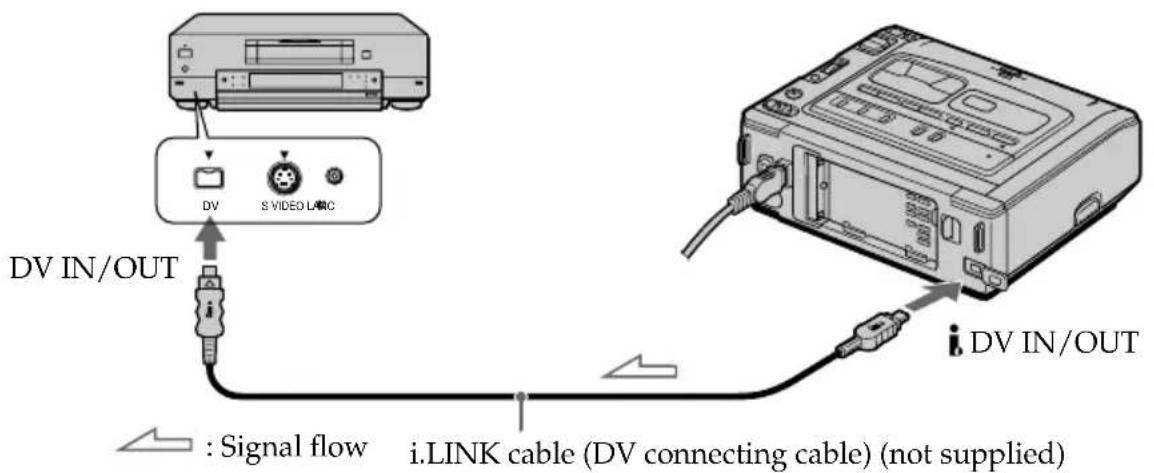
When you have finished dubbing a tape
Press ■ on both your (playback) VCR and the other (recording) VCR.
Note on tapes that are not recorded in the Digital8 System
The picture may fluctuate. This is not a malfunction.
During playback of tapes recorded in the Hi8/standard 8 system
Digital signals are output as the image signals from the iDV IN/OUT jack.
You can connect one VCR only using the i.LINK cable (DV connecting cable).
See page 59 for more information about i.LINK.
If you record a playback pause picture with the i.DV IN/OUT jack
The recorded picture becomes rough. Also, when you play back the recorded pictures on other video equipment, the picture may jitter.
Dubbing only desired scenes – Digital program editing
You can duplicate selected scenes (programs) for editing onto a tape without operating the other (recording) VCR.
Scenes can be selected by frame.
Unwanted scene Unwanted scene![graph TD A["Start"] --> B["Action 1: Dog moves on a hill"] B --> C["Action 2: Dog moves on a path"] C --> D["Action 3: Dog moves on a snow"] D --> E["Action 4: Dog moves on a house"] E --> F["Action 5: Dog moves on a trail"] F --> G["Action 6: Dog moves on a beach"] G --> H["Action 7: Dog moves on a…](/content/2026/06/1301746/images/f93bca23d46afb2d0232ac38aee798f6ab495930ce2573722039675aa82ccf08.jpg)
Before operating the Digital program editing
Step 1 Connecting the other (recording) VCR (p. 37).
Step 2 Setting the other (recording) VCR for operation (p. 38).
Step 3 Adjusting the synchronicity of the other (recording) VCR (p. 43).
When you dub using the same (recording) VCR again, you can skip steps 2 and 3.
Using the Digital program editing function
Operation 1 Making the program (p. 45).
Operation 2 Performing a Digital program editing (dubbing a tape) (p. 46).
Notes
• The Digital program editing works only for tapes recorded in the Digital8 System. - You cannot dub the display indicators. - When you edit a digital video, the operation signals cannot be sent with ⓄANC. - When you confirm the set-up video screen, connect your (playing) VCR to a TV, or a monitor using the super laser link function.
Step 1: Connecting the other (recording) VCR
You can connect either the A/V connecting cable or the i.LINK cable (DV connecting cable).
When you use the A/V connecting cable, connect the devices as illustrated on page 35.
When you use the i.LINK cable (DV connecting cable), connect the devices as illustrated on page 36.
Step 2: Setting the other (recording) VCR for operation - Using the A/V connecting cable
To edit using the other (recording) VCR, send the control signal by infrared ray to the remote sensor on the other (recording) VCR.
When you connect using the A/V connecting cable, follow the procedures below.
Setting the IR SETUP code
(1) Set the POWER switch to ON on your (playback) VCR. (2) Turn the power of the other (recording) VCR on, then set the input selector to LINE. When you connect a digital video camera recorder, set its POWER switch to VCR/VTR. (3) Press MENU to display the menu settings. (4) Turn the SEL/PUSH EXEC dial to select ETC, then press the dial. (5) Turn the SEL/PUSH EXEC dial to select EDIT SET, then press the dial. (6) Turn the SEL/PUSH EXEC dial to select CONTROL, then press the dial. (7) Turn the SEL/PUSH EXEC dial to select IR, then press the dial. (8) Turn the SEL/PUSH EXEC dial to select IR SETUP, then press the dial. (9) Turn the SEL/PUSH EXEC dial to select the IR SETUP code of the other (recording) VCR (P. 39), then press the dial.

3
MENU
![VCR SET P EFFECT HIFI SOUND TBC DNR AUDIO MIX PB MODE A/V→DV OUT [MENU]: END](/content/2026/06/1301746/images/bb244aff7b84043ee8c571ed40ef5fc7d4617e8b9f94e9d9ae98e6cccf099105.jpg)
4
![OTHERS WORLD TIME 0 HR BEEP COMMANDER DISPLAY VIDEO EDIT EDIT SET RETURN [MENU]: END](/content/2026/06/1301746/images/08992e46388e09dd0d860fa4fcbce331030989e45a61fac92f21779525a8cf8c.jpg)


![OTHERS EDIT SET CONTROL IR ADJ TEST I. LINK *CUT-IN* *CUT-OUT* IR SETUP PAUSE MODE IR TEST RETURN [MENU]: END](/content/2026/06/1301746/images/b81dc3dd089404e0914e0793d57129699fd537de80c7cba913a1c4ba92230852.jpg)
→
![OTHERS VCA EDIT SET CONTROL IR ADJ TEST *CUT-IN* *CUT-OUT* IR SETUP PAUSE MODE IR TEST RETURN [MENU]: END](/content/2026/06/1301746/images/fe386772026700fd073389df3b9fb9d4689b3dd51fbbbe5d62da11bd2b9afd32.jpg)
5
![OTHERS VER EDIT SET CONTROL IR ADJ TEST "CUT-IN" "CUT-OUT" IR SETUP PAUSE MODE IR TEST RETURN [MENU]: END](/content/2026/06/1301746/images/2029028a5cd1479c2fdea0fa8140aa6feee683c4fe8af2371a3bebace96dd710.jpg)
![OTHERS VER EDIT SET CONTROL ADJ TEST "CUT-IN" "CUT-OUT" IR SETUP PAUSE MODE IR TEST RETURN [MENU]: END](/content/2026/06/1301746/images/038a590873146894c88e2cbaa2ee3da2032da6fa1e64075ab6dc76f3e02a309d.jpg)
→
![OTHERS EDIT SET CONTROL ADJ TEST "CUT-IN" "CUT-OUT" IR SETUP PAUSE MODE IR TEST RETURN [MENU]: END](/content/2026/06/1301746/images/4462eb665f52a85849a0af7fcdcf535b0d3e0acbbddfdab8151b0f3ed5c63410.jpg)
About the IR SETUP code
The IR SETUP code is stored in the memory of your VCR. Be sure to set the correct code, depending on the other (recording) VCR. The default setting is code number 3.
| Brand IR SET UP code | |
| Sony 1, 2, 3, 4, 5, 6 | |
| Admiral (M. Wards) 89 | |
| Aiwa 80 | |
| Audio Dynamic 21, 35 | |
| Bell&Howell (M. Wards) 36 | |
| Brocsonic 70, 82 | |
| Canon 77, 78, 97 | |
| Citizen 47 | |
| Craig 73, 47 | |
| Curtis Mathis 8, 80, 77 | |
| Daewoo 26, 40, 77 | |
| DBX 21, 33, 35 | |
| Dimensia 8 | |
| Emerson 26, 82, 59, 48, 70, 81 | |
| Fisher 36, 45, 37, 44 | |
| Funai | 80 |
| General Electric | 87, 8, 77, 32*, 94* |
| Goldstar | 47 |
| Hitachi | 78, 8, 42 |
| Instant Replay | 77, 78 |
| JC Penny | 77, 42, 8, 36, 21, 33, 35 |
| JVC | 12, 13, 14, 21, 33, 35 |
| Kenwood | 21, 33, 47, 35 |
| LXI (Sears) | 80, 47, 42, 44, 45, 36, 37 |
| Magnavox | 83, 78, 77 |
| Marantz | 21, 33, 35 |
| Marta | 47 |
| Memorex 77, 37 | |
| Minolta | 42, 8 |
| Mitsubishi/MGA | 28, 22, 23, 24 |
| Brand IR SET UP code | |
| Multitech | 23, 80, 32 |
| NEC | 21, 33, 35 |
| Olympic | 77, 78 |
| Panasonic | 16, 17, 78, 77, 96 |
| Pentax | 42, 8 |
| Philco 78, 77 | |
| Philips | 83, 78, 77 |
| Pioneer | 78 |
| Quasar | 78, 77, 16, 17 |
| RCA/PROSCAN | 8, 42, 16, 77, 83, 7, 40, 41, 78* |
| Realistic | 77, 36 |
| Sansui 21 | |
| Singer | 73 |
| Samsung | 94, 41, 32, 32*, 94*, 24* |
| Sanyo 36, 37 | |
| Scott | 40, 41, 32, 37, 28, 22, 23, 24 |
| Sharp | 89, 88, 98 |
| Shintom | 73 |
| Signature 2000 (M. Wards) | 80, 89 |
| Sylvania | 83, 78, 77, 80 |
| Symphonic | 80 |
| Tashiro | 47 |
| Tatung | 21, 33, 35 |
| Teac 21, 33, 80, 35 | |
| Technics | 77, 78 |
| Toshiba | 40, 7 |
| Wards 89, 88, 37, 95, 47 | |
| Yamaha | 36, 21, 33, 35 |
| Zenith 95 | |
* TV/VCR component
Note on the IR SETUP code
The Digital program editing does not work if the VCR is not corresponded to IR SETUP codes.
Setting the modes to cancel the recording pause on the other (recording) VCR
(1) Turn the SEL/PUSH EXEC dial to select PAUSEMODE, then press the dial. (2) Turn the SEL/PUSH EXEC dial to select the mode to cancel recording pause on the other (recording) VCR, then press the dial. The correct button depends on the other (recording) VCR. Refer to the operating instructions of the other (recording) VCR.
![graph TD A["Device"] --> B["1"] B --> C["2"] C --> D["OTHERS"] D --> E["EDIT SET"] E --> F["CONTROL"] F --> G["ADJ TEST"] G --> H["CUT-IN"] H --> I["CUT-OUT"] I --> J["IR SETUP"] J --> K["PAUSE MODE"] K --> L["PAUSE"] L --> M["IR TEST REC"] M --> N["RETURN PB"] N --> O["[MENU"]: END]](/content/2026/06/1301746/images/4527ca5c6a0eca513b1ffb9b9c49a68985c41b5c11f8ccc36f9a2adbaa6ca9a7.jpg)
The buttons to cancel recording pause on the other (recording) VCR
Select the buttons when you cancel recording pause on the other (recording) VCR, and start recording.
The buttons vary depending on the other (recording) VCR. To cancel recording pause
- Select "PAUSE" if the button to cancel recording pause is II.
- Select "REC" if the button to cancel recording pause is ●.
- Select "PB" if the button to cancel recording pause is ▶.
Setting your (playback) VCR and the other (recording) VCR to face each other
Locate the infrared rays emitter of your (playback) VCR to face it towards the remote sensor of the other (recording) VCR.
Set the devices more than 12 in. (30 cm) apart, and remove any obstacles between the devices.

Confirming the other (recording) VCR operation
(1) Insert a recordable tape into the other (recording) VCR, then set to recording pause. (2) Turn the SEL/PUSH EXEC dial to select IR TEST, then press the dial. (3) Turn the SEL/PUSH EXEC dial to select EXECUTE, then press the dial. If the other (recording) VCR starts recording, the setting is correct. When finished, the indicator changes to COMPLETE.
![graph TD A["Device"] -->|2| B["SET"] B --> C{>| Condition | Value} C -->|1| D["OK"] C -->|2| E["Cancel"] D --> F["OTHERS EDIT SET CONTROL ADJ TEST "CUT-IN" ENGAGE "CUT-OUT" REC PAUSE IR SETUP PAUSE MODE IR TEST RETURN RETURN EXECUTE [MENU"]: END] E --> G["OTHERS EDIT SET CONTROL…](/content/2026/06/1301746/images/de301dad50b8edf09c05cd8b94fcf10063fc31f38de88fa684079ed27af6e640.jpg)
If the other (recording) VCR operates correctly
Skip to step 3 on page 43.
If the other (recording) VCR does not operate correctly
- Set the IR SETUP code, or select the button to cancel the recording pause on the other (recording) VCR.
- Place your (playback) VCR at least 12 in. (30 cm) away from the other (recording) VCR. • Refer to the operating instructions of the other (recording) VCR.
Step 2: Setting the other (recording) VCR for operation - Using the i.LINK cable (DV connecting cable)
When you connect using the i.LINK cable (DV connecting cable) (not supplied), follow the procedures below.
(1) Set the POWER switch to ON on your (playback) VCR. (2) Turn the power of the other (recording) VCR on, then set the input selector to DV input. When you connect a digital video camera recorder, set its POWER switch to VCR/VTR. (3) Press MENU to display the menu settings. (4) Turn the SEL/PUSH EXEC dial to select ETC, then press the dial. (5) Turn the SEL/PUSH EXEC dial to select EDIT SET, then press the dial. (6) Turn the SEL/PUSH EXEC dial to select CONTROL, then press the dial. (7) Turn the SEL/PUSH EXEC dial to select i.LINK, then press the dial.
![graph TD A["3 MENU"] --> B["6,7"] B --> C["5 OTHERS WORLD TIME 0 HR BEEP COMMANDER DI SPLAY VIDEO EDIT EDIT SET RETURN [MENU"]: END] B --> D["6,7 OTHERS EDIT SET CONTROL IR ADJ TEST "CUT-IN" "CUT-OUT" IR SETUP PAUSE MODE IR TEST RETURN [MENU"]: END] B --> E["6,7 OTHERS EDIT SET C…](/content/2026/06/1301746/images/efb5683a06dca030db6bedae87692f16d77e7c72cca5182b78bc7be3cbd0f358.jpg)
If you connect using the i.LINK cable (DV connecting cable)
With digital-to-digital connection, video and audio signals are transmitted in digital form for high-quality editing.
Step 3: Adjusting the synchronicity of the other (recording) VCR
You can adjust the synchronicity of your (playback) VCR and the other (recording) VCR.
First, eject the tape from your (playback) VCR.
Have a pen and paper ready for notes.
(1) Insert a blank tape (or a tape you want to record over) into the other (recording) VCR, then set to recording pause. When you select i.LINK in CONTROL, the above procedure is not necessary. (2) Turn the SEL/PUSH EXEC dial to select ADJ TEST, then press the dial. (3) Turn the SEL/PUSH EXEC dial to select EXECUTE, then press the dial. IN and OUT are recorded on the image for five times each to calculate the numerical values for adjusting the synchronicity. The EXECUTING indicator flashes on the monitor screen. When finished, the indicator changes to COMPLETE. (4) Rewind the tape in the other (recording) VCR, then start slow playback. Take a note of the opening numerical value of each IN and the closing numerical value of each OUT. (5) Calculate the average of all the opening numerical values of each IN, and the average of all the closing numerical values of each OUT. (6) Turn the SEL/PUSH EXEC dial to select "CUT-IN", then press the dial. (7) Turn the SEL/PUSH EXEC dial to select the average numerical value of IN, then press the dial. The calculated start position for recording is set. (8) Turn the SEL/PUSH EXEC dial to select "CUT-OUT", then press the dial. (9) Turn the SEL/PUSH EXEC dial to select the average numerical value of OUT, then press the dial. The calculated stop position for recording is set. (10) Turn the SEL/PUSH EXEC dial to select RETURN, then press the dial.
![graph TD A["Device Input"] --> B{Adjustment} B -->|Yes| C["Adjustment 1"] B -->|No| D["Adjustment 2"] C --> E["Adjustment 3"] D --> E E --> F["Output"]](/content/2026/06/1301746/images/aaa6417f5f9d482849a89157b01c24ee24c6d80881afe3fcc159065f844b440c.jpg)
Notes
- If you start recording from the very beginning of the tape, the first few seconds of the tape may not be recorded properly. Be sure to allow about 10 seconds' lead before starting the recording.
- When you complete step 3, the image to adjust the synchronicity is recorded for about 50 seconds.
When you connect with the i.LINK cable (DV connecting cable)
You may not be able to operate the dubbing function correctly, depending on the other VCR. Keep the i.LINK connection, and follow the procedure from step 2 on page 38.
Operation 1: Making the program
(1) Insert the tape for playback into your (playback) VCR, and insert a tape for recording into the other (recording) VCR. (2) Press MENU to display the menu settings. (3) Turn the SEL/PUSH EXEC dial to select ETC, then press the dial. (4) Turn the SEL/PUSH EXEC dial to select VIDEO EDIT, then press the dial. (5) Search for the beginning of the first scene you want to insert using the video operation buttons, then press ■ to suspend playback momentarily (p. 14). (6) Press the SEL/PUSH EXEC dial.
The IN point of the first program is set, and the top part of the program mark changes to light blue.
(7) Use the video operation buttons to search for the end of the first scene you want to insert, then press ■ to pause playback momentarily. (8) Press the SEL/PUSH EXEC dial. The OUT point of the first program is set, and the bottom part of the program mark changes to light blue. (9) Repeat steps 5 to 8 to set the program. When the program is set, the program mark changes to light blue. You can set a maximum of 20 programs.
![graph TD A["5,7"] --> B["PLAY"] B --> C["REW STOP FF"] C --> D["4"] D --> E["OTHERS WORLD TIME BEEP COMMANDER DISPLAY VIDEO EDIT READY EDIT SET RETURN [MENU: END"]] E --> F["VIDEO EDIT 0:32:30:14 MARK UNDO ERASE ALL START TOTAL 0:00:00:00 SCENE 0 [MENU"]:END] F --> G["6,8,9"] G --> H["VIDEO EDIT 0:0…](/content/2026/06/1301746/images/a1781fa5da1540da463b8a20c8d0b31a668b9748fcbe91c430c546b642bd615a.jpg)
Erasing the program you have set
Erase OUT first and then IN from the last program.
(1) Turn the SEL/PUSH EXEC dial to select UNDO, then press the dial. (2) Turn the SEL/PUSH EXEC dial to select EXECUTE, then press the dial. The last set program mark flashes, then the setting is canceled.
To cancel erasing
Select RETURN in step 2, then press the dial.
Erasing all programs
(1) Select VIDEO EDIT in the menu settings. (2) Turn the SEL/PUSH EXEC dial to select ERASE ALL, then press the dial. (3) Turn the SEL/PUSH EXEC dial to select EXECUTE, then press the dial. All the program marks flash, then the settings are canceled.
To cancel erasing all programs
Select RETURN in step 3, then press the dial.
To cancel a program you have set
Press MENU.
The program is stored in memory until the tape is ejected.
You cannot set IN and OUT when
- You use a tape that is recorded in other than Digital8 System. • The tape has a blank portion.
The total time code may not be displayed correctly when
- You use a tape that is recorded in other than Digital8 System.
- There is a blank portion between IN and OUT on the tape.
When you select PB MODE to Hi the menu settings
You cannot operate the Digital program editing.
Operation 2: Performing a Digital program editing (dubbing a tape)
Make sure both your (playback) VCR and the other (recording) VCR are connected, and that the other (recording) VCR is set to recording pause. When you use the i.LINK cable (DV connecting cable) the following procedure is not necessary. When you use a digital video camera recorder, set its POWER switch to VCR/VTR.
(1) Select VIDEO EDIT in the menu settings. (2) Turn the SEL/PUSH EXEC dial to select START, then press the dial. (3) Turn the SEL/PUSH EXEC dial to select EXECUTE, then press the dial. Search for the beginning of the first program, then start dubbing. The program mark flashes. The SEARCH indicator appears during search on the monitor screen. The program indicator changes to light blue after the dubbing is complete.
When the dubbing ends, both your (playback) VCR and the other (recording) VCR automatically stop.
To stop dubbing
Press ■ using the video operation buttons.
To end the Digital program editing function
Your (playback) VCR stops when the dubbing is complete. Then the display returns to VIDEO EDIT in the menu settings.
Press MENU to end the Digital program editing function.
You cannot record on the other VCR when
• The cassette is not inserted. • The tape has run out. • The write-protect tab is set to expose the red mark. • The IR SETUP code is not correct. (When IR is selected.) • The button to cancel recording pause is not correct. (When IR is selected.) (p. 40) • The programs to operate the Digital program editing have not been made. • i.LINK is selected but the i.LINK cable (DV connecting cable) is not connected. • The power of the other (recording) VCR is not turned on.
Using with an analog video unit and a personal computer – Signal convert function
You can convert analog video signals into digital video signals via your VCR connected to a personal computer and analog video unit.
Capturing images and sound from an analog video unit
Analog video signals → Digital video signals
(1) Set the POWER switch to ON. (2) Set A/V → DV OUT to ON in VCR in the menu settings (p. 50). "A/V → DV" appears on the monitor screen. (3) Start playback on the analog video unit. (4) Start capturing procedures on your personal computer. The operation procedures depend on your personal computer and the software which you use. For details on how to capture images, refer to the instruction manual of your personal computer and software.
![graph TD A["Other VCR"] -->|Signal flow| B["S VIDEO IN"] C["S VIDEO"] -->|S video cable (not supplied)| D["S VIDEO IN"] E["AUDIO"] -->|AUDIO/VIDEO INPUT| D D --> F["A/V connecting cable (supplied)"] D --> G["A/V converting cable (supplied)"] H["i.LINK"] -->|DV IN/OUT| I["i.LINK cable (DV connecting…](/content/2026/06/1301746/images/ead357af78b6158b94d53ec7f791033902509c94811d86ae9fd1957487fc2b6b.jpg)
After capturing images and sound
Stop capturing procedures on your personal computer, and stop the playback on the analog video unit.
Notes
- You need to install software which can exchange video signals.
- Depending on the condition of the analog video signals, the personal computer may not be able to output the images correctly when you convert analog video signals into digital video signals via your VCR. Depending on the analog video unit, the image may contain noise or incorrect colors.
- You cannot record or capture the video output via your VCR when the video includes copyright protection signals such as the ID-2 system.
If the other VCR has an S video jack
Connect using an S video cable (not supplied) to obtain high-quality pictures. With this connection, you do not need to connect the yellow (video) plug of the A/V connecting cable. Connect an S video cable (not supplied) to the S video jacks of both VCRs.
Inserting a scene from the other (playback) VCR – Insert Editing
You can insert a new scene and sound from the other (playback) VCR onto your originally recorded tape by specifying the insert start and end points. Use the Remote Commander supplied with a Sony digital camera recorder for this operation.
Connections are the same as in "Recording from the other VCR or TV" on pages 18 and 19.
Insert a cassette containing the desired scene in the other (playback) VCR to insert into your (recording) VCR.
![graph TD A["Stage a: Snowman on hill"] --> B["Stage b: Moon on snow"] B --> C["Stage c: Snowman on snow"]](/content/2026/06/1301746/images/2252f66df01c4a3b379dc4d30df8a1e6d718153a668fb2e198eb5c8edc3f34d4.jpg)
(1) Set the POWER switch to ON. (2) On the other (playback) VCR, locate just before the insert start point [a], then press PAUSE to set the other (playback) VCR to the playback pause mode. (3) On your (recording) VCR, locate the insert end point [c] by pressing ◀◀ or ▶▶. Then press ■ to set your (recording) VCR to the playback pause mode. (4) Press ZERO SET MEMORY on the Remote Commander. The ZERO SET MEMORY indicator flashes and the end point of the insert is stored in memory. The counter shows "0:00:00". (5) On your (recording) VCR, locate the insert start point [b] by pressing ◀◀, then press REC and the button on its right simultaneously to set your (recording) VCR to the recording pause mode. (6) First press PAUSE on the other (playback) VCR, and after a few seconds press ■ on your (recording) VCR to start inserting the new scene. Inserting automatically stops near the zero point on the counter. Your (recording) VCR automatically stops. The end point [c] of the insert stored in memory is canceled.
![graph TD A["5 REC"] --> B["Device with scroll"] B --> C["4 ZERO SET MEMORY"] C --> D["0:00:00 ZERO SET MEMORY"]](/content/2026/06/1301746/images/a8db6074e731f0662a01646739fa47f5400a2b6010eb5000df16a5bd45f14c8c.jpg)
To change the insert end point
Press ZERO SET MEMORY again after step 5 to erase the ZERO SET MEMORY indicator and begin from step 3.
Notes
• The zero set memory function works only for tapes recorded in the Digital8 System. - The picture and sound recorded on the section between the insert start and end points will be erased when you insert the new scene.
When the inserted picture is played back
The picture may be distorted at the end of the inserted section. This is not a malfunction.
To insert a scene without setting the insert end point
Skip steps 3 and 4. Press ■ when you want to stop inserting.
Changing the menu settings
To change the mode settings in the menu settings, select the menu items with the SEL/PUSH EXEC dial. The default settings can be partially changed. First, select the icon, then the menu item, and then the mode.
(1) Press MENU to display the menu settings. (2) Turn the SEL/PUSH EXEC dial to select the desired icon, then press the dial to set. (3) Turn the SEL/PUSH EXEC dial to select the desired item, then press the dial to set. (4) Turn the SEL/PUSH EXEC dial to select the desired mode, and press the dial to set. (5) If you want to change other items, select → RETURN and press the dial, then repeat steps from 2 to 4.
For details, refer to "Selecting the mode setting of each item" (p. 51).
![1 MENU VCR SET P EFFECT HiFi SOUND TBC ETC DNR AUDIO MIX PB MODE A/V→DV OUT [MENU]: END](/content/2026/06/1301746/images/4582a9dbfb1887dc14aa3630824a272c1716d6f979f0845903ba811d26ea062a.jpg)
![graph TD A["2"] --> B["↓"] B --> C["VCR SET"] C --> D["VOE"] D --> E["PEFFECT"] E --> F["HIFI SOUND"] F --> G["T"] G --> H["ETC"] H --> I["D"] I --> J["OTHERS"] J --> K["A"] K --> L["VOE WORLD TIME"] L --> M["N"] M --> N["BEEP"] N --> O["P"] O --> P["COMMANDER"] P --> Q["A"] Q --> R["ETC"] R --> S["…](/content/2026/06/1301746/images/038c2cefde525871179f8a67bcf8028030e69d476320527dd0fa64a9d1f52ad4.jpg)
![graph TD A["3"] --> B["OTHERS WORLD TIME 0 HR"] B --> C["OTHERS WORLD TI ME"] C --> D["BEEP COMMANDER VTR2"] D --> E["ETC VIDEO EDIT"] E --> F["EDIT SET RETURN"] G["1"] --> H["MANUAL SET WORLD TI ME"] H --> I["BEEP COMMANDER VTR1"] I --> J["ETC VIDEO EDIT VTR2"] J --> K["EDIT SET VTR3"] K --> L["RET…](/content/2026/06/1301746/images/767302a9ab0da188562d011d0cf0387d4ecca915b34337bd50b2088d9cd086ea.jpg)

Menu items are displayed as the following icons:
| VCR | VCR SET |
| TAPE SET | |
| SETUP MENU | |
| ETC | OTHERS |
Selecting the mode setting of each item ● is the default setting.
The monitor screen shows only the items you can operate at the moment.
| Icon/item | Mode | Meaning |
| VCR P EFFECT | ● OFF | No special effects are obtained for images |
| NEG.ART | The colors and brightness of the image are reversed | |
| SEPIA | The image is sepia | |
| B&W | The image is monochrome (black-and-white) | |
| SOLARIZE | The light intensity is clearer, and the image looks like an illustration | |
| HiFi SOUND | ● STEREO | To play back a stereo tape or dual sound track tape with main and sub sound (p. 58) |
| 1 | To play back a stereo tape with the left sound or a dual sound track tape with main sound | |
| 2 | To play back a stereo tape with the right sound or a dual sound track tape with sub sound | |
| TBC* | ● ON | To correct jitter |
| OFF | To not correct jitter. Set TBC to OFF when playing back a tape on which you have dubbed over and recorded the signals of a TV game or similar machine | |
| TBC stands for “Time Base Corrector.” | ||
| DNR* | ● ON | To reduce picture noise |
| OFF | To reduce a conspicuous afterimage when the picture has a lot of movement | |
| DNR stands for “Digital Noise Reduction.” | ||
* When you play back tapes recorded in the Hi8/standard 8 system only.
Note on P EFFECT
The picture effect function works only for tapes recorded in the Digital8 System.
| Icon/item | Mode | Meaning |
| VCR AUDIO MIX | — | To adjust the balance between the stereo 1 and stereo 2 |
| PB MODE | ● AUTO | To automatically select the system (Hi8/standard 8 or Digital8) that was used to record on the tape, and play back the tape |
| Hi8/8 | To play back a tape that was recorded in the Hi8/ standard 8 system when your VCR does not automatically distinguish the recording system | |
| A/V → DV OUT | ● OFF | To convert digital video signals into analog video signals via your VCR |
| ON | To convert analog video signals into digital video signals via your VCR |
Notes on AUDIO MIX
- You can adjust the balance only for tapes recorded in the Digital8 System.
- When playing back a tape recorded in the 16-bit mode, you cannot adjust the balance.
Note on PB MODE
The mode will return to the default setting when
- you remove the battery pack or power source.
- you turn the POWER switch to OFF.
| Icon/item | Mode | Meaning |
| REC MODE | ● SP | To record in the SP (Standard Play) mode |
| LP | To increase the recording time to 1.5 times the SP mode | |
| AUDIO MODE* | ● 12BIT | To record or play back in the 12-bit mode (two stereo sounds) |
| 16BIT | To record or play back in the 16-bit mode (the one stereo sound with high quality) | |
| REMAIN | ● AUTO | To display the remaining tape bar• for about 8 seconds after your VCR is turned on and to calculate the remaining amount of tape• for about 8 seconds after a cassette is inserted and your VCR calculates the remaining amount of tape• for about 8 seconds after ▷ is pressed• for about 8 seconds after the DISPLAY button is pressed• during of tape rewinding, forwarding, or picture search |
| ON | To always display the remaining tape bar | |
| DATA CODE | ● DATE/CAM | To display date, time, and recording data during playback |
| DATE | To display date and time during playback |
* To dub a tape to the other VCR
You cannot select AUDIO MODE for tapes recorded in the Digital8 System. However, you can select AUDIO MODE when you dub tapes recorded in the Hi8/standard 8 system to the other VCR using the i.LINK cable (DV connecting cable).
Note on REC MODE
When you record on the standard 8 tape, your VCR records in the SP mode even if you select the LP mode in the menu settings. In this case, the indicator "8mm TAPE → SP REC, Hi8 TAPE → LP/SP REC" appears on the monitor screen. Use Hi8 tapes for the LP mode.
Notes on the LP mode
- When you record a tape in the LP mode on your VCR, we recommend playing the tape on your VCR. When you play back the tape on other VCRs or camcorders, noise may occur in images or sound.
- When you record in the SP and LP modes on one tape or you record some scenes in the LP mode, the playback image may be distorted or the time code may not be written properly between scenes.
| Icon/item | Mode | Meaning |
| CLOCK SET | — | To reset the date or time (p. 55) |
| AUTO TV ON | ● OFF | — |
| ON | To automatically turn on the Sony TV when using the super laser link function | |
| TV INPUT | ●VIDEO1VIDEO2VIDEO3 | To switch the video input on a Sony TV when using the super laser link function (p. 17) |
| OFF | — | |
| LTR SIZE | ●NORMAL | To display selected menu items in normal size |
| 2· | To display selected menu items at twice the normal size | |
| DEMO MODE | ●OFF | To cancel the demonstration mode |
| ON | To make the demonstration appear | |
| WORLD TIME | — | To set the clock to the local timeTurn the SEL/PUSH EXEC dial to set a time zone difference. The clock changes by the time difference you set here. If you set the time difference to 0, the clock returns to the originally set time. |
| BEEP | ●MELODY | To output the melody when you set the POWER switch to ON, change the menu settings, or when an unusual condition occurs on your VCR |
| NORMAL | To output the beep sound instead of the melody | |
| OFF | To cancel all sound | |
| COMMANDER | ●VTR2 | To activate your VCR with a Remote Commander supplied with a Sony video camera recorder |
| VTR1-6 | To activate your VCR with a Remote Commander supplied with a Sony product.For details, refer to “Playing back a tape” (p. 16). | |
| OFF | To deactivate the Remote Commander to avoid remote control misoperation caused by other VCR’s remote control | |
| VIDEO EDIT | — | To make a program and perform video editing (p. 37) |
| EDIT SET | — | To adjust and set the synchronicity of your VCR and the other VCR for dubbing in edit set mode |
Note on DEMO MODE
You cannot select DEMO MODE when a cassette is inserted in your VCR.
In more than 5 minutes after removing the power source
The AUDIO MIX and HiFi SOUND items are returned to their default settings. The other menu items are held in memory even when the battery is removed.
The default clock setting is set to East Coast Standard Time.
If you do not use your VCR for about six months, the date and time settings may be deleted because the vanadium-lithium battery installed in your VCR will have been discharged.
Charge the battery before you reset the date and time.
First, set the year, then the month, the day, the hour and then the minute.
(1) Press MENU to display the menu settings. (2) Turn the SEL/PUSH EXEC dial to select ☐, then press the dial. (3) Turn the SEL/PUSH EXEC dial to select CLOCK SET, then press the dial. (4) Turn the SEL/PUSH EXEC dial to adjust the desired year, then press the dial. (5) Set the month, day, and hour by turning the SEL/PUSH EXEC dial and pressing the dial. (6) Set the minute by turning the SEL/PUSH EXEC dial and pressing the dial by the time signal. The clock starts to move. (7) Press MENU to make the menu settings disappear.
![graph TD A["1,7 MENU"] --> B["2"] B --> C["3"] A --> D["4"] D --> E["6"]](/content/2026/06/1301746/images/2c6d2652d416387cf7f43a5da0631cad28e373926f6d4141b78f514d8f5faf81.jpg)
The year changes as follows:

If you do not set the date and time
"---- -- ----" "--:--:--" is recorded on the data code of the tape.
Note on the time indicator
The internal clock of your VCR operates on a 12-hour cycle.
• 12:00 AM stands for midnight. • 12:00 PM stands for noon.
Digital8 System, recording, and playback
What is the "Digital8 System"?
This video system has been developed to enable digital recording to Hi8 Hi8 Digital8 B video cassette.
Usable cassette tapes
We recommend using Hi8 HiDigital8 video cassettes.* The recording time when you use your Digital8 System VCR on Hi8 A16dard 8 tape is half the recording time of the conventional Hi8 HiStandard 8 system VCR. (120 minutes of recording time becomes 60 minutes in the SP mode.) * If you use standard 8 tape, be sure to play back the tape on your VCR (the GV-D200). Mosaic pattern noise may appear when you play back standard 8 tape on other VCRs (including another GV-D200).
Notes
- Tapes recorded in the Digital8 System cannot be played back on a Hi8 /Hi8 standard 8 (analog) system machine.
- RC time codes and data codes recorded on Hi8 HiStandard 8 (analog) systems cannot be displayed on the monitor screen.
- PCM sound recorded on Hi8 HiStandard 8 (analog) systems cannot be played back with your VCR.
Playback system
The Digital8 System or Hi8 Standard 8 system is automatically detected before the tape is played back.
During playback of tapes recorded in the Hi8 or Standard 8 system, digital signals are output as the image and sound signals from the iDV IN/OUT jack.
Display during automatic detection of system
The Digital8 System or Hi8 Standard 8 system is automatically detected, and the playback system is automatically switched to. During switching of systems, the screen turns blue, and the following displays appear. A hissing noise also sometimes can be heard.
D → Hi: During switching from Digital8 to Hi8/Standard 8
Hi8/8→D: During switching from Hi8/Standard 8 to Digital8
Copyright signal
When you play back
Using any other VCR, you cannot record on a tape that has recorded copyright control signals for copyright protection of software which is played back on your VCR.
When you record
You cannot record software on your VCR that contains copyright control signals for copyright protection of software.
COPY INHIBIT appears on the monitor screen or TV screen if you try to record such software. Your VCR does not record copyright control signals on the tape when it records.
When you play back a dual sound track tape
When you use tapes recorded in the Digital8 System
When you play back a Digital8 System tape that has been dubbed from a dual sound track tape recorded in the DV system, set HiFi SOUND to the desired mode in the menu settings (p. 50).
Sound from monitor
| HiFi Sound Playing back Playing back a dual Mode a stereo tape sound track tape | |
| STEREO Stereo Main sound and sub sound | |
| 1 Lch Main sound | |
| 2 Rch Sub sound |
When you use a tape recorded in the Hi8/standard 8 system
When you play back a dual sound track tape recorded in an AFM HiFi stereo system, set HiFi SOUND to the desired mode in the menu settings (p. 50).
Sound from monitor
| HiFi Sound Playing back Playing back a dual Mode a stereo tape sound track tape | |
| STEREO Stereo Main sound and sub sound | |
| 1 Monaural Main sound | |
| 2 Unnatural Sound Sub sound |
You cannot record dual sound programs on your VCR.
The DV jack on this unit is an i.LINK-compliant DV IN/OUT jack. This section describes the i.LINK standard and its features.
What is "i.LINK"?
i.LINK is a digital serial interface for handling digital video, digital audio, and other data in two directions between equipment having the i.LINK jack, and for controlling other equipment.
i.LINK-compatible equipment can be connected by a single i.LINK cable. Possible applications are operations and data transactions with various digital AV equipment. When two or more i.LINK-compatible equipment are connected to this unit in a daisy chain, operations and data transactions are possible with not only the equipment that this unit is connected to but also with other devices via the directly connected equipment.
Note, however, that the method of operation sometimes varies according to the characteristics and specifications of the equipment to be connected, and that operations and data transactions are sometimes not possible on some connected equipment.
Note
Normally, only one piece of equipment can be connected to this unit by the i.LINK cable (DV connecting cable). When connecting this unit to i.LINK-compatible equipment having two or more i.LINK jacks (DV jacks), refer to the instruction manual of the equipment to be connected.
About the Name "i.LINK"
i.LINK is a more familiar term for the IEEE 1394 data transport bus proposed by SONY, and is a trademark approved by many corporations.
IEEE 1394 is an international standard standardized by the Institute of Electrical and Electronic Engineers.
i.LINK Baud rate
i.LINK's maximum baud rate varies according to the equipment. Three maximum baud rates are defined:
S100 (approx. 100Mbps*)
S200 (approx. 200Mbps)
S400 (approx. 400Mbps)
The baud rate is listed under "Specifications" in the instruction manual of each equipment. It is also indicated near the i.LINK jack on some equipment.
The maximum baud rate of equipment on which it is not indicated, such as this unit, is "S100".
When units are connected to equipment having a different maximum baud rate, the baud rate sometimes differs from the indicated baud rate.
* What is "Mbps"?
Mbps stands for megabits per second, or the amount of data that can be sent or received in one second. For example, a baud rate of 100Mbps means that 100 megabits of data can be sent in one second.
i.LINK Functions on this unit
For details on how to dub when this unit is connected to other video equipment having DV jacks, refer to "Dubbing a tape" (p. 35).
This unit can also be connected to other i.LINK (DV) compatible equipment made by SONY (e.g., VAIO series personal computer) other than video equipment.
Before connecting this unit to a personal computer, make sure that application software supported by this unit is already installed on the personal computer.
For details on precautions when connecting this unit, also refer to the instruction manuals for the equipment to be connected.
Required i.LINK Cable
Use the Sony i.LINK 4-pin-to-4-pin cable (during DV dubbing).
i.LINK and i are trademarks.
Troubleshooting
If you run into any problem using your VCR, use the following table to troubleshoot the problem. If the problem persists, disconnect the power source and contact your Sony dealer or a local authorized Sony service facility. If "C:□□:□□" appears on the monitor screen, the self-diagnosis display function has worked. Refer to "Self-diagnosis display" (p. 63).
| Symptom Cause and/or Corrective Actions | |
| The power does not turn on. | The AC power adaptor is not connected to a wall outlet.→ Connect the AC power adaptor to a wall outlet (p. 8).The battery pack is not installed, or is dead or nearly dead.→ Install a charged battery pack (p. 9-11). |
| You cannot playback. | The POWER switch is not set to ON.→ Set it to ON (p. 13).The tape has run out.→ Rewind the tape (p. 14). |
| There are horizontal lines on the picture or the playback picture is not clear or does not appear. | The video head may be dirty.→ Clean the heads using a Sony V8-25CLD cleaning cassette (not supplied) (p. 68). |
| No sound or only a low sound is heard when playing back a tape. | The stereo tape is played back with HiFi SOUND set to 2 in the menu settings.→ Set it to STEREO (p. 50).AUDIO MIX is set to ST2 side in the menu settings.→ Adjust AUDIO MIX (p. 50). |
| The date search does not work correctly. | The tape has a blank portion between recorded portions (p. 27). |
| The picture which is recorded in the Digital8 System is not played back. | PB MODE is set to HiB the menu settings.→ Set it to AUTO (p. 50). |
| The tape which is recorded in the Hi8/standard 8 system is not played back correctly. | Set PB MODE to HiB the menu settings (p. 50). |
| You cannot record. | The POWER switch is not set to ON.→ Set it to ON (p. 10).The tape has run out.→ Rewind the tape or insert a new one (p. 12, 14).The write-protect tab is set to expose the red mark.→ Use a new tape or slide the tab (p. 12).The tape is stuck to the drum (moisture condensation).→ Remove the cassette and leave your VCR for at least 1 hour to acclimatize (p. 67). |
| You cannot record in the LP mode. | The tape is the standard 8 tape.→ Use Hi8 Digital8 tap (p. 51). |
| The cassette cannot be removed from the holder. | The power source is disconnected.→ Connect it firmly (p. 8).The battery is dead.→ Use a charged battery pack (p. 9-11). |
| The □ and ▲ indicators flash and no functions except for cassette ejection work. | Moisture condensation has occurred.→ Remove the cassette and leave your VCR for at least 1 hour to acclimatize (p. 67). |
| No function works even though the power is on. | · Disconnect the power cord of the AC power adaptor or remove the battery, then reconnect it after about one minute. Turn the power on. If the functions still do not work, press the RESET button on the backside of your (recording) VCR using a sharp-pointed object. (If you press the RESET button, all the settings including the date and time return to the default.) |
| The battery pack is quickly discharged. | · The operating temperature is too low.· The battery pack is not fully charged.→ Charge the battery pack fully again (p. 9-11).· The battery pack is completely dead, and cannot be recharged.→ Replace with a new battery pack (p. 9). |
| You cannot charge the battery pack. | · The POWER switch is not set to OFF.→ Set it to OFF. |
| While charging the battery pack, the POWER ON/CHARGE lamp flashes. | · Something is wrong with the battery pack.→ Contact your Sony dealer or a local authorized Sony service facility. |
| The melody or beep sounds for 5 seconds. | · Moisture condensation has occurred.→ Remove the cassette and leave your (recording) VCR for at least 1 hour to acclimatize (p. 67).· Some trouble has occurred in your (recording) VCR.→ Remove the cassette and insert it again, then operate your (recording) VCR. |
| While editing using the i.LINK cable (DV connecting cable), the recording picture cannot be monitored. | · Remove the i.LINK cable (DV connecting cable), and connect it again. |
| Digital program editing does not function. | · The input selector on the other (playback) VCR is not set correctly.→ Check the connection and set the input selector on the other (playback) VCR again (p. 35, 36).· Your (recording) VCR is connected to on Sony DV equipment, using the i.LINK cable (DV connecting cable).→ Keep the connection, and follow the procedure on page 38 to 40.· Setting a program on a blank portion of the tape is attempted.→ Set the program again on a recorded portion (p. 45).· Your (recording) VCR and the other (playback) VCR are not synchronized.→ Adjust the synchronicity (p. 43). |
| The Remote Commander supplied with a Sony digital video camera recorder does not work. | · The remote control code is not set correctly or set to OFF.→ Set COMMANDER in the menu settings (p. 15, 50).· Something is blocking the infrared rays.→ Remove the obstacle.· The batteries are inserted in the battery holder with the + - polarities incorrectly matching the + - marks.→ Insert the batteries with the correct polarity.· The batteries are dead.→ Insert new ones. |
Your VCR has a self-diagnosis display function. This function displays the current condition of your VCR as a 5-digit code (a combination of letters and figures) on the monitor screen. If a 5-digit code is displayed, check the following code chart. The last two digits (indicated by □□) will differ depending on the state of your VCR.

Self-diagnosis display
•C:□□:□□ You can service your VCR yourself.
• E: □ □: □ □
Contact your Sony dealer or a local authorized Sony facility.
| Five-digit display Cause and/or Corrective Actions | |
| C:04:□□ | You are using a battery pack that is not an “InfoLITHIUM” battery pack.→ Use an “InfoLITHIUM” battery pack (p. 9, 11). |
| C:21:□□ | Moisture condensation has occurred.→ Remove the cassette and leave your VCR for at least 1 hour to acclimatize (p. 67). |
| C:22:□□ | The video heads are dirty.→ Clean the heads using a Sony V8-25CLD cleaning cassette (not supplied) (p. 68). |
| C:31:□□ | A malfunction, other than the above, that you can service has occurred.→ Remove the cassette and insert it again, then operate your VCR.→ Disconnect the power cord of the AC power adaptor or remove the battery pack. After reconnecting the power source, operate your VCR. |
| E:61:□□ | A malfunction that you cannot service has occurred.→ Contact your Sony dealer or a local authorized Sony service facility and inform them of the 5-digit code (example: E:61:10). |
| E:62:□□ | |
If you are unable to rectify the problem even if you try corrective actions a few times, contact your Sony dealer or a local authorized Sony service facility.
Warning indicators and messages
If the CAUTION lamp and the indicators on the monitor screen flash, check the following:
If the CAUTION lamp flashes, but no indicators appear on the monitor screen, contact your Sony dealer or a local authorized Sony facility.
♪: You can hear the beep sound when BEEP is set to MELODY/NORMAL in the menu settings.
☐: The POWER ON/CHARGE lamp flashes green.
: The CAUTION lamp flashes yellow.
1 | 2 | 3 |
 | 5 | 6 |
 | 8 | 9 |
 | [J268X] | [J4G73] |
1 The battery is weak or dead.
Slow flashing: The battery is weak.
Fast flashing: The battery is empty or dead (p. 10).
Depending on conditions, the 🔒 indicator may flash, even if there are 5 to 10 minutes remaining.
2 The tape is near the end.
The flashing is slow, and the REC lamp flashes.
3 The tape has run out.
The flashing becomes rapid.
When you press the REC button, the indicators appear.
4 No tape has been inserted.
When you press the REC button, the indicators appear.
5 The write protect tab on the tape is set (red).
When you press the REC button, the indicators appear.
6 Moisture condensation has occurred (p. 67). 7 The video heads may be contaminated (p. 68). 8 The clock is not set.
When this message appears even though you set the date and time, the vanadium-lithium battery is discharged. Charge the vanadium-lithium battery (p. 69).
9 Some other trouble has occurred.
Disconnect the power source and contact your Sony dealer or a local authorized facility.
10 The battery is not the "InfoLITHIUM" type. 11 You cannot dub the recordings.
You tried to record a picture that has a copyright control signal (p. 57).
12 You cannot record in the LP mode.
Use Hi8 HiDigital8 tapes when you record in the LP mode (p. 53).
Using your VCR abroad
You can use your VCR in any country or area supplied with the AC power adaptor with your VCR within 100 V to 240 V AC, 50/60 Hz.
When charging the battery pack, use a commercially available AC plug adaptor [a], if necessary, depending on the design of the wall outlet [b].
![graph LR A["AC-L10A/L10B/L10C"] --> B["Plug"] B --> C[" socket"] C --> D["dot"]](/content/2026/06/1301746/images/f4e5a2a7f2ee1243147da6e0a8fc50922105d548a8575d1e02ec9f5e2dc21333.jpg)
Your VCR is an NTSC system based VCR. If you want to view the playback picture on your TV, it must be an NTSC system based TV with a AUDIO/VIDEO input jack. The following shows TV color systems used overseas.
NTSC system
Bahama Islands, Bolivia, Canada, Central America, Chile, Colombia, Ecuador, Jamaica, Japan, Korea, Mexico, Peru, Surinam, Taiwan, the Philippines, the U.S.A., Venezuela, etc.
PAL system
Australia, Austria, Belgium, China, Czech Republic, Denmark, Finland, Germany, Great Britain, Holland, Hong Kong, Italy, Kuwait, Malaysia, New Zealand, Norway, Portugal, Singapore, Slovak Republic, Spain, Sweden, Switzerland, Thailand, etc.
PAL-M system
Brazil
PAL-N system
Argentina, Paraguay, Uruguay
SECAM system
Bulgaria, France, Guyana, Hungary, Iran, Iraq, Monaco, Poland, Russia, Ukraine, etc.
Simple setting of clock by time difference
You can easily set the clock to the local time by setting a time difference. Select WORLD TIME in the menu settings (p. 50). See page 54 for more information.
Maintenance information and precautions
Moisture condensation
If your VCR is brought directly from a cold place to a warm place, moisture may condense inside your VCR or on the surface of the tape. In this condition, the tape may stick to the head drum and be damaged or your VCR may not operate correctly. If there is moisture inside your VCR, the beep sounds and the ▶ indicator flashes. If the ▲ indicator flashes at the same time, a cassette is inserted in your VCR.
If moisture condensation occurs
None of the functions except cassette ejection will work. Eject the cassette, turn off your VCR, and leave it for about 1 hour with the cassette compartment open. Your VCR can be used again if the ⏻ indicator does not appear when the power is turned on again.
Note on moisture condensation
Moisture may condense when you bring your VCR from a cold place into a warm place (or vice versa) or when you use your VCR in a hot place as follows
- You bring your VCR from a ski slope into a place warmed up by a heating device.
- You bring your VCR from an air-conditioned car or room into a hot place outside.
- You use your VCR after a squall or a shower.
- You use your VCR in a high temperature and humid place.
How to prevent moisture condensation
When you bring your VCR from a cold place into a warm place, put your VCR in a plastic bag and tightly seal it. Remove the bag when the air temperature inside the plastic bag has reached the surrounding temperature (after about 1 hour).
Maintenance information
Cleaning the video head
To ensure normal recording and clear pictures, clean the video heads.
When you playback/record in the Digital8 System
The video head may be dirty if
- mosaic-pattern noise appears on the playback picture.
- playback pictures do not move.
- playback pictures are hardly visible.
- playback pictures do not appear.
- the ✗ indicator and “CLEANING CASSETTE” message appear alternately on the monitor screen.

or
When you play back in the Hi8/standard 8 (analog) system
The video head may be dirty if
- playback pictures contain noise.
- playback pictures are hardly visible.
- playback pictures do not appear.

or
If the above problem occurs, clean the video heads with a Sony V8-25CLD cleaning cassette (not supplied). Check the picture and if the above problem persists, repeat cleaning.
Charging the vanadium-lithium battery in your VCR
Your VCR comes with a vanadium-lithium battery installed so as to retain the date and time, etc., regardless of the setting of the POWER switch. The vanadium-lithium battery is always charged as long as you are using your VCR. The battery, however, will become discharged gradually if you do not use your VCR. It will be completely discharged in about six months if you do not use your VCR at all. Even if the vanadium-lithium battery is not charged, it will not affect the VCR operation. To retain the date and time, etc., charge the battery if the battery is discharged.
Charging the vanadium-lithium battery:
Connect your VCR to a wall outlet using the AC power adaptor supplied with your VCR, or connect your VCR to a charged battery and leave your VCR switched off for more than 24 hours.
Precautions
VCR operation
- Operate your VCR on 7.2 V (battery pack) or 8.4 V (AC power adaptor).
- For DC or AC operation, use the accessories recommended in this operating instructions.
- If any solid object or liquid gets inside the casing, unplug your VCR and have it checked by a Sony dealer before operating it any further.
- Handle your VCR rightly, and do not give a mechanical shock.
- Keep the POWER switch set to OFF when you are not using your VCR.
- Do not wrap your VCR with a towel, for example, and operate it. Doing so might cause heat to build up inside.
- Keep your VCR away from strong magnetic fields or mechanical vibration. Noise may appear on the image.
- If your VCR is used in a cold place, a residual image may appear on the monitor screen. This is not a malfunction.
- While using your VCR, the bottom of the VCR may heat up. This is not a malfunction.
On handling tapes
Do not insert anything into the small holes on the rear of the cassette. These holes are used to sense the type and thickness of the tape and if the recording tab is in or out.
VCR care
- Remove the tape, and periodically turn on the power and play back a tape for about 3 minutes when your VCR is not to be used for a long time.
- Clean the VCR body with a dry soft cloth, or a soft cloth lightly moistened with a mild detergent solution. Do not use any type of solvent which may damage the finish.
- Do not let sand get into your VCR. When you use your VCR on a sandy beach or in a dusty place, protect it from the sand or dust. Sand or dust may cause your VCR to malfunction, and sometimes this malfunction cannot be repaired.
Connection to your personal computer
- When recording with the i.LINK cable the image processed or edited by your personal computer, use a new Hi8 Hi8 digital8 tape
- When you capture the pictures recorded in the Hi8 Vi3 andard 8 system to a personal computer, dub the recordings to the Digital or DV system first, then capture them to the personal computer.
When inputting the image recorded by Hi8/standard 8 system into a Sony VAIO
The Program Capture function of DVgate motion doesn't work. To use this function, dub the image into a Digital8 or DV tape first, and then input it into a Sony VAIO.
AC power adaptor
- Unplug the unit from the wall outlet when you do not intend to use the unit for a long time. To disconnect the power cord, pull it out by the plug. Never pull the power cord itself.
- Do not operate the unit with a damaged cord or if the unit has been dropped or damaged.
- Do not bend the power cord forcibly, or place a heavy object on it. This will damage the cord and may cause fire or electrical shock.
- Prevent metallic objects from coming into contact with the metal parts of the plugs or jacks. If this happens, a short may occur and the unit may be damaged. • Always keep metal contacts clean.
- Do not disassemble the unit.
- Do not apply mechanical shock or drop the unit.
- While the unit is in use, particularly during charging, keep it away from AM receivers and video equipment. AM receivers and video equipment disturb AM reception and video operation.
- The unit becomes warm during use. This is not a malfunction.
- Do not place the unit in locations that are
- Extremely hot or cold
- Dusty or dirty
- Very humid
- Vibrating
Battery pack
- Use only the specified charger or video equipment with the charging function.
- To prevent an accidental short circuit, do not allow metal objects to come into contact with the battery terminals.
- Keep the battery pack away from fire.
- Never expose the battery pack to temperatures above 140°F (60°C) , such as in a car parked in the sun or under direct sunlight.
- Keep the battery pack dry.
- Do not expose the battery pack to any mechanical shock.
- Do not disassemble nor modify the battery pack.
- Attach the battery pack to the video equipment securely.
- Charging while some capacity remains does not affect the original battery capacity.
VCR
System
Video recording system
2 rotary heads
Helical scanning system
Audio recording system
Rotary heads, PCM system
Quantization: 12 bits (Fs 32 kHz, stereo 1, stereo 2), 16 bits (Fs 48 kHz, stereo)
Video signal
NTSC color, EIA standards
Recommended cassette
Hi8 HDigital8 video cassette
Recording/ playback time (using 120 min. Hi8 video cassette)
SP mode: 1 hour
LP mode: 1 hour and 30 minutes
Fastforward/rewind time (using 120 min. Hi8 video cassette)
Approx. 5 minutes and 15 seconds
Input/output connectors
S video input
4-pin mini DIN
Luminance signal: 1 Vp-p,
75 ohms, unbalanced
Chrominance signal: 0.286 Vp-p, 75 ohms, unbalanced
S video output
4-pin mini DIN
Luminance signal: 1 Vp-p,
75 ohms, unbalanced
Chrominance signal: 0.286 Vp-p, 75 ohms, unbalanced
Audio/Video input
AV MINIJACK
Video: 1 Vp-p, 75 ohms,
unbalanced, sync negative
Audio: 327 mV, input impedance more than 47 kiloohms
Video output
Phono jack, 1 Vp-p, 75 ohms, unbalanced, sync negative
Audio output
Phono jack (2) 327 mV, output impedance less than 1 kiloohm
RFU DC OUT
Special minijack DC 5 V
DV input/output
4-pin connector
Headphone jack
Stereo minijack (ø 3.5 mm)
LANC Jack
Stereo mini-minijack (Ø 2.5 mm)
General
Power requirements
7.2 V (battery pack)
8.4 V (AC power adaptor)
Average power consumption
(when using the battery pack)
3.0 W
Operating temperature
32°F to 104°F (0°C to 40°C)
Storage temperature
-4°F to +140°F
(-20°C to +60°C)
Dimensions (Approx.)
57/8 · 2 · 53/8 in.
excluding the battery pack and cassette
Supplied accessories
See page 6.
AC power adaptor
Power requirements
100 - 240 V AC, 50/60 Hz
Power consumption
23 W
Output voltage
DC OUT: 8.4 V, 1.5 A in the operating mode
Operating temperature
32°F to 104°F (0°C to 40°C)
Storage temperature
-4°F to +140°F
(-20°C to +60°C)
Dimensions (approx.)
5 · 19/16 · 21/2 in.
excluding projecting parts
Mass (approx.)
9.8 oz (280 g)
excluding power cord
Cord length (approx.)
Power cord: 6.6 feet (2 m)
Connecting cord: 5.2 feet (1.6 m)
Design and specifications are subject to change without notice.
Identifying the parts and controls
VCR

1 VOLUME +/- buttons 2 EJECT knob (p. 12) 3 Cassette compartment (p. 12) 4 POWER ON/CHARGE lamp (p. 13) 5 Remote sensor
Aim a Remote Commander (not supplied) here for remote control.
6 RESET button (bottom) (p. 62) 7 SEL/PUSH EXEC dial (p. 15, 50) 8 MENU button (p. 50) 9 POWER switch (p. 13)
10 SUPER LASER LINK button (p. 17) 11 LANC jack
LANC stands for Local Application Control Bus System. The LANC control jack is used for controlling the tape transport of video equipment and peripherals connected to it. This jack has the same function as the jack indicated as control L or REMOTE.
12 Jack cover (p. 7) 13 AUDIO/VIDEO INPUT jack (p. 18, 47)

This mark indicates that this product is a genuine accessory for Sony video products.
When purchasing Sony video products, Sony recommends that you purchase accessories with this "GENUINE VIDEO ACCESSORIES" mark.

14 DISPLAY button (p. 13) 15 DATA CODE button (p. 30) 16 CAUTION lamp (p. 64) 17 REC (recording) buttons and lamp (p. 18) 18 PAUSE (pause) button and lamp (p. 18) 19 ◀II<FRAME(-)button (p. 14) 20 ←REW (rewind) button (p. 14) 21 ■ STOP (stop) button (p. 13) 22 DIGITAL EFFECT button (p. 24) 23 TITLE button (p. 31, 33) 24 PB (playback) ZOOM button (p. 20) 25 ▶ SLOW button (p. 14) 26 x2 button (p. 14)
27 > II▶ FRAME (+) button (p. 14) 28 ▷ PLAY (playback) button (p. 13, 14) 29 ▶▶ FF (fastforward) button (p. 14) 30 (headphones) jack (p. 14) 31 VIDEO/AUDIO L/R OUT jacks (p. 7, 18, 35, 47) 32 RFU DC OUT jack (p. 7) 33 S VIDEO OUT jack (p. 7, 35) 34 S VIDEO IN jack (p. 18, 47)

35 DC IN jack (p. 8, 10) 36 Infrared rays emitter (p. 17, 40) 37 Battery mounting surface (p. 9) 38 Hooks for shoulder strap
39 RELEASE knob 40 DV IN/OUT jack (p. 19, 36, 47)
The DV IN/OUT jack is i.LINK compatible.
41 BATT release lever (p. 9)
Note on Release knob
When you attach a TV tuner (not supplied) to your VCR, slide up the RELEASE knob and release the terminal cover. After using a TV tuner, attach the terminal cover to your VCR.
Operation indicators
LCD screen![graph TD A["1"] --> B["123min"] C["2"] --> B D["3"] --> E["STILL ZERI鍵SET NEG.ART"] F["4"] --> E G["5"] --> H["VOL ......"] I["6"] --> H B --> J["0:00:00:00"] E --> K["MEMORY"] K --> L["DATE 01 SEARCH"] H --> M["DV IN 16BIT"] J --> N["7"] K --> O["9"] L --> P["10"] M --> Q["11"] N --> R["12"] O -->…](/content/2026/06/1301746/images/65391c4f221a2c3275e9c9ebdd4def89feb1737024bf6564ee4eb91bfcc192b4.jpg)
1 Recording mode indicator (p. 53) 2 Format indicator (p. 57)
B, Hi8 indicator appears.
3 Remaining battery time indicator 4 Picture effect indicator (p. 21)/Digital effect indicator (p. 23) 5 Warning indicators (p. 64) 6 Volume indicator/Data code indicator (p. 30) 7 Video control mode indicator (p. 14)
8 Tape counter indicator (p. 26)/Time code indicator/Self-diagnosis display (p. 63) 9 Remaining tape indicator 10 ZERO SET MEMORY indicator (p. 26, 49) 11 Search mode indicator (p. 27, 28, 29) 12 DV IN indicator (p. 19)/A/V → DV indicator (p. 47) 13 Audio mode indicator (p. 53)
About the time code
A time code is recorded on the tape to search for scenes easily. Your VCR records the time code during recording. Press DISPLAY to check the time code. Hour, minutes, seconds, and frames appear on the monitor screen or on the TV screen. "0:00:00:00" is recorded at the beginning of the tape. If there is a blank portion on the tape, however, "0:00:00:00" is recorded after the blank portion. You cannot rewrite the time code later. The time code of your VCR is a drop frame system. It may skip some frames to adjust the time code.
A
AC power adaptor ...... 6, 8, 10
AFM HiFi Sound.... 58
AUDIO MIX 52
AUDIO MODE 53
A/V connecting cable 6,7,18,35,47
A/V converting cable .. 6, 18, 47
B
Battery pack 9
BEEP 54,64
C
Charging battery 10
Clock set 55
Connection (viewing on TV) ....7 (dubbing a tape) ....35
Connection to your personal computer 47
D, E
Data code 30,53
Date search 27
DC IN jack 8,10
DEMO MODE 54
DIGITAL EFFECT ...... 23
Digital 8 system .... 57
Digital program editing ..... 37
DISPLAY 13
Dual sound track tape ..... 15, 58
Dubbing a tape 35
DV connecting cable 19, 36, 47, 59
DV IN/OUT jack .. 19, 36, 47, 59
F, G
Full charge 10
H
Headphone jack 73
HiFi SOUND ...... 15, 51, 58
I, J, K
i.LINK 19,36,47,59
"InfoLITHIUM" battery .... 9, 11
Infrared rays emitter ..... 17, 40
L
LANC 37,72
M
Main sound.... 58
Menu settings 50
Moisture condensation ...... 67
N
NTSC system 66
0
Operation indicators ...... 75
P, Q
PAL system.... 66
PB MODE....52
PB ZOOM 20
Photo scan 29
Photo search 28
PICTURE EFFECT ...... 21
Picture search 14
Playback 13
Playback pause.... 14
Power sources (battery pack) 9
(the mains) 8
R
REC MODE.... 53
Remaining battery time indicator 9
Remaining tape indicator ..... 75
Remote Commander .... 16, 26, 27, 28, 48
Remote control jack (LANC) 72
Remote sensor 72
RESET 62,72
S
SEL/PUSH EXEC dial ..... 72
Self-diagnosis display ...... 63
Signal convert function ..... 47
Slow playback 14
Stereo tape 58
Sub sound 58
SUPER LASER LINK ...... 17
S VIDEO jack ...... 7, 18, 35, 47
T, U
Tape counter 26
Title 31,33
Time code....75
TV color systems 66
V
Various playback 14
Video head 68
W, X, Y
Warning indicators 64
Wide mode 16
WORLD TIME...... 54
Write-protect tab 12
Z
Zero set memory ...... 26, 49
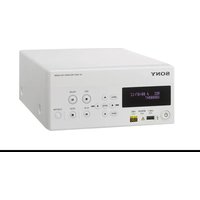

- DIGITAL VIDEO CASSETTE RECORDER B
- OPERATING INSTRUCTIONS
- OWNER'S RECORD
- DIGITAL
- WARNING
- TO PREVENT FIRE OR SHOCK HAZARD, DO NOT EXPOSE THE UNIT TO RAIN OR MOISTURE
- FOR CUSTOMERS IN THE U.S.A. AND CANADA
- DISPOSAL OF LITHIUM ION BATTERY. LITHIUM ION BATTERY. DISPOSE OF PROPERLY
- FOR CUSTOMERS IN THE U.S.A
- CAUTION
- DECLARATION OF CONFORMITY
- NOTE
- FOR CUSTOMERS IN CANADA
- GETTING STARTED
- BASIC OPERATIONS
- ADVANCED OPERATIONS
- EDITING
- CUSTOMIZING YOUR VCR
- ADDITIONAL INFORMATION
- QUICK REFERENCE
- BEFORE USING YOUR VCR
- NOTE ON TV COLOR SYSTEMS
- COPYRIGHT PRECAUTIONS
- PRECAUTIONS ON VCR CARE
- CHECKING SUPPLIED ACCESSORIES
- STEP 1 CONNECTING TO A TV
- IF YOUR TV IS ALREADY CONNECTED TO THE OTHER VCR
- IF YOUR TV OR THE OTHER VCR IS A MONAURAL TYPE
- TO CONNECT TO A TV OR THE OTHER VCR WITHOUT VIDEO/AUDIO JACKS
- IF YOUR TV OR THE OTHER VCR HAS AN S VIDEO JACK
- STEP 2 PREPARING THE POWER SUPPLY
- CONNECTING TO A WALL OUTLET
- PRECAUTION
- NOTES
- WHEN YOU USE YOUR VCR OUTDOORS
- USING A CAR BATTERY
- USING WITH A BATTERY PACK (NOT SUPPLIED)
- INSTALLING THE BATTERY PACK
- TO REMOVE THE BATTERY PACK
- AFTER INSTALLING THE BATTERY PACK
- REMAINING BATTERY TIME INDICATOR
- CHARGING THE BATTERY PACK
- AFTER CHARGING THE BATTERY PACK
- WHEN THE BATTERY PACK IS CHARGED FULLY
- YOU CAN CHARGE THE BATTERY PACK ABROAD
- IF THE POWER GOES OFF EVEN THOUGH THE BATTERY REMAINING INDICATOR SHOWS THAT THE BATTERY PACK HAS ENOUGH POWER TO OPERATE
- WHAT IS "INFOLITHIUM
- STEP 3: INSERTING A CASSETTE
- TO EJECT A CASSETTE
- TO PREVENT ACCIDENTAL ERASURE
- PLAYING BACK A TAPE
- TO STOP PLAYBACK
- NOTES ON THE DISPLAY BUTTON
- VARIOUS PLAYBACK MODES
- TO VIEW A STILL IMAGE (PLAYBACK PAUSE)
- TO ADVANCE THE TAPE
- TO REWIND THE TAPE
- TO CHANGE THE PLAYBACK DIRECTION
- TO LOCATE A SCENE WHILE SEARCHING THE PICTURE (PICTURE SEARCH)
- TO MONITOR THE HIGH-SPEED PICTURE AT HIGH SPEED WHILE ADVANCING OR REWINDING THE TAPE (SKIP SCAN)
- TO VIEW THE PICTURE AT SLOW SPEED (SLOW PLAYBACK)
- TO VIEW THE PICTURE AT DOUBLE SPEED
- TO VIEW THE PICTURE FRAME-BY-FRAME
- IN THESE VARIOUS PLAYBACK MODES
- NOTES ON THE PLAYBACK PAUSE MODE
- SLOW PLAYBACK FOR TAPES RECORDED IN THE DIGITAL8 SYSTEM
- WHEN YOU PLAY BACK A TAPE IN REVERSE
- USING HEADPHONES
- PLAYING BACK A DUAL SOUNDTRACK TAPE
- USING A REMOTE COMMANDER
- WIDE MODE PLAYBACK AND RECORDING
- CONNECTION FOR A TV
- ID-2 SYSTEM
- WHEN RECORDING A 16:9 SCREEN
- USING THE AV CORDLESS IR RECEIVER
- TO CANCEL THE SUPER LASER LINK FUNCTION
- IF YOU TURN THE POWER OFF
- IF YOU USE A SONY TV
- WHEN THE SUPER LASER LINK FUNCTION IS ACTIVATED (THE LAMP ON THE SUPER LASER LINK BUTTON LIGHTS UP)
- USING THE A/V CONNECTING CABLE
- WHEN YOU HAVE FINISHED RECORDING A TAPE
- IF THE OTHER (PLAYBACK) VCR OR TV IS A MONAURAL TYPE
- IF YOUR TV OR THE OTHER (PLAYBACK) VCR HAS AN S VIDEO JACK
- USING THE I.LINK CABLE (DV CONNECTING CABLE)
- DURING DIGITAL EDITING
- IF YOU RECORD A PLAYBACK PAUSE PICTURE WITH THE I.DV IN/OUT JACK
- BEFORE RECORDING
- ENLARGING PLAYBACK IMAGES – PB ZOOM
- TO CANCEL THE PB ZOOM FUNCTION
- PICTURES PROCESSED BY THE PB ZOOM FUNCTION
- WHEN YOU SET THE POWER SWITCH TO OFF OR STOP PLAYBACK
- WATCHING A TAPE WITH SPECIAL EFFECTS – PICTURE EFFECT
- PICTURES PROCESSED BY THE PICTURE EFFECT FUNCTION
- WATCHING A TAPE WITH SPECIAL PERFORMANCES – DIGITAL EFFECT
- STILL
- FLASH (FLASH MOTION)
- LUMI. (LUMINANCE KEY)
- TRAIL
- TO CANCEL THE DIGITAL EFFECT FUNCTION
- PICTURES PROCESSED BY THE DIGITAL EFFECT FUNCTION
- QUICKLY LOCATING A SCENE - ZERO SET MEMORY
- IF A TAPE HAS A BLANK PORTION BETWEEN RECORDED PORTIONS
- SEARCHING WITH RECORDING DATE – DATE SEARCH
- TO STOP SEARCHING
- SEARCHING FOR A PHOTO - PHOTO SEARCH/PHOTO SCAN
- SEARCHING FOR A PHOTO
- SCANNING PHOTO
- TO STOP SCANNING
- DISPLAYING RECORDING DATA AND SCREEN INDICATORS – DATA CODE FUNCTION
- USING THE DATA CODE FUNCTION
- PRESS DATA CODE ON YOUR VCR
- TO NOT DISPLAY VARIOUS SETTINGS
- NOTE ON THE DATA CODE FUNCTION
- RECORDING DATA
- WHEN YOU USE THE DATA CODE FUNCTION, BARS (--- -- ---- AND --:--:) APPEAR IF
- DATA CODE
- TO SUPERIMPOSE THE TITLE WHILE YOU ARE RECORDING
- TO SELECT THE LANGUAGE OF A PRESET TITLE
- TO USE THE CUSTOM TITLE
- TITLE SETTING
- WHEN YOU ARE SELECTING AND SETTING THE TITLE
- WHILE YOU ARE PLAYING BACK
- TO CHANGE A TITLE YOU HAVE STORED
- IF YOU SELECT [▶P
- TO ERASE A CHARACTER
- TO ENTER A SPACE
- WHEN YOU HAVE FINISHED DUBBING A TAPE
- BE SURE TO CLEAR THE INDICATORS FROM THE SCREEN
- YOU CAN EDIT ON VCRS THAT SUPPORT THE FOLLOWING SYSTEMS
- IF THE OTHER (RECORDING) VCR IS A MONAURAL TYPE
- IF THE OTHER (RECORDING) VCR HAS AN S VIDEO JACK
- NOTE ON TAPES THAT ARE NOT RECORDED IN THE DIGITAL8 SYSTEM
- DURING PLAYBACK OF TAPES RECORDED IN THE HI8/STANDARD 8 SYSTEM
- YOU CAN CONNECT ONE VCR ONLY USING THE I.LINK CABLE (DV CONNECTING CABLE)
- DUBBING ONLY DESIRED SCENES – DIGITAL PROGRAM EDITING
- BEFORE OPERATING THE DIGITAL PROGRAM EDITING
- USING THE DIGITAL PROGRAM EDITING FUNCTION
- STEP 1: CONNECTING THE OTHER (RECORDING) VCR
- STEP 2: SETTING THE OTHER (RECORDING) VCR FOR OPERATION - USING THE A/V CONNECTING CABLE
- SETTING THE IR SETUP CODE
- ABOUT THE IR SETUP CODE
- NOTE ON THE IR SETUP CODE
- SETTING THE MODES TO CANCEL THE RECORDING PAUSE ON THE OTHER (RECORDING) VCR
- THE BUTTONS TO CANCEL RECORDING PAUSE ON THE OTHER (RECORDING) VCR
- SETTING YOUR (PLAYBACK) VCR AND THE OTHER (RECORDING) VCR TO FACE EACH OTHER
- CONFIRMING THE OTHER (RECORDING) VCR OPERATION
- IF THE OTHER (RECORDING) VCR OPERATES CORRECTLY
- IF THE OTHER (RECORDING) VCR DOES NOT OPERATE CORRECTLY
- STEP 2: SETTING THE OTHER (RECORDING) VCR FOR OPERATION - USING THE I.LINK CABLE (DV CONNECTING CABLE)
- IF YOU CONNECT USING THE I.LINK CABLE (DV CONNECTING CABLE)
- STEP 3: ADJUSTING THE SYNCHRONICITY OF THE OTHER (RECORDING) VCR
- WHEN YOU CONNECT WITH THE I.LINK CABLE (DV CONNECTING CABLE)
- OPERATION 1: MAKING THE PROGRAM
- ERASING THE PROGRAM YOU HAVE SET
- TO CANCEL ERASING
- ERASING ALL PROGRAMS
- TO CANCEL ERASING ALL PROGRAMS
- TO CANCEL A PROGRAM YOU HAVE SET
- YOU CANNOT SET IN AND OUT WHEN
- THE TOTAL TIME CODE MAY NOT BE DISPLAYED CORRECTLY WHEN
- WHEN YOU SELECT PB MODE TO HI THE MENU SETTINGS
- OPERATION 2: PERFORMING A DIGITAL PROGRAM EDITING (DUBBING A TAPE)
- TO STOP DUBBING
- TO END THE DIGITAL PROGRAM EDITING FUNCTION
- YOU CANNOT RECORD ON THE OTHER VCR WHEN
- USING WITH AN ANALOG VIDEO UNIT AND A PERSONAL COMPUTER – SIGNAL CONVERT FUNCTION
- CAPTURING IMAGES AND SOUND FROM AN ANALOG VIDEO UNIT
- ANALOG VIDEO SIGNALS → DIGITAL VIDEO SIGNALS
- AFTER CAPTURING IMAGES AND SOUND
- IF THE OTHER VCR HAS AN S VIDEO JACK
- INSERTING A SCENE FROM THE OTHER (PLAYBACK) VCR – INSERT EDITING
- TO CHANGE THE INSERT END POINT
- WHEN THE INSERTED PICTURE IS PLAYED BACK
- TO INSERT A SCENE WITHOUT SETTING THE INSERT END POINT
- CHANGING THE MENU SETTINGS
- NOTE ON P EFFECT
- NOTES ON AUDIO MIX
- NOTE ON PB MODE
- TO DUB A TAPE TO THE OTHER VCR
- NOTE ON REC MODE
- NOTES ON THE LP MODE
- NOTE ON DEMO MODE
- IN MORE THAN 5 MINUTES AFTER REMOVING THE POWER SOURCE
- IF YOU DO NOT SET THE DATE AND TIME
- NOTE ON THE TIME INDICATOR
- DIGITAL8 SYSTEM, RECORDING, AND PLAYBACK
- WHAT IS THE "DIGITAL8 SYSTEM
- USABLE CASSETTE TAPES
- PLAYBACK SYSTEM
- DISPLAY DURING AUTOMATIC DETECTION OF SYSTEM
- COPYRIGHT SIGNAL
- WHEN YOU PLAY BACK
- WHEN YOU RECORD
- WHEN YOU PLAY BACK A DUAL SOUND TRACK TAPE
- WHEN YOU USE TAPES RECORDED IN THE DIGITAL8 SYSTEM
- WHEN YOU USE A TAPE RECORDED IN THE HI8/STANDARD 8 SYSTEM
- WHAT IS "I.LINK
- ABOUT THE NAME "I.LINK
- I.LINK BAUD RATE
- WHAT IS "MBPS
- I.LINK FUNCTIONS ON THIS UNIT
- REQUIRED I.LINK CABLE
- TROUBLESHOOTING
- SELF-DIAGNOSIS DISPLAY
- WARNING INDICATORS AND MESSAGES
- USING YOUR VCR ABROAD
- NTSC SYSTEM
- PAL SYSTEM
- PAL-M SYSTEM
- PAL-N SYSTEM
- SECAM SYSTEM
- SIMPLE SETTING OF CLOCK BY TIME DIFFERENCE
- MAINTENANCE INFORMATION AND PRECAUTIONS
- MOISTURE CONDENSATION
- IF MOISTURE CONDENSATION OCCURS
- NOTE ON MOISTURE CONDENSATION
- HOW TO PREVENT MOISTURE CONDENSATION
- MAINTENANCE INFORMATION
- CLEANING THE VIDEO HEAD
- WHEN YOU PLAYBACK/RECORD IN THE DIGITAL8 SYSTEM
- WHEN YOU PLAY BACK IN THE HI8/STANDARD 8 (ANALOG) SYSTEM
- CHARGING THE VANADIUM-LITHIUM BATTERY IN YOUR VCR
- CHARGING THE VANADIUM-LITHIUM BATTERY
- PRECAUTIONS
- VCR OPERATION
- ON HANDLING TAPES
- VCR CARE
- CONNECTION TO YOUR PERSONAL COMPUTER
- WHEN INPUTTING THE IMAGE RECORDED BY HI8/STANDARD 8 SYSTEM INTO A SONY VAIO
- AC POWER ADAPTOR
- BATTERY PACK
- VCR
- SYSTEM
- VIDEO RECORDING SYSTEM
- AUDIO RECORDING SYSTEM
- VIDEO SIGNAL
- RECOMMENDED CASSETTE
- RECORDING/ PLAYBACK TIME (USING 120 MIN. HI8 VIDEO CASSETTE)
- FASTFORWARD/REWIND TIME (USING 120 MIN. HI8 VIDEO CASSETTE)
- INPUT/OUTPUT CONNECTORS
- S VIDEO INPUT
- S VIDEO OUTPUT
- AUDIO/VIDEO INPUT
- VIDEO OUTPUT
- AUDIO OUTPUT
- RFU DC OUT
- DV INPUT/OUTPUT
- HEADPHONE JACK
- LANC JACK
- GENERAL
- POWER REQUIREMENTS
- AVERAGE POWER CONSUMPTION
- (WHEN USING THE BATTERY PACK)
- OPERATING TEMPERATURE
- STORAGE TEMPERATURE
- DIMENSIONS (APPROX.)
- SUPPLIED ACCESSORIES
- POWER CONSUMPTION
- OUTPUT VOLTAGE
- MASS (APPROX.)
- CORD LENGTH (APPROX.)
- IDENTIFYING THE PARTS AND CONTROLS
- NOTE ON RELEASE KNOB
- OPERATION INDICATORS
- ABOUT THE TIME CODE
- A
- B
- C
- D, E
- F, G
- H
- I, J, K
- L
- M
- N
- P, Q
- R
- S
- T, U
- V
- W, X, Y
- Z
Brand : SONY
Model : GV-D200
Category : VCR