
EWA3230 - Kettle AEG - Free user manual and instructions
Find the device manual for free EWA3230 AEG in PDF.


| Brand | AEG |
| Model | EWA3230 |
| Product Type | Cordless Electric Kettle |
| Capacity | 1.7 Liters |
| Power Rating | 2200-2400 Watts |
| Voltage / Frequency | 220-240 V ~ 50/60 Hz |
| Dimensions (W x D x H) | Approx. 24 x 18 x 26 cm |
| Weight | Approx. 1.2 kg |
| Base Type | 360° Connector Base |
| Cord Length | Approx. 70 cm |
| Material | Stainless Steel Body & Plastic Lid |
| Water Level Indicator | Yes, transparent window with scale |
| Concealed Heating Element | Yes |
| Limescale Filter | Removable mesh filter |
| Auto Shut-Off | Yes, after boiling |
| Boil Dry Protection | Yes |
| Lid Opening | Push-button spring release |
| Finish | Brushed stainless steel |
| Color | Silver / Black |
Frequently Asked Questions - EWA3230 AEG
User questions about EWA3230 AEG
0 question about this device. Answer the ones you know or ask your own.
Ask a new question about this device
Download the instructions for your Kettle in PDF format for free! Find your manual EWA3230 - AEG and take your electronic device back in hand. On this page are published all the documents necessary for the use of your device. EWA3230 by AEG.
USER MANUAL EWA3230 AEG
natural_image
Two black and white AEG water heaters with digital calipers, one black and one white, displayed against a plain background (no text or symbols visible on the devices themselves).WATERKETTLE EASYSENSE EWA32xx
GB Instruction book......11–16
Before using the appliance for the first time, please read the safety advice on page 12 carefully.

DG
Teile
natural_image
Illustration of a kettle with a lid and paper towel, next to a black cross symbol (no text or labels)D
natural_image
3D rendering of a black electrical plug connected to a circular base (no text or symbols visible)-
Die Basis auf eine stabile ebene Fläche stellen. Den Netzstecker in eine Steckdose stecken. Nicht benötigtes Kabel kann an der Unterseite der Basis aufgewickelt werden.
-
Τοποθετήστε τη βάση σε μια σταθερή και επίπεδη επιφάνεια. Τοποθετήστε το φις σε μια πρίζα. Μπορείτε να τυλίξετε το καλώδιο που περισσεύει στο κάτω μέρος της βάσης.
-
Plaats de voet op een stevige en vlakke ondergrond. Steek de stekker in een stopcontact. Overtollig snoer kunt u onder aan de voet oprollen.
-
Placez le soclesur une surface plane solide. Branchez l'appareil à une prise secteur murale. Si le cordon d'alimentation est trop long, vous pouvez l'enrouler autour de la base du socle.
natural_image
3D rendering of a white kettle with a curved handle and lid, showing internal components and a black arrow indicating downward motion (no text or symbols)-
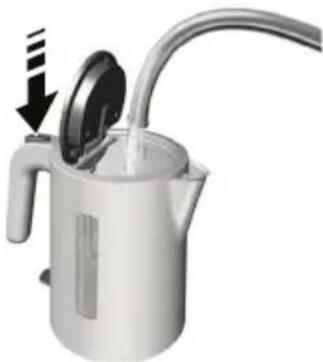
Die Taste zum Öffnen der Abdeckung drücken, Wasser in den Kocher füllen. Der Wasserstand soll an der Wasserstandanzeige sichtbar sein, die oberste Markierung jedoch nicht übersteigen.
-
Πιέστε το διακόπτη για να ανοίξετε το καπάκι και γεμίστε το βραστήρα με νερό. Βεβαιωθείτε ότι το επίπεδο του νερού είναι ορατό στην ένδειξη της στάθμης νερού, αλλά δεν υπερβαίνει την ένδειξη Μαχ.
-
Druk op de knop om het deksel te openenen giet water in de waterkoker. Zorg ervoor dat het waterpeil binnen de waterniveau-aanduidingen blijft, en niet boven de aanduiding Max. uitkomt.
-
Pour ouvrir le couvercle, appuyez sur le bouton, puis versez de l'eau dans la bouilloire. Assurez-vous que l'indicateur de niveau d'eau soit visible, afin de ne pas dépasser le repère Max.

natural_image
Illustration of a white kettle with handle and lid, showing internal components and a close-up inset of its lid (no text or symbols)-
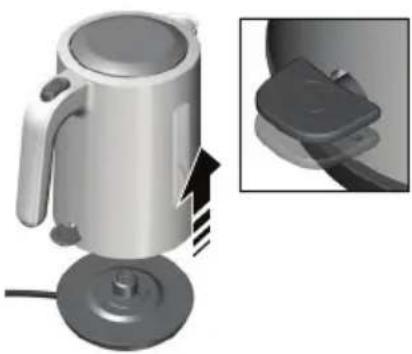
Die Abdeckung schließen und sicherstellen, dass sie einrastet. Andernfalls funktioniert die automatische Abschaltung nicht zuverlässig. Den Wasserkocher auf die Basis setzen. Den EIN/AUS-Schalter herunterdrücken; die Anzeige leuchtet auf und der Wasserkocher beginnt mit dem Erhitzen.
-
Κλείστε το καπάκι και βεβαιωθείτε ότι κλειδώνει κανονικά. Διαφορετικά, η λειτουργία αυτόματης απενεργοποίησης δεν θα λειτουργεί κανονικά. Τοποθετήστε το βραστήρα στη βάση. Πιέστε τον διακόπτη ΟΝ/ΟFF (ΕΝΕΡΓΟΠΟΙΗΣΗ/ΑΠΕΝΕΡΓΟΠΟΙΗΣΗ). Η ενδεικτική λυχνία θα ανάψει και ο βραστήρας θα αρχίσει να ζεσταίνεται.
-
Sluit de klep zodat deze goed vastklikt. Anders werkt de functie voor automatisch uitschakelen niet goed. Plaats de waterkoker op de voet. Druk de AAN/UIT-schakelaar naar beneden; het indicatielampje gaat branden en de waterkoker wordt opgewarmd.
-
Fermez le couvercle et assurez-vousqu'il soit fermé correctement. Si le couvercle est mal enclenché, l'arrêt automatique ne fonctionnera pas correctement. Placez la bouilloire sur son socle. Appuyez sur l'interrupteur marche/arrêt ; le voyant s'allume et la bouilloire commence à chauffer.
natural_image
3D rendering of a metallic kettle with base mount and side view showing internal components (no text or symbols)natural_image
Illustration of a kettle with a lid and paper, next to a black cross symbol (no text or labels)D
natural_image
White kettle with open lid and plug, showing internal components and a black arrow indicating motion (no text or symbols)-
Zum Reinigen des Filter den Siebeinsatz nach oben herausziehen. Reinigen der Heizplatte – Auf der Heizplatte können sich oberflächliche Flecken bilden. Mit einem Edelstahlputzmittel entfernen.
-
Για να καθαρίσετε το φίλτρο, πιάστε την υποδοχή του πλέγματος και σηκώστε τη. Καθαρισμός της βάσης – ενδέχεται να εμφανιστούν επιφανειακοί λεκέδες σκουριάς στη βάση. Αφαιρέστε τους με ένα καθαριστικό για ανοξείδωτο ατσάλι.
-
Voor het reinigen van het netfilter, pakt u de zeefinzet vast en tilt deze eruit. De warmhoudplaat schoonmaken. Er kunnen oppervlakkige vlekken of roest op de warmhoudplaat verschijnen. Verwijder deze met een schoonmaakproduct voor roestvrij staal.
-
Pour nettoyer le filtre, retirez-le en le tirant vers le haut. Nettoyage de la plaque chauffante: de la rouille superficielle peut se former sur la plaque chauffante. Éliminez-la à l'aide d'un nettoyant pour acier inoxydable.
natural_image
3D rendering of a modern electric kettle with a handle and spout, accompanied by a smaller bottle (no text or symbols visible)-
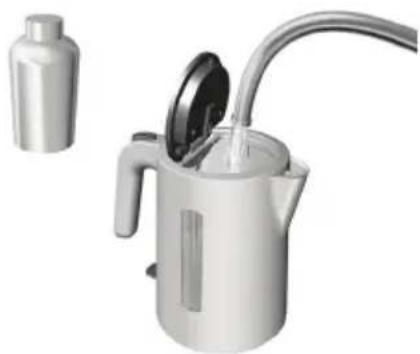
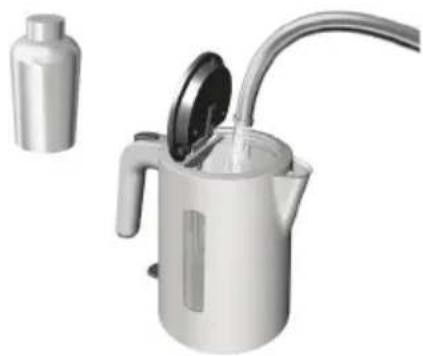
Je nach Wasserhärte sollte das Gerät regelmäßig entkalkt werden. Den Wasserkocher der Produktanleitung entsprechend mit Wasser und Entkalker füllen. Die Lösung nicht kochen lassen, da sie überschäumen könnte. Danach den Wasserkocher gründlich mit frischem Wasser ausspülen.
-
Η αφαλάτωση συνίσταται τακτικά, ανάλογα με τη σκληρότητα του νερού. Γεμίστε το βραστήρα με νερό και αποσκληρυντικό σύμφωνα με τις οδηγίες χρήσης του αποσκληρυντικού. Μη βράζετε το διάλυμα γιατί μπορεί να ξεχειλίσει. Στη συνέχειαξεπλύνετε καλά το βραστήρα με τρεχούμενο νερό.
-
Ontkalken doet u bij voorkeur regelmatig, afhankelijk van de hardheid van het water. Vul de waterkoker met water en ontkalker, volgens de gebruiksaanwijzing van het ontkalkingsproduct. Laat de oplossing niet koken, aangezien deze kan gaan schuimen. Naderhandspoelt u de waterkoker grondig na met schoon water.
-
Il est recommandé il est recommandé de procéder à un détartrage régulier en fonction de la dureté de l'eau. Remplissez la bouilloire d'eau et de détartrant en respectant les consignes d'utilisation du produit détartrant. Ne laissez pas bouillir la solution, car la mousse formée pourrait déborder. Puis,, rincez soigneusement l'intérieur de la bouilloire à l'eau claire.
GB
Components
A. Jug
B. Removable mesh filter
C. Spout
D. Lid
E. Opening lid button
F. Handle
G. Water level indicator
H. ON/OFF switch with indicator light
I. Separate base and mains cable
Read the following instruction carefully before using the appliance for the first time.
- This appliance is not intended for use by persons (including children) with reduced physical, sensory or mental capabilities, or lack of experience and knowledge, unless they have been given supervision or instruction concerning use of the appliance by a person responsible for their safety. Children should be supervised that they do not play with the appliance.
• Children shall not play with the appliance.
• Cleaning and user maintenance shall not be made by children unless they are older than 8 and supervised. - Keep the appliance and its cord out of reach of children less than 8 years.
- The appliance may only be connected to a power supply whose voltage and frequency comply with the specifications on the rating plate!
- Never use or pick up the appliance if – the supply cord is damaged, – the housing is damaged."
• The appliance must only be connected to an earthed socket. If
necessary an extension cable suitable for 10 A can be used.
- If the appliance or the supply cord is damaged, it must be replaced by the manufacturer, its service agent or similarly qualified person, in order to avoid hazard.
• Always place the appliance on a flat, level surface. - Never leave the appliance unattended while connected to the supply mains.
- The appliance must be switched off and the mains plug withdrawn each time after use, before cleaning and maintenance.
- The appliance and accessories become hot during operation. Use only designated handles and knobs. Allow to cool down before cleaning or storage.
- The mains cable must not come into contact with any hot parts of the appliance.
-
Do not immerse the appliance in water or any other liquid.
' Attention: If the kettle is overfilled there is a risk that the boiling water may spray out, which could scald or burn! Therefore never fill the kettle above the maximum marking. -
Never operate appliance with open lid.
- Do not use or place the appliance on a hot surface or near source of heat.
• Only use the kettle for heating water! - The kettle can only be used with the stand provided.
• Appliance is for indoor use only. - This appliance is intended for domestic use only. The manufacturer cannot accept any liability for possible damage caused by improper or incorrect use.
- This appliance is intended to be used in household and similar applications such as:
-staff kitchen areas in shops, offices and other working environments;
-farm houses;
-by clients in hotels, motels and other residential type environments;
-bed and breakfast type environments. - While water boiling, avoid contacting with steam from the spout when water is boiling or just after it has switched off. Do not be anxious to uncover the lid.
GB
natural_image
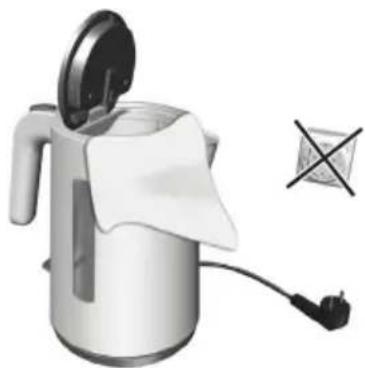
Illustration of a silver kettle with lid and paper towel, next to a black electrical plug (no text or symbols)- Before first use, wipe the inside and outside of the kettle with a damp cloth.
natural_image
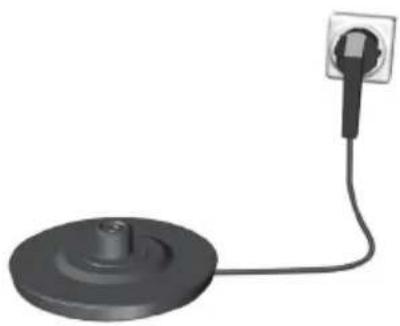
3D rendering of a black electrical plug connected to a circular base with a cable (no text or symbols visible)- Place the base unit on a firm and flat surface. Plug the mains plug into a wall socket. Redundant cord can be wound up at the bottom of base unit.

natural_image
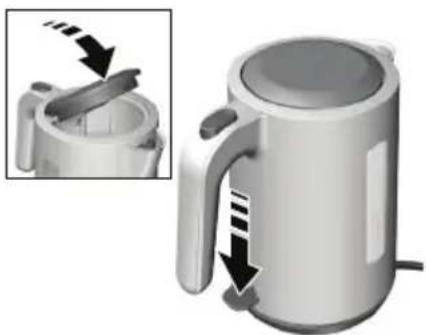
3D rendering of a white kettle with handle and spout, showing internal components and a black arrow indicating motion (no text or symbols)- Press the button to open the lid, pour water into the kettle. Make sure water level is visible in the water level indicator, but not exceeding the Max. mark.
natural_image
3D rendering of a white kettle with handle and lid, showing internal components and a close-up inset (no text or symbols)- Close the lid and make sure it snaps in correctly. Otherwise the auto switch off function will not work reliably. Place the kettle onto the base. Press down the ON/OFF switch; the indicator light will illuminate and the kettle will start to heat up.

natural_image
3D rendering of a metallic kettle with base mount and side view showing internal components (no text or symbols)- The automatic switch off function. When the water has boiled or the kettle is moved from the base, it will switch off automatically. If you wish to stop the heating process before the water is boiling, simply lift up the ON/OFF switch to the OFF position.
Cleaning
natural_image
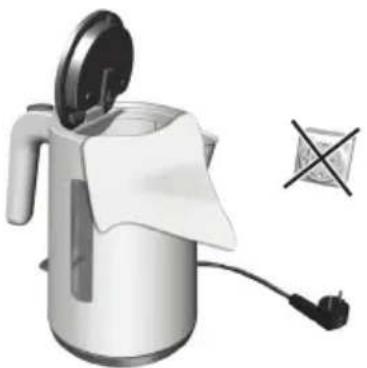
Illustration of a kettle with a lid and paper towel, next to a small cross symbol (no text or labels)- Before cleaning, always unplug the appliance. Never rinse or immerse the kettle or base unit in water. Just wipe with a damp cloth, using no abrasive detergents. Occasionally rinse out the kettle with clean water.
natural_image
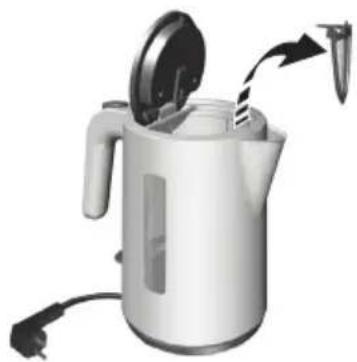
White kettle with lid and power cord, showing internal components and a triangular tip (no text or symbols visible)- To clean the mesh filter, grab the strainer insert and lift out. Cleaning the heating plate – superficial spots of rust may appear on the base unit. Remove with a stainless steel cleaning agent.
natural_image
3D rendering of a white kettle with a handle and spout, accompanied by a smaller bottle (no text or symbols visible)- Decalcifying is recommended regularly, depending on water hardness. Fill the kettle with water and decalcifier according to decalcifier product instructions. Do not boil the solution as it could foam over. Afterwards, rinse kettle thoroughly with fresh water.
Troubleshooting
| Problem Possible cause Solution | ||
| The appliance switches off before boiling. Too much lime scale at the base of the kettle. Run the decalcifying procedure. | ||
| The appliance does not switch off. Close lid until it locks. | ||
| Instert the strainer correctly. | ||
| The appliance cannot be switched on. After operating with little or no water, the appliance has not cooled down sufficiently. | Allow to cool a short time and try again. | |
Disposal
Packaging materials
The packaging materials are environmentally friendly and can be recycled. The plastic components are identified by markings, e.g. >PE<, >PS<, etc. Please dispose the packaging materials in the appropriate container at the community waste disposal facilities.
Old appliance

The symbol ■ on the product or on its packaging indicates that this product may not be treated as household waste. Instead it shall be handed over to the applicable collection point for the recycling of electrical and electronic equipment. By ensuring this product is disposed of correctly, you will help prevent potential negative consequences for the environment and human health,
which could otherwise be caused by inappropriate waste handling of this product. For more detailed information about recycling of this product, please contact your local city office, your household waste disposal service or the shop where you purchased the product.

Brand : AEG
Model : EWA3230
Category : Kettle