
HERO ( ANDROID 2.1 ) - Smartphone HTC - Free user manual and instructions
Find the device manual for free HERO ( ANDROID 2.1 ) HTC in PDF.

User questions about HERO ( ANDROID 2.1 ) HTC
0 question about this device. Answer the ones you know or ask your own.
Ask a new question about this device
Download the instructions for your Smartphone in PDF format for free! Find your manual HERO ( ANDROID 2.1 ) - HTC and take your electronic device back in hand. On this page are published all the documents necessary for the use of your device. HERO ( ANDROID 2.1 ) by HTC.
USER MANUAL HERO ( ANDROID 2.1 ) HTC
Congratulations on your purchase of the HTC Hero.
Your new phone is shipped with an upgraded Android platform. This New Features Guide will help you understand some of the updated features so you can maximize the use of your new phone. Let's get started.
Contents
- Phone Basics.. 3
- Using Phone Features 5
3.People. 6 - Using Mail. 8
- Connecting to a VPN 11
- Using Internet 12
- Using Bluetooth 13
- Camera and Multimedia 18
- Google Apps. 20
- Other Applications 22
- Using Calendar 22
- Using Clock 23
- Managing Your Phone 24
- Technical Updates 26
1. Phone Basics
View all the home screens
Bring up a snapshot of all the home screens and easily jump from one home screen to another.
- Do any of the following:
While on the main Home screen, press HOME.
While on any home screen, pinch the screen.
- A snapshot of all the home screens are displayed. Tap the home screen you want to go to.
Download and add a widget
- Press HOME, and then tap +
- Tap Widget > Get more HTC widgets.
- Tap a widget, and then tap Download. The widget downloads to your phone. When finished, "Installed" appears on the right of the widget name.
- Press BACK, and then tap the new widget to add it to the phone's home screen.
Connect your phone to a computer
Whenever you connect your phone to a computer using the USB cable, the Connect to PC dialog box displays and prompts you to choose the type of USB connection. Select one of the following choices, and then tap Done.
Charge only
Select this mode if you only want to charge the phone's battery using your computer.
- HTC Sync
When selected, the phone automatically uses HTC Sync when connected to your computer and lets you synchronize contacts and calendar events in Outlook and Windows Address Book (Outlook Express)
between your computer and your phone. For more information, see "Using HTC Sync" in the User Guide.
- Disk drive
This mode is available only when you have installed a microSD card on your phone. Select this mode when you want to use the storage card as a USB thumb drive, and copy files between your storage card and your computer faster. For more information, see "Copy files to and from the storage card".
NOTE When Disk drive mode is enabled while your phone is connected to the computer, you will not be able to open or save files on the storage card using your phone.
Internet sharing
When you do not have Internet access on your computer, you can select this mode to use your phone as a modem for your computer.
Copy files to and from the storage card
- Connect the phone to your computer using the supplied USB cable.
- When the Connect to PC screen appears, tap Disk drive, and then tap Done.
- On your computer, the connected phone is recognized as a removable disk. Navigate to this removable disk and open it.
- Transfer files between the computer and the removable disk.
-
After copying the files, unmount the removable disk (that is, the connected phone) as required by your computer's operating system to safely remove your phone.
-
Press and hold the status bar, and then slide your finger downward to open the Notifications panel.
- Tap Disk drive to open the Connect to PC screen.
- Select Charge only to turn the Disk drive mode off, and then tap Done.
- Disconnect the phone from the computer.
Search information anywhere
Press SEARCH to open the Quick Search Box and search information on your phone and on the web. The improved search function can now sift through your applications, email messages, calendar events, contacts, and more.
You can also control which items or applications to include in the Quick Search function.
- Press HOME > MENU.
- Tap Settings > Search > Searchable items.
- Select or clear the items you want to include to or exclude from the search function.
2. Using Phone Features
Take advantage of phone enhancements that make every communication smarter and discrete, whenever you wish.
Quiet ring on pickup
Your phone is automatically set to scale down the ring volume whenever you pick it up to answer calls. To use this feature, the phone must be on a flat surface when you receive an incoming call.
NOTE To disable Quiet ring on pickup, press HOME > MENU, and then tap Settings > Sound & display. Clear the Quiet ring on pickup option.
3. People
Managing your contacts is made more intuitive with the People application that puts important people at the center of your everyday communications.
Use Quick contact
Quick contact lets you quickly choose how to communicate with a contact. Tap the photo or icon of the contact in the contacts list to open Quick contact. Depending on the contact information stored, you can call, send a text message or email, chat, or locate the contact's address in Google Maps.

Merge contact information
Merge duplicated contacts on your phone to avoid clutter and confusion. If you have the same contact on your phone, Google, and Facebook accounts, the phone automatically merges contacts that it finds to have similar data.
You can also manually merge contacts.
- Press HOME, tap and then tap People.
- On the All tab, tap the name of the contact (not the contact photo or icon) you want to merge with another contact on your phone.
-
At the upper right corner of the screen, tap C→ or Link (if there are suggested links).
-
On the screen, you can:
If there are suggested links, tap to link the contact to the selected account.
- Tap one of the options available in the Add contact section.
- Tap Done.
Break the contact information link between contacts
- Press HOME, tap , and then tap People.
- On the All tab, tap the name of the contact (not the contact photo or icon) whose contact information link you want to break.
- On the upper right corner of the screen, tap
- On the Linked contacts section, tap beside the name of the contact to break the link.
- Tap Done.
Back up your contacts to the storage card
- Press HOME, tap , and then tap People.
- On the All tab, press MENU, and then tap Import/Export > Export to SD card.
- Select the contact account type to export. When asked to confirm, tap OK.
Import contacts from the storage card
You can only import contacts that were exported to the storage card using the Export to SD card feature on your phone. See "Back up your contacts to the storage card".
- Press HOME, tap , and then tap People.
-
On the All tab, press MENU, and then tap Import/Export > Import from SD card.
-
If you have added a Google or Exchange ActiveSync account set on your phone, tap the contact account type for the imported contacts.
NOTE If you have several vCard files on the storage card, you will be prompted to select an import option from the Select vCard file window. Tap an import option, and then tap OK.
The contact information is added to your contacts list.
4. Using Mail
View your email messages
Setting up a POP3/IMAP or Microsoft Exchange ActiveSync email account on your phone lets you sync conveniently with your web or work-based email account.
With new and intuitive tabs, you can now enjoy powerful email management right on your phone.
NOTE See the User Guide for information on setting up a POP3/IMAP or Microsoft Exchange ActiveSync email account on your phone and details about switching email accounts in Mail.
Conversations tab (
The Conversations tab lists all your email conversations. Each conversation is expandable so you'll see all email messages in a conversation. Tap a conversation to view all email messages within, and then tap an email to read it.
VIP group tab (
This tab contains all your received email messages from contacts that you have grouped as VIP. You can also use this tab to add contacts to your VIP group.
Unread tab (
The Unread tab displays all unread email messages so you can quickly check new email without scrolling through your long message list. Tap an unread email to open it. Read messages are removed from this tab.
Meeting invitations tab (15)
*For Microsoft Exchange ActiveSync email only. All received meeting invitations show on this tab. Tap a meeting invitation to view the meeting or event details and accept or decline the invitation. When you accept the invitation, the meeting or event is added to your calendar. After accepting or declining an invitation, the meeting invitation disappears from this tab.
Enable the Out of the office auto-reply
If you have added a Microsoft Exchange ActiveSync email account on your phone, you can enable the out of the office auto-reply and automatically send an auto-reply message when you're not available. You can retrieve and change your out of the office status and message.
- Press HOME, tap , and then tap Mail.
- Switch to the Microsoft Exchange ActiveSync email account.
- Press MENU, and then tap More > Out of the office. Your phone retrieves the out of the office setting from the Exchange server.
- Tap the field below "I am currently", and then select Out of the office.
-
Set the start and end date and time when you are not in the office.
-
Tap the reply box, and then enter your out of the office reply.
- Tap Save.
Set the email priority
You can now set the priority of all email messages that you compose and send via your Microsoft Exchange ActiveSync email account.
- Press HOME, tap and then tap Mail.
- Switch to the Microsoft Exchange ActiveSync email account.
3.Compose a new email message.See the User Guide for more information. - Before sending your email, press MENU, and then tap Set priority.
- Tap the priority you want to assign to the email. If you selected High or Low priority, the priority appears below the subject line of the email.
- Tap Send.
Send a meeting invitation
You can send meeting invitations to your contacts through your Microsoft Exchange ActiveSync email account.
- Press HOME, tap and then tap Mail.
- Switch to the Microsoft Exchange ActiveSync email account.
- Press MENU, and then tap More > New meeting invitation.
- Tap To, and then enter the email addresses of the contacts you want to invite. You can also tap to
search for and select contacts on your phone or on the Company directory.
- Enter the meeting details, and then tap Send.
5. Connecting to a VPN
On your phone, set up one or more virtual private network (VPN) connections so you can connect and access resources inside a secured local network, such as your corporate network, even while you're on the road.
Prepare your phone for VPN connection
Depending on the type of VPN you are using at work, you may be required to enter your login credentials and/or install security certificates before you can connect to your company's local network. You can get this information from your network administrator. If your network administrator instructs you to download and install security certificates, you must first set up the phone's secure credential storage.
- Press HOME > MENU, tap Settings > Security, and then tap Set password.
- Enter a new password (at least 8 characters without any spaces) for the credential storage, scroll down and confirm the password, and then tap OK.
- Select the Use secure credentials check box.
- Download and install the certificates needed to access your local network. Your network administrator can tell you how to do this.
Also, your phone must first establish a Wi-Fi or mobile data connection before you can initiate a VPN connection. For information about setting up and using these connections on your phone, see "Getting Connected" in the User Guide.
Add a VPN connection
- Press HOME > MENU, and then tap Settings > Wireless & networks > VPN settings.
- Tap Add VPN, and then tap the type of VPN you want to add. (Consult your network administrator at work to find out what type of VPN you need to set up.)
- Tap the VPN settings and set them up according to the security details that you have obtained from your network administrator.
- When finished, press MENU, and then tap Save.
Connect to a VPN
- Press HOME > MENU, and then tap Settings > Wireless & networks > VPN settings.
- In the VPNs section, tap the VPN you want to connect to.
- When prompted, enter your login credentials, and then tap Connect.
- If connection is successful, open Internet to access resources and Intranet sites on your work network.
6. Using Internet
Your new phone brings a more enjoyable web browsing experience through improved bookmarks display, list of frequently-visited sites, and your browsing history.
NOTE Internet is the new application name of Browser on your phone.
View your bookmarks
- Press HOME, tap and then tap Internet.
-
Press MENU, and then tap Bookmarks.
-
On the Bookmarks tab ( ), do any of the following:
-
To change how the bookmarks display on tab, press MENU, and then tap Thumbs nails, List, or Grid.
- To open a bookmark, navigate to the bookmark, and then tap it.
NOTE See the User Guide for details on how to add or delete bookmarks.
Go to a web site you frequently visit
- Press HOME, tap and then tap Internet.
- Press MENU, and then tap Bookmarks.
- On the Most visited tab ( ), navigate to the page that you want to view, and then tap it.
Know which web sites you have visited
- Press HOME, tap and then tap Internet.
- Press MENU, and then tap Bookmarks.
- On the History tab ( ), navigate to the page that you want to view, and then tap it.
7. Using Bluetooth
You can now use Bluetooth on your phone to exchange information with another device and securely send and receive photos, videos, music, audio files, calendar events, and contact information.
Check the status of your Bluetooth file transfers by opening the Notifications panel.
Before you exchange files via Bluetooth
-
Turn on Bluetooth on your phone, and then pair and connect it to another Bluetooth-enabled device. See the User Guide for details.
-
Install a microSD card on your phone. See the User Guide for details. All files you accept via Bluetooth are stored on the microSD card's root directory.
Send a photo or video you just captured
- Capture a photo or record a video. See Camera and Multimedia for details.
- On the Review screen that appears after you take the shot or record a video, tap and then tap Bluetooth.
- Tap Scan for devices.
- In Bluetooth devices, tap the device you want to send the photo or video to.
NOTE If prompted, enter the same passcode on both your phone and the receiving device, or confirm the auto-generated passcode.
Send a stored photo or video
- Press HOME, tap , and then tap Photos.
- On the Albums tab, tap an album to view the photos or videos inside the album.
- Tap and then tap Bluetooth.
- Tap the photo or video you want to send, and then tap Next. You can send more than one file.
- Tap Scan for devices.
- In Bluetooth devices, tap the device you want to send the photo or video to.
NOTE If prompted, enter the same passcode on both your phone and the receiving device, or confirm the auto-generated passcode.
Send a music file
- Press HOME, tap , and then tap Music.
- Slide your finger left or right across the center of the screen to bring up the music that you want to send.
- Press MENU, and then tap Share > Bluetooth.
- Tap Scan for devices.
- In Bluetooth devices, tap the device you want to send the music to.
NOTE If prompted, enter the same passcode on both your phone and the receiving device, or confirm the auto-generated passcode.
Send an event or appointment
- Press HOME, tap , and then tap Calendar.
- Add a new event or appointment to your phone. See the User Guide for details.
- In the Calendar's Day, Agenda, or Week view, press and hold the event or appointment, and then tap Share vCalendar > Bluetooth.
- Tap Scan for devices.
- In Bluetooth devices, tap the device you want to send the event or appointment to.
NOTE If prompted, enter the same passcode on both your phone and the receiving device, or confirm the auto-generated passcode.
Send a contact information
- Press HOME, tap , and then tap People.
-
On the All tab, press and hold the name of the contact (not the photo or icon) you want to send, and then tap Send contact as vCard.
-
Tap the arrow down button in the Send contact as vCard section, and then tap Bluetooth.
- Select the contact information you want to send, and then tap Send.
- Tap Scan for devices.
- In Bluetooth devices, tap the device you want to send the contact information to.
NOTE If prompted, enter the same passcode on both your phone and the receiving device, or confirm the auto-generated passcode.
Receive and open a multimedia file
When your phone's Bluetooth is set to Discoverable and somebody sends you a photo, video, or music file via Bluetooth, the Bluetooth share icon ( ) appears in the status bar. You may need to authorize the file transfer first.
- Press and hold the status bar, and then slide your finger downward to open the Notifications panel.
- Tap Bluetooth share.
- When prompted to accept the file transfer, tap Accept. When receiving is completed, the Download complete icon ( ) appears in the status bar.
- Open the Notifications panel, and then tap Bluetooth share. The associated application opens the file.
Receive and import a vCard or vCalendar
The Bluetooth share icon ( ) appears in the status bar when somebody sends you a vCard (contact information) or vCalendar (event information) via Bluetooth. You may need to authorize the file transfer first.
- Press and hold the status bar, and then slide your finger downward to open the Notifications panel.
- Tap Bluetooth share.
- When prompted to accept the file transfer, tap Accept. When receiving is completed, the Download complete icon ( l ) appears in the status bar.
- Open the Notifications panel, and then tap Bluetooth share.
-
Do any of the following:
-
For a vCard file, select an import option from the Select the vCard file window, and then tap OK. The contact information is added to your contacts list in People.
- For a vCalendar file, select the calendar where you want to save the event or appointment, and then tap Import. The event is added to your Calendar.
8. Camera and Multimedia
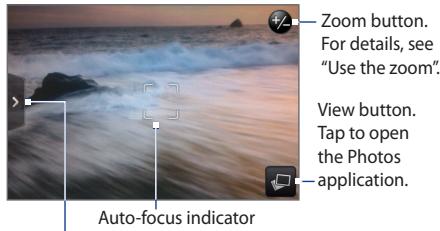
Snapping photos and recording video clips are made more fun with a refreshed viewfinder that delivers all you need to get a clearer and sharper shots.
Get to know the viewfinder
Press HOME, tap and then tap Camera or Camcorder to find out what's new in the camera viewfinder.
Menu tab.
Tap to open the menu panel.
See "Change the camera settings".
Use the zoom
- On the Camera or Camcorder viewfinder, tap to display the onscreen zoom bar.

-
Do any of the following:
-
To slowly zoom in or out, slide your finger up or down on the viewfinder or on the zoom bar.
-
To zoom in to the maximum magnification, tap To zoom to the actual size, tap
-
Press the TRACKBALL to take the photo or start recording video.
Switch capture modes
You can quickly switch to photo or video capture mode whether you are in Camera or Camcorder application.
- On the Camera or Camcorder viewfinder, tap to show the menu panel.
- Tap and then select Photo or Video.
- Press the TRACKBALL to take a photo or start recording video.
Change the camera settings
The menu panel lets you access and change your basic and advanced camera settings.
- On the Camera or Camcorder viewfinder, tap to open the menu panel.
- Tap any of these icons to change the relevant setting:
| Mode | See "Switch capture modes". |
| Exposure | Display the brightness bar and adjust the brightness level. Slide your finger up or down the slider bars to adjust brightness. |
| Image properties | Slide your finger up or down the slider bars to adjust the contrast, saturation, and sharpness. |
| Effect | Tap to apply a special effect to your photos and videos. You can choose from effects such as sepia, solarize, posterize, and more. |
| Settings | Adjust the advanced camera settings. |
9. Google Apps
Using Layers in Google Maps
Layers lets you overlay location-specific information on Google Maps. You can add multiple layers at a time to create a customized map containing the specific information you want to view.
- Press HOME, tap and then tap Maps.
- Press MENU, and then tap Layers.
- Tap the layer you want from the list, or tap More Layers to display more options.
You can choose from the following layers:
| Traffic | Available in selected cities, this layer displays real-time traffic conditions over roads as color-coded lines. Each color represents how fast the traffic is moving. |
| Satellite | Shows the satellite image of the current map on display. Google Maps uses the same satellite data as Google Earth™. |
| Latitude | Shows your friends' locations on the map and lets you share your location with them. To see a list of your friends using Latitude, press MENU, and then tap Latitude. To invite friends to share location information, press MENU, and then tap Add friends. To view a specific friend's location on the map, tap your friend in the list, and then tap Show on map. |
| My Maps | Shows your custom My Maps created using Google Maps on your computer. To learn more about My Maps, go to: http://maps.google.com, and then click Help > My Maps. |
| Wikipedia | Shows locations on the map that have associated Wikipedia articles. Tap the Wikipedia icon marking a location, and then tap More info to view an excerpt of its Wikipedia article. |
| Transit Lines | Shows public transportation lines for selected cities. |
| Favorite Places | Shows favorite places of local travel experts from cities around the world. Tap a favorite place on the list to view a description of the location written by the local expert. Tap Details to view more information about the location. |
Find and install applications from Android Market
Your phone comes with an updated Android Market that provides direct access to useful applications and fun games which you can download and install on your phone.
To learn how to use Android Market, you can:
- Press HOME, tap , and then tap Market.
- When prompted, accept the Android Market's Terms of Service.
- Press MENU, and then tap Help.
10. Other Applications
We have added several useful applications on your phone. Tap on the Home screen to find these applications.
| Desk | Shows the time, date and alarm (if any) in Night |
| Clock | Clock or Screensaver mode. |
| Search | Quickly search for contacts on your phone. |
| People |
Use the scientific calculator
- Press HOME, tap , and then tap Calculator.
- Hold the phone sideways to switch to the scientific calculator.
11. Using Calendar
Calendar features several improvements that will help you manage your events and appointments more easily.
View events and appointments for the week
- Press HOME, tap and then tap Calendar.
- Press MENU, and then tap Week. Days are displayed in columns and event or appointment times are indicated by vertical bars that run along the timeline on the left side of the screen.
Invite contacts to your meeting or event
If you have added a Microsoft Exchange ActiveSync email account on your phone, you can now send meeting or event invitations from Calendar.
- Press HOME, tap , and then tap Calendar.
- Press MENU, and then tap New event.
- Select the calendar you want to use, and then enter the meeting or event details. See the User Guide for details.
- Press MENU, and then tap Meeting Invitation.
- Tap To, and then enter the email addresses of the contacts you want to send the meeting or event invitation to. You can also tap to search for and select contacts on your phone or on the Company directory.
- Tap Send.
12. Using Clock
The Clock application now comes with a Desk Clock and enhanced alarm management features.
Use the Desk Clock
Opening the Clock application brings you directly to the Desk Clock tab. The Desk Clock tab displays the current date, time, and weather, an alarm clock indicator, and a battery charging indicator.
The Desk Clock can also turn into a night clock or a clock screenshotaver.
- Tap the clock on the Home screen.
-
Do any of the following:
-
Tap to set the Desk Clock to Night Clock mode and leave the clock display on during bedtime.
-
Tap to set the Desk Clock to Screensaver mode and dim the screen while you're not using your phone. You will still be able to see the time and date on the screen.
-
To display the Desk Clock back to normal mode, tap the screen or press BACK.
When the Desk Clock is displayed in Normal mode, tap the weather information to open the Weather application.
Adjust the alarm settings
Aside from giving you the freedom to set as many alarms as you want, your phone comes with customizable alarm settings that you can change to suit your needs.
- Tap the clock on the Home screen, and then slide your finger to the Alarms tab.
- Set an alarm following the instructions in the User Guide.
- Press MENU, and then tap Settings.
- Adjust the alarm settings to your needs, and then press BACK.
13. Managing Your Phone
Manage data synchronization
Your phone can sync information and receive updates from your Google and Exchange ActiveSync email accounts as well as popular online services such as Facebook, Twitter, and Flickr.
These are some of the types of information you can sync:
- Email from your Google and Exchange ActiveSync accounts.
-
Contact details from your Google and Exchange ActiveSync accounts, as well as your Facebook friends' contact information.
-
Calendar events from your primary Google account and from Exchange ActiveSync.
- Status updates and links shared by your friends and yourself on Facebook, and Twitter, as well as Facebook photo uploads.
- Flickr and Facebook photo uploads.
To adjust the sync settings of email accounts and online services or to add an online service account, press HOME > MENU, and then tap Settings > Accounts & sync.
Perform a hard (factory) reset
You can return your phone to its original state, as it was when it left the factory. This is also called a hard reset. You might want to do this if you are giving your phone to a friend or relative and you want to remove all your data first, or if your phone has a persistent problem that is not solved by turning the phone on or off.
A factory reset is a drastic measure. It permanently erases all your personal data and customized settings, and also removes any programs you have installed.
Make sure that you have backed up the information and files you want to keep. The most convenient way to do a factory reset is via Settings.
- Press HOME > MENU, and then tap Settings > Privacy.
- Tap Factory data reset.
- On the Factory data reset screen, tap Reset phone, and then tap Erase everything.
To reset the phone using the buttons
- With the phone turned off, press and hold the HOME and BACK buttons, and then briefly press the END CALL/POWER button. The reset process will start after a few seconds.
- Wait for the phone to finish the reset process and then press MENU.
TIP If your phone hangs or freezes, remove the battery then wait for a few seconds, and then re-install it. After re-installing the battery, turn on the phone.
14. Technical Updates
- Your phone is shipped with the Android 2.1 platform.
- The Albums application was renamed to Photos. The first tab of the Photos application — Albums — shows all the phone's photo and video albums.
- The Browser application was renamed to Internet.
www.htc.com