
ZOB 8900 X - Cooker ZANUSSI - Free user manual and instructions
Find the device manual for free ZOB 8900 X ZANUSSI in PDF.


| Product type | Electric cooker with oven and hob |
| Brand | Zanussi |
| Model | ZOB 8900 X |
| Width | 60 cm |
| Height | 85 cm |
| Depth | 60 cm |
| Weight | 55 kg |
| Power supply | 230 V / 50 Hz |
| Total power | 11 kW |
| Hob type | Ceramic hob with 4 burners |
| Number of burners | 4 |
| Oven type | Electric with fan |
| Oven capacity | 65 L |
| Oven functions | Conventional cooking, fan cooking, grill, defrost |
| Oven cleaning | Catalytic |
| Timer | Electronic programmer with end of cooking |
| Child safety | Child safety by control lock |
| Automatic shut-off | Yes, in case of overheating |
| Energy class | A |
| Repairability index | 7.5 / 10 |
| Spare parts available | Yes, via the Zanussi approved network |
| Maintenance and cleaning | Clean the ceramic hob with a suitable product; clean the oven with a damp cloth |
| Included accessories | Grill, drip tray, rotisserie (depending on model) |
Frequently Asked Questions - ZOB 8900 X ZANUSSI
User questions about ZOB 8900 X ZANUSSI
0 question about this device. Answer the ones you know or ask your own.
Ask a new question about this device
Download the instructions for your Cooker in PDF format for free! Find your manual ZOB 8900 X - ZANUSSI and take your electronic device back in hand. On this page are published all the documents necessary for the use of your device. ZOB 8900 X by ZANUSSI.
USER MANUAL ZOB 8900 X ZANUSSI
Your oven will give you years of satisfactory service and pleasure when properly cared for and used. Producing an efficient oven that conserves energy requires a considerable investment of time, effort, and money. Your oven is engineered to surpass all performance and safety requirements. However, safety is also YOUR responsibility through proper use and care. With this in mind, it is important that you read this booklet. Acquaint yourself with the features and follow the use and care suggestions carefully for complete satisfaction.
Be sure you know the correct model and serial number of your oven. The data plate is inside the oven door.
RECORD HERE FOR EASY REFERENCE
Model Colour
Serial Number Installation Date....
Dealer's Name and Address
CAUTION
The appliance may become very hot during use. Please avoid touching the heating elements inside the oven. The oven surfaces may get very hot when the grill is in use.
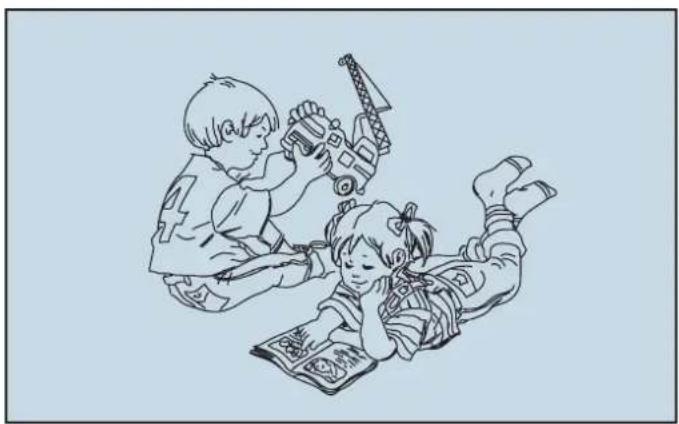
Keep children well away
INDEX
| TECHNICAL FEATURES | page 3 |
| User's instructions | page 3 |
| Controls panel and functions | page 3 |
| Traditional baking | page 4 |
| Forced convection baking | page 4 |
| Using the grill | page 4 |
| Using the led programmer / rotisserie | page 4 - 5 |
| Cleaning and maintenance | page 6 |
| Servicing Informations | page 6 |
| Instructions to the installer | page 6 |
| Electrical connection | page 6 |
| Preparation on the cabinet | page 36 |
IMPORTANT:
The rating data plate is attached to the front of the oven.
| Technical features: | |||
| Dimensions: Height cm 47,4 (appliance) Width cm 89,4 Depth cm 54,5 | |||
| Oven room: Height cm 31,5 Width cm 55,5 Depth cm 38 Volume dm | |||
| 3 | 66 | ||
| Power: Fan oven (rear element) | W | 2500 | |
| Grill | 2800 | ||
| Upper elements | 1200 | ||
| Lower elements | 1400 | ||
| Static oven (upper and lower elements) | 2600 | ||
| Cooking fan motor | 47 | ||
| Cooling fan motor | 22 | ||
| Lamp (miniature Ediso screw high temeprature 300 °C) | 2x) 15/25 | ||
| Total absorbed power | W | 2900 | |
| Voltage (50 Hz single phase) | V | 230 | |
| Section cable alimentation | mm2 | 3x1,5 | |
This product meets the requirements of E.E.C. rules:
- 73/23 E.E.C. "regarding Low Tension"
- 89/336 E.E.C. "regarding electromagnetic disturbances"
- 89/109 E.E.C. "regarding materials in contact with food"
User's instructions
INSTALLATIONS
We recommend that installation, connection and preparation of the cabinet are carried out by a qualified technician accordingly with the instructions of this booklet and with the installation requirements or regulations in force in the user's Country.
Controls panel
- Thermostat knob
- Thermostat indicator lamp
- Functions selector knob
- Power on indicator lamp
- Led programmer

How to use your oven
- Several parts are protected with a special anti-scratch film. REMOVE IT BEFORE USE. Before cooking for the first time, we recommend that the oven should be operated at 200°C for 30 minutes to remove any manufacturing greases and odours. – This oven is for domestic use only.
- Do not place items or pans directly on the oven bottom.
- Foil should only be used to cover food and not oven shelves or part of the oven. When used improperly, it will obstruct the air circulation causing problems in cooking and/or harmful accidents.
- This oven is always used with CLOSED DOOR for all the cooking functions (Grill included).
Electric oven
Function selector knob (fig. 1)
With this knob you can select different heating functions according to your cooking needs.
Please refer to the following symbols for the oven functions:

Oven off.

Oven lamp on.

Upper (outer ring only) and lower heating elements and lamp on.

Upper (outer ring only) heating element and lamp on.

Lower heating element and lamp on.

Grill, turnspit and lamp on.

Grill, cooking fan, turnspit and lamp on.

Upper (outer ring only) and lower heating elements, cooking fan and lamp on.

Rear heating element, fan and lamp on.

Fan and lamp on (defrost).

Traditional baking.
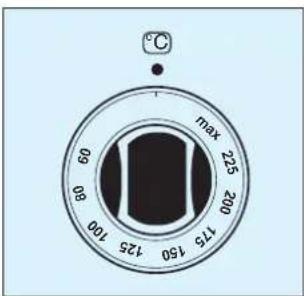
Turn the functions knob to the symbol □ and then turn the thermostat knob (fig. 2) to the required temperature. Preheating of the oven is recommended until the thermostat indicator light switches off, to show the selected temperature has been reached in the center of the oven. This function is recommended for the foods needing highest cooking temperatures or in earthenware pots. When you want to cook your food heating it from bottom turn the function knob to the symbol □ and to the symbol □ when you want to heat the food from the top. With this cooking one tray only, centrally placed, has to be used.
Wishing a more uniform warming of the oven turn the function knob to the symbol ⚠ favourable also when using more than one tray.
Forced convection baking
Turn the function knob (fig. 1) to the symbol 📁, then turn the thermostat knob (fig. 2) to required temperature. With this function more than on tray may be used at the same time because hot air is forced by the fan around the food and between the trays and also the temperature to be selected for cooking is 10-15% lower than the corresponding value for traditional baking and the action of the hot air will do more uniformly dried and crust your food. When using one tray only the lower runner is suggested to be used in order to have easier check by the oven window without opening the door. Preheating time will be very short (15 minutes are sufficient also for very sensitive items such as soufflés or whisked sponges) and the more commun foods may be cooked from a "cold start".
Cooking time
This MULTIFUNCTION oven is engineered to offer you the best cooking way for the most common international foods. Cooking results are a matter of personal preference and may easily be adjusted to follow individual requirements by slight changes to the temperature or/and cooking time.
Using the grill
Turn the function knob (fig. 1) to the symbol ☐ when you wish to grill without fan and to the symbol ☒ for fan assisted grilling. FOR GRILLING TURN THE THERMOSTAT KNOB (fig. 2) TO THE MAX. When switching on the grill the turnspit motor also will start at the same time. The fan assisted grill functions, corresponding to the symbol ☒ is suitable for wet or thick food because the action of the hot air will more uniformly cook, and the heat will enter into the food more gradually by reducing the radiation of the grill. When use this function turn they knob on 200° thermostat.
Warning
Always set the grill grid in the highest possible rack (but not too close to the heating element: fatty foods get smoke and may start a fire) place a pan in the lowest possible rack for collecting juice. If a grease fire should occur in a pan put out the flame placing a lid on the pan: NEVER THROW WATER ON A GREASE FIRE.
Using the rotisserie (see fig.)
Insert the supports "A" of the spit into the proper holes "B" at the corners of the pan, taking care that the support with the rod "C" must be placed on the left side of the pan. Run the meat through (balancing it properly to avoid unnecessary strain on the motor) and grip it securely with the forks. Insert the spit into the hole "E" on the left support; slide the pan on the first runner from the bottom. Check always that the spit end is properly inserted in the hole "E" and the rod "C" also is properly inserted in the driving tip of the motor "F". We suggest for a better connection to turn the rod "C" a little bit when inserting into the hole "F". Switch on the turnspit by turning the selector knob to the symbol ☐. For rotisserie, turn the thermostat knob (fig. 2) to 200°C.
Defrost
Turn the function knob (fig. 1) to the symbol ✦ and the thermostat knob (fig. 2) to the OFF position. Air at room temperature is forced by the fan around the food for fast defrosting.
Remember to place the food on a tray to collect the liquid from defrosting and to remove the packaging from defrosted foods before cooking.
Thermostat indicator lamp
This light is on when you turn the thermostat knob and switches off when the oven reaches the selected temperature. It will cycle on and off during cooking in line with the oven temperature.
Oven lamp
This light is always on with every selected function by the function knob (fig. 1). When needing the inside lit up without any heating element switched on, turn the selector knob to the symbol 🌐.

"LED" PROGRAMMER (Fig. 5A)
Features
24-hour clock with automatic programme and minutes counter.
Functions
Cooking time, cooking end time, clock, minutes counter, times to be set up to 23 hours 59 minutes. Manual selection.
Display
4-figure, 7-segment display for cooking times and time of day. Display for identification of timer conditions:
Automatic setting = A
Time and manual use = saucepan symbol Minutes counter = bell symbol
Fig. 5A
1 Minute timer 2 Cooking time 3 Cooking end 4 Subtract time 5 Add time
Setting
After pressing a function button, the required time can be set with the +/- buttons.
The counting-up and counting-down speed increases when the buttons are held down.
If a function button is briefly touched and released, the selected function is displayed for 5 seconds. Within this time, setting may be commenced.
Five seconds after releasing the function button or after setting is completed, the display reverts to the time of day.
When a programme has been set, it starts immediately. Selection of a function is accompanied by a sound signal.
Setting the time
Press the cooking time and the end time simultaneously, and set the time with the +/- buttons.
This deletes any previously set programme.
Manual use
By pressing buttons 2 and 3 simultaneously (the automatic symbol will be erased), the saucepan symbol lights up.
This deletes any previously set programme.
Semi-automatic use with cooking time setting
Press the cooking time button and set the desired time with +/-
The saucepan and A symbol appear.
The relay switches on immediately.
When the cooking end time corresponds to the time of day, the relay and the saucepan symbol switch off.
The sound signal rings and the A symbol flashes.
Semi-manual use with end time setting
Press the end time button and set the desired time with +/-
The saucepan and A symbol light up.
The relay switches on.
When the cooking end time corresponds to the time of day, the relay and the saucepan symbol switch off.
The sound signal rings and the A flashes.
Fully automatic use
Press the cooking time button and select the length of the cooking time with +/-.
The A symbol appears.
The relay switches on and the saucepan symbol appears.
By setting the cooking end function, the next cooking end time appears.
Set the cooking end time with +/-
The saucepan symbol appears again when the time of day corresponds to the cooking start time.
When the automatic programme is over, the A symbol flashes.
The sound signal rings, the saucepan symbol and the relay switch off.
Minutes counter
Press the minutes counter button and set the cooking time with +/- button.
The bell symbol lights up when the minutes counter is operating.
When the set time is up, the sound signal rings.
Sound signal
The sound signal (0.5 Hz) rings at the end of a programme or of the minutes counter function and it lasts for 7 minutes.
To stop it, push the button 1.
Start programme and check
The programme starts after the required time has been set.
The programme can be checked at any time by pressing the corresponding button.
Setting error
A setting error is made if the time of day on the clock falls within the cooking start and end times.
When an error occurs, the sound signal rings and the A symbol flashes.
To correct the setting error, change the cooking time and cooking end time.
Cancelling a setting
To cancel a setting, press the manual function.
A set programme will automatically cancel on completion.
Cleaning and maintenance
Cleaning should be carried out when the appliance is COOL AND SWITCHED OFF AT THE MAINS SUPPLY. Always clean off spillage as quickly as possible to prevent burning on which will make removal more difficult. Wash with a clean cloth soaked in hot soapy water, rinse and dry with a soft cloth. Do not use abrasives, caustic pastes or sprays, coarse cleaning pads or powders. Do not use excessive water when cleaning your oven in order to avoid water passing through clefts into the back of controls panel or of the unit.
Do not use steam cleaners to clean the oven.
The oven accessories (shelves, grids, oven shelf carriers) and the oven door can also be removed for easier washing, to be done with a mild detergent solution. The slots in the front of the appliance for the passage of the air must be carefully kept unobstructed for an efficient cooling of the unit.
Oven door removal and refitting
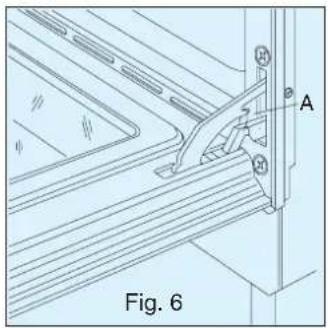
Open fully the oven door and hook the ring A to the upper bar of the door hinge as shown in fig. 6. Once the hinge is locked, grip both sides of the door, near the hinges, then lift and remove as in fig. 7. After cleaning, refit the oven door inversely, proceeding in a similar way. Make sure the lower bars of the hinges are correctly placed in the proper slots and the rings A are released from the upper bars before closing the door.
Oven bulb replacement
Switch off your oven and isolate the power. When the oven is cool, reach the light glass cover and unscrew it as shown in fig. 8. Replace the bulb with a new one with the same specifications and screw the cover back until it is hand tight. Bulb replacement is not covered by your Guarantee.


Servicing information
Before calling the service, be sure you know how to operate your oven: it may help you in explaining the malfunction to the serviceman and check that there is not a power cut (with the fuse still working). When you call for service or order parts, do not forget to give:
- model of your oven
- serial number – colour (when in enamelled version)
- part name or/and description of the problem
- your full name, address, home phone number, (or/and business phone number if appropriate).
Instructions to the installer
The appliance must be installed by a qualified technician accordingly with the instructions of this booklet and with the installation requirements and regulations in force in the user's Country.
The oven must be installed in a housing which has been built to withstand a temperature of 120°C in accordance with EEC REGS.
The manufacturer declines any responsibility for faults arising from incorrect installation or/and connection or/and inadequate ventilation.
Electrical connection
The installer will be responsible for complying with the safety regulations of the user's Country.
Warning:
This appliance MUST be earthed.
The connection must be made directly to the mains supply by installing a double pole switch between the supply mains and the appliance.
The power supply must be fitted with a disconnect switch in which the distance between contacts permits total disconnection in accordance with overvoltage category III, as required by installation regulations.
This appliance must not be connected integrally with any appliance on the same sub-circuit.
Be sure that:
- the earth wire is not interrupted by the switch.
- easy access to the switch is ensured once the appliance is installed.
- the supply cable does not come in contact with any component the temperature of which exceeds 50°C and has sufficient length to allow any subsequent removal of the unit.
- once connected, the appliance is working correctly.
Important
The housing should not be free standing, but secured to the wall or/and adjacent fittings and housing. Do not lift it by the door handle. Do not force the oven into the housing using the open door as a lever and never exercise excessive pressure on the open door. The oven should be secured to the housing by 4 fitting screws in holes of the frame as shown in fig. 10.

Preparation on the cabinet
No specific openings are necessary for ventilation in the cabinet because this appliance is equipped with a cooling fan drawing air across the slots in the top and bottom of the unit.
It is enough to respect the dimensions of the housing as in fig. 11 and 12.
Building-in

Building under
ENVIRONMENTAL NOTES
Disposal of packaging materials

Do not dispose of packaging materials with normal household waste. These materials are recyclable and should be sorted (e.g. cardboard, plastic sheeting, polystyrene) and disposed of in accordance with local regulations.
The only proper use of this appliance is that for which it was expressly designed, as a “cooking appliance”.
This appliance is marked according to the European directive 2002/96/EC on Waste Electrical and Electronic Equipment (WEEE).
By ensuring this product is disposed of correctly, you will help prevent potential negative consequences for the environment and human health, which could otherwise be caused by inappropriate waste handling of this product.
The symbol on the product, or on the documents accompanying the product, indicates that this appliance may not be treated as household waste. Instead it shall be handed over to the applicable collection point for the recycling of electrical and electronic equipment.
Disposal must be carried out in accordance with local environmental regulations for waste disposal.
For more detailed information about treatment, recovery and recycling of this product, please contact your local city office, your household waste disposal service or the shop where you purchased the product.
Important!
CONTENTS

Conventional cooking
INDEX
Technical characteristics

CLEANING THE OVEN DOOR
REPLACING THE OVEN LAMP
Voltage: 230 V (50 Hz)
CONTENTS

Operation
Traditional cooking

"LED" TIMER
Features
- RECORD HERE FOR EASY REFERENCE
- CAUTION
- IMPORTANT
- USER'S INSTRUCTIONS
- INSTALLATIONS
- CONTROLS PANEL
- HOW TO USE YOUR OVEN
- ELECTRIC OVEN
- FUNCTION SELECTOR KNOB (FIG. 1)
- TRADITIONAL BAKING
- FORCED CONVECTION BAKING
- COOKING TIME
- USING THE GRILL
- WARNING
- USING THE ROTISSERIE (SEE FIG.)
- DEFROST
- THERMOSTAT INDICATOR LAMP
- OVEN LAMP
- LED" PROGRAMMER (FIG. 5A)
- FEATURES
- FUNCTIONS
- DISPLAY
- SETTING
- SETTING THE TIME
- MANUAL USE
- SEMI-AUTOMATIC USE WITH COOKING TIME SETTING
- SEMI-MANUAL USE WITH END TIME SETTING
- FULLY AUTOMATIC USE
- MINUTES COUNTER
- SOUND SIGNAL
- START PROGRAMME AND CHECK
- SETTING ERROR
- CANCELLING A SETTING
- CLEANING AND MAINTENANCE
- OVEN DOOR REMOVAL AND REFITTING
- OVEN BULB REPLACEMENT
- SERVICING INFORMATION
- INSTRUCTIONS TO THE INSTALLER
- ELECTRICAL CONNECTION
- PREPARATION ON THE CABINET
- ENVIRONMENTAL NOTES
- DISPOSAL OF PACKAGING MATERIALS
- CONTENTS
- CONVENTIONAL COOKING
- CLEANING THE OVEN DOOR
- REPLACING THE OVEN LAMP
- OPERATION
- TRADITIONAL COOKING
- LED" TIMER
Brand : ZANUSSI
Model : ZOB 8900 X
Category : Cooker