
HD6123 - Deep fryer PHILIPS - Free user manual and instructions
Find the device manual for free HD6123 PHILIPS in PDF.


| Product Type | Deep Fryer |
| Brand | Philips |
| Model | HD6123 |
| Dimensions (W x D x H) | 250 x 300 x 300 mm |
| Weight | 2.8 kg |
| Power Consumption | 1800 W |
| Voltage / Frequency | 220-240 V / 50-60 Hz |
| Oil Capacity | 1.5 L |
| Basket Capacity | 2.5 L |
| Temperature Control | Adjustable thermostat (150-190°C) |
| Heating Indicator | Power-on and ready lights |
| Safety Features | Cool-touch handles, safety switch, reset button |
| Filter Type | Removable oil filter |
| Housing Material | Stainless steel with plastic exterior |
| Basket Material | Metal with non-stick coating |
| Dishwasher Safe Parts | Removable oil container and basket |
| Cleaning Method | Wipe with damp cloth, wash removable parts in warm soapy water |
| Spare Parts Available | Replacement basket, oil filter, heating element |
| Warranty | 2 years |
Frequently Asked Questions - HD6123 PHILIPS
User questions about HD6123 PHILIPS
0 question about this device. Answer the ones you know or ask your own.
Ask a new question about this device
Download the instructions for your Deep fryer in PDF format for free! Find your manual HD6123 - PHILIPS and take your electronic device back in hand. On this page are published all the documents necessary for the use of your device. HD6123 by PHILIPS.
USER MANUAL HD6123 PHILIPS
ENGLISH 6
POLSKI 15
ROMÂNĂ 25
РУССКИЙ 33
ČESKY 45
MAGYAR 54
SLOVENSKY 64
УКРАЇНСЬКІЙ 74
HRVATSKI 84
EESTI 92
LATVISKI 100
LIETUVIŠKAI 109
SLOVENŠČINA 118
БЪЛГАРСКИ 126
SRPSKI 137
Introduction
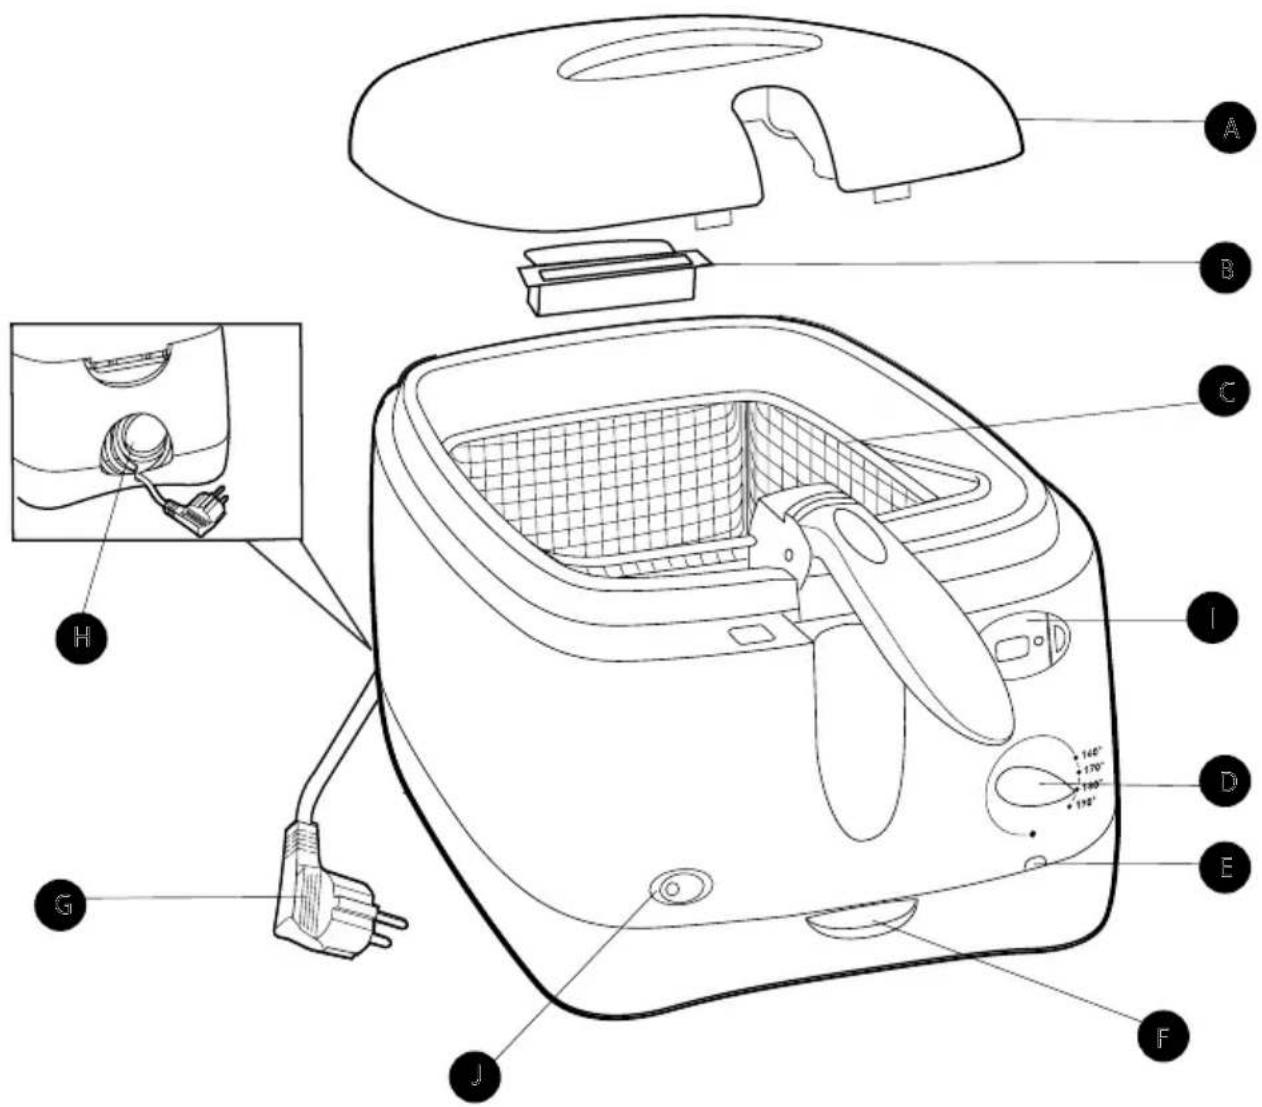
Dear customer, congratulations on acquiring your new Philips Comfort Plus fryer. Your new fryer allows you to fry all kinds of food safely and easily.
General description
A Lid
BCondensed water tray
©Frying basket
D Temperature control
E Pilot light
F Lid release lever
G Cord
H Cord storage compartment
Removable timer (HD6123 only)
J On/off switch (HD6123 only)
Important
Read these instructions for use carefully before using the appliance and save them for future reference.
Check if the voltage indicated on the appliance corresponds to the local mains voltage before you connect the appliance.
▶Only connect the appliance to an earthed wall socket.
If the mains cord is damaged, it must be replaced by Philips, a service centre authorised by Philips or similarly qualified persons in order to avoid a hazard.
▶Always return the appliance to a service centre authorised by Philips for examination or repair. Do not attempt to repair the appliance yourself, otherwise your guarantee will become invalid.
Clean the separate parts of the fryer thoroughly before using the appliance for the first time (see chapter 'Cleaning'). Make sure all parts are completely dry before you fill the fryer with oil or liquid fat.
Never immerse the housing, which contains electrical components and the heating element, in water nor rinse it under the tap.
▶Always unplug the appliance after use. Do not move the fryer until it has cooled down sufficiently.
Do not switch the appliance on before you have filled it with oil or fat. Make sure the fryer is always filled to a level between the two indication marks on the inside of the inner bowl.
During frying, hot steam is released through the filter. Keep your hands and face at a safe distance from the steam. You should also be careful of the hot steam when you open the lid.
Keep the appliance out of the reach of children. Do not let the mains cord hang over the edge of the table or worktop on which the appliance is standing.
This appliance is intended for household use only. If the appliance is used improperly or for (semi-)professional purposes or if it is used in a way that is not in accordance with the instructions for use, the guarantee will become invalid and Philips will not accept liability for any damage caused.
▶Fry food golden-yellow instead of dark or brown and remove burnt remnants! Do not fry starchy foods, especially potato and cereal products, at a temperature above 175° C (to minimise the production of acrylamide).
This appliance is equipped with a safety cut-out that switches the appliance off if it overheats. This may happen if there is not enough oil or fat in the fryer or if blocks of solid fat are being melted in the fryer, which will prevent the heating element from being able to give off its heat.
If the fryer doesn't work anymore, let the oil or fat cool down and turn to your Philips dealer or a service centre authorised by Philips.
Preparing for use
1 Place the appliance on a horizontal, even and stable surface out of the reach of children. If you wish to place the fryer on top of the cooker, make sure the rings of the cooker have been turned off and are cold.
2 Fill the dry fryer with oil, liquid fat or melted solid fat up to the top indication mark on the inside of the inner bowl (see section 'Oil and fat', for instructions on how to use solid fat) (fig. 1).
| Oil/liquid fat | Solid fat | |
| Min. | 2 l | 1700 g |
| Max. | 2.3 l | 2000 g |
Oil and fat
Never mix different types of oil or fat.
We advise you to use frying oil or liquid frying fat, preferably vegetable oil or fat that is rich in unsaturated fats (e.g. linoleic acid).
It is possible to use solid frying fat, but in that case extra precautions are necessary to prevent the fat from spattering and the heating element from overheating or becoming damaged.
If you want to use new blocks of fat, first melt them slowly over a low heat in a normal pan.
2 Pour the melted fat carefully into the fryer.
3 Store the fryer with resolidified fat still in it at room temperature.
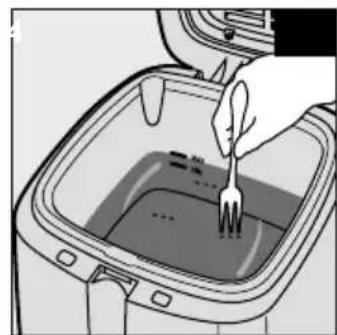
4 If the fat gets very cold, it may start spattering when melted. Punch some holes into the resolidified fat with a fork to prevent this (fig. 2).
Be careful not to damage the inner bowl with the fork.
Using the appliance
Frying
Be careful: hot steam will escape from the filter in the lid during frying.
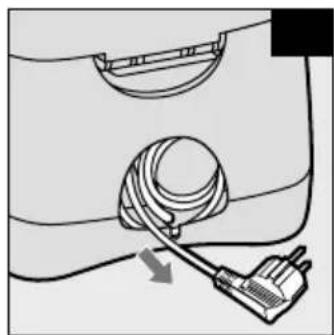
Take the entire cord from the cord storage compartment and put the plug in the wall socket (fig. 3).
Make sure the mains cord does not come into contact with hot parts of the appliance.
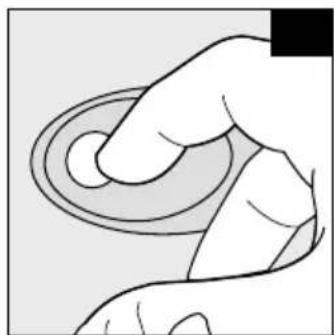
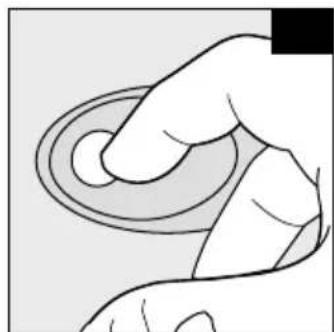
2 HD6123 only - Switch the fryer on by means of the on/off switch (fig. 4).
The pilot light in the on/off switch goes on.
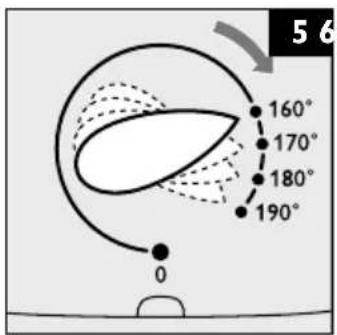
3 Set the temperature control to the required temperature (160-190°C) (fig. 5).
The temperature pilot light goes on.
ENGLISH8
- For information about which temperature to select, check the package of the food to be fried or the table at the end of these instructions for use.
- The oil or fat will be heated to the selected temperature in 10 to 15 minutes.
- While the fryer is heating up, the pilot light goes out and on a number of times. When it stays out for some time, the oil or fat has reached the preset temperature.
- After a batch has been fried, the pilot light also goes on. Wait until it stays out for some time before frying the next batch.
▶ You can leave the basket in the fryer while the fryer is heating up.
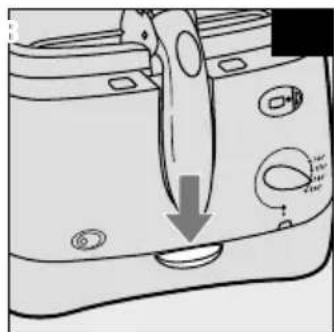
4 Open the lid by pressing the release lever. The lid will open automatically (fig. 6).
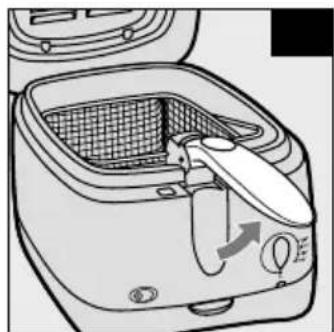
5 Lift the handle to raise the basket to its highest position (fig. 7).
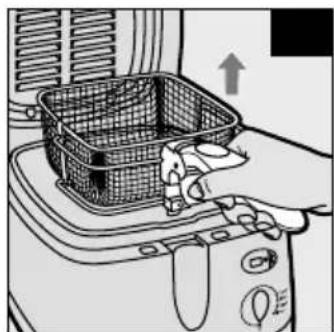
6 Remove the basket from the fryer and put the food to be fried in the basket (fig. 8).
For the best frying results, we advise you not to exceed the maximum quantities mentioned below.
| Home-made French fries | Frozen French fries | |
| Max. quantity | 1000 g | 800 g |
| Recommended quantity for best result | 600 g | 450 g |
Do not fry Asian rice cakes (or similar types of food) in this appliance as this might cause heavy spattering or violent bubbling of the oil or fat.
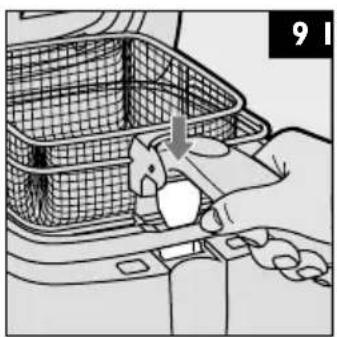
7 Carefully put the basket in the fryer without lowering it into the oil or fat (fig. 9).
8 Close the lid.
9 HD6123 only - Set the required frying time (see section 'Timer' in this chapter).
You can also use the fryer without setting the timer.
10 Press the release button of the basket handle and carefully lower the basket to its lowest position (fig. 10).
For a good end result, stick to the preparation time indicated on the package of the food to be fried or the preparation time mentioned in the table at the end of these instructions for use.
For a uniform golden frying result, lift the basket out of the oil or fat a few times during frying and gently shake the contents.
Timer (HD6123 only)
Type HD6123 is equipped with a digital timer.
The timer indicates the end of the frying time, but does NOT switch the fryer off.
Setting the timer
Press the timer button to set the frying time in minutes.
The set time will become visible on the display.
2 Keep the button pressed to put the minutes forward quickly. Release the button once the required frying time has been reached.
- The maximum time that can be set is 99 minutes.
- A few seconds after you have set the frying time, the timer will start counting down.
- While the timer is counting down, the remaining frying time blinks on the display. The last minute is displayed in seconds.
3 If the preset time is not correct, you can erase it by pressing the timer button for 2 seconds at the moment the timer starts counting downs (i.e. when the time starts to blink). Keep the button pressed until '00' appears on the display. You can now set the correct frying time.
4 When the preset time has elapsed, you will hear an audible signal. After 10 seconds the audible signal will be repeated. You can stop the audible signal by pressing the timer button.
Removing the timer
The timer is removable, which allows you to take the timer with you to another room. In this way you will be able to hear the audible signal which indicates that the fried food is ready wherever you are.
After you have set the required frying time, you can remove the timer from the fryer by pulling the right side towards you (fig. 11).
When the timer gives an audible signal to indicate that the fried food is ready, you can return to the fryer and push the timer back into the fryer.
Water tray
During frying condensed water will appear on the inside of the lid. This water will be collected in the water tray when you open the lid instead of dripping onto the worktop.
▶Empty the water tray after use.
- Wait until the oil or fat has cooled down sufficiently.
- Remove the lid.
- Remove the water tray and empty it into the sink.
After frying
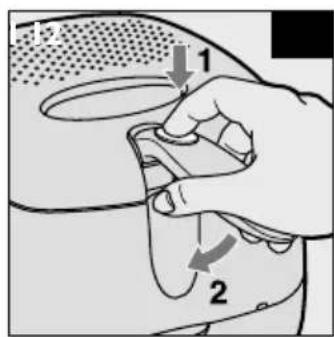
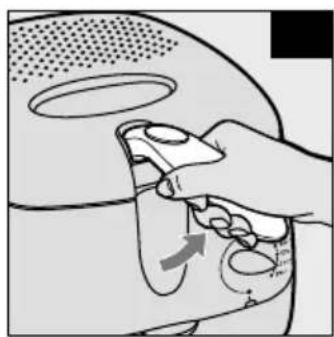
1 Lift the handle to raise the basket to its highest position, i.e. the draining position (fig. 12).
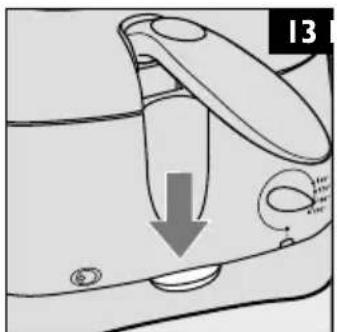
2 Open the lid by pressing the lid release lever (fig. 13). Beware of the hot steam and possible spattering of the oil.
3 Carefully remove the basket from the fryer.
If necessary, shake the basket over the fryer to remove excess oil or fat. Put the fried food in a bowl or colander containing grease-absorbing paper, e.g. kitchen paper.
4 HD6123 only: Switch the fryer off by means of the on/off switch (fig. 14).
The pilot light in the on/off switch goes out.
5 Unplug the appliance after use.
Do not move the fryer until the oil or fat has cooled down sufficiently, which takes approximately 60 minutes.
If you do not use the fryer regularly, we advise you to remove the oil or liquid fat and to store it in well-closed containers, preferably in the refrigerator or in a cool place. Fill the containers by pouring the oil or fat through a fine sieve to remove food particles. Remove the frying basket before emptying the inner bowl.
If the fryer contains solid fat, let the fat solidify in the fryer and store the fryer with the fat still in it (see chapter 'Preparing for use', section 'Oil and fat').
Cleaning
Wait until the oil or fat has cooled down sufficiently.
Do not use any abrasive (liquid) cleaning agents or materials (e.g scouring pads) to clean the appliance.
Press the lid release lever to open the lid.
ENGLISH10
2 Then lift the lid off the appliance.
3 Remove the water tray.
4 Remove the frying basket from the fryer and pour out the oil or fat.
5 Clean the housing with a moist cloth (with some washing-up liquid) and/or kitchen paper.
6 Clean the inner bowl with hot water and some washing-up liquid.
Do not immerse the complete fryer housing in water.
7 Clean the lid, the water tray and the frying basket in hot water with some washing-up liquid or in the dishwasher.
8 Rinse the parts with fresh water and dry them thoroughly.
Cleaning the permanent anti-grease filter
The lid with the permanent anti-grease filter can be cleaned thoroughly in the dishwasher or in hot water with some washing-up liquid.
Dishwasher-proof parts
- Lid with permanent anti-grease filter
- Basket
- Water tray
Changing oil or fat
Because oil and fat lose their favourable properties rather quickly, you should change the oil or fat regularly. To do so, follow the instructions below:
If you mainly use the fryer to prepare French fries and if you sieve the oil or fat after each use, you can re-use the oil or fat 10 to 12 times before it needs to be changed. If you use the fryer to prepare food that is rich in proteins (such as meat or fish), you should change the oil or fat more often.
Never use the same oil longer than 6 months and always follow the instructions on the package.
▶Never add fresh oil or fat to used oil or fat.
▶Never mix different types of oil or fat.
Always change the oil or fat if it starts foaming when it is heated, if it has a strong smell or taste or if it turns dark and/or syrupy.
Disposing of used oil or fat
Pour used oil or liquid fat back into its original (resealable) plastic bottle. You can dispose of used fat by letting it solidify in the fryer (without the basket in it) and subsequently scooping it out of the fryer by means of a spatula and wrapping it in a newspaper. If applicable, you can put the bottle or newspaper in the bin for non-compostable waste (not in the compostable waste bin) or dispose of it in accordance with the regulations in your country.
Storage
I Put all parts back onto/into the fryer and close the lid.
2 Roll up the cord, put it into the cord storage compartment and insert the plug in the plug fixing facility.
3 Lift the fryer by its handles.
Frying tips
For an overview of preparation times and frying temperatures, see the table at the end of these instructions for use.
Home-made French fries
You will make the tastiest and crispiest French fries in the following way:
Use firm potatoes and cut them into sticks. Rinse the sticks with cold water.
This will prevent them from sticking to each other during frying.
▶ Dry the sticks thoroughly.
2 Fry the French fries twice: the first time for 4-6 minutes at a temperature of 160° C, the second time for 5-8 minutes at a temperature of 175° C.
3 Put the home-made French fries in a bowl and shake them. Let the fries cool down before frying them for the second time.
Frozen food
Frozen fries have already been precooked, so you will only have to fry them once in accordance with the instructions on the package.
Food from the freezer (-16 to -18°C) will cause the oil or fat to cool down considerably when the food is immersed in it. Because the food does not sear right away, it may also absorb too much oil or fat.
Take the following measures to prevent this:
- Preferably allow frozen food to defrost at room temperature before frying.
- Carefully shake off as much ice and water as possible and dab the food to be fried until it is properly dry.
- Do not fry very large quantities at one time (consult the table with preparation times and frying temperatures).
- Select the frying temperature indicated in the table in these instructions for use or on the package of the food to be fried. If there are no instructions, select a temperature of 190° C.
- Lower the food into the oil or fat very gently, since frozen food may cause the hot oil or fat to start bubbling violently.
Getting rid of unwanted flavours
Certain types of food, particularly fish, can give the oil or fat an unpleasant flavour. To neutralise the taste of the oil or fat:
I Heat the oil or fat to a temperature of 160° C.
2 Put two thin slices of bread or a few sprigs of parsley in the oil.
3 Wait until no more bubbles appear and then scoop the bread or the parsley out of the fryer with a spatula.
The oil or fat will now have a neutral taste again.
ENGLISH12
Environment
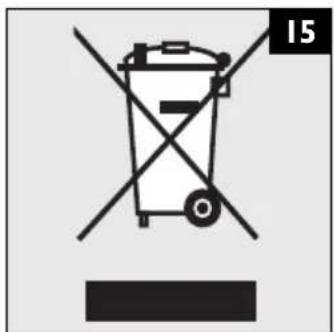
Do not throw the appliance away with the normal household waste at the end of its life, but hand it in at an official collection point for recycling. By doing this you will help to preserve the environment (fig. 15).
Remove the battery of the timer (HD6123 only) before you discard the appliance.
I Use a small flat-blade screwdriver to remove the back of the timer.
2 Remove the battery. Do not throw the battery away with the normal household waste, but hand it in at an official collection point.
Guarantee & service
If you need information or if you have a problem, please visit the Philips website at www.philips.com or contact the Philips Customer Care Centre in your country (you will find its phone number in the worldwide guarantee leaflet). If there is no Customer Care Centre in your country, turn to your local Philips dealer or contact the Service Department of Philips Domestic Appliances and Personal Care BV.
Troubleshooting
| Problem | Possible cause | Solution |
| The fried food does not have a golden brown colour and/or is not crispy. | The selected temperature is too low and/or the food has not been fried long enough. | Check on the package of the food or in the table in these instructions for use whether the temperature and/or preparation time you have selected is/are correct. Set the temperature control to the correct temperature. |
| There is too much food in the basket. | Never fry more food at one time than the quantity mentioned in the table. | |
| The oil or fat does not become hot enough. | The fuse of the temperature control may have blown, causing the safety cut-out to switch the appliance off. Turn to your Philips dealer or a service centre authorised by Philips to have the fuse replaced. | |
| The fryer gives off a strong unpleasant smell. | The permanent anti-grease filter is saturated. | Remove the lid and clean the lid and filter in hot water with some washing-up liquid or in the dishwasher. |
| The oil or fat is no longer fresh. | Change the oil or fat. Regularly sieve the oil or fat to keep it fresh longer. | |
| The type of oil or fat used is not suitable for deep-frying food. | Use frying oil or liquid frying fat of good quality. Never mix two different types of oil or fat. | |
| Steam escapes from other places than the filter. | The lid has not been closed properly. | Check whether the lid has been closed properly. |
| The permanent anti-grease filter is saturated. | Remove the lid and clean the lid and filter in hot water with some washing-up liquid or in the dishwasher. | |
| The sealing ring around the metal inside of the lid is dirty or worn. | If the ring is dirty, clean the lid in hot water with some washing-up liquid or in the dishwasher. If the lid is worn, turn to your Philips dealer or a service centre authorised by Philips to have the sealing ring replaced. | |
| Oil or fat spills over the edge of the fryer during frying. | There is too much oil or fat in the fryer. | Make sure the oil or fat in the fryer does not exceed the maximum level. |
| The food contains too much moisture. | Dry the food thoroughly before you start frying it and fry the food in accordance with these instructions for use. | |
| There is too much food in the frying basket. | Do not fry more food at one time than the quantity mentioned in the table. | |
| The oil or fat foams strongly during frying. | The food contains too much moisture. | Dry the food thoroughly before frying it. |
| The type of oil or fat used is unsuitable for deep-frying food. | Use frying oil or liquid frying fat of good quality. Never mix two different types of oil or fat. | |
| The inner bowl has not been cleaned properly. | Clean the inner bowl as described in these instructions for use. |
Preparation times and temperature settings
The table below indicates how much of a particular type of food you can prepare at one time and which frying temperature and preparation time you should select.
If the instructions on the package of the food to be prepared differ from those in the table, always follow the instructions on the package.
*) Also see 'Frying tips' for the preparation of home-made French fries.
| Temperature | Type of food | Recommended quantity per batch | Frying time (minutes) fresh or (partly) defrosted food | Frying time (minutes) frozen food |
| 160°C | Home-made French fries*) 1st frying cycle | 600g | 4-6 (go to 175°C in this table for instructions about the 2nd cycle) | - |
| Fresh fish | 450g | 5-7 | - | |
| 170°C | Chicken (drumsticks) | 3-5 pieces | 12-15 | 15-20 |
| Cheese croquettes | 5 pieces | 4-5 | 6-7 | |
| Mini potato pancakes | 4 pieces | 3-4 | 4-5 | |
| Vegetable fritters (mushrooms, cauliflower) | 8-10 pieces | 2-3 | - | |
| 175°C | Home-made French fries*) 2nd frying cycle | 600 g | 5-8 | - |
| Frozen French fries | 450 g | - | 5-6 | |
| Crisps (very thin potato slices) | 600 g | 3-4 | - | |
| Potato croquettes | 4-5 pieces | 4-5 | 6-7 | |
| 180°C | Chinese spring rolls | 2-3 pieces | 6-7 | 10-12 |
| Vietnamese spring rolls | 5-6 pieces | 5-6 | 8-10 | |
| Chicken nuggets | 8-10 pieces | 3-4 | 4-5 | |
| Mini snacks | 8-10 pieces | 3-4 | 4-5 | |
| Meatballs (small) | 8-10 pieces | 3-4 | 4-5 | |
| Mussels | 12-15 pieces | 2-3 | 3-4 | |
| Prawns | 8-10 pieces | 3-4 | 4-5 | |
| Apple fritters | 5 pieces | 3-4 | 4-5 | |
| 190°C | Aubergine (slices) | 600 g | 3-4 | - |
| Doughnuts | 3-4 pieces | 5-6 | - | |
| Camembert (breadcrumbed) | 2-4 pieces | 2-3 | - | |
| Wiener schnitzel | 2 pieces | 3-4 | - |
Wstep

- INTRODUCTION
- GENERAL DESCRIPTION
- IMPORTANT
- PREPARING FOR USE
- OIL AND FAT
- NEVER MIX DIFFERENT TYPES OF OIL OR FAT
- USING THE APPLIANCE
- FRYING
- ENGLISH8
- TIMER (HD6123 ONLY)
- SETTING THE TIMER
- REMOVING THE TIMER
- WATER TRAY
- AFTER FRYING
- CLEANING
- ENGLISH10
- CLEANING THE PERMANENT ANTI-GREASE FILTER
- DISHWASHER-PROOF PARTS
- CHANGING OIL OR FAT
- DISPOSING OF USED OIL OR FAT
- STORAGE
- FRYING TIPS
- HOME-MADE FRENCH FRIES
- FROZEN FOOD
- GETTING RID OF UNWANTED FLAVOURS
- ENGLISH12
- ENVIRONMENT
- GUARANTEE & SERVICE
- PREPARATION TIMES AND TEMPERATURE SETTINGS
- WSTEP
Brand : PHILIPS
Model : HD6123
Category : Deep fryer