
KH-6V08FT00 - Cooker SHARP - Free user manual and instructions
Find the device manual for free KH-6V08FT00 SHARP in PDF.


| Product Type | Freestanding Cooker |
| Brand | Sharp |
| Model | KH-6V08FT00 |
| Dimensions (H x W x D) | 85 cm x 60 cm x 60 cm |
| Weight | 55 kg |
| Power Supply | 220-240 V, 50/60 Hz |
| Hob Type | Gas hob with 4 burners |
| Oven Type | Electric oven |
| Oven Capacity | 65 L |
| Oven Functions | Conventional heating, grill, fan-assisted |
| Timer | Mechanical timer with alarm |
| Oven Light | Yes |
| Ignition | Automatic ignition on gas burners |
| Safety Features | Flame failure device, child lock (oven door) |
| Cleaning | Enamel interior, removable oven door |
| Spare Parts Availability | Knobs, burners, oven elements, thermostats |
| Energy Class | A |
| Color | Stainless steel / White |
| Installation Type | Freestanding, gas connection required |
Frequently Asked Questions - KH-6V08FT00 SHARP
User questions about KH-6V08FT00 SHARP
0 question about this device. Answer the ones you know or ask your own.
Ask a new question about this device
Download the instructions for your Cooker in PDF format for free! Find your manual KH-6V08FT00 - SHARP and take your electronic device back in hand. On this page are published all the documents necessary for the use of your device. KH-6V08FT00 by SHARP.
USER MANUAL KH-6V08FT00 SHARP
Hob
KH-6V08FT00-EU
CONTENTS:
DESCRIPTION OF THE HOB
SAFETY WARNINGS
INSTALLATION
Locating Your Built-in Hob
Electrical Connection of Your Hob
USAGE
Turn the Control Off and On
Selecting the Heater
Turning on the Dual and Triple Zones
Setting the Cooking Level With and Without Heat Boost
Turning Off Individual Heaters
Timer Function
Key Lock
Touch Control Safety Functions
Sensor Safety Cut Off
Excess Temperature Switch Off
Operating Time Limitations
Residual Heat Functions
Cleaning and Care
Description of the Hob
Dear Customer
It is important that you read this manual for best performance and to extend the life of your appliance. We recommend you keep this manual for future reference.
Your new hob is guaranteed and will give lasting service. This guarantee is only applicable if the appliance has been installed and is operated in accordance with the operating and installation instructions detailed in this manual.

Note: Appearance of your hob may vary from the model shown above due to its configuration.
Safety Warnings
Read these instructions carefully and completely before using your appliance, and keep it in a convenient place for reference.
This manual has been prepared for more than one model. Your appliance may not have some of the features that are explained in this manual. Pay attention to the expressions that have figures while you are reading the operating manual.
General Safety Warnings
- This appliance can be used by children aged 8 years and above, and by persons with reduced physical, sensory, or mental capabilities, or lack of experience and knowledge, provided they are supervised or have been instructed on the safe use of the appliance and understand the hazards involved. Children must not play with the appliance.
Cleaning and user maintenance must not be performed by children without supervision.
- WARNING: The appliance and its accessible parts become hot during use. Care should be taken to avoid touching heating elements. Children under 8 years old should be kept away unless they are constantly supervised.
- WARNING: Unattended cooking on a hob with fat or oil can be dangerous and may result in fire. NEVER try to extinguish a fire with water; instead, switch off the appliance and cover the flame with a lid or a fire blanket.
- WARNING: Danger of fire: do not store items on the cooking surfaces.
- WARNING: If the sur-
face is cracked, switch off the appliance to avoid the possibility of electric shock.
- For hobs incorporating a lid, any spillage should be removed from the lid before opening. Also, the hob surface should be allowed to cool before closing the lid.
- This appliance is not intended to be operated using an external timer or a separate remote-control system.
- Do not use harsh abrasive cleaners or sharp metal scrapers to clean the oven door glass and other surfaces, as they can scratch the surface, which may result in shattering the glass or damaging the surface.
- Do not use steam cleaners for cleaning the appliance.
- Your appliance has been produced in compliance with all applicable local and international standards and regulations. - Maintenance and repair work must be carried out only by authorized service technicians. Installation and repair work carried out by unauthorized technicians may endanger you. It is dangerous to alter or modify the specification of the appliance in any way.
- Prior to installation, ensure that the local distribution conditions (nature of the gas and gas pressure or electricity voltage and frequency) and the appliance requirements are compatible. The requirements for this appliance are stated on the label.
- CAUTION: This appliance is designed only for cooking food and is intended for indoor domestic household use only. It should not be used for any other purpose or in any other application, such as non-domestic use, commercial environment, or for heating rooms.
- All possible security measures have been taken to ensure your safety. Since the glass could break, you should be careful while cleaning to avoid scratching it. Avoid hitting or knocking on the glass with accessories.
- Ensure that the supply cord is not wedged during the installation. If the supply cord is damaged, it must be replaced by the manufacturer, its service agent or similarly
qualified persons in order to prevent any hazards.
Installation Warnings
- Do not operate the appliance before it is fully installed.
- The appliance must be installed by an authorized technician and put into use. The manufacturer is not responsible for any damage that might be caused by defective placement and installation by unauthorized people.
- When you unpack the appliance, make sure that it has not been damaged during transport. In case of any defect, do not use the appliance and contact a qualified service agent immediately. Because the materials used for packaging (nylon, staplers, styrofoam, etc.) may cause harm to children, they should be gathered up and disposed of immediately.
- Protect your appliance against atmospheric effects. Do not expose the stove to sun, rain, snow, etc.
- The materials surrounding the appliance (cabinet) must be able to withstand a temperature of min. 100°C.
- During usage
- Do not put flammable or combustible materials in or near the appliance when it is operating.
- Do not leave the cooker while cooking with solid or liquid oils. They may catch fire due to extreme heating. Never pour water on flames that oil has ignited. Cover the saucepan or frying pan
with its cover in order to extinguish the resulting flame and turn the cooker off.
- Always position pans over the centre of the cooking zone, and turn the handles to a safe position so they cannot be knocked or grabbed.
- Unplug the appliance if you will not be using it for a long time. Keep the main control switch off. Also when you are not using the appliance, keep the gas valve turned off.
- Make sure the appliance control knobs are always in the "0" (stop) position when it is not being used.
- The temperature on the bottom surface of the hob might rise during operation. Therefore, a board must be installed underneath the product. During cleaning and maintenance
- Always turn the appliance off before operations such as cleaning or maintenance. You can do this after unplugging the appliance or turning the main switches off.
- Do not remove the control knobs to clean the control panel. To maintain the efficiency and safety of your appliance, we recommend you always use original spare parts and to call only our authorized service agents.
INSTALLATION
The electrical connection of this hob should be carried out by an authorized service person or a qualified electrician according to the instructions in this guide and in compliance with the current regulations.
- Before connecting your appliance to the mains at home, make sure to check the conformity of voltage settings, which are specified on the information available.
- The laws, ordinances, directives and standards in force in the country of use are to be followed (safety regulations, proper recycling in accordance with the regulations, etc.)
Locating your built-in hob
After removing the packaging material from the appliance and its accessories, ensure that the hob is not damaged. If you suspect any damage, do not use the appliance and contact authorized service personnel or a qualified electrician immediately.
This built-in hob is to be inserted into a cut-out in a worktop.
Create an opening with the dimensions shown in the next illustration. The distance between the rear edge of the hob and any adjacent wall depends on the wall surface. Please do not use easily combustible material like curtain or paper near the hob.
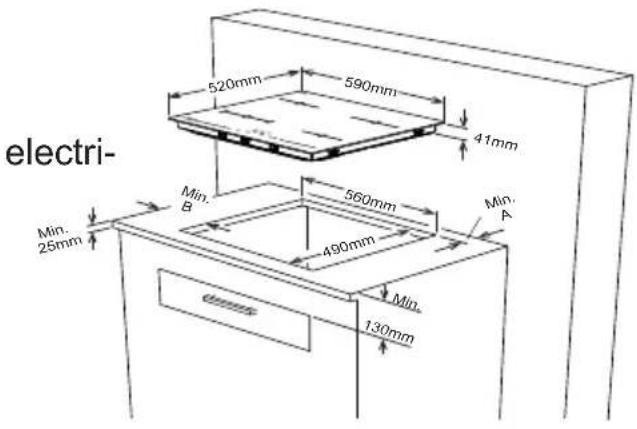
| Neighbourhood walls | A (mm) | B (mm) |
| dCombustible | 60 | 150 |
| Non-combustible | 25 | 40 |
- Apply the one-sided self-adhesive sealing tape supplied all the way round the lower edge of the cooking surface along the outer edge of the glass ceramic panel. Do not stretch it. - Screw the four worktop mounting brackets on the side walls of the product.

Electrical connection of your hob
- Before proceeding with the electrical connection, verify that the current carrying capacity of the system and the socket are adequate for the maximum power rating of the hob.
- Electrical installation throughout the residence and the electrical current plug in use must be earthed and conform with safety regulations.
- If there is no dedicated hob circuit and fused switch, they must be installed by a qualified electrician before hob is connected.
- Fused switch must be easily accessible once the hob has been installed.
- Do not use adaptors, multiple sockets and/or extension leads.
- This appliance conforms with the requirements of the following EEC Directives:
- Vitroceramic hob EEC/73/23 and 93/68, EEC/89/336 associated with radio interference,
- EEC/89/109 associated with contact with foods.
- A circuit breaker with a contact opening of at least 3 mm, rated 25 A and delayed functioning type must be installed inside the supply circuit.
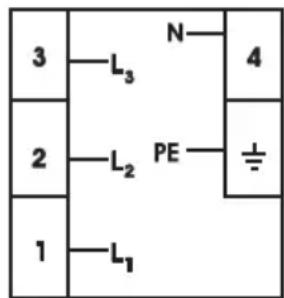
- For the touch-controlled vitroceramic hob, the cable must be H05VV-F 3X2.5 mm² / 60227 IEC 53. You will find the connection diagram shown on the back of your appliance.
- During installation, please ensure that insulated cables are used. An incorrect connection might damage your appliance. The warranty will not cover such damages.
- All repairs must be carried out by authorised service personnel or a qualified electrician.
- Unplug your appliance before each maintenance. For reconnection, follow the connection diagrams exactly.

3x2.5 mm² 220V~ 3x2.5 mm² 230V~ 3x2.5 mm² 240V~

5x1.5 mm² 380V 3N~ 5x1.5 mm² 400V 3N~ 5x1.5 mm² 415V 3N~
/
3x2.5 mm² 220V~ 3x2.5 mm² 230V~ 3x2.5 mm² 240V~

5x1.5 mm² 380V 3N~ 5x1.5 mm² 400V 3N~ 5x1.5 mm² 415V 3N~
Supply cable connection can differ according to terminal box type.
USAGE
The appliance is operated by touching buttons and the functions are confirmed by displays and acoustic signals.

| Stand-By-Mode S-Mode | The mains | are applied to the hob control and all heater displays are off or residual heat display is active. |
| Operating Mode B mode | At least one | heater display shows a heat setting between ‘0’ and ‘9’ |
| Lock Mode VR-Mode | The hob control | is locked. |
MODE DESCRIPTION
Turn the Appliance off and on
If the appliance is in standby mode, it is put in operating mode by holding the On/Off button down for at least 1 second. A buzzer signal acoustically indicates the successful operation. A '0' appears and all decimal points on the heater flash (1 sec on, 1 sec off) on all the heaters.
If operation does not start within 10 sec, the display for all heaters will turn off.
If the displays are turned off, the heater will go into standby mode.
If ☐ is pressed for more than 2 seconds (in operating mode), the appliance will switch off and go back to S mode. The appliance can be turned off by pressing ☐ at any time, even if other buttons are pressed simultaneously.
If there is residual heat from a heater, this will be indicated on the heater display.
Selecting the Heater
If a single heater is chosen by pressing the respective activate/deactivate heater button, the decimal point on the related heater display will flash. For the selected heater, you can set the heat level between 1-9 by touching the heat setting buttons ☐br. ☐
The buttons must be pressed within 3 seconds, otherwise the heater selection will be erased and the heat setting dot will disappear (decimal point). If there is no further operation within 10 seconds, the heater goes back into S mode. The heat setting can always be changed by pressing + or - between levels 1-9.
Each button operation or each display change is confirmed by a buzzer signal.
Setting the Cooking Level With and Without Heat Boost
All heaters are equipped with heat boost functionality.
If the heat boost is active, then the heater will be operated with maximum power for the period of the heat boost time, which is dependent on the selected heat setting. This is indicated by a flashing 'A', alternating with the heat setting value (e.g., 0.5 sec 'A' and 0.5 sec '9') on the heater display. Once the heat boost time has ended, only the heat setting will be indicated.
If the heat boost is used for a heater, heater level 9 must be operated by pressing ⏻ starting from level 0. After setting the heat to level 9, 'A' will be indicated alternating. This means that level 9 and heat boost are now active.
The heat boost can be turned off by pressing until heat setting '0' appears.
If the heat boost is used, it can always be activated by reactuating + it if the heat setting is set to level 9. 'A/9' will flash on the heat display.
Turning Off Individual Heaters
A selective heater can be turned off in 3 different ways:
- Simultaneous operation of the off and — buttons
- Reduce the heat setting to '0' by pressing the ☐ button
- Use the timer turn-off function for the corresponding heater
Simultaneously pressing the ⊕ and ⊖ buttons
The corresponding heater must be selected with the Active/Deactivated Heater Button; the decimal point flashes on the heater display. To turn off the heater, the ⊕ and ⊖ buttons must be pressed at the same time. A buzzer signal sounds and '0' appears in the heat setting display.
If the timer is active for the selected heater, then '0' will appear in the heater display and also on the related timer cooking zone indicator. The timer function and the timer display are turned off.
If there is any residual heat for this heater, this will be indicated by a static display 'H' in the heat setting display.
Reduce the heat setting to '0' by pressing the ☐ button
The heater can also be turned off by reducing the operated heat setting to '0'.
When the heater display indicates '0', the associated decimal point for the heater will also turn off.
When turning off an active heater, the '0' appears in the Heater Display, but also the related timer cooking zone indicator and the Timer Display are turned off.
If there is any residual heat for this heater, this will be indicated by a static display 'H' in the heat setting display.
Use of timer turn-off function for corresponding heater (available only on some models)
After counting down to 0 minutes, the timer stops the linked heater, showing the '0' shown on the heater display and it shuts down the timer display. '00' shows on the timer display. The related timer cooking zone indicator will disappear.
An assigned dual-zone selection indicator also disappears if it is active.
Also, the buzzer signals that the timer has counted down to zero. The buzzer will stop buzzing after you confirm that the timer has run out by touching any button.
Timer Function
The timer provides the following features:
The control can run a maximum of 4 heater-assigned timers and the 1-minute minder (which is assigned to no heater) simultaneously.
All timers can only be used in B mode. A heater timer can only be assigned to an active heater running at levels between 1-9. The minute minder is independent of any heater.
In order to use both functions, the timer function must be activated by the active/deactivated timer button 🔒.
Touching for the first time after activating the heaters, the control proposes the minute minder (no cooking zone indicator is flashing; they are all on or off).
Touching for the second time, the control proposes the assignment to one of the activated heaters by flashing the cooking zone indicator. Now the timer is linked to the timer signal.
Touching 📋 again, the next timer in the clockwise direction is proposed for assignment to the next active heater. And so on...
Minute Minder
No matter whether a heater is active or not, the minute minder can be operated by touching ⏻. The '00' that displays shows that the timer is active, and the dot in the right timer display indicates that + and - are now linked for setting the timer value.
The minute minder is selected when all cooking zone indicators are statically on or off (no cooking zone indicator is flashing).
Use + and - to set the timer value.
After successfully setting the minute minder time, the timer starts to count down the time.
The minute minder will not be stopped by switching off the appliance or activating the key lock function. It will proceed by increasing the minutes until it has finished counting down the minutes.
After the timer has reached '00', the buzzer indicates that time is up.
To stop the buzzer, you have to confirm that time is up by touching any button.
Heater timer
Heater timers can only be set for activated heaters (heater level must be set between 1-9).
Touching once activates the minute minder. Touching the second time assigns the timer to the activated heater. The proposed assignment is indicated by the related cooking zone indicator that is flashing.
Touching again after activating the first heater timer, the control will recommend the next active heater assigned to the timer in the clockwise direction. The assignment recommendation is indicated by the flashing cooking zone indicator.
Touching + and - sets the timer value for the heater.
The timer running for the first set heater timer is indicated by the lit cooking zone indicator.
Touching 📋 once again assigns other timers to other activated heaters.
10 sec after the last operation, the timer display changes to the timer that will finish next.
The assignment of that timer is always displayed by a flashing cooking indicator. The cooking zone indicator shows how many timers are on at any one time.
By toggling ⏻, you can display the timer values for the heater timer and the minute minder. The assignment is always indicated by the flashing cooking zone indicator. If no cooking zone indicator flashes, the minute minder time is shown in the 2-digit timer display.
All heater timers can be erased by switching off the appliance into the S mode using ⏻. A minute minder will not be erased. It will continue with the operation until time is up.
To erase a timer in operation mode, you first have to select the timer by toggling the Active/Deactivated timer button until it is displayed. The value can then be erased 2 different ways:
- Decrement by touching ☐ until '00' appears on the Timer Display.
Touch ⊕ and - simultaneously for 0.5 seconds until '00' is shown on the timer display.
After reaching '00' on a heater timer, the assigned heater level will be set to '0'.
A buzzer will signal that the heater timer or minute minder has finished counting down to 0. Acknowledge by touching any button.
Wait until 'F' disappears for all zones, then turn the hob on by touching 📋 and continue to use the zone.
Key Lock
Key lock functionality is for blocking and setting the appliance into a safe mode during operation. Touch modifications such as raising heat settings and others should not be possible. It is only possible to switch the appliance off.
The lock function is active if the Key Lock button 🔒 is pressed for at least 2 seconds. This operation is acknowledged by a buzzer. After successful operation of more than 2 seconds, the key lock indicator flashes and the heater is locked.
The heater can only be locked in operating mode (B mode).
If the heater is locked, only 🏠 can be operated; all other buttons are blocked. If any other button is operated in the blocked mode, the buzzer signal sounds and the key lock indicator flashes as an indication that the key lock functionality has been activated. Only the switch off by operation of is possible. But if you switch off the appliance, you cannot restart it again without first unlocking.
indication that the key lock functionality has been activated. Only the switch off by operation is possible. But if you switched off the appliance, you cannot restart it again without first unlocking.
The key lock indicator will go out after pressing for 2 seconds. Now the hob control is unlocked and can be operated in normal order.
The following safety functions are available to avoid unintentionally operating the hob control.
The following safety functions are available to avoid unintentionally operating the hob control.
Sensor monitoring is included to prevent the appliance from unwanted, random sensor operation.
Sensor monitoring is included to prevent the appliance from unwanted, random sensor operation.
If one or more buttons are pressed for longer than 12 seconds, the sensor monitoring routine acoustically indicates a wrong operation (pot or other object placed on the button, sensor failure, etc.) and switches off the appliance.
it.
The safety turn-off causes the hob control to be turned off and to switch to the S mode. An 'F' will flash in all head displays.
Any residual heat present will be displayed on all the other heater displays.
The hob control will then go into S mode. At the same time a buzzer signal will appear. After 10 minutes, the acoustic signalling will stop.
If erroneous operation is no longer present, both the visual and the acoustic signal will disappear.
Over-Temperature Switch-Off
Because the control is placed very close to the heater in the centre front of the hob, it can occur that an incorrectly placed pot might be situated only halfway on the control and not sensed by the sensor safety cut off (not covering a button), heats the hob up to a very high temperature, which makes the glass and the buttons hot enough to burn fingers.
To prevent the hob control unit from being damaged, the control monitors the temperature all the time and switches off in case of overheating emergency. It
is indicated in the heater 4 heater display with the letter 't' for all the time until the temperature decreases.

As the temperature drops, the 't' displays will be erased and the hob control unit falls back into the S mode. This means that the user can reactivate the appliance by touching
Operating Time Limitations
The hob control unit has limits the operating time. If the heat setting for this heater has not been changed for a certain length of time, then the heater will turn off automatically (for 10 sec a '0' is displayed, afterwards the residual heat). The limit of the operating time depends on the selected heat setting. If a timer is associated with the heater, then '00' will display on the timer display for 10 sec. Afterwards, the timer display turns off.
After the heater turns off automatically as described above, the heater is operable again and the maximum operating time for this heat setting is applied.
Residual Heat Functions
After all cooking processes there is some heat stored in the vitroceramic glass called residual heat. The control can calculate roughly how hot the glass is in the worst case. If the calculated temperature is higher than +60°C, then this will be indicated in the corresponding heater display after the heater or the hob control was turned off. The residual heat display is shown as long as the calculated heater temperature is >+60°C.
The residual heat display has the lowest priority and is overwritten by every other display value, during safety turn-offs and displaying an error code.
After reapplying the supply voltage to the hob control after an interruption in the supply voltage, causes that the residual heat display flashes, if the corresponding heater had a residual heat of greater + 60 °C before the power interruption occurred. The display will flash until the max. residual heat time has expired or the heater is selected and activated.
CLEANING AND CARE
Cookware with rough finishes is not be used since these can scratch the glass ceramic surface. The bottom of quality cookware should be as thick and flat as possible. Before use, make sure that the bottom of the cookware is clean and dry.
Always place the cookware on the cooking zone before switching the cooking zone on. If possible, always place the lids on the cookware. Bottom of cookwares must not be smaller or larger than the cooking zones, they should be at the proper size as indicated below to avoid wasting energy.
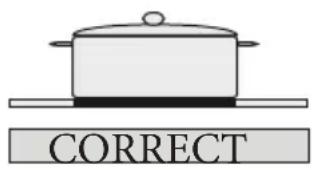


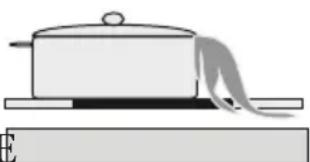
Before cleaning the hob, first the plug from the electrical supply socket. Then ensure that there is no residual heat stored in the appliance. Vitroceramic glass is very resistant to high temperature and overheating. If there is residual heat stored in the appliance, 'H' will flash on the heater order to avoid burns, let the appliance cool down.
Remove all spilt food and fat using a
window scraper. Then wipe the hob with a suitable cleaning detergent liquid and a clean damp cloth. Wipe the appliance should down using a clean dry cloth.
If aluminium foil or plastic items accidentally melt on the hob surface, they should be immediately removed from the hot cooking area with a scraper. This will avoid any possible damage to the surface. This also applies to sugar or food containing sugar that may spill on the hob.
If any other food melts on the hob surface, remove it once the appliance has cooled down. Use glass ceramic or stainless steel cleaner when cleaning the surface.
Do not use a dishcloth or abrasive sponge to clean the vitroceramic surface. These materials may damage the surface.
Do not use chemical detergents, sprays or spot removers on the vitroceramic surface. These materials may start a fire or cause the vitroceramic colour to fade. Clean with water and liquid dish-washing detergent.
remove
display. In
CONTENTS
DESCRIPTION OF THE HOB
SAFETY WARNINGS
INSTALLATION
SAFETY WARNINGS
READ THESE INSTRUCTIONS CAREFULLY AND COMPLETELY BEFORE USING YOUR NEW APPLIANCE AND KEEP THEM IN A CONVENIENT PLACE FOR FUTURE REFERENCE IF NEEDED.
THIS MANUAL HAS BEEN COMPILED FOR MORE THAN 1 SIMILAR MODEL. IT IS THEREFORE POSSIBLE THAT YOUR APPLIANCE DOES NOT HAVE ALL THE FUNCTIONS MENTIONED IN THIS MANUAL. CAREFULLY EXAMINE THE EXPRESSIONS WITH NUMBERS WHILE GOING THROUGH THESE INSTRUCTIONS FOR USE.
3x2.5 mm² 220V~ 3x2.5 mm² 230V~ 3x2.5 mm² 240V~
5x1.5 mm² 380V 3N~ 5x1.5 mm² 400V 3N~ 5x1.5 mm² 415V 3N~
/
3x2.5 mm² 220V~ 3x2.5 mm² 230V~ 3x2.5 mm² 240V~
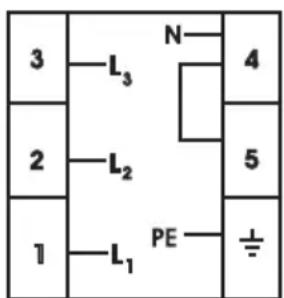

3x2.5 mm² 220V~ 3x2.5 mm² 230V~ 3x2.5 mm² 240V~

5x1.5 mm² 380V 3N~ 5x1.5 mm² 400V 3N~ 5x1.5 mm² 415V 3N~
/

3x2.5 mm² 220V~ 3x2.5 mm² 230V~ 3x2.5 mm² 240V~
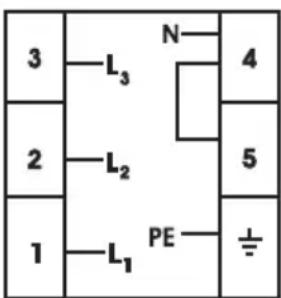
5x1.5 mm² 380V 3N~ 5x1.5 mm² 400V 3N~ 5x1.5 mm² 415V 3N~
USAGE
The device operates with touch buttons and functions are confirmed by indicators and acoustic signals.

3x2.5 mm² 220V~ 3x2.5 mm² 230V~ 3x2.5 mm² 240V~

5x1.5 mm² 380V 3N~ 5x1.5 mm² 400V 3N~ 5x1.5 mm² 415V 3N~
/
3x2.5 mm² 220V~ 3x2.5 mm² 230V~ 3x2.5 mm² 240V~

5x1.5 mm² 380V 3N~ 5x1.5 mm² 400V 3N~ 5x1.5 mm² 415V 3N~
3x2.5 mm² 220V~ 3x2.5 mm² 230V~ 3x2.5 mm² 240V~

5x1.5 mm² 380V 3N~ 5x1.5 mm² 400V 3N~ 5x1.5 mm² 415V 3N~
/
3x2.5 mm² 220V~ 3x2.5 mm² 230V~ 3x2.5 mm² 240V~

5x1.5 mm² 380V 3N~ 5x1.5 mm² 400V 3N~ 5x1.5 mm² 415V 3N~
The power supply cable connection may vary depending on the type of junction box.
USAGE
The product is operated using touch keys, and functions are confirmed on the screen and by an acoustic signal.

| Način rada stanja pripravnosti | Način rada S | Napajanje do upravljačke ploče nije isključeno, no svi prikazi grijača su isključeni ili je aktiviran prikaz preostale topline. |
| Operativni način rada | Način rada B | Najmanje jedan prikaz grijača prikazu-je postavku grijanja između "0" i "9" |
| Način rada zaklju-čano | Način rada VR | Upravljačka ploča ploče za kuhanje je zaključana. |
DESCRIPTION OF OPERATING MODES
3x2.5 mm² 220V~ 3x2.5 mm² 230V~ 3x2.5 mm² 240V~

5x1.5 mm² 380V 3N~ 5x1.5 mm² 400V 3N~ 5x1.5 mm² 415V 3N~
/
3x2.5 mm² 220V~ 3x2.5 mm² 230V~ 3x2.5 mm² 240V~

5x1.5 mm² 380V 3N~ 5x1.5 mm² 400V 3N~ 5x1.5 mm² 415V 3N~
www.sharphomeappliances.com
Or contact us:


YouTube


- CONTENTS
- DESCRIPTION OF THE HOB
- DEAR CUSTOMER
- SAFETY WARNINGS
- GENERAL SAFETY WARNINGS
- INSTALLATION WARNINGS
- INSTALLATION
- LOCATING YOUR BUILT-IN HOB
- ELECTRICAL CONNECTION OF YOUR HOB
- USAGE
- TURN THE APPLIANCE OFF AND ON
- SELECTING THE HEATER
- SETTING THE COOKING LEVEL WITH AND WITHOUT HEAT BOOST
- TURNING OFF INDIVIDUAL HEATERS
- TIMER FUNCTION
- MINUTE MINDER
- HEATER TIMER
- KEY LOCK
- THE FOLLOWING SAFETY FUNCTIONS ARE AVAILABLE TO AVOID UNINTENTIONALLY OPERATING THE HOB CONTROL
- SENSOR MONITORING IS INCLUDED TO PREVENT THE APPLIANCE FROM UNWANTED, RANDOM SENSOR OPERATION
- OVER-TEMPERATURE SWITCH-OFF
- OPERATING TIME LIMITATIONS
- RESIDUAL HEAT FUNCTIONS
- CLEANING AND CARE
Brand : SHARP
Model : KH-6V08FT00
Category : Cooker