
DSX-A42UI - Car radio SONY - Free user manual and instructions
Find the device manual for free DSX-A42UI SONY in PDF.


| Product type | Digital car radio |
| Brand | Sony |
| Model | DSX-A42UI |
| Dimensions (W × H × D) | 178 × 50 × 178 mm (1 DIN) |
| Weight | 0.9 kg |
| Power supply | 12 V DC (vehicle battery) |
| Power consumption | 10 A max |
| Tuner | FM/AM with RDS |
| Audio inputs | 1 x AUX (3.5 mm mini-jack), 1 x USB (front) |
| Audio outputs | 4 x speakers (50 W × 4 max) |
| Bluetooth | Built-in for calls and audio streaming |
| Supported audio formats | MP3, WMA, AAC, WAV (via USB) |
| Display | Backlit LCD display |
| Main functions | FM/AM radio, USB player, Bluetooth, AUX input, equalizer, clock |
| Equalizer | Presets (Rock, Pop, Jazz, etc.) and customizable |
| Steering wheel controls compatible | Yes (via optional adapter) |
| Care and cleaning | Wipe with a soft, dry cloth; do not use abrasive products |
| Security | Detachable front panel to prevent theft |
| Spare parts and repairability | Front panel, wiring, fuse; repair by authorized center |
| General information | User manual available for download |
Frequently Asked Questions - DSX-A42UI SONY
User questions about DSX-A42UI SONY
0 question about this device. Answer the ones you know or ask your own.
Ask a new question about this device
Download the instructions for your Car radio in PDF format for free! Find your manual DSX-A42UI - SONY and take your electronic device back in hand. On this page are published all the documents necessary for the use of your device. DSX-A42UI by SONY.
USER MANUAL DSX-A42UI SONY
FM/MW/LW Digital Media Player
| Operating Instructions | GB |
| Bedienungsanleitung | DE |
| Mode d’emploi | FR |
| Istruzioni per l’uso | IT |
| Gebruiksaanwijzing | NL |
Be sure to install this unit in the dashboard of the car for safety.
For installation and connections, see the supplied installation/connections manual.
Made in Thailand
Notice for customers: the following information is only applicable to equipment sold in countries applying EU Directives
Manufacturer: Sony Corporation, 1-7-1 Konan Minato-ku Tokyo, 108-0075 Japan For EU product compliance: Sony Deutschland GmbH, Hedelfinger Strasse 61, 70327 Stuttgart, Germany

Disposal of waste batteries (applicable in the European Union and other European countries with separate collection systems)
This symbol on the battery or on the packaging indicates that the battery provided with this product shall not be treated as household waste. On certain batteries this symbol might be used in combination with a chemical symbol. The chemical symbols for mercury (Hg) or lead (Pb) are added if the battery contains more than 0.0005% mercury or 0.004% lead. By ensuring these batteries are disposed of correctly, you will help prevent potentially negative consequences for the environment and human health which could otherwise be caused by inappropriate waste handling of the battery. The recycling of the materials will help to conserve natural resources. In case of products that for safety, performance or data integrity reasons require a
permanent connection with an incorporated battery, this battery should be replaced by qualified service staff only. To ensure that the battery will be treated properly, hand over the product at end-of-life to the applicable collection point for the recycling of electrical and electronic equipment. For all other batteries, please view the section on how to remove the battery from the product safely. Hand the battery over to the applicable collection point for the recycling of waste batteries. For more detailed information about recycling of this product or battery, please contact your local Civic Office, your household waste disposal service or the shop where you purchased the product.
Note on the lithium battery
Do not expose the battery to excessive heat such as direct sunlight, fire or the like.
Warning if your car's ignition has no ACC position
Be sure to set the AUTO OFF function (page 13). The unit will shut off completely and automatically in the set time after the unit is turned off, which prevents battery drain. If you do not set the AUTO OFF function, press and hold OFF until the display disappears each time you turn the ignition off.
Table of Contents
Guide to Parts and Controls....4
Getting Started
Detaching the Front Panel 6
Setting the Clock....7
Connecting an iPod/USB Device ..... 7
Connecting Other Portable Audio Device....7
Listening to the Radio
Listening to the Radio 8
Using Radio Data System (RDS)....9
Playback
Playing an iPod/USB Device ..... 10
Searching and Playing Tracks .....11
Settings
Canceling the DEMO Mode ..... 13
Basic Setting Operation 13
General Setup 13
Sound Setup 14
EQ3 PRST (EQ3 preset) ..... 14
EQ3 LOW, EQ3 MID, EQ3 HIGH ..... 14
Additional Information
Precautions 15
Maintenance....16
Specifications....16
Troubleshooting....18
Guide to Parts and Controls
Main unit

The number 2/ALBUM ▲ button has a tactile dot.
1 Q(browse) (page 12)
Enter the browse mode during playback.
2 SOURCE
Turn on the power.
Change the source.
-OFF
Press and hold for 1 second to turn off the power.
Press and hold for more than 2 seconds to turn off the power and the display. If the unit is turned off and the display disappears, you will not be able to operate it with the remote.
3 Control dial
Rotate to adjust the volume.
ENTER
Enter the selected item.
SELECT
Enter sound setting.
Press and hold to open the general setup menu.
4 MODE (page 8, 11)
5 Display window
6 (back)
Return to the previous display.
7 (front panel release)
8 SEEK +/-
Tune in radio stations automatically. Press and hold to tune manually.
|◀◀/▶▶I (prev/next), ◀◀/▶▶ (reverse/fast-forward)
9 Receptor for the remote commander
10 AF (alternative frequencies)/TA (traffic announcement)
Set AF and TA in RDS.
-PTY (program type)
Press and hold to select PTY in RDS.
11 Number buttons
Receive stored radio stations. Press and hold to store stations.
ALBUM ▼/▲
Skip an album for audio device. Press and hold to skip albums continuously.
PAUSE
SHUF (shuffle)
12 DSPL (display)
Change display items.
-SCRL (scroll)
Press and hold to scroll a display item.
13 USB port
14 AUX input jack
RM-X211 Remote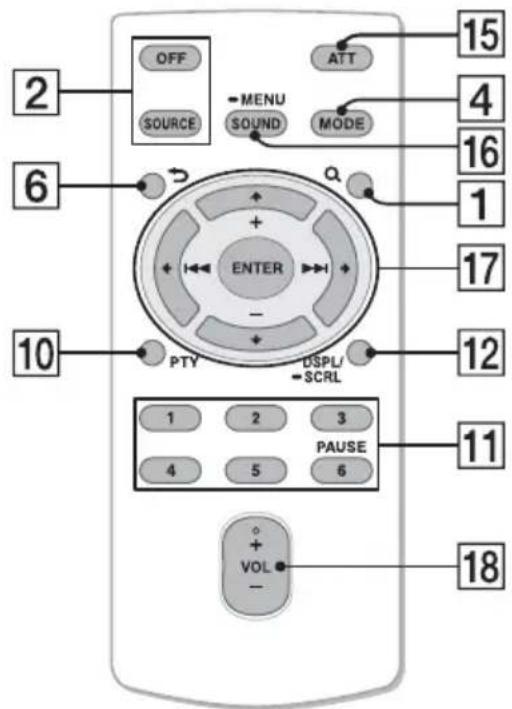
The VOL (volume) + button has a tactile dot.
Remove the insulation film before use.

15 ATT (attenuate)
Attenuate the sound. Press again to cancel the attenuated sound.
16 SOUND
Open the sound setup menu directly.
-MENU
Press and hold to open the general setup menu.
17 ← (I◀◀)/↑ (+)/↓ (-)/→ (▶▶I)/ENTER Setup items, etc. can be operated by ←/↑/↓/→. 18 VOL (volume) +/-
Getting Started
Detaching the Front Panel
You can detach the front panel of this unit to prevent theft.
1 Press and hold OFF ①.
The unit is turned off.
2 Press ⏻ ②, then remove the panel by pulling it towards you.

Caution alarm
If you turn the ignition switch to the OFF position without detaching the front panel, the caution alarm will sound for a few seconds. The alarm will only sound if the built-in amplifier is used.
Attaching the front panel
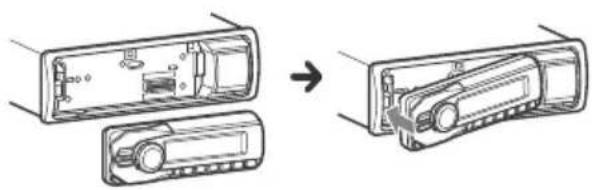
Setting the Clock
1 Press and hold SELECT.
The setup display appears.
2 Rotate the control dial to select [CLOCK-ADJ], then press it.
The hour indication flashes.
3 Rotate the control dial to set the hour and minute.
To move the digital indication, press SEEK +/-.
4 After setting the minute, press SELECT.
The setup is complete and the clock starts.
To display the clock, press DSPL.
Connecting an iPod/USB Device
1 Turn down the volume on the unit.
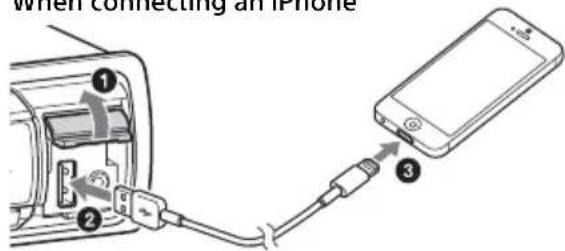
2 Connect the iPod/USB device to the unit.
To connect an iPod/iPhone, use the USB connection cable for iPod (not supplied).
When connecting an iPhone
Connecting Other Portable Audio Device
1 Turn off the portable audio device.
2 Turn down the volume on the unit.
3 Connect the portable audio device to the AUX input jack (stereo mini jack) on the unit with a connecting cord (not supplied)*.
* Be sure to use a straight type plug.

4 Press SOURCE to select [AUX].
To match the volume level of the connected device to other sources
Start playback of the portable audio device at a moderate volume, and set your usual listening volume on the unit.
Press SELECT, and rotate the control dial to select [AUX VOL] (page 14).
Listening to the Radio
Listening to the Radio
To listen to the radio, press SOURCE to select [TUNER].
Storing automatically (BTM)
1 Press MODE to change the band. 2 Press and hold SELECT (FM1, FM2, FM3, MW or LW). The setup display appears. 3 Rotate the control dial to select [BTM], then press it. The unit stores stations in order of frequency on the number buttons.
Tuning
1 Press MODE to change the band (FM1, FM2, FM3, MW or LW).
2 Perform tuning.
To tune manually
Press and hold SEEK +/- to locate the approximate frequency, then press SEEK +/- repeatedly to fine adjust to the desired frequency.
To tune automatically
Press SEEK +/-
Scanning stops when the unit receives a station. Repeat this procedure until the desired station is received.
Storing manually
1 While receiving the station that you want to store, press and hold a number button (1 to 6) until [MEM] appears.
Receiving the stored stations
1 Select the band, then press a number button (1 to 6).
Using Radio Data System (RDS)
Setting alternative frequencies (AF) and traffic announcement (TA)
AF continuously retunes the station to the strongest signal in a network, and TA provides current traffic information or traffic programs (TP) if received.
1 Press AF/TA to select [AF-ON], [TA-ON], [AF/TA-ON] or [AF/TA-OFF].
To store RDS stations with the AF and TA setting
You can preset RDS stations along with an AF/TA setting. Set AF/TA, then store the station with BTM or manually. If you preset manually, you can also preset non-RDS stations.
To receive emergency announcements
With AF or TA on, emergency announcements will automatically interrupt the currently selected source.
When adjusting the volume level during a traffic announcement
Level will be stored into memory for subsequent traffic announcements, independently from the regular volume level.
To stay with one regional program (REGIONAL)
When the AF and REGIONAL functions are on, you will not be switched to another regional station with a stronger frequency. If you leave this regional program's reception area, set [REG-OFF] in the general setup during FM reception (page 14).
This function does not work in the UK and some other areas.
Local Link function (UK only)
This function enables you to select other local stations in the area, even if they are not stored on your number buttons.
During FM reception, press a number button (1 to 6) on which a local station is stored.
Within 5 seconds, press again a number button of the local station. Repeat this procedure until the local station is received.
Selecting program types (PTY)
Use PTY to display or search for a desired program type.
1 Press and hold PTY during FM reception.
2 Rotate the control dial until the desired program type appears, then press it.
The unit starts to search for a station broadcasting the selected program type.
Type of programs
NEWS (News), AFFAIRS (Current Affairs), INFO (Information), SPORT (Sports), EDUCATE (Education), DRAMA (Drama), CULTURE (Culture), SCIENCE (Science), VARIED (Varied), POP M (Pop Music), ROCK M (Rock Music), EASY M (M.O.R. Music), LIGHT M (Light classical), CLASSICS (Serious classical), OTHER M (Other Music), WEATHER (Weather), FINANCE (Finance), CHILDREN (Children's program), SOCIAL A (Social Affairs), RELIGION (Religion), PHONE IN (Phone In), TRAVEL (Travel), LEISURE (Leisure), JAZZ (Jazz Music), COUNTRY (Country Music), NATION M (National Music), OLDIES (Oldies Music), FOLK M (Folk Music), DOCUMENT (Documentary)
Setting clock time (CT)
The CT data from the RDS transmission sets the clock.
1 Set [CT-ON] in the general setup (page 13).
Playback
Playing an iPod/USB Device
In these Operating Instructions, "iPod" is used as a general reference for the iPod functions on an iPod and iPhone, unless otherwise specified by the text or illustrations.
For details on the compatibility of your iPod, see "About iPod" (page 15) or visit the support site on the back cover.
MSC (Mass Storage Class)-type USB devices (such as a USB flash drive, digital media player, Android™ phone) compliant with the USB standard can be used.
Depending on the digital media player or Android phone, setting the USB connection mode to MSC is required.
Notes
- For details on the compatibility of your USB device, visit the support site on the back cover.
- Playback of the following MP3/WMA files is not supported.
— lossless compression files – copyright-protected files — DRM (Digital Rights Management) files — Multi-channel audio files
1 Connect an iPod/USB device to the USB port (page 7).
Playback starts.
If a device is already connected, to start playback, press SOURCE to select [USB].
2 Adjust the volume on this unit.
To stop playback
Press and hold OFF for 1 second.
To remove the device
Stop playback, then remove the device.
Caution for iPhone
When you connect an iPhone via USB, phone call volume is controlled by the iPhone, not the unit. Do not inadvertently increase the volume on the unit during a call, as sudden loud sound may result when the call ends.
Operating an iPod directly (Passenger control)
Press and hold MODE during playback to display [IPOD] to enable operation by the iPod directly.
Note that the volume can be adjusted only by the unit.
To exit passenger control
Press and hold MODE until [AUDIO] appears.
Searching and Playing Tracks
Repeat play and shuffle play
Repeat play:
1 During playback, press and hold SELECT. 2 Rotate the control dial to select [REPEAT], then press it. 3 Rotate the control dial to select the desired play mode, then press it. 4 Press (back) to return to the previous display.
Shuffle play:
1 During playback, press SHUF repeatedly to select the desired play mode.
Playback in selected play mode may take time to start.
Available play modes differ depending on the selected sound source.
Searching a track by name (Quick-BrowZer™)
1 During USB playback, press (browse)* to display the list of search categories.
When the track list appears, press (back) repeatedly to display the desired search category.
* During playback, press (browse) for more than 2 seconds to directly return to the beginning of the category list.
2 Rotate the control dial to select the desired search category, then press it to confirm. 3 Repeat step 2 to search the desired track. Playback starts.
To exit the Quick-BrowZer mode
Press Q (browse).
Searching by skipping items (Jump mode)
1 Press 🔒 (browse) 2 Press SEEK +. 3 Rotate the control dial to select the item.
The list is jumped in steps of 10% of the total number of items.
4 Press ENTER to return to the Quick-BrowZer mode. The selected item appears. 5 Rotate the control dial to select the desired item, then press it. Playback starts.
Settings
Canceling the DEMO Mode
You can cancel the demonstration display which appears while this unit is turned off.
1 Press and hold SELECT. The setup display appears.
2 Rotate the control dial to select [DEMO], then press it.
3 Rotate the control dial to select [DEMO-OFF], then press it.
The setting is complete.
4 Press → (back).
The display returns to normal reception/play mode.
Basic Setting Operation
You can set items in the menu to the following procedure.
The following items can be set depending on the source and setting.
1 Press SELECT for the sound setup or press and hold SELECT for the general setup.
2 Rotate the control dial to select the desired item, then press it.
3 Rotate the control dial to select the options, then press it.
To return to the previous display
Press ↩ (back).
General Setup
CLOCK-ADJ (clock adjust) (page 7)
CT (clock time) Activates the CT function: [ON], [OFF].
BEEP Activates the beep sound: [ON], [OFF].
CAUT ALM (caution alarm) Activates the caution alarm: [ON], [OFF] (page 6). (Available only when the unit is turned off.)
AUX-A (AUX audio) Activates the AUX source display: [ON], [OFF]. (Available only when the unit is turned off.)
AUTO OFF Shuts off automatically after a desired time when the unit is turned off: [NO], [30S] (30 seconds), [30M] (30 minutes), [60M] (60 minutes).
DEMO (demonstration) Activates the demonstration: [ON], [OFF].
DIMMER Changes the display brightness: [ON], [OFF].
AUTO SCR (auto scroll) Scrolls long items automatically: [ON], [OFF].
REPEAT (page 11)
REGIONAL
Restricts reception to a specific region: [ON], [OFF]. (Available only when FM is received.)
LOUDNESS (dynamic loudness)
Reinforces bass and treble for clear sound at low volume levels: [ON], [OFF].
BTM (page 8)
Sound Setup
EQ3 PRST (EQ3 preset)
Selects an equalizer curve from 7 equalizer curves or off: [XPLOD], [VOCAL], [EDGE], [CRUISE], [SPACE], [GRAVITY], [CUSTOM], [OFF].
The equalizer curve setting can be memorized for each source.
EQ3 LOW, EQ3 MID, EQ3 HIGH
Sets [CUSTOM] of EQ3.
Customizes the equalizer curve.
The volume level is adjustable in 1 dB steps, from -10 dB to +10 dB.
BALANCE
Adjusts the sound balance: [RIGHT-15 (R15)] - [CENTER (0)] - [LEFT-15 (L15)].
FADER
Adjusts the relative level: [FRONT-15 (F15)] - [CENTER (0)] - [REAR-15 (R15)].
AUX VOL (AUX volume level)
Adjusts the volume level for each connected auxiliary device:
[+18 dB] - [0 dB] - [-8 dB].
This setting negates the need to adjust the volume level between sources.
Additional Information
Precautions
- Cool off the unit beforehand if your car has been parked in direct sunlight.
- Do not leave the front panel or audio devices brought in inside the car, or it may cause malfunction due to high temperature in direct sunlight. • Power antenna (aerial) extends automatically.
To maintain high sound quality
Do not splash liquid onto the unit.
Playback order of MP3/WMA files
![graph TD A["MP3/WMA"] --> B["1"] B --> C["①"] B --> D["②"] B --> E["③"] B --> F["④"] B --> G["⑤"] B --> H["⑥"] B --> I["⑦"] B --> J["⑧"] C --> K["2"] D --> L["3"] E --> M["4"] F --> N["5"] G --> O["6"] H --> P["7"] I --> Q["8"] style A fill:#f9f,stroke:#333 style B fill:#ccf,stroke:#333 style C fill…](/content/2026/06/1296287/images/8e772e564b6d3242d4708fa5a84c6cc3efb922e920088546d5f7961c73d08bcb.jpg)
About iPod
- You can connect to the following iPod models. Update your iPod devices to the latest software before use. Made for
- iPod touch (5th generation) — iPod touch (4th generation) — iPod touch (3rd generation) — iPod touch (2nd generation) — iPod classic — iPod nano (7th generation) — iPod nano (6th generation) — iPod nano (5th generation) — iPod nano (4th generation) — iPod nano (3rd generation) — iPod nano (2nd generation) — iPod nano (1st generation)*
- iPhone 5
- iPhone 4S
- iPhone 4
- iPhone 3GS
- iPhone 3G
* Passenger control is not available for iPod nano (1st generation).
- "Made for iPod" and "Made for iPhone" mean that an electronic accessory has been designed to connect specifically to iPod or iPhone respectively and has been certified by the developer to meet Apple performance standards. Apple is not responsible for the operation of this device or its compliance with safety and regulatory standards. Please note that the use of this accessory with iPod or iPhone may affect wireless performance.
Maintenance
Replacing the lithium battery of the remote commander
When the battery becomes weak, the range of the remote commander becomes shorter. Replace the battery with a new CR2025 lithium battery. Use of any other battery may present a risk of fire or explosion.
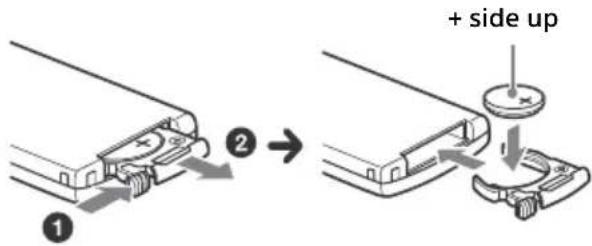
Notes on the lithium battery
- Keep the lithium battery out of the reach of children. Should the battery be swallowed, immediately consult a doctor.
- Wipe the battery with a dry cloth to assure a good contact.
- Be sure to observe the correct polarity when installing the battery.
- Do not hold the battery with metallic tweezers, otherwise a short-circuit may occur.
WARNING
Battery may explode if mistreated. Do not recharge, disassemble, or dispose of in fire.
Cleaning the connectors
The unit may not function properly if the connectors between the unit and the front panel are not clean. In order to prevent this, detach the front panel (page 6) and clean the connectors with a cotton swab. Do not apply too much force. Otherwise, the connectors may be damaged.

Notes
- For safety, turn off the ignition before cleaning the connectors, and remove the key from the ignition switch.
- Never touch the connectors directly with your fingers or with any metal device.
Specifications
Tuner section
FM
Tuning range: 87.5 - 108.0 MHz
Antenna (aerial) terminal: External antenna (aerial) connector
Intermediate frequency: 25 kHz
Usable sensitivity: 8 dBf
Selectivity: 75 dB at 400 kHz
Signal-to-noise ratio: 80 dB (stereo)
Separation: 50 dB at 1 kHz
Frequency response: 20 - 15,000 Hz
MW/LW
Tuning range:
MW: 531 - 1,602 kHz
LW: 153 - 279 kHz
Antenna (aerial) terminal:
External antenna (aerial) connector
Intermediate frequency:
9,124.5 kHz or 9,115.5 kHz/4.5 kHz
Sensitivity:
MW: 26 μV
LW: 45 μV
USB Player section
Interface: USB (Full-speed)
Maximum current: 1 A
The maximum number of recognizable data:
Folders (albums): 128
Files (tracks) per folder: 512
Corresponding codec:
MP3 (.mp3) and WMA (.wma)
Power amplifier section
Output: Speaker outputs
Speaker impedance: 4 – 8 ohms
Maximum power output: 55 W × 4 (at 4 ohms)
General
Outputs:
Audio outputs terminal (rear)
Power antenna (aerial) relay control terminal
Power amplifier control terminal
Inputs:
Remote controller input terminal
Antenna (aerial) input terminal
Power requirements: 12 V DC car battery (negative ground (earth))
Dimensions:
Approx. 178 mm × 50 mm × 120 mm
(7 1/8 in × 2 in × 4 7/8 in) (w/h/d)
Mounting dimensions:
Approx. 182 mm × 53 mm × 103 mm
(7 1/4 in × 2 1/8 in × 4 1/8 in) (w/h/d)
Mass: Approx. 0.7 kg (1 lb 9 oz)
Package contents:
Main unit (1)
Remote commander (1): RM-X211
Parts for installation and connections (1 set)
Optional accessories/equipment:
USB connection cable for iPod: RC-100IP
Your dealer may not handle some of the above listed accessories. Please ask the dealer for detailed information.
Design and specifications are subject to change without notice.
Copyrights
Windows Media is either a registered trademark or trademark of Microsoft Corporation in the United States and/or other countries.
This product is protected by certain intellectual property rights of Microsoft Corporation. Use or distribution of such technology outside of this product is prohibited without a license from Microsoft or an authorized Microsoft subsidiary.
iPhone, iPod, iPod classic, iPod nano, and iPod touch are trademarks of Apple Inc., registered in the U.S. and other countries.
MPEG Layer-3 audio coding technology and patents licensed from Fraunhofer IIS and Thomson.
Android is a trademark of Google Inc. Use of this trademark is subject to Google Permissions.
Troubleshooting
The following checklist will help you remedy problems you may encounter with your unit. Before going through the checklist below, check the connection and operating procedures.
For details on using the fuse and removing the unit from the dashboard, refer to the installation/connections manual supplied with this unit.
If the problem is not solved, visit the support site on the back cover.
General
No power is being supplied to the unit.
→ If the unit is turned off and the display disappears, the unit cannot be operated with the remote commander. — Turn on the unit.
No sound.
→ The position of the fader control [FADER] is not set for a 2-speaker system.
No beep sound.
→ An optional power amplifier is connected and you are not using the built-in amplifier.
The contents of the memory have been erased.
→ The power supply lead or battery has been disconnected or not connected properly.
Stored stations and correct time are erased.
The fuse has blown.
Makes a noise when the position of the ignition is switched.
→ The leads are not matched correctly with the car's accessory power connector.
During playback or reception, the demonstration mode starts.
→ If no operation is performed for 5 minutes with [DEMO-ON] set, the demonstration mode starts. — Set [DEMO-OFF] (page 13).
The display disappears from/does not appear in the display window.
→ The dimmer is set to [DIM-ON] (page 13). → The display disappears if you press and hold OFF. — Press OFF on the unit until the display appears. → The connectors are dirty (page 16).
Radio reception
Stations cannot be received.
The sound is hampered by noises.
→ The connection is not correct. — Check the connection of the car antenna (aerial). - If the auto antenna (aerial) will not extend, check the connection of the power antenna (aerial) control lead.
Preset tuning is not possible.
→ The broadcast signal is too weak.
RDS
The SEEK starts after a few seconds of listening.
→ The station is non-TP or has weak signal. — Deactivate TA (page 9).
No traffic announcements.
→ Activate TA (page 9). → The station does not broadcast any traffic announcements despite being TP. — Tune in another station.
PTY displays [----].
→ The current station is not an RDS station. → RDS data has not been received. → The station does not specify the program type.
Program service name flashes.
→ There is no alternative frequency for the current station. - Press SEEK +/- while the program service name is flashing. [PI SEEK] appears and the unit starts searching for another frequency with the same PI (program identification) data.
USB playback
You cannot play back items via a USB hub.
→ This unit cannot recognize USB devices via a USB hub.
A USB device takes longer to play back.
→ The USB device contains files with a complicated tree structure.
The sound is intermittent.
→ The sound may be intermittent at a high-bit-rate of more than 320 kbps.
Error displays/Messages
CHECKING
→ The unit is confirming the connection of a USB device. - Wait until confirming the connection is finished.
ERROR
→ There may be an internal malfunction. — Press OFF for more than 2 seconds (the display disappears), then press OFF again.
There may be an internal malfunction. Press OFF for more than 2 seconds (the display disappears), then press OFF again. If the error indication remains on in the display, consult your nearest Sony dealer.
NO AF (no alternative frequencies)
There is no alternative frequency for the current station. Press SEEK +/- while the program service name is flashing. The unit starts searching for another frequency with the same PI (program identification) data ([PI SEEK] appears).
NO MUSIC
The USB device does not contain a music file. Connect a USB device with a music file in it.
NO NAME
An album/artist/track name is not written in the USB.
NO SUPRT (not supported)
USB hub is not supported on this unit. The connected USB device is not supported. For details on the compatibility of your USB device, visit the support site on the back cover.
NO TP (no traffic programs)
The unit will continue searching for available TP stations.
NO USB
USB is selected as source without a USB device connected. A USB device or a USB cable has been disconnected during playback. Be sure to connect a USB device and USB cable.
OVERLOAD
→ USB device is overloaded.
- Disconnect the USB device, then change the source by pressing OFF.
- Indicates that the USB device is out of order, or an unsupported device is connected.
READ
→ The unit is reading all track and album information on the USB device.
— Wait until reading is complete and playback starts automatically. Depending on the USB device structure, it may take more than a minute.
STOP
→ When repeat play is not set, playback of the last track in album finished.
The music application in the iPod/iPhone is terminated.
— Press PAUSE to start playback again.
If these solutions do not help improve the situation, consult your nearest Sony dealer.
Basic settings ..... 15
General configuration....15
Sound configuration ....16
EQ3 PRST (EQ3 preset) ..... 16
EQ3 LOW, EQ3 MID, EQ3 HIGH.....16
15 ATT (attenuation)
Playback starts.
Notes
Main unit (1)
Note
Intermediate frequency: 25 kHz
Folders (albums): 128
-PTY (program type)
15 ATT (attenuation)
Warning tone
Setting the clock
1 Hold down SELECT.
4 Press SOURCE to select [AUX].
Notes
Interface: USB (Full-speed)
Maximum current: 1 A
Folders (albums): 128
Files (tracks) per folder: 512
Compatible codec:
MP3 (.mp3) and WMA (.wma)
Amplifier
If you have any questions or for the latest support information on this product, please visit the web site below:
Support site
Register your product online now at:
www.sony-europe.com/myproducts
- FM/MW/LW DIGITAL MEDIA PLAYER
- NOTICE FOR CUSTOMERS: THE FOLLOWING INFORMATION IS ONLY APPLICABLE TO EQUIPMENT SOLD IN COUNTRIES APPLYING EU DIRECTIVES
- DISPOSAL OF WASTE BATTERIES (APPLICABLE IN THE EUROPEAN UNION AND OTHER EUROPEAN COUNTRIES WITH SEPARATE COLLECTION SYSTEMS)
- NOTE ON THE LITHIUM BATTERY
- WARNING IF YOUR CAR'S IGNITION HAS NO ACC POSITION
- TABLE OF CONTENTS
- GETTING STARTED
- LISTENING TO THE RADIO
- PLAYBACK
- SETTINGS
- ADDITIONAL INFORMATION
- GUIDE TO PARTS AND CONTROLS
- MAIN UNIT
- DETACHING THE FRONT PANEL
- CAUTION ALARM
- ATTACHING THE FRONT PANEL
- SETTING THE CLOCK
- CONNECTING AN IPOD/USB DEVICE
- CONNECTING OTHER PORTABLE AUDIO DEVICE
- TO MATCH THE VOLUME LEVEL OF THE CONNECTED DEVICE TO OTHER SOURCES
- STORING AUTOMATICALLY (BTM)
- TUNING
- STORING MANUALLY
- RECEIVING THE STORED STATIONS
- USING RADIO DATA SYSTEM (RDS)
- SETTING ALTERNATIVE FREQUENCIES (AF) AND TRAFFIC ANNOUNCEMENT (TA)
- TO STORE RDS STATIONS WITH THE AF AND TA SETTING
- TO RECEIVE EMERGENCY ANNOUNCEMENTS
- WHEN ADJUSTING THE VOLUME LEVEL DURING A TRAFFIC ANNOUNCEMENT
- TO STAY WITH ONE REGIONAL PROGRAM (REGIONAL)
- LOCAL LINK FUNCTION (UK ONLY)
- SELECTING PROGRAM TYPES (PTY)
- PRESS AND HOLD PTY DURING FM RECEPTION
- ROTATE THE CONTROL DIAL UNTIL THE DESIRED PROGRAM TYPE APPEARS, THEN PRESS IT
- TYPE OF PROGRAMS
- SETTING CLOCK TIME (CT)
- PLAYING AN IPOD/USB DEVICE
- NOTES
- TO STOP PLAYBACK
- TO REMOVE THE DEVICE
- CAUTION FOR IPHONE
- OPERATING AN IPOD DIRECTLY (PASSENGER CONTROL)
- TO EXIT PASSENGER CONTROL
- SEARCHING AND PLAYING TRACKS
- REPEAT PLAY AND SHUFFLE PLAY
- REPEAT PLAY
- SHUFFLE PLAY
- SEARCHING A TRACK BY NAME (QUICK-BROWZER™)
- SEARCHING BY SKIPPING ITEMS (JUMP MODE)
- CANCELING THE DEMO MODE
- BASIC SETTING OPERATION
- ROTATE THE CONTROL DIAL TO SELECT THE OPTIONS, THEN PRESS IT
- GENERAL SETUP
- REPEAT (PAGE 11)
- REGIONAL
- LOUDNESS (DYNAMIC LOUDNESS)
- BTM (PAGE 8)
- SOUND SETUP
- EQ3 PRST (EQ3 PRESET)
- EQ3 LOW, EQ3 MID, EQ3 HIGH
- BALANCE
- FADER
- AUX VOL (AUX VOLUME LEVEL)
- PRECAUTIONS
- TO MAINTAIN HIGH SOUND QUALITY
- PLAYBACK ORDER OF MP3/WMA FILES
- ABOUT IPOD
- MAINTENANCE
- REPLACING THE LITHIUM BATTERY OF THE REMOTE COMMANDER
- NOTES ON THE LITHIUM BATTERY
- WARNING
- CLEANING THE CONNECTORS
- SPECIFICATIONS
- TUNER SECTION
- FM
- MW/LW
- USB PLAYER SECTION
- POWER AMPLIFIER SECTION
- GENERAL
- COPYRIGHTS
- TROUBLESHOOTING
- NO POWER IS BEING SUPPLIED TO THE UNIT
- NO SOUND
- NO BEEP SOUND
- THE CONTENTS OF THE MEMORY HAVE BEEN ERASED
- STORED STATIONS AND CORRECT TIME ARE ERASED
- THE FUSE HAS BLOWN
- MAKES A NOISE WHEN THE POSITION OF THE IGNITION IS SWITCHED
- DURING PLAYBACK OR RECEPTION, THE DEMONSTRATION MODE STARTS
- THE DISPLAY DISAPPEARS FROM/DOES NOT APPEAR IN THE DISPLAY WINDOW
- RADIO RECEPTION
- STATIONS CANNOT BE RECEIVED
- THE SOUND IS HAMPERED BY NOISES
- PRESET TUNING IS NOT POSSIBLE
- RDS
- THE SEEK STARTS AFTER A FEW SECONDS OF LISTENING
- NO TRAFFIC ANNOUNCEMENTS
- PTY DISPLAYS [----]
- PROGRAM SERVICE NAME FLASHES
- USB PLAYBACK
- YOU CANNOT PLAY BACK ITEMS VIA A USB HUB
- A USB DEVICE TAKES LONGER TO PLAY BACK
- THE SOUND IS INTERMITTENT
- ERROR DISPLAYS/MESSAGES
- CHECKING
- ERROR
- NO AF (NO ALTERNATIVE FREQUENCIES)
- NO MUSIC
- NO NAME
- NO SUPRT (NOT SUPPORTED)
- NO TP (NO TRAFFIC PROGRAMS)
- NO USB
- OVERLOAD
- READ
- STOP
- NOTE
- WARNING TONE
- AMPLIFIER
- SUPPORT SITE
Brand : SONY
Model : DSX-A42UI
Category : Car radio