
WK-110 - Electronic keyboard CASIO - Free user manual and instructions
Find the device manual for free WK-110 CASIO in PDF.
| Product Type | Portable Electronic Keyboard |
| Brand | CASIO |
| Model | WK-110 |
| Number of Keys | 76 velocity-sensitive keys |
| Polyphony | 32 notes (maximum) |
| Number of Tones | 515 |
| Number of Built-in Songs | 100 songs in memory |
| Number of Rhythms | 120 |
| Power Supply | 6 AA batteries (approx. 2.5 h alkaline) or AD-5 AC adapter (optional) |
| Learning Functions | 3-step learning system with evaluation mode and voice finger guide |
| Sound Effects | Reverb (4 types) and Chorus (4 types) |
| Recording | 2-track recorder (approx. 12,000 notes) for lessons and performances |
| Registration Memory | 32 setups (4 x 8 banks) |
| Auto Accompaniment | Yes, with CASIO CHORD, FINGERED, and FULL RANGE CHORD modes |
| Connectivity | USB (type B) port for computer connection, headphone/output jack, sustain/assignable jack |
| Built-in Speakers | 2 speakers, 5W each (estimated) |
| Additional Functions | Layer, Split, Transpose, Tuning, Touch Response, Metronome, Piano Setting Button |
| Dimensions | Not specified in the manual |
| Weight | Not specified in the manual |
| Power Consumption | Not specified |
| Maintenance | Disconnect adapter before cleaning; use a dry cloth; do not use detergent |
| Replacement Parts and Options | AD-5 adapter, SP-3/SP-20 sustain pedal, optional stand |
| Warranty and Certification | Complies with FCC Part 15 (USA); CE marking for EU |
Frequently Asked Questions - WK-110 CASIO
User questions about WK-110 CASIO
0 question about this device. Answer the ones you know or ask your own.
Ask a new question about this device
Download the instructions for your Electronic keyboard in PDF format for free! Find your manual WK-110 - CASIO and take your electronic device back in hand. On this page are published all the documents necessary for the use of your device. WK-110 by CASIO.
USER MANUAL WK-110 CASIO
natural_image
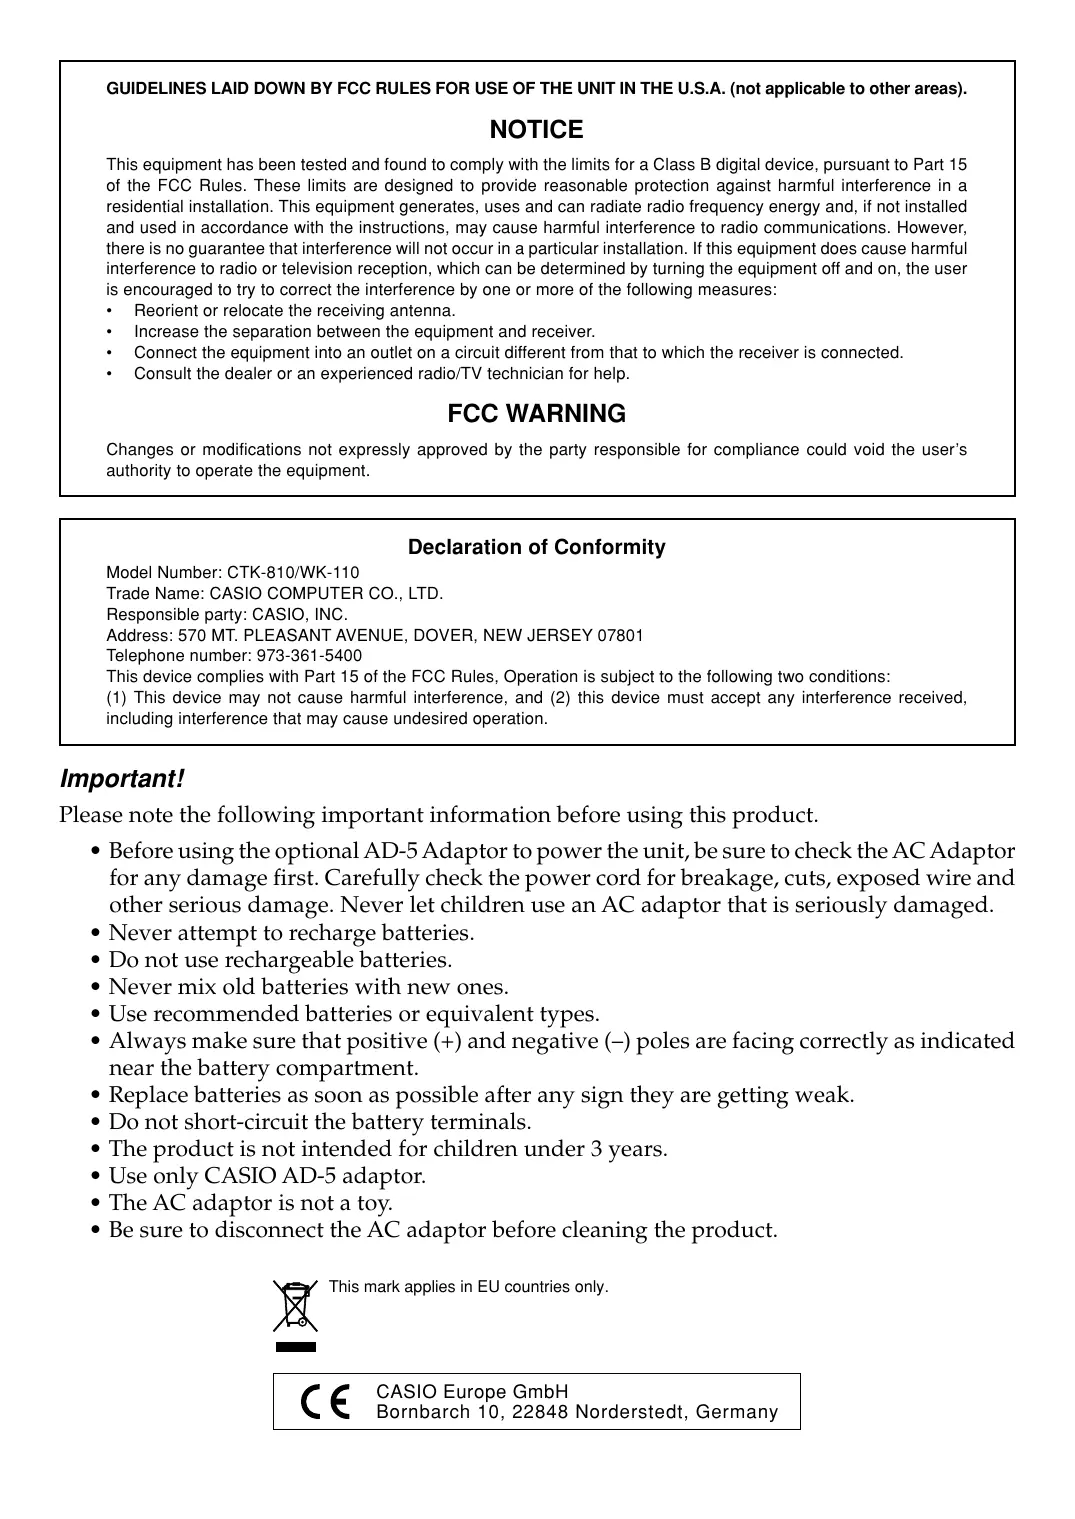
Abstract graphic with musical notes and a stylized musical note shape (no text or symbols)GUIDELINES LAID DOWN BY FCC RULES FOR USE OF THE UNIT IN THE U.S.A. (not applicable to other areas).
NOTICE
This equipment has been tested and found to comply with the limits for a Class B digital device, pursuant to Part 15 of the FCC Rules. These limits are designed to provide reasonable protection against harmful interference in a residential installation. This equipment generates, uses and can radiate radio frequency energy and, if not installed and used in accordance with the instructions, may cause harmful interference to radio communications. However, there is no guarantee that interference will not occur in a particular installation. If this equipment does cause harmful interference to radio or television reception, which can be determined by turning the equipment off and on, the user is encouraged to try to correct the interference by one or more of the following measures:
• Reorient or relocate the receiving antenna.
- Increase the separation between the equipment and receiver.
- Connect the equipment into an outlet on a circuit different from that to which the receiver is connected.
- Consult the dealer or an experienced radio/TV technician for help.
FCC WARNING
Changes or modifications not expressly approved by the party responsible for compliance could void the user's authority to operate the equipment.
Declaration of Conformity
Model Number: CTK-810/WK-110
Trade Name: CASIO COMPUTER CO., LTD.
Responsible party: CASIO, INC.
Address: 570 MT. PLEASANT AVENUE, DOVER, NEW JERSEY 07801
Telephone number: 973-361-5400
This device complies with Part 15 of the FCC Rules, Operation is subject to the following two conditions:
(1) This device may not cause harmful interference, and (2) this device must accept any interference received, including interference that may cause undesired operation.
Important!
Please note the following important information before using this product.
- Before using the optional AD-5 Adaptor to power the unit, be sure to check the AC Adaptor for any damage first. Carefully check the power cord for breakage, cuts, exposed wire and other serious damage. Never let children use an AC adaptor that is seriously damaged.
- Never attempt to recharge batteries.
- Do not use rechargeable batteries.
- Never mix old batteries with new ones.
- Use recommended batteries or equivalent types.
- Always make sure that positive (+) and negative (−) poles are facing correctly as indicated near the battery compartment.
- Replace batteries as soon as possible after any sign they are getting weak.
- Do not short-circuit the battery terminals.
- The product is not intended for children under 3 years.
- Use only CASIO AD-5 adaptor.
- The AC adaptor is not a toy.
- Be sure to disconnect the AC adaptor before cleaning the product.

This mark applies in EU countries only.

CASIO Europe GmbH
Bornbarch 10, 22848 Norderstedt, Germany
Congratulations on your selection of the CASIO electronic musical instrument.
- Before using the instrument, be sure to carefully read through the instructions contained in this manual.
- Please keep all information for future reference.
Symbols
Various symbols are used in this user's guide and on the product itself to ensure that the product is used safely and correctly, and to prevent injury to the user and other persons as well as damage to property. Those symbols along with their meanings are shown below.

DANGER
This symbol indicates information that, if ignored or applied incorrectly, creates the danger of death or serious personal injury.

WARNING
This indication stipulates matters that have the risk of causing death or serious injury if the product is operated incorrectly while ignoring this indication.

CAUTION
This indication stipulates matters that have the risk of causing injury as well as matters for which there is the likelihood of occurrence of physical damage only if the product is operated incorrectly while ignoring this indication.
Symbol Examples

This triangle symbol ( ) means that the user should be careful. (The example at left indicates electrical shock caution.)

This circle with a line through it ( ) means that the indicated action must not be performed. Indications within or nearby this symbol are specifically prohibited. (The example at left indicates that disassembly is prohibited.)

The black dot (●) means that the indicated action must be performed. Indications within this symbol are actions that are specifically instructed to be performed. (The example at left indicates that the power plug must be unplugged from the electrical socket.)

DANGER
Alkaline Batteries
Perform the following steps immediately if fluid leaking from alkaline batteries ever gets into your eyes.
- Do not rub your eyes! Rinse them with water.
- Contact your physician immediately. Leaving alkaline battery fluid in your eyes can lead to loss of sight.


WARNING
Smoke, Strange Odor, Overheating
Continued use of the product while it is emitting smoke, a strange odor, or heat creates the risk of fire and electric shock. Take the following steps immediately.
- Turn off power.
- If you are using the AC adaptor for power, unplug it from the wall outlet.
- Contact your original retailer or an authorized CASIO Service Provider.
AC Adaptor
- Misuse of the AC adaptor creates the risk of fire and electric shock. Always make sure you observe the following precautions.
- Be sure to use only the AC adaptor that is specified for this product.
- Use only a power source whose voltage is within the rating marked on the AC adaptor.
- Do not overload electrical outlets and extension cords.
- Misuse of the AC adaptor's electric cord can damage or break it, creating the risk of fire and electric shock. Always make sure you observe the following precautions.
- Never place heavy objects on the cord or subject it to heat.
- Never try to modify the cord or subject it to excessive bending.
- Never twist or stretch the cord.
- Should the electric cord or plug become damaged, contact your original retailer or authorized CASIO Service Provider.


● Never touch the AC adaptor while your hands are wet.
Doing so creates the risk of electric shock.
- Use the AC adaptor where it will not be splashed with water. Water creates the risk of fire and electric shock.
- Do not place a vase or any other container filled with liquid on top of the AC adaptor. Water creates the risk of fire and electric shock.
Batteries
Misuse of batteries can cause them to leak, resulting in damage to nearby objects, or to explode, creating the risk of fire and personal injury. Always make sure you observe the following precautions.
- Never try to take batteries apart or allow them to become shorted.
- Never expose batteries to heat or dispose of them by incineration.
- Never mix old batteries with new ones.
- Never mix batteries of different types.
- Do not charge the batteries.
- Make sure the positive (+) and negative (−) ends of the batteries are facing correctly.
Do not incinerate the product.
Never throw the product into fire.
Doing so can cause it to explode, creating the risk of fire and personal injury.
Water and Foreign Matter
Water, other liquids, and foreign matter (such as pieces of metal) getting into the product create the risk of fire and electric shock. Take the following steps immediately.
- Turn off power.
- If you are using the AC adaptor for power, unplug it from the wall outlet.
- Contact your original retailer or an authorized CASIO Service Provider.
Disassembly and Modification
Never try to take this product apart or modify it in any way. Doing so creates the risk of electric shock, burn injury, or other personal injury. Leave all internal inspection, adjustment, and maintenance up to your original retailer or authorized CASIO Service Provider.


Dropping and Impact
Continued use of this product after it has been damaged by dropping or subjecting it to strong impact creates the risk of fire and electric shock. Take the following steps immediately.
- Turn off power.
- If you are using the AC adaptor for power, unplug it from the wall outlet.
- Contact your original retailer or an authorized CASIO Service Provider.
Plastic Bags
Never place the plastic bag the product comes in over your head or in your mouth. Doing so creates the risk of suffocation.
Particular care concerning this precaution is required where small children are present.
Keep off of the product and stand.\*
Climbing onto the product or stand can cause it to tip over or become damaged. Particular care concerning this precaution is required where small children are present.
Location
Avoid locating the product on an unstable stand, on an uneven surface, or any other unstable location. An unstable location can cause the product to fall over, creating the risk of personal injury.


CAUTION
AC Adaptor
- Misuse of the AC adaptor creates the risk of fire and electric shock. Always make sure you observe the following precautions.
- Do not locate the electric cord near a stove or other sources of heat.
- Never pull on the cord when unplugging from the electrical outlet. Always grasp the AC adaptor when unplugging.
- Misuse of the AC adaptor creates the risk of fire and electric shock. Always make sure you observe the following precautions.
- Insert the AC adaptor into the wall outlet as far as it will go.
- Unplug the AC adaptor from the wall outlet during lightening storms or before leaving on a trip or other long-term absence.
- To keep dust from building up in the area between the prongs of the power plug, unplug it from the power outlet and use a dry cloth or vacuum cleaner to remove dust at least once a year.
- Never use detergent to clean the power cord, especially the plug and jack parts.
Relocating the Product
Before relocating the product, always unplug the AC adaptor from the wall outlet and disconnect all other cables and connecting cords. Leaving cords connected creates the risk of damage to the cords, fire, and electric shock.
Cleaning
Before cleaning the product, always unplug the AC adaptor from the wall outlet first. Leaving the AC adaptor plugged in creates the risk of damage to the AC adaptor, fire, and electric shock.
Batteries
Misuse of batteries can cause them to leak resulting in damage to nearby objects, or to explode, creating the risk of fire and personal injury. Always make sure you observe the following precautions.
- Use only batteries that are specified for use with this product.
- Remove batteries from the product if you do not plan to use it for a long time.


Connectors
Connect only the specified devices and equipment to the product's connectors. Connection of a non-specified device or equipment creates the risk of fire and electric shock.
Location
Avoid the following locations for this product. Such locations create the risk of fire and electric shock.
- Areas subject to high humidity or large amounts of dust.
- In food preparation areas or other areas subject to oil smoke.
- Near air conditioning equipment, on a heated carpet, in areas exposed to direct sunlight, inside of a vehicle parked in the sun, or any other area that subjects the product to high temperatures.
Display Screen
- Never push on the display screen's LCD panel or subject it to strong impact. Doing so can cause the LCD panel's glass to crack, creating the risk of personal injury.
- Should the LCD panel ever crack or break, never touch the liquid inside of the panel. LCD panel liquid can cause skin irritation.
- Should LCD panel liquid ever get inside your mouth, immediately wash out your mouth with water and contact your physician.
- Should LCD panel liquid ever get into your eyes or onto your skin, rinse with clear water for at least 15 minutes, and then contact a physician.
Sound Volume
Do not listen to music at very loud volumes for long periods. Particular care concerning this precaution is required when using headphones. High volume settings can damage your hearing.
Heavy Objects
Never place heavy object on top of the product.
Doing so can make the product top heavy, causing the product to tip over or the object to fall from it, creating the risk of personal injury.


Correct Stand\* Assembly
An incorrectly assembled stand can tip over, causing the product to fall and creating the risk of personal injury.
Make sure you assemble the stand correctly, following the assembly instructions that come with it. Make sure you mount the product on the stand correctly.

* Stand is available as an option.
IMPORTANT!
When using batteries, be sure to replace them or shift to one of the alternate power sources whenever you notice any of the following symptoms.
• Dim power supply indicator
- Instrument does not turn on.
- Dim, difficult to read display
- Abnormally low speaker/headphone volume
• Distortion of sound output
- Occasional interruption of sound when playing at high volumes
- Sudden power failure when playing at high volumes
- Dimming of the display when playing at high volume
- Continued sound output even after you release a key
• A totally different tone may sound
- Abnormal rhythm pattern and demo tune play
Company and product names used in this manual may be registered trademarks of others.
515 tones
A wide selection of tones includes stereo piano and synthesized sounds, drum sets, and much more. Other features include digital effects that control the acoustical characteristic of tones.
☐ PIANO SETTING button
The press of a button optimizes the keyboard setup for piano play.
☐ 3-Step Lesson System
- 3-Step Lesson System: Now you can learn the parts that make up the keyboard's built-in tunes and SMF data you download over the Internet step-by-step. Guidance that appears on the monitor screen helps lead you down the path to music proficiency.
- Evaluation System: The keyboard can be configured to evaluate your 3-Step Lesson progress. You can even have the keyboard display your points, both part way through and at the end of a lesson.
□ 100 built-in tunes
□ 120 rhythms
A selection of rhythms cover rock, pops, jazz and just about any other musical style imaginable.
□ Auto Accompaniment
Simply play a chord and the corresponding rhythm, bass, and chord parts play along automatically. One Touch Presets instantly recalls the most suitable tone and tempo settings to match the rhythm you are using.
□ Registration Memory
Keyboard setups can be stored in memory for later recall and instant settings whenever you need them. Up to 32 setups (4 setups × 8 banks) can be stored in registration memory.
□ Recording and Play Back
With lesson recording you can record as you play along with built-in tunes for later playback. Performance recording lets you record your performances, including Auto Accompaniment, in real time.
□ Storing and Playing Back Tune Data You Transferred from Your Computer
You can connect your keyboard to a computer, use special CASIO conversion software to convert SMF data you purchase or create to CASIO format, and then transfer it to the keyboard.
Safety Precautions ...... E-1
Main Features ...... E-5
General Guide...... E-8
Attaching the Score Stand ...... E-12
Quick Reference ...... E-13
To play the keyboard ...... E-13
Power Supply ...... E-15
Using batteries ...... E-15
Using the AC Adaptor.... E-16
Auto Power Off.... E-17
Memory Contents...... E-17
Connections ...... E-18
Phones/Output Terminal.... E-18
Connecting to a Computer or Other
Equipment E-18
Sustain/Assignable jack Terminal...... E-19
Accessories and Options ...... E-19
Basic Operations...... E-20
To play the keyboard ...... E-20
Selecting a Tone.... E-20
Using Tone Effects ...... E-21
PIANO SETTING Button ...... E-21
Playing a Built-in Tune...... E-22
To play back a Song Bank tune ...... E-22
Adjusting the Tempo.... E-23
To pause playback ...... E-23
To fast reverse ...... E-23
To fast forward ...... E-23
Looping a Musical Phrase ...... E-24
To change the melody tone .... E-24
To play all tunes in succession...... E-24
3-Step Lesson...... E-25
Evaluation Mode ...... E-26
Using the Lesson Functions and
Evaluation Mode ...... E-26
Step 1 – Master the timing. ...... E-27
Step 2 – Master the notes. ...... E-27
Step 3 – Play at normal speed. ..... E-28
Evaluating Your Keyboard Play ...... E-28
Voice Fingering Guide...... E-29
Using the Metronome ...... E-29
Auto Accompaniment ...... E-30
Selecting a Rhythm ...... E-30
Playing a Rhythm.... E-31
Adjusting the Tempo.... E-31
Using Auto Accompaniment ...... E-31
Using an Intro Pattern ...... E-35
Using a Fill-in Pattern.... E-35
Using a Rhythm Variation...... E-35
Using a Fill-in Pattern with a Variation
Rhythm....E-35
Synchro Starting Accompaniment with
Rhythm Play ...... E-35
Finishing with an Ending Pattern ...... E-36
Using One-touch Preset...... E-36
Registration Memory ...... E-37
Registration Memory Features...... E-37
To Save a Setup in Registration
Memory E-38
To Recall a Setup from Registration
Memory E-38
Recording and Play Back ... E-39
Parts and Tracks ...... E-39
Recording Play Along with a
Built-in Tune ...... E-40
Playing Back a Lesson Recording ..... E-41
Recording a Performance ...... E-41
Playing Back a Performance
Recording E-43
Overdubbing a Performance
Recording E-44
Deleting a Specific Part/Track ...... E-44
Keyboard Settings ...... E-45
Using Layer ...... E-45
Using Split ...... E-45
Using Layer and Split Together ...... E-46
Transposing the Keyboard ...... E-47
Adjusting Accompaniment and
Song Bank Volume ...... E-47
Using Touch Response ...... E-48
Tuning the Keyboard ...... E-48
Connection to a
Computer ...... E-49
Connecting to a Computer ...... E-49
Expanding the Selections in the
Song Bank Tunes E-50
Using the SMF Data on the Bundled
CD-ROM E-51
General MIDI Tone ...... E-51
Changing the Settings...... E-51
Troubleshooting ...... E-54
Specifications ...... E-56
Operating Precautions...... E-57
Appendix ...... A-1
Tone List.... A-1
Drum Assignment List ...... A-5
FINGERED Chord Chart ...... A-7
Rhythm List ...... A-8
Song List ...... A-9
MIDI messages that can be sent and received using the USB port
CTK-810
① Power indicator
② POWER button
③ MODE switch
④ RECORDER button
⑤ TRANSPOSE/SETTING button
⑥ REVERB/CHORUS button
⑦ ONE TOUCH PRESET button
⑧ VOLUME knob
⑨ SONG BANK button
⑩ RHYTHM button
⑪ TONE button
⑫ DATA ACCESS lamp
⑬ PIANO SETTING button
⑭ Speaker
⑮ TONE list
⑯ Display
⑰ RHYTHM list
⑱ SONG BANK list
⑲ CHORD root names
⑳ Percussion instrument list
- Illustrations in this User's Guide shows the WK-110.
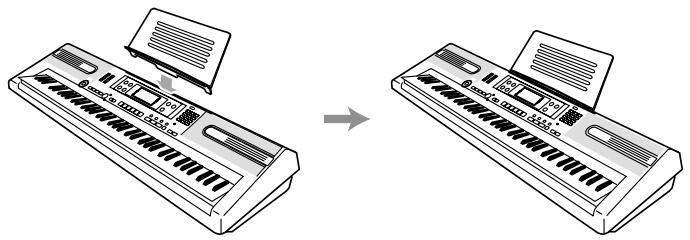
\*1 Attaching the Score Stand
Insert the score stand into the slot at the top of the keyboard as shown in the illustration.
*2
![7 8 9 4 5 6 1 2 3 0 - + NO V YES ^ ④④ [+]/[-] buttons ④④ Number buttons](/content/2025/01/129613/images/8daf920f42f8cf83b5e8d584d81fdbc2ccdf7c3a876aa753c2319a9c0003d6b0.jpg)
- For input of numbers to change a displayed number or setting.
- Negative values cannot be input using the number buttons. Use [+] (increase) and [-] (decrease) instead.
Rear Panel
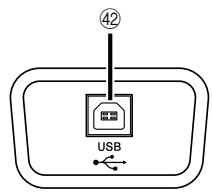
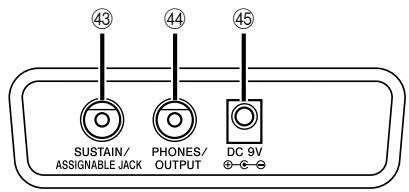
④2 USB port
④3 SUSTAIN/ASSIGNABLE JACK terminal
④4 PHONES/OUTPUT terminal
④5 DC 9V jack
Controller Indicators
Rhythm controller indicator (CTK-810: 26, WK-110: 25)
Pressing the RHYTHM button to enter the Rhythm Mode causes the Rhythm controller indicator to light. This indicates that buttons ② through ⑤ (WK-110: ⑳ through ⑭) are currently functioning as rhythm control buttons.
Song controller indicator (CTK-810: ⑳, WK-110: ⑳)
Pressing the SONG BANK button, or pressing the RHYTHM and TONE buttons at the same time to start demo tune play causes the Song controller indicator to light. This indicates that buttons ② through ⑤ (WK-110: ⑩ through ⑭) are currently functioning as playback control buttons.
NOTE
- Display examples shown in this User's Guide are intended for illustrative purposes only. The actual text and values that appear on the display may differ from the examples shown in this User's Guide.
- Viewing a liquid crystal display screen from an angle can change the appearance of display contrast. The display contrast of this keyboard is set to allow easy viewing for a person seated on a chair in front of the keyboard. Note that display contrast is fixed, and cannot be adjusted.
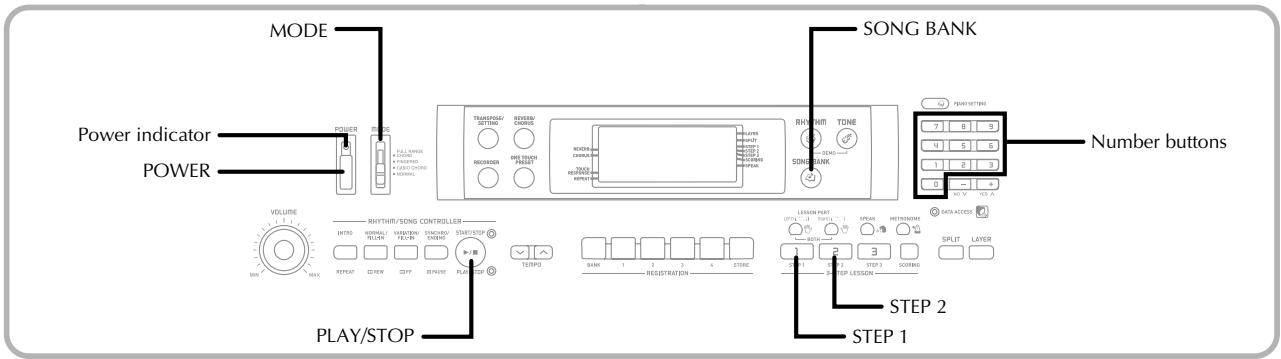
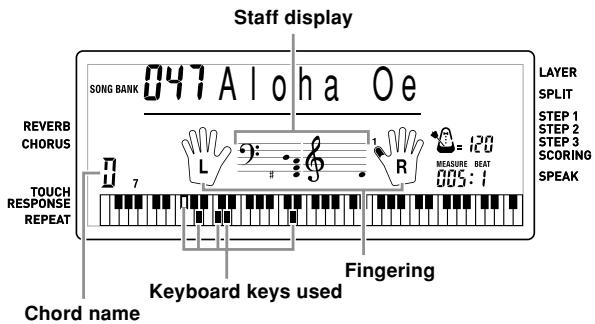
This section provides a quick overview of keyboard operation using steps one and two of the 3-step lesson feature.
With the 3-step lesson feature, the on-screen keyboard guide keys light to show the next note of the tune.
To play the keyboard
1 Press the POWER button to turn on power.
- This causes the power indicator to light.
2 Set the MODE switch to NORMAL.
3 Press the SONG BANK button.
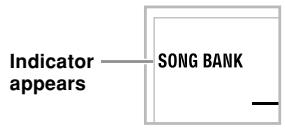
flowchart
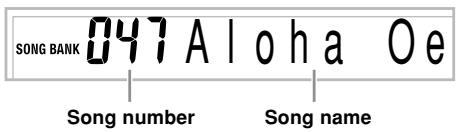
graph LR
    A["Indicator appears"] --> B["SONG BANK"]
4 Find the tune you want to play in the SONG BANK List, and then use the number buttons to input its three-digit number.
• See page A-9 for the SONG BANK List.
Example: To select "047 ALOHA OE", input 0, 4 and then 7.

5 Press the STEP 1 button or STEP 2 button.
- The keyboard sounds a count beat and waits for you to play something on the keyboard. The keys that you need to press first flash on the display.
6 Play the melody along with the selected tune's accompaniment.
- Play in accordance with the keyboard keys, fingerings and notes that appear on the display.
If you selected lesson Step 1
- Play the notes on the keyboard.
- Accompaniment (left-hand part) plays in time with the notes.
- With Step 1, the correct melody note is played no matter which keyboard key you press.
If you selected lesson Step 2
- Play the correct notes on the keyboard.
- While an on-screen keyboard guide key is lit, press the corresponding key on the actual keyboard. In the case of a two-hand tune, the keyboard guide indication turns off when you press a keyboard key, and the on-screen keyboard guide key lights for the next note to be played.
- Accompaniment (left-hand part) plays in time with the notes, as long as you press the correct keyboard keys.
7 To stop play at any time, press the PLAY/STOP button.
This keyboard can be powered by current from a standard household wall outlet (using the specified AC adaptor) or by batteries. Always make sure you turn the keyboard off whenever you are not using it.
Using batteries
Always make sure you turn off the keyboard before loading or replacing batteries.
NOTE
- The keyboard may not function correctly if you load or replace batteries with power turned on. If this happens, turning the keyboard off and then back on again should return functions back to normal.
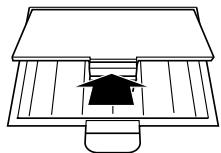
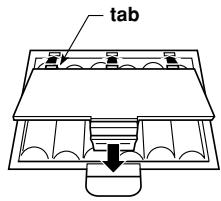
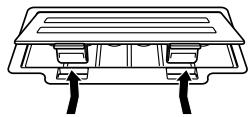
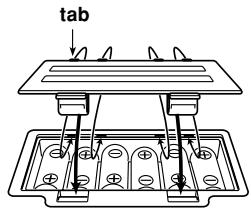
To load batteries
1 Remove the battery compartment cover.
natural_image
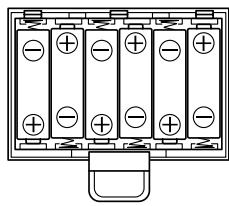
Simple line drawing of a house with a roof and window (no text or symbols)2 Load 6 AA-size batteries into the battery compartment.
- Make sure that the positive (+) and negative (−) ends are facing correctly.
natural_image
Pure electrical circuit lines without any symbols3 Insert the tabs on the battery compartment cover into the holes provided and close the cover.
1 Remove the battery compartment cover.
natural_image
Diagram of a vehicle rear vent with two arrows indicating direction (no text or symbols)2 Load six D-size batteries into the battery compartment.
- Make sure that the positive (+) and negative (−) ends are facing correctly.

natural_image
Diagram of a battery pack with four terminals and a switch, no text or symbols present3 Insert the tabs on the battery compartment cover into the holes provided and close the cover.
Important Battery Information
The following shows the approximate battery life. Alkaline batteries ....

WARNING
Misuse of batteries can cause them to leak, resulting in damage to nearby objects, or to explode, creating the risk of fire and personal injury. Always make sure you observe the following precautions.
- Never try to take batteries apart or allow them to become shorted.
- Never expose batteries to heat or dispose of them by incineration.
- Never mix old batteries with new ones.
- Never mix batteries of different types.
- Do not charge the batteries.
- Make sure the positive (+) and negative (−) ends of the batteries are facing correctly.


CAUTION
Misuse of batteries can cause them to leak resulting in damage to nearby objects, or to explode, creating the risk of fire and personal injury. Always make sure you observe the following precautions.
- Use only batteries that are specified for use with this product.

- Remove batteries from the product if you do not plan to use it for a long time.
NOTE
- Do not use an oxyride battery or any other type of nickel-based primary battery with this product.
Incompatibility between such batteries and product specifications can result in shorter battery life and product malfunction.
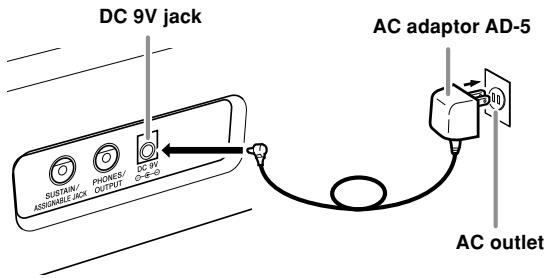
Using the AC Adaptor
Make sure that you use only the AC adaptor specified for this keyboard.
Specified AC Adaptor: AD-5
[Rear Panel]
Note the following important precautions to avoid damage to the power cord.
●During Use
- Never pull on the cord with excessive force.
- Never repeatedly pull on the cord.
- Never twist the cord at the base of the plug or connector.
- The power cord should not be stretched tight while it is in use.
●During Movement
- Before moving the keyboard, be sure to unplug the AC adaptor from the power outlet.
●During Storage
- Loop and bundle the power cord, but never wind it around the AC adaptor.
IMPORTANT!
- Make sure that the keyboard is turned off before connecting or disconnecting the AC adaptor.
- Using the AC adaptor for a long time can cause it to become warm to the touch. This is normal and does not indicate malfunction.
Auto Power Off
When you are using battery power, keyboard power turns off automatically whenever you leave it on without performing any operation for about 6 minutes. When this happens, press the POWER button to turn power back on.
NOTE
- Auto Power Off is disabled (it does not function) when you are using the AC adaptor to power the keyboard.
To disable Auto Power Off
Hold down the TONE button while turning on the keyboard to disable Auto Power Off.
NOTE
- When this function is turned off, the keyboard does not turn off automatically no matter how long it is left with no operation being performed.
- Auto Power Off is enabled again when you manually turn off power and then turn it back on again.
Memory Contents
Registration memory contents, recorder memory contents, and song bank data you transfer from a computer to keyboard memory are all retained when the keyboard is turned off, either by pressing the power button or by Auto Power Off.
Electrical Power
The memory contents described above are retained as long as the keyboard is being supplied with electrical power. Unplugging the AC adaptor when batteries are not loaded or when loaded batteries are dead cuts off the keyboard's electrical power supply. This clears all data stored in memory.
Power Requirements
Note the following precautions whenever you want to ensure that current memory contents are not lost.
- Make sure the keyboard is being supplied power through the AC adaptor before replacing its batteries.
- Before unplugging the AC adaptor, make sure that fresh batteries are loaded in the keyboard.
Make sure that keyboard power is turned off before replacing batteries or unplugging the AC adaptor.
Phones/Output Terminal
PREPARATION
- Before connecting headphones or other external equipment, be sure to first turn down the volume settings of the keyboard and the connected equipment. You can then adjust volume to the desired level after connections are complete.
[Rear Panel]
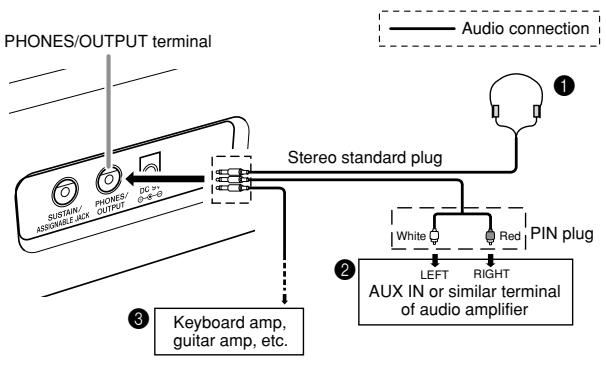
Connecting Headphones (Figure 1)
Connecting headphones cuts off output from the keyboard's built-in speakers, so you can play even late at night without disturbing anyone.
Audio Equipment (Figure ②)
Connect the keyboard to an audio equipment using a commercially available connecting cord with a standard plug on one end and two PIN plugs on the other end. Note that the standard plug you connect to the keyboard must be a stereo plug, otherwise you will be able to output only one of stereo channels. In this configuration, you normally set the input selector of the audio equipment to the terminal (usually marked AUX IN or something similar) where the cord from the keyboard is connected. See the user documentation that comes with your audio equipment for full details.
Musical Instrument Amplifier (Figure ③)
Use a commercially available connecting cord to connect the keyboard to a musical instrument amplifier.
NOTE
- Be sure to use a connecting cord that has a stereo standard plug on the end you connect to the keyboard, and a connector that provides dual channel (left and right) input to the amplifier to which you are connecting. The wrong type of connector at either end can cause one of the stereo channels to be lost.
When connected to a musical instrument amplifier, set the volume of the keyboard to a relatively low level and make output volume adjustments using the amplifier's controls.
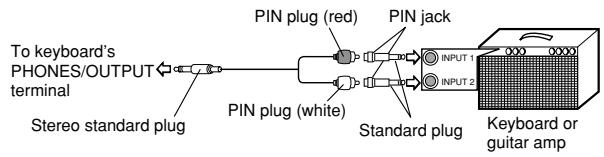
Connection Example
Connecting to a Computer or Other Equipment
You can also connect the keyboard to a computer. See "Connecting to a Computer" on page E-49 for details.
Sustain/Assignable jack Terminal
You can connect an optional sustain pedal (SP-3 or SP-20) to the SUSTAIN/ASSIGNABLE JACK terminal to enable the capabilities described below.
For details on how to select the pedal function you want, see "SUSTAIN/ASSIGNABLE JACK (Default: SUS)" on page E-53.
SUSTAIN/ASSIGNABLE JACK Terminal
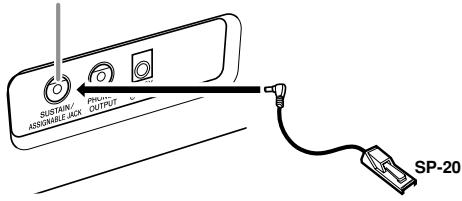
Sustain Pedal
- With piano tones, depressing the pedal causes notes to linger, much like a piano's damper pedal.
- With organ tones, depressing the pedal causes notes to continue to sound until the pedal is released.
Sostenuto Pedal
- As with the sustain pedal function described above, depressing the sostenuto pedal causes notes to be sustained.
- This difference between a sostenuto pedal and sustain pedal is the timing. With a sostenuto pedal, you press the keys and then depress the pedal before you release the keys.
- Only the notes that are sounding when the pedal is depressed are sustained.
Soft Pedal
Depressing the pedal softens the sound of the notes being played.
Rhythm Start/Stop Pedal
In this case, the pedal performs the same functions as the START/STOP button.
Accessories and Options
Use only the accessories and options specified for this keyboard. Use of non-authorized items creates the danger of fire, electrical shock, and personal injury.
![REVERB/CHORUS MODE POWER VOLUME TONE PIANO SETTING Number buttons [+] / [-] POWER RHYTHIR/SONS CONTROLLER ENTRO NORMAL/ PULSE SENSITIVE FLEXIBLE START/STEP +/-/- TEMP RECEMBER RHYTHIR CONJER STRAWING RHYTHIR TONE SONG BANK 7 8 9 4 5 6 1 2 3 0 - + DATA ACCESS LESSIGN PART (0"") - 1 0"") - 1 SPEAK METROSOME 1 2 3 STEP 1 STEP 2 STEP 3 STEP LESSON SPLIT LAYER](/content/2025/01/129613/images/9cb9f1542eba59bc84477cea169ea3abf62d9b4af1c0fbdbd16fa117f2a7d381.jpg)
This section provides information on performing basic keyboard operations.
To play the keyboard
1 Press the POWER button to turn the keyboard on.
2 Set the MODE switch to NORMAL.
3 Use the VOLUME knob to set the volume to a relatively low level.
4 Play something on the keyboard.
Selecting a Tone
This keyboard comes with 515 built-in tones. Use the following procedure to select the tone you want.
To select a tone
1 Find the tone you want to use in the TONE List and note its tone number.
- Not all of the available tones are shown on the tone list printed on the keyboard console. For a complete list, see the "Tone List" on page A-1.
2 Press the TONE button.

3 Use the number buttons to input the three-digit tone number of the tone you want to select.
Example: To select "111 ACOUSTIC BASS", input 1, 1 and then 1.

NOTE
- Always input all three digits for the tone number, including leading zeros (if any). If you input one or two digits and stop, the display will automatically clear your input after a few seconds.
- You can also increment the displayed tone number by pressing [+] and decrement it by pressing [-] .
- When one of the drum sets is selected (tone numbers 501 through 515), each keyboard key is assigned a different percussion sound. See page A-5 for details.
Polyphony
The term polyphony refers to the maximum number of notes you can play at the same time. The keyboard has 32-note polyphony, which includes the notes you play as well as the rhythms and auto-accompaniment patterns that are played by the keyboard. This means that when a rhythm or auto-accompaniment pattern is being played by the keyboard, the number of notes (polyphony) available for keyboard play is reduced. Also note that some of the tones offer only 16-note polyphony.
- When rhythm or auto accompaniment is playing, the number of sounds simultaneously played is reduced.
Using Tone Effects
Reverb: Makes your notes resonate
Chorus: Adds more breadth to your notes
1 Press the REVERB/CHORUS button to cycle through the effect settings as shown below.
- You can find out the current effect setting by looking at the REVERB and CHORUS indicators.

flowchart
graph TD
    A["Reverb on"] --> B["Chorus on"]
    B --> C["Both on"]
    C --> D["Both off"]
    A --> E["Reverb on CHORUS"]
    B --> F["Reverb on CHORUS"]
    C --> G["Reverb on CHORUS"]
    D --> H["Reverb on CHORUS"]
2 After turning on the effect you want, use the number buttons or the [+]/[-] buttons to select the effect type you want.
- Note that you need to select an effect type with the number buttons or the [+]/[-] buttons within a few seconds after turning on an effect. If you don't, the display will exit the setting screen.
Effect List
| Reverb | 1: Room 12: Room 23: Hall 14: Hall 2 |
| Chorus | 1: Chorus 12: Chorus 23: Chorus 34: Chorus 4 |
PIANO SETTING Button
Pressing this button changes the setup of the keyboard to optimize it for piano play.
Settings
Tone Number: "001"
Rhythm Number: "101"
Layer: Off
Split: Off
Reverb: On (Type 3)
Chorus: Off
Transpose: 00
Touch Response:
Off: Returns to initial default
On: No change
Assignable Jack: SUS
Local Control: On
To optimize keyboard settings for piano play
1 Set the MODE switch to NORMAL.
2 Press the PIANO SETTING button.
3 Now try playing something on the keyboard.
- The notes you play will sound with a piano tone.
- If you want to play with rhythm accompaniment, press the START/STOP button. This causes a rhythm that is optimized for piano will start to play.
- To stop rhythm play, press the START/STOP button again.
NOTE
- Pressing the PIANO SETTING button while a rhythm is playing stops rhythm play and then changes the keyboard setup.
-
The setup of the keyboard does not change if you press the PIANO SETTING button when any one of the following exists.
-
During real-time recording of the Song Memory
- During demo tune play
![REPEAT VOLUME POWER MODE FILLI/SONING [24]WEDD RHYTHM/SONG CONTROLLER RETURN REFLECTIVE RETURN STRAW/STOP STRAW/STOP STRAW/STOP STRAW/STOP STRAW/STOP STRAW/STOP STRAW/STOP STRAW/STOP STRAW/STOP STRAW/STOP STRAW/STOP STRAW/STOP STRAW/STOP STRAW/STOP STRAW/STOP STRAW/STOP STRAW/STOP STRAW/STOP STRAW/STOP STRAW/STOP STRAW/TOP STRAW/TOP STRAW/TOP STRAW/TOP STRAW/TOP STRAW/TOP STRAW/TOP STRAW/TOP STRAW/TOP STRAW/TOP STRAW/TOP STRAW/TOP STRAW/TOP STRAW/TOP STRAW/TOP STRAW/TOP STRAW/TOP STRAW/TOP STRAW/TOP STRAW/TOP STRAW/Bottom STRAW/Bottom STRAW/Bottom STRAW/Bottom STRAW/Bottom STRAW/Bottom STRAW/Bottom STRAW/Bottom STRAW/Bottom STRAW/Bottom STRAW/Bottom STRAW/Bottom STRAW/Bottom STRAW/Bottom STRAW/Bottom STRAW/Bottom STRAW/Bottom STRAW/Bottom STRAW/Bottom STRAW/Bottom STRAW/Top STRAW/Top STRAW/Top STRAW/Top STRAW/Top STRAW/Top STRAW/Top STRAW/Top STRAW/Top STRAW/Top STRAW/Top STRAW/Top STRAW/Top STRAW/Top STRAW/Top STRAW/Top STRAW/Top STRAW/Top STRAW/Top STRAW/Top STRAW/Bottom](/content/2025/01/129613/images/cc4e36915fdd4fb4d9da3a4b885c529387341a99323d6f0ce907084aa6e8d9bd.jpg)
Your keyboard comes with a total of built-in 100 tunes. You can play back built-in tunes for your own listening pleasure, or you can use them for practice. Built-in tunes are divided between the two groups described below.
| Tune Numbers | Left-hand Part | Right-hand Part | |
| Auto-accompaniment Tunes | 001, 004 through 050003 through 050 | Auto-accompaniment (percussion, bass, chords) | Melody |
| Two-hand tune | 002, 003, and 051 through 100001, 002, and 051 through 100 | Left-hand notes | Right-hand notes |
In addition to the built-in tunes, you can also play back the tunes you download over the Internet (page E-50).
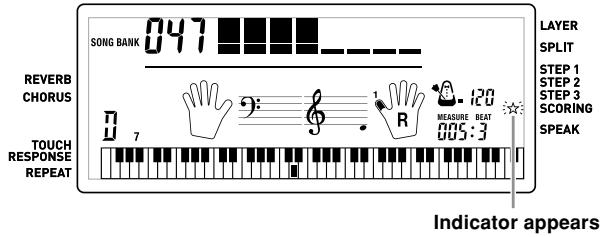
To play back a Song Bank tune
PREPARATION
- Adjust the main volume (page E-20).
1 Find the tune you want to play in the SONG BANK List, and note its number.
• See page A-9 for the SONG BANK List.
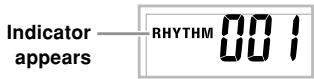
2 Press the SONG BANK button to enter the Song Bank Mode.

flowchart
graph LR
    A["Indicator appears"] --> B["SONG BANK"]
3 Use the number buttons to input the tune's three-digit number.
Example: To select "047 ALOHA OE", input 0, 4 and then 7.
NOTE
- Tune Number 001 is the initial default Song Bank tune setting whenever you turn on keyboard power.
- You can also increment the displayed tune number by pressing [+] and decrement is by pressing [-] .
4 Press the PLAY/STOP button to start play of the tune.
5 Press the PLAY/STOP button to stop playback of the Song Bank tune.
- The tune you select continues to play until you stop it.
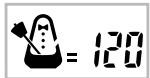
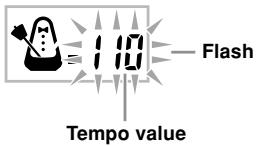
Adjusting the Tempo
Each tune has a preset default tempo (beats per minute) that is set automatically whenever you select a tune. While the tune is playing, you can change the tempo setting to a value in the range of 30 to 255.
To set the tempo
1 Use the TEMPO buttons to set the tempo.
^ : Increases the tempo value.
√ : Decreases the tempo value.
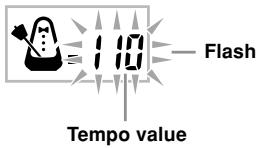
NOTE
- While the tempo value is flashing, you can also use the number buttons or [+] and [-] to input a three-digit value. Note that you must input leading zeros, so 90 is input as 090.
- Pressing both the ∧ and ∨ TEMPO buttons at the same time automatically returns the currently selected rhythm to its default tempo.
To pause playback
1 Press the PAUSE button while a tune is playing to pause it.
2 Pressing the PAUSE button again resumes play from the point where it was paused.
To fast reverse
1 While a tune is playing or paused, hold down the REW button to skip in a reverse direction at high speed.
- The fast reverse operation skips back one measure at a time.
- The measure and beat numbers on the display change while the fast reverse operation is being performed.
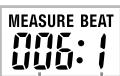
Measure number
Beat number
2 Releasing the REW button starts song playback from the measure whose number is shown on the display.
NOTE
- Fast reverse does not work while tune play is stopped.
To fast forward
1 While a tune is playing or paused, hold down the FF button to skip forward at high speed.
- The fast forward operation skips forward one measure at a time.
- The measure and beat numbers on the display change while the fast forward operation is being performed.
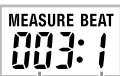
Measure number
Beat number
2 Releasing the FF button starts song playback from the measure whose number is shown on the display.
NOTE
- Fast forward does not work while tune play is stopped.
Looping a Musical Phrase
You can select one or more measures and "loop" them, which means that they play again and again until you stop playback.
1 While the tune is playing, press the REPEAT button while the measure you want to start from is playing.
2 When playback is within the measure you want to specify as the end of the loop, press the REPEAT button again.
- To cancel repeat play of a loop, press the REPEAT button again so the repeat indicator is not displayed.
To change the melody tone
1 Press the TONE button.
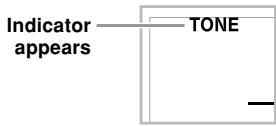
2 Find the tone you want in the TONE List, and then use the number buttons to input its three-digit number.
Example: To select "131 VIOLIN", input 1, then 3, then 1.
- You can select any one of the keyboard's built-in tones.

NOTE
- You can also use the [+] and [-] buttons to change the melody tones.
- Specifying the tune number for the same tune that is currently selected returns the melody tone to the default setting for that tune.
To play all tunes in succession
1 Press the RHYTHM button and TONE button at the same time.
- Playback starts from Song Bank tune number 001.
2 To stop tune play, press the PLAY/STOP button.
NOTE
- While a tune is playing, you can use the number buttons or [+] and [-] to change to another tune.
- You can play along with the tunes on the keyboard.
With the 3-Step Lesson System, you can practice built-in tunes and SMF data you download over the Internet, and even plot your progress according to the evaluation points the keyboard awards you.
* See "Expanding the Selections in the Song Bank Tunes" on page E-50 for information about the SMF data you download over the Internet.
Lesson Progress
Step 1 → Step 2 → Step 3 → Evaluation
3-Step Lesson
The 3-step lesson feature takes you through the three distinct steps described below to help you learn to play tunes on the keyboard.
Step 1 – Master the timing.
Step 2 – Master the notes.
Step 3 – Play at normal speed.
Lesson Parts
3-Step Lesson lets you practice the right-hand part, left-hand part, or the parts for both hands.
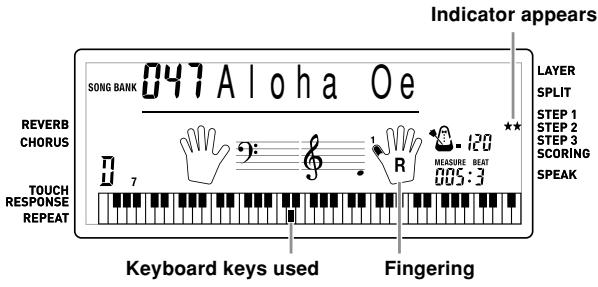
Display Contents During 3-step Lesson Play
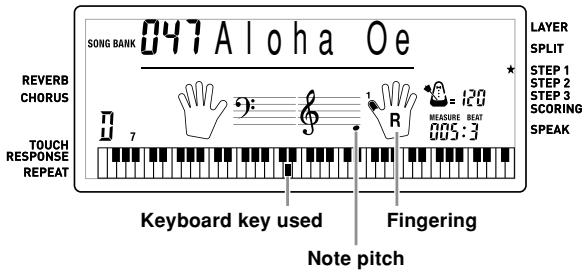
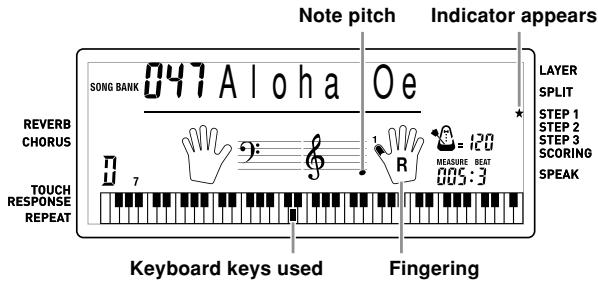
Whenever you select an Auto Accompaniment tune for 3-step lesson play, the on-screen keyboard guide and staff notation shows the note you should play and its length. The on-screen keyboard guide also shows the notes you play on the keyboard. The following describes the information that appears on the display.
Note Pitch
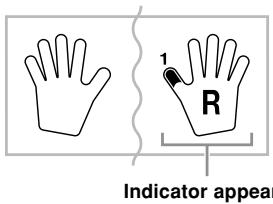
The key you should press lights on the on-screen keyboard guide, while the actual pitch of the note appears in the display's staff notation area. The fingers you should use to play the notes are also shown on the display.
Note Length
The key stays lit on the on-screen keyboard guide for as long as the note should be sustained. The staff notation and fingerings also remain on the display for the length of the note.
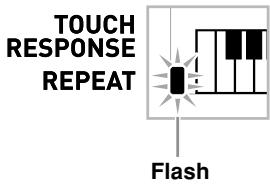
Next Note
An on-screen keyboard guide key flashes to indicate the next note to be played, while a number appears on the display near the finger you should use to play the next note.
Series of Same Pitch Notes
The on-screen keyboard guide key turns off momentarily between the notes, and lights again for each successive note. The staff notation and fingerings also turn off and back on again.
Example: When play requires pressing keys with fingers 3, 2, and then 1
NOTE
- Note length is not indicated when you are using two-hand tunes with 3-step lesson Steps 1 and 2. As soon as you press a key that is lit on the on-screen keyboard guide, it goes out and the next key you need to press starts to flash.
- Note length is indicated by the on-screen keyboard guide when you use two-hand tunes with Step 3. In this case, the next key to be pressed does not flash when you press a lit key.
- During Step 3, the next finger number does not appear on the display. Only the current finger number is shown.
3-step Lesson Tempo Setting
Use the procedure under “Adjusting the Tempo” on page E-23 to adjust the tempo for 3-step lesson play.
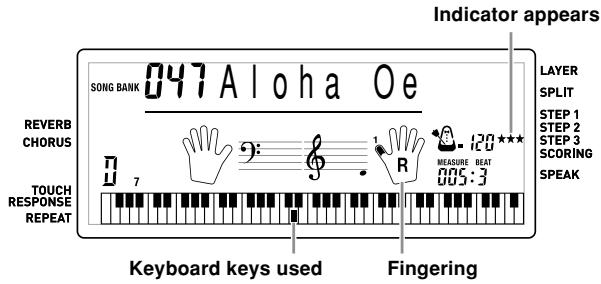
Evaluation Mode
The keyboard can be configured to evaluate your 3-Step Lesson progress. A perfect score is 100. You can even have the piano display your points, both part way through and at the end of a lesson.
Evaluation Mode Display
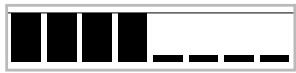
Level Indicator (9 Levels): This indicator shows the evaluation of your current performance at a glance. The more segments that appear, the higher your points.
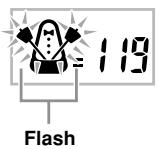
Example: 50 points
Timing Indicator: In the Evaluation Mode, the configuration of the star changes with each note to let you know how your timing is. The more stars, the better your timing.


Using Tone Guide
When the keyboard senses that your timing is off, it will let you know by changing the notes you play to a tone that is different from the one you currently have selected.
Evaluation Results
After you finish playing, the keyboard calculates an evaluation of your total performance, from beginning to end, and displays your total score on the monitor screen.
Evaluation Rank Display Messages
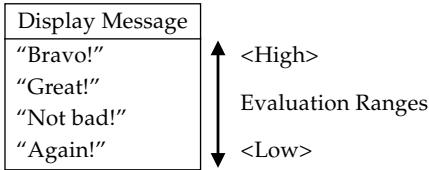
"****": indicates that the Evaluation Mode was exited before an evaluation result could be obtained.
Using the Lesson Functions and Evaluation Mode
Perform the following steps to master your favorite tunes.
![TEMPO LEFT/TRACK 1 RIGHT/TRACK 2 SPEAK Number buttons [+] / [-] METRONOME SPLIT LAYER SCORING STEP 1 STEP 2 STEP 3 PLAY/STOP POWER MODE PUL: 0.0000 + : 0.0000 - : 0.0000 + : 0.0000 + : 0.0000 RECEMBER RANGE ORDER TOLER THYTHIR TONE LEMON PLET PUSH SETTING SPECTRUMONE DATA ACCESS BASE 1 2 3 4 STAGE PRISERATION PASS STEP LESSON MINI MAX WHYTHIR/SONG CONTROLLER INTRO NOTWITH VOUTHW VENTWEN SINKHOU STRET/STIP REPEAT CD REP QFF EPULSE PLAB STEP PWR TECHNO SPRING POWER SPECTRUMONE SPLIT LAYER](/content/2025/01/129613/images/30a7808814bce3ba431349fbf942bedd7f63c3c93680dc900b1d4a3a0a32eae7.jpg)
Step 1 – Master the timing.
1 Select the tune you want to use.
2 Press the RIGHT/TRACK 2 button or the LEFT/TRACK 1 button to specify the part you want to practice.
- Indicator appears on the display whose part is selected for practice.
- If you want to practice both hands, press both buttons at the same time.
3 Press the STEP 1 button to start Step 1 play.
• After a count sounds, they keyboard stands by and waits for you to play the first note of the tune.
- Voice fingering guide will use a simulated human voice to call out fingering numbers during one-hand part practice. See “Voice Fingering Guide” on page E-29 for details.
4 Press any keyboard keys to play the notes.
- The key for the next note to be played flashes on the on-screen keyboard guide and the keyboard waits for you to play it. When you press any key to play the note, the on-screen key remains lit as the note plays.
- Accompaniment (left-hand part) waits until you press any key to play a note.
- If you accidentally press more than one key in succession, accompaniment is played for the corresponding number of notes.
- Pressing more than one key at the same time counts as a single note. Pressing a key while another key is held down is counted as two notes.
5 To stop play at any time, press the STEP 1 or PLAY/STOP button.
Step 2 – Master the notes.
1 Select the tune you want to use.
2 Press the RIGHT/TRACK 2 button or the LEFT/TRACK 1 button to specify the part you want to practice.
- Indicator appears on the display whose part is selected for practice.
- If you want to practice both hands, press both buttons at the same time.
3 Press the STEP 2 button to start Step 2 play.
• After a count sounds, the keyboard stands by and waits for you to play the first note of the tune.
- Voice fingering guide will use a simulated human voice to call out fingering numbers during one-hand part practice. See “Voice Fingering Guide” on page E-29 for details.
4 Play the notes as indicated by the on-screen keyboard guide.
- The key for the next note to be played flashes on the on-screen keyboard guide and the keyboard waits for you to play it. When you press any key to play the note, the on-screen key remains lit as the note plays.
- If multiple keys light on the on-screen keyboard guide when you are using a two-hand tune, it means that you must press all of the keys that are lit.
5 To stop play at any time, press the STEP 2 or PLAY/STOP button.
Step 3 – Play at normal speed.
1 Select the tune you want to play.
2 Press the RIGHT/TRACK 2 button or the LEFT/TRACK 1 button to specify the part you want to practice.
- Indicator appears on the display whose part is selected for practice.
- If you want to practice both hands, press both buttons at the same time.
3 Press the STEP 3 button to start Step 3 play.
- Accompaniment (left hand part) starts to play at normal speed.
4 Play the notes as indicated by the on-screen keyboard guide.
5 To stop play at any time, press the STEP 3 or PLAY/STOP button.
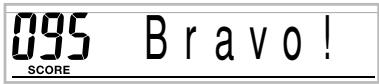
Evaluating Your Keyboard Play
1 Press the SCORING button.
- This causes the SCORING indicator to appear on the display.
- A count beat sounds and then evaluation mode starts.
2 Play in accordance with the guidance on the monitor screen.
- To stop evaluation, press the PLAY/STOP button. This displays only the points accumulated up to that point.
3 After you finished playing, your evaluation result appears on the display.
- For information about evaluation ranks, see "Evaluation Results" on page E-26.
- Pressing the SONG BANK button returns to the tune selection screen.
Voice Fingering Guide
Voice fingering guide uses a simulated human voice to call out fingering numbers during Step 1 and Step 2 one-hand part practice. If you need to press a key with your thumb, for example, voice fingering guide says, "One!" In the case of a chord to be played with your thumb, middle and little finger, voice fingering guide says, "One, three, five!"
Voice Fingering Guide calls out fingerings only when you do not press the proper key when you should.
Voice Fingering Guide
One : Thumb
Two : Forefinger
Three : Middle finger
Four : Ring finger
Five : Little finger
To turn voice fingering guide on or off
Press the SPEAK button to toggle voice fingering guide on (voice fingering guide indicator displayed) and off (indicator not displayed).

NOTE
- Note that Voice Fingering is disabled in the Evaluation Mode.
- Exiting the Evaluation Mode automatically restores the Voice Fingering setting that was in effect when you entered the Evaluation Mode.
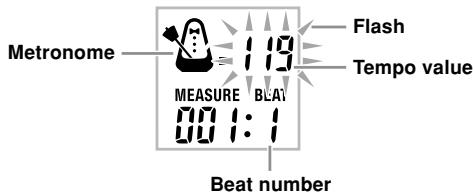
Using the Metronome
The metronome feature of this keyboard produces a bell sound for the first beat of each measure, followed by click sounds for each successive beat of the measure. It is the perfect tool for practicing tunes without accompaniment (rhythm).
To start the metronome
1 Press the METRONOME button to start sounding the metronome.
- This causes "Beat" to appear on the display. Perform step 2 within five seconds after "Beat" appears.

Use the number buttons or [+] and [-] to change the number of beats per measure.
- You can specify 0, or a value from 2 to 6 as the number of beats per measure.
6 Beat
NOTE
- The bell (indicating the first beat of a measure) does not sound while 0 beat per measure is specified. All beats are indicated by a click sound. This setting lets you practice with a steady beat, without worrying about how many beats there are in each measure.

Use the TEMPO buttons to set the tempo.
- Press to increase the tempo (make if faster) or to decrease it (make it slower).
NOTE
- While the tempo value is flashing, you can also use the number buttons or [+] and [-] to input a three-digit value. Note that you must input leading zeros, so 90 is input as 090.
- Pressing both the ∧ and ∨ TEMPO buttons at the same time automatically returns the currently selected rhythm or tune to its default tempo.

To turn off the metronome, press the METRONOME button.
NOTE
- The metronome is disabled whenever you are using Step 1 or Step 2 of the 3-step lesson.
![ONE TOUCH PRESET MODE INTRO VOLUME MAX NORMAL/FILL-IN VARIATION/FILL-IN RHYTHM/SONG CONTROLLER START/STOP SYNCHRO/ENDING TEMP0 TEMP0 RHYTHM TONE SONG BANK LESSON PART SPEAK HETREMOHE DATA ACCESS 1 2 3 STEP 1 STEP 2 STEP 3 COLUMN SPLIT LAYER Number buttons [+] / [-]](/content/2025/01/129613/images/54e7eef475a35f7c0843f02b6ada8959698162ebefbd8b4c9d979d4a2c1f6235.jpg)
This keyboard automatically plays bass and chord parts in accordance with the chords you finger. The bass and chord parts are played using sounds and tones that are automatically selected to select the rhythm you are using. All of this means that you get full, realistic accompaniments for the melody notes you play with your right hand, creating the mood of an one-person ensemble.
Selecting a Rhythm
This keyboard provides you with 120 exciting rhythms that you can select using the following procedure.
To select a rhythm
1 Find the rhythm you want to use in the RHYTHM List and note its rhythm number.
- Not all of the available rhythms are shown on the rhythm list printed on the keyboard console. For a complete list, see the "Rhythm List" on page A-8.
2 Press the RHYTHM button to enter the Rhythm Mode.
3 Use the number buttons to input the three digit rhythm number for the rhythm you want to select. Example: To select "095 HAWAIIAN", input 0, 9 and then 5.

NOTE
- You can also increment the displayed rhythm number by pressing [+] and decrement it by pressing [-] .
- Some rhythms (No. 110, 112 to 120) consist of chord accompaniments only, without any drums or other percussion instruments. Such rhythms do not sound unless CASIO CHORD, FINGERED, or FULL RANGE CHORD is selected as the accompaniment mode.
Playing a Rhythm
Use the following procedure to start and stop rhythm play.
To play a rhythm
1 Set the MODE switch to NORMAL.
2 Press the START/STOP button to start play of the currently selected rhythm.
3 To stop rhythm play, press the START/STOP button again.
NOTE
- All of the keyboard keys are melody keys while the MODE switch is set to NORMAL.
Adjusting the Tempo
The tempo (beats per minute) can be set to a value in the range of 30 to 255. The tempo value you set is use for Song Bank, 3-step lesson, and Auto Accompaniment chord play, as well as playback from the recorder and metronome operation.
To set the tempo
1 Use the TEMPO buttons to set the tempo.
^ : Increase the tempo value.
√ : Decreases the tempo value.
NOTE
- While the tempo value is flashing, you can also use the number buttons or [+] and [-] to input a three-digit value. Note that you must input leading zeros, so 90 is input as 090.
- Pressing both the ∧ and ∨ TEMPO buttons at the same time automatically returns the currently selected rhythm to its default tempo.
Using Auto Accompaniment
The following procedure describes how to use the keyboard's Auto Accompaniment feature. Before starting, you should first select the rhythm you want to use and set the tempo of the rhythm to the value you want.
To use Auto Accompaniment
1 Set the MODE switch to CASIO CHORD, FINGERED, or FULL RANGE CHORD.
2 Press the START/STOP button to start play of the currently selected rhythm.
3 Play a chord.
- The actual procedure you should use to play a chord depends on the current MODE switch position. Refer to the following pages for details on chord play.
CASIO CHORD ...... Page E-32
FINGERED ...... Page E-33
FULL RANGE CHORD ...... Page E-34
4 To stop Auto Accompaniment play, press the START/STOP button again.
NOTE
- If you press the SYNCHRO/ENDING button and then the INTRO button in place of the START/STOP button in step 2, accompaniment will start with an intro pattern when you perform the operation in step 3. For details about these buttons, see pages E-35 and E-36.
- If you press the SYNCHRO/ENDING button in place of the START/STOP button in step 4, an ending pattern will play before accompaniment play is ended. For details about this button, see page E-36.
- You can adjust the accompaniment part volume level independently of the main volume. For details, see "Adjusting Accompaniment and Song Bank Volume" on page E-47.
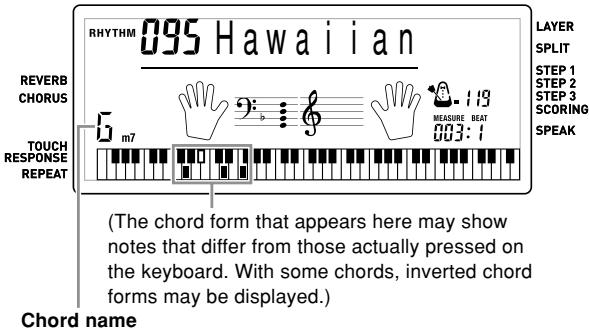
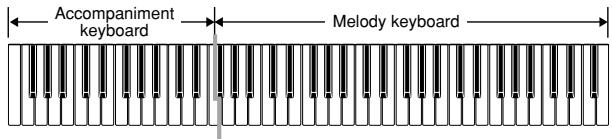
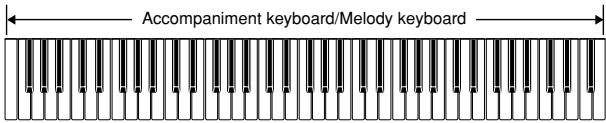
CASIO CHORD
This method of chord play makes it possible for anyone to easily play chords, regardless of previous musical knowledge and experience. The following describes the CASIO CHORD "Accompaniment keyboard" and "Melody keyboard", and tells you how to play CASIO CHORDs.
CASIO CHORD Accompaniment Keyboard and Melody Keyboard
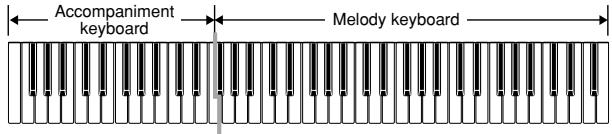
NOTE
- The accompaniment keyboard can be used for playing chords only. No sound will be produced if you try playing single melody notes on the accompaniment keyboard.
- The split point (page E-46) is the point that separates the Auto Accompaniment area and the melody area of the keyboard. You can change the location of the split point, which also changes the sizes of the keyboard areas.
Chord Types
CASIO CHORD accompaniment lets you play four types of chords with minimal fingering.
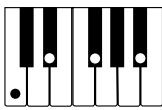
| Chord Types | Example |
| Major chordsMajor chord names are marked above the keys of the accompaniment keyboard. Note that the chord produced when you press an accompaniment keyboard does not change octave, regardless of which key you use to play it. | C Major (C) |
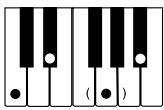
| Minor chords (m)To play a minor chord, keep the major chord key depressed and press any other accompaniment keyboard key located to the right of the major chord key. | C minor (Cm) |
| Seventh chords (7)To play a seventh chord, keep the major chord key depressed and press any other two accompaniment keyboard keys located to the right of the major chord key. | C seventh (C7) |
| Minor seventh chords (m7)To play a minor seventh chord, keep the major chord key depressed and press any other three accompaniment keyboard keys located to the right of the major chord key. | C minor seventh (Cm7) |
NOTE
- It makes no difference whether you press black or white keys to the right of a major chord key when playing minor and seventh chords.
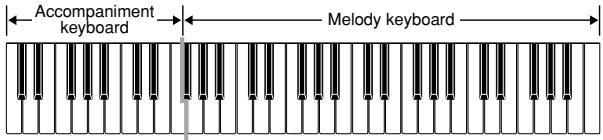
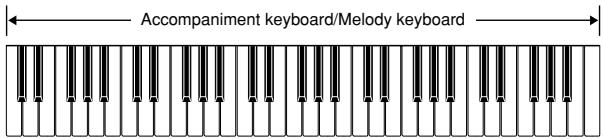
FINGERED
FINGERED provides you with a total of 15 different chord types. The following describes the FINGERED "Accompaniment keyboard" and "Melody keyboard", and tells you how to play a C-root chord using FINGERED.
FINGERED Accompaniment Keyboard and Melody Keyboard
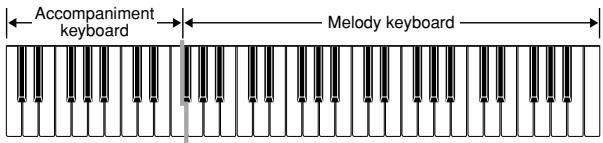
NOTE
- The accompaniment keyboard can be used for playing chords only. No sound will be produced if you try playing single melody notes on the accompaniment keyboard.
- The split point (page E-46) is the point that separates the Auto Accompaniment area and the melody area of the keyboard. You can change the location of the split point, which also changes the sizes of the keyboard areas.
C
Cm
Cdim
Caug ^*1
Csus4
C7 ^*2
Cm7 ^*2
Cmaj7 ^*2

Cm7 ^b5
C7 ^b5*1
C7sus4
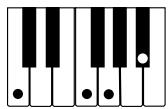
Cadd9
Cmadd9
CmM7*2
Cdim7*1
See the FINGERED Chord Chart on page A-7 for details on playing chords with other roots.
*1: Inverted fingerings cannot be used. The lowest note is the root.
*2: The same chord can be played without pressing the 5th G.
NOTE
- Except for the chords specified in note*1 above, inverted fingerings (i.e. playing E-G-C or G-C-E instead of C-E-G) will produce the same chords as the standard fingering.
- Except for the exception specified in note ^*2 above, all of the keys that make up a chord must be pressed. Failure to press even a single key will not play the desired FINGERED chord.
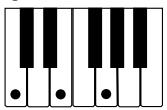
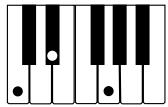
FULL RANGE CHORD
This accompaniment method provides a total of 38 different chord types: the 15 chord types available with FINGERED plus 23 additional types. The keyboard interprets any input of three or more keys that matches a FULL RANGE CHORD pattern to be a chord. Any other input (that is not a FULL RANGE CHORD pattern) is interpreted as melody play. Because of this, there is no need for a separate accompaniment keyboard, so the entire keyboard, from end to end, can be used for both melody and chords.
FULL RANGE CHORD Accompaniment Keyboard and Melody Keyboard
< Chords Recognized by This Keyboard >
| Chord Types | Number of Types |
| Corresponding FINGERED Chord | 15 (page E-33) |
| Other Chords | 23The following are examples of chords that use C as the bass note. C_6 · Cm_6 · C_69 ^ · · · · · ^bC · ^bC · ^ mC · · · · · ^b mC · ^b_7C · _7C · _7C · _7C · ^b_add9C |
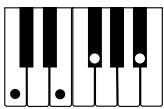
Example: To play the chord C major.
Any of the fingerings shown in the illustration below will produce C major.
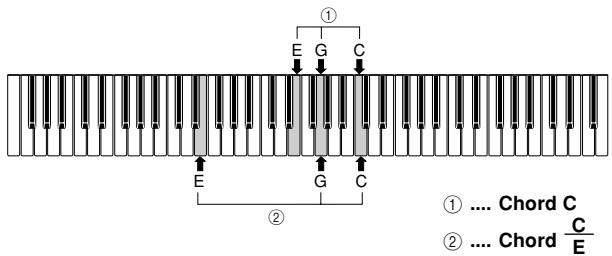
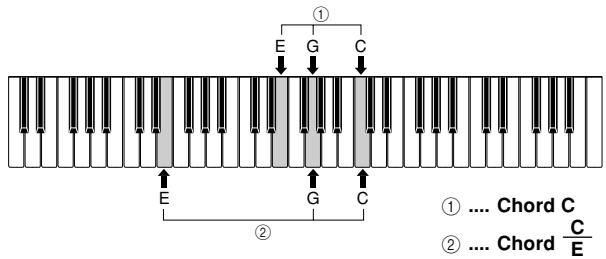
NOTE
- As with the FINGERED mode (page E-33), you can play the notes that form a chord in any combination (①).
- When the composite notes of a chord are separated by 6 or more notes, the lowest sound becomes the bass (②).
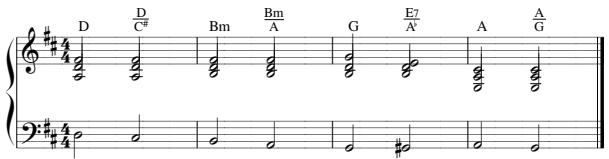
< Music Example >
Tone: 001, Rhythm: 102, Tempo: 070
Using an Intro Pattern
This keyboard lets you insert a short intro into a rhythm pattern to make startup smoother and more natural.
The following procedure describes how to use the Intro feature. Before starting, you should first select the rhythm you want to use, and set the tempo.
To insert an intro
1 Press the INTRO button to start the selected rhythm with an intro pattern.
- With the above setup, the intro pattern is played and the auto accompaniment with intro pattern starts as soon as you play chords on the accompaniment keyboard.
NOTE
- The standard rhythm pattern starts to play after the intro pattern is complete.
- Pressing the VARIATION/FILL-IN button while an intro pattern is playing causes the variation pattern to sound after the intro pattern is complete.
Using a Fill-in Pattern
Fill-in patterns let you momentarily change the rhythm pattern to add some interesting variation to your performances.
The following procedure describes how to use the Fill-in feature.
To insert a fill-in
1 Press the START/STOP button to start rhythm play.
2 Press the NORMAL/FILL-IN button to insert a fill-in pattern for the rhythm you are using.
NOTE
- The fill-in pattern does not play if you press the NORMAL/FILL-IN button while an intro pattern is playing.
Using a Rhythm Variation
In addition to the standard rhythm pattern, you can also switch to a secondary “variation” rhythm pattern for a bit of variety.
To insert the variation rhythm pattern
1 Press the START/STOP button to start rhythm play.
2 Press the VARIATION/FILL-IN button to switch to the variation pattern for the rhythm you are using.
NOTE
- To switch back to the standard rhythm pattern, press the NORMAL/FILL-IN button.
Using a Fill-in Pattern with a Variation Rhythm
You can also insert a fill-in pattern while a variation rhythm pattern is playing.
To insert a fill-in into a rhythm variation
1 While a variation rhythm pattern is playing, press the VARIATION/FILL-IN button to insert a fill-in pattern for the variation rhythm you are using.
Synchro Starting Accompaniment with Rhythm Play
You can set up the keyboard to start rhythm play at the same time you play the accompaniment on the keyboard.
The following procedure describes how to use synchro start. Before starting, you should first select the rhythm you want to use, set the tempo, and use the MODE switch to select the chord play method you want to use (NORMAL, CASIO CHORD, FINGERED, FULL RANGE CHORD).
To use synchro start
1 Press the SYNCHRO/ENDING button to put the keyboard into synchro start standby.
2 Playing a chord and the rhythm pattern starts to play automatically.
NOTE
- If the MODE switch is set to NORMAL, only the rhythm plays (without a chord) when you play on the accompaniment keyboard.
- If you press the INTRO button before playing anything on the keyboard, the rhythm starts automatically with an intro pattern when you play something on the accompaniment keyboard.
- Pressing the VARIATION/FILL-IN button before playing anything on the keyboard causes play to start with the variation pattern when something is played on the keyboard.
- To cancel synchro start standby, press the SYNCHRO/ ENDING button one more time.
Finishing with an Ending Pattern
You can end your performances with an ending pattern that brings the rhythm pattern you are using to a natural-sounding conclusion.
The following procedure describes how to insert an ending pattern. Note that the actual ending pattern played depends on the rhythm pattern you are using.
To finish with an ending pattern
1 While the rhythm is playing, press the SYNCHRO/ ENDING button.
- This causes the ending pattern to play, which brings rhythm accompaniment to an end.
Using One-touch Preset
One-touch preset automatically makes the settings listed below in accordance with the rhythm pattern you are using.
- Keyboard tone
- Layer, Split, or Layer Split on/off
- Layered tone (when layer is turned on), split tone (when split is turned on), or layered split tone (when layer and split are turned on)
- Tempo
- Reverb and chorus settings
To use one-touch preset
1 Select the rhythm you want to use.
2 Use the MODE switch to select the accompaniment mode you want to use.
3 Press the ONE TOUCH PRESET button.
- This automatically configures the one-touch preset settings in accordance with the rhythm you selected, and enters synchro start standby.
4 Play a chord. This will cause the rhythm pattern to start to play automatically.
- Accompaniment is played using the one touch preset settings.
Registration Memory Features
Registration memory lets you store up to 32 keyboard setups (4 sets × 8 banks) for instant recall whenever you need them. The following is a list of settings that are saved in registration memory.
Registration Memory Settings
- Tone
- Rhythm
- Tempo
- Layer on/off
- Split on/off
- Split point
- Effect settings
- Touch Response settings
- Assignable jack setting
- Synchro standby state
NOTE
- Each bank of registration memory initially contains data when you first use the keyboard. Simple replace the existing data with your own data.
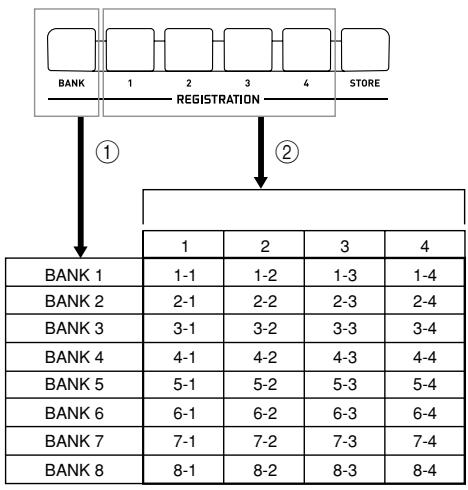
Setup Names
You can assign setups into one of 32 areas, which you can select using BANK button and the four REGISTRATION buttons. Area names range from 1-1 through 8-4 as shown below.
flowchart
graph TD
    A["Bank"] --> B["1"]
    A --> C["2"]
    A --> D["3"]
    A --> E["4"]
    A --> F["STORE"]
    B --> G["REGISTRATION"]
    C --> G
    D --> G
    E --> G
    F --> G
    G --> H["1"]
    G --> I["2"]
    G --> J["3"]
    G --> K["4"]
    H --> L["BANK 1"]
    I --> M["BANK 2"]
    J --> N["BANK 3"]
    K --> O["BANK 4"]
    L --> P["BANK 5"]
    M --> Q["BANK 6"]
    N --> R["BANK 7"]
    O --> S["BANK 8"]
    P --> T["BANK 1-1"]
    Q --> U["BANK 2-1"]
    R --> V["BANK 3-1"]
    S --> W["BANK 4-1"]
    T --> X["BANK 5-1"]
    U --> Y["BANK 6-1"]
    V --> Z["BANK 7-1"]
    W --> AA["BANK 8-1"]
    X --> AB["1-2"]
    Y --> AC["2-2"]
    Z --> AD["3-2"]
    AA --> AE["4-2"]
    AB --> AF["1-3"]
    AC --> AG["2-3"]
    AD --> AH["3-3"]
    AE --> AI["4-3"]
    AF --> AJ["5-3"]
    AG --> AK["6-3"]
    AH --> AL["7-3"]
    AI --> AM["8-3"]
    AJ --> AN["1-4"]
    AK --> AO["2-4"]
    AL --> AP["3-4"]
    AM --> AQ["4-4"]
    AN --> AR["5-4"]
    AO --> AS["6-4"]
    AP --> AT["7-4"]
① Use the BANK button to select the bank. Each press of BANK cycles through the bank numbers from 1 to 8.
② Pressing one of the REGISTRATION buttons (1 to 4) selects the corresponding area in the currently selected bank.
NOTE.
- Whenever you save a setup and assign it a setup name, any setup data previously assigned to that name is replaced with the new data.
To Save a Setup in Registration Memory
1 Select a tone and rhythm, and otherwise set up the keyboard the way you want it.
- See "Registration Memory Settings" on page E-37 for details on what data is stored in the registration memory.
2 Use the BANK button or the number buttons to select the bank you want.
- If you do not perform any operation for about three seconds after pressing the BANK button, the display returns to the contents in step 1, above.
• Bank 1 selected.
1- Bank
3 While holding down the STORE button, press a REGISTRATION button (1 to 4).
- The following display appears when you press the 2 button.
1-2 Store
4 Release the STORE and REGISTRATION buttons.
NOTE
- The setup is saved as soon as you press a REGISTRATION button in step 3, above.
To Recall a Setup from Registration Memory
1 Use the BANK button or the number buttons to select the bank.
- If you do not perform any operation for about three seconds after pressing the BANK button, the keyboard automatically clears the registration memory recall screen.
1- Bank
2 Press the REGISTRATION button (1 to 4) for the area whose setup you want to recall.
1-2 Recall
- The setup name along with the message "Recall" appears on the display.
NOTE
- If you press a REGISTRATION button without using the BANK button to select a bank first, the last bank number selected is used.
![MODE RECORDER SONG BANK RHYTHM POWER MODE TRANSMISSIONS REVEREY CHINA RICHINI TONE SONG BANK RHYTHM/SONG CONTROLLER INTRO NORMAL 1 RELAY VERSIDEI NURSOME COLDING START/STOP W/R START/STOP TEMP0 LENSION PART LESS 1 - 1 SPEAK METHANONE 54 6 1 2 3 0 - + DATA ACCESS SPLIT LAVER RIGHT/TRACK 2 LEFT/TRACK 1 MAIN REGISTRATION STOCKS 1 2 3 3 STOP 3 RESP LESSON [+] / [-]](/content/2025/01/129613/images/bdd82ff67adad612d5e4e15d7db9e1358d0c634aea4aef61521e17e56fc10806.jpg)
You can record your lesson play (lesson recording) and keyboard play along with the Auto Accompaniment you are using (performance recording).
Parts and Tracks
How data is recorded to the keyboard and the type of data that is recorded depends on whether you are performing a performance recording operation or a lesson recording operation.
Lesson Recording
With lesson recording, you use the LEFT/TRACK 1 button and the RIGHT/TRACK 2 button to select recording of only the left-hand part, only the right-hand part, or both the left-hand and right-hand parts.
Performance Recording
With performance recording, the keyboard operates like a tape recorder or sequencer. In this case, you can use the LEFT/TRACK 1 button and the RIGHT/TRACK 2 button to select the track you want to record to.
Performance recording records the data shown in the illustration below, using two memory tracks.
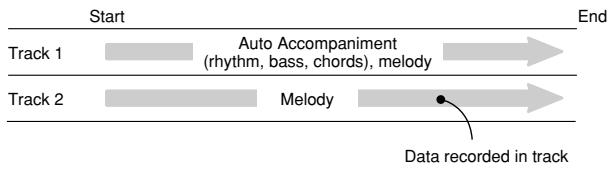
flowchart
graph LR
    A["Start"] --> B["Track 1"]
    B --> C["Auto Accompaniment (rhythm, bass, chords), melody"]
    C --> D["End"]
    E["Track 2"] --> F["Melody"]
    F --> G["Data recorded in track"]
- Since each track is independent of the other, you can edit a recording by re-recording only one of the tracks.
Using the RECORDER Button
Each press of the RECORDER button cycles through the recording options in the sequence shown below.
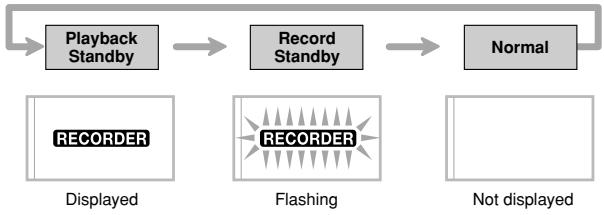
flowchart
graph LR
    A["Playback Standby"] --> B["Record Standby"]
    B --> C["Normal"]
    D["REORDER\nDisplayed"] --> E["REORDER\nFlashing"] --> F["Not displayed"]
Memory Capacity
This keyboard can hold a total of approximately 12,000 notes, which can be divided between a lesson recording and a performance recording. Note that you can use up all 12,000 notes for either the lesson recording or the performance recording. If you do, you will not be able to record anything for the other type of recording.
- The recorder shares the same memory area with the song bank area used for storing song data transferred from a computer. Because of this, you may not be able to store the full 12,000 notes of data.
- When the number of remaining notes becomes less than about 100 while you are recording, the RECORDER indicator and the track/part indicator (L, R) will start to flash at high speed.
- Recording will stop automatically if memory becomes full.
If you are using Auto Accompaniment or a rhythm, they will also stop playing at this time.
IMPORTANT!
- Never turn off the keyboard while it is recording or standing by for recording to the keyboard. Doing so will cause all of the song data currently stored in the Song Bank user area to be deleted.
Recorded Data Storage
- Anything previously stored in the keyboard is replaced whenever you make a new recording.
- Recorder contents are retained even when power is turned off, as long as the keyboard is being supplied battery or AC adaptor power. If you remove the batteries or should the batteries go dead while the keyboard is not being supplied power by the AC adaptor, recorder contents will be deleted. Be sure to supply power to the keyboard with the AC adaptor when replacing batteries.
- Turning off the keyboard while a record operation is in progress causes the contents of the track you are currently recording to be lost.
CASIO COMPUTER CO., LTD. assumes no responsibility for any loss or damage to you or any third party arising out of the loss or corruption of data.
Recording Play Along with a Built-in Tune
You can use the lesson recording procedure to record notes you play along with one of the keyboard's built-in tunes. When you start a lesson recording, the keyboard plays the song minus the part(s) you selected as the recording part(s).
Selecting Parts
Press the part/track button that corresponds to the part(s) you want to select as the recording part(s).
| To select this part: | Press this button: |
| Left-hand | LEFT/TRACK 1 |
| Right-hand | RIGHT/TRACK 2 |
| Both hands | LEFT/TRACK 1 +RIGHT/TRACK 2 |
The part that is currently selected is indicated by the part/track indicators (L and R) that appear on the display as described below.
Part/Track Indicators in Recording Standby
Press the part/track button of the part you want to play on the keyboard (recording part). This causes its part/track indicator to flash.
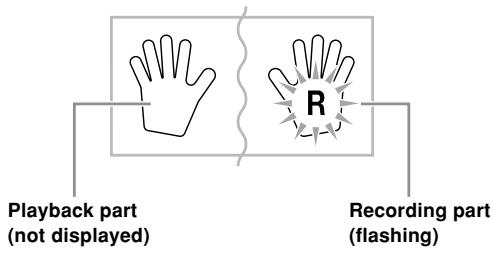
flowchart
graph TD
    A["Playback part (not displayed)"] --> B["Recording part (flashing)"]
    B --> C["R"]
    style A fill:#f9f,stroke:#333
    style B fill:#ccf,stroke:#333
    style C fill:#cfc,stroke:#333
Example: The above indicates the left-hand part is the playback part, and the right-hand part is the recording part.
To record as you play along with a built-in tune
1 Press the SONG BANK button to select the mode that includes the tune you want to play along with.
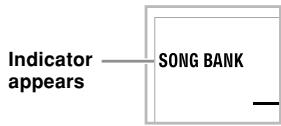
flowchart
graph LR
    A["Indicator appears"] --> B["SONG BANK"]
2 Use the RECORDER button to select record standby.
- This causes the RECORDER indicator to flash on the display.
3 Select the tune you want to play along with.
- See “To play back a Song Bank tune” on page E-22 for information about selecting Song Bank tunes.
4 Use the LEFT/TRACK 1 button or RIGHT/TRACK 2 button to select the part(s) (left-hand, right-hand) you want to mute in the built-in tune playback and play along on the keyboard.
- If you want to mute and play both parts, press both buttons at the same time.
5 Configure the following settings as required.
- Tone (page E-20)
- Tempo (page E-23)
6 Press the controller block START/STOP button.
• This starts recording.
7 Play the notes for the part(s) you selected in step 4 on the keyboard.
8 Recording stops automatically when playback of the built-in tune is finished.
- To interrupt recording part way through, press the controller block START/STOP button. This will play back everything you recorded up to that point.
- If you want to hear what you recorded immediately, press the controller block START/STOP button again.
Lesson Recording Data
In addition to the notes you play on the keyboard and the accompaniment of the built-in song you selected, the following data is also stored by a lesson recording operation.
- Tone setting
- Tempo setting
- Tune name
• Recording part selection - Pedal operations
- Layer and split settings, and their tone settings
- Effect setting
Playing Back a Lesson Recording
1 Press the SONG BANK button to select the bank of the built-in tune that you originally used to record the lesson recording.
2 Use the RECORDER button to select playback standby.
3 Press the controller block START/STOP button. - This starts playback of lesson recording contents. - You can adjust the tempo at this point, if you want.
4 To stop playback, press the controller block START/STOP button again.
Recording a Performance
Use this procedure when you want to record what you play on the keyboard in real time. Performance recording records both the notes you play and any accompaniment patterns that you use.
Selecting a Track
Press the part/track button that corresponds to the track you want to select.
| To select this track: | Press this button: |
| Track 1 | LEFT/TRACK 1 |
| Track 2 | RIGHT/TRACK 2 |
The track that is currently selected is indicated by the part/track indicator (L or R) that appears on the display as described below.
Part/Track Indicators in Playback Standby
Each press of a part/track button toggles playback of that track on (part/track indicator displayed) and off (indicator not displayed).
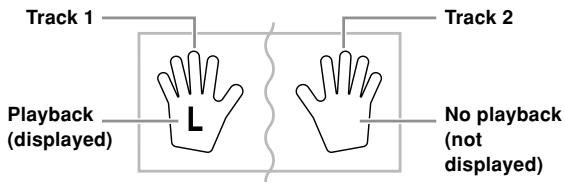
Example: The above indicates that Track 1 will be played back, while Track 2 will not.
Part/Track Indicators in Recording Standby
The part/track indicator will be displayed if its track already contains data.
Press the part/track button of the track to which you want to record (record track). This causes its part/track indicator to flash. The part/track indicator of the other track will remain displayed (without flashing) to indicate that it will playback during recording ( playback track).
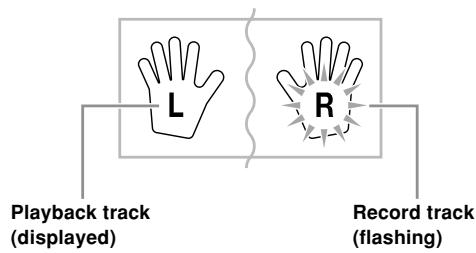
flowchart
graph TD
    A["Playback track (displayed)"] --> B["L"]
    C["Record track (flashing)"] --> D["R"]
Example: The above indicates Track 1 is the playback track, and Track 2 is the record track.
To record your keyboard performances
IMPORTANT!
- Recording to a track that already contains data causes the existing data to be replaced by your new performance.
1 Press the RHYTHM button to enter the rhythm mode.
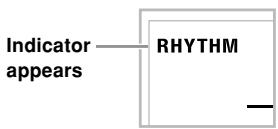
2 Use the RECORDER button to select record standby.
- This causes the RECORDER indicator to flash on the display.
3 Press the LEFT/TRACK 1 button to select Track 1.
- This causes the L indicator to flash, indicating that Track 1 is the recording track.

4 Configure the following settings as required.
- Tone (page E-20)
• Rhythm (page E-30)
• MODE switch setting (page E-31) - Use a slower tempo if you feel you might have trouble playing properly at a faster tempo (page E-23).
5 Press the controller block START/STOP button.
• This starts recording.
6 Play the notes you want on the keyboard.
- Besides notes, any chords you play on the keyboard are recorded, along with their Auto Accompaniment patterns. Melody notes you play are also recorded.
- Any pedal operations you perform while playing are also recorded.
7 To stop recording, press the controller block START/STOP button again.
- If you make a mistake, you need to go back and re-record from step 2.
- If you want to immediately hear what you recorded, press the controller block START/STOP button again.
Track 1 Data
In addition to notes played on the keyboard and chord accompaniments, the following data is also stored in Track 1 during performance recording.
- Tone number
- Rhythm number
- INTRO button, SYNCHRO/ENDING button, NORMAL/FILL-IN button, VARIATION/FILL-IN button operations
- Pedal operations
- Layer and split settings, and their tone settings
- Split point
- Tempo setting
- Effect setting
Track 1 Recording Variations
■ To record without rhythm
Skip step 5 of the above procedure.
- Recording without rhythm starts as soon as you press a keyboard key.
■To start recording with synchro start
In place of step 5 of the above procedure, press the SYNCHRO/ENDING button.
- Now Auto Accompaniment and recording will start when you play a chord within the accompaniment keyboard range.
■To insert an intro, ending, or fill-in into a recording
During recording, press the INTRO button, SYNCHRO/ENDING button, NORMAL/FILL-IN button, or VARIATION/FILL-IN button as required.
■ To start recording with an intro using synchro start
In place of step 5 of the above procedure, press the SYNCHRO/ENDING button and then the INTRO button.
- Now Auto Accompaniment and recording will start with an intro pattern when you play a chord within the accompaniment keyboard range.
■ To start Auto Accompaniment part way into a recording In place of step 5 of the above procedure, press the SYNCHRO/ENDING button, and play something within the melody range of the keyboard.
- This records the melody without any accompaniment. Auto Accompaniment will start when you play a chord within the accompaniment keyboard range.
Playing Back a Performance Recording
Perform the following procedure when you want to play back a tune you recorded with performance recording.
1 Press the RHYTHM button to enter the rhythm mode.
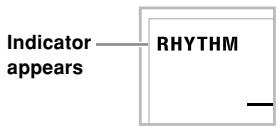
flowchart
graph TD
    A["Indicator"] --> B["RHYTHM"]
    B --> C["-"]
2 Use the RECORDER button to select playback standby.
3 Press the controller block START/STOP button.
- This starts playback of performance recording contents. During playback, you can press the LEFT/TRACK 1 or RIGHT/TRACK 2 button to mute either track and listen to the contents of the other track only.
- You can adjust the tempo at this point, if you want.
4 To stop playback, press the controller block START/STOP button again.
NOTE
- During performance recording playback, the entire range of the keyboard operates as a melody keyboard, regardless of the MODE switch setting. You can play along with performance recording playback, if you want. You could use layer and split (page E-45 through E-47) at this time to assign multiple tones to the keyboard.
- Note that pause, skip forward, and skip back operations cannot be performed during performance recording playback.
- You can send playback of performance recording contents as MIDI data.
Overdubbing a Performance Recording
You can use the following procedure to record a melody in Track 2 so it combines with a recording you previously made in Track 1.
1 Press the RHYTHM button to enter the rhythm mode.

2 Use the RECORDER button to select record standby.
3 Press the RIGHT/TRACK 2 button to select Track 2 as the recording track.
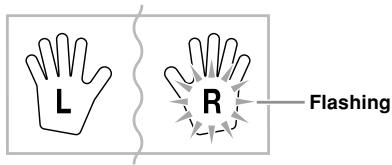
4 Select the tone you want to use.
5 Press the controller block START/STOP button.
- This starts playback of Track 1 and recording in Track 2.
6 Play the melody notes you want as you listen to the playback from Track 1.
7 To stop recording, press the controller block START/STOP button again.
- If you make a mistake, you need to go back and re-record from step 2.
- If you want to immediately hear what you recorded, press the controller block START/STOP button again.
NOTE
- Track 2 is a melody-only track, which means that chord accompaniment cannot be recorded there. Because of this, the entire range of the keyboard becomes a melody keyboard when recording the Track 2, regardless of the current MODE switch setting.
- If you want to record without playback from a recorded track, enter playback standby, deselect the playback track, and then enter record standby. Note, however, that you cannot turn off rhythm and Auto Accompaniment.
Track 2 Data
In addition to notes played on the keyboard, the following data is also recorded to Track 2.
- Tone number
- Pedal operations
Deleting a Specific Part/Track
You can use the following procedure to delete a specific part/track from a lesson recording or performance recording.
Getting Ready
■When deleting a lesson recording part
- Press the SONG BANK button.
■When deleting a performance recording track
- Press the RHYTHM button.
1 Press the RECORDER button to enter record standby.
2 Select the part/track you want to delete by pressing the LEFT/TRACK 1 button or RIGHT/TRACK 2 button.
3 Hold down the RECORDER button.
- This causes a confirmation message to appear on the display.
- To cancel the delete operation, press the [-] (NO) button.
4 Press the [+] (YES) button to delete the part/track.
- This causes the keyboard to return to playback standby.
NOTE
- Pressing the RECORDER button while the part/track delete screen is on the display returns to record standby.
![TRANSPOSE/SETTING POWER MODE FULL-SANEO PANEER A CHAPY ON/OFFIC ON/OFFIC TRANPOSE/ REVERSE/ CORRDER RHYTHM TONE SONG BANK RHYTHM/SONS CONTROLLER ENTRE NORMAL/TOTAL VARIATION/SURVE SYNC/BASE START/STEP 100 REPEAT COMF COMP PERIASE PLAT/STEP TERPO BANK 1 2 3 4 S/STONE REGISTRATION LESSUM PART SPEAK HETRINCOME DATA ACCESS 1 2 3 STEP 1 STEP 2 STEP 3 ORDERING SPLIT LAYER NUMBER BUTTONS 7 8 9 4 5 6 1 2 3 0 -1 -2 [+] / [-] SPLIT LAYER](/content/2025/01/129613/images/86dc93c63d957bd8a0a0fd4f696231543d0242ada1fe7870d787e767f4f6537a.jpg)
This section describes how to use layer (to play two tones with a single key) and split (to assign different tones to either end of the keyboard), and how to make touch response, transpose, and tuning settings.
Using Layer
Layer lets you assign two different tones (a main tone and a layered tone) to the keyboard, both of which play whenever you press a key. For example, you could layer the FRENCH HORN tone on the BRASS tone to produce a rich and brassy sound.
To layer tones
1 First select the main tone.
Example: To select "180 BRASS" as the main tone, press the TONE button and then use the number buttons or [+] and [-] buttons to input 1, 8 and then 0.

2 Press the LAYER button.
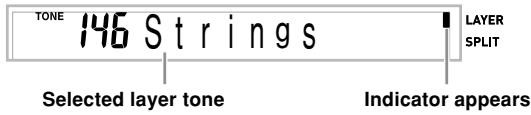
3 Select the layered tone.
Example: To select "178 FRENCH HORN" as the layered tone, use the number buttons or [+] and [-] buttons to input 1, 7 and then 8.
TONE 178 Fr. Horn
4 Now try playing something on the keyboard.
- Both tones are played at the same time.
5 Press the LAYER button again to unlayer the tones and return the keyboard to normal.
LAYER
Example: WK-110
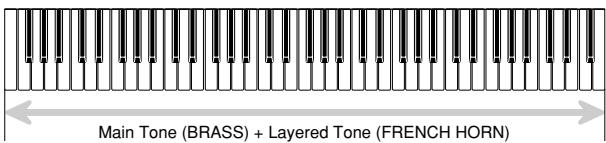
Using Split
With split you can assign two different tones (a main tone and a split tone) to either end of the keyboard, which lets you play one tone with your left hand and another tone with your right hand. For example, you could select STRINGS as the main (high range) tone and PIZZICATO STRINGS as the split (low range) tone, putting an entire string ensemble at your fingertips.
Split also lets you specify the split point, which is the location on the keyboard where the changeover between the two tones occurs.
To split the keyboard
1 First select the main tone.
Example: To select "146 STRINGS" as the main tone, press the TONE button and then use the number buttons or [+] and [-] buttons to input 1, 4 and then 6.

2 Press the SPLIT button.
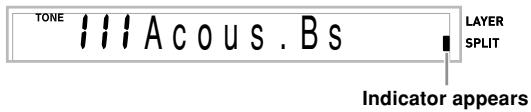
3 Select the split tone.
Example: To select "134 PIZZICATO STRINGS" as the split tone, use the number buttons or [+] and [-] buttons to input 1, 3 and then 4.

4 Specify the split point. While holding down the SPLIT button, press the keyboard where you want the leftmost key of the high end range to be.
Example: To specify G3 as the split point, press the G3 key.
| G 3 |
5 Now try playing something on the keyboard.
- Every key from F#3 and below is assigned the PIZZICATO STRINGS tone, while every key from G3 and above is assigned the STRINGS tone.
6 Press the SPLIT button again to unsplit the keyboard and return it to normal.
SPLIT
Example: WK-110
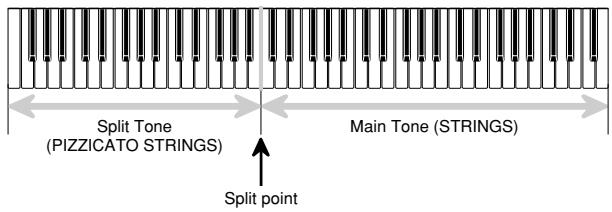
Using Layer and Split Together
You can use layer and split together to create a layered split keyboard. It makes no difference whether you layer tones first and then split the keyboard, or split the keyboard and then layer tones. When you use layer and split in combination, the high range of the keyboard is assigned two tones (main tone + layered tone), and the low range two tones (split tone + layered split tone).
To split the keyboard and then layer tones
1 Press the TONE button and then input the tone number of the main tone.

2 Press the SPLIT button and then input the number of the split tone.
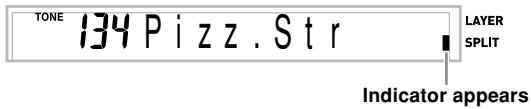
- After specifying the split tone, press the SPLIT button to unsplit the keyboard.
3 Press the LAYER button and then input the number of the layered tone.
- Note that you can reverse steps 2 and 3, specifying the layered tone first and then the split tone.
4 Press the SPLIT button or the LAYER button so both of the SPLIT and LAYER indicators are displayed.
5 Input the number of the layered split tone.

6 Specify the split point.
- While holding down the SPLIT button, press the keyboard where you want the leftmost key of the low end range to be.
7 Play something on the keyboard.
- Press the LAYER button to unlayer the keyboard, and the SPLIT button to unsplit it.
LAYER SPLIT
Example: WK-110
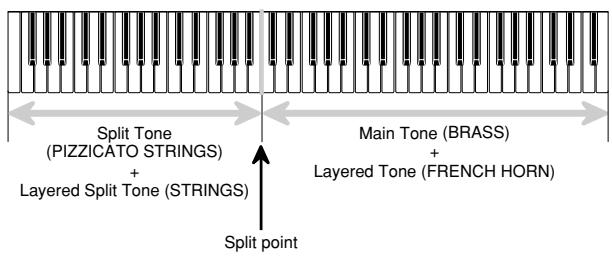
About TRANSPOSE/SETTING button
Each press of the TRANSPOSE/SETTING button cycles through the setting screens. If you accidentally pass the screen you want to use, keep pressing the TRANSPOSE/SETTING button until the screen appears again.
Transposing the Keyboard
Transpose lets you raise and lower the overall key of the keyboard in semitone units. If you want to play an accompaniment for a vocalist who sings in a key that's different from the keyboard, for example, simply use transpose to change the key of the keyboard.
To transpose the keyboard
1 Press the TRANSPOSE/SETTING button until the transpose setting screen appears.
00 Trans.
2 Use the number buttons or the [+]/[-] buttons to change the key of the keyboard.
Example: To transpose the keyboard five semitones upwards.
05 Trans.
NOTE
- The keyboard can be transposed within a range of -12 (one octave downwards) to +12 (one octave upwards).
-
The default transpose setting is "00" when keyboard power is turned on.
-
If you leave the transpose screen on the display for about five seconds without doing anything, the screen is automatically cleared.
- The transpose setting also affects playback from memory and Auto Accompaniment.
- To return the keyboard to its default key, perform the above procedure and press both of the [+] and [-] buttons at the same time in step 2.
- The effect of a transpose operation depends on the pitch of each note and on the tone you are currently using. If a transpose operation causes a note to be outside of the allowable range for a tone, the same note in the nearest octave within the range will be substituted.
Adjusting Accompaniment and Song Bank Volume
You can adjust the volume of the accompaniment and Song Bank tunes independently of the notes you play on the keyboard. You can specify a volume level in the range of 000 (minimum) to 127 (maximum).
To adjust the accompaniment volume
1 Press the TRANSPOSE/SETTING button until the accompaniment volume adjustment screen appears.
115 A comp Vol
Current accompaniment volume setting
2 Use the number buttons or the [+]/[-] buttons to change the current volume setting value. Example: 110
110 A comp Vol
NOTE
- The current accompaniment volume value that appears in Step 1 automatically clears from the display if you do not input anything within about five seconds.
To adjust built-in tune volume
Enter the Song Bank mode, and then perform the procedure under "To adjust the accompaniment volume".
- In this case, a song volume screen will appear in place of the accompaniment volume screen.
Using Touch Response
When touch response is turned on, the relative volume of sound output by the keyboard is varied in accordance with the amount of pressure applied, just like an acoustic piano.
Touch response provides a choice of three settings, described below.
OFF: This setting turns off touch response. Keyboard pressure does not have any affect on the output notes.
1: This setting provides touch response that is suited for normal play.
2: This setting increases touch response, so stronger keyboard pressure has a greater effect than the "1" setting.
1 Press the TRANSPOSE/SETTING button until the TOUCH RESPONSE SELECT screen appears.
! Touch
2 Use the [+] and [-] or [0] and [1] buttons to change the setting.
Example: To select touch response 2.
2 Touch
- Touch response is on when touch response indicator is on.
TOUCH RESPONSE REPEAT
Indicator appears
- Touch response is off when touch response indicator is off.
TOUCH RESPONSE REPEAT

NOTE
- Recording playback and accompaniment do not affect the touch response setting.
Tuning the Keyboard
Use the following procedure to fine tune the keyboard to match the tuning of another musical instrument.
To tune the keyboard
1 Press the TRANSPOSE/SETTING button until the tuning screen appears.
00 Tune
2 Use the [+] , [-] , and the number buttons to adjust the tuning value.
Example: To lower tuning by 20
-20 Tune
NOTE
- The keyboard can be tuned within a range of -50 cents to +50 cents.
* 100 cents is equivalent to one semitone. - The default tuning setting is "00" when keyboard power is turned on.
- If you leave the tuning screen on the display for about five seconds without doing anything, the screen is automatically cleared.
- The tuning setting also affects playback from recorder and Auto Accompaniment.
- To return the keyboard to its default tuning, perform the above procedure and press the [+] and [-] buttons at the same time in step 2.
![TRANSPOSE/SETTING POWER MODE TRANPOSE/ SOUND RECOODER RICHTHIR TONE SONS BANK RICHTHIR/SONS RICHTHIR/SONS CONTROLLER INTRO REFRIVAL SELLER VOLTAGE PLUG/RUB STRAW/SHOTTER START/SHOTTER RESET PLOT/STOP TEPPOL BANK 1 2 3 4 STOP REGISTRATION LESSN PART LEAVE STRAVE METHROMONE DATA ACCESS SPLIT LAYER LEFT/TRACK 1 RIGHT/TRACK 2 Number buttons [+] / [-]](/content/2025/01/129613/images/5aec2420de7952b9a0f57f60b8f4e9460d44ea2d5f1a5b6ea6b80795c90fff1a.jpg)
Connecting to a Computer
The keyboard's USB port makes it quick and simple to connect to a computer. After installing the USB MIDI driver onto your computer from the CD-ROM that comes with the keyboard, you will be able to use commercially available MIDI software on your computer to exchange data between the keyboard and your computer.
To install the USB MIDI driver
1 On the computer to which you plan to connect, install the USB MIDI driver that comes on the CD-ROM that comes bundled with the keyboard.
- For information about installing the USB MIDI driver, see the "CASIO USB MIDI Driver User's Guide" (manual_e.pdf) on the "USB Manual and Driver CD-ROM".
NOTE
- Before starting actual installation of USB MIDI driver, be sure to read the contents of the "readme.txt" file in the "English" folder on the CD-ROM.
- Use Adobe Reader or Acrobat Reader to access the USB MIDI driver user's guide.*
* You need to have Adobe Reader or Acrobat Reader installed on your computer in order to view the contents of the "CASIO USB MIDI Driver User's Guide" (manual_e.pdf). If your computer does not have either Adobe Reader or Acrobat Reader installed, use the procedure below to install it.
Installing Adobe Reader (Acrobat Reader\*\*)
- Place the “USB Manual and Driver CD-ROM” into your computer’s CD-ROM drive.
- On the CD-ROM, navigate to the folder named "Adobe", open the folder named "English", and then double-click "ar601enu.exe" ("ar505enu.exe"**). Follow the instructions that appear on your computer screen to install Adobe Reader.
** Adobe Reader cannot be installed on a computer running Windows 98. If your computer is running under Windows 98, double-click "ar505enu.exe" to install Acrobat Reader.
Minimum Computer system Requirements
Supported Operating Systems
Operation is supported under Windows ^® XP Professional, Windows ^® XP Home Edition, Windows ^® 2000 Professional, Windows ^® Me, Windows ^® 98SE, and Windows ^® 98.
- Universal
- IBM AT or compatible computer
- USB port that provides normal operation under Windows
• CD-ROM drive (for installation) - At least 2MB of free hard disk space (not including space required for Adobe Reader)
● Windows XP
• 300MHz or higher Pentium processor
- At least 128MB of memory
● Windows 2000
• 166MHz or higher Pentium processor
- At least 64MB of memory
● Windows Me, Windows 98SE, Windows 98
• 166MHz or higher Pentium processor
- At least 32MB of memory
NOTE
- Company and product names used herein are trademarks of their respective owners.
Using the USB port
Note that you need to purchase a commercially available USB cable to connect the keyboard to a computer using the USB port.
To connect to a computer using the USB port
1 Use a commercially available USB cable to connect the keyboard to the computer.
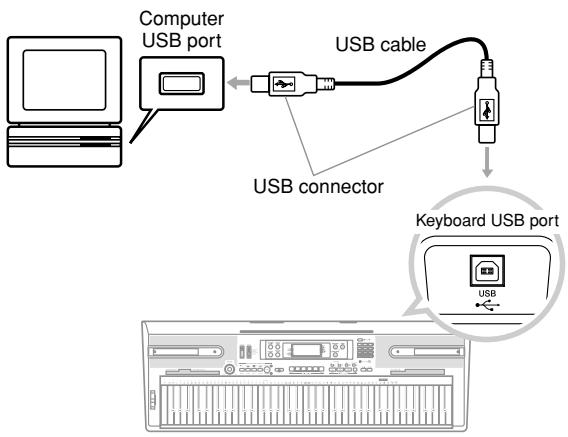
DATA ACCESS Lamp
- The DATA ACCESS lamp lights whenever the keyboard is exchanging data with a connected computer over a USB cable connection. Never disconnect the USB cable while the DATA ACCESS lamp is lit.
Expanding the Selections in the Song Bank Tunes
You can transfer song data from your computer to the keyboard. You can store up to 5 tunes as Song Bank tunes 101 through 105. For SMF data you purchase or create, you need to use an SMF Converter to convert it to CASIO format before transferring it to the keyboard.
To install the SMF Converter
1 On the computer to which you plan to connect, install the SMF Converter that comes on the CD-ROM that comes bundled with the keyboard.
- On the CD-ROM, double-click "SMFConv-e.exe", and then follow the instructions that appear on your computer screen to install SMF Converter.
- Before installing SMF Converter, be sure to read the contents of the "smfreadme.txt" file in each language folder on the CD-ROM.
For information about using SMF Converter, double-click "index.html" in the [help] folder, which was created when you installed SMF Converter. You can also access user documentation from the Windows [Start] menu by clicking [Programs] - [CASIO] - [SMF Converter] - [manual].
- A browser that supports frames (like Internet Explorer 4 or Netscape Navigator 4.04 or higher) is required to view the SMF Converter manual.
Minimum Computer System Requirements
● Operating System:
Windows 98SE
Windows Me
Windows XP Home Edition/XP Professional
● Storage
At least 10MB free HDD space
- USB interface
- You can also obtain a copy of the SMF Converter by downloading it at the Web page shown below. After downloading, install the software on your computer.
CASIO MUSIC SITE
http://music.casio.com/
- In addition to the software itself, the CASIO MUSIC SITE will also provide you with information about its installation and use. You can also find out about the latest news about your keyboard and other CASIO musical instruments, and much more.
Song Data Storage
Song data saved as Song Bank tunes are retained even when power is turned off, as long as the keyboard is being supplied battery or AC adaptor power. If you remove the batteries or should the batteries go dead while the keyboard is not being supplied power by the AC adaptor, song data will be deleted. Be sure to supply power to the keyboard with the AC adaptor when replacing batteries.
NOTE
- This keyboard supports SMF 0 and 1 format data.
- Voice Fingering Guide, on-screen fingering indicators, and voice announcement of evaluation points are not supported for SMF data you purchase or create.
Using the SMF Data on the Bundled CD-ROM
The CD-ROM that comes bundled with the keyboard contains demos as well as 25 tunes (SMF data) that you can use for step lessons. It also contains PDF format files that contain the sheet music of the included tunes. For a full list of the tunes that are included, open the "List.txt" file located inside the "MusicDataFolder" on the CD-ROM. For each tune, "List.txt" shows the tune name, SMF file name, PDF file name of the music score, and the type of lesson★ for which the tune can be used.
★A tune marked with an asterisk (*) can be used for a both-hand lesson. A tune that is not marked with an asterisk can be used for a right-hand lesson.
NOTE
- You can load SMF data from the CD-ROM to the keyboard using the SMF converter tool (page E-50).
- You will need to have Adobe Reader or Acrobat Reader installed on your computer in order to view the contents of a music score PDF file. If neither of these applications is installed on your computer, see “Installing Adobe Reader (Acrobat Reader)” on page E-49.
General MIDI Tone
The General MIDI standard defines the tone numbering sequence, the drum sound numbering sequence, the number of MIDI channels that can be used, and other general factors that determine the sound source configuration. Because of this, musical data produced on a General MIDI sound source can be played back using similar tones and identical nuances as the original, even when played on another manufacturers sound source.
This keyboard conforms with General MIDI standards, so it can be connected to a computer and used to play back General MIDI data that has been purchased, downloaded from the Internet, or obtained from any other source.
Changing the Settings
This section tells you how to make the settings required when connecting to a computer.
KEYBOARD CHANNEL (Default: 1)
The keyboard channel is the channel used to send messages from this keyboard to a computer. You can specify one channel from 1 to 16 as the keyboard channel.

Press the TRANSPOSE/SETTING button until the KEYBOARD CHANNEL screen appears.
01 Keybd Ch

Use the [+] , [-] , and the number buttons to change the channel number.
Example: To specify channel 4
04 Keybd Ch
NAVIGATE CHANNEL (Default: 4)
When messages are received from a computer for play on this keyboard, the navigate channel is the channel whose note data appears on the display. You can select one channel from 01 to 16 as the navigate channel. Since this setting lets you use the data on any channel of commercially available SMF data to light on the on-screen keyboard guide, you can analyze how different parts of an arrangement are played.
1 Press the TRANSPOSE/SETTING button until the NAVIGATE CHANNEL screen appears.
04 Navi. Ch
2 Use the [+] , [-] , and the number buttons [0] through [9] to change the channel number. Example: To specify channel 2
02 Navi. Ch
To turn off specific sounds before playing back tune data that is being received
<
While playing tune data, press the RIGHT/TRACK 2 button. - This cuts the sound of the navigate channel, but on-screen keyboard guide keys continue to light in accordance with the channel's data as it is received. Press RIGHT/TRACK 2 button again to turn the channel back on.
<
While playing tune data, press the LEFT/TRACK 1 button. - This cuts the sound of the channel whose number is one less than the navigate channel, but on-screen keyboard guide keys continue to light in accordance with the channel's data as it is received. Press LEFT/TRACK 1 button again to turn the channel back on. Example: If the navigate channel is channel 4, the above operation turns off channel 3.
LOCAL CONTROL (Default: On)
oFF: Anything played on the keyboard is output as a message from the USB port, without being sounded by the internal sound source.
- Note that no sound is produced by the keyboard if LOCAL CONTROL is turned off and no external device is connected.
1 Press the TRANSPOSE/SETTING button until the LOCAL CONTROL screen appears. Example: When LOCAL CONTROL is on
on Local
2 Use the [+] and [-] or [0] and [1] buttons to turn the setting on and off. Example: To turn LOCAL CONTROL off
off Local
ACCOMP OUT (Default: Off)
on: Auto Accompaniment is played by the keyboard and the corresponding message is output from the USB port. oFF: Auto Accompaniment messages are not output from the USB port.
1 Press the TRANSPOSE/SETTING button until the ACCOMP OUT screen appears. Example: When ACCOMP OUT is off
off AcompOut
2 Use the [+] and [-] or [0] and [1] buttons to turn the setting on and off. Example: To turn ACCOMP OUT on
on AcompOut
SUSTAIN/ASSIGNABLE JACK (Default: SUS)
SUS(sustain): Specifies a sustain*1 effect when the pedal is depressed.
SoS (sostenuto): Specifies a sostenuto ^*2 effect when the pedal is depressed.
SFt (soft): Specifies reduction of the sound's volume when the pedal is depressed.
rHy (rhythm): Specifies START/STOP button operation when the pedal is depressed.

Press the TRANSPOSE/SETTING button until the SUSTAIN/ASSIGNABLE JACK screen appears.
Example: When sustain is currently set
SUS Jack

Use the [+] and [-] or [0] , [1] , [2] , and [3] buttons to change the setting.
Example: To select rhythm
rHY Jack
\*1 Sustain
With piano tones and other sounds that decay, the pedal acts as a damper pedal, with sounds being sustained longer when the pedal is depressed. With organ tones and other continuous sounds, notes played on the keyboard continue to sound until the pedal is released. In either case, the sustain effect is also applied to any notes that are played while the pedal is depressed.
\*2 Sostenuto
This effect performs the same way as sustain, except that it is applied only to notes that are sounding already when the pedal is depressed. It does not affect notes that are played after the pedal is depressed.
| Problem | Possible Cause | Action | See page |
| No keyboard sound | 1. Power supply problem.2. Power is not turned on.3. Volume setting is too low.4. The MODE switch is in the CASIO CHORD or FINGERED position.5. LOCAL CONTROL is off. | 1. Correctly attach the AC adaptor, make sure that batteries poles (+/-) are facing correctly, and check to make sure that batteries are not dead.2. Press the POWER button to turn on power.3. Use the VOLUME knob to increase volume.4. Normal play is not possible on the accompaniment keyboard while the MODE switch is set to CASIO CHORD or FINGERED. Change the MODE switch setting to NORMAL.5. Turn on LOCAL CONTROL. | PagesE-15, 16Page E-20Page E-20Page E-31Page E-52 |
| Any of the following symptoms while using battery power. | Low battery power | Replace the batteries with a set of new ones or use the AC adaptor. | PagesE-15, 16 |
| Dim power supply indicatorInstrument does not turn onDim, difficult to read displayAbnormally low speaker/headphone volumeDistortion of sound outputOccasional interruption of sound when playing at high volumesSudden power failure when playing at high volumesDimming of the display when playing at high volumeContinued sound output even after you release a keyA totally different tone may soundAbnormal rhythm pattern and demo tune play | |||
| Auto Accompaniment does not sound. | Accompaniment volume is set to 000. | Use the TRANSPOSE/SETTING button to increase the volume. | Page E-47 |
| Sound output does not change when key pressure is varied. | Touch response is turned off. | Press the TRANSPOSE/SETTING button to turn it on. | Page E-48 |
| On-screen keyboard guide keys stay on. | Keyboard is waiting for play of the correct note during Step 1 or Step 2 play. | 1. Press the lit key to continue with Step 1 or Step 2 play.2. Press the PLAY/STOP button to quit Step 1 or Step 2 play. | PagesE-27, 28PagesE-27, 28 |
| When playing with another instrument, keys or tunings do not match. | Transpose or tuning is set to a value other than 00. | Use the TRANSPOSE/SETTING button to display the applicable setting screens and set both transpose and tuning to 00. | Page E-47 |
| Cannot record Auto Accompaniment or rhythm. | Track other than Track 1 is selected as the recording track. | Use the track select buttons to select Track 1. (Track 2 is melody track.) | Page E-41 |
| Cannot record chord accompaniment data on a computer. | ACCOMP OUT is turned off. | Turn on ACCOMP OUT. | Page E-52 |
| After transferring song data from my computer, playback stops part way through. | Digital noise from the USB cable or power cord caused data communication between your computer and keyboard to be interrupted. | Stop playback, disconnect the USB cable from and then reconnect it to the keyboard's USB port, and then try playing back the tune again. If this does not correct the problem, exit the MIDI software you are using, and then disconnect the USB cable from and then reconnect it to the keyboard's USB port. Next, restart your MIDI software and try playback again. | Page E-50 |
| A tone's quality and volume sounds slightly different depending where it is played on the keyboard. | This is an unavoidable result of the digital sampling process,* and does not indicate malfunction.* Multiple digital samples are taken for the low range, middle range, and high range of the original musical instrument. Because of this, there may be a very slight difference in tonal quality and volume between sample ranges. | ||
| Models: | CTK-810/WK-110 | ||
| Keyboard: | CTK-810: 61 standard-size keys, WK-110: 76 standard-size keys (with touch response on/off) | ||
| Tones: | 515; with layer and split | ||
| Polyphony: | 32 notes maximum (16 for certain tones) | ||
| Auto Accompaniment | |||
| Rhythm Patterns: | 120 | ||
| Tempo: | Variable (226 steps, ↓ = 30 to 255) | ||
| Chords: | 3 fingering methods (CASIO CHORD, FINGERED, FULL RANGE CHORD) | ||
| Rhythm Controller: | START/STOP, INTRO, NORMAL/NORMAL FILL-IN, VARIATION/VARIATION FILL-IN, SYNCHRO/ENDING | ||
| Accomp Volume: | 0 to 127 (128 steps) | ||
| One Touch Presets: | Recalls settings for tone, tempo, layer, split, reverb, and chorus. | ||
| 3-step Lesson: | 3 lessons (Step 1, 2, 3) | ||
| Playback: | Repeat play of a single tune | ||
| Evaluation Mode: | Scoring | ||
| Voice Fingering Guide: | On/Off | ||
| Song Bank | |||
| Number of Tunes: | Song Bank: 100, download songs: Up to 5 (Capacity: Approximately 70 KB*) * Calculated based on 1 KB = 1024 bytes. | ||
| Controllers: | PLAY/STOP, PAUSE, FF, REW, REPEAT, LEFT/RIGHT | ||
| Musical Information Function: | Tone, Auto Accompaniment, Song Bank, numbers and names; staff notation, tempo, metronome, measure and beat number, step lesson display, chord name, fingering, pedal operation, Keyboard, Voice Fingering Guide, Evaluation Mode, Recorder indicator | ||
| Metronome: | On/Off | ||
| Beat Specification: | 0, 2 to 6 | ||
| Registration Memory: | |||
| Number of Setups: | 32 (4 setups × 8 banks) | ||
| Recorder | |||
| Number of Songs: | Two (1 Lesson Recording, 1 Performance Recording) | ||
| Recorded Data: | Lesson Recording: Right-hand part, left-hand part, both-hand parts | ||
| Recording Method: | Performance Recording: Track 1 (chord accompaniment), Track 2 (melody) | ||
| Memory Capacity: | Real-time | ||
| Approximately 12,000 notes (total for two songs) | |||
| Other Functions | |||
| Transpose: | 25 steps (-12 semitones to +12 semitones) | ||
| Tuning: | 101 steps (A4 = approximatory 440Hz ±50Cents) | ||
| Terminals | |||
| USB port: | TYPE B | ||
| Sustain/Assignable Jack: | Standard jack (sustain, sostenuto, soft, rhythm start/stop) | ||
| Headphone/Output Terminal: | Stereo standard jack | ||
| Output Impedance: 150Ω, Output Voltage: 4.5V (RMS) MAX | |||
| Output Impedance: 200Ω, Output Voltage: 5.2V (RMS) MAX | |||
| Power Jack: | 9V DC | ||
| Power Supply: | 2-way | ||
| Batteries: | CTK-810: 6 AA-size batteries, WK-110: 6 D-size batteries | ||
| Battery Life: | CTK-810: Approximately 2.5 hours continuous operation on alkaline batteries | ||
| AC Adaptor: | WK-110: Approximately 6 hours continuous operation on manganese batteries | ||
| Auto Power Off: | AD-5 | ||
| Turns power off approximately 6 minutes after last key operation. Enabled under batter power only, can be disabled manually. | |||
| Speaker Output: | 2.5W + 2.5W | ||
| Power Consumption: | 9V 7.7W | ||
| Dimensions: | CTK-810: 94.5 × 37.3 × 13.1 cm (37^1/_4 × 14^11/_16 × 5^1/_8 inch) WK-110: 118.7 × 40.0 × 15.3 cm (46^3/_4 × 15^3/_4 × 6 inch) | ||
| Weight: | CTK-810: Approximately 4.8 kg (10.6 lbs)(without batteries)WK-110: Approximately 7.0 kg (15.4 lbs)(without batteries) | ||
- Design and specifications are subject to change without notice.
Operating Precautions
Be sure to read and observe the following operating precautions.
■ Location
Avoid the following locations for this product.
- Areas exposed to direct sunlight and high humidity
- Areas subjected to temperature extremes
- Near a radio, TV, video deck, or tuner
The above devices will not cause malfunction of the product, but interference from the product can cause audio or video interference of a nearby device.
■ User Maintenance
- Never use benzene, alcohol, thinner, or other chemical agents to clean the product.
- To clean the product or its keyboard, wipe with a soft cloth moistened in a weak solution of water and a mild neutral detergent. Wring all excess moisture from the cloth before wiping.
■ Included and Optional Accessories
Use only accessories that are specified for use with this product. Use of unauthorized accessories creates the risk of fire, electric shock, and personal injury.
■ Weld Lines
Lines may be visible on the exterior of the product. These are “weld lines” that result from the plastic molding process. They are not cracks or scratches.
■ Musical Instrument Etiquette
Always be aware of others around you whenever using this product. Be especially careful when playing late at night to keep the volume at levels that do not disturb others. Other steps you can take when playing late at night are closing the window and using headphones.
- Any reproduction of the contents of this manual, either in part or its entirety, is prohibited. Except for your own, personal use, any other use of the contents of this manual without the consent of CASIO is prohibited under copyright laws.
- IN NO EVENT SHALL CASIO BE LIABLE FOR ANY DAMAGES WHATSOEVER (INCLUDING, WITHOUT LIMITATION, DAMAGES FOR LOSS OF PROFITS, BUSINESS INTERRUPTION, LOSS OF INFORMATION) ARISING OUT OF THE USE OF OR INABILITY TO USE THIS MANUAL OR PRODUCT, EVEN IF CASIO HAS BEEN ADVISED OF THE POSSIBILITY OF SUCH DAMAGES.
- The contents of this manual are subject to change without notice.
Tone List/Lista de sonidos
* These chords can be fingered if you expand the accompaniment area of the keyboard by changing the split point. For details, see "Using Split" on page E-45.
- Some rhythms (No. 110, 112 to 120) consist of chord accompaniments only, without any drums or other percussion instruments. Such rhythms do not sound unless CASIO CHORD, FINGERED, or FULL RANGE CHORD is selected as the accompaniment mode.
NOTA
This recycle mark indicates that the packaging conforms to the environmental protection legislation in Germany.
- GUIDELINES LAID DOWN BY FCC RULES FOR USE OF THE UNIT IN THE U.S.A. (not applicable to other areas).
- NOTICE
- FCC WARNING
- Declaration of Conformity
- Important!
- Symbols
- DANGER
- WARNING
- CAUTION
- Symbol Examples
- Alkaline Batteries
- Smoke, Strange Odor, Overheating
- AC Adaptor
- Batteries
- Do not incinerate the product.
- Water and Foreign Matter
- Disassembly and Modification
- Dropping and Impact
- Plastic Bags
- Keep off of the product and stand.\*
- Location
- Relocating the Product
- Cleaning
- Connectors
- Display Screen
- Sound Volume
- Heavy Objects
- Correct Stand\* Assembly
- tones
- ☐ PIANO SETTING button
- ☐ 3-Step Lesson System
- □ 100 built-in tunes
- □ 120 rhythms
- □ Auto Accompaniment
- □ Registration Memory
- □ Recording and Play Back
- □ Storing and Playing Back Tune Data You Transferred from Your Computer
- Safety Precautions ...... E-1
- Main Features ...... E-5
- General Guide...... E-8
- Quick Reference ...... E-13
- Power Supply ...... E-15
- Connections ...... E-18
- Basic Operations...... E-20
- Playing a Built-in Tune...... E-22
- 3-Step Lesson...... E-25
- Auto Accompaniment ...... E-30
- Registration Memory ...... E-37
- Recording and Play Back ... E-39
- Keyboard Settings ...... E-45
- Connection to a
- Computer ...... E-49
- Troubleshooting ...... E-54
- Specifications ...... E-56
- Operating Precautions...... E-57
- Appendix ...... A-1
- MIDI messages that can be sent and received using the USB port
- \*1 Attaching the Score Stand
- Controller Indicators
- Rhythm controller indicator (CTK-810: 26, WK-110: 25)
- Song controller indicator (CTK-810: ⑳, WK-110: ⑳)
- NOTE
- To play the keyboard
- If you selected lesson Step 1
- If you selected lesson Step 2
- Using batteries
- To load batteries
- Important Battery Information
- Using the AC Adaptor
- Specified AC Adaptor: AD-5
- ●During Use
- ●During Movement
- ●During Storage
- Auto Power Off
- To disable Auto Power Off
- Memory Contents
- Electrical Power
- Power Requirements
- Phones/Output Terminal
- PREPARATION
- Connecting Headphones (Figure 1)
- Audio Equipment (Figure ②)
- Musical Instrument Amplifier (Figure ③)
- Connecting to a Computer or Other Equipment
- Sustain/Assignable jack Terminal
- Sustain Pedal
- Sostenuto Pedal
- Soft Pedal
- Rhythm Start/Stop Pedal
- Accessories and Options
- Selecting a Tone
- To select a tone
- Polyphony
- Using Tone Effects
- PIANO SETTING Button
- Settings
- To optimize keyboard settings for piano play
- To play back a Song Bank tune
- Adjusting the Tempo
- To set the tempo
- To pause playback
- To fast reverse
- To fast forward
- Looping a Musical Phrase
- To change the melody tone
- To play all tunes in succession
- Lesson Progress
- 3-Step Lesson
- Lesson Parts
- Display Contents During 3-step Lesson Play
- Note Pitch
- Note Length
- Next Note
- Series of Same Pitch Notes
- 3-step Lesson Tempo Setting
- Evaluation Mode
- Evaluation Mode Display
- Using Tone Guide
- Evaluation Results
- Using the Lesson Functions and Evaluation Mode
- Step 1 – Master the timing.
- Step 2 – Master the notes.
- Press the STEP 2 button to start Step 2 play.
- Play the notes as indicated by the on-screen keyboard guide.
- To stop play at any time, press the STEP 2 or PLAY/STOP button.
- Step 3 – Play at normal speed.
- Select the tune you want to play.
- Press the RIGHT/TRACK 2 button or the LEFT/TRACK 1 button to specify the part you want to practice.
- Press the STEP 3 button to start Step 3 play.
- To stop play at any time, press the STEP 3 or PLAY/STOP button.
- Evaluating Your Keyboard Play
- Press the SCORING button.
- Play in accordance with the guidance on the monitor screen.
- After you finished playing, your evaluation result appears on the display.
- Voice Fingering Guide
- To turn voice fingering guide on or off
- Using the Metronome
- To start the metronome
- Selecting a Rhythm
- To select a rhythm
- Playing a Rhythm
- To play a rhythm
- Using Auto Accompaniment
- To use Auto Accompaniment
- CASIO CHORD
- CASIO CHORD Accompaniment Keyboard and Melody Keyboard
- Chord Types
- FINGERED
- FINGERED Accompaniment Keyboard and Melody Keyboard
- FULL RANGE CHORD
- FULL RANGE CHORD Accompaniment Keyboard and Melody Keyboard
- < Chords Recognized by This Keyboard >
- < Music Example >
- # 4 2 3 4 5 6 7 8 9 10 11 12 13 14 15 16 17 18 19 20 21 22 23 24 25 26 27 28 29 30 31 32 33 34 35 36 37 38 39 40 41 42 43 44 45 46 47 48 49 50 51 52 53 54 55 56 57 58 59 60 61 62 63 64 65 66 67 68 69 70 71 72 73 74 75 76 77 78 79 80
- # # # # # # # # # # # # # # # # # # # # # # # # # # # # # # # # # # # # # # # # # # # # # # # # # # # # # # # # # # # # # # # # # # # # # # # # # # # # # # # # # # # # # # # # # # # # # # # # # # # # % % % % % % % % % % % % % % % % % % % % % % % % % % % % % % % % % % % % % % % % % % % % % % % % % % % % % % % % % % % % % % % % % % % % % % % % % % % % % % % % % % % % % % % % % % % % % % % % % % % %
- :# + / - / - / - / - / - / - / - / - / - / - / - / - / - / - / - / - / - / - / - / - / - / - / - / - / - / - / - / - / - / - / - / - / - / - / - / - / - / - / - / - / - / - / - / - / - / - / - / - / - / - /
- Using an Intro Pattern
- To insert an intro
- Using a Fill-in Pattern
- To insert a fill-in
- Using a Rhythm Variation
- To insert the variation rhythm pattern
- Using a Fill-in Pattern with a Variation Rhythm
- To insert a fill-in into a rhythm variation
- Synchro Starting Accompaniment with Rhythm Play
- To use synchro start
- Finishing with an Ending Pattern
- To finish with an ending pattern
- Using One-touch Preset
- To use one-touch preset
- Registration Memory Features
- Registration Memory Settings
- Setup Names
- NOTE.
- To Save a Setup in Registration Memory
- To Recall a Setup from Registration Memory
- Parts and Tracks
- Lesson Recording
- Performance Recording
- Using the RECORDER Button
- Memory Capacity
- Recorded Data Storage
- Recording Play Along with a Built-in Tune
- Selecting Parts
- Part/Track Indicators in Recording Standby
- To record as you play along with a built-in tune
- Lesson Recording Data
- Playing Back a Lesson Recording
- Recording a Performance
- Selecting a Track
- Part/Track Indicators in Playback Standby
- To record your keyboard performances
- Track 1 Data
- Track 1 Recording Variations
- ■ To record without rhythm
- ■To start recording with synchro start
- ■To insert an intro, ending, or fill-in into a recording
- ■ To start recording with an intro using synchro start
- ■ To start Auto Accompaniment part way into a recording In place of step 5 of the above procedure, press the SYNCHRO/ENDING button, and play something within the melody range of the keyboard.
- Playing Back a Performance Recording
- Overdubbing a Performance Recording
- Track 2 Data
- Deleting a Specific Part/Track
- Getting Ready
- Using Layer
- To layer tones
- LAYER
- Using Split
- To split the keyboard
- SPLIT
- Using Layer and Split Together
- To split the keyboard and then layer tones
- Play something on the keyboard.
- LAYER SPLIT
- About TRANSPOSE/SETTING button
- Transposing the Keyboard
- To transpose the keyboard
- Adjusting Accompaniment and Song Bank Volume
- To adjust the accompaniment volume
- To adjust built-in tune volume
- Using Touch Response
- Tuning the Keyboard
- To tune the keyboard
- Connecting to a Computer
- To install the USB MIDI driver
- Installing Adobe Reader (Acrobat Reader\*\*)
- Minimum Computer system Requirements
- Supported Operating Systems
- - Universal
- ● Windows XP
- ● Windows 2000
- ● Windows Me, Windows 98SE, Windows 98
- Using the USB port
- To connect to a computer using the USB port
- DATA ACCESS Lamp
- Expanding the Selections in the Song Bank Tunes
- To install the SMF Converter
- Song Data Storage
- Using the SMF Data on the Bundled CD-ROM
- General MIDI Tone
- Changing the Settings
- KEYBOARD CHANNEL (Default: 1)
- NAVIGATE CHANNEL (Default: 4)
- LOCAL CONTROL (Default: On)
- ACCOMP OUT (Default: Off)
- SUSTAIN/ASSIGNABLE JACK (Default: SUS)
- \*1 Sustain
- \*2 Sostenuto
- Operating Precautions
- ■ Location
- ■ User Maintenance
- ■ Included and Optional Accessories
- ■ Weld Lines
- ■ Musical Instrument Etiquette
- Tone List/Lista de sonidos
- NOTA
Brand : CASIO
Model : WK-110
Category : Electronic keyboard