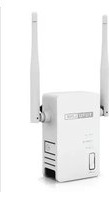
EX300 - Wi-Fi repeater Totolink - Free user manual and instructions
Find the device manual for free EX300 Totolink in PDF.


| Product type | Wi-Fi repeater / range extender |
| Model | EX300 |
| Brand | Totolink |
| Wireless standard | IEEE 802.11b/g/n |
| Data transfer rate | Up to 300 Mbps |
| Frequency band | 2.4 GHz |
| Wi-Fi security | WEP, WPA/WPA2-PSK |
| Modes | Repeater, access point |
| Ethernet port | 1 x 10/100 Mbps RJ-45 |
| WPS button | Yes, for easy pairing |
| Antenna type | Internal (or 1 external, typical) |
| Dimensions (W x D x H) | 100 x 65 x 35 mm (estimated) |
| Weight | Approx. 100 g |
| Power input | AC 100-240V via micro USB (5V/1A) |
| Power consumption | 5W max |
| LED indicators | Power, LAN, WLAN, WPS |
| Reset button | Yes, pinhole |
| Operating temperature | 0°C to 40°C |
| Storage temperature | -20°C to 70°C |
| Humidity | 10% to 90% non-condensing |
| Compatibility | Any standard Wi-Fi router |
| Setup method | WPS push button or web interface |
| Management | Web-based GUI (192.168.0.254) |
| Certifications | CE, FCC |
Frequently Asked Questions - EX300 Totolink
User questions about EX300 Totolink
0 question about this device. Answer the ones you know or ask your own.
Ask a new question about this device
Download the instructions for your Wi-Fi repeater in PDF format for free! Find your manual EX300 - Totolink and take your electronic device back in hand. On this page are published all the documents necessary for the use of your device. EX300 by Totolink.
USER MANUAL EX300 Totolink
Chapter 1 Product Introduction....2
1.1 Overview....2
1.2 Main Features....2
1.3 Appearance ....2
1.3.1 LED Indicators....2
1.3.2 Button and Port Description....3
Chapter 2 Hardware Installation ....4
2.1 Connecting the device....4
2.2 Configure the PC....4
Chapter 3 Basic Setup....8
3.1 Login Web Interface 8
3.2 Quick Setup....9
Chapter 4 Advanced Setup ....12
4.1 Advanced Wireless Setup 12
4.2 System....13
4.2.1 LAN/DCHP Server....14
4.2.2 System Log....14
4.2.3 Admin Setup 14
4.2.4 Firmware Upgrade....15
4.2.5 Config Backup/Restore 15
4.2.6 Misc Setup 16
Copyright Statement
All the photos and product specifications mentioned in this manual are for references only, as the upgrading of software and hardware. They are subject to change without notice. No part of the specifications may be reproduced in any form or by any means or used to make any derivative such as translation, transformation, or adaptation without permission from TOTOLINK. If you want to know more about our products information, please visit our website at http://www.totolink.net
Copyrights 2013 by TOTOLINK All rights reserved.
Chapter 1 Product Introduction
Thanks very much for purchasing this Wireless N Range Extender. This guide will introduce you how this device work and how to configure it.
1.1 Overview
This is a 2.4G wireless range extender that is designed to expand your existing wireless network signals and coverage. Users can extend their wireless network just by placing this extender between the wireless router and wireless devices. So that it can make more wireless device to access Internet, such as iPads, iPods, Notebooks, Smart Phones, Game Consoles and TV. Generally, they can effectively meet users' demands for wireless Internet access on hard-to-reach areas.
1.2 Main Features
Complies with IEEE 802.11n and IEEE 802.11g/b standards for 2.4GHz Wireless LAN.
➢ Mini size, portable for users.
- Allows more users to share one account to access Internet.
- Easy plug and play, no configuration required.
Supports WPS (Wi-Fi Protected Setup) with one-click button.
Power ON/OFF button is easy for users to control the device.
- Low power consumption and no radiation.
1.3 Appearance

natural_image
Two white electronic devices with visible ports and a black plastic plug inserted into one (no text or symbols)EX150

natural_image
Three white wireless devices with visible antennas and ventilation slots, arranged side by side (no text or symbols)EX300
1.3.1 LED Indicators
| Name | Status | Description |
| WiFi | OnBlinking | WiFi is on but no data transmitting existsSuccessful wireless connection with data transmitting |
| Extending | On | Connected with Upper AP has been completed |
| Blinking | Connecting with Upper AP | |
| Off | No connection with Upper AP | |
| LAN | On | Successfully connected with the LAN port and no data transmitting exists |
| Blink | Successfully connected with the LAN port with data transmitting | |
| Off | There is no device linked to the LAN port |
1.3.2 Button and Port Description
| Name | Description |
| Power | This button can turn on/off the device. |
| RST/WPS | With the extender powered on, press the button for 1 second, it is WPS working. For 5~10 seconds, the device will reboot to its factory default settings. |
| LAN | This port is used to connect to PC. |
Chapter 2 Hardware Installation
This chapter will tell you how to connect your PC and the device, how to configure the PC to make it access the web setup interface of the extender. So please read the following contents carefully to create correct connections and configuration.
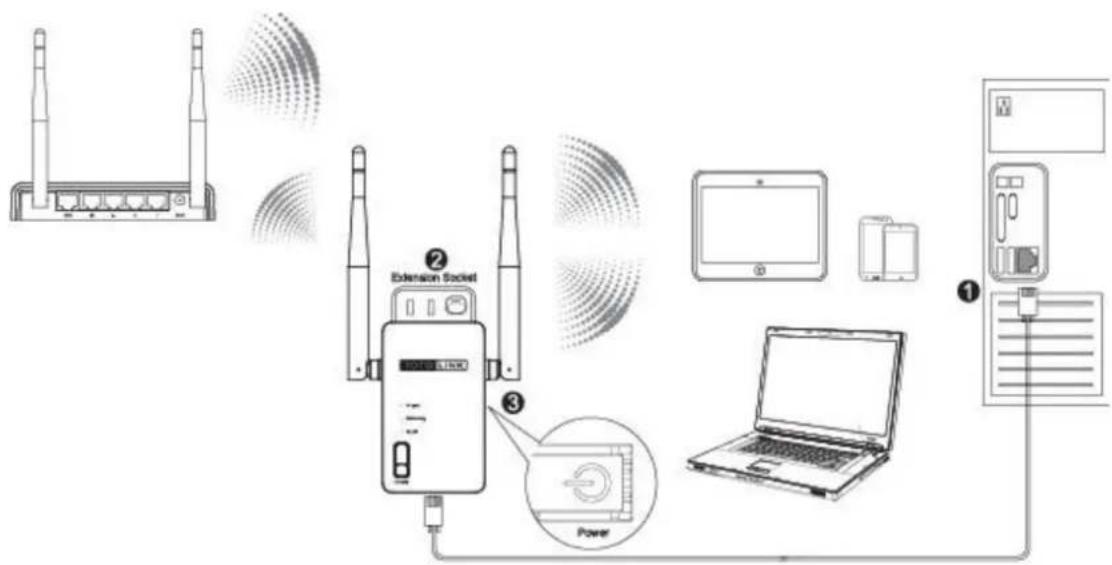
2.1 Connecting the device
The extender provides one LAN port for PCs to connect. Please follow below steps to build a right connection between PC and this device.
- Connect the LAN port to your computer's network interface.
- Plug the extender into a wall outlet.
- Press the power ON/OFF button to start the device.
2.2 Configure the PC
The default IP address of this extender is 192.168.1.254, the default Subnet Mask is 255.255.255.0. You can only configure the IP address of your PC manually. Please follow below steps to configure your PC correctly.
- Right-click My Network Places on your desktop and choose Properties.

- It will pop up the following window. Please right click Local Area Connection and choose Properties.

- Double-click Internet Protocol(TCP/IP) :

- Configure the IP address manually, see below:

- Verify the network connection between your PC and the device. Open a
command prompt, and type in ping 192.168.1.254, then press Enter.
![Microsoft Windows XP [Version 5.1.2600] (C) Copyright 1985-2001 Microsoft Corp. F:\Documents and Settings\lsz>ping 192.168.1.254 Pinging 192.168.1.254 with 32 bytes of data: Reply from 192.168.1.254: bytes=32 time=1ms TTL=64 Reply from 192.168.1.254: bytes=32 time<1ms TTL=64 Reply from 192.168.1.254: bytes=32 time<1ms TTL=64 Reply from 192.168.1.254: bytes=32 time<1ms TTL=64 Ping statistics for 192.168.1.254: Packets: Sent = 4, Received = 4, Lost = 0 (0% loss), Approximate round trip times in milli-seconds: Minimum = 0ms, Maximum = 1ms, Average = 0ms F:\Documents and Settings\lsz>](/content/2026/06/1295561/images/d0dd59d764314c10ae702b5d4cb99ea905c8d11ec672dcb86694597249069251.jpg)
If the result displayed is similar to that shown in above figure, it means that the connection between your PC and the extender has been established.
![Microsoft Windows XP [Version 5.1.2600] (C) Copyright 1985-2001 Microsoft Corp. F:\Documents and Settings\lsz>ping 192.168.1.254 Pinging 192.168.1.254 with 32 bytes of data: Request timed out. Request timed out. Request timed out. Request timed out. Ping statistics for 192.168.1.254: Packets: Sent = 4, Received = 0, Lost = 4 (100% loss), F:\Documents and Settings\lsz>](/content/2026/06/1295561/images/eda8b3619481c379eba2c0f9d0e3113bf349c98143661d57b19afa028cad8589.jpg)
If the result displayed is similar to that shown in the above figure, it means that your PC has not connected to the extender successfully. Please check it following below steps:
- Check to see if your PC and the extender are right connected. The LED of LAN port and the LED on your PC's adapter should be lit up.
- Make sure the TCP/IP for your PC is configured correctly. Since the extender's IP address is 192.168.1.254, your PC's IP address must be within the range of 192.168.1.1\~192.168.1.253.
Chapter 3 Basic Setup
This chapter introduces how to configure the basic parameters of your wireless range extender so that it can get wireless signals from other AP/Router.
3.1 Login Web Interface
With a web-based utility, for example Google Chrome, the wireless N range extender is easy to configure and manage.
Connect to the extender by typing 192.168.1.254 in the address field of Web Browser. Then press Enter key.

It will show up the following page:
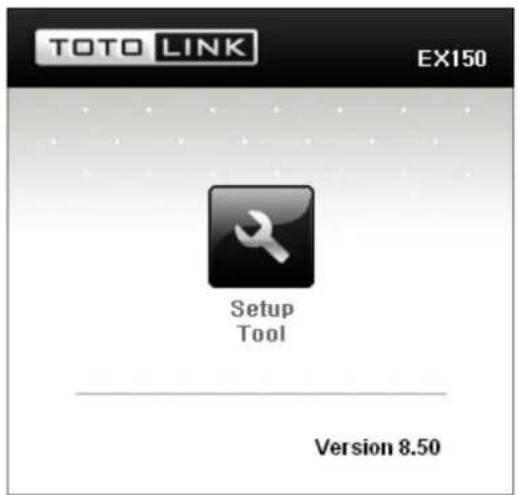
Click Setup Tool in the middle to enter the extender's setting interface. Then it will require you to enter valid User Name and Password.

Enter admin for User Name and Password, both in lower case letters. Then click Log In button or press Enter key.
Note: If the above screen does not prompt, it means that your web-browser has been set to using a proxy. Go to Tools menu>Internet Options>Connections>LAN Settings, in the screen that appears, cancel the Using Proxy checkbox, and click OK to finish it.
Now you have logged into the web interface of the extender. The first page you can see is the current extender status.
![TOTO LINK The Smartest Network Device EX150 G Refresh Save Config Explorer Basic Setup Status Summary Extender Setup Firmware Upgrade Advanced Setup Status Summary Extender Status Status Running SSID or upper AP Zion (BSSID:00-0E-E8-64-07-56) Signal Strength 100 % Channel Channel 9 [ 2.452 GHz ] Wireless MAC Address 00-26-06-00-00-10 Miscellaneous LAN IP 192.168.1.254 Firmware Version 8 50 System run time 0 Hour 26 Min 21 Sec](/content/2026/06/1295561/images/6d0354ca6ad9fd2c65c883d80858c97c2559a3a0916043b95486df908af7c369.jpg)
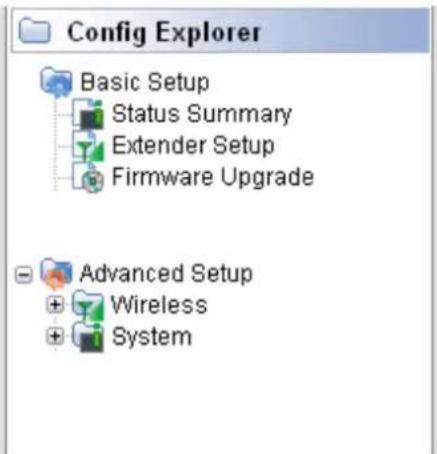
On the left, it is a guide bar:
3.2 Quick Setup
Click Extender Setup on the guide bar to configure the basic parameters of this extender to make it repeater successfully.

By default, the extender is disabled. Please click Start to enable the extender's function:

Click Search AP to choose one available AP to connect.
![iptime-n6004 (Channel 9 [2.452 GHz,Lower,40MHz] - 00-08-9F-0C- 33-b0) Wireless network with security (WEP) Signal power - 42% TOTOLINK N150RB (Channel 6 [2.437 GHz,Upper,40MHz] - 78-44-76-00- 00-0a) Wireless network without security Signal power - 55% zion (Channel 9 - 00-0E-E8-64-07-56) Wireless network with security (WPA) Signal power - 42% Resan AP Double click a AP row or click 'Select AP' button Select AP](/content/2026/06/1295561/images/25cd7c26405667fffde1a2cc1b664b15f20b5d4f5a49a9688dfd473a1b7d177c.jpg)
Select one SSID that you want to repeater with and then click Select AP.
![iptime-n6004 (Channel 9 [2.452 GHz,Lower,40MHz] - 00-08-9F-0C- 33-b0) Wireless network with security (WEP) TOTOLINK N150RB (Channel 6 [2.437 GHz,Upper,40MHz] - 78-44-76-00- 00-0a) Wireless network without security zion (Channel 9 - 00-0E-E8-64-07-56) Wireless network with security (WPA) Signal power - 42% Signal power - 55% Signal power - 42% Resan AP Double click a AP row or click 'Select AP' button Select AP](/content/2026/06/1295561/images/31df9974a09fcd296a6dfa06260cef7f096dea40247d1d032dc158aa9ed26725.jpg)
If the SSID you selected is encrypted, it will pop up below window reminding you to input the network key to connect. Click OK.

The interface will get back to main page which shows the information and encryption method of your selected upper AP. Please type in the right Encryption key to connect to it successfully.
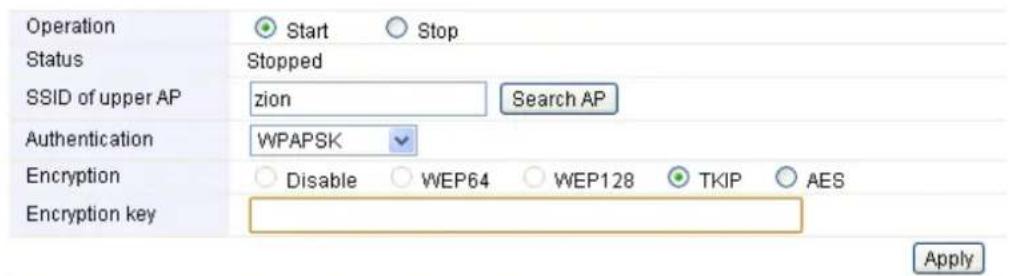
After configured correctly, click Apply to make it work.
Chapter 4 Advanced Setup
The Advanced Setup includes Wireless and System settings. For wireless setup, since we have introduced the Extender's basic setup before, here we will mainly explain the Advanced Wireless Setup.
4.1 Advanced Wireless Setup

Click Wireless---Advanced Setup, you will see:

Channel Bandwidth: this is the spectral width of the radio channel. Supported wireless channel spectrum widths:
20MHz is the standard channel spectrum width.
40MHz is the channel spectrum with the width of 40MHz (selected by default).
TX Power: please refer to the description on the page.
Tx Burst: enable this function will make it easy for you to enhance the
performance in data transmission.
Preamble Length: this option is to define the length of the sync field in an 802.11 packet. Most modern wireless network uses shot preamble with 56 bit sync filed instead of long preamble with 128 bit sync filed. However, some original 11b wireless network devices only support long preamble.
RTS Threshold: determines the packet size of a transmission and, through the use of an access point, helps control traffic flow. The range is 0-2347 bytes. The default value is 2347, which means that RTS is disabled.
RTS/CTS (Request to Send / Clear to send) are the mechanism used by the 802.11 wireless networking protocols to reduce frame collisions introduced by the hidden terminal problem. RTS/CTS packet size threshold is 0-2347 bytes. If the packet size the node wants to transmit is larger than the threshold, the RTS/CTS handshake gets triggered. If the packet size is equal to or less than threshold the data frame gets sent immediately.
System uses Request to Send/Clear to send frames for the handshake that provide collision reduction for an access point with hidden stations. The stations are sending a RTS frame first while data is sent only after a handshake with an AP is completed. Stations respond with the CTS frame to the RTS, which provide clear media for the requesting station to send the data. CTS collision control management has a time interval defined during which all the other stations hold off the transmission and wait until the requesting station will finish transmission.
Fragment Threshold: specifies the maximum size for a packet before data is fragmented into multiple packets. The range is 256-2346 bytes. Setting the Fragment Threshold too low may result in poor network performance. The use of fragment can increase the reliability of frame transmissions. Because of sending smaller frames, collisions are much less likely to occur. However, lower values of the Fragment Threshold will result in lower throughput as well. Minor or no modifications of the Fragmentation Threshold value is recommended while default setting of 2346 is optimum in most of the wireless network use cases.
Beacon Period: By default, it is set to 100ms. Higher Beacon interval will improve the device's wireless performance and is also power-saving for client side. If this value set lower than 100ms, it will speed up the wireless client connection.
4.2 System
Click the plus sign beside the System menu to open up all the parameters contained, please see below:
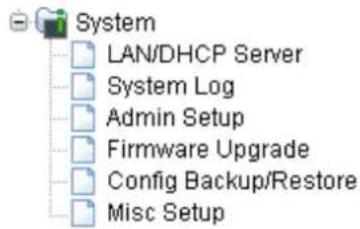
4.2.1 LAN/DCHP Server

LAN IP: by default, the LAN IP is 192.168.1.254, you can change it by your needs.
Subnet Mask: by default, this value is 255.255.255.0, you can change it as well.
4.2.2 System Log
System Log shows the working status of the wireless extender, user can check the running status information here:

4.2.3 Admin Setup
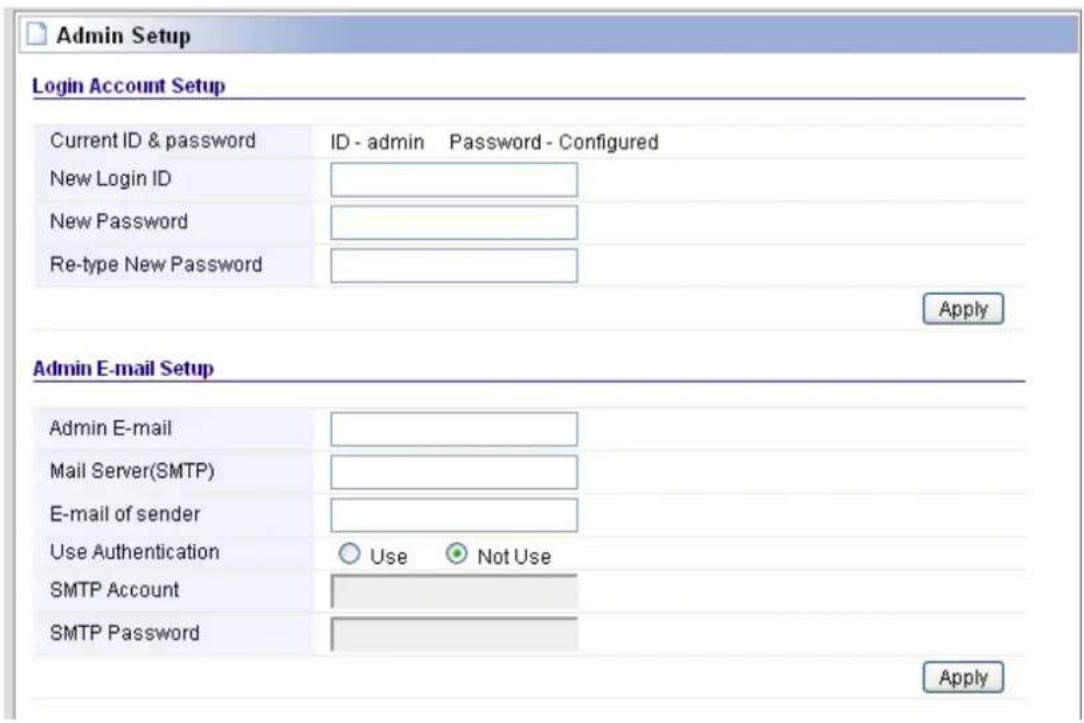
Here you can change the login account name and password, and administrator email information. For this device, you need to create a new one. Then click Apply to make it work.
Admin E-Mail Setup: If you want to receive IP routing log, set up Email address and SMTP server to receive it.
4.2.4 Firmware Upgrade
This page allows you to upgrade the extender firmware to new version. Please note: DO NOT power off the device during the upload because it may crash the system.
![Firmware Upgrade Firmware Version 8.50 Build Date Wed Jan 30 13:48:28 KST 2013 To upgrade manually 1. Download a firmware at [ TOTOLINK Homepage ]. 2. Click [Browse] and choose a downloaded firmware 3. Click [Upgrade] button. Choose File No file chosen Upgrade Note. • Internet will be unavailable for upgrading firmware. • Power down for updating firmware can be the cause of system halt.](/content/2026/06/1295561/images/780be6a47047e10f771492b1057aaaed5a6874f7f474ea1d467b0d7b9bd6bf32.jpg)
4.2.5 Config Backup/Restore
This webpage allows you to save current settings to a file and reload the settings from the file which was saved previously. Besides, you could reset the current configuration to factory default.

4.2.6 Misc Setup
Misc Setup provides Host name, Login page setup and how to run setup window settings.

- Chapter 1 Product Introduction....2
- Chapter 2 Hardware Installation ....4
- Chapter 3 Basic Setup....8
- Chapter 4 Advanced Setup ....12
- Copyright Statement
- Chapter 1 Product Introduction
- Overview
- Main Features
- Appearance
- LED Indicators
- Button and Port Description
- Chapter 2 Hardware Installation
- Connecting the device
- Configure the PC
- Chapter 3 Basic Setup
- Login Web Interface
- Quick Setup
- Chapter 4 Advanced Setup
- Advanced Wireless Setup
- System
- LAN/DCHP Server
- System Log
- Admin Setup
- Firmware Upgrade
- Config Backup/Restore
- Misc Setup
Brand : Totolink
Model : EX300
Category : Wi-Fi repeater