
KL-7000 - Labeler CASIO - Free user manual and instructions
Find the device manual for free KL-7000 CASIO in PDF.

| Product type | Portable thermal label maker |
| Brand | CASIO |
| Model | KL-7000 |
| Compatible tape widths | 6 mm, 9 mm, 12 mm, 18 mm |
| Number of fonts | 2 (serif and sans-serif) |
| Character styles | Normal, outline, shadow, emboss |
| Text effects | Shadowed, underlined, framed |
| Max. number of lines | 4 lines (9-18 mm tape), 2 lines (6 mm tape) |
| Max. number of characters | 127 characters entered, 326 in memory |
| Built-in illustrations | 50 illustrations |
| Special symbols | 153 symbols |
| Predefined formats | VHS cassette, 8 mm, BETA, audio cassette, floppy disk, etc. |
| Mirror printing | Yes, for transparent tape or thermal transfer |
| Text alignment | Left, center, right, justified |
| Main power | 8 AA (LR6) batteries or CASIO AD-A95100 AC adapter (optional) |
| Memory backup battery | 1 CR2032 lithium battery (life approx. 1 year) |
| Dimensions (L × W × H) | 174 × 224.8 × 48.8 mm |
| Weight (without batteries) | 513 g |
| Printing technology | Thermal transfer 64 dots |
| Printing speed | approx. 6.76 mm/s |
| Head cleaning | Alcohol-moistened cotton swab |
| Safety | Do not expose to moisture, do not disassemble, use only the recommended adapter |
Frequently Asked Questions - KL-7000 CASIO
User questions about KL-7000 CASIO
0 question about this device. Answer the ones you know or ask your own.
Ask a new question about this device
Download the instructions for your Labeler in PDF format for free! Find your manual KL-7000 - CASIO and take your electronic device back in hand. On this page are published all the documents necessary for the use of your device. KL-7000 by CASIO.
USER MANUAL KL-7000 CASIO
Congratulations on your selection of the CASIO KL-7000 Label Printer. The CASIO Label Printer makes it possible for you to print adhesive labels for a wide variety of applications such as name tags, cassette tape labels, floppy disks, binders, and other applications.
You can produce attractive original labels thanks to such features as:
- Variable tape sizes (6mm, 9mm, 12mm, 18mm)
- Two fonts (serif, sans-serif)
- Four character styles (normal, outline, shadow, raised)
- Various effects
- Illustrations
- Quick formats and preset layouts
You can even store data in memory for instant recall when you need it.
All of this makes the CASIO Label Printer the perfect tool for just about all of your labeling needs!
Important!
- Contact a nearby dealer whenever you require servicing.
- Note that the manufacturer shall not be held liable for any losses, or for many claims by third parties which may arise out of the use of this product.
- Note that the manufacturer shall not be held liable for any damages incurred as a result of data losses caused by malfunctions, repairs, or interruptions of power supply.
- It is up to the user to keep backup records of important data.
Contents
Part 1 Getting Acquainted 4
Important Precautions 4
General Guide 6
Label Printer Menus 8
Part 2 Getting Ready 9
Power Supply 9
Replacing Batteries 9
To replace the memoryback-up battery .... 10
To replace the main batteries 10
AC Adaptor 11
To connect the AC adaptor 11
Switching Power On and Off 11
Resetting the Memory 11
To reset the memory 11
Power On Recall Function 12
Auto Power Off Function 12
Tape Cartridges 12
To load a tape cartridge 12
To specify the tape width 14
Display Contrast 15
Sound Effects 15
To cancel sound effects when switching power on. 15
To switch sound effects on and off 15
Setting the message language 16
To set the message language 16
Setting the unit of measurement 16
Demo Print 17
To produce a demo print using tape other than 6mm 17
To produce a demo print using 6mm tape 17
Part 3 Inputting Characters, Symbols, and Illustrations 18
Display Symbols and Indicators 18
Basic Alpha-Numeric Input 20
To input alpha-numeric characters 20
About the CODE key.. 21
To input special symbols 21
To input illustrations 22
Part 4 Deleting and Inserting Characters 23
Moving the Cursor 23
To move the cursor 23
Deleting Individual Characters 23
To delete characters using the BS key .... 23
To delete characters using the DEL key ... 24
Deleting a Series of Characters 24
To delete a series of characters 24
Using the CLS Function 24
To clear all text from the display 24
To clear specific text 25
Overwrite and Insert 25
Overwrite 25
Insert 26
To switch between overwrite and insert .... 26
Part 5 Character Attributes and Text Effects 27
Specifying Character Attributes 27
To specify attributes before inputting characters 27
To change attributes in the middle of text 28
To change attributes or effects of existing text 28
Changing Fonts 29
How to tell the current font settings 29
To change the font setting 29
Changing Character Styles 30
How to tell the current style settings 30
To change the style setting 31
Changing Character Size 32
About Auto Fit 32
About the FIT mark 32
How to tell the current size settings 33
To change the characters size 33
Assigning Text Effects 34
Changing Text Effects 34
To assign text effects 34
To remove text effects 35
Part 6 FORM Menu Functions 37
Fundamentals of Label Layout 37
Creating and Deleting Blocks 38
To create a block 38
To delete a block mark 38
Character Pitch 38
To specify the character pitch 38
Block Length 39
To specify a block length 39
To cancel block length settings 40
Tape Length 41
To select a preset tape length 41
To specify your own tape length 42
To cancel a tape length setting 43
Auto Feed 43
To select a feed option 44
Block Spacing 44
To specify the block spacing 44
To specify vertical printing 44
Mirror Image 45
To specify mirror image 45
Text Alignment 45
To specify text alignment 46
Justification 47
To switch justification on and off 47
Part 7 Quick Formats 48
To select a built-in format 49
To cancel a built-in format 50
Part 8 Presets. 51
Using the preset menu 51
Preset (Auto) Layouts 51
To use a preset layout to create a label 51
To print a label made with a preset layout 53
To store a preset layout label in memory 53
To recall a preset layout label from memory 54
To delete a preset layout label from memory 55
Preset Phrases 56
To print a preset phrases 56
Numbering 56
To print a numbered series 56
Part 9 Printing 58
Printing a Tape 58
To print a tape 58
To show the image display 59
To show the layout display 59
To feed tape 59
To adjust the print density 60
Frame Printing 60
To add a frame around the outside of the printing area 60
Part 10 Memory 62
Storing Data 62
To store data into memory 62
Recalling Data 62
To recall data from memory 63
Deleting Text 63
To delete text from memory 64
Part 11 Reference 65
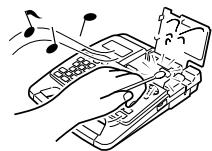
Cleaning the Printer Head and Roller 65
To clean the printer head and roller 65
Resetting 66
About the Label Printer's Keys 67
Troubleshooting 69
Messages 71
Initial Settings 72
Symbols, Illustrations and Frames 73
Preset (Auto) Layouts 74
Application Examples 78
Specifications 79
Part 1
Getting Acquainted
This part of the manual provides you with important information you need to know in order to use the Label Printer to its full potential. Be sure to read it carefully before using the Label Printer for the first time.
Important Precautions
- Keep your Label Printer out of areas subject to temperature extremes, moisture and direct sunlight. The recommended temperature range is 10^ to 35^ ( 50^ to 95^ ).
- Don't let coffee, juice or other liquids splash onto the Label Printer.
- Never let paper clips, pins or other foreign objects get into the tape outlet slot or printer of the Label Printer.
- Do not pile heavy objects on top of the Label Printer.
- Never try to take the Label Printer apart or attempt your own maintenance.
- Do not drop your Label Printer, and avoid strong impact.


- Do not pull on the tape or try to force it back into the Label Printer.
- Do not use benzine, thinner, or other volatile chemicals to clean the exterior of the Label Printer. Use a soft dry cloth or a cloth dampened with a weak solution of a mild neutral detergent and water. Wring the cloth out until all excess moisture is removed.

- A dirty printer head can cause printing to become smudged. When this happens, clean off the printer head by wiping it with a cotton swab moistened with alcohol (page 65).
- Use of the Label Printer next to a television or radio may interfere with reception.
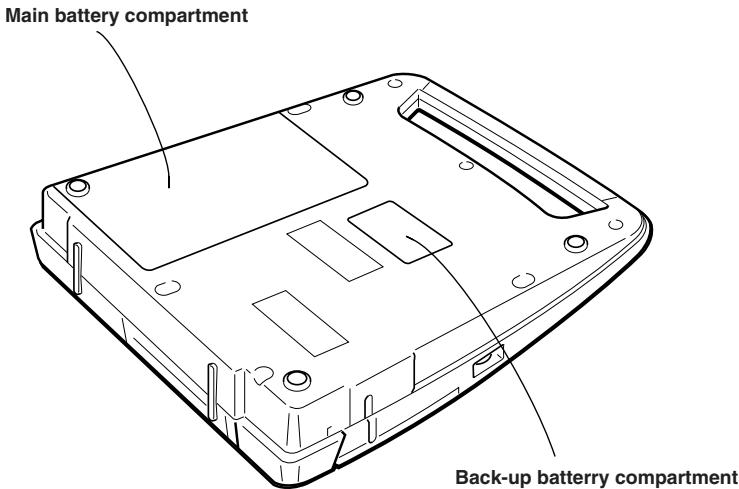
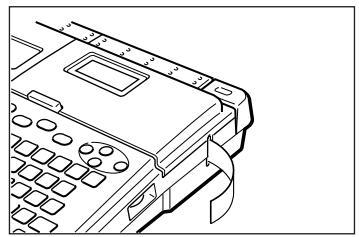
General Guide
Front
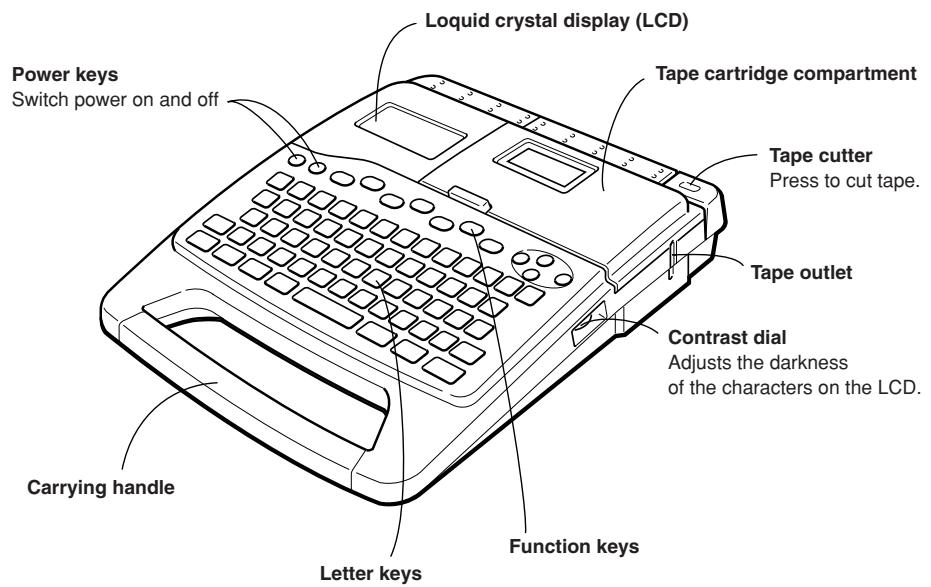
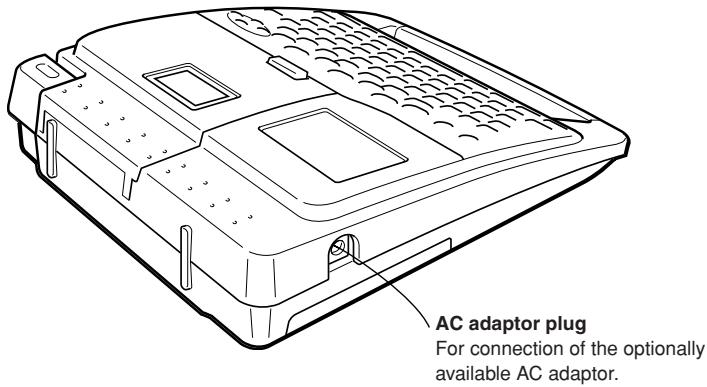
Bottom
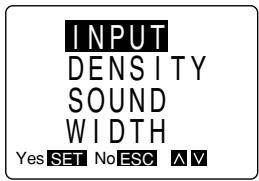
Label Printer Menus
Label Printer operation is designed to be as simple as possible, thanks to on-screen menus that you can use to select the settings you need. Each menu is described in detail in the sections that follow in this manual, but note the following general points.
- The item that is highlighted in a menu is the one that is currently selected.
Currently selected item
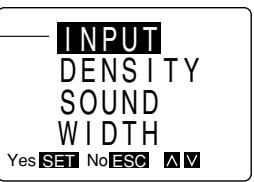
- Use and to move the highlighting up and down and change the selected item.
- Press SET to execute the highlighted item, or ESC to exit the displayed menu (and return to the previous menu or screen) without selecting anything.
- When you press SET to execute a menu item, the Label Printer either moves on to the next menu, or it executes the selected function and returns to the text input screen that you started from.
Part 2
Getting Ready
This part of the manual tells you how to load batteries and the tape cartridge, and how to perform other basic setups for the Label Printer.
Important!
Be sure to read this section before attempting to use the Label Printer.
Power Supply
The Label Printer can be powered by eight AA-size batteries or an optional AC adaptor (AD-A95100). A CR2032 battery is also used as a memory back-up power supply.
Replacing Batteries
A handy low battery power indicator lets you know when battery power is getting too low for proper operation. The message LOW BATTERY appears on the display if battery power is low when you perform any of the following operations.
- Switching power on
- Executing a print operation
- Executing a tape feed operation
When the LOW BATTERY message appears, press ESC to clear it from the display. You should still be able to perform some Label Printer operations, but some power intensive operations (like printing or tape feed) may become impossible if battery power is too low. In any case, you should replace batteries as soon as possible or switch to the AC adaptor as soon as possible after the LOW BATTERY message appears.
Important!
Batteries can burst or leak and damage your unit if you use them the wrong way. Note the following important points.
- Be sure that the plus (+) and minus (-) sides of each battery are facing correctly.
- Never mix batteries of different types
- Never leave dead batteries in the battery compartment.
- Remove the batteries if you do not plan to use the unit for a long time.
- Be sure to replace the main battery in accordance with the battery life noted on the side of the battery itself, and the back-up battery once every 1 year.
Warning!
- Never recharge the batteries you use with this unit.
- Do not expose batteries to direct heat, do not short circuit them, and do not try to take them apart.
- Keep batteries out of the reach of small children. If swallowed, consult with a physician immediately.
- Low battery power is indicated by poor print quality or power switching off while printing is in progress.
To replace the memory back-up battery
Before using the Label Printer for the first time, be sure that you first use the following procedure to install the memory back-up battery that comes with it. Data stored in memory will be lost if you do not load this battery.
- Switch power off.
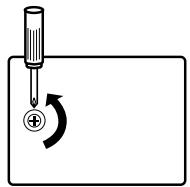
- Use a small phillips head screwdriver to loosen the screw that secures the back-up battery compartment cover in place, and remove the cover.
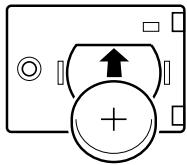
- Wipe off the surfaces of a CR2032 battery with a soft dry cloth, and install it with its plus (+) side facing up (so you can see it).
- Carefully replace the battery compartment cover and secure it in place with the screw.
- You should use the above procedure to replace the memory back-up battery once a year.
To replace the main batteries
- Switch power off.
- If you are using the AC adaptor to power the unit, you should also unplug the adaptor from the Label Printer.
- Open the battery compartment cover on the back of the Label Printer by sliding it in the direction indicated by the arrow.
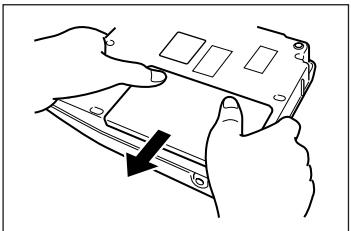
- Remove all eight of the old batteries.
- Load a set of eight new batteries into the battery compartment, making sure that their positive (+) and negative (-) ends are facing in the correct directions.
- Replace the battery compartment cover.
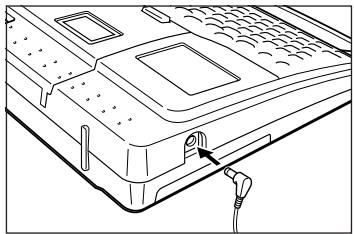
AC Adaptor
Note the following important precautions when using an AC adaptor to power your Label Printer.
- Use only a genuine CASIO AD-A95100 AC adaptor with the same voltage rating as the household current in your area. Using a wrong adaptor can damage your Label Printer.
- Be sure to switch the Label Printer off before you connect the adaptor. Do not switch power on until the adaptor is connected to the Label Printer and plugged into an AC outlet.
To connect the AC adaptor
Connect the AC adaptor to the Label Printer as illustrated on the right. Plug the other end into a standard household AC outlet.
Switching Power On and Off
Press ON to switch power on, and OFF to switch power off.
Important!
If you are using the Label Printer for the first time, you should use the procedure described under "Resetting the Memory" to switch power on.
Resetting the Memory
You should reset the memory of the Label Printer before using it for the first time, after you have not used it for a long time, or if nothing happens when you switch power on even after you change the batteries.
Important!
Resetting Label Printer memory clears the memory of all input data.
To reset the memory
- Make sure that Label Printer power is off.
- While holding down the PRINT and ESC keys, press ON to switch power on.
INITIAL?
Yes SET No ESC
-
Press SET to initialize the Label Printer or ESC to abort the operation without initializing anything.
-
If you press SET, the initial reset screen appears.
-
See "Initial Settings" for the initial default settings of the Label Printer following the reset operation.
Power On Recall Function
Whenever you switch your Label Printer off, it stores the text that is currently on the display. Immediately after you switch power on, you can recall the last text displayed by pressing SET.
Important!
You can recall text by pressing SET when the text input display is clear, immediately after switching power on only. Even if you input text and then delete it, pressing SET will not recall stored text.
Auto Power Off Function
If you do not perform any key operation for about six minutes, the Label Printer automatically switches power off. To restore power, press ON.
- After you restore power, you can recall the last text that you displayed by pressing SET. See "Power On Recall Function" for details.
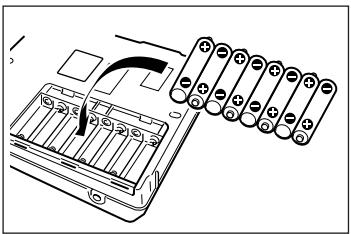
Tape Cartridges
Use the procedures described below to load tape cartridge into the Label Printer. After you load the tape cartridge, be sure to use the procedure described under "To specify the tape width" to tell the Label Printer what width of tape you are using.
Important!
- Never try to push the tape back into the cassette. Once tape is out of the cassette, there is no way to wind it back in. Trying to do so can cause operational problems with the Label Printer.
- Always make sure that Label Printer power is switched off before you replace the tape cartridge.
To load a tape cartridge
-
Make sure that the power of the Label Printer is switched off.
-
Press the tape cartridge compartment cover release and open the compartment cover.
-
If there is a cartridge already installed in the unit, remove it by grasping the tape cartridge on both sides with your thumb and forefinger and lifting it straight up.
-
Remove the stopper from a new tape cartridge and check to see that the tape is ready to use.
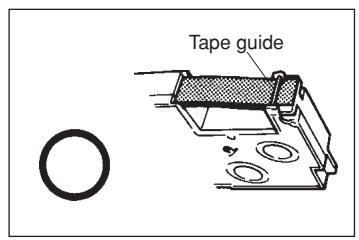
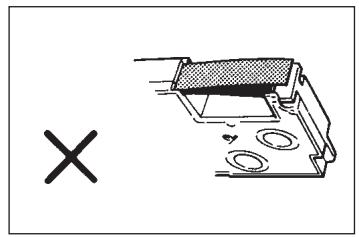
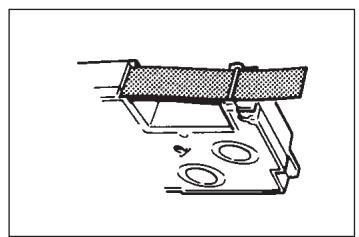
-
Make sure that the tape is under the tape guide and that it is not bent or twisted.
-
Make sure that the tape does not extend too far past the tape guide. If it does, cut off the end with a pair of scissors.
-
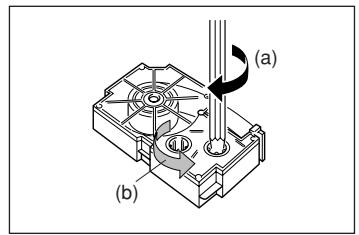
Use a pencil or some other thin object to take up slack in the ink ribbon as shown in the illustration. Note that the tape does not move at this time.
-
If the ink ribbon is slack when you load it into the Label Printer, it can break or cause some other problem.
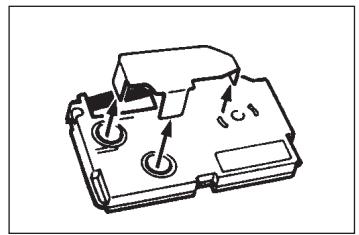
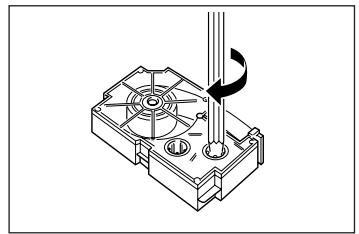
- Be sure to turn the ink ribbon take up spool only in the direction indicated by the arrow (a).
- Turn the spool until the other spool (b) starts turning in the direction noted by the arrow. This indicates there is no slack in the ribbon.
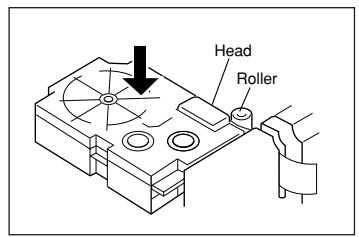
- Load the tape cartridge into the Label Printer, making sure that the tape and ink ribbon pass between the head and roller.
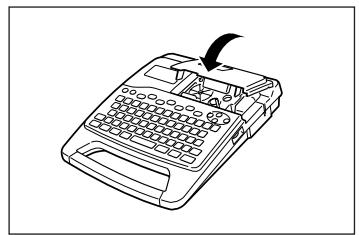
- Close the tape cartridge compartment cover.
-
Switch on Label Printer power and press FUNC and then FEED two or three times to make sure that the tape comes out without any problem.
-
If the tape does not come out normally, switch off power and start again from step 1 above.
To specify the tape width
Important!
- When using 6mm tape, certain character sizes and layouts can cause characters to run off the top or bottom of the tape.
- Be sure to specify 6mm tape whenever you are using it.
-
In addition to the following tape size specification procedure, you can also specify 6mm tape by holding down the 6 key while pressing ON to switch power on. To specify another tape size (other than 6mm) you must use the following procedure.
-
Switch power on.
-
Press SET UP to display the setup menu.
- Use and to highlight WIDTH, and then press SET.
- Use and to select 6mm (to specify 6mm wide tape) or OTHER (to specify another width), and then press SET.
Display Contrast
Rotate the dial on the side of the Label Printer to adjust display contrast.
Sound Effects
The Label Printer is equipped with sound effects that sound when you switch power on and when an illegal operation is attempted. Normally, sound effects are switched on whenever you switch power on, but you can use the following procedure to cancel the sound effects.
To cancel sound effects when switching power on
Hold down the ESC key, switch power on.
Sound effects remain switched off until you switch them back on again (using the procedure described below), or until you switch power off and then on again.
Use the following procedure to switch sound effects on and off.
To switch sound effects on and off
- Switch power on.
-
Press SET UP to display the setup menu.
-
Use and to highlight SOUND, and then press SET.
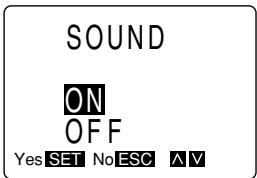
- Use and to select OFF (to switch the beep tone off) or ON (to switch the beep tone on), and then press SET.
Setting the message language
The Label Printer lets you specify English, German, French, Italian, or Spanish as the language to use for display messages.
To set the message language
- Switch power on.
- Press SET UP to display the setup menu.

- Press and to highlight LANGUAGE, and then press SET.
Note that the language option does not appear immediately on the screen when you first display the set up menu. This is because there are more than four items in the menu. Use to scroll down four times to make the LANGUAGE option appear.
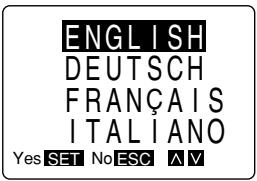
-
Use and to highlight the language you want to use, and then press SET to apply the setting and return to the text input screen.
-
Since there are five languages, they do not all fit on a single screen. To view the language at the bottom of the menu (ESPANOL), press four times.
Setting the unit of measurement
- Switch power on.
- Press SET UP to display the setup menu.
- Press and to highlight cm/inch, and then press SET.
Note that the cm/inch option does not appear immediately on the screen when you first display the set up menu. This is because there are more than four items in the menu. Use to scroll down five times to make the cm/inch option appear.
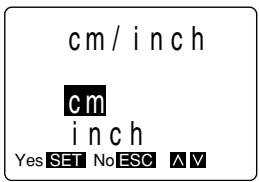
- Use and to highlight the measurement unit you want to use, and then press SET to apply the setting and return to the text input screen.
Demo Print
Use one of the following procedures to produce a print that demonstrates some of the features of the Label Printer. The procedure you should use depends on the size of the tape you are using.
To produce a demo print using tape other than 6mm
- Press ON to switch power on.
- Press PRINT.
- Press SET.
QUICK&EASY
Suitable for
| PresetLayouts |
| 2 Font s |
| 4-line printing |
| C A S T O |
To produce a demo print using 6mm tape
- Holding down the 6 key, press ON to switch power on.
- Press PRINT.
- Press SET.
QUICK&EASY
Suitable for TITLES MAKING
Presel layouts CASTO
Important!
You can produce a demo print when the text input display is clear, immediately after switching power on only. Even if you input text and then delete it, pressing PRINT will not produce a demo print.
- If you experience problems with printing, check your tape cartridge and power supply, and try again.
Part 3
Inputting Characters, Symbols, and Illustrations
This part of the manual tells you how to input characters. To make things easier to understand, we call everything you input a character regardless of whether it is actually a letter, number, or symbol. Explanations here all use the default settings that are in effect from the initial power-on screen.
For information on using other fonts, styles, effects and characters sizes, see page 27.
Important!
- You can input up to 127 characters. Further input becomes impossible after you input the 127th character.
Display Symbols and Indicators
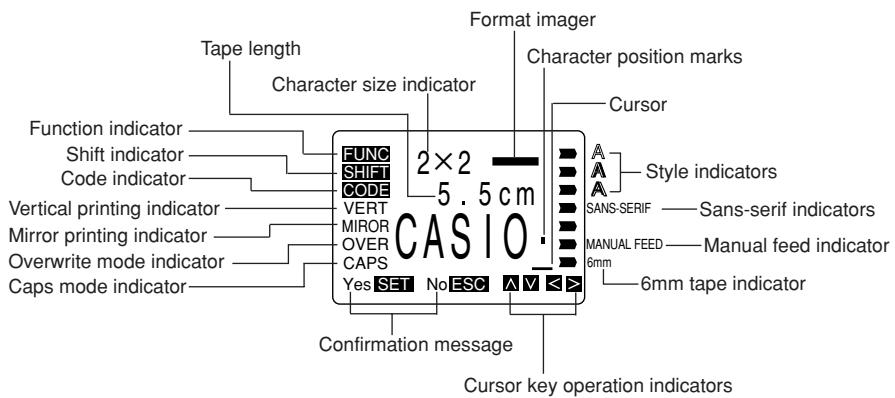
Before getting into actual input, you should first become acquainted with the symbols and indicators used on the Label Printer display.
- Function indicator
This indicator appears when you press FUNC. Pressing a key while this indicator is on the display causes the function marked above that key to be executed.
- Shift indicator
This indicator appears when you press SHIFT. While this indicator is on the display, the keyboard is shifted, so the letter keys input upper-case alpha characters. The number keys input the punctuation symbols marked in the upper right corners of the keys.
If both the caps mode indicator and the shift indicator are shown on the display, the keyboard is shifted to lower-case input.
The keyboard is unshifted (and the shift indicator disappears) as soon as you input a character.
Code indicator
This indicator appears when you press CODE. While this indicator is on the display, the number keys input the accents marked above the keys.
The keyboard returns to normal (and the code indicator disappears) as soon as you input an accent.
Vertical printing indicator
This indicator appears when the Label Printer is set up for vertical printing. Horizontal printing is performed when this indicator is not shown.
- Mirror image printing indicator
This indicator appears when the Label Printer is set up for mirror image printing. Normal (non mirror image) printing is performed when this indicator is not shown.
Overwrite mode indicator
This indicator appears when the Label Printer is in the overwrite mode. In the overwrite mode, inputting a character at a location where there is already a character, replaces the original character with a new one. When this indicator is not shown, the input character is inserted in front of the existing character.
- Caps mode indicator
This indicator appears when the Label Printer is in the caps (upper-case) mode. All letters you input in the caps mode are upper-case. When the caps mode indicator is not shown on the display, all letters are input as lower-case.
Note that the Label Printer stays in the caps mode until you press CAPS again.
If both the caps mode indicator and the shift indicator are shown on the display, the keyboard is shifted to lower-case input.
Confirmation message
The confirmation message appears when you must make a yes-or-no choice for the message shown on the display. When this message appears, press SET for "yes" or ESC for "no."
- Cursor key operation indicators
These indicators show you what cursor key operations are available in the screen shown on the display. If the and indicators are shown, it means you can use the and cursor keys. If the and indicators are shown, it means you can use the and cursor keys.
- Style indicators
These indicators point to the character style that is currently in use. You can select between outline, shadow, and raised.
- Sans-serif indicator
This indicator appears when you are using the sans-serif font. The serif font is in effect when this indicator is not on the display.
- Manual feed indicator
This indicator appears when you are using manual feed instead of auto feed. Auto feed is in effect when this indicator is not on the display.
Important!
- After you finish printing when using manual feed, be sure to always press FUNC and then FEED to feed the tape before cutting it. If you don't, you will cut off part of the printed text.
- 6mm tape indicator
This indicator appears when you use the procedure described under "To specify the tape width" to specify 6 millimeter wide tape. Another tape size is specified when this indicator is not on the display.
- Format imager
This graphic shows how many lines of text are in the format. The thickness of each line also gives you some idea of the relative size of the characters in each line.
If the format you are using has more than one line, the line in the format imager that corresponds to the current cursor location flashes on the display.
- Cursor
The cursor shows the next input position. Any character you input appears at the point where the cursor is located.
- Character size indicator
These values show the height and width measurements of the characters.
- Tape length
The value shows how long the tape will be when you print it. You can select inches or centimeters for this value.
- Character position marks
These marks show where characters will appear as you input them. This part of the display is always blank when you switch power on.
Basic Alpha-Numeric Input
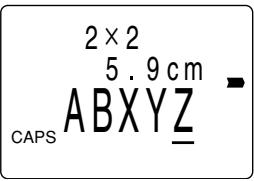
The following operation shows you the basic procedures for inputting letters and numbers. We will explain the procedure by inputting the following characters onto the default initial power-on screen.
ABXYZ Computer Company 1234567890
Note
- If you hold down any key, it will repeat its operation or input at high speed until you release it.
To input alpha-numeric characters
-
Switch power on.
-
Input the first line of characters. CAPS A B X Y Z SPACE C CAPS O M P U T E R SPACESHIFT CO M P A N Y
-
To input the upper-case letters, you use either SHIFT or CAPS. Remember that with SHIFT you must shift the keyboard for each character. With CAPS, on the other hand, the keyboard stays shifted until you press CAPS again.
- Press SPACE to input spaces.
- If you input a wrong character, press BS to delete it and input again. See page 23 for other details on editing text.
-
Note how the second line of the display changes as you input characters. These numbers indicate the length of tape required to print the character.
-
When you reach the end of a line of text, press to input a newline mark.
-
A newline operation is indicated on the display by the symbol. This shows where you changed lines.
-
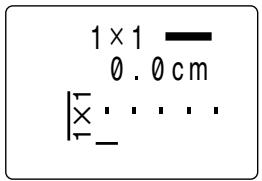
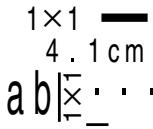
When you insert , the Label Printer automatically makes adjustments in the size of the characters if the size you are currently using cannot fit. With a 9mm tape for example, you start out with 2 × 2 size characters, but this automatically changes to 1 × 1 as soon as you input a symbol.
-
Input the characters in the second line.
1234567890
- To print the text that you input, press PRINT. For details on printing, see page 58.
About the CODE key...
The CODE key makes it possible to input punctuation needed for a number of different languages. The following shows the key operations you should use for each of the characters formed using the CODE key.
-
With the cursor at the location where you want to input a special symbol, press SYMBOL.
-
Use the and cursor keys to move the highlighting to the symbol list that contains the symbol you want to use.
-
In this example, highlight SYMBOLS.
-
After you highlight the symbol list you want, press SET.
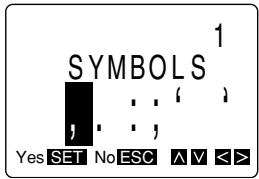
-
Use the and cursor keys to scroll the list line-by-line, or the and cursor keys to move the highlighting left and right.
-
In this example, highlight .
-
After you highlight the symbol you want, press SET.
-
This returns to the input screen, with the symbol you selected input at the location where the cursor was located when you displayed the symbol list.
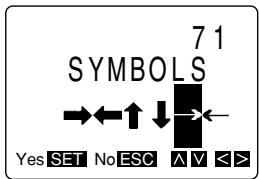
To input illustrations
Example: To input 12 .
-
With the cursor at the location where you want to input an illustration, press ILLUST.
-
The highlighted list name is the one that is currently selected.
-
Use the and cursor keys to scroll the list line-by-line, or the and cursor keys to move the highlighting left and right.
In this example, highlight
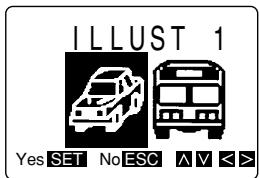
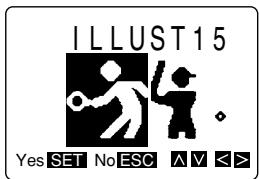
-
After you highlight the illustration you want, press SET.
-
This returns to the input screen, with the illustration you selected input at the location where the cursor was located when you displayed the illustration list.
Part 4
Deleting and Inserting Characters
This section describes everything you need to know about deleting and editing characters you have already input.
Moving the Cursor
The following points describe how to move the cursor around the display to position it for deleting and editing characters.
To move the cursor
- Press to move the cursor to the left, and to move the cursor to the right.
- Press FUNC and then to make the cursor jump to the beginning (far left) of the characters on the display.
- Press FUNC and then to make the cursor jump to the end (far right) of the characters on the display.
- Press SHIFT and then to make the cursor jump to the next newline mark (see "To input alpha-numeric characters") or block mark (page 37) to the left.
- Press SHIFT and then to make the cursor jump to the next newline mark or block mark to the right.
- Holding down the cursor keys moves the cursor left or right at high speed.
Deleting Individual Characters
You can delete individual characters with either the BS key or the DEL key. The only difference between the operation of these two keys is the location of the cursor.
To delete characters using the BS key
Example: To change the word "commputer" to "computer".
- Use and to move the cursor under "p".

- Press BS twice to delete the two m's to the left of the cursor, shifting "puter" to the left as you do.
- Press FUNC and then to jump back to the end of the characters for more input.
To delete characters using the DEL key
Example: To change the word "commputer" to "computer".
- Use and to move the cursor under the first (far left) "m".
- Press DEL twice to delete the two m's at the cursor's position, shifting "mputer" to the left as you do.
- Press FUNC and then to jump back to the end of the characters for more input.
Deleting a Series of Characters
The Label Priter's Word Out function lets you delete a series of characters with a single operation. This operation deletes all characters to the left of the current cursor location, up to the previous space.
To delete a series of characters
Example: To change "ABC XYZDEF GHI" to "ABC DEF GHI".
- Use and to move the cursor under the letter "Z".
- Press FUNC (the FUNC indicator appears on the display), and then BS.
- This deletes everything from "Z" up to the next space to the left of the cursor, leaving "ABC DEF GHI".
Using the CLS Function
The CLS function gives you two options for clearing the display. You can either clear all text from the display, or you can specify a series of text for clearing.
To clear all text from the display
- Press FUNC and then CLS to display the clear screen menu.
ALL
PART
Yes SET No ESC A V
- The ALL (all text) option is highlighted, so press SET.
CLEAR?
Yes SET No ESC
- Press SET to clear all of the text or ESC to abort the clear procedure without deleting anything.
To clear specific text
Example: To change "ABC UVW XYZ DEF" to "ABC DEF".
- Press FUNC and then CLS to display the clear screen menu.
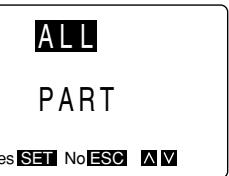
- Use to highlight PART, and then press SET.
-
Use and to move the cursor to one end of the text you want to clear.
-
In our example, move the cursor so it is under "Z" or "U".
-
Press SET.
-
Use and to move the cursor to the other end of the text you want to clear.
-
If you selected "Z" in step 3, move the cursor to the space to the left of "U". If you selected "U" in step 3, move the cursor to the space to the right of "Z".
Note that the text that will be deleted is highlighted as you move the cursor.
Important!
The next step will delete the selected text without a warning message. Make sure that you really want to clear the selected text before proceeding.
-
If you change your mind about deleting text, you can use ESC to backstep to the input screen without deleting anything.
-
Press SET to clear the text you selected.
Overwrite and Insert
You can set up the Label Printer for either overwrite or insert of characters at the cursor position. The following describes the difference between these two options.
Overwrite
With overwrite, characters you input replace the characters at the cursor location. The Label Printer is in the overwrite mode when the overwrite mode indicator (see "Display Symbols and Indicators") is on the display.
Insert
With insert, characters you input are inserted between the characters at the cursor location. The Label Printer is in the insert mode when the overwrite mode indicator is not on the display.
Note that insert is the default whenever you switch Label Printer power on.
The following table illustrates the difference between the overwrite and insert modes.
| Display Characters | Input | Overwrite Mode | Insert Mode |
| ABCDEFG | XYZ | ABXYZFG | ABXYZCDEFG |
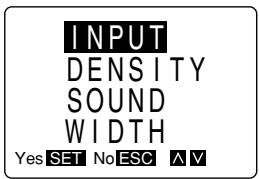
To switch between overwrite and insert
- Switch power on.
-
Press SET UP to display the setup menu.
-
The INPUT option is highlighted, so press SET.
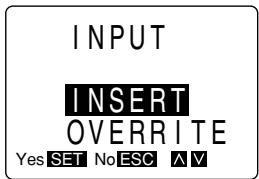
- Use and to highlight OVERRIDE (overwrite) or INSERT, and then press SET to apply the setting and return to the text input screen.
Part 5
Character Attributes and Text Effects
The operations in this part of the manual explain how to change the fonts, style, and size of characters. These characteristics are called character attributes. It also tells you how to assign such text effects as underlining, shading, and box printing to text after you finish inputting it.
Specifying Character Attributes
You can specify character attributes at any of the following three points.
- Before you input any characters
In this case, the attributes are applied to the characters you input later. You cannot use this method to assign text effects.
After inputting some characters
This method lets you change the attributes being applied to the text you are inputting. You cannot use this method to assign text effects.
After you finish inputting text
Use this method to change the attributes of the text you have finished inputting. Text effects can be assigned only for text that is already input.
The techniques to use for each of the above cases are described below.
Important!
- Character attributes you specify affect printed text only. The characters on the display do not change.
- Remember that character attributes are assigned to specific characters, not to positions on the display.
Text effects are applied to both displayed text and printed text.
To specify attributes before inputting characters
When there are no characters on the display, simply specify the character attributes you want. The characters that you input are then automatically assigned the attributes as you input them.
- See the following pages of this manual for details on specifying attributes.
Font - page 29
Style - page 30
Size - page 32
- If you change the character size, a symbol appears to show where the size change takes place.
To change attributes in the middle of text
- Input text using the initial attributes.
-
Perform one of the character attribute change operations.
-
See the following pages of this manual for details on specifying attributes.
Font - page 29
Style - page 30
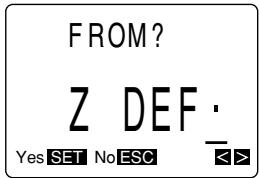
Size - page 32 -
Whenever you perform an attribute change operation after inputting some text, a message appears asking from where you want to begin the change.
-
Press SET.
-
This causes a message to appear asking up to which point you want the change to take effect.
-
Press SET.
-
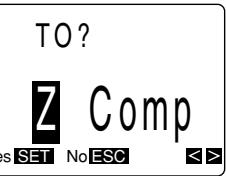
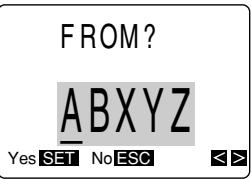
Note that you should specify the points for FROM? and TO? in this operation.
- Any characters you now input will use the attributes you specified in step 2, above.
- If you change the character size, a symbol appears to show where the size change takes place.
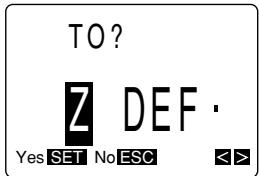
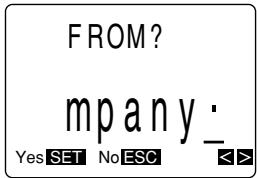
To change attributes or effects of existing text
-
After inputting text, perform one of the character attribute or text effect change operations.
-
See the following pages of this manual for details on actually specifying attributes.
Font - page 29
Style - page 30
Size - page 32
Text effects - page 34
-
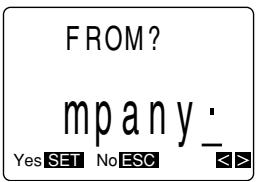
Whenever you perform an attribute or effect change operation after inputting text, a message appears asking from where you want to begin the change.
-
Use and to move the cursor to the point where you want the change to start.
-
Press SET.
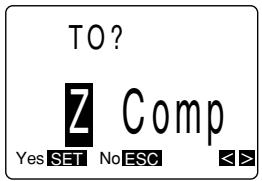
-
This causes a message to appear asking up to which point you want the change to take effect.
-
Use and to move the cursor to the point up to which you want the change to take effect.
-
Note that the text that will be affected by the change is highlighted as you move the cursor.
-
Note that the TO? point can be either to the left or to the right of the FROM? point.
-
Press SET to make the change
-
If you change the character size, a symbol appears to show where the size change takes place.

Important!
- All of the following examples show how to make changes in existing text.
Changing Fonts
There are two fonts that you can select: serif and sans-serif. The following shows examples of each type of font:
Serif:
Sans-serif:
ABC. XYZ
ABC. XYZ
The following section describes how to change the font setting and how you can find out what the current setting is.
Important!
- Note that you cannot make font changes for illustrations.
- Some symbols do not change even when you select a different font.
How to tell the current font settings
Use the and cursor keys to move the cursor around the display. The sans-serif indicator will appear on the display when the cursor is located under a sans-serif character, and it will disappear from the display when the cursor is located under a serif character.
To change the font setting
Example: To change "ABXYZ" in the following text to sans-serif.
ABXYZ Computer Company
- Input the text.
- Press FONT to display a menu of fonts.
SERIF
SANS
Yes SET No ESC A V
- Use to highlight SANS, and then press SET.
-
Use and to move the cursor to the point where you want the font change to start.
-
In our example, you would move to either "A" or "Z".
-
Since "A" is the first character, you can make the cursor jump directly there by pressing FUNC and then .
-
Press SET and the letter at the cursor location becomes highlighted.
-
Use and to move the cursor to the other end of the range you want to change.
-
The text that will be affected by the change is highlighted as you move the cursor.
-
When all the characters you want to change to the new font are highlighted, press SET to apply the change and return to the text input screen.
Changing Character Styles
There are four character styles that you can select: normal, outline, shadow, and raised. The following shows examples of each type of style:
Normal:
Shadow:
ABC. XYZ
ABC. XYZ
Outline:
Raised:
ABC. XYZ
ABC. XYZ
The following section describes how to change the style setting and how you can find out what the current setting is.
How to tell the current style settings
Use the and cursor keys to move the cursor around the display. The style indicators appear on the display to indicate the style of the letter at the current cursor location.
| Indicator | Meaning |
| None | Normal |
| ▲A | Outline |
| ▲A | Shadow |
| ▲A | Raised |
To change the style setting
Example: To change "ABXYZ" in the following text to shadow.
ABXYZ Computer Company
- Input the text.
- Press STYLE to display a menu of styles.
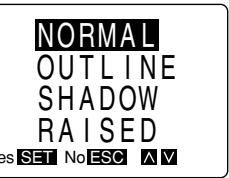
- Use to highlight SHADOW, and then press SET.
-
Use and to move the cursor to the point where you want the style change to start.
-
In our example, you would move to either "A" or "Z".
-
Since "A" is the first character, you can make the cursor jump directly there by pressing FUNC and then .
-
Press SET and the letter at the cursor location becomes highlighted.
-
Use and to move the cursor to the other end of the range you want to change.
-
The text that will be affected by the change is highlighted as you move the cursor.
-
When all the characters you want to change to the new style are highlighted, press SET to apply the change and return to the text input screen.
Important!
If you change the character style for character sizes L2 × 3 or any "S" character sizes, the edges of the printed characters may be broken.
Changing Character Size
There are seven character sizes that you can specify manually, plus six more that the Label Printer automatically applies. The following table shows all of the character sizes available. The unshaded sizes are those you can specify manually, while the shaded sizes are those that are applied automatically (and cannot be specified manually).
| Indicator | Size of each printed character (mm) | Indicator | Size of each printed character (mm) |
| 1 × 1 | 3 × 3 | S1 × 1 | 2 × 2 |
| 1 × 2 | 3 × 6 | S1 × 2 | 2 × 4 |
| 1 × 3 | 3 × 9 | S1 × 3 | 2 × 6 |
| 2 × 1 | 6 × 3 | S2 × 1 | 4 × 2 |
| 2 × 2 | 6 × 6 | S2 × 2 | 4 × 4 |
| 2 × 3 | 6 × 9 | S2 × 3 | 4 × 6 |
| L2 × 3 | 8 × 9 |
Important!
- Note that certain character style and effects may result in poor print quality. This does not indicate malfunction of the Label Printer.
- When the character size you select causes the text to become too large to fit on the tape you are using, the Label Printer automatically reduces the character size to fit. When this happens, the character size indicator shows the character size selected by the Label Printer. The character size indicator is highlighted to show that your selected size was adjusted to fit the tape.
About Auto Fit
If you do not specify a character size, the Label Printer automatically selects the optimum size that can be used to fit all of the characters on the tape. When using 9 to 18mm wide tape, for example, the Label Printer automatically uses 2× 2 characters as the initial default. If you insert a newline mark inside the text (see "To input alpha-numeric characters"), the default character size automatically changes to 1× 1 so both lines of text can fit on the tape.
About the FIT mark
Whenever you change the size of some of the characters on the display, the Label Printer recalculates the optimum size of all the remaining characters. It also recalculates when you input a newline mark () . When this happens, the Label Printer automatically inserts a fit mark (比) inside the text, which indicates that all text to the right of it is automatically adjusted to make it fit on the tape.
You can delete a fit mark, but if you do, the character size indicator will become highlighted to indicate that characters will be automatically adjusted to a size that can be printed.
How to tell the current size settings
Size marks on the display show where characters sizes change.
To change the characters size
Example: To change "ABXYZ" in the following text to 1 × 1 , leaving the remaining characters at 2 × 2 .
ABXYZ Computer Company
- Input the text.
- Press SIZE to display a menu of sizes.
- Use and to highlight to 1× 1 , and then press SET.
-
Use and to move the cursor to the point where you want the size change to start.
-
In our example, you would move to either "A" or "Z".
-
Since "A" is the first character, you can make the cursor jump directly there by pressing FUNC and then .
-
Press SET and the letter at the cursor location becomes highlighted.

-
Use and to move the cursor to the other end of the range you want to change.
-
The text that will be affected by the change is highlighted as you move the cursor.
-
When all the characters you want to change to the new size are highlighted, press SET to apply the change and return to the text input screen.
Notes
- You can delete a character size change by moving the cursor to the character size indicator on the display and deleting the indicator using BS or DEL.
- Standard size characters (sizes without "S" in front of them) are proportionally spaced.
Assigning Text Effects
You can assign text effects only to text that has already been input. If you later input text in between existing text that is already assigned a text effect, the inserted text is also assigned the effect assigned to the text on the left and right.
Important!
- The text effects are applied to text on the display, in addition to the printed text.
Changing Text Effects
There are three text effects that you can assign: shading, underlining, and boxed text. The following shows examples of each effect:
Shading:
ABC. XYZ
Boxed Text:
ABC. XYZ
Underlining:
ABC. XYZ
The following section describes how to assign and remove text effects.
Note
Note that you can assign multiple effects to the same text.
To assign text effects
Example: To shade "ABXYZ" in the following text.
ABXYZ Computer Company
- Input the text.
-
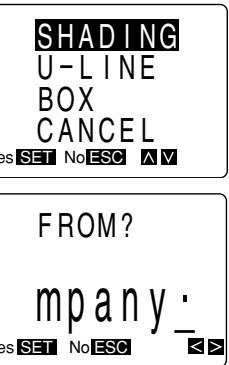
Press EFFECT to display a menu of effects.
-
Use and to highlight SHADING, and then press SET.
-
Use and to move the cursor to the point from which you want the effect to start.
-
In our example, you would move to either "A" or "Z".
-
Since "A" is the first character, you can make the cursor jump directly there by pressing FUNC and then .
-
Press SET and the letter at the cursor location becomes highlighted.
-
Use and to move the cursor to the other end of the range to which you want to assign the effect.
-
The text that will be assigned the effect is highlighted as you move the cursor.
-
Note that you can assign effects to one block at a time. You cannot select text across multiple blocks to assign effects.
-
When all the characters to which you want to assign the effects are highlighted, press SET to assign the effects and return to the text input screen.
Note that the characters on the display are shaded.
Important!
- When using the box effect with two lines of text, the result you get depends on how you select the text. Note the following text.
ABXYZ Computer Company
If you assign the box effect to "ABXYZ" and "Computer Company" separately, you get the following result.
ABXYZ
Computer Company
If you assign the box effect to the entire text (From "A" to "y"), you get the following result.
ABXYZ Computer Company
To remove text effects
Example: To remove the shading from "ABXYZ" in the following text.
ABXYZ Computer Company
Note
-
The following operation removes all effects assigned to the text you specify.
-
Press EFFECT to display a menu of effects.
- Use to highlight CANCEL, and then press SET.
- Use and to move the cursor to the point from which you want to remove effects.
-
Press SET and the letter at the cursor location becomes highlighted.
-
Use and to move the cursor to the other end of the range from which you want to remove the effects.
- When all the characters from which you want to remove effects are highlighted, press SET to remove the effects and return to the text input screen.
Part 6
FORM Menu Functions
This part of the manual describes how to use the FORM menu to layout your text exactly the way you want it on the label. With the FORM menu, you can control character pitch, text blocks, text alignment, and a wide range of other features.
Fundamentals of Label Layout
Before we actually begin our discussion about how to layout a tape, we should first define a few terms. Note the following illustration.
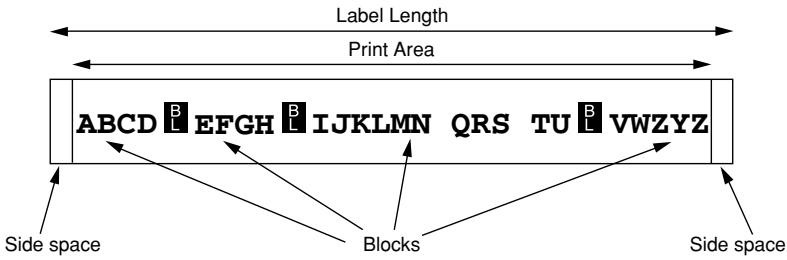
Blocks
A block is text that is enclosed between two block marks (B). Note that the first (far left) block does not require a block mark at the beginning, and the last (far right) block does not require a block mark at the end. If there are no block marks, all of the text is treated as a single block. You can individually specify the length of each block, as well as the pitch and the number of lines inside each block.
- Print Area
The print area is the actual area of a label that contains printed text. It starts with the left side of the first character printed, and ends with the right side of the last character printed.
- Side Spaces
The side spaces are blank areas that the Label Printer automatically adds on either end of the print area. Note that side spaces are only added when you are using auto feed, and they are not added when using manual feed (see "Auto Feed").
Auto Feed (with long side spaces)
ABXYZ
Auto Feed (with short side spaces)
ABXYZ
Manual Feed
ABXYZ
Label Length
The label length is the print area, plus the side spaces.
Settings you make for side spaces, block spacing, and mirror printing affect the entire label length.
Creating and Deleting Blocks
The following procedures describe how to create and delete blocks. Later you will learn how you can change certain settings on a block-by-block basis.
To create a block
Example: To input the text "ABXYZ Computer Company" and create two blocks: "ABXYZ" and "Computer Company".
- Input the text.
- Move the cursor to the space between "ABXYZ" and "Computer Company".
-
Press BLOCK.
-
If you wanted to break the text up into three blocks, you would input another block mark.
To delete a block mark
To delete a block mark, use the procedures for BS and DEL as described under "Deleting Individual Characters".
Character Pitch
The term character pitch refers to the relative spacing between characters. The Label Printer provides three character pitches from which to choose: NONE (0mm), NARROW (0.5mm), and WIDE (1mm).
The character pitch setting you make is applied only to the block where the cursor is located when you perform the setting operation.
- The default character pitch setting is NONE.
To specify the character pitch
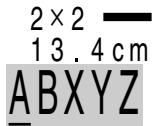
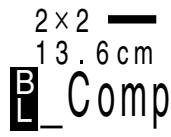
Example: For the two-block text "ABXYZ", "Computer Company", to change the spacing of "ABXYZ" to WIDE.
- Input the text and define the two blocks.
- Use and to move the cursor so it is inside the block whose character pitch you want to change.
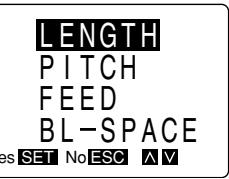
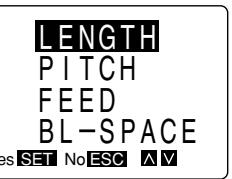
- Press FORM to display the FORM menu.
LENGTH
PITCH
FEED
BL-SPACE
Yes SET No ESC A V
- Use to highlight PITCH, and press SET.
-
Use and to select the character pitch you want.
-
You can select NONE, NARROW, or WIDE.
-
In this example, you should select WIDE.
-
After selecting the character pitch, press SET to apply the setting and return to the text input screen.
2× 2
14.4cm
ABXYZ
- It is impossible to change the PITCH setting while the cursor is located at a block mark (R) at the beginning of a block of text.
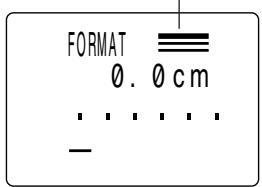
Block Length
You can individually specify the length of each block that makes up your label. If you are making title labels for the edge of binders, for example, you can specify a uniform length for the title, date, and author. This causes the text on the labels to be uniformly aligned when the binders are placed on a bookshelf.
The block length setting you make is applied only to the block where the cursor is located when you perform the setting operation.
To specify a block length
Example: To specify the following block lengths for the text noted below.
| Text | Block Length |
| Monthly Sales | 6.5 cm |
| Accounting Department | 6.5 cm |
| 1st Quarter 1995 | 6.5 cm |
- Input the text and define the three blocks.
-
Use and to move the cursor so it is inside the block whose length you want to change.
-
Press FORM to display the FORM menu.
- Use and to highlight LENGTH, and press SET.
-
Use and to highlight FREE, and press SET.
-
Since there are six options on this menu, they do not all fit on a single screen. To view the two options at the bottom of the menu (FREE and CANCEL), press four times.
-
Use and to select B-LENGTH for the block length setting screen, and press SET.


-
Use to decrease the current block length setting value or to increase it.
-
Note that the tape length at the top of the display also changes when you change the block length.
-
After setting the block length (and tape length), press SET to apply the setting and return to the text input screen.
-
After making the setting, press SET to apply it.
The imager appears as illustrated below when you are using fixed block lengths.
[ ] Printing can be performed as specified.
[ (\equiv \equiv ] ] Printing can be performed using the length specified, but characters are condensed horizontally.
Printi ng cannot be performed as specified. The error message "TEXT DOES NOT FIT!" appears on the display.
To cancel block length settings
- Press FORM to display the FORM menu.
-
Use and to highlight LENGTH, and press SET.
-
Press SET to cancel the block length setting for all the blocks and return to the text input screen.
Important!
- If you input a block mark while inputting new text, the text to the right of the block mark inherits its block-specific settings (block length and pitch) from the block to the left of the block mark. If you specify a block length and then input "ABC DEF" for example, both "ABC" and "DEF" have the same block length and pitch settings.
- If you change the block-specific settings of a block of text after inputting a block mark, only the selected block is affected. If you change the settings of "ABC" in the above example, the settings of "DEF" remain unchanged.
Tape Length
You can specify the physical length of tape that should be used for printing your text. There are six different settings that you can use to specify the tape length.
VHS
This setting automatically sets the tape length so it is suitable for use as a label for a VHS video tape cassette.
- 8mm
This setting automatically sets the tape length so it is suitable for use as a label for an 8mm video tape cassette.
CASSETTE
This setting automatically sets the tape length so it is suitable for use as a label for an audio cassette tape case.
FLOPPY
This setting automatically sets the tape length so it is suitable for use as a label for a floppy disk.
FREE
Use this setting to set the tape to any length that you want.
- CANCEL
This setting cancels any of the above settings and instructs the Label Printer to automatically set the tape length.
To select a preset tape length
Example: Layout an audio cassette tape case label with the text "MY FAVORITE SONGS".
- Input the text.
- Press FORM to display the FORM menu.
- Use and to highlight LENGTH, and press SET.
- Use and the highlight CASSETTE.
- Press SET to apply the setting and return to the text input screen.
- If the text you input is too long to fit within the tape length you specified, the error message TEXT DOES NOT FIT! appears on the display for about one second. When this happens, try making the characters smaller or inserting newline marks (see "To input alpha-numeric characters") to make the text fit better on the tape.
To specify your own tape length
Example: To specify a tape length of 10cm for the text "ABXYZ Computer Company".
- Input the text.
- Press FORM to display the FORM menu.
- Use and to highlight LENGTH, and press SET.
-
Use and to highlight FREE, and press SET.
-
Since there are six options on this menu, they do not all fit on a single screen. To view the two options at the bottom of the menu (FREE and CANCEL), press four times.
-
Use and to select T-LENGTH and then press SET.
-
Use to decrease the current tape length setting value or to increase it.
- After setting the tape length, press SET to apply the setting and return to the text input screen.
- If the text you input is too long to fit within the tape length you specified, the error message TEXT DOES NOT FIT! appears on the display for about one second. When this happens, try making the characters smaller or inserting newline marks (see "To input alpha-numeric characters") to make the text fit better on the tape.
To cancel a tape length setting
- Press FORM to display the FORM menu.
- Use and to highlight LENGTH, and press SET.
- Use and to highlight CANCEL.
- Press SET to cancel the tape length setting and return to the text input screen.
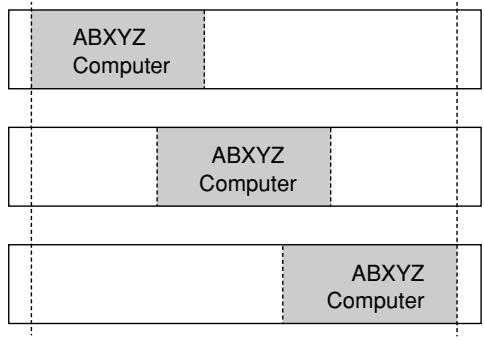
Auto Feed
You can switch the Label Printer's auto feed feature on and off. You can also specify one of two different feed settings that provides either large or small side spaces ("Fundamentals of Label Layout"). You can choose any one of the three following operations for tape feed.
- Auto Feed (LONG)
This setting causes the tape to feed 16mm at the beginning and end of each printing, creating 16mm side spaces.
- Auto Feed (SHORT)
This setting causes the tape to feed 5mm at the beginning and end of each printing, creating 5mm side spaces.
When using the SHORT feed option, the message "CUT THEN [SET]!" appears as soon as you press PRINT. Operate the cutter to cut off the leading end of the tape and press SET to continue the print operation.
- Manual Feed (M-FEED)
This setting provides side spaces of only 1mm of the printed text. If you perform two consecutive print operations (without manually feeding between prints), the last character of the first print operation is followed by the first character of the second print operation, with no space provided between them. It is a good way to save tape when you print a series of tapes.
Important!
- After you finish printing when using manual feed, be sure to always press FUNC and then FEED to feed the tape before cutting it. If you don't, you will cut off part of the printed text.
To select a feed option
- Press FORM to display the FORM menu.
- Use and to highlight FEED, and press SET.
- Use and to highlight the option that you want (LONG, SHORT, M-FEED).
- Press SET to set the option and return to the text input screen.
Block Spacing
You can specify the amount of space to be inserted between each block. You can select any one of three different block spacings: NONE (0mm), NARROW (2mm), and WIDE (4mm).
To specify the block spacing
Example: For the two-block text "ABXYZ", "Computer Company", change the spacing to WIDE.
- Input the text and define the two blocks.
- Press FORM to display the FORM menu.
- Use to highlight BL-SPACE, and press SET.
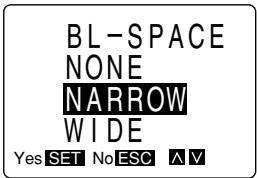
-
Use and to select the block spacing you want.
-
In this example, you should select WIDE.
-
After selecting the block spacing, press SET to apply the setting and return to the text input screen.
To specify vertical printing
- Input the text you want to print.
-
Press FORM to display the FORM menu.
-
Use to highlight DIRECTION, and press SET.
- Since there are eight options on this menu, they do not all fit on a single screen. To view the four options at the bottom of the menu, press four times.
- Use to highlight VERT (vertical).
- Press SET to return to the text input screen.
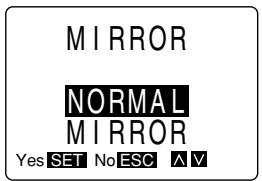
Mirror Image
When you specify mirror image for text, it is printed in reverse image. Use mirror image when you plan to print on transparent tape, with the printing on the inside. When viewed through the transparent tape, the text will appear normal. You can also use mirror image printing when using iron-on transfer tape to print iron-on transfers.
Normal
ABC. XYZ
- Mirror Image
SYX.08A
To specify mirror image
- Input the text you want to print.
-
Press FORM to display the FORM menu.
-
Use to highlight MIRROR, and press SET.
-
Since there are eight options on this menu, they do not all fit on a single screen. To view the four options at the bottom of the menu, press four times.
-
Use and to highlight selection you want.
-
Highlight MIRROR to switch mirror image on, and NORMAL to switch it off.
-
Press SET to return to the text input screen.
Text Alignment
After you specify the length of the tape to be printed, you can position the text on a label to be left flush, right flush or centered. You should remember that the results that you get from a text alignment specification will depend on whether your label is made up of one block or multiple blocks. The following shows examples of each option available.
One Block Left
Center
Right
- Multiple Blocks Left
Center
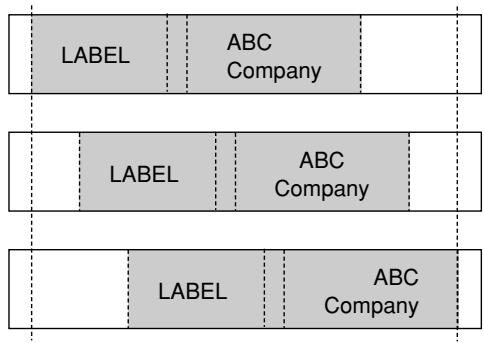
Right
To specify text alignment
- Input the text you want to print.
- Use the procedure under "Tape Length" to specify the length of the tape.
-
Press FORM to display the FORM menu.
-
Use to highlight ALIGN (alignment), and press SET.
-
Since there are eight options on this menu, they do not all fit on a single screen. To view the four options at the bottom of the menu, press .

- Use to highlight LEFT, CENTER, or RIGHT.
- Press SET to return to the text input screen.
Justification
You can use the justification feature to align the right side of text. When you switch justification on, the text of all blocks that have two or more lines is justified. The following shows some examples of how justification affects text.
Ragged
ABXYZ Computer Company Label Printer KL-7000
- Justified
ABXYZ Computer Company Label Printer KL-7000
To switch justification on and off
- Input the text you want to print.
- Press FORM to display the FORM menu.

-
Use to highlight JUSTIFY (justification), and press SET.
-
Since there are eight options on this menu, they do not all fit on a single screen. To view the four options at the bottom of the menu, press four times.
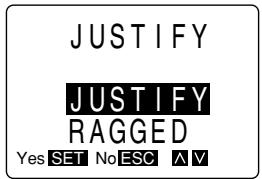
-
Use to highlight the selection that you want.
-
Highlight JUSTIFY to switch justification on, and RAGGED to switch it off.
-
Press SET to return to the text input screen.
Part 7
Quick Formats
The quick formats in the Label Printer's memory let you make character size settings with the touch of a key. Then you simply input your text, which is automatically assigned the character sizes according to the quick format you selected.
The following shows each of the selections available in the menu of quick formats, and the character sizes for each line.
| Text | Block |
| CANCEL | Cancels a built-in format specification. |
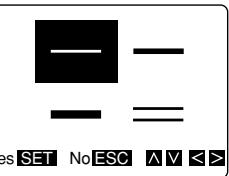
| —— | Line 1: 1×1 |
| —— | Line 1: 2×2 |
| —— | Line 1: L2×3 |
| —— | Line 1: 1×1 Line 2: 1×1 |
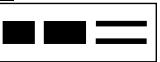
| —— | Line 1: S1×1 Line 2: S1×1 Line 3: S1×1 |
| —— | Line 1: S1×1 Line 2: S1×1 Line 3: S2×2 |
| —— | Line 1: S1×1 Line 2: S2×2 Line 3: S1×1 |
| —— | Line 1: S2×2 Line 2: S1×1 Line 3: S1×1 |
| —— | Line 1: S1×1 Line 2: S1×1 Line 3: S1×1 Line 4: S1×1 |
Important!
- Built-in formats affect character sizes only. Preset layouts (page 51) also include specifications for tape length, font attributes, etc.
- You can make attribute, font, and other specifications inside of a quick format, but you cannot specify a character size.
- Selecting a quick format also limits the number of lines you can input. If you select a 2-line format, for example, inputting a second newline mark (()) causes an error message to appear on the display.
-
If the text you input has fewer lines than the selected format, the unused lines are left blank.
-
You can assign different quick format settings for each block. This means you can have a 4-line block, followed by a 2-line block, etc.
- If you insert a block mark (B) inside formatted text, the text to the left of the block mark retains the formatting but the text to the right of the block mark is not affected by the formatting.
- Remember that you can use only 2-line formats with 6mm tape. If you specify a format with more than two lines while using 6mm tape, the error message TOO MANY LINES! appears on the display. The error input display shown on the right appears when you try to print.
- When editing text, it is impossible to select a format that has fewer lines than the text you are editing.
TOOMANY LINES!
NoESC
To select a quick format
Example: To use a quick format to input the following text.
S2×2: ABXYZ Computer Company
S1×1: 12345
S1×1:67890
- Start with a clear input screen or use and to move the cursor to the block for which you want to specify a quick format.
- Press FORMAT.
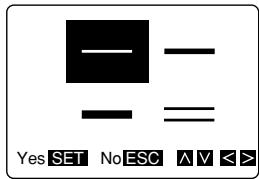
-
Use , , , and to highlight the quick format you want to use.
-
For this example, highlight (≡).
-
Press SET.
Indicates selected format
-
Input your text, pressing at the end of each line.
-
For this example, input: ABXYZ Computer Company 12345 67890. Each line is automatically assigned the character sizes in the format.
To cancel a quick format
- Use and to move the cursor to the block whose quick format you want to cancel.
- Press FORMAT.
- Highlight CANCEL.
- Press SET.
Part 8
Presets
This part of the manual tells you how to use the presets menu to select from among a variety of built-in auto layouts, preset expressions, and numbering styles that help you to create instant labels.
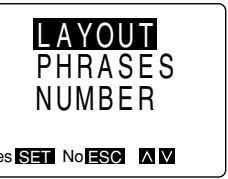
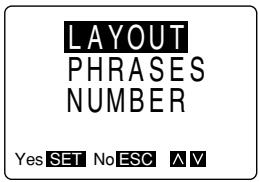
Using the presets menu
-
Press PRESETS to display the presets menu.
-
The preset menu includes the items LAYOUT (preset layouts), PHRASES (preset expressions), and NUMBER (preset numbering formats).
LAYOUT
PHRASES
NUMBER
Yes SET No ESC A V
-
Use and to select the type of preset that you want and press SET.
-
Information on how to use each of the types of presets available is described in the following sections.
Preset (Auto) Layouts
Preset (auto) layouts put a wide selection of instant label layouts at your fingertips. Simply select the preset layout you want to use and input your text. Character sizes, attributes, and other settings are automatically applied according to the preset layout you select.
The table on page 74 shows each of the selections available in the menu of preset layouts, and the character sizes for each block.
Important!
- Preset layouts also include specifications for tape length, font attributes, etc.
- Any text that is on the screen is deleted whenever you select LAYOUT from the presets menu and press SET.
To use a preset layout to create a label
Example: To use the 8mm (1) preset layout to create the following label for an 8mm video cassette.
1995 Junior Tennis
Semi-Finals
Finals
- While the input screen is displayed, press PRESETS.
LAYOUT
PHRASES
NUMBER
Yes SET No ESC A V
-
Use and to highlight LAYOUT, and then press SET.
-
If the message "CLEAR INPUT TEXT!" appears on the display, press SET to clear previously input text or ESC to abort the operation without clearing input text.
-
Use and to move the highlighting to the type of layout you want, and then press SET.
-
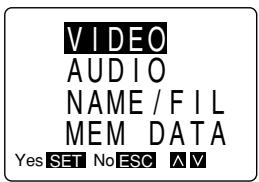
In this example, highlight VIDEO.
-
Use and to highlight the type of video tape label you want, and then press SET.
-
In this example, highlight 8mm.
-
Use and to display the variation you want, and then press SET.
-
In this example, display 8mm (1).
- The text section that is flashing on the display is the one that is selected for text input.
VIDEO
AUDIO
NAME / F I L
MEM DATA
Yes SET No ESC A V
VHS
VHS-C
8mm
BETA
Yes SET No ESC A V
8mm
1 2
Yes SET No ESC

-
Repeat steps 6 and 7 for each section.
-
Input the text for the flashing section.
-
After you input text for a section, press SET to move to the next section.
-
When the section for the illustration is flashing, you will note that there is already an illustration there. Use BS or DEL to delete the illustration, and then input the new illustration.
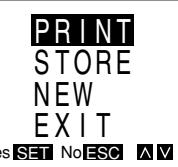
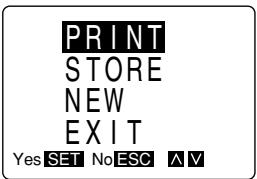
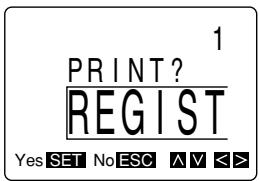
See page 22 for details on inputting illustrations. - When you press SET after inputting the illustration, the display shows the following menu.
PRINT
STORE
NEW
EXIT
Yes SET NoESCI A V
-
Use and to highlight the operation you want and then press SET.
-
Highlight PRINT to print the label.
- Highlight STORE to store the label in memory (see "To store a preset layout label in memory").
- Highlight EXIT to exit the label operation without storing the label you created in memory.
To print a label made with a preset layout
- Create a label or recall the label you want from memory.
-
Use the procedures under "To use a preset layout to create a label" to edit the label.
-
You can start with either a preset layout using the procedure described under "To use a preset layout to create a label".
-
The menu shown here should be on the display following step 8 under "To use a preset layout to create a label".
- Use and to highlight PRINT, and then press SET to print the label. (See "Printing a Tape")
- Operate the cutter to cut the leading end of the tape, and then press SET to resume the print operation.

- Instead of printing the new label, you could use the procedures under "To store a preset layout label in memory" to store the new label in memory.
To store a preset layout label in memory
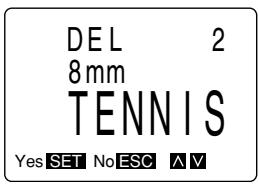
Example: To store a label under the name "TENNIS".
-
Create the label you want to store.
-
Use the procedures under "To use a preset layout to create a label" to create a label from a preset layout.
- You can create a label using one you previously stored in memory (see "To recall a preset layout label from memory").
- After you finish creating the label, the menu shown here should be on the display (following step 8 under "To use a preset layout to create a label").
- Use and to highlight STORE, and then press SET.
-
Input a name for your layout.
-
A layout name can be up to six characters long.
-
For this example, input the name "TENNIS".
-
Press SET to store the label under the name you specified.
-
Some symbols cannot be used in names.
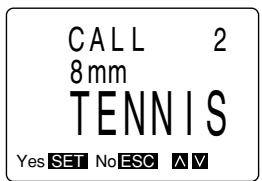
To recall a preset layout label from memory
Example: To recall the label named "TENNIS".
- While the input screen is displayed, press PRESETS.
- Use and to highlight LAYOUT, and then press SET.
- Use and to highlight MEM DATA, and then press SET.
- Use and to highlight RECALL, and then press SET.
-
Use and to display the label you want.
-
In this example, display the label named TENNIS.
-
Press SET to recall the displayed label.

- Now you can print the label using the procedures under "Part 9 Printing".
- You can edit a label recalled from memory. Use the same procedures as those described under "To use a preset layout to create a label".
To delete a preset layout label from memory
Example: To delete the label named "TENNIS".
- While the input screen is displayed, press PRESETS.
- Use and to highlight LAYOUT, and then press SET.
- Use and to highlight MEM DATA, and then press SET
- Use and to highlight DELETE, and then press SET
-
Use and to display the label you want to delete.
-
In this example, display the label named "TENNIS".
-
Press SET.

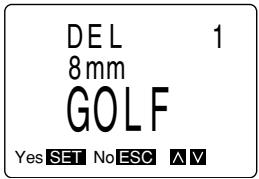

- Press SET to delete the label you selected or ESC to abort the delete operation without deleting anything.
Preset Phrases
Label Printer memory contains a number of commonly used expressions that are attractively laid out. You simply select the phrases you want to use and print it.
Important!
- Be sure to read "Part 9 Printing" before trying to perform a printing operation.
To print a preset phrases
Example: To print the preset phrases "AIR MAIL".
-
Press PRESETS.
-
Use and to highlight PHRASES, and then press SET.
- Use and until the phrases you want appear on the display.
- While the text you want is displayed, press PRINT to start the print operation.
- Before printing a preset phrases, you can use IMAGE to view what the phrases will look like when it is printed. See "To show the image display" for details.
Numbering
The numbering item in the presets memory prints a series of labels that are sequentially numbered. Each time you perform a printing operation, the number increases by 1 automatically.
- Numbers can be up to four digits long (from -999 to 9999).
- You can print up to 50 labels per operation. If you want to produce more than 50 numbered labels, you should repeat the following procedure as many times as necessary.
Important!
- Be sure to read "Part 9 Printing" before trying to perform a printing operation.
To print a numbered series
Example: To print a numbered series in the format "NUMBER 111" to "NUMBER 123".
-
In the text input screen, input the text "NUMBER 111".
-
You can make font, attribute, and other specifications when inputting your text. The specifications you make here will also be applied to the numbers that are printed along with the text.
-
Press PRESETS.
-
Use and to move the highlighting to NUMBER, and then press SET.
-
Use and to move the cursor to the start point, and then press SET.
After you highlight the number, you can increase it by pressing or decrease it by pressing .
- You can only highlight numbers. You cannot highlight alpha characters.
- Use and to move the cursor to the end point, and then press SET.
- Press PRINT to start the print operation.
-
Cut the tape and then press PRINT to print the next label.
-
The number is automatically increased with each printing operation you perform.
-
Repeat step 6 as many times as necessary.
- You can abort the number printing operation at any time by pressing ESC.
LAYOUT
PHRASES
NUMBER
Yes SET No ESC A V
FROM?
R 111·
Yes SET No ESC

NUMBER
PRINT?
ER
111
CAPS
Yes SET
No ESC

Part 9
Printing
In addition to the procedure you should follow in order to actually print, this part of the manual also includes information on a number of other useful printing features and functions.
Printing Precautions
- Never switch power off while printing is being performed.
- Make sure that the tape outlet is not blocked before you start printing.
- Make sure the tape cartridge compartment cover is closed when cutting the tape.
- Never operate the tape cutter while printing is being performed (indicated by the message NOW PRINTING on the display).
- During printing at very high density, printing of very long text, or repeat printing of the same text a number of times, the Label Printer may stop printing for about five seconds. This is not a malfunction, and normal printing should resume shortly.
Printing a Tape
Printing a tape is as easy as pressing PRINT. Before printing, you can also use IMAGE to display what your output will look like.
To print a tape
- Press PRINT to print a tape of the text you have input and laid out.
- To stop a print operation that is in progress, press ESC.
- After the print operation is complete, press down on the tape cutter button to cut the tape.
-
Use scissors to trim the tape to the size you want, if necessary.
-
After you print a tape, you can peel off its paper backing and stick the tape onto the object you want. Note that the tape will not stick on coarse, wet, oily, or soiled surfaces. Also, you should not try to use the tape where it is exposed to direct sunlight or rain. Do not stick the tape onto human skin.
- An easy way to remove the backing from a tape and expose the adhesive surface is to bend the tape near one of its ends. This should cause the tape and its backing to separate, allowing you to pull them apart.
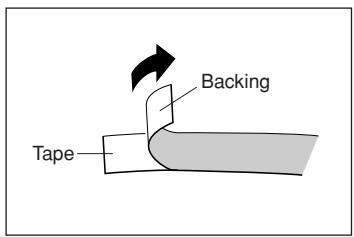
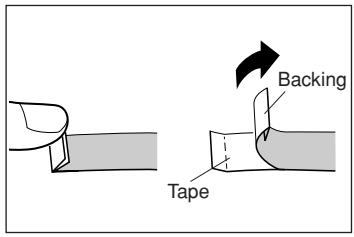
To show the image display
Press IMAGE, and the display shows what your text will look like when it is printed. The text automatically scrolls from right to left while you have this key pressed.
To show the layout display
-
Press LAYOUT to show the layout display.
-
This display shows you a rough outline of how the various elements will be laid out on the tape.
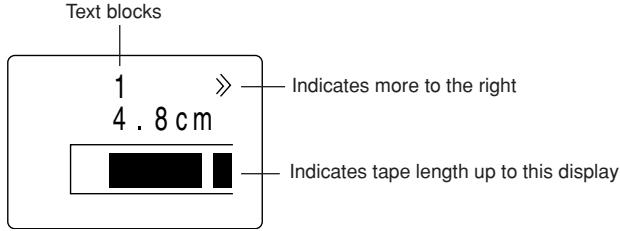
-
To view the part of the display that runs off the right, press
-
Note that you can scroll the display to the right only. You cannot scroll to the left.
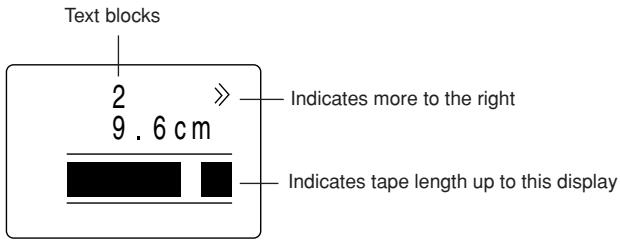
- Keep pressing until you reach the final display.
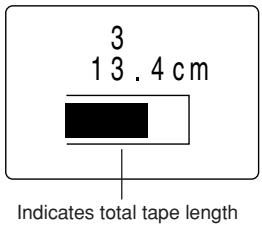
- Press ESC to return to the normal input screen.
To feed tape
Each time you press FUNC and then FEED, the tape is fed about 16 mm.
To adjust the print density
- Switch power on.
- Press SET UP to display the set up menu.
- Use and to highlight DENSITY, and then press SET.
-
Use and to highlight the density you want to use and then press SET to apply the setting and return to the text input screen.
-
The higher the number you select, the darker the characters that are printed.
Frame Printing
The frame printing feature of the Label Printer makes it easy to add attractive ornamental frames to your text. You can specify frames around the outside of the printing area.
Important! You cannot use frame printing with 6mm tape.
To add a frame around the outside of the printing area
Example: To frame the text "HAPPY BIRTHDAY" with the following frame.
- Input the text that you want to print.
- Press FRAME.
- Use , , , and to move the highlighting to the frame you want, and then press SET.
See page 73 for a complete list of the frames that are available.
-
Press SET to start printing, or ESC to abort the printing operation.
-
You could press PRINT instead of SET in step 4 above. In either case, printing starts immediately without a confirmation message.
- Use layout display to check framed text before printing.
Part 10
Memory
This part of the manual tells you how to store text and layout data in memory for instant recall when you want it. You can store approximately 326 characters of text in memory.
Storing Data
You cannot store two copies of identical data in memory at the same time. If you try to, one of the copies will be discarded automatically.
To store data into memory
- Input the data you want to store.
- Press MEMORY.
STORE
RECALL
DELETE
Yes SET NoESC A V
-
Use and to highlight STORE, and press SET.
-
This message tells you how much memory is used for data storage.
USED
15%
Yes SET No ESC
-
Press SET to store the data.
-
If there is not enough room in memory to store the data, the message MEMORY FULL! appears on the display. In this case, make your new data item smaller (by deleting some of its text), or make room for the new data by deleting items already stored in memory that you no longer need.
Recalling Data
When you recall data, you can specify whether it is to be used as a new data item or in combination with text you have input.
- Press MEMORY.
- Use and to highlight RECALL, and press SET.
- Use and to scroll through the text stored in memory. Use and to scroll the text left and right.
-
After you find the text that you want to recall, press SET.
-
The NEW/COMBINE display appears only if you already have input text before starting the recall operation. If you did not input any data before starting the recall operation, this display does not appear, and steps 5 and 6 of this procedure are not necessary (so you should skip directly to step 7).
-
Move the highlighting to specify whether you want to use the recalled text as new data (NEW) or in combination with existing data (COMBINE).
-
If you select NEW, the recalled data replaces any text that was on the data input screen when you pressed SET.
-
If you select COMBINE, the recalled data is inserted into the text on the input display.
-
Press SET to recall the text from memory.
-
If you selected NEW in step 5, the procedure ends here. If you selected COMBINE, continue with the following.
- Use and to move the cursor to the location where you want the recalled text to be inserted.
- Press SET to recall the text and insert it at the cursor position.
Deleting Text
Use the following procedure to delete text from memory.
To delete text from memory
- Press MEMORY.
- Use and to move the highlighting to DELETE, and press SET.
- Use and to scroll through the text stored in memory. Use and to scroll the text left and right.
- After you find the text that you want to delete, press SET.
DELETE?
ABXYZ
Yes SET No ESC
-
Press SET.
-
To abort the operation without deleting anything, press ESC.
Part 11
Reference
This section contains information about the Label Printer that you can use as a reference when you need it.
Cleaning the Printer Head and Roller
A dirty printer head and roller can result in poor printing quality. If you have problems with print quality, use the following procedure to clean the printer head and roller.
To clean the printer head and roller
- Make sure the Label Printer is switched off.
- Press the tape cartridge compartment cover release and open the compartment cover.
- Remove the tape cartridge.
- Use a cotton swab dipped in alcohol to clean the printer head and roller as shown in the illustration.
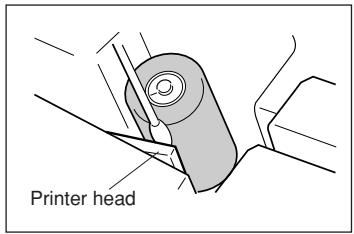

- Replace the tape cartridge and close the compartment cover.
Resetting
If you experience serious malfunction of the Label Printer or if operation fails completely, try performing the following operation to reset the unit.
- Switch power off.
- Open the tape cartridge compartment cover and remove the tape cartridge.
- Press the RESET switch inside the tape cartridge compartment to reset the Label Printer.
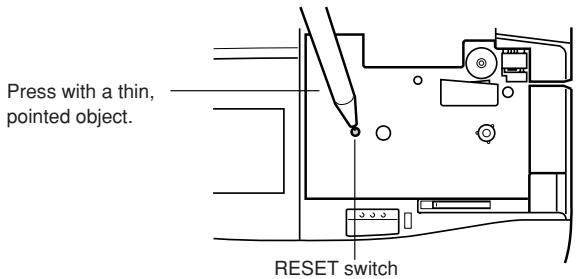
- Take care not to press the RESET switch too hard with a pointed object. Doing so can cause malfunction.
- Never press the RESET switch except when the Label Printer fails to operate correctly.
- Data stored in memory is not cleared when you press the RESET switch.
About the Label Printer's Keys
| Key | Name | Description |
| BLOCK | Block | Inputs a block mark. |
| BS | Backspace | Deletes the character to the left of the cursor and shifts characters to the left. |
| CAPS | Caps | Shift locks the keyboard for input of upper-case characters. Unshifts the keyboard for input of lower-case characters. |
| CODE | Code | Causes the code indicator CODE to appear on the display. The next key operation inputs special punctuation or character (if available). |
| DEL | Delete | Deletes the character at the cursor location and shifts characters to the left. |
| ▼ | Down | Moves highlighting in a menu down. |
| EFFECT | Effect | Displays a menu of effects. |
| ESC | Escape | Cancels the current operation. If the current display was produced from a previous menu, pressing this key backsteps to the previous display. Specifies “No” for a Yes/No dialog. |
| FONT | Font | Displays a menu of fonts. |
| FORM | Form | Displays the FORM menu for pitch, text blocks, text alignment, and other features. |
| FORMAT | Format | Displays a menu of layout formats. |
| FRAME | Frame | Displays a menu of text frames. |
| FUNC | Function | Accesses the functions marked above some of the keys on the keyboard. FUNC FEED Manually feeds the tape. FUNC CLS Displays the display clear menu. FUNC ↓ Makes the cursor jump to the first character of text on the display. FUNC ↑ Makes the cursor jump to the last character of text on the display. FUNC BS Deletes all characters to the left of the current cursor location, up to the next space to the left of the cursor. |
| ILLUST | Illustration | Displays a menu of illustrations. |
| IMAGE | IMAGE | • Displays text as it will appear on the printed tape. |
| LAYOUT | Layout | • Displays a rough layout of the tape. |
| \(\triangleleft\) | Left | • Moves the cursor to the left. |
| MEMORY | Memory | • Displays a menu of memory functions. |
| OFF | Off | • Switches power off. |
| ON | On | • Switches power on. |
| PRESETS | Presents | • Displays a menu of preset items. |
| • Executes the print operation. • Immediately after switching power on, outputs a demo print. | ||
| \(\triangleleft\) | Return | • Inputs a newline mark. |
| \(\triangleright\) | Right | • Moves the cursor to the right. |
| SET | Set | • Executes the currently selected function. • Specifies “Yes” for a Yes/No dialog. • Immediately after switching power on, recalls the text that was on the display when power was last switched off. |
| SET UP | Set up | • Displays the set up menu. |
| SHIFT | Shift | • Shifts the keyboard for input of one alpha-character that is opposite that of the current keyboard setting (upper-case or lower-case). • Shifts the keyboard for input of punctuation symbols marked on the number keys. • The indicator \(\text{SHIFT}\) indicates that the keyboard is shifted. • SHIFT \(\triangleleft\) makes the cursor jump to the next newline mark or block mark to the left. • SHIFT \(\triangleright\) makes the cursor jump to the next newline mark or block mark to the right. |
| SIZE | Size | • Displays a menu of character sizes. |
| SPACE | Space | • Inserts a space in text. |
| STYLE | Style | • Displays a menu of character styles (normal, outline, shadow, raised). |
| SYMBOL | Symbol | • Displays a menu of symbols. |
| ▲ | Up | • Moves highlighting in a menu up. |
Troubleshooting
| Problem | Possible Cause | Action | |
| Power | ·No display when power is switched on | ·Wrong contrast setting | ·Use contrast dial to adjust contrast. |
| ·Dead batteries | ·Change batteries. | ||
| ·Batteries not loaded correctly. | ·Load batteries correctly. | ||
| ·Adaptor not connected correctly. | ·Plug in the AC adaptor correctly. | ||
| Input | ·Cannot input characters. | ·FUNC was pressed, and unit is waiting for pressing of next key. | ·Press ESC to clear function indicator from display. |
| Printing | ·No tape comes out when PRINT is pressed. | ·Tape cartridge compartment cover is not closed securely. | ·Close the tape cartridge compartment cover securely. |
| ·Out of tape | ·Load a new tape cartridge. | ||
| ·Tape is jammed. | ·Remove the tape cartridge, pull out the jammed tape with your fingers, and cut it off. Avoid touching the tape cutter, the tape outlet, and the tape itself while printing is in progress. | ||
| ·Low battery power | ·Change batteries. | ||
| ·Tape comes out, but nothing is printed. | ·Only blank spaces are input. | ·Input other text. | |
| ·Printing is not clear. | ·Low battery power | ·Change batteries. | |
| ·Printing density is not set correctly. | ·Adjust the printing density. | ||
| ·The tape cartridge is not loaded correctly. | ·Load the tape cartridge correctly. | ||
| ·Printer head or roller is dirty. | ·Clean the printer head and roller. | ||
| ·Ink ribbon comes out with tape. | ·The tape cartridge was loaded with too much slack in the ink ribbon. | ·Remove the tape cartridge and take up any slack, taking care not to break the ribbon. Reload the tape cartridge. If the ink ribbon breaks, load a new tape cartridge. | |
| Tape Cutter | · Tape does not cut. | · Tape cutter is dull or damaged. | · Take your Label Printer to an authorized CASIO service provider to have the cutter replaced. |
| · Text is cut off. | · Auto Feed is switched off. | · Press FUNC FEED to feed tape before cutting it. | |
| · End of tape | · Load a new tape cartridge. | ||
| Tape Adhesion | · Tape does not stick. | · Paper backing is still in place. | · Remove paper backing from tape. |
| · Bad surface | · Tape will not stick on coarse, wet, oily, or soiled surfaces. |
Messages
| Message | Meaning | Action |
| NO DATA! | There is no data stored in memory. | Store some data before trying to perform this operation. |
| NOT ENOUGH MEMORY! | There is not enough unused memory to perform the operation. | Reduce the size of the data you are trying to store or delete data already stored to make room for the new data. |
| NOW PRINTING | Printer is performing printing operation. | Wait for printing operation to end. |
| NOW PRINTING CUT THEN [SET]! | Printing is paused for a tape cut operation. | Cut the tape and then press SET to resume printing. |
| SAME NAME ALREADY USED! | The name you are using when storing data in memory is already used. | Use a different name or delete the data in memory this is under the same name. |
| TEXT DOES NOT FIT! | Text is too long to fit in the specified tape length. | Reduce the size of the characters or shorten the text. |
| TOO MANY LINES! | Text has too many lines to fit on tape. | Reduce the number of lines. |
| TOO MANY LINES TO FRAME! | Text has too many line to fit into a frame. | Reduce line number of lines. |
| WHERE? | Unit is asking for the starting point of the operation you are performing. | Use ▲ and ▲ to move the cursor to the starting point and press SET to specify it. |
| CANNOT COMBINE! | Previously input text cannot be combined with new input text. | Perform the operation and input new text. |
| CANNOT USE 6mm | Current operation cannot be performed using 6mm tape. | Change to a different tape size. |
| CLEAR INPUT TEXT! | The operation you have selected will clear the text you previously input. | Proceed with the opera-tion (and clear the text), or press ESC to abort without clearing anything. |
| DATA ERROR! RESET! | Memory data has become corrupted for some reason. | Reset the unit. Note that the reset operation deletes all data in memory. |
| INITIAL? | Memory initialization is required. | Initialize memory. |
| INPUT TEXT! | Unit is requesting input of text. | Input the text you want to print. |
| LOW BATTERY | Battery power is low. | Replace batteries or use AC adapter. |
| MEMORY FULL! | Memory is full and data cannot be stored. | Delete data you no longer need and make room for new data. |
| OUT OF FORMAT RANGE! | Input text exceeds the range of the selected format. | Shorten text or use a different format. |
| ERROR! | 1. The number of lines in the input text is greater than the number of lines in the format being specified. 2. There is a character size indicator inside the text for which a format is being specified. | 1. Reduce the number of lines in the text or use a different format. 2. Delete the character size indicator from the text before specifying a format. |
Initial Settings
There are two types of initial settings: those that are set automatically each time you switch power on, and those that are set whenever you reset Label Printer memory. The following table shows the initial settings in each case.
| Item | Power On | Reset |
| Display | Cleared* | Cleared |
| Memory | Retained | Cleared |
| Horz/Vert | Horz | Horz |
| Pitch | None | None |
| Side Space | Yes | Yes |
| Block Spacing | Narrow | Narrow |
| Insert/Overwrite | Insert | Insert |
| Density | Retained | 3 |
| Sound | On | On |
| Character Attributes | None | None |
| Style | Normal | Normal |
| Form | Normal | Normal |
| Auto Feed | Long | Long |
| Font | Serif | Serif |
| Character Size | Auto Fit | Auto Fit |
| Language | Retained | English |
| Length Unit | Retained | cm |
- Display is cleared, but last input data is retained in memory. To recall last input data, press SET.
Symbols, Illustrations and Frames
- Symbols
$$ , \therefore ; ^ {\prime \prime} ^ {\prime \prime} ^ {\prime \prime}?! i (.) [ ] {} \langle) \langle \rangle / \backslash - _ {-} $$
$$ \sim \cdot , \mathbb {9} \mathbb {S} \varphi \text {£ F r} \mathbb {Y} # \& * @ \mathbb {S} o z. l b. i n. f t. ^ {\circ} F $$
$$ ^ {\circ} \mathrm {C} ^ {\circ} f \quad \varrho^ {\mathrm {T M}} \quad \text {⑥} = \varphi \pm / . \% \% + - x \pm $$
$$ \pm = < > \div \rightarrow \leftarrow \uparrow \downarrow \rightarrow \leftarrow \uparrow \downarrow \swarrow \nearrow $$
- Illustrations
$$ \text {韩 国} \triangle \mathrm {袋} \triangle \mathrm {B} \oplus \text {国 王 欧 木} \text {方} \cdot \text {欢} $$
$$ \text {要}? \quad \text {心} \quad \text {心} \quad \text {心} \quad \text {心} \quad \text {心} \quad \text {心} \quad \text {心} \quad \text {心} \quad \text {心} \quad \text {心} \quad \text {心} \quad \text {心} $$
- When the contents of a label indicates "Illust", we recommend that only one illustration be input.
Application Examples
The following are a number of sample label layouts, along with information about how you can produce them.
A PRESENT FOR YOU?
- ILLUST (Select) SET
- BLOCK (block)
- CAPS (CAPS Mode) SIZE ▲▼ (select “1 × 2”) SET SET SET
- A SPACE PRESENT FORSPACEYOU
- ILLUST (Select) SET
- EFFECT ▲▼ (Select “BOX”) SET “FROM?” ▲▶ (Move cursor to “A”) SET “TO?” (Move cursor to the after “YOU”) SET
- (Move cursor to end of text) BLOCK
- ILLUST (Select SET
DIANA'S BIRTHDAY PARTY DIANA'S HOUSE JUNE 14, 1995
- PRESET ▲▼ (Select "LAYOUT") SET
- PRESET ▲▼ (Select“VIDEO”) SET
3.▲▼ (Select "VHS") SET - (Select "1") SET
- CAPS (CAPS Mode)
- DI AN A SYMBOL (Select “SYMBOLS”) SET ▶ (Select “”) SET S SPACE BIRTHDAY SPACE PARTY SET
- DI AN A SYMBOL (Select “SYMBOLS”) SET (Select “”) SET S SPACE H O U S E S E T
- J U N E SP A C E 1 4 S Y B O L (Select "SYMBOLS") SET (Select " · ," SET SPACE 1 9 9 5 SET
- DEL (Delete previous illustration)
- ILLUST (Select SET
- DEL (Delete previous illustration)
12.ILLUST (Select) SET SET - DEL (Delete previous illustration)
- ILLUST Select SET SET
15.▲▼(Select“PRINT”)SET(Photos)SET
Specifications
Model: KL-7000
Input
Keyboard Layout: Typewriter (QWERTY)
Character Types
Alpha (English and other languages): 151
Numbers: 10
Symbols: 153
Illustrations: 50
Display
Type: 48 × 32 -dot liquid crystal display
Number of columns: 6
Character matrix: 16 × 8 -dot
Printing
Type: 64-dot thermal transfer
Speed: Approximately 6.76mm/second
Width: 4mm (6mm tape) or 8mm (other tape)
Character Matrix: 24 × 24 -dot (normal); 16 × 16 -dot (s)
Character fonts: Serif, sans-serif
Character styles: Normal, outline, shadow, raised
Character effects: Shade, underline, box
Character sizes: 1 × 1, 1 × 2, 1 × 3, 2 × 1, 2 × 2, 2 × 3, L2 × 3, S1 × 1, S1 × 2, S1 × 3, S2 × 1, S2 × 2, S2 × 3
Character pitch: None (0mm), Narrow (0.5mm), Wide (1.0mm)
Number of lines: 1 or 2 (6mm tape); 1 to 4 (other tapes)
Memory
Text: Up to approximately 326 characters
General
Main power supply: Eight AA-size batteries (battery life = approximately 2 tape cartridges (continuous printing)) or optional AD-A95100 AC adaptor
Memory back-up battery: One CR2032 lithium battery (battery life = approximately one year)
Power consumption: 9W
Auto Power Off: Approximately six minutes after last key operation.
Dimensions: 48.8H× 174W× 224.8mmD
$$ \left(2 ^ {\prime \prime} H \times 6 ^ {7 / 8} ^ {\prime \prime} W \times 8 ^ {7 / 8} ^ {\prime \prime} D\right) $$
Weight: 513 g (1.1 lbs) (excluding batteries)
Ambient Temperature: 10^ 35^ ( 50^ 95^ )
CASIO®
CASIO COMPUTER CO., LTD.
6-2, Hon-machi 1-chome Shibuya-ku, Tokyo 151-8543, Japan
- Important!
- Contents
- Part 1 Getting Acquainted 4
- Part 2 Getting Ready 9
- Part 3 Inputting Characters, Symbols, and Illustrations 18
- Part 4 Deleting and Inserting Characters 23
- Part 5 Character Attributes and Text Effects 27
- Part 6 FORM Menu Functions 37
- Part 7 Quick Formats 48
- Part 8 Presets. 51
- Part 9 Printing 58
- Part 10 Memory 62
- Part 11 Reference 65
- Part 1
- Getting Acquainted
- Important Precautions
- General Guide
- Front
- Bottom
- Label Printer Menus
- Part 2
- Getting Ready
- Power Supply
- Replacing Batteries
- Warning!
- To replace the memory back-up battery
- To replace the main batteries
- AC Adaptor
- To connect the AC adaptor
- Switching Power On and Off
- Resetting the Memory
- To reset the memory
- Power On Recall Function
- Auto Power Off Function
- Tape Cartridges
- To load a tape cartridge
- To specify the tape width
- Display Contrast
- Sound Effects
- To cancel sound effects when switching power on
- To switch sound effects on and off
- Setting the message language
- To set the message language
- Setting the unit of measurement
- Demo Print
- To produce a demo print using tape other than 6mm
- To produce a demo print using 6mm tape
- Part 3
- Inputting Characters, Symbols, and Illustrations
- Display Symbols and Indicators
- - Function indicator
- - Shift indicator
- Code indicator
- Vertical printing indicator
- - Mirror image printing indicator
- Overwrite mode indicator
- - Caps mode indicator
- Confirmation message
- - Cursor key operation indicators
- - Style indicators
- - Sans-serif indicator
- - Manual feed indicator
- - 6mm tape indicator
- - Format imager
- - Cursor
- - Character size indicator
- - Tape length
- - Character position marks
- Basic Alpha-Numeric Input
- Note
- To input alpha-numeric characters
- About the CODE key...
- To input illustrations
- Part 4
- Deleting and Inserting Characters
- Moving the Cursor
- To move the cursor
- Deleting Individual Characters
- To delete characters using the BS key
- To delete characters using the DEL key
- Deleting a Series of Characters
- To delete a series of characters
- Using the CLS Function
- To clear all text from the display
- To clear specific text
- Overwrite and Insert
- Overwrite
- Insert
- To switch between overwrite and insert
- Part 5
- Character Attributes and Text Effects
- Specifying Character Attributes
- - Before you input any characters
- After inputting some characters
- After you finish inputting text
- To specify attributes before inputting characters
- To change attributes in the middle of text
- To change attributes or effects of existing text
- Changing Fonts
- How to tell the current font settings
- To change the font setting
- Changing Character Styles
- How to tell the current style settings
- To change the style setting
- Changing Character Size
- About Auto Fit
- About the FIT mark
- How to tell the current size settings
- To change the characters size
- Notes
- Assigning Text Effects
- Changing Text Effects
- To assign text effects
- To remove text effects
- Part 6
- FORM Menu Functions
- Fundamentals of Label Layout
- Blocks
- - Print Area
- - Side Spaces
- Manual Feed
- ABXYZ
- Label Length
- Creating and Deleting Blocks
- To create a block
- To delete a block mark
- Character Pitch
- To specify the character pitch
- LENGTH
- Block Length
- To specify a block length
- To cancel block length settings
- Tape Length
- VHS
- - 8mm
- CASSETTE
- FLOPPY
- FREE
- - CANCEL
- To select a preset tape length
- To specify your own tape length
- To cancel a tape length setting
- Auto Feed
- - Auto Feed (LONG)
- - Auto Feed (SHORT)
- - Manual Feed (M-FEED)
- To select a feed option
- Block Spacing
- To specify the block spacing
- To specify vertical printing
- Mirror Image
- To specify mirror image
- Text Alignment
- To specify text alignment
- Justification
- To switch justification on and off
- Part 7
- Quick Formats
- To select a quick format
- To cancel a quick format
- Part 8
- Presets
- Using the presets menu
- Preset (Auto) Layouts
- To use a preset layout to create a label
- To print a label made with a preset layout
- To store a preset layout label in memory
- To recall a preset layout label from memory
- To delete a preset layout label from memory
- Preset Phrases
- To print a preset phrases
- Numbering
- To print a numbered series
- Part 9
- Printing
- Printing Precautions
- Printing a Tape
- To print a tape
- To show the image display
- To show the layout display
- To feed tape
- To adjust the print density
- Frame Printing
- To add a frame around the outside of the printing area
- Part 10
- Memory
- Storing Data
- To store data into memory
- Recalling Data
- Deleting Text
- To delete text from memory
- Part 11
- Reference
- Cleaning the Printer Head and Roller
- To clean the printer head and roller
- Resetting
- Initial Settings
- Symbols, Illustrations and Frames
- - Symbols
- - Illustrations
- Application Examples
- A PRESENT FOR YOU?
- DIANA'S BIRTHDAY PARTY DIANA'S HOUSE JUNE 14, 1995
- Specifications
- Input
- Character Types
- Display
- General
- CASIO®
Brand : CASIO
Model : KL-7000
Category : Labeler