
GO 2700 KUB - Camcorder Trevi - Free user manual and instructions
Find the device manual for free GO 2700 KUB Trevi in PDF.


| Product Type | Camcorder |
| Brand | Trevi |
| Model | GO 2700 KUB |
| Video Resolution | Full HD 1080p (1920x1080) at 30fps |
| Photo Resolution | Up to 12MP (interpolated) |
| Image Sensor | CMOS |
| Lens | Fixed focus, auto focus |
| Digital Zoom | 5x |
| Display | 2.7" LCD screen |
| Storage Media | SD/SDHC memory card (up to 32GB, not included) |
| Video Format | AVI |
| Photo Format | JPEG |
| Battery Type | Rechargeable Li-ion (3.7V 900mAh) |
| Power Supply | 5V DC via USB or AC adapter (included) |
| Connectivity | USB 2.0, AV out, mini HDMI |
| Dimensions (W x H x D) | Approx. 100 x 60 x 40 mm |
| Weight | Approx. 200 g (with battery) |
| Functions | Video recording, still photo, playback, webcam mode |
| Care & Cleaning | Clean lens with soft, dry cloth; avoid moisture and dust |
| Safety Precautions | Keep away from water, extreme temperatures, and strong magnetic fields |
| Spare Parts Availability | Battery, charger, USB cable, AV cable available from Trevi support |
| General Information | Supports tripod mount (1/4") and remote control (optional) |
Frequently Asked Questions - GO 2700 KUB Trevi
User questions about GO 2700 KUB Trevi
0 question about this device. Answer the ones you know or ask your own.
Ask a new question about this device
Download the instructions for your Camcorder in PDF format for free! Find your manual GO 2700 KUB - Trevi and take your electronic device back in hand. On this page are published all the documents necessary for the use of your device. GO 2700 KUB by Trevi.
USER MANUAL GO 2700 KUB Trevi
User's Manual
English
Foreword
Thank you for purchasing our WIFI DV. Before use, please carefully read this User's Manual for best performance and longer service life of this product, and properly keep this manual for future reference.
This manual covers the latest information while it was prepared. The displays and pictures used in this manual are for better understanding of the operation of the product. Due to technical reasons and different production batches, the DV you receive may be different from how it is described herein.
System requirement
Before using and operating your DV, please know the minimum system requirement to operate it and we strongly recommend you to use a better PC to operate the product for best performance of the DV. The minimum system requirement to operate the product is as below:
| System Requirements | |
| Operating System | Microsoft system:Microsoft Window 2000, XP, Vista, 7, 8Apple system: Mac OS X ver: 10.0.0 or above version |
| CPU | Intel Pentium of more than 1GB Hz or other CPU with equivalent performance |
| Internal Memory Large | ger than 1GB |
| Sound Card and Display Card | The sound card and video card shall support DirectX8 or higher version. |
| CD Driver Speed of | 4 times or faster |
| Hard Disk Free space | of more than 2GB |
| Others USB1.1 or USB2.0 port | |
Features and functions
● Wifi, photo shooting, video recording, , Time lapse
● 1.45-inch color display
- 5m effective pixels
● Built-in 800mah Battery for power supply
- USB port + TF card slot
● G-SENSOR (Under Photo/Video mode, it can automatically rotate 180°)
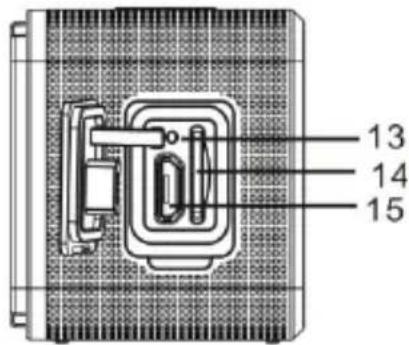
Appearance and buttons


-
1.45-inch color display
-
buzzer
-
Lens
-
Lens Glass Sheet
-
Loudspeaker
-
Charging Indicator (blue)
-
Shutter button
-
Busy indicator (indic. for
video/photo mode(red)
-
Power/Menu
-
WiFi/Selection
-
WiFi Indicator (red)
-
Dust Cover
-
Reset
-
TF Card Slot (Insert TF Card)
-
Micro-USB port (connecting PC)
I. Using your WiFi DV for the first time
- Insert a micro SD or a micro SDHC card first, see right picture

High speed card of Class 6 or above is recommended. When using professional video mode, Class 10 is required.
Turn off your DV before inserting/removing card.
- Power on/off
Power on: press the button and hold for 3 seconds, The Video indicator lights in red (Video mode by default after power-on)
Power off: press the ⏻ button and hold for 3 seconds, the buzzer will beep once.
3. Charging battery
Built-in lithium battery is applied to this device. While power-off, connect the DV to the PC by a USB cable to charge the battery; while charging, the charging indicator will remain on. It takes about 3 to 4 hours to fully charge the battery, and the indicator will go off when charging completes.
Remark: blue lamp while charging, red lamp while working and in wifi mode;
4. Function mode switch
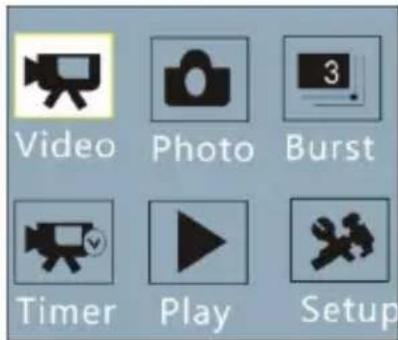
6 modes are available for this camera including Video Recording, Photo, Continuous Shooting, Timelaps, Playback and Setting. Start up the camera, and press Power button to enter Mode interface; please press WIFI button to select a mode, and then press Shutter button to confirm; then it will enter the mode you've chosen, and the chosen mode will be displayed with background color; (as shown below)
5. Mode Preview
Start it up, and the camera will directly enter Video Recording mode; under preview mode, press Shutter button to conduct video recording; press Shutter button again, it will stop shooting; if the memory card is full or the battery is low, it will automatically stop shooting also:
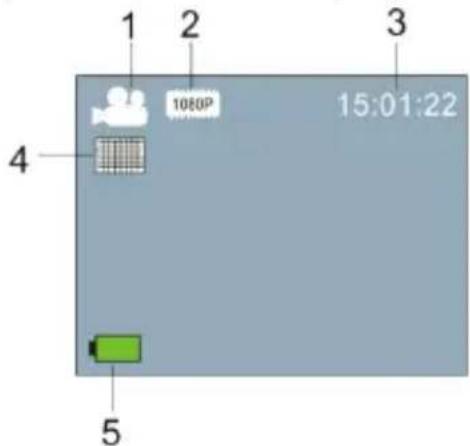
Video mode
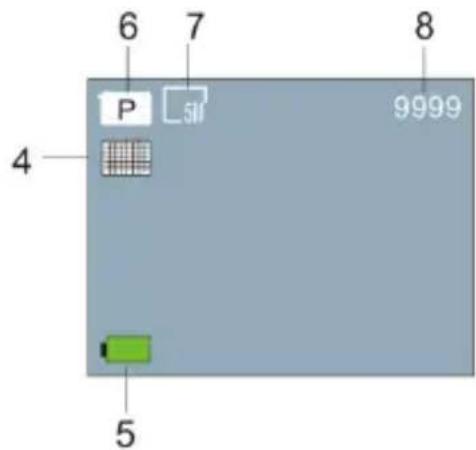
Photo mode
| No. Icon | Name Description | |
| 1 | Video mode | It is under Video mode |
| 2 | Video resolution | Current Resolution: 1920x1080 30 frame; 1280x720 60 frame/30 frame are optional; |
| 3 | Recording Time It indicates the currently available recording time. | |
| 4 | Quality It indicates excellent current quality. | |
| 5 | Battery Icon It indicates current battery is full. | |
| 6 | Photo mode It is under Photo mode | |
| 7 | Photo size | Current photo size: 5M(2592X1944), 12M(4000X3000), 8M(3264X2448) and 3M(2048X1536) are optional. |
| 8 | Number of Photo | It indicates current number of photo can be taken. |
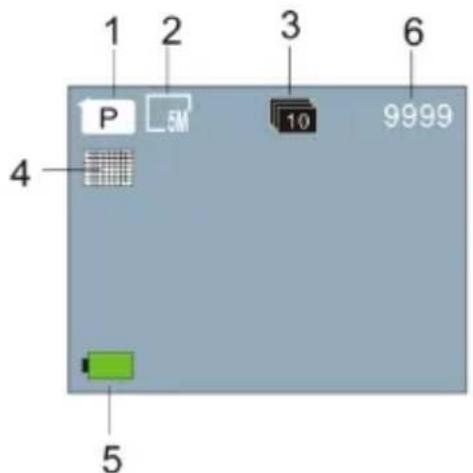
Continuous shooting mode

Timelaps mode
| No. | Icon Name Description | |
| 1 | Photo mode It is under Photo mode | |
| 2 | Photo size | Current photo size: p5M(2592X1944), 12M(4000X3000), 8M(3264X2448) and 3M(2048X1536) are optional. |
| 3 | Continuous Shooting 10 photos can be shot continuously; 3/5 photos are optional. | |
| 4 | Quality It indicates excellent current quality. | |
| 5 | Battery icon | It indicates current battery is full. |
| 6 | Number of Photo It indicates current number of photo can be taken. | |
| 7 | Video mode | It is under Video mode |
| 8 | Video resolution | Current resolution: 1920x1080 30 frame; 1280x720 60 frame/30frame are optional. |
| 9 | Recording time It indicates the currently available recording time. | |
| 10 | Time laps icon | It is under Time laps mode for recording. |
6 Playback mode:
6.1 Start it up to enter Video Recording mode; then press Power button for mode selection; press WIFI button to select playback mode, and press Shutter button to enter; (as shown below):

Playback mode
6.2 Photo Example
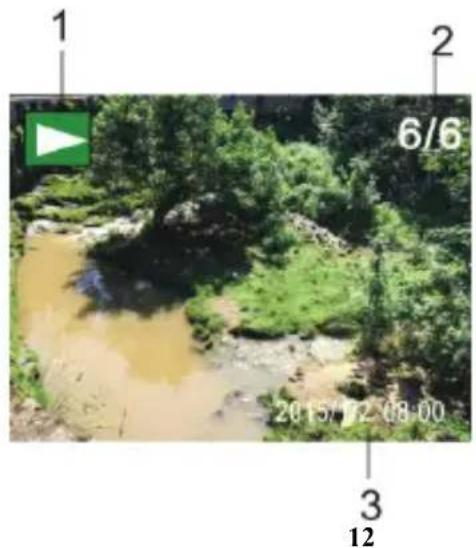
- Playback Mode Icon
- Current File Number/Total Files
- The date of photo
6.3 Frames under Playback Mode Introduction:
6.3.1 Frames of Video Recording File

- Playback mode icon
- The date for video recording
- Current File Number/Total Files
- Playback Timer
- Operation Indicator Icon (Press Power Button to stop)
- Operation Indicator Icon (Press Shutter button for Pause)
Note: Under playback mode, press WIFI button to select other photos/video recording files to realize loop selection.
6.4 Playback Mode Menu Setting
Quit from Playback mode, and press Power button to enable the mode interface; select Setting mode, and press Shutter button to enter Menu; then press WIFI button to select Menu; press Shutter button again to enter Sub-menu; the chosen Item in the Menu will be displayed with background color; press WiFi button again to select the secondary sub-menu and press Shutter button for confirmation; press Power button to quit from Menu setting.

7. Menu Setting
Under Video Recording/Photo and Timelaps mode, press Power button to enable the mode interface; select a
mode you need to set, and press Shutter button to enable the Menu; then, press WiFi button to select Menu, and press Shutter button to enter Sub-menu; the chosen item in the Menu will be displayed with background color; press WiFi button again to select secondary sub-men, and press Shutter button for confirmation; press Power button to quit from Menu Setting.

15
5. Watch remote control:
- Buttons on watch remote control:
Buttons on the remote control are shown in the picture below
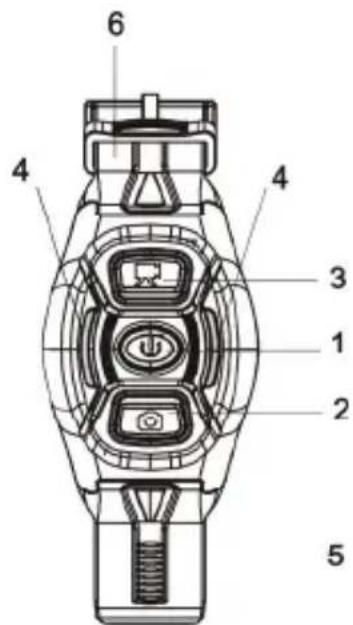
- Power button
- Photo button
- Video button
- Button indicator (red)
- Strap
-
Buckle
-
Using the remote control:
The watch remote control allows you to power on/off the DV and to take photo or video at 30M away without
operating on DV directly; just press a button to achieve the said functions.
Remark: press any button the two indicator lamps at both sides will light in red at the same time.
- Power on/off the DV by remote control
Power on: press and hold the 📄 button until the indicator goes off, the DV will turn on and the buzzer will beep once.
Power off: press and hold the button, the DV will turn off and the buzzer will beep once.
- Changing battery of the remote control:
You need to change the battery of the remote control when the battery level is low. Open the battery cover carefully with a coin and avoid scratching the surface.
To change the battery, put a coin in the slot at the center of the battery cover and unscrew the cover according to the direction marked on it, replace the old battery with the new one (pay attention to the +/-), then cover and screw the cover.

APP (support Android and iOS)
I. Installing the APP
- For Android, search for "SYMAGIX2" at Play Store and install the APP according to the
prompt; or scan the QR code 📁 on the package to install.
- For iOS, search for "SYMAGIX2" at APP Store and install the APP according to the prompt;
or scan the QR code on the package to install.
II. Android APP
- Install SYMAGIX2 APP (obtained from your vendor or internet) on your Android smart phone
or tablet, the icon will display on the screen;
- Insert card and power on the DV, press the Wi-Fi button to enable Wi-Fi, the Wi-Fi indicator
will flash, and then remain on after successful connection;
-
Enable Wi-Fi on your phone or tablet, search for wireless AP name WDV800 and connect, the system will display when connection successes;
-
Click the APP icon on your phone or tablet, you can see the preview picture (see picture below) of the DV on your phone or tablet, then you can operate the DV.
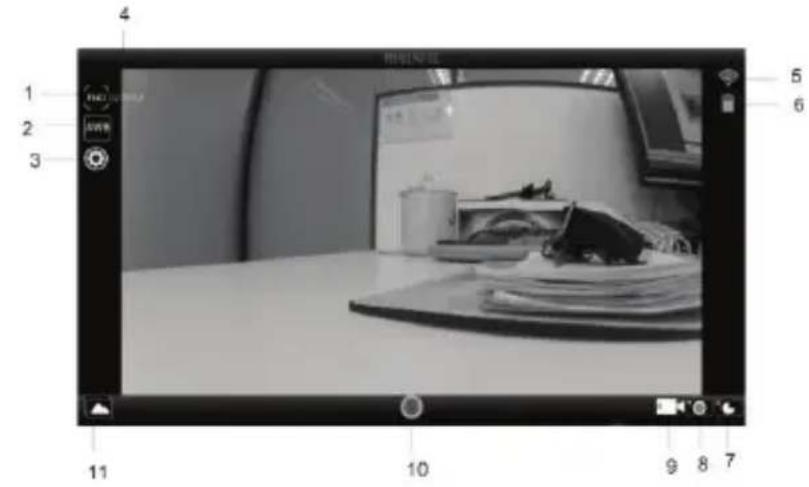
-
Video resolution
-
White balance
-
Setting (enter setting menu)
-
Rest recording time
-
WIFI signal icon
-
Battery level of the DV
-
Timelaps mode
8.. Photo mode
-
Video mode
-
Video button
-
Enter playback mode
III. iOS APP
- Install SYMAGIX2 APP (obtained from your vendor or internet) on your iPhone or iPad, the
icon will display on the screen;
- Insert card and power on the DV, press the Wi-Fi button to enable Wi-Fi, the Wi-Fi indicator will flash, and then remain on after successful connection;
- Enable Wi-Fi on your iPhone or iPad, search for wireless AP name WDV800 and connect, the system will display when connection successes;
Remark: for first use, please enter password: 1234567890.
- Click the APP icon 📋 on your iPhone or iPad, you can see the preview picture (see picture below) of the DV on your phone or tablet, then you can operate the DV.
5.
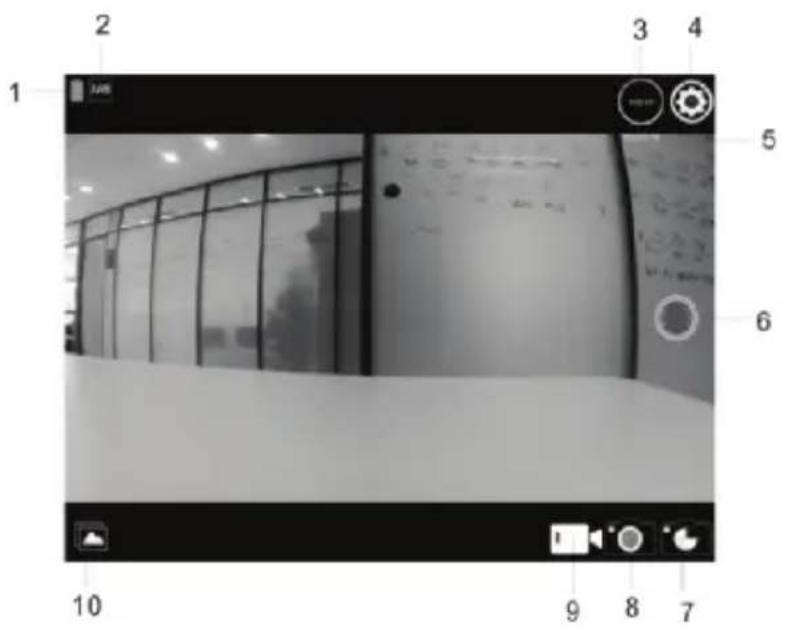
- Battery level of the DV
- White balance
- Video resolution
- Setting (enter setting menu)
- Rest recording time
- Video button
- Timelaps mode
- Photo mode
- Video mode
- Playback mode
Note:
- You need to insert a TF card into the DV to take or download picture via your phone or tablet;
- After successful connection between your phone/tablet and the DV, the Wi-Fi indicator will remain on.
Application on PC
The DV supports plug-and-play function. After power on, the mobile hard disk mode is activated automatically when the DV is connected to PC via USB cable.
The icon of the mobile hard disk will display in "My computer". The photos taken will be saved in I:\jpg folder (I is the volume label of your mobile hard disk which varies); the car files will be saved in I:\CAR folder.
Note: driver is not required to use mobile hard disk function on Windows 2000 or above.
Technical parameters
| Image sensor 5m pixels (CMOS) | ||
| Function mode | Video recording, photo taking, continuous shooting, time laps, Playback mode, Setting Mode | |
| Lens | F3.1 f=2.9mm | |
| Video resolution | FHD: 1920x1080(30fps)H: 1280x720 (60fps)、L: 1280x720 (30fps) | |
| Wifi Standard 802.11 b/g/n (2,4GHz) | ||
| Frequencies | 2412-2472MHz (802.11b/g/n HT20), 2422-2462MHz (802.11n HT40) | |
| File format | Video | H.264 (MOV) |
| Photo | JPG | |
| Storage TF card (up to 32GB) | ||
| USB port High speed USB 2.0/3.0 port | ||
| Power Supply Built-in lithium battery: 800mAh | ||
PRECAUTIONS FOR CORRECT DISPOSAL OF THE PRODUCT
The symbol shown on the equipment indicates that waste must be disposed of in “separate collection”
and so the product must not be disposed of together with urban waste. The user must take the product to special “separate waste collection centers” provided by local government, or deliver it to the retailer against the purchase of a new product. Separate collection of waste and subsequent treatment, recycling and disposal operations promotes the production of equipment with recycled materials and limits negative effects on the environment and on health caused by improper handling of waste. Illegal disposal of the product leads to the enforcement of administrative penalties.
WARNING FOR A CORRECT USE OF RECHARGEABLE BATTERY
- Recharge the battery in an ambient temperature between 5° C and 35° C.
- When the recharge is complete the device shows a message/signal (check the user's guide).
- Don't recharge more than the suitable period to prevent the risk of overheating and burst.
- Recharging the battery over the suitable period or an extended period of inactivity may reduce battery duration.
- Rechargeable battery is liable to wear and tear and its performance will reduce gradually.
- To extend the duration of the battery use it when is completely charged up to the complete discharging, then recharge it fully before use it again. Recharge a battery not completely consumed, will result a reduced duration.
In this case, repeat the full charging/discharging cycle many times.
- Avoid recharge the battery for the whole night.
INFORMATION NOTE ON THE REMOVAL AND DISPOSAL OF BATTERIES
Warning: Only high-qualified personnel should perform this operation!
BATTERY REMOVAL
The appliance should not be plugged to the mains socket when performing this operation!
1) Remove the screws holding the cabinet;
2) Select the battery;
3) Disconnect and remove the battery.
Used batteries should not be disposed of with household waste or thrown into fire or water. Used batteries should be recycled or disposed of in separate waste collection centers.
Simplified EU Declaration Of Conformity
Hereby Trevi Spa declares that the camcorder equipment GO 2700 KUB is in compliance with Directive 2014/53/EU. The full text of the EU declaration of conformity is available at the following internet address www.trevi.it

For additional information and updates of this product see: www.trevi.it


- USER'S MANUAL
- ENGLISH
- FOREWORD
- SYSTEM REQUIREMENT
- FEATURES AND FUNCTIONS
- APPEARANCE AND BUTTONS
- CHARGING BATTERY
- FUNCTION MODE SWITCH
- MODE PREVIEW
- 6 PLAYBACK MODE
- 6.2 PHOTO EXAMPLE
- 6.3 FRAMES UNDER PLAYBACK MODE INTRODUCTION
- 6.3.1 FRAMES OF VIDEO RECORDING FILE
- 6.4 PLAYBACK MODE MENU SETTING
- MENU SETTING
- WATCH REMOTE CONTROL
- APP (SUPPORT ANDROID AND IOS)
- IOS APP
- NOTE
- APPLICATION ON PC
- PRECAUTIONS FOR CORRECT DISPOSAL OF THE PRODUCT
- WARNING FOR A CORRECT USE OF RECHARGEABLE BATTERY
- INFORMATION NOTE ON THE REMOVAL AND DISPOSAL OF BATTERIES
- SIMPLIFIED EU DECLARATION OF CONFORMITY
Brand : Trevi
Model : GO 2700 KUB
Category : Camcorder