
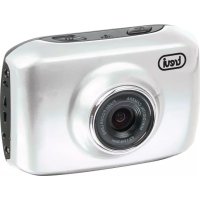
Go 2000 WiFi - Camcorder Trevi - Free user manual and instructions
Find the device manual for free Go 2000 WiFi Trevi in PDF.


| Product Type | Camcorder |
| Brand | Trevi |
| Model | Go 2000 WiFi |
| Dimensions (approx.) | 120 x 60 x 40 mm |
| Weight (approx.) | 250 g (including battery) |
| Power Source | Rechargeable lithium-ion battery (3.7V, 1500 mAh) or USB power |
| Recording Media | microSD card (up to 128 GB, not included) |
| Video Resolution | Full HD 1080p at 30 fps |
| Photo Resolution | 20 MP (interpolated) |
| Display | 2.0 inch LCD screen |
| Lens Aperture | F/2.8 |
| Digital Zoom | 4x |
| WiFi Connectivity | IEEE 802.11 b/g/n (2.4 GHz) |
| Night Vision | Infrared LEDs for low-light recording |
| Water Resistance | Not waterproof (use in dry conditions) |
| Battery Life | Up to 2 hours of continuous recording |
| Main Functions | Video recording, photo capture, playback, WiFi streaming, motion detection |
| Care and Cleaning | Wipe with a soft, dry cloth; avoid solvents; keep lens clean |
| Safety Precautions | Do not disassemble; avoid extreme temperatures; use only supplied charger |
| Spare Parts and Reparability | Contact Trevi support; battery is replaceable; lens is non-serviceable |
Frequently Asked Questions - Go 2000 WiFi Trevi
User questions about Go 2000 WiFi Trevi
0 question about this device. Answer the ones you know or ask your own.
Ask a new question about this device
Download the instructions for your Camcorder in PDF format for free! Find your manual Go 2000 WiFi - Trevi and take your electronic device back in hand. On this page are published all the documents necessary for the use of your device. Go 2000 WiFi by Trevi.
USER MANUAL Go 2000 WiFi Trevi
English
Thank you for purchasing this Wi-Fi camera. Before using the camera, please read this manual carefully to maximize its performance.
Special notices about the waterproof case
Before sealing the waterproof case, keep the camera housing's rubber seal clean. A single hair or grain of sand can cause leaking. You can test it by closing the case without inserting the camera. Submerse the case completely in water for about one minute. Remove the case from the water, dry off its exterior with a towel, and then open the case. If the interior is dry, the case is safe for use under water.
◆ After use in salt water you will need to rinse the case appearance parts with fresh water and dry it. This will prevent corrosion of the hinge pin, which can cause failure.
◆ To clean the seal, rinse in fresh water and wind dry (drying with a cloth may cause lint to compromise the seal). Re-install the seal into the grooves in the backdoor of the housing.
Appearance and buttons
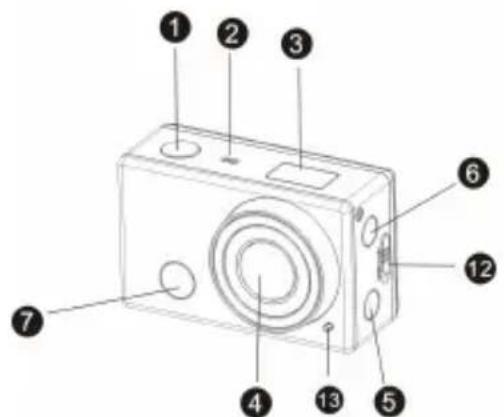
- Shutter button
- Built-in microphone
- Status LCD
- Lens
- Wi-Fi button and Wi-Fi status indicator
- Power / Mode button
- Infrared signal reception light

- Micro USB port
- Mini HDMI port
- microSD card slot
- External microphone port
- Battery cover switch
- Status LED
Status LCD Icons


- Camera mode
- Video recording mode
- Wi-Fi icon (displayed when enabled)
-
microSD card icon (displayed when card inserted)
-
Photo resolution / video size icon:
(a) In camera mode, HI stands for 8 Mega Pixels, and in video recording mode, it stands for FHD (1920x1080, 30fps).
(b) In camera mode, LO stands for 5 Mega Pixels, and in video recording mode, it stands for HD (1280x720, 30fps).
(c) HILO only displays in video recording mode which stands for 1280x720, 60fps.
-
Mute mode: Displays when enabled.
-
Photo counter: Displays up to 999.
-
Video recording timer: Displays hours and minutes.
-
Battery power status icon: Displays the current battery power level.
Introduction of working modes
There are four modes as in the following chart. Continuous shooting mode and self-timer mode are to be controlled by the cell phone.
 | Video recording mode | HI stands for FHD (1920x1080, 30 fps) video |
| LO stands for HD (1280x720, 30 fps) video | ||
| HILO stands for 1280x720, 60 fps video | ||
 | Photo mode | HI stands for 8M resolution |
| LO stands for 5M resolution | ||
 | Continuous shooting mode | 3 photos continuously (only via APP) |
 | Self-timer mode | Shutter delay for 0s, 2s or 10s (only via APP) |
Video recording mode and photo mode flow chart
After the camera is turned on, you can short press the Power/Mode button to switch between modes by the following order.
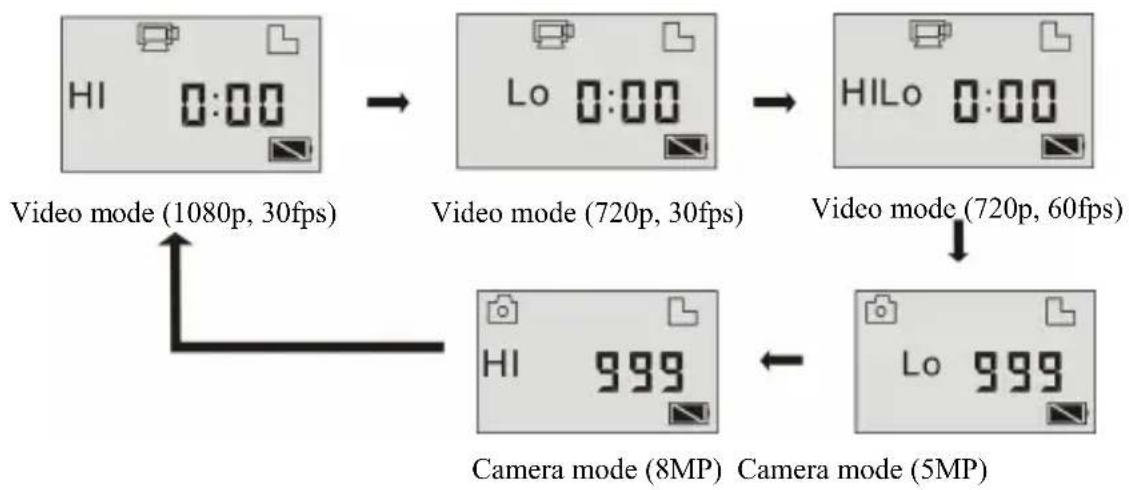
flowchart
graph TD
    A["Video mode (1080p, 30fps)"] --> B["Video mode (720p, 30fps)"]
    B --> C["Video mode (720p, 60fps)"]
    C --> D["Camera mode (8MP)"]
    D --> E["Camera mode (5MP)"]
Preparation
- Insert a microSD or microSDHC card.

- Please use memory cards with speeds faster than Class 4.
- The camera supports memory cards up to 32GB.
- Please make sure the memory card is inserted by correction direction.
- Make sure the cameras is off when inserting or removing the memory card.
-
To remove the memory card, press down the memory card and the memory card will pop up.
-
Battery
2.1 Install the battery
First please make sure that the camera is off when inserting or removing the battery.

flowchart
graph LR
    A["Step 1"] --> B["Step 2"]
    B --> C["Step 3"]
    C --> D["Step 4"]
Step 1: Slide up the battery cover switch ( ) to open the battery cover.
Step 2 & Step 3: Insert the lithium battery into the battery compartment. Make sure the contacts of the battery are
corresponding to the symbols on the camera body ( ).
Step 4: Place back the battery cover.
2.2 Charging the battery
(a) Make sure that the camera is switched off (If the camera is being switched on, the battery will not be charged).
(b) Connect the camera with the PC via the USB cable to start battery charging. The charger indicator will be lit in blue color while charging and will go off when charging is completed.
Turn on/off the camera
- Turn on the camera: Long press the ⏻ button for about 3 seconds until the status LCD displays “ON” and a beep sound is heard.

natural_image
Diagram of a digital camera with an input button and power button, connected to a screen (no text or symbols present)9
- Turn off the camera: Long press the button for about 3 seconds until the status LCD displays "OFF" and a beep sound is heard.
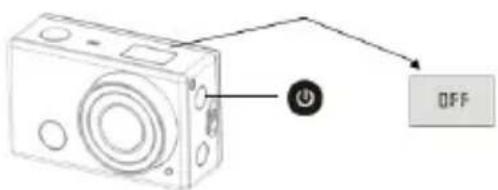
Note: The camera will be automatically shut down to save power after the camera is being idle for 5 minutes.
Start to Use
1. Video recording mode

To record a video, make sure the camera is under video recording mode which the icon is displayed on the status LCD. If not, short press the button repeatedly until the icon appears.
Start recording: Press the button, the icon and the [ : ] displayed on the LCD will flash. At the same time the red indicator flashes which indicates that the recording is in process.
Stop recording: Press the 📄 button, the icon 📋 and the [ : ] displayed on the LCD will stop flashing. At the same time the red indicator will stop flashing which indicates that the recording is stopped.
Note:
When the microSD card is memory full or the battery is drained, the recording will stop automatically. The recorded video will be saved before the camera goes off.
2. Photo mode

To take a photo, make sure the camera is under photo mode which the

icon is displayed on the status
LCD. If not, short press the button repeatedly until the icon appears.

Press the button to take the photo. There will be a beep sound and the red indicator will flash when the photo is taken and under process.
3. Mute / activate sound
The sound is enabled by default. In the video recording mode or photo mode, long press the shutter button to
mute sound. The icon will be displayed on the status LCD when the sound is being muted. Long press the shutter button again will activate the sound.
4. Connecting to HD TV
4.1 Connect the camera to an HDTV via HDMI cable (not included)
If you wish to playback the saved photos and videos on an HD TV, connect the HDMI cable (Mini HDMI) between the camera and the HD TV. Thus the HD TV will be used as the display screen.
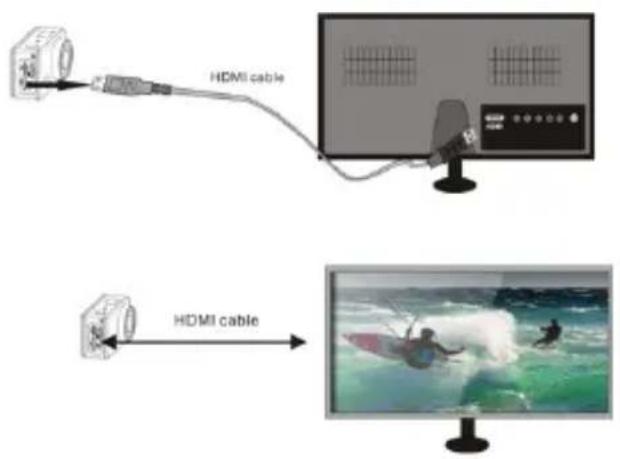
Note:
Before connecting or removing the HDMI cable, please stop video recording and disconnect the Wi-Fi connection.
In Playback mode, short press the power /mode button 🪟 to switch between photos and videos. When there are several photos or videos, press the Wi-Fi button 🪟 to select the desired photo or video. When a video clip is selected, press the shutter button 🪟 to start the playback and press the shutter button again to stop the playback.
4.2 When the camera is connected to a HDTV the status LCD will show the following:

| No. Item Description | ||
| 1 Playback mode | Camera is currently in Playback mode. | |
| 2 File number | There are 31 files and the current file is number. 19. | |
| 3 Video icon The current file is a video clip. | ||
In Playback mode, long press the shutter button

and a prompt for file deletion and memory formatting
will appear. Press the Wi-Fi button

to switch between file deleting and memory formatting. Press the
power button

to select YES or NO and press the shutter button

to confirm and exit.


5. Connecting to PC and using PC camera feature
5.1 Turn on the camera and connect it to PC by the USB cable and the camera will enter the PCU mode.

The saved photos and video clips can be found in the following folder: "My Computer →Removable Disc".
Note:
When the camera is connected to your PC you will see the internal memory of the camera where it is not possible to make recordings, but that contains a file named SSID_PW.CFG that contains the configuration data for the Wi-Fi camera (SSID name and password).
5.2 Press the Shutter button

can switch to the PC camera mode (PCC mode). To return to PCU mode,
press the

button again.

Note:
The PC camera mode can only be activated when your computer's operating system is Windows XP SP3.0 / Mac 10.6 or later versions.
Remote Control

You can use the remote controller to record videos, take photos and shut down the camera. When using the remote control, please make sure that the signal emission port on the remote control is pointing to the infrared signal reception light on the camera.

(a) Press the video button to record a video and stop the recording.
(b) Press the photo button to take a photo.
Using Wi-Fi
1. Android O/S
(a) Search for “SYMAGIX APP” from “Play Store®” on your cell phone and install it. When the installation is
completed, this icon will show on the cell phone's screen

(b) Insert the microSD/microSDHC card in the camera's memory card slot.
(c) Press the Wi-Fi button on the side of the camera to active the camera Wi-Fi (When the camera Wi-Fi is getting ready, the Wi-Fi status indicator will be flashing. When the camera Wi-Fi is ready, the Wi-Fi status indicator will stay on and the Wi-Fi icon will be displayed on the status LCD.).
(d) Turn on the Wi-Fi on your cell phone and press on “GO_2000_WIFI” in the available Wi-Fi AP list to start the connection with the camera. If a password is required, it is “1234567890”.

(e) Click the icon SYMAGIX and now you can control the camera by your cell phone. The introduction of the user
interface is as following.

- Video resolution
- White balance
- Setup (enter setup menu)
- Enter playback mode
- Shutter button
- Photo mode
- Video recording mode
- Wi-Fi signal
- Battery power level
Note: Wi-Fi will be automatically disabled when the camera cannot be connected to the Wi-Fi network within 30 seconds.
2. iOS O/S
(a) Search for “SYMAGIX APP” from “App Store®” on your cell phone and install it. When the installation is
completed, this icon will show on the cell phone's screen SYMAGIX.

(b) Insert the microSD/microSDHC card in the camera's memory card slot.
(c) Press the Wi-Fi button on the side of the camera to active the camera Wi-Fi (When the camera Wi-Fi is getting ready, the Wi-Fi status indicator will be flashing. When the camera Wi-Fi is ready, the Wi-Fi status indicator will stay on and the Wi-Fi icon will be displayed on the status LCD.).
(d) Turn on the Wi-Fi on your cell phone and press on “GO_2000_WIFI” in the available Wi-Fi AP list to start the connection with the camera. If a password is required, it is “1234567890”.

(e) Click the icon SYMAGIX and now you can control the camera by your cell phone. The introduction of the user interface is as following.

- Battery power level
- Video resolution
- White balance
- Setup (enter setup menu)
- Enter Playback mode
- Shutter button
- Photo mode
- Video recording mode
Note: Wi-Fi will be automatically disabled when the camera cannot be connected to the Wi-Fi network within 30 seconds.

PRECAUTIONS FOR CORRECT DISPOSAL OF THE PRODUCT
The symbol shown on the equipment indicates that waste must be disposed of in “separate collection” and so the product must not be disposed of together with urban waste.
The user must take the product to special “separate waste collection centres” provided by local government, or deliver it to the retailer against the purchase of a new product.
Separate collection of waste and subsequent treatment, recycling and disposal operations promotes the production of equipment with recycled materials and limits negative effects on the environment and on health caused by improper handling of waste.
Illegal disposal of the product leads to the enforcement of administrative penalties.
WARNING FOR A CORRECT USE OF RECHARGEABLE BATTERY
- Recharge the battery in an ambient temperature between 5^ C and 35^ C.
- When the recharge is complete the device shows a message/signal (check the user's guide).
- Don't recharge more than the suitable period to prevent the risk of overheating and burst.
- Recharging the battery over the suitable period or an extended period of inactivity may reduce battery duration.
- Rechargeable battery is liable to wear and tear and its performance will reduce gradually.
- To extend the duration of the battery use it when is completely charged up to the complete discharging, then recharge it fully before use it again. Recharge a battery not completely consumed, will result in a reduced duration. In this case, repeat the full charging/discharging cycle many times.
- Avoid recharge the battery for the whole night.
INFORMATION NOTE ON THE REMOVAL AND DISPOSAL OF BATTERIES
Warning: Only high-qualified personnel should perform this operation!
BATTERY REMOVAL
The appliance should not be plugged to the mains socket when performing this operation!
1) Remove the battery cover as indicated in Chapter 2;
2) Select the battery;
3) Disconnect and remove the battery.
Used batteries should not be disposed of with household waste or thrown into fire or water. Used batteries should be recycled or disposed of in separate waste collection centers.

For additional information and updates of this product see: www.trevi.it


- Special notices about the waterproof case
- Appearance and buttons
- Status LCD Icons
- Introduction of working modes
- Video recording mode and photo mode flow chart
- Preparation
- Charging the battery
- Turn on/off the camera
- Start to Use
- Video recording mode
- Photo mode
- Mute / activate sound
- Connecting to HD TV
- Connect the camera to an HDTV via HDMI cable (not included)
- Connecting to PC and using PC camera feature
- Remote Control
- Using Wi-Fi
- Android O/S
- iOS O/S
- PRECAUTIONS FOR CORRECT DISPOSAL OF THE PRODUCT
- WARNING FOR A CORRECT USE OF RECHARGEABLE BATTERY
- INFORMATION NOTE ON THE REMOVAL AND DISPOSAL OF BATTERIES
- BATTERY REMOVAL
Brand : Trevi
Model : Go 2000 WiFi
Category : Camcorder