
MVH-290DAB - Car radio PIONEER - Free user manual and instructions
Find the device manual for free MVH-290DAB PIONEER in PDF.


| Product type | Car radio with DAB+ tuner |
| Brand | Pioneer |
| Model | MVH-290DAB |
| Dimensions (W x H x D) | 178 x 50 x 150 mm (standard DIN) |
| Weight | Approximately 1.0 kg |
| Power supply | 12 V DC (vehicle battery) |
| Max. output power | 4 x 50 W (MOSFET) |
| RMS power | 4 x 22 W (CEA-2006) |
| Radio tuner | FM/AM with RDS, DAB/DAB+ |
| Media player | Front USB, Front AUX (3.5 mm) |
| Compatible audio formats | MP3, WMA, WAV, FLAC (via USB) |
| Display | Monochrome LCD with backlight |
| Audio settings | Bass, treble, balance, fader, loudness |
| Main functions | Automatic tuning, radio presets (FM: 18, DAB: 18), Mute function, PTY search |
| Maintenance and cleaning | Clean with a soft, dry cloth. Do not use abrasive products or solvents. |
| Security | Detachable faceplate to deter theft |
| Spare parts and repairability | Detachable faceplate, power cables and speaker harness available from customer service |
| General information | Car radio designed for installation in a DIN slot. Compatible with steering wheel controls (adapter required). |
Frequently Asked Questions - MVH-290DAB PIONEER
User questions about MVH-290DAB PIONEER
0 question about this device. Answer the ones you know or ask your own.
Ask a new question about this device
Download the instructions for your Car radio in PDF format for free! Find your manual MVH-290DAB - PIONEER and take your electronic device back in hand. On this page are published all the documents necessary for the use of your device. MVH-290DAB by PIONEER.
USER MANUAL MVH-290DAB PIONEER
DIGITAL MEDIA RECEIVER
RECEPTEUR NUMERIQUE MULTIMEDIA
RICEVITORE MULTIMEDIALE DIGITALE
RECEPTOR DIGITAL DE MEDIOS
DIGITALER MEDIA RECEIVER
DIGITALE MEDIA-RECEIVER
Pioneer

Spotify®
Made for

iPod

iPhone
MVH-290DAB
Owner's Manual
Mode d'emploi
Before You Start....2
Getting Started.... 3
Digital Audio Broadcasting (DAB)......4
Radio....5
USB/iPod/AUX....6
App Mode....7
Spotify ^® 8
Using Pioneer ARC APP....8
Settings 9
FUNCTION settings 9
AUDIO settings.... 10
SYSTEM settings 11
ILLUMINATION settings.... 12
Connections/Installation.... 12
Additional Information....14
About this manual:
- In the following instructions, a USB memory or USB audio player are referred to as "USB device".
- In this manual, iPod and iPhone are referred to as "iPod".
Before You Start
Thank you for purchasing this PIONEER product
To ensure proper use, please read through this manual before using this product. It is especially important that you read and observe WARNINGS and CAUTIONS in this manual. Please keep the manual in a safe and accessible place for future reference.

If you want to dispose this product, do not mix it with general household waste. There is a separate collection system for used electronic products in accordance with legislation that requires proper treatment, recovery and recycling.
Private households in the member states of the EU, In Switzerland and Norway may return their used electronic products free of charge to designated collection facilities or to a retailer (If you purchase a similar new one).
For countries not mentioned above, please contact your local authorities for the correct method of disposal.
By doing so you will ensure that your disposed product undergoes the necessary treatment, recovery and recycling and thus prevent potential negative effects on the environment and human health.
WARNING
- Do not attempt to install or service this product by yourself. Installation or servicing of this product by persons without training and experience in electronic equipment and automotive accessories may be dangerous and could expose you to the risk of electric shock, injury or other hazards.
- Do not attempt to operate the unit while driving. Make sure to pull off the road and park your vehicle in a safe location before attempting to use the controls on the device.
CAUTION
- Do not allow this unit to come into contact with moisture and/or liquids. Electrical shock could result.
Also, damage to this unit, smoke, and overheating could result from contact with liquids.
• Always keep the volume low enough to hear outside sounds.
• The Pioneer CarStereo-Pass is for use only in Germany. - This product is evaluated in moderate and tropical climate condition under the Audio, video and similar electronic apparatus - Safety requirements, IEC 60065.
If you experience problems
Should this unit fail to work properly, please contact your dealer or nearest authorized PIONEER Service Station.
Getting Started
Basic operation
MVH-290DAB

Frequently used operations
| Purpose Operation | |
| Turn on the power* Press SRC | /OFF to turn on the power. Press and hold SRC/OFF to turn off the power. |
| Adjust the volume Turn the M. | C. dial. Press MUTE to mute the unit. Press MUTE again or turn the M.C. dial to unmute. |
| Select a source Press SRC | /OFF repeatedly. |
| Change the display information | Press DISP repeatedly. |
| Return to the previous display/list Press BA | ND/ ➔ |
| Return to the normal display from the menu | Press and hold BAND/ ➔. |
* When this unit's blue/white lead is connected to the vehicle's auto-antenna relay control terminal, the vehicle's antenna extends when this unit's source is turned on. To retract the antenna, turn the source off.
Display indication
| Indication Description | |
| Appears when a lower tier of the menu or folder exists. | |
| Appears when the 🔒 button is pressed. | |
| LOC | Appears when the local seek tuning function is set (page 10). |
| TP | Appears when a traffic program is received. |
| TA | Appears when the TA (traffic announcements) function is set (page 10). |
| S.Rtrv | Appears when the sound retriever function is set (page 10). |
| Appears when random/shuffle play is set. | |
| Appears when repeat play is set. | |
| Appears when the iPod control function is set (page 7). | |
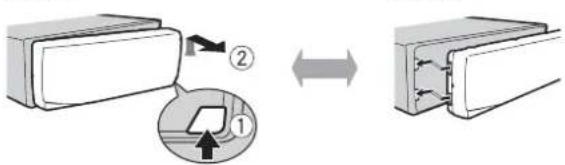
Detaching the front panel
Detach the front panel to prevent theft. Remove any cables and devices attached to the front panel and turn off the unit before detaching it.
Detach
Important
- Avoid subjecting the front panel to excessive shock.
- Keep the front panel out of direct sunlight and high temperatures.
• Always store the detached front panel in a protective case or bag.
Setup menu
When you turn the ignition switch to ON after installation, [SET UP :YES] appears in the display.
1 Press the M.C. dial.
The setup menu disappears after 30 seconds of no operation. If you prefer not to set at this time, turn the M.C. dial to select [NO], then press to confirm.
2 Turn the M.C. dial to select the options, then press to confirm. To proceed to the next menu option, you need to confirm your selection.
| Menu Item Description | |
| LANGUAGE Select the language to display the text information from a[ENG](English),[PYC](Russian),[TUR](Turkish) | compressed audio file. |
| CLOCK SET Set the clock. | |
| FM STEP Select the FM tuning step from 100 kHz or 50 kHz.[100], [50] | |
| DAB ANT PW Supply power to a DAB antenna. Select this when using the[ON] optional DAB antenna (AN-DAB1, sold separately) with the unit.[OFF] No power is supplied to a DAB antenna. Select this when using apassive antenna with no booster. | |
3[QUIT:YES] appears when all the settings have been made. To return to the first item of the setup menu, turn the M.C. dial to select [QUIT:NO], then press to confirm.
4 Press the M.C. dial to confirm the settings. When [DAB ANT PW] is set to [ON], [UPDATING LIST] appears in the display and the service list will be updated.
| NOTES |
| You can cancel the menu setting by pressing SRC/OFF. |
| These settings can be made at any time from the SYSTEM settings (page 11) and INITIAL settings(page 4). |
Canceling the demonstration display (DEMO OFF)
1 Press the M.C. dial to display the main menu.
2 Turn the M.C. dial to select [SYSTEM], then press to confirm.
3 Turn the M.C. dial to select [DEMO OFF], then press to confirm.
4 Turn the M.C. dial to select [YES], then press to confirm.
INITIAL settings
1 Press and hold SRC/OFF until the unit turns off.
2 Press and hold SRC/OFF to display the main menu.
3 Turn the M.C. dial to select [INITIAL], then press to confirm.
4 Turn the M.C. dial to select an option, then press to confirm.
| Menu Item Description | |
| FM STEP Select the FM tuning step from 100 kHz or 50 kHz.[100], [50] | |
| SP-P/O MODE Select when there is a full-range speaker connected to the rear speaker output leads and there is a subwoofer connected to the RCA output. | |
| [REAR/SUB.W] | Select when there is a passive subwoofer connected directly to the rear speaker output leads and there is a subwoofer connected to the RCA output. |
| [REAR/REAR] Select | when there are full-range speakers connected to the rear speaker output leads and RCA output. If there is a full-range speaker connected to the rear speaker output leads, and the RCA output is not used, you may select either [REAR/SUB.W] or [REAR/REAR]. |
| S/W UPDATE Select to confirm the latest system information on the unit.[SYSTEM INFO] | |
| [SYSTEM UPDATE] Select to update the unit to the latest software and initialize the unit settings. For details on the latest software and updating, visit our website. | |
| DAB ANT PW Supply power to a DAB antenna. Select this when using the optional DAB antenna (AN-DAB1, sold separately) with the unit. | |
| [ON] | |
| [OFF] No power is supplied to a DAB antenna. Select this when using a passive antenna with no booster. | |
| SYSTEM RESET Select [YES] to initialize the unit settings. The unit will be restarted automatically.(Some of the settings may be retained even after resetting the unit.) | |
Digital Audio Broadcasting (DAB)
To receive DAB signals, connect a DAB antenna (AN-DAB1) (sold separately) to the unit.
Seeking a service component/station
1 Press SRC/OFF to select [DIGITAL RADIO].
2 Press BAND/ ⊃ to select the band from [D1], [D2] or [D3].
3 Press |◀◀/▶▶▶ to select a service component/station.
NOTE
Press and hold ◀◀◀/▶▶ then release to seek an available service. Scanning stops when the unit receives a service.
To select service component/station from service lists
1 During DAB reception, press .
Displays the list of all service components/stations. Press again to search for a service component/station alphabetically.
2 Select a service component/station from the list you selected, then press the M.C. dial to confirm.
NOTE
You can update the service list by pressing and holding 🔒. To cancel updating, press and hold 🔒 again.
Presetting service components/stations
To store service components/stations
1 While receiving the service component/station you want to store, press and hold one of the number buttons (1/ ∧ to 6/ ⇌) until it stops flashing.
To retrieve stored service components/stations
1 Select the band, then press a number button (1/∧ to 6/⇐).
Radio
The tuner frequencies on this unit are allocated for use in Western Europe, Asia, the Middle East, Africa and Oceania. Use in other areas may result in poor reception. The RDS (radio data system) function only works in areas that broadcast RDS signals for FM stations.
Receiving preset stations
1 Press SRC/OFF to select [RADIO].
2 Press BAND/⊃ to select the band from [FM1], [FM2], [FM3], [MW] or [LW].
3 Press a number button (1/∧ to 6/⇐).
TIP
The ◀◀◀/▶▶▶ buttons can be also used to select a preset station when [SEEK] is set to [PCH] in the FUNCTION settings (page 10).
Best stations memory (BSM)
The six strongest stations are stored on the number buttons (1/∧ to 6/⇐).
1 After selecting the band, press the M.C. dial to display the main menu.
2 Turn the M.C. dial to select [FUNCTION], then press to confirm.
3 Turn the M.C. dial to select [BSM], then press to confirm.
To seek a station manually
1 After selecting the band, press ◀◀◀/▶▶ to select a station. Press and hold ◀◀◀/▶▶ then release to seek an available station. Scanning stops when the unit receives a station. To cancel seek tuning, press ◀◀◀ ▶▶
NOTE
[SEEK] needs to be set to [MAN] in the FUNCTION settings (page 10).
To store stations manually
1 While receiving the station you want to store, press and hold one of the number buttons (1/∧ to 6/⇐) until it stops flashing.
Using PTY functions
The unit searches for a station by PTY (program type) information.
1 Press during FM reception.
2 Turn the M.C. dial to select a program type from [NEWS/INFO], [POPULAR], [CLASSICS] or [OTHERS].
3 Press the M.C. dial.
The unit begins to search for a station. When it is found, its program service name is displayed.
NOTES
• To cancel the search, press the M.C. dial.
• The program of some stations may differ from that indicated by the transmitted PTY.
- If no station is broadcasting the type of program you searched for, [NOT FOUND] is displayed for about two seconds and then the tuner returns to the original station.
USB/iPod/AUX
Playing back
Disconnect headphones from the device before connecting it to the unit.
USB devices (including Android™)/iPod
1 Open the USB port cover.
2 Plug in the USB device/IPod using an appropriate cable.
NOTE
To automatically switch to [USB] source when a USB device/iPod is connected to the unit, set [USB AUTO] to [ON] in the SYSTEM settings (page 11).
CAUTION
Use an optional Pioneer USB cable (CD-U50E) to connect the USB device as any device connected directly to the unit will protrude out from the unit, which could be dangerous.
Before removing the device, stop playback.
AOA connections
For details on AOA connection, see page 8.
MTP connection
A device installed with Android OS 4.0 or later can be connected to the unit via MTP, using the cable supplied with the device. However, depending on the connected device and the numbers of the files in the device, audio files/songs may not be able to be played back via MTP. Note that MTP connection is not compatible with WAV file formats.
NOTE
If you use an MTP connection, [ANDROID WIRED] needs to be set to [MEMORY] in the SYSTEM settings (page 11).
AUX
1 Insert the stereo mini plug into the AUX input jack.
2 Press SRC/OFF to select [AUX] as the source.
NOTE
If [AUX] is set to [OFF] in the SYSTEM settings, [AUX] cannot be selected as a source (page 11).
Operations
You can make various adjustments in the FUNCTION settings (page 9). Note that the following operations do not work for an AUX device. To operate an AUX device, use the device itself.
| Purpose Operation | |
| Select a folder/album*1 | Press 1/ ∧ or 2/ √. |
| Select a track/song (chapter) | Press ◀◀ or ▶▶. |
| Fast forward or reverse*2 | Press and hold ◀◀ or ▶▶. |
| Search for a file from a list | 1 Press 🔒 to display the list.2Tu m the M.C. dial to select the desired file (folder) name or category, then press to confirm.3Tu m the M.C. dial to select the desired file, then press to confirm.Playback starts. |
| View a list of the files in the selected folder/ category*1 | Press the M.C. dial when a folder/category is selected. |
| Play a song in the selected folder/ category*1 | Press and hold the M.C. dial when a folder/ category is selected. |
| Alphabetical search (iPod only) 1P | ress 🔒o display the list.2Tu m the M.C. dial to select the desired category list, then press 🔒 enter the alphabetical search mode.(Turning the M.C. dial twice also enters the alphabetical search mode.)3Tu m the M.C. dial to select a letter, then press to display the alphabetical list.To cancel alphabetical search, press BAND/ ➔. |
| Repeat play | Press 6/ ➔. |
| Random/shuffle play | Press 5/XX. |
| Shuffle all play (iPod only) | Press and hold 5/XX. |
| Pause/resume playback | Press 4/PAUSE. |
| Sound retriever | Press 3/S.Rtrv.[1]: Effective for low compression rates[2]: Effective for high compression rates |
| Return to root folder (USB only)*1 Press and hold . | |
| Change drives in USB device(Devices that support the USB mass storage device class protocol only) | Press BAND/ ➔ |
*1 Compressed audio files only
*2 When you use the fast forward or reverse function while playing a VBR file, the playback time may be not correct.
Useful functions for iPod
Link play mode
You can access songs based on the artist, album, or genre currently playing.
1 While listening to a song, press and hold 🔒 to enter the link play mode.
2 Turn the M.C. dial to select the mode ([ARTIST], [ALBUM], [GENRE]), then press to confirm.
The selected song/album will be played after the currently playing song.
NOTE
The selected song/album may be canceled if you use functions other than those from the link play mode (e.g. fast forward and reverse).
iPod control
You can control the unit via a connected iPod.
The following iPod models are not compatible with this function.
i P o d nano 1st generation, iPod with video
1 Press BAND/ during playback, then select the control mode.
[CONTROL iPod]: The unit's iPod function can be operated from the connected iPod. [CONTROL AUDIO]: The unit's iPod function can only be operated by the buttons on the unit. In this mode, the connected iPod cannot be turned on or off.
NOTES
- Switching the control mode to [CONTROL iPod] pauses song playback. Use the connected iPod to resume playback.
- The following operations are still accessible from the unit, even if the control mode is set to [CONTROL iPod].
– Pause, fast forward/reverse, song/chapter selection
• The volume can only be adjusted from the unit.
App Mode
You can enjoy listening to an application on an iPhone via the unit. In some cases, you can control an application by using the unit.
For details on compatible devices, visit our website.
Important
Use of third party apps may involve or require the provision of personally identifiable information, whether through the creation of a user account or otherwise, and for certain applications, the provision of geolocation data.
ALL THIRD PARTY APPS ARE THE SOLE RESPONSIBILITY OF THE PROVIDERS, INCLUDING WITHOUT LIMITATION COLLECTION AND SECURITY OF USER DATA AND PRIVACY PRACTICES. BY ACCESSING THIRD PARTY APPS, YOU AGREE TO REVIEW THE TERMS OF SERVICE AND PRIVACY POLICIES OF THE PROVIDERS. IF YOU DO NOT AGREE WITH THE TERMS OR POLICIES OF ANY PROVIDER OR DO NOT CONSENT TO THE USE OF GEOLOCATION DATA WHERE APPLICABLE, DO NOT USE THAT THIRD PARTY APP.
For iPhone users
This function is compatible with iPhones and iPod touches installed with iOS 5.0 or later.
NOTE
PIONEER IS NOT LIABLE FOR ANY THIRD PARTY APPS OR CONTENT, INCLUDING WITHOUT LIMITATION THEIR ACCURACY OR COMPLETENESS. THE CONTENT AND FUNCTIONALITY OF SUCH APPS ARE THE SOLE RESPONSIBILITY OF THE APP PROVIDER.
Playback of an application via the unit
1 Connect this unit with the mobile device.
- iPhone via USB (page 6)
2 Press SRC/OFF to select [APP].
3 Operate the mobile device to start up the application.
Basic operations
You can make various adjustments in the FUNCTION settings (page 9).
| Purpose Operation | |
| Select a track | Press ◀◀ or ▶▶. |
| Fast forward or reverse | Press and hold ◀◀ or ▶▶. |
| Pause/resume playback Press BA | ND/ ➕ |
Spotify®
(MVH-290DAB is only compatible with Spotify installed on iPhone.)
Spotify is a music streaming distribution ser vice not affiliated with Pioneer. More information is available at http://www.spotify.com.
The Spotify application is available for compatible smartphones, please visit https://support.spotify.com/ for the latest compatibility information.
To enjoy Spotify as you drive, first download the Spotify app to your iPhone. You can download it on the iTunes App Store. Choose a free account or a paid Premium account, either in the app or at spotify.com. A Premium account gives you more features, like offline listening.
Important
- This product incorporates Spotify software which is subject to 3rd party licenses found here: www.spotify.com/connect/third-party-licenses.
- For information on the countries and regions where Spotify can be used, take a look at https://www.spotify.com/us/select-your-country/.
Listening to Spotify
Update the firmware of the Spotify application to the latest version before use.
1 Connect this unit with the mobile device.
- iPhone via USB (page 6)
2 Press SRC/OFF to select [SPOTIFY].
3 Launch the Spotify application on the mobile device and start playback.
Basic operations
You can make various adjustments in the FUNCTION settings (page 9).
NOTE
The available operations may vary according to the type of contents (track/album/artist/playlist/radio) you want to play.
| Purpose Operation | |
| Skip a track Press or . | |◀◀ ▶▶| |
| Search for a track from a list | 1 Press 🔒 (list) to display the list.2Tu m the M.C. dial to select the desired category, then press to confirm.3Tu m the M.C. dial to select the desired file, then press to confirm.Playback starts. |
| Purpose Operation | |
| Pause/resume playback | Press 4/PAUSE. |
| Thumbs Up (Only for radio) | Press 1/ . |
| Thumbs Down (Only for radio) | Press 2/ . |
| Random play (Only for track/album/artist/playlist) | Press 5/ . |
| Repeat play (Only for track/album/artist/playlist) | Press 6/ . |
| Start a radio channel based on the song currently being played. | 1Press and hold (Rt) to start a radio.2P press the M.C. dial.• This function may not be available depending on the selected song. |
| Store the information about the song currently being played.Remove the song information stored. | 1 Press and hold 3/S.Rtrv.[SAVE]/[UNSAVE] appears.2P press the M.C. dial. |
NOTE
Some functions of Spotify may not be operated from the unit.
Using Pioneer ARC APP
You can operate the unit from Pioneer ARC APP installed on an iPhone/Android device. In some cases, you can control aspects of the application, such as source selection, pause, etc., by using the unit.
For details on what operations are available on the application, see the application's help section.
WARNING
Do not attempt to operate the application while driving. Make sure to pull off the road and park your vehicle in a safe location before attempting to use the controls on the application.
For iPhone users
This function is compatible with iPhones (iPhone 5 or later) and iPod touches installed with iOS 8.0 or later.
You can download Pioneer ARC APP on iTunes App Store.
For Android device users
This function is compatible with devices that have Android OS 4.1 or later installed and also support AOA (Android Open Accessory) 2.0.
You can download Pioneer ARC APP on Google Play™.
NOTE
Some Android devices connected via AOA 2.0 may not work properly or emit sounds due to their own software design, regardless of the OS version.
Making a connection with Pioneer ARC APP
1Connect this unit with the mobile device.
- iPhone/Android device via USB (page 6)
Proceed to step 6 if you select the USB connection for iPhone.
2 Press the M.C. dial to display the main menu.
3 Turn the M.C. dial to select [SYSTEM], then press to confirm.
4 Turn the M.C. dial to select [ANDROID WIRED], then press to confirm.
5 Turn the M.C. dial to select [APP CONTROL] for an Android device connected via USB.
If [ON] is selected in [P.APP AUTO ON] (page 11), Pioneer ARC APP on the Android device starts automatically, and all the steps are finished.
NOTE
If Pioneer ARC APP has not been installed on your Android device yet, a message that prompts you to install the application will appear on your Android device. Select [OFF] in [P.APP AUTO ON] to clear the message (page 11).
6 Press SRC/OFF to select any source.
7 Launch Pioneer ARC APP on the mobile device.
NOTE
You can also launch the application by pressing and holding the M.C. dial for iPhone.
Listening to music on Android
1 Press SRC/OFF to select [ANDROID].
Basic operations
| Purpose Operation | |
| Select a track Press or . | |◀◀ ▶▶| |
| Fast forward or reverse | Press and hold |◀◀ or ▶▶|. |
| Pause/resume playback | Press 4/PAUSE. |
| Purpose Operation | |
| Sound retriever | Press 3/S.Rtrv.[1]: Effective for low compression rates[2]: Effective for high compression rates |
Settings
You can adjust various settings in the main menu.
1 Press the M.C. dial to display the main menu.
2 Turn the M.C. dial to select one of the categories below, then press to confirm.
• FUNCTION settings (page 9)
• AUDIO settings (page 10)
• SYSTEM settings (page 11)
• ILLUMINATION settings (page 12)
3 Turn the M.C. dial to select the options, then press to confirm.
FUNCTION settings
The menu items vary according to the source.
Menu Item Description
| S.FOLLOW DAB |
| [ON], [OFF] Search for another ensemble that supports the same service component/station with better reception. If no alternative service component/ station can be found or reception remains poor, the unit will automatically switch to an identical FM broadcast. |
| SOFTLINK#1 #2 | DAB |
[ON], [OFF] If the reception of the service component/
station being received becomes poor, the unit will automatically switch to a station with a similar broadcast.
| PROGRAM TYPE | DAB |
[NEWS/INFO], [POPULAR],[CLASSICS],[OTHERS]
Displays the program type information.
| Menu Item Description | |
| ENSEMBLE DAB | Displays the list of relevant ensembles. |
| FM SETTING RADIO[TALK], [STANDARD], [MUSIC] Match the sound quality level with the broadcast signal conditions of the FM band signal.(Available only when FM band is selected.) | |
| BSM RADIO | Store the six strongest stations on the number buttons (1/ ∧ to 6/ ⇌) automatically. |
| REGIONAL RADIO[ON], [OFF] Limit the reception to the specific regionalprograms when AF (alternative frequencies search) is selected. (Available only when FM band is selected.) | |
| LOCAL RADIOFM: [OFF], [LV1], [LV2], [LV3], [LV4]MW/LW: [OFF], [LV1], [LV2] | Restrict the tuning station according to the signal strength. |
| TA DAB RADIO[DAB+RDS TA] Receive current traffic information for DAB andRDS (DAB has priority) if available. | |
| [RDS TA ONLY] Receive current traffic information for only RDS ifavailable. | |
| [TA OFF] Disables this function. | |
| AF RADIO[ON], [OFF] Allow the unit to return to a different frequencyproviding the same station. (Available only when FM band is selected.) | |
| NEWS RADIO[ON], [OFF] Interrupt the currently selected source withnews programs. (Available only when FM band is selected.) | |
| SEEK RADIO[MAN], [PCH] | Assign ◀◀ or ▶▶| buttons to seek the stations one by one (manual tuning) or select a station from the preset channels. |
| Menu Item Description | |
| SAVE SPOTIFY | Store the information about the song currently being played to your music list on Spotify. |
| UNSAVE SPOTIFY | Remove the song information stored in [SAVE]. |
| S.RTRV USB iPod APP ANDROID SPOTIFY[1] (effective for low compression rates), [2] (effective for high compression rates), [OFF] | Enhance compressed audio and restore rich sound. |
| AUDIO BOOK iPod[FASTER], [NORMAL], [SLOWER] Change the playback speed. (Not available when [CONTROL iPod] is selected in the control mode.) | |
| PAUSE APP | Pause or resume playback. |
*1 Only available in areas where [SOFTLINK] function is supported.
*2 Not available when [S.FOLLOW] function is turned off.
AUDIO settings
| Menu Item Description | |
| FADER*1 | Adjust the front and rear speaker balance. |
| BALANCE | Adjust the left and right speaker balance. |
| EQ SETTING | |
| [SUPER BASS], [POWERFUL], [NATURAL], [VOCAL], [CUSTOM1], [CUSTOM2], [FLAT] | Select or customise the equalizer curve.[CUSTOM1] can be set separately for each source.However, each of the below combinations are set to the same setting automatically. |
| Select an equalizer band and level for further customising. | • USB, iPod, ANDROID, SPOTIFY, and APP (iPhone) |
| Equalizer band: [80HZ], [250HZ], [800HZ], [2.5KHZ], [8KHZ] | [CUSTOM2] is a shared setting used for all sources. |
| Equalizer level: [+6] to [-6] | |
Menu Item Description
LOUDNESS
| [OFF], [LOW], [MID], [HI] Compensate for clear sound at low volume. |
SUB.W*2
| [NOR], [REV], [OFF] Select the subwoofer phase. |
SUB.W CTRL*2*3
| Cut-off frequency: [50HZ], [63HZ], [80HZ], [100HZ], [125HZ], [160HZ], [200HZ] | Only frequencies lower than those in the selected range are output from the subwoofer. |
| Output level: [-24] to [+6] | |
| Slope level: [-12], [-24] |
BASS BOOST
| [0] to [+6] Select the bass boost level. |
HPF SETTING
| Cut-off frequency: [OFF], [50HZ], [63HZ], [80HZ], [100HZ], [125HZ], [160HZ], [200HZ] | Only frequencies higher than the high-pass filter (HPF) cutoff are output from the speakers. |
| Slope level: [-12], [-24] | |
SLA
| [+4] to [−4] Adjust the volume level for each source except FM.Each of the below combinations are set to the same setting automatically.U SB, iPod, ANDROID, SPOTIFY, and APP (iPhone) |
*1 Not available when [SUB.W/SUB.W] is selected in [SP-P/O MODE] in the INITIAL settings (page 4).
*2 Not available when [REAR/REAR] is selected in [SP-P/O MODE] in the INITIAL settings (page 4).
*3 Not available when [OFF] is selected in [SUB.W].
SYSTEM settings
You can also access to these menus when the unit is turned off.
Menu Item Description
LANGUAGE
| [ENG](English), [PYC](Russian), [TUR](Turkish) | Select the language to display the text information from a compressed audio file. |
| Menu Item | Description |
| CLOCK SET | |
| Set the clock (page 4). | |
| 12H/24H[12H], [24H] Select the time notation. | |
| AUTO PI[ON], [OFF] Search for a different station with the same programming, even if using a preset station. | |
| AUX[ON], [OFF] Set to [ON] when using an auxiliary device connected to the unit. | |
| SPOTIFY[ON], [OFF] Set to [ON] when using the Spotify function. | |
| MUTE MODE[MUTE], [20dB ATT], [10dB ATT] Mute or attenuate sound automatically when a signal from equipment with a mute function is received. | |
| PW SAVE*[ON], [OFF] Reduce the battery power consumption.Turning on the source is the only operation allowed when this function is on. | |
| ANDROID WIRED[MEMORY], [APP CONTROL] Select the appropriate connection method for an Android device. | |
| P.APP AUTO ON[ON], [OFF] | Select [ON] to automatically launch Pioneer ARC APP when an Android device is connected to the unit via AOA. (Not available when [MEMORY] is selected in [ANDROID WIRED].) |
| USB AUTO[ON], [OFF] Select [ON] to automatically switch to [USB] source when a USB device/iPod is connected to the unit.Select [OFF] when a USB device/iPod is being connected to the unit just for charging. | |
* [PW SAVE] is canceled if the vehicle battery is disconnected and will need to be turned back on once the battery is reconnected. When [PW SAVE] is off, depending on connection methods, the unit may
continue to draw power from the battery if your vehicle's ignition does not have an ACC (accessory) position.
ILLUMINATION settings
Menu Item Description
DIM SETTING
[SYNC CLOCK], [MANUAL] Change the display brightness.
BRIGHTNESS
[1] to [10] Change the display brightness.
The available setting ranges differ depending on
[DIM SETTING].
Connections/Installation
Connections
Important
- When installing this unit in a vehicle without an ACC (accessory) position on the ignition switch, failure to connect the red cable to the terminal that detects operation of the ignition key may result in battery drain.

ACC position No ACC position

- Use of this unit in conditions other than the following could result in fire or malfunction.
-Vehicles with a 12-volt battery and negative grounding.
-When speaker output is used by 4 channels, use speakers over 50 W (maximum input power) and between 4 Ω to 8 Ω (impedance value). Do not use 1 Ω to 3 Ω speakers for this unit.
- When rear speaker output is used by 2 of subwoofer, use speakers over 70 W (maximum input power).
* Please refer to connections for a connection method.
- To prevent a short-circuit, overheating or malfunction, be sure to follow the directions below.
-Disconnect the negative terminal of the battery before installation.
- Secure the wiring with cable clamps or adhesive tape. Wrap adhesive tape around wiring that comes into contact with metal parts to protect the wiring.
- Place all cables away from moving parts, such as the shift lever and seat rails.
-Place all cables away from hot places, such as near the heater outlet.
-Do not connect the yellow cable to the battery by passing it through the hole to the engine compartment.
-Cover any disconnected cable
connectors with insulating tape.
-Do not shorten any cables.
- Never cut the insulation of the power cable of this unit in order to share the power with other devices. The current capacity of the cable is limited.
-Use a fuse of the rating prescribed.
—Never wire the negative speaker cable directly to ground.
—Never band together negative cables of multiple speakers.
- When this unit is on, control signals are sent through the blue/white cable. Connect this cable to the system remote control of an external power amp or the vehicle's auto-antenna relay control terminal (max. 300mA 12 V DC). If the vehicle is equipped with a glass antenna, connect it to the antenna booster power supply terminal.
- Never connect the blue/white cable to the power terminal of an external power amp. Also, never connect it to the power terminal of the auto antenna. Doing so may result in battery drain or a malfunction.
- The black cable is ground. Ground cables for this unit and other equipment (especially, high-current products such as power amps) must be wired separately. If they are not, an accidental detachment may result in a fire or malfunction.
• The graphical symbol placed on the product means direct current.
This unit

① DAB antenna input
To receive DAB signals, connect a DAB antenna (AN-DAB1) (sold separately) to the unit.
② Power cord input
③ Rear output or subwoofer output
④ Front output
⑤ Antenna input
⑥ Fuse (10 A)
⑦ Wired remote input
Hard-wired remote control adapter can be connected (sold separately).
Power cord

flowchart
graph TD
    A["①"] --> B["②"]
    B --> C["③"]
    C --> D["④"]
    D --> E["⑤"]
    E --> F["⑥"]
    F --> G["⑦"]
    G --> H["⑧"]
    H --> I["⑨"]
    I --> J["⑩"]
    J --> K["⑪"]
    K --> L["⑫"]
    L --> M["⑬"]
    M --> N["⑭"]
    N --> O["⑮"]
    O --> P["⑯"]
    P --> Q["⑰"]
    Q --> R["⑱"]
    R --> S["⑲"]
    S --> T["⑳"]
    T --> U["⑴"]
    U --> V["⑫"]
    V --> W["⑬"]
    W --> X["⑭"]
    X --> Y["⑮"]
    Y --> Z["⑯"]
    Z --> AA["⑰"]
    AA --> AB["⑱"]
    AB --> AC["⑲"]
    AC --> AD["⑳"]
    AD --> AE["㉑"]
    AE --> AF["㉒"]
    AF --> AG["㉓"]
    AG --> AH["㉔"]
①To power cord input
② Depending on the kind of vehicle, the function of and may be different.
In this case, be sure to connect to ⑤ and to . ③
③ Yellow
Back-up (or accessory)
④ Yellow
Connect to the constant 12 V supply terminal.
⑤ Red
Accessory (or back-up)
⑥ Red
Connect to terminal controlled by the ignition switch (12 V DC).
⑦ Connect leads of the same colour to each other.
⑧ Black (chassis ground)
⑨ Blue/white
The pin position of the ISO connector will differ depending on the type of vehicle. Connect and when Pin 5 is an antenna control type. In another type of vehicle, never connect and
⑩ Blue/white
Connect to the system control terminal of the power amp (max. 300 mA 12 V DC).
⑪ Blue/white
Connect to the auto-antenna relay control terminal (max. 300 mA 12 V DC).
⑫ Yellow/black
If you use equipment with a Mute function, wire this lead to the Audio Mute lead on that equipment. If not, keep the Audio Mute lead free of any connections.
⑬ Speaker leads
White: Front left ⊕
White/black: Front left ⊖
Gray: Front right ⊕
Gray/black: Front right
Green: Rear left or subwoofer
Green/black: Rear left or subwoofer
-
Violet: Rear right or subwoofer Violet/black: Rear right or subwoofer
14 ISO connector
In some vehicles, the ISO connector
may be divided into two. In this case, be sure to connect to both connectors.
NOTES
- Change the initial menu of this unit. Refer to [SP-P/O MODE] (page 4). The subwoofer output of this unit is monaural.
- When using a subwoofer of 2 , be sure to connect the subwoofer to the violet and violet/black leads of this unit. Do not connect anything to the green and green/black leads.
Power amp (sold separately)
Perform these connections when using the optional amplifier.

flowchart
graph TD
    A["①"] --> B["②"]
    B --> C["③"]
    B --> D["④"]
    B --> E["⑤"]
    B --> F["⑥"]
    G["①"] --> H["②"]
    H --> I["③"]
    H --> J["④"]
    H --> K["⑤"]
    H --> L["⑥"]
    M["⑦"] --> N["⑦"]
    O["⊕"] --> P["⊕"]
    Q["⊕"] --> R["⊕"]
    S["⊕"] --> T["⊕"]
    U["⊕"] --> V["⊕"]
① System remote control
Connect to blue/white cable.
② Power amp (sold separately)
③ Connect with RCA cables (sold separately)
④ To front output
⑤ Front speaker
⑥ To rear output or subwoofer output
⑦ Rear speaker or subwoofer
Installation

Important
- Check all connections and systems before final installation.
-
Do not use unauthorized parts as this may cause malfunctions.
-
Consult your dealer if installation requires drilling of holes or other modifications to the vehicle.
- Do not install this unit where:
- it may interfere with operation of the
vehicle.
- it may cause injury to a passenger as a result of a sudden stop.
• The semiconductor laser will be damaged if it overheats. Install this unit away from hot places such as near the heater outlet.
- Optimum performance is obtained when the unit is installed at an angle of less than 60°.
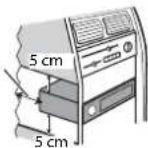
- When installing, to ensure proper heat dispersal when using this unit, make sure you leave ample space behind the rear panel and wrap any loose cables so they are not blocking the vents.
Leave ample space
DIN mount installation
1 Insert the supplied mounting sleeve into the dashboard.
2 Secure the mounting sleeve by using a screwdriver to bend the metal tabs (90°) into place.

① Dashboard
② Mounting sleeve
• Make sure that the unit is installed securely in place. An unstable installation may cause skipping or other malfunctions.
When not using the supplied mounting sleeve
1 Determine the appropriate position where the holes on the bracket and the side of the unit match.

2 Tighten two screws on each side.

① Tapping screw (5 mm × 9 mm, not supplied with product)
② Mounting bracket
③ Dashboard or console
Removing the unit (Installed with the supplied mounting sleeve)
1 Remove the trim ring.
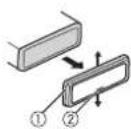
① Trim ring
② Notched tab
- Releasing the front panel allows easier access to the trim ring.
- When reattaching the trim ring, point the side with the notched tab down.
2 Insert the supplied extraction keys into both sides of the unit until they click into place.
3 Pull the unit out of the dashboard.

Additional Information
Troubleshooting
The display automatically returns to the normal display.
→ No operations have been made for about 30 seconds.
- Perform an operation.
The repeat play range changes unexpectedly.
→ Depending on the repeat play range, the selected range may change when another folder or track is being selected or during fast forwarding/reversing. - Select the repeat play range again.
A subfolder is not played back.
→ Subfolders cannot be played when [FLD] (folder repeat) is selected. - Select another repeat play range.
The sound is intermittent.
→ You are using a device, such as a cellular phone, that may cause audible interference.
- Move electrical devices that may be causing the interference away from the unit.
Error messages
Common
AMP ERROR
→ This unit fails to operate or the speaker connection is incorrect.
→ The protective circuit is activated. - Check the speaker connection.
- Turn the ignition switch OFF and back to ON again. If the message remains, contact your dealer or an authorized Pioneer Service Station for assistance.
NO XXXX (NO TITLE, for example)
→ There is no embedded text information. - Switch the display or play another track/file.
DAB tuner
ANTENNA ERROR
→ The antenna connection is incorrect. - Check the antenna connection.
- Turn the ignition switch OFF and back to ON again. If the message remains, contact your dealer or an authorized Pioneer Service Station for assistance.
USB device/iPod
FORMAT READ
→ Sometimes there is a delay between the start of playback and when you start to hear any sound.
- Wait until the message disappears and you hear sound.
NO AUDIO
→ There are no songs.
- Transfer the audio files to the USB device and connect.
→ The connected USB device has security enabled.
– Follow the USB device instructions to disable the security.
SKIPPED
→ The connected USB device contains DRM protected files.
– The protected files are skipped.
PROTECT
→ All the files on the connected USB device are embedded with DRM. - Replace the USB device.
N/A USB
→ The connected USB device is not supported by this unit. - Disconnect your device and replace it with a compatible USB device.
HUB ERROR
→ The USB device connected via a USB hub is not supported by this unit. - Connect the USB device directly to this unit using a USB cable.
CHECK USB
→ The USB connector or USB cable has short-circuited. - Check that the USB connector or USB cable is not caught in something or damaged. → The connected USB device consumes more than maximum allowable current. - Disconnect the USB device and do not use it. Turn the ignition switch OFF and back to ACC or ON. Connect only compliant USB devices.
→ The iPod operates correctly but does not charge. - Make sure the connection cable for the iPod has not shorted out (e.g., n caught in metal objects). After checking, turn the ignition switch OF and back to ON, or disconnect the iPod and reconnect.
ERROR-19
→ Communication failed. - Perform one of the following operations, then return to the USB source. - Turn the ignition switch OFF and back to ON. - Disconnect the USB device. - Change to a different source. → iPod failure. - Disconnect the cable from the iPod. Once the iPod's main menu is
displayed, reconnect the iPod and reset it.
ERROR-23
→ USB device was not formatted properly. - Format the USB device with FAT12, FAT 16 or FAT32.
ERROR-16
→ The iPod firmware version is old. - Update the iPod version. → iPod failure. - Disconnect the cable from the iPod. Once the iPod's main menu is displayed, reconnect the iPod and reset it.
STOP
→ There are no songs in the current list. -Select a list that contains songs.
NOT FOUND
→ No related songs. -Transfer songs to the iPod.
Apps
START UP APP
→ The application has not started running yet. - Operate the mobile device to start up the application.
Spotify
CHECK APP
→ Connection to the Spotify application failed. -Follow the instructions that appear on the screen.
Handling guidelines
USB storage device
- Connections via USB hubs are not supported.
- Firmly secure the USB storage device before driving. Do not let the USB storage device fall onto the floor, where it may become jammed under the brake or accelerator pedal. - Depending on the USB storage device, the following problems may occur. - Operations may vary. - The storage device may not be recognized. - Files may not be played back properly. - The device may cause audible interference when you are listening to the radio.
iPod
- Do not leave the iPod in places with high temperatures.
- Firmly secure the iPod when driving. Do not let the iPod fall onto the floor, where it may become jammed under the brake or accelerator pedal.
- The settings of the iPod such as the equalizer and repeat play are changed automatically when the iPod is connected to the unit. Once the iPod is disconnected, those settings will return to the original settings.
- Incompatible text saved on the iPod will not be displayed by the unit.
Compressed audio compatibility
- Only the first 32 characters can be displayed as a file name (including the file extension) or a folder name.
• The unit may not work properly depending on the application used to encode WMA files. - There may be a slight delay at the start of the playback of audio files embedded with image data, or audio files stored on a USB device with numerous folder hierarchies.
CAUTION
- Pioneer cannot guarantee compatibility with all USB mass storage devices, and assumes no responsibility for any loss of data on media players, smartphones, or other devices while using this product. - Do not leave discs or a USB storage device in any place that is subject to high temperatures.
WMA files
| File extension .wma | |
| Bit rate 48 kbps to 320 kbps(CBR), 48 kbps to 384 kbps (VBR) | |
| Sampling frequency 32 kHz, 44.1 kHz, 48 kHz | |
| Windows MediaTM Audio Professional, Lossless, Voice/DRM Stream/Stream with video | Not compatible |
MP3 files
| File extension .mp3 | |
| Bit rate 8 kbps to 320 kbps(CBR), VBR | |
| Sampling frequency 8 kHz to 48 kHz (32 kHz, 44.1 kHz, 48 kHz for emphasis) | |
| Compatible ID3 tag version | 1.0, 1.1, 2.2, 2.3, 2.4(ID3 tag Version 2.x is given priority over Version 1.x.) |
| M3u playlist Not compatible | |
| MP3i (MP3 interactive), mp3 PRO | Not compatible |
WAV files
- WAV file formats cannot be connected via MTP.
| File extension .wav | |
| Quantization bits 8 and | 16 (LPCM), 4(MSADPCM) |
| Sampling frequency 16 kHz to 48 kHz(LPCM), 22.05 kHz and44.1 kHz (MS ADPCM) | |
AAC files
| Compatible format AAC | encoded by iTunes |
| File extension .m4a | |
| Sampling frequency 11.0 | 25 kHz to 48 kHz |
| Transmission rate 16 kbps to 320 kbps, VBR | |
| Apple Lossless Not compatible | |
| AAC file bought from the iTunes Store (.m4p file extension) | Not compatible |
USB device
- There may be a slight delay when starting playback of audio files on a USB storage device with numerous folder hierarchies.
| Playable folder hierarchy | Up to eight tiers (A practical hierarchy is less than two tiers.) |
| Playable folders Up to 500 | |
| Playable files Up to 1500 | |
| Playback of copyright-protected files | Not compatible |
| Partitioned USB device | Only the first partition can be played. |
iPod compatibility
This unit supports only the following iPod models. Supported iPod software versions are shown below. Older versions may not be
supported.
Made for
-iPod touch (1st through 6th generation)
-iPod classic
-iPod with video
-iPod nano (1st through 7th generation)
-iPhone 6s
-
iPhone 6s Plus
-iPhone 6
-iPhone 6 Plus
-iPhone 5s
-iPhone 5c
-iPhone 5
-iPhone 4s
-iPhone 4
-iPhone 3GS
-iPhone 3G
-iPhone -
Operations may vary depending on the generation and/or software version of the iPod.
- Users of iPod with the Lightning Connector should use the Lightning to USB Cable (supplied with iPod).
- Users of iPod with the Dock Connector should use the CD-IU51. For details, consult your dealer.
• Refer to the iPod manuals for information about the file/format compatibility.
• Audiobook, Podcast: Compatible
CAUTION
Pioneer accepts no responsibility for data lost on the iPod, even if that data is lost while this unit is used.
Sequence of audio files
The user cannot assign folder numbers and specify playback sequences with this unit. Sequence of audio file depends on the connected device.
Note that the hidden files in a USB device cannot be played back.
Example of a hierarchy

flowchart
graph TD
    A["01"] --> B["02"]
    B --> C["① Compressed audio file"]
    B --> D["②"]
    D --> E["03"]
    E --> F["③"]
    E --> G["④"]
    H["04"] --> I["⑤"]
    H --> J["⑥"]
    K["05"] --> L["⑦"]
Level 1 Level 2 Level 3 Level 4
01 to 05: Folder number
① to :Playback sequence
Copyright and trademark
iTunes
Apple and iTunes are trademarks of Apple Inc., registered in the U.S. and other countries.
WMA
Windows Media is either a registered trademark or trademark of Microsoft Corporation in the United States and/or other countries.
This product includes technology owned by Microsoft Corporation and cannot be used or distributed without a license from Microsoft Licensing, Inc.
iPod & iPhone
iPhone, iPod, iPod classic, iPod nano, and iPod touch are trademarks of Apple Inc., registered in the U.S. and other countries. Lightning is a trademark of Apple Inc. "Made for iPod" and "Made for iPhone" mean that an electronic accessory has been designed to connect specifically to iPod or iPhone, respectively, and has been certified by the developer to meet Apple performance standards. Apple is not responsible for the operation of this device or its compliance with safety and
regulatory standards. Please note that the use of this accessory with iPod or iPhone may affect wireless performance.
Android & Google Play
Android, Google Play, and the Google Play logo are trademarks of Google Inc.
Spotify®
SPOTIFY and the Spotify logo are among the registered trademarks of Spotify AB. Compatible mobile digital devices and premium subscription required, where available, see https://www.spotify.com.
Specifications
General
Power source: 14.4 V DC (10.8 V to 15.1 V allowable)
Grounding system: Negative type
Maximum current consumption: 10.0 A
Dimensions (W × H × D):
DIN
Chassis: 178 mm × 50 mm × 165 mm
Nose: 188 mm × 58 mm × 17 mm
D
Chassis: 178 mm × 50 mm × 165 mm
Nose: 170 mm × 46 mm × 17 mm
Weight: 0.7 kg
Audio
Maximum power output:
- 50 W × 4 ch/4 Ω (for no subwoofer)
- 50 W × 2 ch/4 Ω + 70 W × 1 ch/2 Ω
(for subwoofer)
Continuous power output:
22 W × 4 (50 Hz to 15 000 Hz, 5 %
THD, 4 Ω load, both channels driven)
Load impedance: 4 Ω (4 Ω to 8 Ω allowable)
Preout maximum output level: 2.0 V
Loudness contour: +10 dB (100 Hz), +6.5
dB (10 kHz) (volume: -30 dB)
Equalizer (5-Band Graphic Equalizer):
Frequency: 80 Hz/250 Hz/800 Hz/2.5
kHz/8 kHz
Equalization range: ±12 dB (2 dB step)
Subwoofer (mono):
Frequency: 50 Hz/63 Hz/80 Hz/100
Hz/125 Hz/160 Hz/200 Hz
Slope: -12 dB/oct, -24 dB/oct
Gain: +6 dB to -24 dB
Phase: Normal/Reverse
USB
USB standard specification: USB 2.0 full speed
Maximum current supply: 1 A
USB Protocol:
MSC (Mass Storage Class)
MTP (Media Transfer Protocol)
AOA (Android Open Accessory) 2.0
File system: FAT12, FAT16, FAT32
MP3 decoding format: MPEG-1 & 2 Audio Layer 3
WMA decoding format: Ver. 7, 7.1, 8, 9, 10, 11, 12 (2 ch audio) (Windows Media Player)
AAC decoding format: MPEG-4 AAC (iTunes
encoded only) (Ver. 10.6 and earlier)
WAV signal format: Linear PCM & MS
ADPCM (Non-compressed)
FM tuner
Frequency range: 87.5 MHz to 108.0 MHz
Usable sensitivity: 11 dBf (1.0 μV/75 Ω,
mono, S/N: 30 dB)
Signal-to-noise ratio: 72 dB (IEC-A network)
MW tuner
Frequency range: 531 kHz to 1 602 kHz
Usable sensitivity: 25 μV (S/N: 20 dB)
Signal-to-noise ratio: 62 dB (IEC-A network)
LW tuner
Frequency range: 153 kHz to 281 kHz
Usable sensitivity: 28 μV (S/N: 20 dB)
Signal-to-noise ratio: 62 dB (IEC-A network)
DAB tuner
Frequency range (Band III): 174.928 MHz to
239.200 MHz (5 A to 13 F)
Frequency range (L Band): 1 452.960 MHz
to 1 490.624 MHz (LA to LW)
Usable sensitivity (Band III): -100 dBm
Usable sensitivity (L Band): -100 dBm
Signal-to-noise ratio: 85 dB
NOTE
Specifications and the design are subject
to modifications without notice.
Table des matières
Raccordements/Installation.... 14
Raccordements/Installation
Raccordements

Important
Protocole USB : MSC (Mass Storage Class) MTP (Media Transfer Protocol) AOA (Android Open Accessory) 2.0
Digital Audio Broadcasting (DAB)...... 5
Radio....5
USB/iPod/AUX....6
Modalità app....8
Spotify ^® 8
Importante
Digital Audio Broadcasting (DAB)
Best stations memory (BSM)
*1 Solo file audio compressi
Dimensioni (L × A × P):
DIN
Telaio: 178 mm × 50 mm × 165 mm
Testata: 188 mm × 58 mm × 17 mm
D
Telaio: 178 mm × 50 mm × 165 mm
Testata: 170 mm × 46 mm × 17 mm
Peso: 0,7 kg
Audio
Potenza massima:
Profilo loudness: +10 dB (100 Hz), +6.5 dB
(10 kHz) (volume: -30 dB)
Pendenza: -12 dB/oct, -24 dB/oct
Specifica standard USB: USB 2.0 full speed
MSC (Mass Storage Class)
MTP (Media Transfer Protocol)
AOA (Android Open Accessory) 2.0
File system: FAT12, FAT16, FAT32
Digital Audio Broadcasting (DAB)...... 5
Radio....5
USB/iPod/AUX....6
Modo app 8
Spotify ^® 8
Uso de Pioneer ARC APP....9
Ajustes.... 10
Ajustes de FUNCTION 10
Ajustes de AUDIO 11
Ajustes de SYSTEM.... 12
Ajustes de ILLUMINATION.... 13
Importante
Digital Audio Broadcasting (DAB)
Curva: -12 dB/oct, -24 dB/oct
Ganancia: +6 dB a -24 dB
Anschlüsse/Einbau.... 14
Wichtig
Abmessungen (B × H × T):
DIN
AOA (Android Open Accessory) 2.0
WMA-Decodierformat: Vers. 7, 7.1, 8, 9, 10,
11, 12 (2-Kanal-Audio) (Windows
Media Player)
AAC-Decodierformat MPEG-4 AAC (nur
Digital Audio Broadcasting (DAB)...... 5
Radio....5
USB/iPod/AUX....6
App-modus 8
Spotify ^® 8
Belangrijk
Digital Audio Broadcasting (DAB)
Best stations memory (BSM)
→ Geen verwante songs.
-iPhone 5c
-iPhone 5
-iPhone 4s
-iPhone 4
-iPhone 3GS
-iPhone 3G
-iPhone
Helling: -12 dB/oct, -24 dB/oct
Gain: +6 dB tot -24 dB
Fase: Normaal/tegengesteld
USB
MSC (Mass Storage Class)
MTP (Media Transfer Protocol)
AOA (Android Open Accessory) 2.0
Bestandsysteem: FAT12, FAT16, FAT32
MP3-decoderingsformaat: MPEG-1 & 2 Audio Layer 3
WMA-decoderingsformaat: Versie 7, 7.1, 8, 9, 10, 11, 12 (2-kanaalsaudio) (Windows Media Player)
Pioneer CarStereo-Pass
Please fill out immediately after purchase.
© 2016 PIONEER CORPORATION. All rights reserved.
28-8, Honkomagome 2-chome, Bunkyo-ku, Tokyo 113-0021, Japan
Корпорация Пайонир
PIONEER ELECTRONICS (USA) INC.
P.O. Box 1540, Long Beach, California 90801-1540, U.S.A. TEL: (800) 421-1404
PIONEER ELECTRONICS OF CANADA, INC.
340 Ferrier Street, Unit 2, Markham, Ontario L3R 2Z5, Canada
TEL: 1-877-283-5901
TEL: 905-479-4411
PIONEER ELECTRONICS ASIACENTRE PTE. LTD.
2 Jalan Kilang Barat, #07-01, Singapore 159346 TEL: 65-6378-7888
PIONEER ELECTRONICS AUSTRALIA PTY. LTD.
5 Arco Lane, Heatherton, Victoria, 3202 Australia TEL: (03) 9586-6300
PIONEER ELECTRONICS DE MÉXICO S.A. DE C.V.
Blvd. Manuel Ávila Camacho 138, 10 piso
Col.Lomas de Chapultepec, México, D.F. 11000
Tel: 52-55-9178-4270, Fax: 52-55-5202-3714
先鋒股份有限公司
台北市內湖區瑞光路407號8樓
電話:886-(0)2-2657-3588
先鋒電子(香港)有限公司
香港九龍長沙灣道909號5樓
電話:852-2848-6488
- Pioneer
- MVH-290DAB
- About this manual:
- Before You Start
- WARNING
- CAUTION
- If you experience problems
- Getting Started
- Basic operation
- Detaching the front panel
- Important
- Setup menu
- Press the M.C. dial.
- Canceling the demonstration display (DEMO OFF)
- INITIAL settings
- Digital Audio Broadcasting (DAB)
- Seeking a service component/station
- NOTE
- To select service component/station from service lists
- Presetting service components/stations
- To store service components/stations
- To retrieve stored service components/stations
- Radio
- Receiving preset stations
- TIP
- Best stations memory (BSM)
- To seek a station manually
- To store stations manually
- Using PTY functions
- NOTES
- USB/iPod/AUX
- Playing back
- USB devices (including Android™)/iPod
- AOA connections
- MTP connection
- AUX
- Operations
- Useful functions for iPod
- Link play mode
- iPod control
- App Mode
- For iPhone users
- Playback of an application via the unit
- Basic operations
- Spotify®
- Listening to Spotify
- Using Pioneer ARC APP
- For Android device users
- Making a connection with Pioneer ARC APP
- Listening to music on Android
- Settings
- FUNCTION settings
- SYSTEM settings
- ILLUMINATION settings
- Connections/Installation
- Connections
- This unit
- Power cord
- Power amp (sold separately)
- Installation
- DIN mount installation
- When not using the supplied mounting sleeve
- Removing the unit (Installed with the supplied mounting sleeve)
- Additional Information
- Troubleshooting
- Error messages
- Common
- AMP ERROR
- DAB tuner
- ANTENNA ERROR
- USB device/iPod
- FORMAT READ
- NO AUDIO
- SKIPPED
- PROTECT
- N/A USB
- HUB ERROR
- CHECK USB
- ERROR-19
- ERROR-23
- ERROR-16
- STOP
- NOT FOUND
- Apps
- START UP APP
- Spotify
- CHECK APP
- Handling guidelines
- USB storage device
- iPod
- Compressed audio compatibility
- WAV files
- USB device
- iPod compatibility
- Sequence of audio files
- Copyright and trademark
- iTunes
- WMA
- iPod & iPhone
- Android & Google Play
- Specifications
- General
- Audio
- USB
- FM tuner
- MW tuner
- LW tuner
- Table des matières
- Raccordements/Installation
- Raccordements
- Importante
- Wichtig
- Belangrijk
- Pioneer CarStereo-Pass
- Корпорация Пайонир
Brand : PIONEER
Model : MVH-290DAB
Category : Car radio