
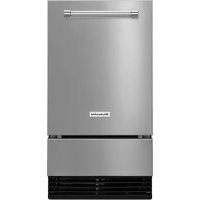
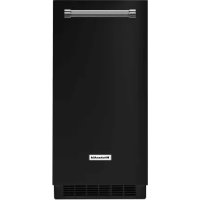
KICA0WH - Ice machine KITCHENAID - Free user manual and instructions
Find the device manual for free KICA0WH KITCHENAID in PDF.


| Product Type | Ice Maker |
| Brand | KitchenAid |
| Model | KICA0WH |
| Color | White |
| Dimensions (L x D x H) | 30 x 40 x 40 cm |
| Net Weight | 15 kg |
| Power Supply | 220-240 V ~ 50 Hz, 150 W |
| Ice Production | 12 kg per 24 hours |
| Water Tank Capacity | 2 L |
| Ice Basket Capacity | 1 kg |
| Ice Type | Cube or bullet (depending on model) |
| Production Cycle | 8-15 minutes depending on ambient temperature |
| Main Functions | Automatic shut-off when basket is full, operation indicator light |
| Maintenance and Cleaning | Clean the tank, pump and basket regularly; descaling recommended |
| Safety | Automatic shut-off in case of overheating or insufficient water level |
| Spare Parts and Repairability | Ice basket, water tank, pump are repairable |
| General Information | Indoor use, noise level < 50 dB(A) |
Frequently Asked Questions - KICA0WH KITCHENAID
User questions about KICA0WH KITCHENAID
0 question about this device. Answer the ones you know or ask your own.
Ask a new question about this device
Download the instructions for your Ice machine in PDF format for free! Find your manual KICA0WH - KITCHENAID and take your electronic device back in hand. On this page are published all the documents necessary for the use of your device. KICA0WH by KITCHENAID.
USER MANUAL KICA0WH KITCHENAID
natural_image
Exterior view of a modern kitchen stand mixer (no visible text or symbols)KitchenAid
WELCOME TO THE WORLD OF KITCHENAID.
We're committed to helping you create a lifetime of delicious meals for family and friends. To help ensure the longevity and performance of your appliance, keep this guide handy. It will empower you with the best way to use and care for your product. Your satisfaction is our #1 goal. Remember to register your product online at www.kitchenaid.com, or by mail using the attached Product Registration Card.

natural_image
Exterior view of a modern kitchen stand mixer with control panel (no visible text or symbols)
Join us in the kitchen at www.kitchenaid.com. Scan with your mobile device for recipes, tips, and more.
TABLE OF CONTENTS
ICE CREAM MAKER ATTACHMENT SAFETY
Important safeguards....4
PARTS AND FEATURES
Parts and accessories....5
ASSEMBLING THE ICE CREAM MAKER
Attaching the Ice Cream Maker for Tilt-Head Mixers 6
Attaching the drive assembly to a Tilt-Head Mixer....7
Attaching the Ice Cream Maker for Bowl-Lift Mixers 8
Attaching the drive assembly to a Bowl-Lift Mixer....10
USING THE ICE CREAM MAKER
Making Ice Cream ....II
TIPS FOR GREAT RESULTS ...... 12
CARE AND CLEANING....13
RECIPES
Caramel Pecan Ice Cream....14
French Vanilla Ice Cream....15
Triple Chocolate Ice Cream 16
Pumpkin Ice Cream....17
Creamy Lemon-Orange Gelato 17
Fresh Raspberry Sorbet....18
Other Sorbets....18
Minted Mango Sherbet....19
WARRANTY 20
PROOF OF PURCHASE & PRODUCT REGISTRATION
Always keep a copy of the itemized sales receipt showing the date of purchase of your Stand Mixer Attachment. Proof of purchase will assure you of in-warranty service. Before you use your Stand Mixer Attachment, please fill out and mail your product registration card packed with the unit, or register on-line at www.kitchenaid.com. This card will enable us to contact you in the unlikely event of a product safety notification and assist us in complying with the provisions of the Consumer Product Safety Act. This card does not verify your warranty. Please complete the following for your personal records:
Model Number
Serial Number
Date Purchased
Store Name
Your safety and the safety of others are very important.
We have provided many important safety messages in this manual and on your appliance. Always read and obey all safety messages.

This is the safety alert symbol.
This symbol alerts you to potential hazards that can kill or hurt you and others.
All safety messages will follow the safety alert symbol and either the word "DANGER" or "WARNING." These words mean:
! DANGER
You can be killed or seriously injured if you don't immediately follow instructions.
WARNING
You can be killed or seriously injured if you don't follow instructions.
All safety messages will tell you what the potential hazard is, tell you how to reduce the chance of injury, and tell you what can happen if the instructions are not followed.
State of California Proposition 65 Warnings:
WARNING: This product contains one or more chemicals known to the State of California to cause cancer.
WARNING: This product contains one or more chemicals known to the State of California to cause birth defects or other reproductive harm.
IMPORTANT SAFEGUARDS
When using electrical appliances, basic safety precautions should always be followed including the following:
I. Read all instructions.
2. To protect against risk of electrical shock, do not put Stand Mixer in water or other liquid.
3. Close supervision is necessary when this or any appliance is used near children.
4. Unplug Stand Mixer from outlet when not in use, before putting on or taking off parts and before cleaning.
5. Avoid contacting moving parts. Keep fingers out of hopper inlet and discharge opening.
6. Do not operate the Stand Mixer with a damaged cord or plug or after the mixer malfunctions, or is dropped or damaged in any manner. Return the Stand Mixer to the nearest Authorized Service Center for examination, repair or electrical or mechanical adjustment.
7. The use of attachments not recommended or sold by KitchenAid may cause fire, electric shock or injury.
8. Do not use the Stand Mixer outdoors.
9. Do not let the cord hang over the edge of table or counter.
10. Do not let the cord contact hot surfaces, including the stove.
II. This product is designed for household use only.
SAVE THESE INSTRUCTIONS
Parts and accessories
NOTE: The freeze bowl must be completely frozen to make ice cream.
IMPORTANT: The freeze bowl is not dishwasher safe. Hand wash only.

natural_image
Line drawing of a cylindrical container with two side handles and a triangular handle, no text or symbols present.Freeze bowl

natural_image
Technical line drawing of a mechanical clamp or spring component (no text or symbols)Drive assembly

natural_image
Line drawing of a mechanical device with three legs and a central handle (no text or symbols)Dasher
Attaching the Ice Cream Maker for Tilt-Head Mixers
Before First Use
Before using your attachment, remove the "Do not immerse in water" label. Never immerse attachments in water or other liquid. Never wash in dishwasher.

|
Turn Stand Mixer OFF and unplug.
natural_image
Line drawing of a mechanical device with a base mount and handle (no text or symbols)2
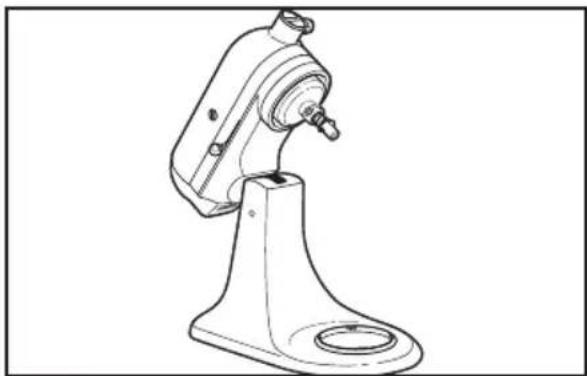
Tilt motor head back and remove the mixing bowl.
IMPORTANT: Do not pour ice cream batter into the freeze bowl until all parts are assembled and the mixer is running.
NOTE: Use the freeze bowl immediately upon removal from freezer, as it begins to thaw once removed.

natural_image
Diagram of a mechanical device with a downward arrow pointing to a container (no text or symbols)3
Place dasher inside the freeze bowl.

4
Place the freeze bowl on bowl-clamping plate.
Attaching the drive assembly for Tilt-Head Mixers

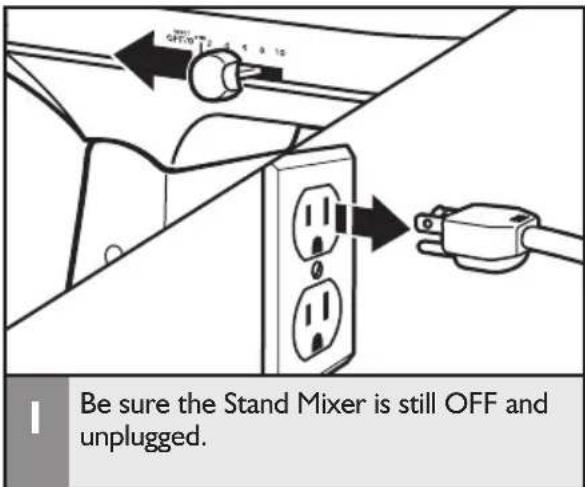
Be sure the Stand Mixer is still OFF and unplugged. Keep the motor head tilted back and put the dasher and freeze bowl into place.


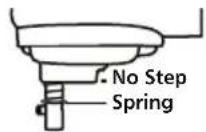

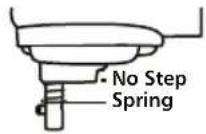
2 Determine your mixer model by checking for a spring on the beater shaft, and then position the drive assembly as illustrated for proper placement.
natural_image
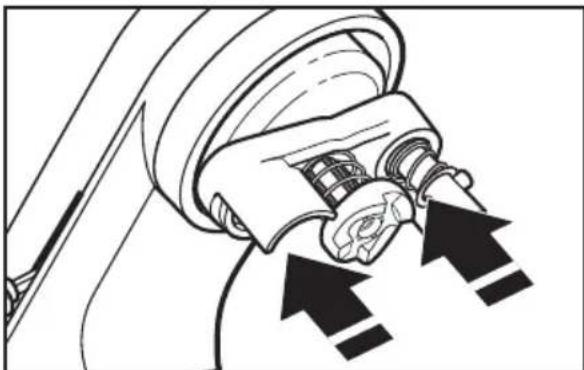
Mechanical component diagram showing a gear and shaft assembly with directional arrows indicating motion (no text or symbols)3 Slide drive assembly onto the motor head until it will not slide any further. When properly assembled, the outer curved edges of the drive assembly should center on the motor head. If they are not centered, slide the drive assembly either back or forward until it is centered on the motor head. Make sure the drive assembly is securely in place by pressing upward.

natural_image
Line drawing of a kitchen mixer with a bowl (no text or symbols)4 Lower the motor head to engage the drive assembly with the dasher. If the drive assembly doesn't engage the dasher, slide the drive assembly either back or forward until it does engage the dasher properly.
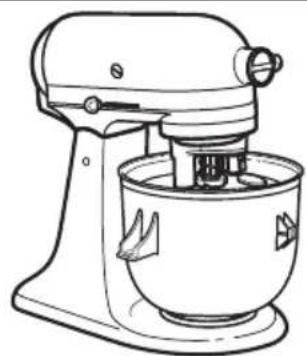
natural_image
Line drawing of a kitchen mixer with no text or symbols5 Make sure the motor head is down completely.
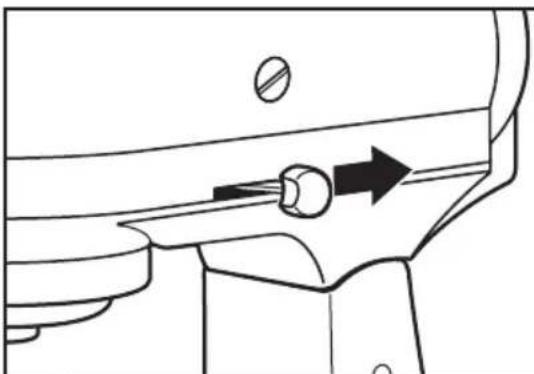
natural_image
Line drawing of a mechanical component with a knob and directional arrow (no text or symbols)6 Place locking lever in the LOCK position. Before mixing, test the lock by attempting to raise the motor head.
Attaching the drive assembly for Tilt-Head Mixers
WARNING

Electrical Shock Hazard
Plug into a grounded 3 prong outlet.
Do not remove ground prong.
Do not use an adapter.
Do not use an extension cord.
Failure to follow these instructions can result in death, fire, or electrical shock.

natural_image
Illustration of a hand inserting into an electrical outlet with two outlets (no text or symbols)7 Plug the mixer into a grounded 3-prong outlet.
Attaching the Ice Cream Maker for Bowl-Lift Mixers
Before First Use
Before using your attachment, remove the "Do not immerse in water" label. Never immerse attachments in water or other liquid. Never wash in dishwasher.

1
Turn Stand Mixer OFF and unplug.

natural_image
Line drawing of a kitchen stand with handle and base (no text or symbols)2 Place bowl-lift handle in down position and remove mixing bowl.
IMPORTANT: Do not pour ice cream batter into the freeze bowl until all parts are assembled and the mixer is running.
NOTE: Use the freeze bowl immediately upon removal from freezer, as it begins to thaw once removed.
Attaching the Ice Cream Maker for Bowl-Lift Mixers
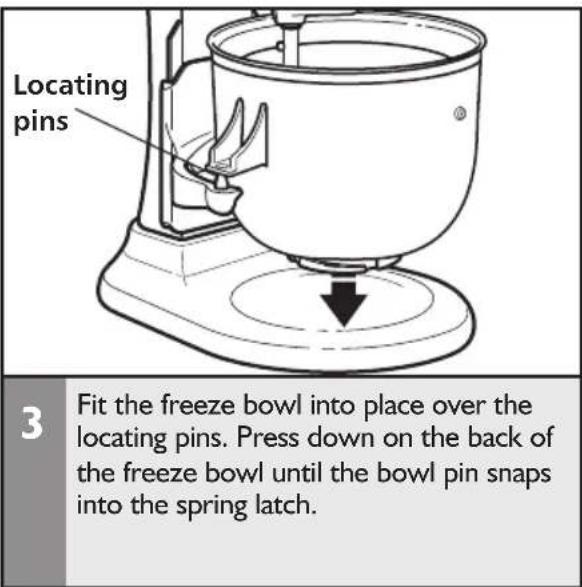
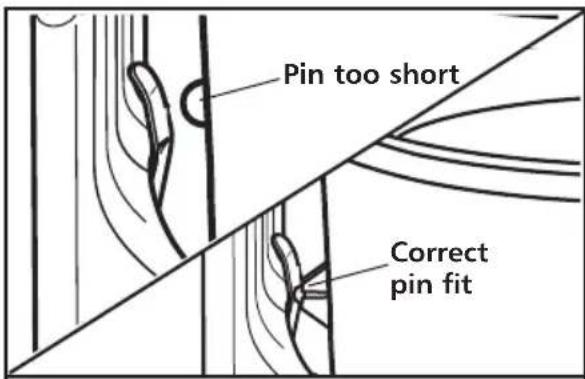
NOTE: The freeze bowl is designed to fit all bowl-lift mixers. If the bowl pin at the back of the bowl is too short or too long to snap into the spring latch, remove and rotate the bowl so the opposite bowl pin faces the spring latch. Repeat step 3.

Attaching the drive assembly for Bowl-Lift Mixers




3
Determine your mixer model by checking for a spring on the beater shaft, and then position the drive assembly as illustrated for proper placement.

natural_image
Line drawing of a kitchen mixer with directional arrows indicating components (no text or symbols)4
Slide drive assembly onto the motor head until it will not slide any further. When properly assembled, the outer curved edges of the drive assembly should center on the motor head. If they are not centered, slide the drive assembly either back or forward until it is centered on the motor head. Make sure the drive assembly is securely in place by pressing upward.

natural_image
Technical line drawing of a kitchen mixer or mixing unit (no text or symbols)5
Raise the bowl to engage the dasher with the drive assembly before mixing. If the drive assembly doesn't engage the dasher, slide the drive assembly either back or forward until it does engage the dasher properly.
WARNING

Electrical Shock Hazard
Plug into a grounded 3 prong outlet.
Do not remove ground prong.
Do not use an adapter.
Do not use an extension cord.
Failure to follow these instructions can result in death, fire, or electrical shock.

natural_image
Line drawing of a hand inserting into an electrical outlet with two outlets (no text or symbols)6
Plug the mixer into a grounded 3-prong outlet.
Making ice cream
IMPORTANT: Pouring batter into the freeze bowl before starting the mixer may cause the batter to freeze prematurely and lock the dasher.
Before Use
Set freezer to coldest setting. Store the freeze bowl in the freezer for a minimum of 15 hours. Prepare ice cream batter in advance (see "Tips for Great Results").



NOTE: If the dasher begins to slip and make a clicking noise, this is an audible indicator that the ice cream is done.
NOTE: The Ice Cream Maker Attachment will create a soft-consistency ice cream. For firmer consistency, store ice cream in a shallow airtight container in the freezer for 2-4 hours.
IMPORTANT: Do not store ice cream in the freeze bowl in the freezer. Prying hard ice cream out of the freeze bowl with metal scoops or utensils may damage the freeze bowl.
TIPS FOR GREAT RESULTS
- The freeze bowl must be completely frozen to make ice cream or other frozen desserts.
- For best results, store the freeze bowl in the back of your freezer where the temperature is coldest for at least 15 hours. Adjusting your freezer to its coldest setting will help the freeze bowl make firmer ice cream faster.
- Storing the freeze bowl in the freezer at all times allows you the flexibility to make your favorite frozen desserts on a whim.
- For recipes that need to be pre-cooked, allow the mixture to cool completely in the refrigerator.
- All batter recipes need to be completely chilled in the refrigerator before making ice cream.
- Most ice cream recipes call for a combination of cream, milk, eggs, and sugar. The type of cream you choose will determine how rich in flavor and how creamy the texture of the finished result. The higher percentage of fat in the cream, the richer and creamier your ice cream will be. Any combination can be used, as long as the liquid measurement stays the same. Lighter ice creams can be made by using more milk than cream, or by eliminating cream. Skim milk will work, but there will be a noticeable difference in texture.
TYPE OF CREAM FAT %
Heavy Cream 36% Whipping Cream 30%
Light Cream 18%
Half and Half 10%
- When mixing an ice cream recipe that calls for solid ingredients such as fruits, nuts, candies, or chocolate chips, it is best to wait until the final two minutes of the mixing process to add them.
- Ice cream making is a two-part process: conversion and ripening. Mixing batter into ice cream is the conversion process in which the ice cream consistency will be similar to soft serve. The ripening process takes place in the freezer, where the ice cream will harden over a period of 2-4 hours.
- Follow recommended mixer speeds. Faster speeds will slow the conversion process.
- Batter volume grows significantly during the conversion process.
- Initial batter volume should not exceed 46 oz. (1.4 L) to produce 2 quarts (1.9 L) of ice cream.
- Keep in mind that freezing subdues sweetness, so recipes won't taste quite as sweet once they are frozen.
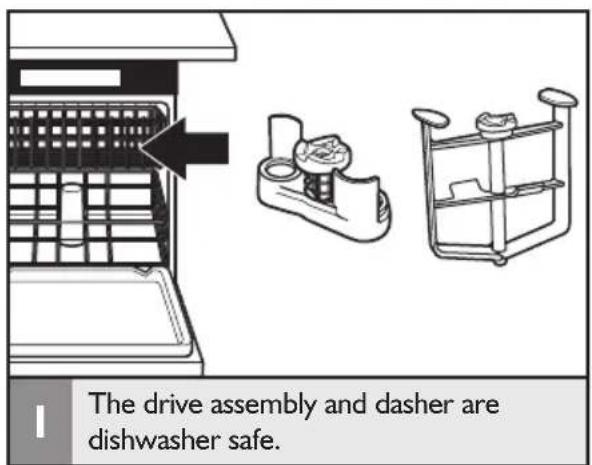
IMPORTANT: Allow the freeze bowl to reach room temperature before attempting to clean it.


WARNING
Food Poisoning Hazard
Do not let foods that contain perishable ingredients such as eggs, dairy products, and meats remain unrefrigerated for more than one hour.
Doing so can result in food poisoning or sickness.
Caramel Pecan Ice Cream
3 12 cups (830 mL) whole milk
I can (14 oz. [415 mL]) sweetened condensed milk
I cup (235 mL) prepared hot caramel or butterscotch caramel topping (about 12 oz. [340 g])
I package (3.4 oz. [100 g]) instant cheesecake pudding and pie filling mix
I teaspoon (5 mL) vanilla ^1/_8 teaspoon (.5 mL) salt
1-1½ cups (235-355 mL) coarsely chopped pecans
In medium bowl, place all ingredients except pecans. Whisk until well blended and pudding is dissolved. Cover and chill thoroughly, at least 6 hours.
Assemble and engage freeze bowl, dasher, and drive assembly as directed in attachment instructions. Turn to STIR (Speed I). Using container with spout, pour mixture into freeze bowl. Continue on STIR (Speed I) for 15-20 minutes or until desired consistency, adding pecans during last 1 minute of freeze time. Immediately transfer ice cream into serving dishes, or freeze in an airtight container.
Yield: 16 servings (1/2 cup [120 mL] per serving).
Per Serving: About 240 cal, 5 g pro, 35 g carb, 10 g total fat, 3.5 g sat fat, 15 mg chol, 230 mg sod.
French Vanilla Ice Cream
2½ cups (590 mL)
half-and-half
8 egg yolks
I cup (235 mL) sugar
2½ cups (590 mL) whipping cream
4 teaspoons (20 mL) vanilla
1/8 teaspoon (.5 mL) salt
In medium saucepan over medium heat, heat half-and-half until very hot but not boiling, stirring often. Remove from heat; set aside.
Place egg yolks and sugar in mixer bowl. Attach bowl and wire whip to mixer. Turn to Speed 2 and mix about 30 seconds, or until well blended and slightly thickened. Continuing on Speed 2, very gradually add half-and-half; mix until blended. Return half-and-half mixture to medium saucepan; cook over medium heat until small bubbles form around edge and mixture is steamy, stirring constantly. Do not boil. Transfer half-and-half mixture into large bowl; stir in whipping cream, vanilla, and salt. Cover and chill thoroughly, at least 8 hours.
Assemble and engage freeze bowl, dasher, and drive assembly as directed in attachment instructions. Turn to STIR (Speed I). Using a container with a spout, pour mixture into freeze bowl. Continue on STIR (Speed I) for 15 to 20 minutes or until desired consistency. Immediately transfer ice cream into serving dishes, or freeze in airtight container.
Yield: 16 servings (1/2 cup [120 mL] per serving).
Per Serving: About 260 cal, 3 g pro, 16 g carb, 20 g total fat, 12 g sat fat, 165 mg chol, 50 mg sod.
VARIATIONS
Fresh Strawberry Ice Cream
In medium bowl, combine 2 cups (475 mL) chopped, fresh strawberries (or other fresh fruit) and 2 to 3 teaspoons (10 to 15 mL) sugar, if desired. Let stand while ice cream is processing. Add during last 3 to 5 minutes of freeze time.
Yield 20 servings (1/2 cup [120 mL] per serving).
Per Serving: About 210 cal, 3 g pro, 14 g carb, 16 g total fat, 10 g sat fat, 135 mg chol, 40 mg sod.
Cookies 'n Cream Ice Cream
Add 1½ cups (355 mL) chopped, cream-filled chocolate sandwich cookies (or other cookies, nuts, or candy) during last 1 to 2 minutes of freeze time.
Yield 19 servings (1/2 cup [120 mL] per serving).
Per Serving: About 230 cal, 3 g pro, 16 g carb, 18 g total fat, 10 g sat fat, 140 mg chol, 70 mg sod.
Triple Chocolate Ice Cream
2 cups (475 mL) whipping cream, divided
2 squares (1 oz. [30 g] each) semisweet baking chocolate, cut into chunks
2 squares (1 oz. [30 g] each) unsweetened baking chocolate, cut into chunks
2 cups (475 mL) half-and-half
I cup (235 mL) sugar
^1/3 cup (80 mL) unsweetened cocoa powder
8 egg yolks
4 teaspoons (20 mL) vanilla
1/8 teaspoon (.5 mL) salt
4 bars (1.55 oz. [46 g] each) milk chocolate, chopped (about 1 ½ cups [355 mL])
In small saucepan, place 12 cup (120 mL) whipping cream, semisweet chocolate, and unsweetened chocolate. Heat over medium-low heat until chocolate melts, stirring frequently. Remove from heat; set aside. In medium saucepan over medium heat, heat half-and-half until very hot but not boiling, stirring often. Remove from heat; set aside.
In small bowl, combine sugar and cocoa powder. Set aside. Place egg yolks in mixer bowl. Attach bowl and wire whip to mixer. Turn to Speed 2 and gradually add sugar mixture; mix about 30 seconds, or until well blended and slightly thickened. Continuing on Speed 2, very gradually add chocolate mixture and half-and-half; mix until well blended.
Return half-and-half mixture to medium saucepan; stirring constantly, cook over medium heat until small bubbles form around edge and mixture is steamy. Do not boil. Transfer half-and-half mixture into large bowl; stir in remaining 1 ½ cups (355 mL) whipping cream, vanilla, and salt. Cover and chill thoroughly, at least 8 hours.
Assemble and engage freeze bowl, dasher, and drive assembly as directed in attachment instructions. Turn to STIR (Speed I). Using a container with a spout, pour mixture into freeze bowl. Continue on STIR (Speed I) for 10 to 15 minutes or until desired consistency, adding milk chocolate during last 1 to 2 minutes of freeze time. Immediately transfer ice cream into serving dishes, or freeze in an airtight container.
Yield: 16 servings (1/2 cup [120 mL] per serving).
Per Serving: About 340 cal, 5 g pro, 30 g carb, 24 g total fat, 15 g sat fat, 160 mg chol, 50 mg sod.
Pumpkin Ice Cream
1 12 cups (355 mL) light cream
6 egg yolks
^3/_4 cup (175 mL) sugar
^1/_2 teaspoon (2 mL) vanilla extract
^3/_4 teaspoon (4 mL) pumpkin pie spice
1 ½ cups (355 mL) heavy cream
1 12 cups (355 mL) canned solid pack pumpkin
Scald cream in a heavy saucepan. Whisk yolks, sugar, and vanilla in a medium bowl. Gradually whisk in the cream, add the spice. Return to saucepan and stir over medium-low heat until mixture thickens, about 10 minutes; do not boil. Remove from heat. Whisk in the heavy cream and the pumpkin. Strain into bowl. Refrigerate until well chilled.
Assemble and engage freeze bowl, dasher, and drive assembly as directed in attachment instructions. Turn to STIR (Speed I). Using a container with a spout, pour mixture into freeze bowl. Continue on STIR (Speed I) for 15 to 20 minutes or until desired consistency. Immediately transfer ice cream to serving dishes, or freeze in airtight container.
Yield: 8 servings (1 cup [235 mL] per serving).
Per Serving: About 370 cal, 25 g carb, 29 g total fat, 17 g sat fat, 245 mg chol, 43 mg sod.
Creamy Lemon-Orange Gelato
2 cups (475 mL) reduced-fat (2%) milk
4 (2 × 34 - inch [5 × 2 cm] strips orange peel
4 (2 × 34 - inch [5 × 2 cm] strips lemon peel
6 coffee beans
5 egg yolks
^3/_4 cup (175 mL) sugar
Scald milk with orange peel, lemon peel and coffee beans in heavy medium saucepan.
Whisk yolks and sugar in medium bowl to blend. Gradually whisk half of milk mixture into yolks. Return yolks to saucepan with remaining milk. Stir over low heat until mixture thickens slightly and leaves path on back of spoon when finger is drawn across, about 8 minutes; do not boil. Strain into medium bowl. Refrigerate until well chilled.
Assemble and engage freeze bowl, dasher, and drive assembly as directed in attachment instructions. Turn to STIR (Speed I). Using a container with a spout, pour mixture into freeze bowl. Continue on STIR (Speed I) for 15 to 20 minutes or until desired consistency. Transfer ice cream to airtight container and freeze several hours to allow flavors to ripen. Can be prepared up to 4 days ahead. If frozen solid, soften slightly in refrigerator about 20 minutes before serving.
Yield: 8 servings (1/2 cup [120 mL] per serving).
Per serving: About 135 cal, 4 g pro, 21 g carb, 4 g total fat, 2 g sat fat, 133 mg chol, 30 mg sod.
Fresh Raspberry Sorbet
6 cups (1.5 L) raspberries
^1/_4 cup (60 mL) plus two tablespoons (30 mL) water
114 cups (295 mL) Simple Syrup (recipe follows)
Combine raspberries and water in bowl of food processor fitted with metal blade. Process until very smooth; pour through fine mesh strainer, pressing down lightly on solids trapped in strainer to extract as much liquid as possible without forcing solids through strainer. Discard solids. Pour liquid into airtight container and refrigerate until thoroughly chilled, at least 8 hours.
Assemble and engage freeze bowl, dasher, and drive assembly as directed in attachment instructions. Turn to STIR (Speed I). Combine chilled raspberry juice and chilled simple syrup. Using a container with a spout, pour mixture into freeze bowl. Continue on STIR (Speed I) for 7 to 12 minutes or until desired consistency. Immediately transfer sorbet into airtight container and freeze at least 2 hours before serving.
Yield: 8 servings (1 cup [235 mL] per serving).
Per serving: About 234 cal, 1 g pro, 59 g carb, 1 g total fat, 0 mg chol, 1 mg. sod.
Simple Syrup
2 cups (475 mL) sugar
2 cups (475 mL) water
Combine sugar and water in saucepan. Bring to a boil over medium-high heat; cook and stir until sugar dissolves completely, about 10 minutes. Transfer to ice bath, stirring until well chilled. Refrigerate until ready to use.
Other Sorbets
Substitute the following quantities of ingredients for the ingredients listed above to make these sorbets:
| Flavor Fruit Syrup | Plus Water | Plus Simple | |
| Lemon 2 cups none (475 mL) lemon juice | 1 | 14 cups (295 mL) | |
| Mango | 2 cups (475 mL) chopped | 14 to 12 cup (60 to 120 mL) | 114 cups (295 mL) |
| Kiwi | 2 cups (475 mL) chopped | 12 cup (120 mL) 1 plus 1 tablespoon (15 mL) lime juice | 14 cups (295 mL) |
| Pineapple | 2 cups (475 mL) chopped | 14 cup (60 mL) plus 1 tablespoon (15 mL) lime juice | 114 cups (295 mL) |
| Blueberry | 5 cups (1.2 L) | 14 cup (60 mL) plus 2 tablespoons (30mL) lime juice | 114 cups (295 mL) |
Minted Mango Sherbet
I cup (235 mL) sugar
2 cups (710 mL)
whole milk
^1/_4 cup (60 mL) light
corn syrup
3 ripe mangoes, peeled, seeded, and chopped (about 3 cups [710 mL])
2 tablespoons (30 mL)
fresh lime or lemon juice
2 teaspoons (10 mL) finely chopped fresh mint, if desired
In medium saucepan, combine sugar, milk, and corn syrup. Heat over medium heat, stirring often, until very hot but not boiling. Remove from heat; set aside.
Place mangoes and lime juice in food processor work bowl; use the multipurpose blade to process until smooth. Add mango mixture and mint to milk mixture. Cover and chill thoroughly, at least 8 hours.
Assemble and engage freeze bowl, dasher, and drive assembly as directed in attachment instructions. Turn to STIR (Speed 1). Using a container with a spout, pour mixture into freeze bowl. Continue on STIR (Speed 1) for 7 to 12 minutes or until desired consistency. Immediately transfer sherbet into serving dishes, or freeze in an airtight container.
Yield: 14 servings (1/2 cups [120 mL] per serving).
Per Serving: About 130 cal, 2 g pro, 29 g carb, 2 g total fat, 1 g sat fat, 5 mg chol, 30 mg sod.
KitchenAid® Stand Mixer Attachment Warranty for the 50 United States, the District of Columbia, Puerto Rico, and Canada
This warranty extends to the purchaser and any succeeding owner for Stand Mixer Attachments operated in the 50 United States, the District of Columbia, Puerto Rico, and Canada.
| Length of Warranty: One Year Full Warranty from date of purchase. | |
KitchenAid Will Pay Hassle-Free Replacement of your Stand Mixer Attachment. for Your Choice of: See the next page for details on how to arrange for service, or call the Customer eXperience Center toll-free at I-800-541-6390.OR ent parts and repair labor costs to correct serials and workmanship. Service must be n Authorized KitchenAid Service Center. ent parts and repair labor costs to correct serials and workmanship. Service must be n Authorized KitchenAid Service Center. | |
| KitchenAid Will A. Repairs when Stand Mixer Attachment is used in other Not Pay for: than normal single family home use.B. Damage resulting from accident, alteration, misuse or abuse.C. Any shipping or handling costs to deliver your Stand Mixer Attachment to an Authorized Service Center.D. Replacement parts or repair labor costs for Stand Mixer Attachment operated outside the 50 United States, District of Columbia, Puerto Rico, and Canada. | |
| DISCLAIMER OF IMPLIED WARRANTIES; LIMITATION OF REMEDIESIMPLIED WARRANTIES, INCLUDING TO THE EXTENT APPLICABLE WARRANTIES OF MERCHANTABILITY OR FITNESS FOR A PARTICULAR PURPOSE, ARE EXCLUDED TO THE EXTENT LEGALLY PERMISSIBLE. ANY IMPLIED WARRANTIES THAT MAY BE IMPOSED BY LAW ARE LIMITED TO ONE YEAR, OR THE SHORTEST PERIOD ALLOWED BY LAW. SOME STATES AND PROVINCES DO NOT ALLOW LIMITATIONS OR EXCLUSIONS ON HOW LONG AN IMPLIED WARRANTY OF MERCHANTABILITY OR FITNESS LASTS, SO THE ABOVE LIMITATIONS OR EXCLUSIONS MAY NOT APPLY TO YOU.IF THIS PRODUCT FAILS TO WORK AS WARRANTED, CUSTOMER'S SOLE AND EXCLUSIVE REMEDY SHALL BE REPAIR OR REPLACEMENT ACCORDING TO THE TERMS OF THIS LIMITED WARRANTY. KITCHENAID AND KITCHENAID CANADA DO NOT ASSUME ANY RESPONSIBILITY FOR INCIDENTAL OR CONSEQUENTIAL DAMAGES. This warranty gives you specific legal rights and you may also have other rights which vary from state to state or province to province. |
Hassle-Free Replacement Warranty – 50 United States, District of Columbia, and Puerto Rico
We're so confident the quality of our products meets the exacting standards of KitchenAid that, if your Stand Mixer Attachment should fail within the first year of ownership, KitchenAid will arrange to deliver an identical or comparable replacement to your door free of charge and arrange to have your original Stand Mixer Attachment returned to us. Your replacement unit will also be covered by our one year limited warranty. Please follow these instructions to receive this quality service.
If your Stand Mixer Attachment should fail within the first year of ownership, simply call our toll-free Customer eXperience Center at 1-800-541-6390 Monday through Friday. Please have your original sales receipt available when you call. Proof of purchase will be required to initiate the claim. Give the consultant your complete shipping address. (No P.O. Box numbers, please.)
When you receive your replacement Stand Mixer Attachment, use the carton and packing materials to pack up your original Stand Mixer Attachment.
Hassle-Free Replacement Warranty – Canada
We're so confident the quality of our products meets the exacting standards of the KitchenAid® brand that, if your Stand Mixer attachment should fail within the first year of ownership, KitchenAid Canada will replace your Stand Mixer Attachment with an identical or comparable replacement. Your replacement unit will also be covered by our one year limited warranty. Please follow these instructions to receive this quality service.
If your Stand Mixer Attachment should fail within the first year of ownership, simply call our toll-free Customer eXperience Center at 1-800-807-6777 Monday through Friday. Please have your original
sales receipt available when you call. Proof of purchase will be required to initiate the claim. Give the consultant your complete shipping address. (No P.O. Box numbers, please.)
Your replacement Stand Mixer Attachment will be returned prepaid and insured. If you are unable to obtain satisfactory service in this manner call our toll-free Customer eXperience Centre at 1-800-807-6777.
Or write to us at: Customer eXperience Centre KitchenAid Canada 200 - 6750 Century Ave. Mississauga, ON L5N 0B7
Arranging for Service after the Warranty Expires, or Ordering Accessories and Replacement Parts
In the United States and Puerto Rico:
For service information, or to order accessories or replacement parts, call toll-free at 1-800-541-6390 or write to: Customer eXperience Center, KitchenAid Portable Appliances, P.O. Box 218 St. Joseph, MI 49085-0218
Outside the United States and Puerto Rico:
Consult your local KitchenAid dealer or the store where you purchased the Stand Mixer Attachment for information on how to obtain service.
For service information in Canada:
Call toll-free I-800-807-6777.
Or write to:
Customer eXperience Centre
KitchenAid Canada
200 - 6750 Century Ave.
Mississauga, ON L5N 0B7
BIENVENUE DANS LE MONDE DE KITCHENAID.
natural_image
Exterior view of a modern kitchen stand mixer with control panel and brand logo (no text or symbols on the main body)
natural_image
Line drawing of a cylindrical container with two side handles and a triangular handle, no text or symbols present.Bol de congélation

natural_image
Technical line drawing of a mechanical clamp or bracket component (no text or symbols)natural_image
Line drawing of a mechanical device with three legs and a central handle (no text or symbols)Palette
natural_image
Line drawing of a mechanical device with a base mount and handle (no text or symbols)natural_image
Diagram of a mechanical device with a downward arrow pointing to a circular component (no text or symbols)natural_image
Diagram of a mechanical component with directional arrows indicating movement or force (no text or symbols present)natural_image
Line drawing of a kitchen mixer with bowl and side blades (no text or symbols)natural_image
Line drawing of a kitchen mixer with control panel and side blades (no text or symbols)5
natural_image
Line drawing of a mechanical component with a knob and directional arrow (no text or symbols)6
natural_image
Illustration of a hand inserting into an electrical outlet with two outlets (no text or symbols)7
natural_image
Line drawing of a kitchen mixer with directional arrows indicating motion (no text or symbols)4
natural_image
Technical line drawing of a mechanical component with internal springs and housing (no text or symbols)5
natural_image
Illustration of a hand inserting into an electrical outlet with two outlets (no text or symbols)6
natural_image
Diagram showing a laptop keyboard with an arrow pointing to a device and its corresponding two views of a battery pack (no text or symbols present)natural_image
Line drawing of a hand washing a bucket with water, no text or symbols presentCustomer Satisfaction Center, KitchenAid Small Appliances, P.O. Box 218, St. Joseph, MI 49085-0218
natural_image
Exterior view of a modern kitchen stand mixer with a white bowl (no visible text or symbols)
natural_image
Line drawing of a cylindrical container with two side handles and a triangular handle, no text or symbols present.Tazón congelador

natural_image
Technical line drawing of a mechanical clamp or connector (no text or symbols)natural_image
Line drawing of a mechanical device with three legs and a central handle (no text or symbols)Agitador
I
natural_image
Technical line drawing of a mechanical device with a base mount (no text or symbols)2
natural_image
Diagram of a mechanical device with a downward arrow pointing to a circular component (no text or symbols)3
natural_image
Diagram of a mechanical component with directional arrows indicating flow or movement (no text or symbols)natural_image
Line drawing of a kitchen mixer with bowl and side blades (no text or symbols)natural_image
Line drawing of a kitchen stand mixer with control panel (no text or symbols)5
natural_image
Line drawing of a mechanical component with an arrow indicating direction (no text or symbols)6
natural_image
Illustration of a hand inserting into an electrical outlet with two outlets (no text or symbols)7
1
natural_image
Line drawing of a kitchen stand with handle and base (no text or symbols)2
natural_image
Diagram of a mechanical device with a downward arrow indicating force or direction (no text or symbols present)4
natural_image
Line drawing of a kitchen mixer with a bowl and stand (no text or symbols)natural_image
Line drawing of a kitchen mixer with directional arrows indicating motion (no text or symbols)4
natural_image
Technical line drawing of a mechanical component with internal spring and housing (no text or symbols)5
natural_image
Line drawing of a hand inserting a plug into an electrical outlet (no text or symbols)6
Customer Satisfaction Center, KitchenAid Small Appliances, P.O. Box 218, St. Joseph, MI 49085-0218
®/™ © 2013 KitchenAid. All rights reserved. The design of the stand mixer is a trademark in the U.S. and elsewhere. Used under license in Canada.

- WELCOME TO THE WORLD OF KITCHENAID.
- TABLE OF CONTENTS
- ICE CREAM MAKER ATTACHMENT SAFETY
- PARTS AND FEATURES
- ASSEMBLING THE ICE CREAM MAKER
- USING THE ICE CREAM MAKER
- TIPS FOR GREAT RESULTS ...... 12
- CARE AND CLEANING....13
- RECIPES
- WARRANTY 20
- PROOF OF PURCHASE & PRODUCT REGISTRATION
- Model Number
- Serial Number
- Date Purchased
- Store Name
- Your safety and the safety of others are very important.
- ! DANGER
- WARNING
- IMPORTANT SAFEGUARDS
- When using electrical appliances, basic safety precautions should always be followed including the following:
- SAVE THESE INSTRUCTIONS
- Parts and accessories
- Attaching the Ice Cream Maker for Tilt-Head Mixers
- Before First Use
- Attaching the drive assembly for Tilt-Head Mixers
- Attaching the Ice Cream Maker for Bowl-Lift Mixers
- Attaching the drive assembly for Bowl-Lift Mixers
- 3
- 4
- 5
- 6
- Making ice cream
- Before Use
- TIPS FOR GREAT RESULTS
- TYPE OF CREAM FAT %
- Caramel Pecan Ice Cream
- French Vanilla Ice Cream
- VARIATIONS
- Fresh Strawberry Ice Cream
- Cookies 'n Cream Ice Cream
- Triple Chocolate Ice Cream
- Pumpkin Ice Cream
- Creamy Lemon-Orange Gelato
- Fresh Raspberry Sorbet
- Simple Syrup
- Other Sorbets
- Minted Mango Sherbet
- KitchenAid® Stand Mixer Attachment Warranty for the 50 United States, the District of Columbia, Puerto Rico, and Canada
- Hassle-Free Replacement Warranty – 50 United States, District of Columbia, and Puerto Rico
- Hassle-Free Replacement Warranty – Canada
- Arranging for Service after the Warranty Expires, or Ordering Accessories and Replacement Parts
- In the United States and Puerto Rico:
- Outside the United States and Puerto Rico:
- For service information in Canada:
- BIENVENUE DANS LE MONDE DE KITCHENAID.
Brand : KITCHENAID
Model : KICA0WH
Category : Ice machine