
WD 7.300 - Vacuum Cleaner KARCHER - Free user manual and instructions
Find the device manual for free WD 7.300 KARCHER in PDF.


| Product type | Wet and dry vacuum cleaner |
| Brand | Kärcher |
| Model | WD 7.300 |
| Color | Yellow and black |
| Dimensions (L x W x H) | 389 x 340 x 536 mm |
| Weight | 8.5 kg |
| Tank volume | 30 liters |
| Nominal power | 1400 W |
| Maximum suction | 235 mbar |
| Maximum air flow | 70 l/s |
| Filter type | Washable pleated paper filter |
| Cable length | 4 m |
| Hose length | 2.5 m |
| Blower function | Yes |
| Power tool socket | Yes |
| Noise level | 74 dB(A) |
| Protection class | II |
| Included accessories | Suction hose, floor nozzle, crevice nozzle, upholstery nozzle, foam filter, filter bag |
| Maintenance and cleaning | Rinse the tank with clean water, clean the pleated filter under running water, allow to dry before use |
| Safety instructions | Do not vacuum flammable liquids, unplug before cleaning, use indoors only |
| Spare parts and repairability | Filters and bags available as spare parts, repairable by an authorized professional |
| Warranty | 2 years parts and labor |
Frequently Asked Questions - WD 7.300 KARCHER
User questions about WD 7.300 KARCHER
0 question about this device. Answer the ones you know or ask your own.
Ask a new question about this device
Download the instructions for your Vacuum Cleaner in PDF format for free! Find your manual WD 7.300 - KARCHER and take your electronic device back in hand. On this page are published all the documents necessary for the use of your device. WD 7.300 by KARCHER.
USER MANUAL WD 7.300 KARCHER
Deutsch 7
English 13
Français 19
Italiano 26
Nederlands 33
Español 40
Português 47
Dansk 54
Norsk 60
Svenska 66
Suomi 72
Ελληνικά 78
Türkçe 85
Русский 91
Magyar 99
Čeština 106
Slovenščina 112
Polski 118
Românește 125
Slovenčina 132
Hrvatski 138
Srpski 144
Български 150
Eesti 157
Latviešu 163
Lietuviškai 169
Українська 175
العربية 189
Register and win! www.karcher.com

17 | 18 19 | 20 | 21 | 22 | 23 | 24[cdws] | 25 | |
| WD 7.2xx | ● | ● | ● | ● | ● | ● | ○ | ○ |
| WD 7.3xx | ● | ● | ● | ● | ● | ● | ○ | ○ |
| WD 7.5xx | ● | ● | ● | ● | ● | ● | ○ | ○ |
| WD 7.7xx | ● | ● | ● | ● | ● | ● | ● | ● |






![| Category | Power (W) | Power (A) | Power (kg) | | :--- | :--- | :--- | :--- | | [V~] | 220 - 240 V / 1~50, 60 Hz | | | | nom | 1200 W | 1400 W | 9,0 kg | | Max. | 1400 W | 1600 W | 10,0 kg | | Max. | | | 10 A | | EU: 1800 W GB: 1400 W CH: 700 W | | | 16 A | | EU: 16 A GB: 13 A CH: 10 A | | | 14 I…](/content/2026/06/1293077/images/0a9c553f408462f7ecae37e0d2f54dfb520e72b6b50383aa42e7ece947c504c6.jpg)
Inhaltsverzeichnis
Safety instructions ..... EN ...8
Description of the Appliance EN . . .8
Operation ..... EN ..10
Maintenance and care .... EN .. 11
Troubleshooting ..... EN ..12
Technical specifications . . . EN . .12
General notes
Dear Customer,

Please read and comply with these original instructions prior to the initial operation of your appliance and store them for later use or subsequent owners.
Proper use
The appliance is intended for use as a Multi-Purpose Vac corresponding to the descriptions given in these operating instructions and the safety notes.
This appliance has been designed for use in private households and is not intended for commercial use.
- Protect the unit from rain. Do not store outside.
- Caution: Always use a pre-separator while vacuuming ashes and soot (order no. 2.863-139).
Use the Multi-Purpose Vac only with:
- Original filter bag.
- Original spare parts, accessories and special accessories.
The manufacturer is not responsible for any damages that may occur on account of improper use or wrong operations.
Environmental protection

The packaging material can be recycled. Please do not place the packaging into the ordinary refuse for disposal, but arrange for the proper recycling.

Old appliances contain valuable materials that can be recycled. Please
arrange for the proper recycling of old appliances. Please dispose your old appliances using appropriate collection systems.
Disposing the filters and filter bags
Filters and filter bags are made from environment-friendly materials.
They can therefore be disposed off through the normal household garbage provided you have not sucked in substances that are not permitted to be thrown into household garbage.
Notes about the ingredients (REACH)
You will find current information about the ingredients at:
www.kaercher.com/REACH
Warranty
The terms of the guarantee applicable in each country have been published by our respective national distributors. We will repair possible faults on your unit free of charge within the warranty period, insofar as the faults are caused by material defects or defective workmanship. Guarantee claims should be addressed to your dealer or the nearest authorized customer service centre, and supported by documentary evidence of purchase.
(See address on the reverse)
Customer Service
Our KÄRCHER branch will be pleased to help you further in the case of questions or faults.
(See address on the reverse)
Ordering spare parts and special attachments
At the end of the operating instructions you will find a selected list of spare parts that are often required.
You can procure the spare parts and the attachments from your dealer or your KÄRCHER branch office.
(See address on the reverse)
Safety instructions
- This device is not intended for use by persons (including children) with reduced physical, sensory or mental abilities or lacking experience and/or knowledge, unless they are supervised by a person responsible for their safety or are instructed by these persons on the use of the device. Children should be supervised, to ensure that they do not play with the device.
- Keep packaging film away from children - risk of suffocation!
- Switch the appliance off after every use and prior to every cleaning/maintenance procedure.
– Risk of fire. Do not vacuum up any burning or glowing objects. - The appliance may not be used in areas where a risk of explosion is present.
Electrical connection
The appliance may only be connected to alternating current. The voltage must correspond with the type plate on the appliance.
⚠️Risk of electric shock
Never touch the mains plug and the socket with wet hands.
Always hold the plug rather than the cable when disconnecting the power cord.
Check the power cord with mains plug for damage before every use. If the power cord is damaged, please arrange immediately for the exchange by an authorised customer service or a skilled electrician.
To avoid accidents due to electrical faults we recommend the use of sockets with a line-side current-limiting circuit breaker (max. 30 mA nominal tripping current).
Caution
Certain materials may produce explosive vapours or mixtures when agitated by the suction air!
Never vacuum up the following materials:
- Explosive or combustible gases, liquids and dust particles (reactive dust particles)
- Reactive metal dust particles (such as aluminium, magnesium, zinc) in combination with highly alkaline or acidic detergents
– Undiluted, strong acids and alkalies - Organic solvents (such as petrol, paint thinners, acetone, heating oil).
In addition, these substances may cause the appliance materials to corrode.
Description of the Appliance
Illustrations on fold-out pages!

■ These operating instructions describe the basic models of the Multi-Purpose Vacs shown on the front cover.
■ Depending on the model, there are differences in the equipment and included accessories.
When unpacking the product, make sure that no accessories are missing and that none of the package contents have been damaged. If you detect any transport damages please contact your dealer.
- included in the scope of delivery
- possible accessories
1 Suction hose connection
To connect the suction hose during vacuuming.
Note: In order to disconnect it, push down with your thumb and pull the suction hose out.
2 Machine socket
To connect an electric tool.
Note: Observe the maximum connected power (see Chapter "Specifications").
3 Blowing connection
Connect the suction hose to the blower connection, this will activate the blower function.
4 Carrying handle
To carry the appliance or to remove the appliance head after unlocking.
5 Filter flap release button
6 Push handle
7 ExPress filter cleaning button
8 Filter cleaning display
9 Accessory compartment, hook
This accessory compartment allows the storage of the suction hose, suction nozzles and the mains cable.
10 Key for mains cable retraction
11 Rotary switch (ON/OFF)
12 Parking position
To rest the floor nozzle during work interruptions.
13 Accessory storage container
This accessory compartment allows the storage of the suction pipes or other accessories.
14 Container closure
Pull out to open, push in to lock.
15 Wheels
16 Swivel casters
17 Flat fold filter with frame
(already installed in the appliance)
Caution
Filters and their frames must always be inserted during operation.
18 Filter bag intake
⚠ Caution: Please do not dispose of!
Is hooked into the interior of the container, is used to hold the filter bag.
19 Filter bag
Note: Do not use a filter bag for wet vacuuming!
Recommendation for appliances without filter cleaning: To vacuum fine dust, use the filter bag.
20 Suction hose with handle
21 Suction tubes 2 x 0.5 m
22 Floor nozzle
(with switching lever)
For vacuuming dust from hard surfaces and carpets:
Lever on symbol for carpets
Lever on symbol for hard surfaces
23 Crevice nozzle
24 Adapter
To connect the suction hose with an electric tool.
25 Flexible tool hose
For more flexibility when working with electric tools.
Note: Can also be used with an adapter.
Operation
△Always work with an inserted flat fold filter - during wet as well as dry vacuum cleaning!
Before Startup
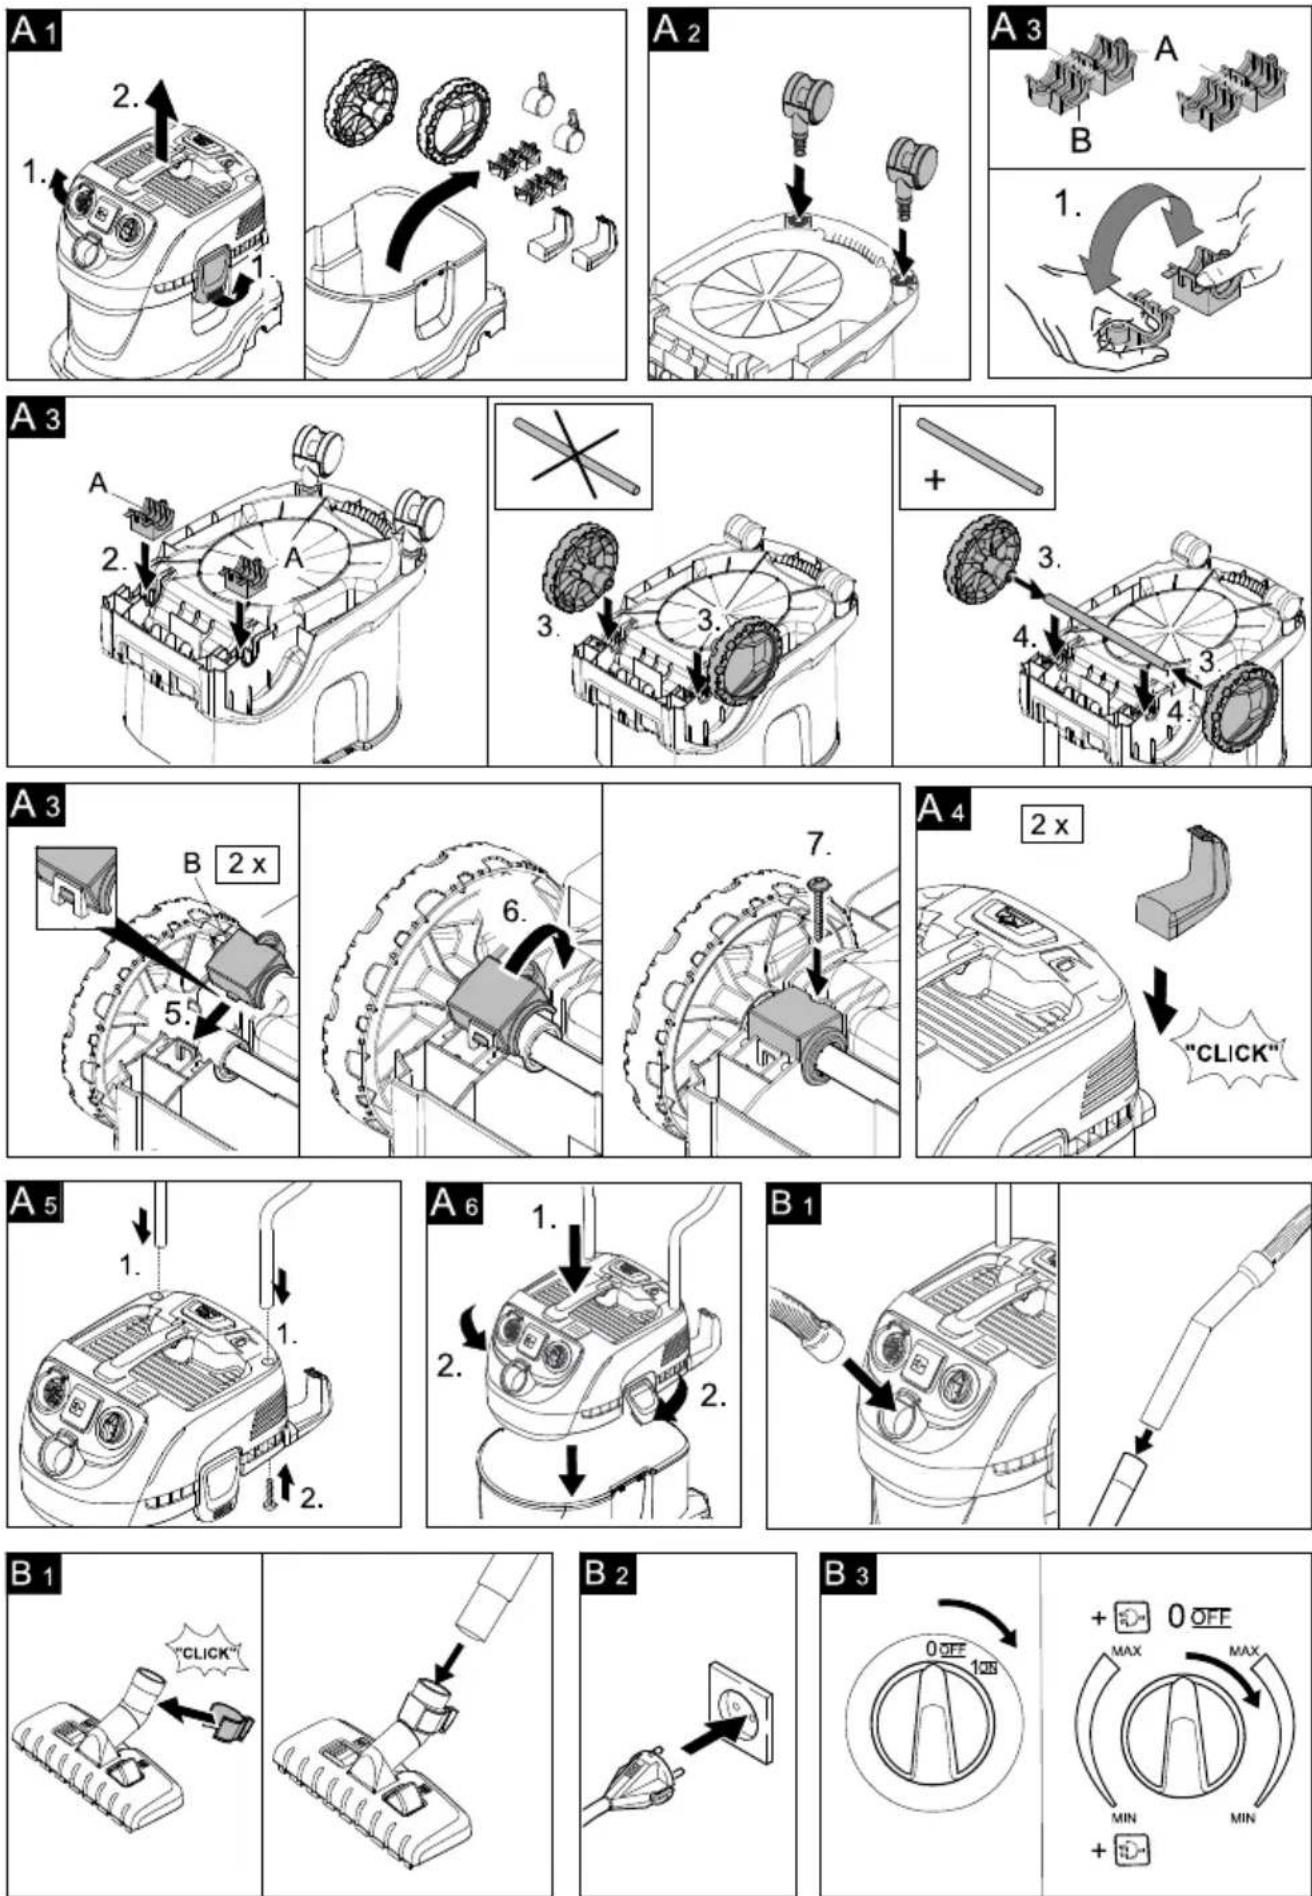
Illustration A1
→ Remove the appliance head and take the contents out of the container.
Illustration A2
→ Turn the container, press in the swivel casters in the openings at the base of the container till the end-point.
Illustration A 3
→ Install the rear wheels: Break the bearing halves apart and press the large halves into the wheel pickup.
For appliances without axle: Place the wheels into the wheel intake.
For appliances with axle: Attach the wheels to the axle and place into wheel intake.
Finally, hook the smaller halves into the larger ones and screw them in.
Illustration A 4
→ Install the hook.
For appliances with pushing handle: Illustration A 5
→ Insert the pushing handle into the two respective openings in the appliance head from above and press them down all the way. Secure from below using 2 screws.
Note: If the pushing handle is removed later on, the bottom openings must be closed up with the two screws for functional reasons.
Illustration A6
→ Insert and lock the appliance head.
Start up
Illustration B1
→ Connect accessories.
Illustration B2
→ Plug in the main plug.
Illustration B3
→ Turn on the machine.
For appliances without built-in socket.
→ Position I: Suction or blowing
→ Position 0: Appliance is switched off
For appliances with built-in socket
→ Position MAX: Suction or blowing.
→ Position+ MAX: Vacuuming with connected electric tool
→ Performance regulation: Reduce the suction if necessary during vacuuming, blowing or when working with an electric tool.
→ Position 0: The appliance is switched off. Electric tool is supplied with voltage.
Dry vacuum cleaning
⚠️Work only with a dry flat fold filter!
Illustration C1
Recommendation for appliances without filter cleaning: To vacuum fine dust, use the filter bag.
→ The filling level of the filter bag depends on the dirt that is sucked in.
Clogged filter bags can burst - therefore make sure to replace the filter bag in a timely manner!
The filter bag needs to be replaced more frequently while sucking in fine dust, sand, etc.
For appliances with ExPress filter cleaning: When vacuuming without a filter bag, the filter cleaning indicator lights up red if the flat fold filter needs to be cleaned.
→ Use the filter cleaning.
ExPress filter cleaning
The ExPress filter cleaning is intended for the vacuuming of large volumes of fine dust without the filter bag inserted.
If the filter cleaning indicator is red, clean the flat fold filter:
Illustration D1
→ Press the filter cleaning key 3 x times with the appliance switched on; wait about 4 seconds between the individual presses.
Note: After several filter cleaning processes or if the filter cleaning indicator is red, check the container for its fill volume. Empty the container if needed.
Wet vacuum cleaning
→ Attach the accessories to vacuum moisture or wetness to the suction pipes or directly to the handle.
Caution:
Do not use a filter bag!
Immediately switch the appliance off if foam forms or liquids escape!
Note: If the container is full a float closes the suction opening and the appliance works at a higher speed. Switch off the appliance immediately and empty the container.
Working with electrical power tools
→ Adapt the adapter to the connection diameter of the electric tool using a knife if necessary.
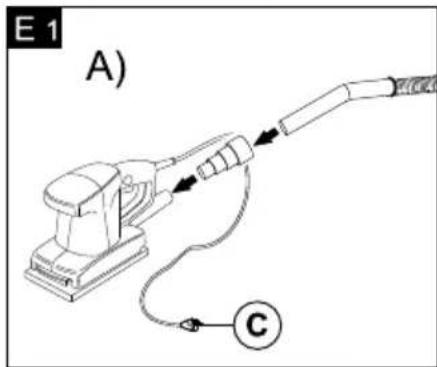
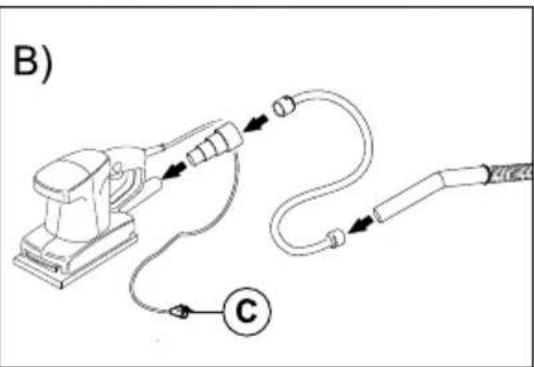
Illustration E1
→ A) Plug the enclosed adapter onto the handle of the suction hose and connect the electric tool with the connection.
→or
B) Use the flexible tool hose to gain more flexibility in your work. Connect this hose to the suction hose and to the adapter and then to the connection of the electric tool.
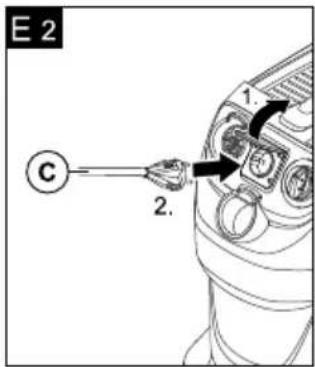
Illustration E2
→ For appliances with built-in socket:
Connect the mains plug of the electric power tool to the vacuum cleaner.
→ Switch the appliance on (move the rotary switch to the left to position + MAX) and start working.
Note: The suction turbine starts with a delay of 0.5 seconds after the electric tool has been switched on. After the electric tool has been switched off, the suction turbine will continue to run for approx. 5 seconds to suck in the remaining dirt from the suction hose.
Blowing function
Cleaning hard to reach locations or, where vacuuming is not possible, like leaves from a gravel bed.
Illustration F1
→ Connect the suction hose to the blower connection, this will activate the blower function.
Interrupting operation
→ Turn off the appliance.
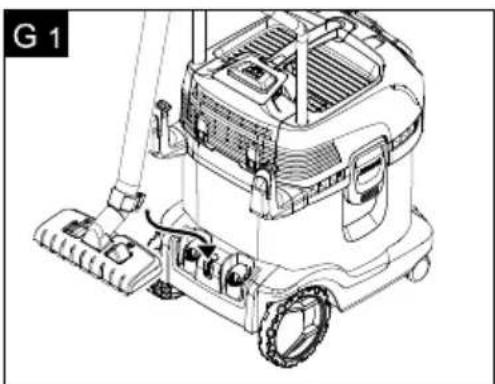
Illustration G1
→ Hook the floor nozzle into the parking position.
Finish operation
→ Turn off the appliance and disconnect the mains plug.
Empty the container
Illustration H1
→ Remove the appliance head and empty the reservoir filled with wet or dry dirt.
Storing the appliance
Illustration H2
→ Store the accessories and the mains cable on the appliance and store the appliance in dry rooms.
Maintenance and care
⚠️Danger
Turn off the appliance and remove the mains plug prior to any care and maintenance work.
Repair works may only be performed by the authorized customer service.
Caution
Do not use abrasives, glass or universal cleaners! Never immerse the appliance in water.
→ Clean the appliance and accessory parts made of plastic with a commercial plastic cleaner.
→ If required, rinse the container and accessories with water properly and dry them before reuse.
Clean flat fold filter
Illustration |1
→ For appliances without filter cleaning:
Release and open the filter flap. Remove the frame and filter and knock the dirt out of the filter. Clean the filter under running water if necessary. Do not rub or brush the filter dry.
Let it dry completely prior to installation.
Illustration | 2
→ After that, insert the filter first and then the frame.
→ For appliances with ExPress filter cleaning: Use the filter cleaning (see Chapter "ExPress filter cleaning").
Note: If the suction performance is still not satisfactory, in spite of the cleaning, separate the suction hose from the pipes, hold the opening of the suction hose shut/close it and activate the filter cleaning button three more times with the suction hose held shut.
Troubleshooting
Mains cable retraction does not function
→ The mains cable is probably dirty, clean the mains cable.
Water is leaking
→ Turn off the appliance immediately.
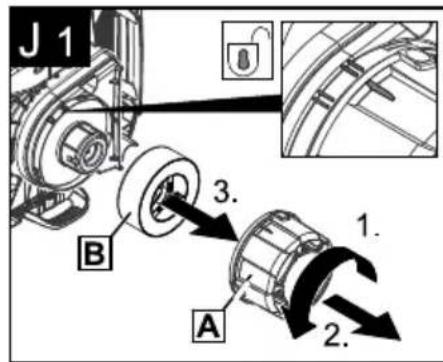
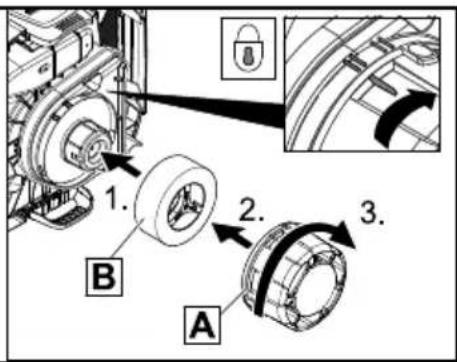
Illustration J1
→ Clean the floater system.
Remove the appliance head, unscrew the floater basket (A) in the direction of the arrow and remove it. Remove the floater (B) and clean both under flowing water.
To install, first insert the floater, then add the floater basket and lock it.
Decreasing cleaning power
If the suction power becomes less, check the following points:
→ Accessories, suction hose or suction tubes are clogged, please remove the obstruction.
→ Flat fold filter contaminated:
For appliances without ExPress filter cleaning: Remove the flat fold filter and clean it (see chapter "Cleaning the flat fold filter").
For appliances with ExPress filter cleaning: Activate the filter cleaning button 3 times; if necessary, repeat the cleaning process with the suction hose closed (held shut) (see Chapter "Cleaning flat fold filter").
Clean the filter under running water if necessary.
→ Replace damaged flat folded filter.
→ Filter bag is full: Insert new filter bag (Order No. refer to spare parts list at the end of this manual).
Caution
Please do not dispose of the filter bag intake!
Technical specifications
The specifications are listed on the flaps. In the following, you will find the explanation of the symbols used.
 | Voltage | |
 | Output Pnom | |
 | Output Pmax | |
 | Max. connection output of appli-ance socket | |
 | Mains fuse (slow-blow) | |
 | Container capacity | |
 | Water intake with handle | |
 | Water intake with floor nozzle | |
 | Power cord | |
 | Sound pressure level (EN 60704-2-1) | |
 | Weight (without accessories) |
Subject to technical modifications!
Table des matières
Consignes générales ..... FR ...7
www.kaercher.com/REACH
Garantie
www.kaercher.com/REACH
Garanzia
www.kaercher.com/REACH
Garantie
www.kaercher.com/REACH
Garantía
www.kaercher.com/REACH
Garantia
www.kaercher.com/REACH
Garanti
www.kaercher.com/REACH
Garanti
www.kaercher.com/REACH
Garanti
www.kaercher.com/REACH
Takuu
www.kaercher.com/REACH
Εγγύηση
www.kaercher.com/REACH
Garanti
www.kaercher.com/REACH
Гарантия
www.kaercher.com/REACH
Garancia
www.kaercher.com/REACH
Záruka
www.kaercher.com/REACH
Garancija
www.kaercher.com/REACH
Gwarancja
Mult stimate client,

www.kaercher.com/REACH
Conditii de garantie
www.kaercher.com/REACH
Záruka
www.kaercher.com/REACH
Jamstvo
www.kaercher.com/REACH
Garancija
U svakoj zemlji važe uslovi garancije koje je objavila naša prodajna služba. U garantnom roku besplatno otklanjamo sve smetnje na uređaju ako se radi o grešci materijala ili proizvodnim manama. U slučaju ostvarivanja garantnih prava obratite se svom prodavcu ili ovlašćenoj servisnoj službi; priložite pribor i originalni račun.
www.kaercher.com/REACH
Гаранция
www.kaercher.com/REACH
Garantii
www.kaercher.com/REACH
Garantija
www.kaercher.com/REACH
Garantija
www.kaercher.com/REACH
Гарантія

5.964-776.0 14.08.2012
AE Karcher FZE, P.O. Box 17416, Jebel Ali Free Zone, Dubai, United Arab Emirates,
4 8861177 • www.karcher.ae
AT Alfred Kärcher Ges.m.b.H., Lichtblaustraße 7, 1220 Wien,
01 250 600 • www.kaercher.at
AU Karcher Pty. Ltd., 40 Koornang Road, Scoresby 3179, Victoria, Australia,
1800 675 714 • www.karcher.com.au
BE Kärcher N.V., Industrieweg 12, 2320 Hoogstraten,
0900 10027 • www.karcher.be
CH Kärcher AG, Industriestrasse 16, 8108 Dällikon, Kärcher SA, Croix-du-Péage, 1029 Villars-Ste-Croix,
0844 850 863 • www.kaercher.ch
CN Kärcher (Shanghai) Cleaning Systems Co. Ltd., East Part, Building 20, No. 1000, Jinhai Road, Pudong, Shanghai, 201206
021 5076 8018 • www.karcher.cn
CZ Kärcher spol. s r.o., Modletice 141, 251 01 Ricany,
0323 606 014 • www.kaercher.cz
GBKärcher (U.K.) Ltd., Kärcher House, Beaumont Road, Banbury, Oxon OX16 1TB,
01295 752 000 • www.karcher.co.uk
GRKärcher Cleaning Systems A.E., 31-33, Nikitara str. & Konstantinoupoleos str., 13671 Aharnes,
210 2316 153 • www.karcher.gr
HK Kärcher Limited, Unit 10, 17/F., Apec Plaza, 49 Hoi Yuen Road, Kwun Tong, Kowloon,
2357 5863 • www.karcher.hk
HU Kärcher Hungaria KFT, Tormásrét ut 2. (Vendelpark), 2051 Biatorbagy,
23 530 640 • www.kaercher.hu
IE Kärcher Limited (Ireland), C1 Centrepoint Business Park, Oak Road, Dublin 12,
01 409 7777 • www.kaercher.ie
IN Karcher Cleaning Systems Pvt. Ltd., Plot No. D-120, Sector-63, Noida 201307, Uttar Pradesh,
0120 466 1800 • www.karcher.in
IT Kärcher S.p.A., Via A. Vespucci 19, 21013 Gallarate (VA),
848 99 88 77 • www.karcher.it
JP Kärcher (Japan) Co., Ltd., Irene Kärcher Building, No. 2, Matsusaka-Daira 3-chome, Taiwa-cho, Kurokawa-gun, Miyagi 981-3408,
022 344 3140 • www.karcher.co.jp
KR Karcher Co. Ltd. (South Korea), 872-2 Sinjeong-Dong, Yangcheon-Gu, Seoul, Korea Zip code 158-856
02-322 6588, A/S. 1544-6577 • www.karcher.co.kr
NZ Karcher Limited, 12 Ron Driver Place, East Tamaki, Auckland, New Zealand,
09 274 4603 • www.karcher.co.nz
PL Kärcher Sp. z o.o., Ul. Stawowa 140, 31-346 Kraków,
012 6397 222 • www.karcher.pl
PT Neoparts S.A., Av. Infante D. Henrique, Lote 35, 1800-218 Lisboa,
218 558 300 • www.karcher.pt
ROKarcher Romania s.r.l., Sos. Odaii 439 Sector 1, RO-013606 Bucureşti,
0372 709 001, www.kaercher.ro
SG Karcher South East Asia Pte. Ltd., 5 Toh Guan Road East, #01-00 Freight Links Express Distripark, Singapore 608831.
6897-1811 • www.karcher.com.sg
SK Kärcher Slovakia, s.r.o., Bratislavská 25, 94901 Nitra,
037 6555 798 • www.kaercher.sk
TR Kärcher Servis Ticaret A.S., Mahmutbey Mahallesi İstoç, Petrol Plaza C-Blok Kat: 2-3, Bağcılar, 34218 Istanbul
0212 659 43 69 • www.karcher.com.tr
TWKarcher Limited, 7/F, No. 66, Jhongijheng Rd., Sinjhuang City, Taipei County 24243,
2 2991 5533 • www.karcher.tw
UA Kärcher Ltd., Petropavlivska Str., 4, Petropavlivska Borschagivka, Kyiv region, 08130,
0800 500 48 90 • www.karcher.ua
ZA Kärcher (Pty) Ltd., 144 Kuschke Street, Meadowdale, Edenvale, 1614,
011 574 5360 • www.karcher.co.za


- INHALTSVERZEICHNIS
- GENERAL NOTES
- DEAR CUSTOMER
- PROPER USE
- ENVIRONMENTAL PROTECTION
- DISPOSING THE FILTERS AND FILTER BAGS
- NOTES ABOUT THE INGREDIENTS (REACH)
- WARRANTY
- CUSTOMER SERVICE
- ORDERING SPARE PARTS AND SPECIAL ATTACHMENTS
- SAFETY INSTRUCTIONS
- ELECTRICAL CONNECTION
- ⚠️RISK OF ELECTRIC SHOCK
- CAUTION
- DESCRIPTION OF THE APPLIANCE
- ILLUSTRATIONS ON FOLD-OUT PAGES
- 1 SUCTION HOSE CONNECTION
- 2 MACHINE SOCKET
- 3 BLOWING CONNECTION
- OPERATION
- BEFORE STARTUP
- START UP
- DRY VACUUM CLEANING
- EXPRESS FILTER CLEANING
- WET VACUUM CLEANING
- WORKING WITH ELECTRICAL POWER TOOLS
- ILLUSTRATION E1
- →OR
- ILLUSTRATION E2
- BLOWING FUNCTION
- ILLUSTRATION F1
- INTERRUPTING OPERATION
- ILLUSTRATION G1
- FINISH OPERATION
- EMPTY THE CONTAINER
- ILLUSTRATION H1
- STORING THE APPLIANCE
- ILLUSTRATION H2
- MAINTENANCE AND CARE
- ⚠️DANGER
- CLEAN FLAT FOLD FILTER
- ILLUSTRATION |1
- ILLUSTRATION | 2
- TROUBLESHOOTING
- MAINS CABLE RETRACTION DOES NOT FUNCTION
- WATER IS LEAKING
- DECREASING CLEANING POWER
- TECHNICAL SPECIFICATIONS
- TABLE DES MATIÈRES
- GARANTIE
- GARANZIA
- GARANTÍA
- GARANTIA
- GARANTI
- TAKUU
- ΕΓΓΎΗΣΗ
- ГАРАНТИЯ
- GARANCIA
- ZÁRUKA
- GARANCIJA
- GWARANCJA
- MULT STIMATE CLIENT
- CONDITII DE GARANTIE
- JAMSTVO
- ГАРАНЦИЯ
- GARANTII
- GARANTIJA
- ГАРАНТІЯ
Brand : KARCHER
Model : WD 7.300
Category : Vacuum Cleaner