WA 6010 A plus - Washing machine Exquisit - Free user manual and instructions
Find the device manual for free WA 6010 A plus Exquisit in PDF.


| Product Type | Washing Machine |
| Brand | Exquisit |
| Model | WA 6010 A plus |
| Washing Capacity | 6 kg |
| Maximum Spin Speed | 1000 rpm |
| Energy Class | A+ |
| Dimensions (H x W x D) | 85 x 60 x 55 cm |
| Weight | 65 kg |
| Power Supply | 230 V / 50 Hz |
| Power Consumption | 2000 W |
| Opening Type | Front load |
| Number of Programs | 15 |
| Main Programs | Cotton, Synthetics, Delicates, Wool, Quick 30 min, Rinse, Spin, Drain |
| Special Functions | Delay start, Child lock, Rinse hold, Prewash |
| Display | LED with cycle indicators |
| Noise Level (Wash/Spin) | 56 dB / 76 dB |
| Water Consumption per Cycle | 45 L |
| Energy Consumption per Cycle | 0.85 kWh |
| Maintenance | Regular cleaning of filter and detergent drawer |
| Safety | Child lock, overflow protection system |
| Spare Parts | Available for standard components |
Frequently Asked Questions - WA 6010 A plus Exquisit
User questions about WA 6010 A plus Exquisit
0 question about this device. Answer the ones you know or ask your own.
Ask a new question about this device
Download the instructions for your Washing machine in PDF format for free! Find your manual WA 6010 A plus - Exquisit and take your electronic device back in hand. On this page are published all the documents necessary for the use of your device. WA 6010 A plus by Exquisit.
USER MANUAL WA 6010 A plus Exquisit
natural_image
Front view of a white three-wheeled washing machine with a digital display and control panel (no visible text or symbols)WA 6010 A+
DE
natural_image
Technical diagram of a mechanical housing with internal components and directional arrows indicating motion (no text or symbols)Abbildung 6
natural_image
Technical diagram of a mechanical housing or enclosure with an internal cavity and mounting holes, labeled with number 1 (no text or symbols beyond label)natural_image
Line drawing of a bathroom sink with a hose and faucet, no text or symbols present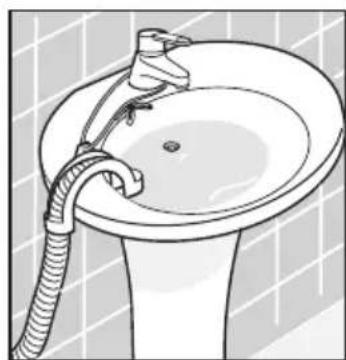
natural_image
Line drawing of a bathtub with a hose and faucet, no text or symbols presentnatural_image
Diagram of a drawer with arrows indicating direction, no text or symbols present
natural_image
Line drawing of a hand washing a small box on a circular sink (no text or symbols)Abbildung 19

natural_image
Technical diagram of a mechanical housing with internal components and directional arrows indicating motion (no text or symbols)Figure 6 Figure 7
natural_image
Technical line drawing of a mechanical housing or enclosure with a curved internal component and labeled part '1' (no text or symbols beyond label)
Figure 8
FR
natural_image
Line drawing of a bathroom sink with a hose and faucet, no text or symbols present
natural_image
Line drawing of a bathtub with a hose and faucet, no text or symbols presentFigure 12 Figure 14 Figure 13
FR
Figure 19 Figure 18 Figure 20

natural_image
Illustration of a hand inserting a coin into a device component, with no visible text or symbols
Figure 21 Figure 23 Figure 22
FR
The present Operation Manual describes technical features of the household automatic washing machine (hereinafter referred to as “the Machine”) and gives necessary information on its operation and helpful tips on how to make your laundry. Having carefully read the Operation Manual before switching on and using the Machine, you will be able to operate it properly.
Be sure to keep the Operation Manual throughout the whole service life of your Machine.
1 GENERAL INFORMATION
The Machine is intended to launder textile items by using low-foaming washing powders and synthetic detergents, and to rinse and spin them in the household conditions. All the operations with the items are performed automatically according to the preset washing program.
The Machine is intended for operation in the household conditions (at home) only. Operating it for industrial purposes (in restaurants, cafes, offices, kindergartens, hospitals, etc.) is forbidden.
The Machine should be operated at:
- ambient temperature of (25 ± 10) °C and maximum relative humidity of 75%;
- nominal voltage 230 V and frequency of (50 ± 1) Hz in single-phase AC electric mains;
- water pressure from 0,05 to 1 MPa in the water-supply system.
ATTENTION! Temperature drop in the room below 0^ C may result in freezing of the water inside the Machine and its failure.
The Machine is Class 1 electric shock protection device, therefore it must be connected to the electric mains through a two-pole socket with a grounding contact and minimum current capacity of 16 A.
To install a socket with a grounding contact, address an entity authorized to carry out these works.
The basic technical characteristics of the Machine are listed in Table 1.
The manufacturer reserves the right to improve the design of the Machine and introduce its new versions while keeping its basic specifications unchanged.
If transported at ambient temperature below 0 °C , the Machine should stay for at least 24 hour at room temperature before connecting to the electric mains.
ATTENTION! The manufacturer (seller) should not be made liable (including during the warranty period) for any defects or damage arising due to violation of operation or storage conditions, or resulting from force majeure circumstances (fire, natural calamity, etc.).
2 DESCRIPTION OF THE MACHINE
The basic parts of the Machine are shown in Fig. 1.
The control panel of laundry washer with notations of functions is shown in Fig. 2.
Switching the Machine on and program selection are made by turning the Wash Program Selector Knob (Fig. 4).
The selected washing parameters are indicated on the display of the Control Panel (Fig. 3). With putting the button START/PAUSE▶ II (Fig. 2) the indicator on the button lights and the laundry washer runs owing to chosen program.
In the time indicator on the display, you may set the time of delay of the washing cycle of the Machine. Optional Machine functions, if necessary, are set by pressing the respective buttons (Fig. 3).
The Machine has audio (sound) signalling. The audio signal accompanies the start and the end of the Machine cycle, and also is heard at setting non-compatible functions and at accidental pressing of the button during the Machine operation under the preset program.
The Machine has an electronic control system, which contributes to a uniform distribution of washed items in the drum before every spin to avoid excessive vibration and noise.
The door has an anti-closing blocking in case of accidental switching the Machine on, for example, by children.
PROGRAM SELECTION
Washing program is selected by the Selector (Knob), which turns in both directions – clockwise and contraclockwise. Around the Selector on the Control Panel the names of the programs are written. The basic parameters of the programs are specified in Table 4. The Selector is set exactly to the respective mark of the selected program.
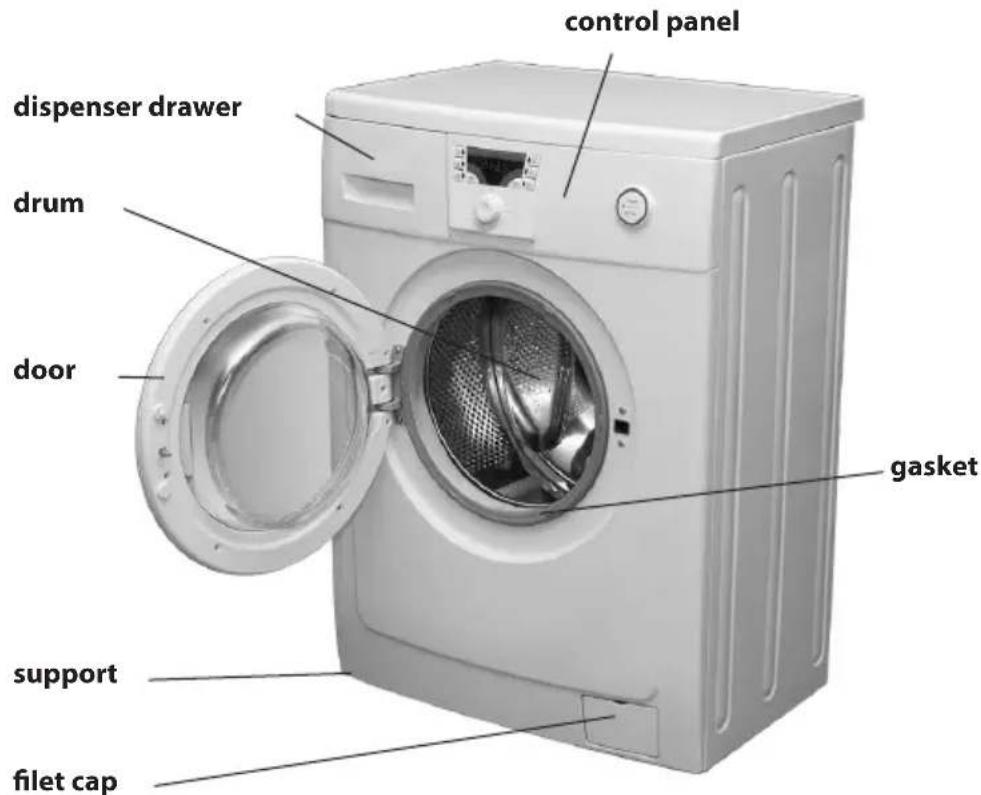
Figure 1
Table 1 Product fiche for household washing machines according to Delegated Regulation (EU) 1061/2010.
| Brand name | Exquisit |
| Model | WA 6010 A+ |
| Energy consumption class1 | A+ |
| Washing efficiency class | A |
| Wringing efficiency class2 | C |
| Annual energy consumption [kW·h/year]3 | 190 |
| Annual water consumption [l/annum]3 | 9900 |
| Consumption per cycle 6 kg Cotton 60°C [kW·h/l], Programme time [min.] | 1,05 kW·h/50 l, 147 min. |
| Consumption per cycle 3 kg Cotton 60°C [kW·h/l], Programme time [min.] | 0,80 kW·h/40 l, 140 min. |
| Consumption per cycle 3 kg Cotton 40°C [kW·h/l], Programme time [min.] | 0,65 kW·h/40 l, 87 min. |
| Remaining moisture [%] | <63 |
| Power Left on/Power off [W] | 2,00/1,00 |
| Maximum rotational speed during the wringing [rpm] | 1000 |
| Maximum loading in the cotton washing mode [kg] | 6,0 |
| Water supply system pressure [MPa] | 0,05 – 1,0 |
| Voltage/Frequency [V/Hz] | 230/50 |
| Nominal power consumed [W] | 2100 |
| Overall dimensions [H/W/D mm] | 846x596x558 |
| Net weight [kg] | 63 |
| Noise level: Washing / Wringing [dB(A)] | 59/73 |
^1 A + + + (highest efficiency) to D (least effective).
^2 A (highest efficiency) to D (least effective).
^3 On the basis of 220 standard washing cycles within a year when washing cotton at 60 °C and 40 °C at full or partial loading
«Cotton» 60 °C and «Cotton» 40 °C are the standard washing programmes to which the information in the label and the fiche relates, that these programmes are suitable to clean normally soiled cotton laundry and that they are the most efficient programmes in terms of combined energy and water consumption.
Dispenser drawer Display START/PAUSE button
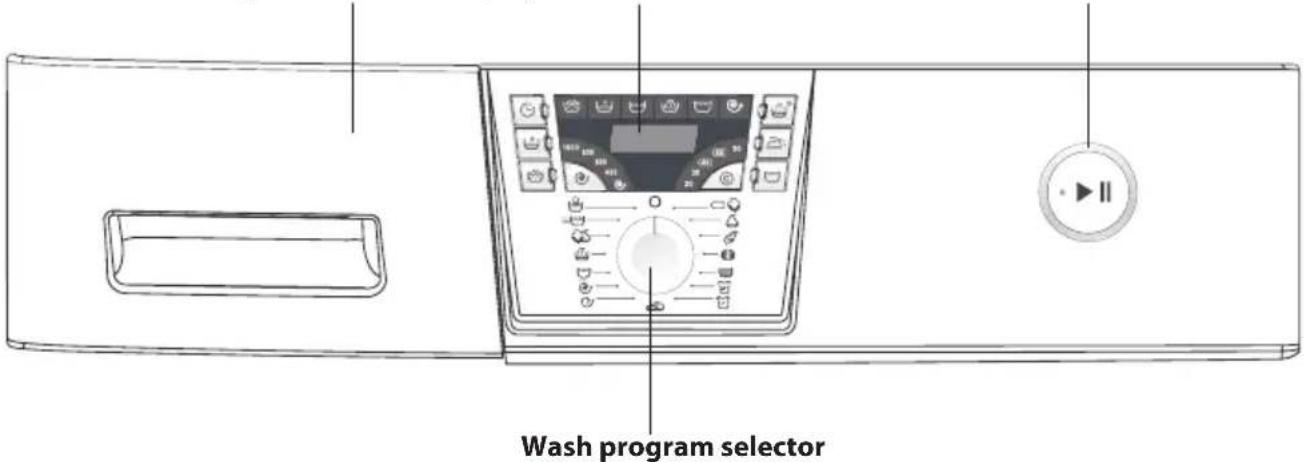
Figure 2 – Control Panel
After setting the Wash Program Selector to the mark, the Machine is switched off and the selected program is cancelled.
TEMPERATURE SELECTION
The Machine allows setting the washing temperature below the maximum value provided by the Wash Program in accordance with recommendations of detergent manufacturers. The temperature indicator (Fig. 3) has values of the washing temperature and the symbol 20^ , indicating the washing temperature in the cold water supply.
When selecting the wash program, the temperature indicator highlights the maximum value of washing temperature. To decrease the washing temperature, press the button Ⓐ (Fig. 3) – the values of the temperature will alternate from the maximum value to the 20 °C, and then back.
SPIN SPEED SELECTION
The spin speed indicator shows numerical values of the spin speed – from the maximum value (depending on the model and program) to the minimum one – and the symbol (the spin is off). When selecting the wash program, the spin speed indicator shows the maximum value of the spin speed. To decrease the spin speed, press the button (Fig. 3) – the values of the spin speed are shown alternately from the maximum value to the and then back.
ATTENTION! The speed of intermediate spins between the basic wash stages is not adjusted and depends on the selected program.
OPTIONAL FUNCTIONS OF THE MACHINE
To select an optional function, press the button of the needed function – the respective indicator will go on. After repeated pressing, the light indicator goes out, the function is off.
ATTENTION! When the selected function is incompatible with the set program, the indicator will not go on and the function will not be off (three audio signals will be heard).

Setting time for delay wash
To set the function, press the button – the time indicator will show the maximum time of delay wash 24 hours ("24:H"). At long pressing or short repeated pressings of the button, the time will change with a step of 1 hour down to the minimum value of 1 hour ("1:H"). When the time is not set, the wash will start immediately after pressing the ▶ II button.

Pre-wash
The function is provided for washing of heavily soiled (very dirty) cotton items. When switching the function on, the items will be washed additionally in the water with detergent at the temperature of 30^ C. It ensures a high quality dirt removal during the basic wash.

Soaking
The function is provided for washing heavily soiled (very dirty) cotton items. When switching the function on, the items will be kept additionally in water with detergent for 1 to 2 hours, and then washed under a pre-wash program. To cut the time of soaking and start of washing, switch off the function by pressing the button over again.
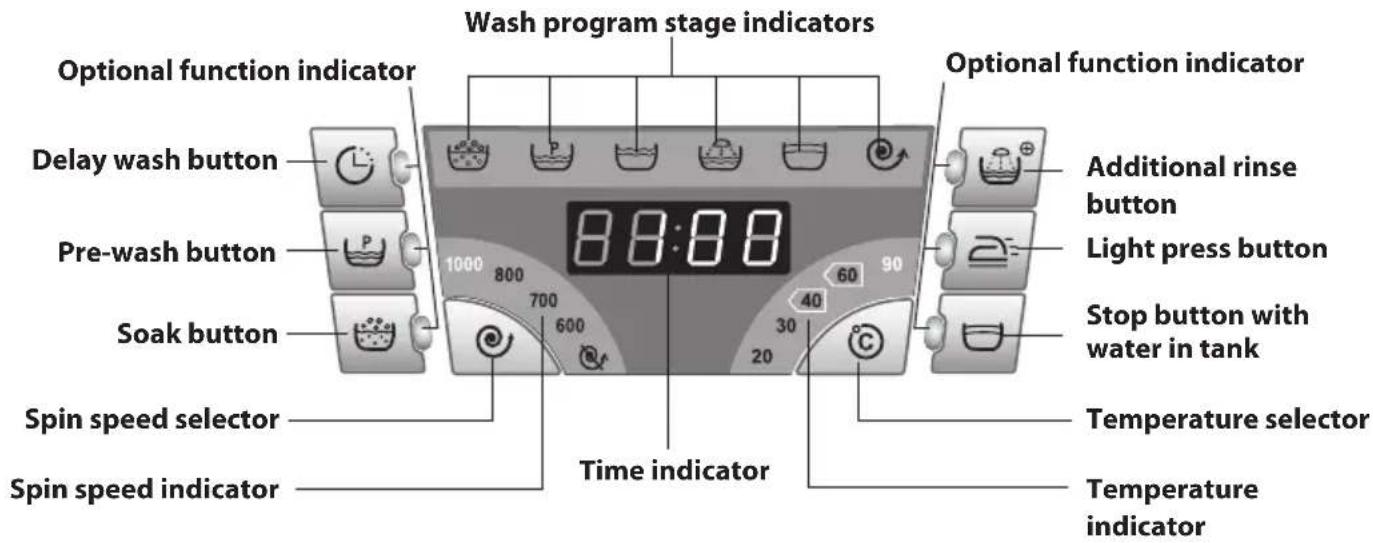
Figure 3 – Display

flowchart
graph LR
    A["Hand wash"] --> B["Speed wash"]
    B --> C["Combi-wash"]
    C --> D["Rinse"]
    D --> E["Drain"]
    E --> F["Spin"]
    F --> G["Delicate spin"]
    H["Cotton"] --> I["Sinthetics"]
    I --> J["Delicate spin"]
    J --> K["Wool"]
    K --> L["Extra wash"]
    L --> M["Sport removal"]
    M --> N["Sport clothes"]
    style A fill:#f9f,stroke:#333
    style B fill:#f9f,stroke:#333
    style C fill:#f9f,stroke:#333
    style D fill:#f9f,stroke:#333
    style E fill:#f9f,stroke:#333
    style F fill:#f9f,stroke:#333
    style G fill:#f9f,stroke:#333
    style H fill:#f9f,stroke:#333
    style I fill:#f9f,stroke:#333
    style J fill:#f9f,stroke:#333
    style K fill:#f9f,stroke:#333
    style L fill:#f9f,stroke:#333
    style M fill:#f9f,stroke:#333
    style N fill:#f9f,stroke:#333
Figure 4 – Wash Program Selector

Figure 5
EN

Additional rinse
The function is provided for washing children's clothes, items of people, who are detergent allergic, or for washing in a very soft water, in which a detergent is rinsed insufficiently. When the function is included into the Wash Program, one more rinse will be added.
Light press

he function is provided to reduce the creasing level of fabrics during washing and spinning and to ease subsequent ironing. The function ensures a delicate washing mode and careful spinning minimum number of wrinkles after washing.

Stop with water in the tank
The function is used, when items of a fine texture are washed, and when there is no possibility to take items from the Machine immediately after washing, not to get them crumpled. When the function is switched on, the Machine will stop automatically after the last rinse (before water drain).
ANTI-CLOSING DOOR BLOCKING
The anti-closing door blocking prevents from accidental Machine operation, for example, by children. To lock the door, turn the lock (Fig. 5) by a screwdriver clockwise up against the stop – the lock will move forward and prevent to close the door. To cancel the locking before washing, perform all the actions in the reverse sequence.
ATTENTION! Not to damage the Machine, never move it by holding the dispenser drawer, door or gasket.
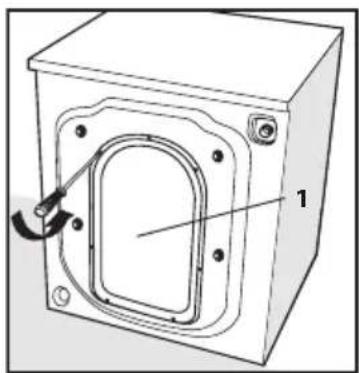
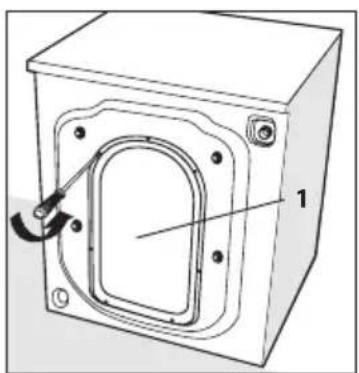
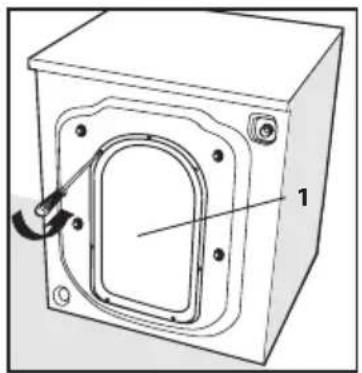
For transportation purposes, the drum of the Machine is fixed by locking bolts and spacer bars. Un-screw the four bolts with a spanner and take out the spacer bars (Fig. 6). If the spacer bars remain inside the Machine and would not get out, remove the back panel 1 (Fig. 7) with a crossblade screwdriver and take the bars out. Reinstall the panel. Close the holes with plastic plugs, including in the kit. Keep the bolts and spacer bars for future transportation.
NEVER operate the Machine with open spacer bar holes in the rear wall of the body.
INSTALLATION OF THE MACHINE
The Machine should be installed on a solid, even and dry surface. Soft flooring (carpets, polyurethane-based coatings) is not recommended as it promotes vibration and degrades ventilation of the Machine.
When installed on a wooded floor, the Machine should be first placed onto a wooden slab at least 15mm thick that is reliably bolted to the floor.
To increase the stability of the Machine during its operation on a wooden floor, it is recommended to install the Machine in the corner of the room.
The Machine should be levelled precisely horizontally by screwing its adjustable supports 1 in or out: loosen lock nuts 2 of the supports with a spanner, adjust the height of the supports, and tighten the lock nuts (Fig. 8). A wrong installation of the Machine by its horizontal level and low tightening of the lock nuts may be in the future a source of vibration and excessive noise during its operation.

natural_image
Technical diagram of a mechanical housing with internal components and directional arrows indicating motion (no text or symbols)
natural_image
Technical diagram of a mechanical housing or enclosure with an internal cavity and mounting holes, labeled with number 1 (no text or symbols beyond label)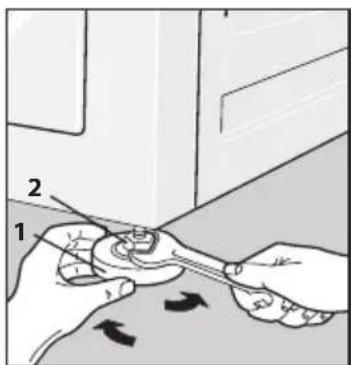
Figure 6 Figure 7 Figure 8
CONNECTING TO WATER SUPPLY AND DRAINAGE
Prior to connect the Machine to water supply, open the tap and let water flow and flush any sand and rust from water supply pipes.
The Machine is connected only to the cold water supply system through a water supply tap with a 34 -inch threaded branch pipe.
Prior to connect the Machine to the water conduit, open the cock and let the water flow down thus making washing down the contaminations of sand and rust out off the pipes.
The filling hose of, Machine is equipped with "AQUASTOP" protective system. Check up the filling hose prior to connect the Machine. Keep an eye on following circumstances: In accordance with Fig. 9, a yellow-orange color should be seen through the special window; if the color is red, than the hose is out of service. Connect the filling hose to the threaded branch pipe of the water delivery cock in accordance with Fig. 9 and to the solenoid-operated value in accordance with Fig. 10 having tightened the nuts by hand.
CAUTION! Do not sink the hose with a system "AQUASTOP" in water.
In the process of washing, the water supply tap should be completely open (Fig. 11).
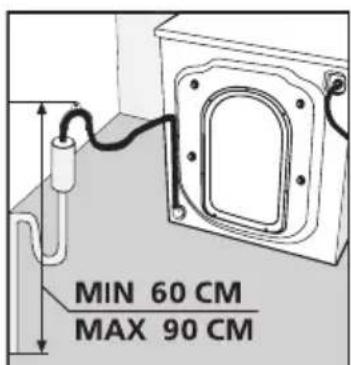
The draining hose (Fig. 12) should be at least 60~cm and at most 90~cm above the floor level. It this requirement is not observed, the Machine would not work.
For draining water directly into the sewerage, the draining hose should be fixed above the sewerage elbow (trap) into the sewerage pipe with internal diameter of at least 40mm to avoid reverse suction of drain water into the Machine.
The draining hose may be connected directly to the trap (Fig. 13), if it has a branch pipe for this purpose.
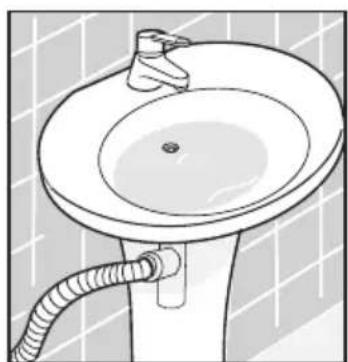
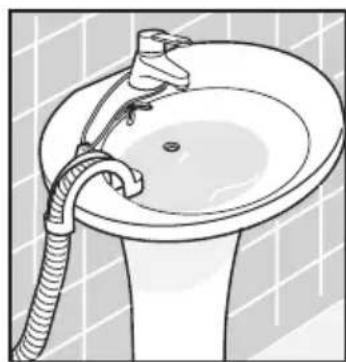
When draining water into the sink or bath the hose (Fig. 14), fix the hose in the bending point by a special clamp supplied with the Machine. The hose should not be immersed into water.
ATTENTION! After connecting to the water supply and sewerage, the filling and draining hoses should not be bent or pinched.
After connecting the Machine to water supply and sewerage, check the tightness of the filling hose connections: the connection points should be dry.
4 MACHINE OPERATION

Figure 9

Figure 10 Figure 11

natural_image
Line drawing of a bathroom sink with a hose and faucet, no text or symbols present
natural_image
Line drawing of a bathtub with a hose and faucet, no text or symbols presentFigure 12 Figure 13 Figure 14
EN
FIRST WASHING
Every Machine has been tested by the manufacturer, therefore, a little amount of water may remain in the Machine. To clean the Machine from inside and remove the water that might remain after tests, perform the fist washing cycle without any items.
Make your first washing by setting the Wash Program Selector Knob to the mark (Cotton) and the temperature to 90 °C.
ATTENTION! For the first washing, add 1/2 of the recommended dose of washing powder (detergent) into compartment 2 of the dispenser drawer (Fig. 15), making account of the manufacturer's guidelines as to the maximum items loading.
PREPARATION AND LOADING OF ITEMS
Prior to start washing:
- sort out the items, having separated the coloured ones from the white ones;
- distribute the items according to the fabric care labels;
- check that the pockets of your items of clothes be empty, the damaged and torn parts be repaired, and zippers, belts, buckles and hooks be closed or locked, and all the hard-removable spots be removed in advance;
- be sure to shake all the sand out of the clothes (pockets, cuffs);
- turn the items with applications attached inside out.
ATTENTION! Penetration into the Machine of metal objects (coins, clips) together with clothes may be a cause of damage of the rubber gasket and plastic drum of the Machine.
Prior to washing, put small items (socks, handkerchiefs, etc.) and delicate clothes (thin tights, stockings, etc.) into a special net or a pillowcase.
It is recommended to wash uplifts (bras) with plastic inserts (which are fit for machinewashing) in a special bag, since inserts may get into the Machine interior through drum openings and damage the mechanisms.
Examine the drum for absence of foreign objects and occasional presence of domestic animals (pets).
Load your clothes items into the drum. For better results of washing and spinning, it is recommended to wash big and small items together.
ATTENTION! At non-uniform distribution of items in the drum, the spinning speed will drop automatically, or no spinning will take place (it would not switch on).
NEVER load the machine only with the items made of fabrics, which absorb a lot of water (terry (Turkish) towels, gowns, mats, etc.), to avoid overloading.
ATTENTION! Close the door of the Machine until you hear a clear click of the lock (anti-closing blocking should be removed). The items should not be pinched between the door and the sealing gasket.
ORDER OF OPERATION
Check for correct installation of the filling and draining hoses.
If the Machine was not in use for a long time, drain off the stagnant water by unscrewing the nut and disconnecting the hose from the water supply tap. Connect the filing hose.
Open the water supply tap.
Load the respective compartments of the drawer with the washing powder intended for automatic washers, and any special treatment substances. Close the drawer.
Insert the electric power plug into the socket (receptacle) of the electric mains.
For switching the Machine on, rotate the Wash Program Selector away from its position and set it to the mark corresponding to the selected program). The display indication zones highlight the basic program parameters (main operations, maximum washing temperature and spinning rotation speed, and washing cycle duration.
Averaged time of selected washing program duration is displayed.
The real time of a washing may differ from the displayed one as it depends on water temperature and pressure in water-supply line, weight of laundry, type of good's cloths, voltage magnitude in electric main, etc.
ATTENTION! Nonconcurrency in displayed reading of time up to the end of washing with its real termination time is admitted.
If necessary, you may set optional functions, select the temperature and spinning rotation speed.
To start the Machine operation under the selected program, press the button ▶ || – the indicator illuminates on the button and sound signal is generated. The door locking device operates, and the display starts showing the indicators of the washing program and program operations.
If you have set the delay washing time, the time indicator of the display will show slowly blinking delay time with a onehour interval. Upon expiry of the preset time, the Machine will start to perform the selected program, and the time indicator will count down the cycle time.
After the end of the last washing operation, the door blocking device will switch off – a triple sound signal will be heard with a one-minute interval. The display will show "END", and the indicator will go out.
Upon termination of washing, set the Program Selector into the mark – the Machine will switch off. Take the plug out of the mains socket and close the water supply tap.
Open the door and take your items out.
Move the drawer out a little and leave the door opened a little, until the internal parts of the machine get dry. To avoid unpleasant smell from appearing in the Machine, the door should remain open till the next laundry. It is recommended to fix the door anti-closing blocking.
ATTENTION! A drop (interruption) of electric power supply during washing does not effect further. Machine operation: once the power is resumed, the Machine will go on with the program from the interruption moment.
PROGRAM CHANGE
To make changes in the earlier selected program, set the Wash Program Selector Knob into the mark. The Machine is switched off and the program underway is cancelled. Set the Knob to the setting of the new program.
It is recommended to check the presence of the washing powder in the drawer, and to add it, if necessary.
If it is required to stop the Machine without changing the program (for example, to add items into the drum), keep the button ▶ II depressed for 2 seconds – until blinking of the indicator in the ▶ II button and a sound signal. The time in the display will stop, and in about 2 minutes the door blocking device will switch off.
5 RECOMMENDATIONS AND TIPS
USE OF SYNTHETIC DETERGENTS (SDs)
The machine has a drawer for loading washing powders or detergents (Fig. 15). The drawer has three compartment marked with figures and a symbol as follows:
1 – for pre-washing and bleaching agents;
2 – for the basic washing;
- for special treatment substances (conditioners, softeners, starchers, aromatizers, etc.).
Take for your washing the SDs, bleachers and conditioners intended for automatic washers, and take into account the manufacturer's guidelines.
ATTENTION! In is not recommended to use gelbleachers for your washing.
Select the dosage of SDs with account of the weight of the items, their dirtiness and water hardness.
ATTENTION! SD overdosage, and use of the SDs intended for manual washing may result in excessive foam-formation, which degrades the washing quality and may cause the Machine failure.
Shutter, in section 2 in accordance with Figs. 15 and 16, is provided for liquid detergent using. Numeral

Figure 15
EN
levels of dosing in ml are applied on the both sides of the shutter.
Shutter with numerals on the face should be installed in WA 6010 A+, , Machine, but with numerals 200, 150, 100, 50.
When installing in pan section 2, the shutter must moved on the guides in lower position freely.
When you are using SDs as powder, take the shutter out of the main wash compartment 2 (Fig. 15). Be careful not to put any powder into the compartment for special treatment substances (Fig. 16), otherwise foam may form during rinsing and white spots may appear on the items.
In case of a liquid SD, set the shutter into compartment 2 (Fig. 17) and pour the SD with the account of the level marks on the shutter.
When choosing optional functions, place the SD into compartment 1. When using a liquid SD, put it in right before washing.
Any overdosage of special treatment agents in the compartment (above the level MAX on the cap), and their getting into the neighbouring compartments will degrade the washing quality.
When choosing the program (Spot Removal), put the bleachers into compartment 1 (Fig. 15), and the bleaching will take place immediately after the main washing.
ATTENTION! When using a bleacher, never set the optional function of pre-washing.
To improve the washing quality and protect the Machine from lime sediments, when washing in water having hardness II or III, it is recommended to use, alongside with SDs, a water softener. It should be added to the SD into compartment 2 (Fig. 15) according to manufacturer's guidelines.
The water hardness is defined according to Table 2. You may obtain data on your water hardness from the local water supply entity.
Prior to start washing, close the drawer filled with the SD.
NEVER move out the detergent drawer, when the Machine is working, otherwise water may leak and spray out of the Machine.
REMOVAL OF CERTAIN SPOT TYPES
Certain spots cannot be removed from items at usual machine washing. Therefore, they must be removed manually before washing in the Machine. First try the process in an unseen place of the item, then start from the edge of the spot and proceed towards its centre to avoid formation of blotchiness. See below the removal methods of various spots.
Wax should be scraped off with a rounded object in order not to damage the cloth, then the item is placed between two sheets of blotting paper and hot-ironed.
Spots from ball pens and felt pens are cleaned by means of soft cloth moistened in ethyl alcohol. Watch for the spot not to bleed.
Spots of mould are removed at washing with adding of a bleacher into the bleacher tray (Fig. 15), if the cloth withstands the effect of the bleacher. Otherwise, the dirty spot is moistened with 10-percent solution of hydrogen peroxide and left for 15 minutes.
Light fabric burns left by an iron are removed in the same way as the mould spots.
Rust is removed by special rustremoving agents. Follow the manufacturer's guidelines.

Figure 16 Figure 17
Shutter

natural_image
Line drawing of a mechanical device with a piston and handle, showing internal components (no text or symbols)To remove the chewing gum, rub the cloth with ice, then rub with a force and treat with a piece of cotton cloth moistened in acetone.
Paint is removed after complete drying. A contaminated spot is wiped with a solvent as indicated in the paint packing (for example, water, turpentine, trichloroethylene), soaped and washed.
Lipstick spots on cotton and wool are wiped with a cloth moistened in ether, and on silk – in trichloroethylene.
To remove nail varnish (polish), put some blotting paper over the dirty cloth and moisten the spot with acetone from the backside. By frequently changing the paper, moisten the cloth with acetone, until the spot disappears.
Spots of vegetable oil or tar (resin) are coated with butter for some time, and then washed off with turpentine.
Grass spots should be soaped by using diluted bleacher. They are easily removed from wool fabrics by 90-percent alcohol solution.
A cloth with spots of blood should be soaked in cold water with adding salt, and then washed with household soap.
INTERNATIONAL SYMBOLS FOR TAKING CARE OF TEXTILE ITEMS
The labels attached to the items contain marks to indicate the permitted care. Symbol meanings are summarized in Table 3.
When choosing the washing program and temperature, we recommend to get acquainted with the care symbols to avoid shrinkage and fading of your items.
6 WASH PROGRAMS
ATTENTION! To save washing powder or detergents and electric power, and to avoid contamination of the environment, when choosing the washing program, take into account the fabric type and the dirtiness of your items according to Table 4.
Table 2
| Hardness Degree | Water Characterization Water Hardness in ^0 dH Water Hardness in Milli-Mol per Litre | |
| I Soft 0 - 7 Up to 1,3 | ||
| II Medium hard 7 - 14 1,3 - 2,5 | ||
| III Hard 14 - 21 2,5 - 3,8 | ||
Table 3
| Washing |  | Wash at max. temperature of 40 °C |  |
| Delicate washing |  | Wash at max. temperature of 30 °C |  |
| Wash at max. temperature of 95 °C |  | Hand washing |  |
| Wash at max. temperature of 60 °C | 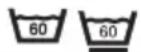 | Washing is forbidden |  |
Table 4 – Washing Programs
| Program name | Wash temperature | Rotational speed in the wringing mode, (rpm) | Power consumption, kWh | Water consumption, l | Weight of clothes to be washed, kg | Program duration, min.* | Detergent compartment | ||||||
| max | min | standard max | min | standard II | |||||||||
| Cotton | 90°C | 20°C | 1000 | 1000 | 40°C: 0,6560°C: 1,0590°C: 2,3 | 50 6,0 | 147 | ||||||
| Synthetics | 60°C | 20°C | 40°C | 800 | 800 | 0,4 40 3,0 | 82 X | ||||||
| Delicates | 40°C | 20°C | 30°C | 400 | 0 | 400 | 0,3 | 60 | 3,0 | 52 | X | ||
| Wool | 40°C | 20°C | 30°C | 400 | 0 | 400 | 0,3 | 85 | 1,0 | 48 | X | ||
| Hand wash | 30°C | 20°C | 30°C | 400 | 0 | 400 | 0,3 | 60 | 1,0 | 62 | X | ||
| Speed wash | 30°C | 20°C | 30°C | 800 | 0 | 800 | 0,2 | 30 | 3,0 | 43 | X | ||
| Combi-wash | 40°C | 20°C | 40°C | 600 | 0 | 600 | 0,3 | 60 | 6,0 | 57 | X | ||
| Extra wash | 60°C | 20°C | 60°C | 1000 | 0 | 1000 | 0,9 | 70 | 6,0 | 152 | X | ||
| Spot removal | 40°C | 20°C | 30°C | 1000 | 0 | 1000 | 0,4 | 60 | 6,0 | 80 | |||
| Sport clothes | 30°C | 20°C | 30°C | 1000 | 0 | 1000 | 0,2 | 30 | 3,0 | 78 | X | ||
| Sport shoes | 30°C | 20°C | 30°C | 1000 | 0 | 1000 | 0,06 | 25 | 2 pairs | 59 | X | ||
| Rinse | - | - | - | 1000 | 0 | 1000 | 0,06 | 40 | 6,0 | 35 | X | ||
| Drain | - | - | - | - | - | - | - | 6,0 | 3 | X | |||
| Spin | - | - | - | 1000 | - | 1000 | 0,1 | 0 | 11 | X | |||
| Delicate spin | - | - | - | 1000 | - | 1000 | 0,1 | - | 5 | X | |||
| ● - fill the detergent compartment;○ - fill the detergent compartment according to the function and your wish;X - do not fill the detergent compartment. | |||||||||||||
| * The real time of a washing may differ from the displayed one as it depends on water temperature and pressure in water-supply line, weight of laundry, type of good's cloths, voltage magnitude in electric main, etc. | |||||||||||||
7 MAINTENANCE
The Machine is a household appliance that needs no special technical maintenance, and it is designed for the minimum maintenance and care operations.
CLEANING THE MACHINE
ATTENTION! Prior to cleaning, disconnect the Machine from the electric mains and close the water supply tap.
The Machine should be cleaned on the regular basis. The exterior of the Machine, plastic and rubber parts should be wiped with a wet soft cloth only.
ATTENTION! Carefully remove accumulation of any foreign particles on the door sealing gasket.
NEVER use chemicals, abrasive compounds, spirit, soap, petrol and other solvents, since they may damage the Machine.
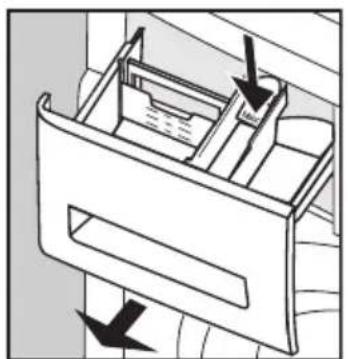
The detergents dispenser drawer needs periodic washing. For this purpose, pull the drawer out, and pressing down a little to the snug of the lid, following the indicator, and take it out of the Machine (Fig. 18).
Take the shutter, caps, and bleach tray out of the drawer (Fig. 15), and carefully wash their internal and external surfaces under a jet of warm water. Wash the dispenser drawer (Fig. 19). Install the removable parts back into the drawer and insert the drawer back into the Machine.
In case any rusty objects get into the Machine together with clothes items, spots of rust may appear on the drum. They should be removed by means of substances intended to clean stainless steel articles.
CLEANING WATER SUPPLY FILTERS
Filter 1 between the filling hose and the tap (Fig. 20) and filter 2 in the threaded branch pipe of the electric valve 1 (Fig. 21) are intended to stop mechanical impurities (sand, metal chips, etc.) from getting into the Machine together with water. It is recommended to clean up the filters at least once a year.
To clean up the filters, proceed as follows:
- disconnect the filling hose from the water supply tap (Fig. 20);
- manually extract filter 1 (Fig. 20) out of the filling hose;
- disconnect the filling hose from the threaded branch pipe of the electric valve of the Machine 1 (Fig. 21);
- remove filter 2 out of the threaded branch pipe of the electric valve with the help of a pair of pincers or pliers (Fig. 21);
- remove rubbish and dirt out of the filters, clean with a brush, and rinse the filters with a water jet.
natural_image
Diagram of a file drawer with arrows indicating direction (no text or symbols)
natural_image
Line drawing of a hand cleaning a small object on a circular plate (no text or symbols)
Figure 18 Figure 19 Figure 20

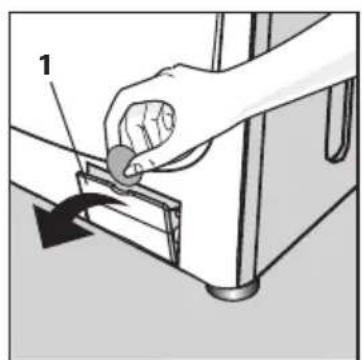

Figure 21 Figure 22 Figure 23
EN
After cleaning, install the filters back to the filling hose and into the threaded branch pipe of the electric valve in the reverse order. Connect the filling hose and check the tightness of connections – they should be dry, when Machine works.
CLEANING THE PUMP FILTER
Prior to start cleaning the filter, check for any water present in the drum.
It is recommended to clean the filter once a month and after every washing of longnap items.
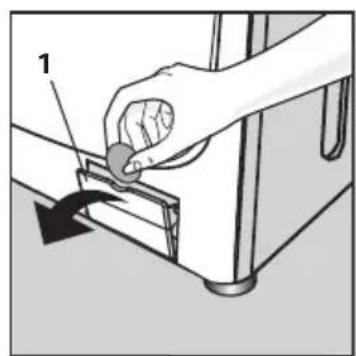
Prior to cleaning, drain off the water remaining in the filter. Open the lid of filter 1 (Fig. 22) with the help of a screwdriver, coin or some other sharpened piece. Draw hose 2 (Fig. 23) out of the Machine and put some vessel to collect the water. Take plug 1 out of hose 2 and drain the water down into the vessel. Turn the filter handle 4 contraclockwise (Fig. 23) and take the filter out.
ATTENTION! Residual water may leak out when filter handle is rotated.
Remove any rubbish out of the filter and clean it by a water jet.
Insert the plug into the hose and the filter into its place in the reverse order. Check the correct position and clamping of the filter. Close the lid of filter 3.
8 SAFETY REQUIREMENTS
When handling and transporting the Machine, observe safety precautions since the Machine is rather heavy in weight.
ATTENTION! Never use the Machine as a support, pedestal, etc.
NEVER place the Machine outdoors, where it may be exposed to weather conditions.
NEVER operate the Machine without plastic plugs installed as required.
Prior to connect the Machine to the electric mains, examine visually the power cord for absence of damage. The cord should not overbend or get pinched.
For safety reasons, a damaged power cord should be replaced for a new one by the manufacturer or a repair service.
The Machine is not designed for use by handicapped persons (including children), people having degraded sensorial and mental abilities, and with insufficient experience and incomplete knowledge also, in case if above persons are not under supervision, or do not receive instructions from persons responsible for their safety. Keep your Machine away from use in children games.
To ensure electric and fire safety, NEVER:
- connect the Machine to the electric mains with defective overcorrect protection facilities;
- connect the Machine by means of a socket without a grounding contact;
- connect the Machine to the electric mains by means of adapters, multioutput sockets (with two and more connection outputs) and/or cord extensions;
- insert the plug in and out of the socket with wet hands;
- touch the Machine with wet hands;
- wash the Machine with a water spray;
- pull the power cord to disconnect the Machine from the electric mains;
- make any unauthorized repairs and changes of the Machine design, its water and electric supplies, which may result in a serious damage of the Machine and cancel the warranties. The Machine should be only repaired by a qualified specialist of the repair service.
ATTENTION! In case of a failure of the Machine or detection of a malfunction, disconnect the Machine from the electric mains, cut water supply and call up a service specialist.
Please, use the new filling hose only by fixing to the cold water supply system.
NEVER let children operate the Machine.
To escape an explosion risk, NEVER use washing substances containing solvents.
During the washing cycle, it is recommended not to touch the door of the Machine, since it gets hot and may cause a burn.
Bipolar grounding receptacle for power supply of machine should be installed in place which is accessible for immediate shutting down the machine from electrical network.
After the washing cycle, set the Wash Program Selector Knob to the mark (Fig. 4), disconnect the Machine from the electric mains, having taken the plug out of the socket and shut off the water supply.
9 DISPOSAL
The materials used for packing the Machine may be processed and reused, if delivered to the second-hand materials collection points.
ATTENTION! Never let children play with the packing materials, since there is a danger to suffocate by getting entrapped in the film.
The Machine, which is subject to disposal, should be brought to the condition of unfitness by cutting away the power cord to exclude any possibility to connect the Machine to the electric mains, and by breaking the door lock. Then, dispose the Machine according to the current legislation of your country.
NL
Beste klanten!
natural_image
Technical diagram of a mechanical housing with rotating components and wrenches (no text or symbols)Beeld 6 Beeld 7
natural_image
Technical diagram of a mechanical housing or enclosure with a curved internal component and a labeled component (no text or symbols present)
Beeld 8
3 VOORBEREIDING VAN DE MACHINE VOOR GEBRUIK
VOORBEREIDING VOOR INSTALLATIE
natural_image
Line drawing of a bathroom sink with a hose and faucet, no text or symbols presentBeeld 13
natural_image
Line drawing of a bathtub with a hose and faucet, no text or symbols presentBeeld 14
natural_image
Diagram of a door handle with arrows indicating direction (no text or symbols)
natural_image
Illustration of a hand cleaning a tiled wall with a tool and container (no text or symbols)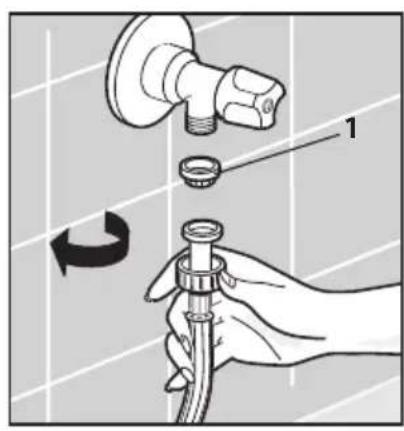


- DE
- FR
- GENERAL INFORMATION
- DESCRIPTION OF THE MACHINE
- PROGRAM SELECTION
- TEMPERATURE SELECTION
- SPIN SPEED SELECTION
- OPTIONAL FUNCTIONS OF THE MACHINE
- Setting time for delay wash
- Pre-wash
- Soaking
- EN
- Additional rinse
- Light press
- Stop with water in the tank
- ANTI-CLOSING DOOR BLOCKING
- INSTALLATION OF THE MACHINE
- CONNECTING TO WATER SUPPLY AND DRAINAGE
- CAUTION! Do not sink the hose with a system "AQUASTOP" in water.
- ATTENTION! After connecting to the water supply and sewerage, the filling and draining hoses should not be bent or pinched.
- MACHINE OPERATION
- FIRST WASHING
- PREPARATION AND LOADING OF ITEMS
- ORDER OF OPERATION
- PROGRAM CHANGE
- RECOMMENDATIONS AND TIPS
- USE OF SYNTHETIC DETERGENTS (SDs)
- ATTENTION! When using a bleacher, never set the optional function of pre-washing.
- REMOVAL OF CERTAIN SPOT TYPES
- INTERNATIONAL SYMBOLS FOR TAKING CARE OF TEXTILE ITEMS
- WASH PROGRAMS
- MAINTENANCE
- CLEANING THE MACHINE
- CLEANING WATER SUPPLY FILTERS
- CLEANING THE PUMP FILTER
- SAFETY REQUIREMENTS
- DISPOSAL
- NL
- Beste klanten!
- VOORBEREIDING VAN DE MACHINE VOOR GEBRUIK
- VOORBEREIDING VOOR INSTALLATIE
Brand : Exquisit
Model : WA 6010 A plus
Category : Washing machine