
HI6271MV - Frying Pan Atag - Free user manual and instructions
Find the device manual for free HI6271MV Atag in PDF.


| Product Type | Frying Pan |
| Brand | Atag |
| Model | HI6271MV |
| Diameter | 28 cm |
| Material | Stainless Steel with Non-Stick Coating |
| Weight | 1.5 kg |
| Handle Material | Stainless Steel with Silicone Grip |
| Compatible Cooktops | Gas, Electric, Ceramic, Induction |
| Oven Safe | Yes, up to 180°C |
| Dishwasher Safe | Yes |
| Non-Stick Coating | PTFE-Free (PFOA-Free) |
| Cleaning Instructions | Hand wash recommended; use soft sponge |
| Heat Resistance | Up to 250°C on cooktop |
| Warranty | 2 years |
| Country of Origin | Netherlands |
Frequently Asked Questions - HI6271MV Atag
User questions about HI6271MV Atag
0 question about this device. Answer the ones you know or ask your own.
Ask a new question about this device
Download the instructions for your Frying Pan in PDF format for free! Find your manual HI6271MV - Atag and take your electronic device back in hand. On this page are published all the documents necessary for the use of your device. HI6271MV by Atag.
USER MANUAL HI6271MV Atag
instructions for use induction hob
ATAG

natural_image
Black electrical stove with four circular burners on top (no text or symbols visible)HI3271MV HI7271M
HI6271M HI8271MT
HI6271MI HI9271M
HI6271MV HI9271MV
HI6272MV
700003177300
NL
HI9271MV

natural_image
Illustration of a cooking pot with lid and side handles on a stove (no text or symbols)natural_image
Two-panel illustration showing a cooking pot on a stove with upward arrows indicating heating and a crossed-out pan on the stove (no text or symbols)Let op
HI8271MT Boost management
natural_image
User interface icons including play, lock, pause, and navigation buttons (no text or symbols)natural_image
User interface icons including play, lock, pause, and navigation buttons (no text or symbols)natural_image
Pure graphical icons without any text or symbolsnatural_image
Pure graphical interface icons without any text or symbolsnatural_image
Symbol of a trash bin with crossed x's and y' axes, no text or numbers present| Temperature safety 8Cooking-time limiter 8 | |
| Use | |
| Using the touch controls 9Induction cooking 9How does induction work 10Induction noises 10Pans 11 |
Operation
| Switching on the hob and setting the power 13 | |
| Residual warmth indicator 13 | |
| Boost 14 | |
| Two cooking zones behind each other 14 | |
| HI8271MT Boost management 15 | |
| How to bridge the Vario induction zones 15 | |
| Switching off 16 | |
| Stand-by modus 16 | |
| Eco stand-by modus | 16 |
| Child lock | 17 |
| Pause | 18 |
| Recognizing a mode | 18 |
| Timer / Kitchen timer | 19 |
| Switching on and off the beep | 21 |
| Automatic pan detection | 21 |
| Automatic cooking programs | 22 |
| Chef function (HI9271MV) | 22 |
| Healthy cooking | 27 |
| Cooking settings | 28 |
Maintenance
| Cleaning | 30 | |
| Faults | ||
| General | 31 | |
| Troubleshooting table | 31 | |
| Technical details | ||
| 33 | ||
Environmental aspects
| Disposal of packaging and appliance | 36 |
Introduction
This hob has been designed for the real lover of cooking. Cooking on an induction hob has a number of advantages. It is easy, because the hob reacts quickly and can also be set to a very low power level. Because, moreover, it can also be set to a high power level, it can bring dishes to the boil very quickly. The ample space between the cooking zones makes cooking comfortable.
Cooking on an induction hob is different from cooking on a traditional appliance. Induction cooking makes use of a magnetic field to generate heat. This means that you cannot use just any pan on it. The pans section gives more information about this.
For optimum safety the induction hob is equipped with several temperature protections and a residual heat indicator, which shows which cooking zones are still hot.
This manual describes how you can make the best possible use of the induction hob. In addition to information about operation, you will also find background information that can assist you in using this product. You will also find cooking tables and maintenance tips.
Read the manual thoroughly before using the appliance, and store these instructions in a safe place for future reference.
The manual also serves as reference material for service technicians. Please, therefore, stick the appliance identification card in the space provided, at the back of the manual. The appliance identification card contains all the information that the service technician will need in order to respond appropriately to your needs and questions.
Enjoy your cooking!
Control panel
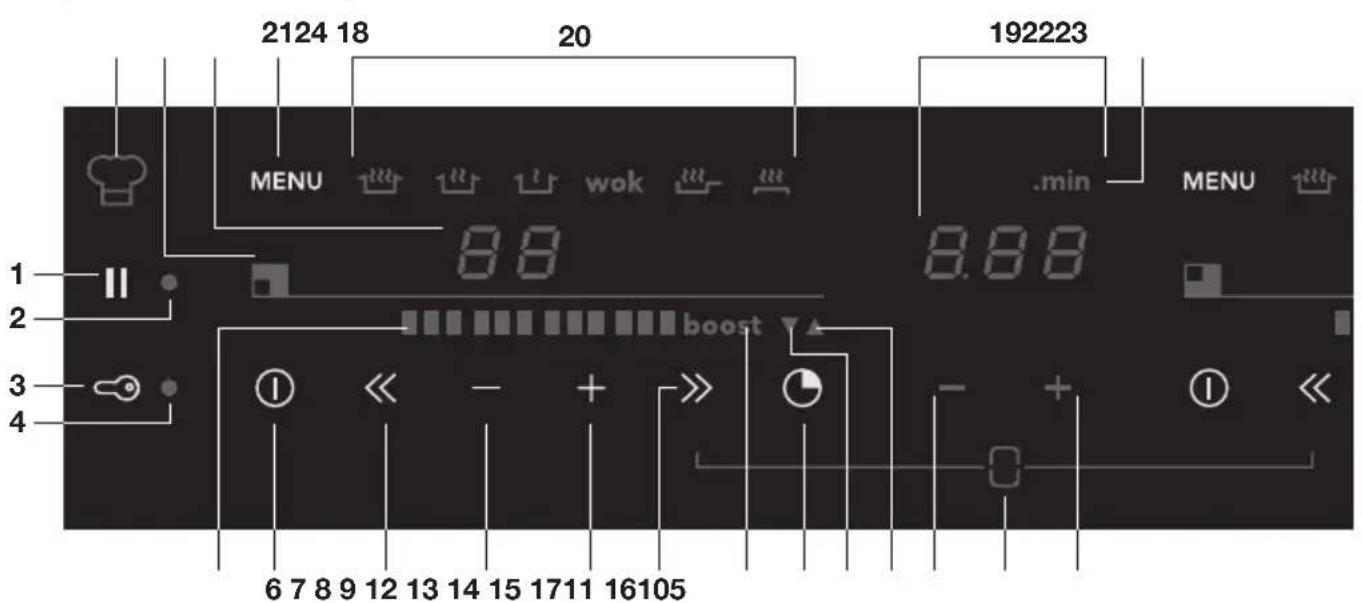
- Pause button
- Pause indicator
- Childproof lock/Eco stand-by button
- Childproof lock indicator/Eco stand-by indicator
- Level indicator in cubes
- On/off button
- Reduce the power quickly
- Reduce the power
- Raise the power
- Raise the power quickly
- Boost
- Timer/alarmclock button
- Alarmclock indicator
- Cooking time indicator
- 'Reduce the time' button
-
Bridge function (Two zones are connected; this creates one 'big' zone. Control 2 zones with one slider).
-
'Raise the time' button
-
'Minutes after dot' indicator
-
Timer/alarmclock
-
Menu functions (see page 22-27; 'Automatic cooking programs')
-
Menu button
-
Level indicator
-
Cooking zone indicator
-
Chef function
Description
HI3271MV HI6271MV / HI6272MV


HI6271M / HI6271MI

- Cooking zone ∅145 2,2 kW
- Cooking zone ∅180 3,0 kW
- Cooking zone ∅210 3,7 kW
- Cooking zone ∅260 3,7 kW
- Vario zone 180 x 220 mm 3,7kW (zones that can be connected)
HI7271IM
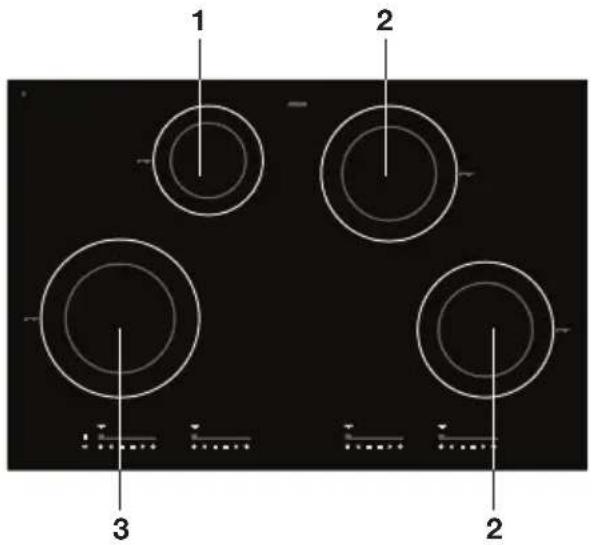
HI8271MT

HI9271M

natural_image
Pure electrical circuit lines without any symbolsHI9271MV

Before use, read the separate safety instructions first!
Temperature safety
- A sensor continuously measures the temperature of certain parts of the hob. Every cooking zone is equipped with a sensor that measures the temperature of the bottom of the pan to avoid any risk of overheating when a pan boils dry. In case of temperatures rising too high, the power is reduced automatically or the hob switches off automatically.
Cooking-time limiter

- The cooking-time limiter is a safety function of your cooking appliance. It will operate if you forget to switch off your hob.
- Depending on the setting you have chosen, the cooking time will be limited as follows:
| Setting The cooking zone switches automatically off after: | |
| 1 and 2 9 hours | |
| 3, 4 and 5 5 hours | |
| 6, 7 and 8 4 hours | |
| 9 3 hours | |
| 10 2 hours | |
| 11 and 12 1 hour | |
| Chef function 9 hours | |
The cooking-time limiter switches the cooking zones off if the time in the table has elapsed.
| Setting The cooking zone switches automatically to setting 12 after: | |
| boost 10 minutes |
Using the touch controls
The touch controls may take some getting used to if you are used to other (rotary) controls. Place the tip of your finger flat on the control to achieve the best results. You do not have to apply any pressure.
The touch sensors only react to the light pressure of a fingertip. Do not operate the controls with any other objects. The hob will not switch on when your pet walks over it.
Induction cooking
natural_image
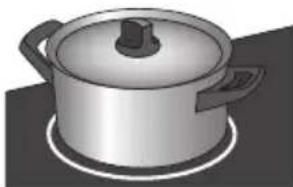
Illustration of a cooking pot with lid and side handles (no text or symbols)No heat loss and cold handles with induction cooking.
Induction cooking is fast
- To start you will be surprised by the speed of induction cooking. Especially at higher settings, foods and liquids will boil very rapidly. It is best not to leave pans unattended to avoid them boiling over or boiling dry.
The power will be adjusted
- In the case of induction cooking, it is only the part of the zone on which the pan stands that is used. If you use a small pan on a large zone, the power will be adjusted to the diameter of the pan. The power will thus be lower and it will take longer before the food in the pan comes to the boil.

natural_image
Illustration of a cooking pot on a stove with two upward arrows indicating heating (no text or symbols)
natural_image
Illustration of a cooking pot with crossed black lines indicating resistance or prohibition (no text or symbols)Attention
- Grains of sand may cause scratches which cannot be removed. Only put pans with a clean base on the cooking surface and always pick pans up to move them. - Do not use the hob as a worktop. - Always keep the lid on the pan when cooking, in order to avoid energy loss.
How does induction work

The coil (1) in the hob (2) generates a magnetic field (3). By placing a pan with an iron base (4) on the coil, a current is induced in the base of the pan.
A magnetic field is generated in the appliance. By placing a pan with an iron base on a cooking zone, a current is induced in the pan base. This induced current generates heat in the base of the pan.
Easy
The electronic controls are accurate and easy to set. On the lowest setting, you can melt chocolate directly in the pan, for example, or cook ingredients that you would normally heat in a bain-marie.
Fast
Thanks to the induction hob's high power levels, bringing food to the boil is very quick. Cooking food through takes just as long as for other types of cooking.
Clean
The hob is easy to clean. Because the cooking zones do not get any hotter than the pans themselves, food spills cannot burn on.
Safe
The heat is generated in the pan itself. The glass top does not get any warmer than the pan. This means that the cooking zone is considerable cooler compared to that from a Ceramic hob or a gasburner. Once a pan has been taken away, the cooking zone cools down quickly.
Induction noises
A ticking sound
This is caused by the capacity limiter on the front and back zones. Ticking can also occur at lower settings.
Pans are making noise
Pans can make some noise during cooking. This is caused by the energy flowing from the hob to the saucepan. At high settings this is perfectly normal for some pans. It will not damage either the pans or the hob.
The fan is making noise
To enlarge the lifespan of the electronics, the appliance is equipped with a fan. If you use the appliance intense, the fan is activated to cool down the appliance and you will hear a buzzing sound. The fan runs on for several minutes after the hob has been switched off.
Automatic power-on function
When the automatic power-on function (APD) is active, you will hear a ticking noise, even if the zone is not being used.
Pans
Pans for induction cooking
Induction cooking requires a particular quality of pan.

Attention
- Pans that have already been used for cooking on a gas hob are no longer suitable for use on an induction hob. - Only use pans that are suitable for electric and induction cooking with:
▶a thick base (minimum 2.25 mm);
a flat base.
- The best are pans with the ‘Class Induction’ quality mark.

Tip
You can check for yourself whether your pans are suitable using a magnet. A pan is suitable if the base of the pan is attracted by the magnet.
| Suitable Unsuitable | |
| Special stainless steel pans Earthenware | |
| Class Induction Stainless steel | |
| Hard-wearing enamelled pans Porcelain | |
| Enamelled cast-iron pans Copper | |
| Plastic | |
| Aluminium | |
One is advised to use the pans recommended by ATAG for the automatic cooking programs.

Attention
Be careful with enamelled sheet-steel pans:
- the enamel may chip (the enamel comes loose from the steel), if you switch the hob on at a high setting when the pan is (too) dry;
- the base of the pan may warp - due, for example, to overheating or to the use of too high a power level.

Attention
Never use pans with a misshapen base. A hollow or rounded base can interfere with the operation of the overheating protection, so that the appliance becomes too hot. This may lead to the glass top cracking and the pan base melting. Damage arising from the use of unsuitable pans or from boiling dry is excluded from the guarantee.
Minimum pan diameter
The diameter of the bottom of the pan must be at least 12 cm. You will achieve the best results by using a pan with the same diameter as the zone. If a pan is too small the zone will not work.
The lenght of a fish-pan (oval pan), used on the vario zone, must be at least 22 cm.
Pressure cookers
Induction cooking is very suitable for cooking in pressure cookers. The cooking zone reacts very quickly, and so the pressure cooker is quickly up to pressure. As soon as you switch a cooking zone off, the cooking process stops immediately.
Switching on the hob and setting the power
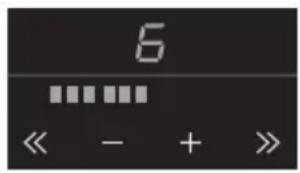
The cooking zones have 12 levels. Beside it there is a level ‘boost’.
- Place a pan in the middle of a cooking zone.
- Press the child lock button. You will hear a single beep.
-
Press the on/off button of the cooking zone concerned.
A flashing ‘-’ appears in the display and you will hear a single beep. If no further action is taken, the cooking zone will automatically switch off after a few seconds. -
Press the + or - button, or the << or >> button to select the desired setting. The cooking zone starts automatically in the level that has been set (when a pan is detected).
▶ If you press the + or - button first, level 6 appears.
If you press the >> button first, level 12 + 'boost' appear in the display. This is power level 'boost' and you can use this setting if you want to bring dishes to the boil quickly (see page 14).
▶If you press the << button first, level 1 will appear.

Tips
- With the + or - button you can raise or reduce the power setting step by step. By pressing the << or >> button, you can raise or reduce the power setting quick.
- Press and hold the << , - , + or >> button to set the desired power level more quickly.
Pandetection
If the hob does not detect a (ferrous) pan after the cooking power has been set, the display will blink and the hob will remain cold. If a (ferrous) pan is not placed on the cooking zone within 1 minute, the cooking zone will automatically switch off (see also page 11 and 12 'Pans').
Residual warmth indicator

A cooking zone that has been used intensively will retain heat for several minutes after it has been switched off. An 'H' appears in the display as long as the cooking zone is hot.
Boost

You can use the 'boost' function to cook at the highest power level during a short period of time (max.10 minutes). After the maximum boost time the power will be reduced to setting 12.
Switching on 'boost'
- Put a pan on a cooking zone.
- Press the >> button immediately after you have switched on the zone.
Level 12 and 'boost' appear in the display.
- If a cooking zone has already been set to a power level and you want to use 'boost', press several times the >> button or the + button of the cooking zone concerned.
Switching off 'boost'
'Boost' has been switched on, the display shows level 12 and 'boost'.
- Press the << button or the - button. In the display you will see a lower level.
Or:
- Press the on/off button of the cooking zone you want to switch off. You will hear a beep and the level in the display disappears. The cooking zone has been switched off completely.
Two cooking zones one in front of the other (except for HI8271MT)
- Two cooking zones one in front of the other affect each other. When both of these cooking zones are switched on at the same time, the power is automatically shared between them. The first set cooking zone will remain at the set setting at all times. The maximum set setting for the cooking zones to the front or back that is added later, depends on the setting of the first cooking zone. When you have reached the maximum amount of cooking setting combinations, the last set setting will start to flash and is automatically lowered to the highest possible setting.
- Two cooking zones alongside each other have no effect on each other. You can set both cooking zones on a high setting.
- If the vario zones are bridged, they cannot be set to boost and the menu functions cannot be used.
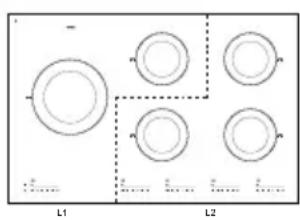
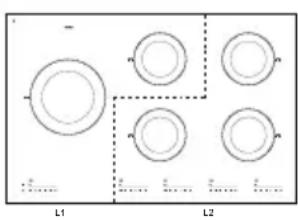
HI8271MT Boost management
natural_image
Diagram showing six circular components arranged in two groups, labeled L1 and L2, with dashed lines indicating connections or boundaries (no text or symbols beyond labels)The zones on the same phase affect each other. The division of the zones is given alongside.
- A maximum of 1 of the cooking zones connected together to 1 phase can be set to boost. The first boost set will remain.
- If all three zones on 1 phase are switched on, boost is not possible.
How to bridge the Vario induction zones

The Vario induction zones can be bridged (linked) to each other. This creates 1 large zone that can be used for example for a large fish pan or one large cooking pan.
- If the vario zones are bridged, they cannot be set to boost and the menu functions cannot be used.
Use a (fish) pan where at least one of the centre/middle positions of the vario zones is covered.
Activating the bridge mode
- Place the large pan on both cooking zones so that these are both well covered.
- Switch the front cooking zone on.
- Hold two keys down at the same time (for a few seconds): first press the << button on the rear vario zone and then immediately the >> button on the front vario zone.
‘BR’ will appear in the display on the rear zone. Then use the front zone control to set a cooking level for both zones. - Set the desired cooking level using the + or - button, or the << or >> button of the front zone. Both zones are heated in the level set.

Deactivating the bridge mode
- Press simultaneously on the >> button on the front vario zone and the << button on the very back vario zone to switch off the 'bridge' level.
The front zone goes further on the level set in bridge function.
Or:
- Press the on/off button of the cooking zone you want to switch off.
You will hear a beep and the level in the display disappears.
The cooking zone has been switched off completely.
Switching off
Switching off one cooking zone
Press the on/off button of the cooking zone you want to switch off.
You will hear a beep and the level in the display disappears.
- If all cooking zones have been switched off in this way, the hob will automatically be in the stand-by mode (also refer to 'stand-by mode').
Switching off all cooking zones
Press the child lock button to switch off all the cooking zones at the same time.
You will hear a beep. The red childproof lock indicator next to the child lock button will blink very slowly.
- The induction hob is now in eco stand-by modus (see also ‘eco stand-by modus’).
Stand-by mode
In stand-by mode the induction hob is switched off. You can switch to the stand-by mode from the eco stand-by mode, or by switching off all cooking zones.
From the stand-by mode you can directly start cooking by pressing the on/off button of the desired cooking zone.

natural_image
Pure graphical icons without any text or symbolsSwitching the hob from the eco stand-by mode to the standby-by mode
The red light next to the child lock button keeps slowly going on and off.
- Press the child lock button for a short while to switch to the stand-by mode.
A single beep will be heard. All lights on the hob are out.
Eco stand-by mode
In the eco stand-by mode the hob is switched off and it uses as little energy as possible.
The hob can also be switched to the eco stand-by mode from the stand-by mode and when cooking zones are still active.

Did you know that
The hob uses less than 0,5 Watt in the eco- stand-by mode. That is even less than in the stand-by mode of the hob.

natural_image
Pure graphical interface icons without any text or symbolsSwitching the hob to the eco stand-by mode
- Press the child lock button.
A will hear a single beep. The eco stand-by mode is active, the red light next to the child lock button keeps slowly going on and off.
From the eco stand-by mode you can't immediately start cooking. To be able to, the hob first needs to be switched to the stand-by mode.

Did you know that
After 30 minutes in the stand-by mode the hob will automatically switch to the eco stand-by mode to prevent unnecessary energy consumption.
Child lock
Your induction hob is equipped with a childproof lock that lets you lock the appliance. It prevents unintended switching on.

natural_image
Pure graphical icons without any text or symbolsSwitching on the child lock
- Press the child lock button for two seconds.
You will hear a double beep. All buttons are inactive now, except for the child lock button. The hob first switches to the eco stand-by mode and then to the childproof lock mode. The red light is constantly on.
- Press the button again for 2 seconds to get the hob of the childproof lock.
A single beep will be heard. The hob is now in the stand-by mode. The red light next to the child lock button is out.

Tip
Set the hob to the child lock mode before cleaning the hob to prevent it from accidentally switching on.

Did you know that
When the hob is set to the child lock, is uses just as little energy as when it is in the eco stand-by mode.
Pause
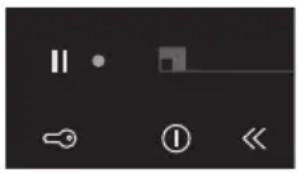
With this pause function, you can set the entire hob to 'pause' for 5 minutes during cooking. In this way you can leave or clean the hob in a safe way during a short period of time, without losing settings.
natural_image
User interface icons including play, navigation, and control buttons (no text or symbols)Switching the hob to the pause mode
- Press the pause button once.
You will hear a double beep, the settings change into a lower setting and the red light next to the pause button flashes.
▶ Any set timers/kitchen timers stop. All cooking zones are automatically changed to a lower setting.
- All buttons are inactive except for the child lock button and the pause button.
The on/off button of the individual cooking zones also remain active, they do however react with a delay of two seconds.
- If you press the pause button again within 5 minutes, the paused cooking process will be resumed.
You will hear a double beep, the hob resumes the settings as they were set before the pause.
- If you do not undertake any further action within 5 minutes:
All active cooking zones will be switched off automatically. After that the pause button will keep flashing for 25 minutes to indicate the cooking processes have been ended by the pause mode. The hob automatically switches from the pause mode to the eco stand-by mode after 25 minutes.
Recognizing a mode
| The stand-by mode | Not a single light is lit. |
| The eco stand-by mode | The red light next to the child lock button button keeps slowly going on and off. |
| The child lock mode | The red light next to the child lock button is constantly on. |
| The pause mode | The red light next to the pause button flashes. |
Timer / Kitchen timer
The timer/alarmclock button of each cooking zone has two functions:

| The timer function The kitchen timer function | |
| This function can be recognized by the red small arrow pointing up. | This function can be recognized by the red small arrow pointing down. |
| The time increases in the timer function. | The time decreases in the kitchen timer function. |
| The timer cannot be linked to a cooking zone. | The kitchen timer can be linked to a cooking zone. This means the cooking zone switches off if the set time has passed. |
| When the timer button is pressed, the timer function automatically switches on after 3 seconds if you do nothing. | The kitchen timer function can be reached from the timer function by pressing the red + button or red - button. |

Attention
- Per set of two cooking zones (front and back) one timer/kitchen timer is available. In the case of a 5th cooking zone (type HI8271MT, HI9271M), the 5th cooking zone has its own timer/kitchen timer.
- The timer/kitchen timer can only be linked to one of both cooking zones per set of two cooking zones.
- The timer-/kitchen timer function can also be used without activating an accompanying cooking zone.

Switching on the timer
- Press the timer/alarmclock button of the cooking zone once. The display of the timer lights up and you'll see three zeroes flashing. Under that appears a + and -.
- If you do not set a time with the + or - button, the timer will start running automatically after 3 seconds. The timer can go as far as 9 hours and 59 minutes. The red arrow pointing up lights up and the time increases.
- Press the timer/alarmclock button of the cooking zone again, to switch it off.

Switching on the kitchen timer
- Press the timer/alarmclock button of the cooking zone once.
-
Press the + or - button to switch from the timer function to the kitchen timer function. After that you can set the desired cooking time with the + button. Then you can change the set time with the - button.
The red small arrow pointing down lights up. Time is counting down. -
Press the timer/alarmclock button of the cooking zone again, to switch it off.
Attention
- The kitchen timer is linked to the cooking zone if the accompanying cooking zone is switched on. The kitchen timer stops as soon as the pan is removed and resumes when the pan is put back.
- If the kitchen timer is linked to a cooking zone, the cooking zone will switch off after the set time has passed.
The kitchen timer alarm beeps for a quarter of an hour while decreasing as the time passes, while '0.00' and the arrow pointing down keeps flashing. Press the timer/alarm clock button of the cooking zone again, to switch off the kitchen timer alarm. Press the timer/alarm clock button again for the cooking zone where the red arrow pointing down is flashing, or remove the pan from the zone to switch off the timer again.
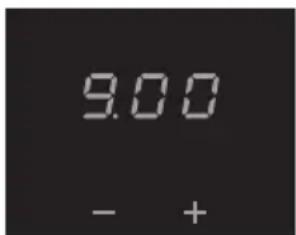
Setting the cooking time
- Switch the kitchen timer on.
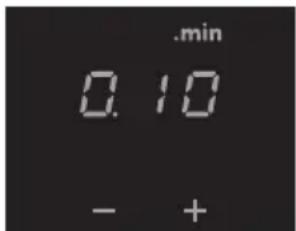
| Button Steps of x per | button contact | Time |
| + x = 1 minute 0.00 to | ... | |
| - x = 10 seconds 5.00 | - 0.00 | |
| - x = 30 seconds 9.00 | - 5.00 | |
| - x = 1 minute ... to 9.00 |
After 9 minutes and 0 seconds ('9.00') the word '.min' appears above the display and the minutes will be added behind the dot.

Tip
You can press and hold the + or - button to set the desired cooking time quicker.
Switching on and off the beep
- Press the on/off button on the far left twice.
- Press and hold the << button and the + button simultaneously until you hear a beep.
The beep is now switched off for all button operations, except for the pause button and the child lock button. Note: the kitchen timer alarm and the beep for error messages cannot be switched off. - Use the same button combination to switch the sound back on.
Switching on/off the automatic pan detection
If, after the hob has been turned on, a pan is placed in an inactive cooking zone, the corresponding operating controls light up and this can be used immediately (without operating the on/off switch).
If the cooking zone is not activated within 10 seconds, the light will go out. It can be re-activated by removing the pan and then replacing it or by using the on/off switch.
This function is active by default, but can also be switched off. This is done by switching the hob off and operating the 'menu' (6) and 'on/off button' (21) on the left-hand control panel for 5 seconds. 'APd OFF' will appear on the display. By repeating this process, the function can be reactivated and the 'APd On' will appear on the display.
Automatic cooking programs
Your hob is fitted with 6 automatic cooking programs. You can set any end time of an automatic cooking program with the aid of the kitchen timer function (refer to page 22). The cooking programs are based on regular quantities. The tables are meant as a guideline, because of the large margins you can alter the dish according to your wishes.

To set an automatic program
The cooking zone is switched on.
- Press the menu button.
A series of 6 icons will light up (7 icons on the HI9271MV), one of which will be brighter than the others.. - Again press the menu button, or press and hold down the menu button to go to the next menu functions.
The selected cooking programme automatically starts after 3 seconds. An ‘A’ for ‘automatic’ appears in the display.
If an automatic cooking program is active, you can use the following buttons to go back to the manual cooking process:
$$ < < , +, -, > >. $$

Attention
For ‘Vario’ appliances, the cooking programs and boost function will not work if the zones are bridged or the chef function is active.

Chef function (HI9271MV)
The ‘Chef function’ will activate all zones when switched on. The right-hand zones in setting 1, the middle ones in 7 and the left-hand zones in 12. ‘Ch’ will appear on the display for the rear zones. Afterwards you can configure a different cooking setting for both zones using the controls for the front zone.
This function enables you too cook without making use of the power controls, but by moving the pans from zone to zone.
This function can only be switched on if the hob is not being used. To switch on this function, all zones first need to be switched off. With the far left-hand menu button, the function can be selected by releasing the menu button when the chef indicator (24) lights up.
Switching off the chef function (HI9271MV)
- By means of the eco-lock button (3), the whole hob can be switched off.
- Using the on/off buttons (6): This switches off the chef function; all zones are deactivated. The displays light up for the zones where there is a pan, if the APD is activated.
- By operating the far left-hand menu button (21) next to the chef indicator, the chef function is terminated, active zones and timers remain active. Zones not in use will be switched off.
- The chef function is switched off automatically if there has been no pan on the hob for 10 minutes.
During the chef function, only the ascending timer is available.

Boiling function\*/\*\*
This function brings the content of the pan to a boil (100 °C) and keeps it boiling. A beep can be heard when the content is cooking or if the food has to be added. This function works only with the lid on the pan.
| Dish Number | of people | Quantity Pan Zone Fill the pan up to: | (start the cooking process) | ||
| Cooked potatoes | 1 - 3 200 - | 500 g Saucepan (Ø 200) | Ø 145 / HI8271MT Ø 180 | 1,0 l incl. potatoes | |
| 3 - 5 500 - | 800 g Low pan (Ø 200) | Ø 180 1,5 l incl. potatoes | |||
| 3 - 5 500 - | 800 g High pan (Ø 200) | Ø 180 1,5 l incl. potatoes | |||
| 6 - 8 1000 | - 1400 g High pan (Ø 200) | Ø 210 / Vario 2,5 l incl. potatoes | |||
| 9 - 15 1500 | - 2200 g Large pan (Ø 240) | Ø 260 3,5 l incl. potatoes | |||
| 9 - 15 1500 | - 2200 g Large pan (Ø 240) | Ø 260 double 3,5 l incl. potatoes | |||
| Cooked (hard) vegetables | 1 - 3 150 - | 250 g Saucepan (Ø 200) | Ø 145 / HI8271MT Ø 180 | 1,0 l incl. vegetables | |
| 3 - 4 300 - | 500 g Low pan (Ø 200) | Ø 180 1,5 l incl. vegetables | |||
| 3 - 4 300 - | 500 g High pan (Ø 200) | Ø 180 1,5 l incl. vegetables | |||
| 4 - 6 500 - | 750 g High pan (Ø 200) | Ø 210 / Vario 2,5 l incl. vegetables | |||
| 6 - 8 750 - | 900 g Large pan (Ø 240) | Ø 260 3,5 l incl. vegetables | |||
| 6 - 8 750 - | 900 g Large pan (Ø 240) | Ø 260 double 3,5 l incl. vegetables | |||
| Eggs | 2 - 6 2 - 6 eggs | Saucepan (Ø 200) | Ø 145 / HI8271MT Ø 180 | 1,0 l incl. eggs | |
| 8 - 12 | 8 - 12 eggs | Low pan (Ø 200) | Ø 180 | 1,5 l incl. eggs | |
| Rice | 1 | 100 g | Saucepan (Ø 200) | Ø 145 / HI8271MT Ø 180 | 1,0 l only water1) |
| 2 - 4 200 - | 400 g Low pan (Ø 200) | Ø 180 1,5 l only water | 1) | ||
| 2 - 4 200 - | 400 g High pan (Ø 200) | Ø 180 1,5 l only water | 1) | ||
| 4 - 5 400 - | 500 g High pan (Ø 240) | Ø 210 / Vario 2,0 l only water | 1) | ||
| Pasta | 1 - 2 100 - | 200 g Low pan (Ø 200) | Ø 180 1,0 l only water | 1) | |
| 2 - 3 200 - | 300 g High pan (Ø 200) | Ø 210 / Vario 2,0 l only water | 1) | ||
| 4 - 6 400 - | 600 g Large pan (Ø 240) | Ø 260 3,0 l only water | 1) | ||
| 4 - 6 400 - | 600 g Large pan (Ø 240) | Ø 260 double 3,5 l only water | 1) | ||
1) After the beep the rice or pasta can be added.
* This function works best with pans recommended by ATAG (please refer to www.atag.nl).
** These menu functions work best if they are started at the beginning of the cooking process.

Simmering function\*
The temperature of the dish is constantly kept near the boiling point (90 °C - 95 °C). The simmer setting works best with a lid on the pan. Thicker dishes have to be stirred every 15 minutes. The maximum simmering time is 8 hours, unless a shorter time has been set with the aid of a timer.
| Dish Quantity +/- | Pan Zone | ||
| Sauce or soup | 1 | Low | pan (∅ 200) | ∅ 145 / HI8271MT ∅ 180 |
| 1 | | Low pan (∅ 200) ∅ 180 | ||
| 1,5 | High pan (∅ 200) ∅ 180 | |||
| 1 | Low pan (∅ 200) ∅ 210 / Vario | |||
| 1,5 | High pan (∅ 200) ∅ 210 / Vario | |||
| 2,5 | Large pan (∅ 240) ∅ 260 | |||
| 2.5 | Large pan (∅ 240) ∅ 260 double | |||

Function for keeping warm\*
The temperature of a dish is automatically kept at a constant temperature of 70 °C - 75 °C . The setting for keeping warm works best with a lid on the pan. Larger quantities and thicker dishes need to be stirred occasionally. The maximum time for keeping warm is 8 hours, unless a shorter time has been set with the aid of a timer.
| Dish Number | of people | Quantity +/- Pan Zone | ||
| All dishes | 1 1000 g | Saucepan (∅ 200) | ∅ 145 / HI8271MT ∅ 180 | |
| 2 - 3 1500 | g | Low pan (∅ 200) ∅ | 180 | |
| 4 2000 g | High pan (∅ 200) ∅ 180 | |||
| 4 2000 g | High pan (∅ 200) ∅ 210 / Vario | |||
| 8 4000 g | Large pan (∅ 240) ∅ 260 | |||
| 8 4000 g | Large pan (∅ 240) ∅ 260 double | |||
* This function works best with pans recommended by ATAG (please refer to www.atag.nl).
wok
Wok function\*/\*\*
The wok setting provides an optimal wok temperature, for both the oil and the wok. After the beep the pan has reached its temperature, the oil can be put in the pan and then the dish.
| Dish Number | of people | Maximum amount of meat or fish / vegetables | Pan Zone | |
| Meat, fi sh, vegetables | 1 - 2 300 g | / 300 g Wokpan | ∅ 145 / HI8271MT ∅ 180 | |
| 1 - 2 300 g | / 300 g | Wokpan ∅ 180 | ||
| 3 - 4 600 g | / 600 g Wokpan ∅ 210 / Vario | |||
| 3 - 4 600 g | / 600 g Wokpan ∅ 260 | |||
| 1 - 2 300 g | / 300 g Wokpan ∅ 260 double | |||

Searing function\*/\*\*
The searing setting provides the optimal searing temperature.
After the beep the pan has reached its temperature. The oil or butter can be put into the pan and then the dish.
| Dish Number | of people | Quantity Pan Zone | ||
| Meat, fi sh | 1 - 2 150 - | 200 g Frying pan | ∅ 145 / HI8271MT∅ 180 | |
| 2 - 3 | 200 - 400 g Frying pan | ∅ 180 | ||
| 4 - 5 400 - | 500 g Frying pan | ∅ 210 / Vario | ||
| 5 - 6 500 - | 600 g Frying pan | ∅ 260 | ||
| 5 - 6 500 - | 600 g Frying pan | ∅ 260 double |
* This function works best with pans recommended by ATAG (please refer to www.atag.nl).
** These menu functions work best if they are started at the beginning of the cooking process.

Grill function\*/\*\*
The grill setting provides the optimal grilling temperature. A beep can be heard when the pan has reached its temperature.
| Dish Number | of people | Quantity Pan | Zone | |
| Meat, fi sh, vegetables | 1 - 2 100 - | 200 g Grill pan / plate | ∅ 145 / HI8271MT ∅ 180 | |
| 2 - 3 | 200 - 300 g Grill pan / plate ∅ 180 | |||
| 3 - 4 300 - | 400 g Grill pan / plate ∅ 210 / Vario | |||
| 4 - 6 400 - | 600 g Grill pan / plate ∅ 260 | |||
| 4 - 6 400 - | 600 g Grill pan / plate ∅ 260 double | |||
Healthy cooking
Burning point of different types of oil
To ensure your food is fried as healthily as possible, Atag recommends choosing the type of oil according to the frying temperature. Each oil has a different burning point at which toxic gasses are released. The below table shows the burning points for various types of oil.
| Oil Smoke point °C | |
| Extra virgin olive oil 160 °C | |
| Butter 177 °C | |
| Coconut oil 177 °C | |
| Canola oil 204 °C | |
| Virgin olive oil 216 °C | |
| Sunflower oil 227 °C | |
| Corn oil 232 °C | |
| Peanut oil 232 °C | |
| Rice oil 255 °C | |
| Olive oil | 242 °C |
* This function works best with pans recommended by ATAG (please refer to www.atag.nl).
** These menu functions work best if they are started at the beginning of the cooking process.
Cooking settings
Because the settings depend on the quantity and composition of the contents of the pan, the table below is intended as a guideline only.
Use setting 'boost' and setting 11 and 12 to:
- bring the food or liquid to the boil quickly;
- 'shrink' greens;
- heat oil and fat;
- bring a pressure cooker up to pressure;
- wok
Use setting 9 and 10 to:
- sear meats;
- cook fish;
- cook omelettes;
- fry boiled potatoes;
- deep fry foods.
Use setting 7 and 8 to:
- fry thick pancakes;
- fry thick slices of breaded meat;
- fry bacon (fat);
• cook raw potatoes; - make French toast;
- fry breaded fish;
- cook through pasta;
- fry thin slices of breaded meat;
- fry thin slices of meat;
Use setting 4-6 to:
• complete the cooking of large quantities;
• defrost hard vegetables;
- fry thick slices of breaded meat.
Use settings 1-3 to:
- simmer bouillon;
- stew meats;
- simmer vegetables;
- melt chocolate;
- poach;
- keep warm;
- melt cheese.
Cleaning
Tip
Set the child lock before you start cleaning the hob.
Daily cleaning
- Although food spills cannot burn into the glass, we nevertheless recommend you to clean the hob immediately after use.
• Best for daily cleaning is a damp cloth with a mild cleaning agent. - Dry with kitchen paper or a dry teacloth.
Stubborn stains
- Stubborn stains can also be removed with a mild cleaning agent such as washing-up liquid.
- Remove water marks and lime scale with vinegar.
- Metal marks (caused by sliding pans) can be difficult to remove. Special agents are available.
- Use a glass scraper to remove food spills. Melted plastic and sugar is also best removed with a glass scraper.

Never use
- Never use abrasives. They leave scratches in which dirt and lime scale can accumulate.
• Never use anything sharp such as steel wool or scourers.
General
If you notice a crack in the glass top (however small), switch the hob off immediately, unplug the hob, turn off the (automatic) fuse switch(es) in the meter cupboard or, in the event of a permanent connection, set the switch in the power supply lead to zero.) Contact the service department.
Troubleshooting table
If the appliance does not work properly, this does not always mean that it is defective. Try to deal with the problem yourself first by checking the points mentioned below or check for more information the website ‘www.atag.nl’.
| Symptom Possible cause Solution | ||
| The display lights up when the hob is activated for the first time. | This is the standard set-up routine. | Normal operation. |
| The fan runs on for several minutes after the hob has been switched off. | The hob is cooling. Normal operation. | |
| A slight smell is noticeable the first few times the hob is used. | The new appliance is heating up. | This is normal and will disappear once it has been used a few times. Ventilate the kitchen. |
| You can hear a ticking sound in your hob. | This is caused by the capacity limiter on the front and back zones. Ticking can also occur at lower settings. | Normal operation. |
| The pans make a noise while cooking. | This is caused by the energy flowing from the hob to the saucepan. | At high settings this is perfectly normal for some pans. It will not damage either the pans or the hob. |
| You have switched on a cooking zone, but the display keeps flashing. | The pan you are using is not suitable for induction cooking. or has a diameter of less than 12 cm. | Use a suitable pan, see page 11 and 12. |
| A cooking zone suddenly stops working and you hear a signal. | The preset time has ended. Switch the bleep off by pressing the + or - button of the timer. | |
| The hob is not working and nothing appears in the display. | There is no power supply due to a defective cable or a faulty connection. | Check the fuses or the electric switch (if there is no plug). |
| A fuse blows as soon as the hob is switched on. | The hob has been wrongly connected. | Check the electrical connections. |
| ‘br’ appears in the display and the touch controls are not working. | The bridge function is activated. | Deactivate the bridge function (see pagina 17). |
| Error code F00. | The control panel is dirty or has water lying on it. | Clean the control panel. |
| Error code F0 up to and including F6 and FC. | Defective generator. Contact the service department. | |
| Error code F7. | The ambient temperature is not good. | Switch off all heat sources in the vicinity of the cooking plate. |
| Error code F8 and F08. | Appliance over heated. The appliance has been switched off because of over heating. Let the appliance cool down and start again on a lower setting. | |
| Error code F9 and/or continuous beep. | The appliance has been connected incorrectly and/or the mains voltage is too high. | Let your connection be changed. |
| Error code F99. | You have pressed two or more buttons at the same time. | Do not operate more than one button at the same time. |
| Error code FA. | Mains voltage is too low. Contact your energy supplier. | |
| Error code FAN. | Air circulation not good. Make sure the venting holes under the cooking plate are open. | |
| Other error codes. | Defective generator. Contact the service department. | |
Technical details
This appliance complies with all relevant CE directives.
| Hob type HI6271M HI6271MI HI6271MV HI6272MV | ||||
| Induction x x x x | ||||
| Connection 230V - 50Hz 230V - 50Hz 230V - 50Hz | ||||
| Phases 2 2 2 2 | ||||
| Maximum capacity cooking zones | ||||
| Middle left | ||||
| Front left | 3,7 kW (∅210) | 3,7 kW (∅210) | 3,7 kW (180x220) | 3,7 kW (180x220) |
| Rear left | 2,2 kW (∅145) | 2,2 kW (∅145) | 3,7 kW (180x220) | 3,7 kW (180x220) |
| Rear right | 3 kW (∅180) | 3 kW (∅180) | 3,7 kW (180x220) | 3,7 kW (180x220) |
| Front right | 3 kW (∅180) | 3 kW (∅180) | 3,7 kW (180x220) | 3,7 kW (180x220) |
| Connected load | ||||
| L1 | 3,7 kW | 3,7 kW | 3,7 kW | 3,7 kW |
| L2 | 3,7 kW | 3,7 kW | 3,7 kW | 3,7 kW |
| L3 | ||||
| Total connected load | 7400 W | 7400 W | 7400 W | 7400 W |
| (Building in) dimensions | ||||
| Appliance width x depth | 644 x 522 mm | 640 x 510 mm | 644 x 522 mm | 644 x 522 mm |
| Build-in height from top of worktop | 43 mm | 50 mm | 43 mm | 43 mm |
| Cut-out width x depth | 560 x 490 mm | 560 x 490 mm | 560 x 490 mm | 560 x 490 mm |
| Minimal distance cut-out to back wall | 40 mm | 40 mm | 40 mm | 40 mm |
| Minimal distance cut-out to side wall | 40 mm | 40 mm | 40 mm | 40 mm |
| Hob type HI7271M HI8271MT | ||
| Induction x x | ||
| Connection 230V - 50Hz | z 230V - 50Hz | |
| Phases 2 2 | ||
| Maximum capacity cooking zones | ||
| Middle left 3,7 kW (∅260) | ||
| Front left 3,7 kW (∅210) | 3 kW (∅180) | |
| Rear left 2,2 kW (∅145) | 3 kW (∅180) | |
| Rear right 3 kW (∅180) | 3 kW (∅180) | |
| Front right 3 kW (∅180) | 3 kW (∅180) | |
| Connected load | ||
| L1 3,7 kW 3,7 kW | ||
| L2 3,7 kW 3,7 kW | ||
| L3 | ||
| Total connected load | 7400 W | 7400 W |
| (Building in) dimensions | ||
| Appliance width x depth | 774 x 522 mm | 804 x 522 mm |
| Build-in height from top of worktop | 43 mm | 46 mm |
| Cut-out width x depth | 750 x 490 mm | 780 x 490 mm |
| Minimal distance cut-out to back wall | 40 mm | 40 mm |
| Minimal distance cut-out to side wall | 40 mm | 40 mm |
| Hob type HI9271M HI9 | 271MV HI3271MV | ||
| Induction x x x | |||
| Connection 230V - 50Hz | z 230V - 50Hz | 230V - 50Hz | |
| Phases 3 3 1 | |||
| Maximum capacity cooking zones | |||
| Front left 3,7 kW (∅260) | 3,7 kW (180x220) | ||
| Rear left 3 kW (∅180) | 3,7 kW (180x220) | ||
| Front middle | 3 kW (∅180) | 3,7 kW (180x220) | 3,7 kW (180x220) |
| Rear middle | 3 kW (∅180) | 3,7 kW (180x220) | 3,7 kW (180x220) |
| Front right | 3 kW (∅180) | 3,7 kW (180x220) | |
| Rear right | 3 kW (∅180) | 3,7 kW (180x220) | |
| Connected load | |||
| L1 | 3,7 kW | 3,7 kW | 3,7 kW |
| L2 | 3,7 kW | 3,7 kW | |
| L3 | 3,7 kW | 3,7 kW | |
| Total connected load | 11100 W | 11100 W | 3700 W |
| (Building in) dimensions | |||
| Appliance width x depth | 904 x 522 mm | 904 x 522 mm | 330 x 522 mm |
| Build-in height from top of worktop | 43 mm | 43 mm | 43 mm |
| Cut-out width x depth | 860 x 490 mm | 860 x 490 mm | 290 x 490 mm |
| Minimal distance cut-out to back wall | 40 mm | 40 mm | 40 mm |
| Minimal distance cut-out to side wall | 40 mm | 40 mm | 40 mm |
Disposal of packaging and appliance
In the manufacturing of this appliance durable materials were used. Make sure to dispose of this equipment responsibly at the end of its lifecycle. Ask the authorities for more information regarding this.
The appliance packaging is recyclable. The following may have been used:
- cardboard;
• polythene film (PE);
• CFC-free polystyrene (PS hard foam).
Dispose of these materials in a responsible manner and in accordance with government regulations.

natural_image
Symbol of a trash bin with crossed lines indicating no waste or restriction, no text presentAs a reminder of the need to dispose of household appliances separately, the product is marked with the symbol of a crossed-out wheeled dustbin. This means that at the end of its working life, the product must not be disposed of as urban waste. It must be taken to a special local authority differentiated waste collection centre or to a dealer providing this service.
Disposing of a household appliance separately avoids possible negative consequences for the environment and health deriving from inappropriate disposal and enables the constituent materials to be recovered to obtain significant savings in energy and resources.

Declaration of conformity
We declare that our products meet the applicable European Directives, Decisions and Regulations and the requirements listed in the standards referenced.


- instructions for use induction hob
- ATAG
- Let op
- HI8271MT Boost management
- Introduction
- Read the manual thoroughly before using the appliance, and store these instructions in a safe place for future reference.
- Description
- Before use, read the separate safety instructions first!
- Temperature safety
- Cooking-time limiter
- Using the touch controls
- Induction cooking
- Induction cooking is fast
- The power will be adjusted
- Attention
- How does induction work
- Easy
- Fast
- Clean
- Safe
- Induction noises
- A ticking sound
- Pans are making noise
- The fan is making noise
- Automatic power-on function
- Pans
- Pans for induction cooking
- Tip
- Minimum pan diameter
- Pressure cookers
- Switching on the hob and setting the power
- Tips
- Pandetection
- Residual warmth indicator
- Boost
- Switching on 'boost'
- Switching off 'boost'
- Or:
- Two cooking zones one in front of the other (except for HI8271MT)
- How to bridge the Vario induction zones
- Activating the bridge mode
- Deactivating the bridge mode
- Switching off
- Switching off one cooking zone
- Switching off all cooking zones
- Stand-by mode
- Switching the hob from the eco stand-by mode to the standby-by mode
- Eco stand-by mode
- Did you know that
- Switching the hob to the eco stand-by mode
- Child lock
- Switching on the child lock
- Pause
- Switching the hob to the pause mode
- Recognizing a mode
- Timer / Kitchen timer
- Switching on the timer
- Switching on the kitchen timer
- Setting the cooking time
- Switching on and off the beep
- Switching on/off the automatic pan detection
- Automatic cooking programs
- To set an automatic program
- Chef function (HI9271MV)
- Switching off the chef function (HI9271MV)
- Boiling function\*/\*\*
- Simmering function\*
- Function for keeping warm\*
- wok
- Wok function\*/\*\*
- Searing function\*/\*\*
- Grill function\*/\*\*
- Healthy cooking
- Burning point of different types of oil
- Cooking settings
- Use setting 'boost' and setting 11 and 12 to:
- Use setting 9 and 10 to:
- Use setting 7 and 8 to:
- Use setting 4-6 to:
- Use settings 1-3 to:
- Cleaning
- Daily cleaning
- Stubborn stains
- Never use
- General
- Troubleshooting table
- Technical details
- Disposal of packaging and appliance
- Declaration of conformity
Brand : Atag
Model : HI6271MV
Category : Frying Pan