
HI7271E - Frying Pan Atag - Free user manual and instructions
Find the device manual for free HI7271E Atag in PDF.


| Product type | Induction hob |
| Brand | Atag |
| Model | HI7271E |
| Dimensions (W x D x H) | 59 x 52 x 5 cm |
| Net weight | 12 kg |
| Electrical supply | 230 V / 50 Hz, 7200 W |
| Number of cooking zones | 4 induction zones |
| Main functions | Booster on each zone, independent timer, pan detection, keep warm function |
| Controls | Touch controls with digital display |
| Power levels | 9 levels + Booster |
| Child safety | Control lock |
| Automatic shut-off | Yes, in case of overheating or absence of pan |
| Overheating detection | Yes, with safety shut-off |
| Residual heat indicator | Yes, for each zone |
| Surface material | Black ceramic glass |
| Care and cleaning | Clean with a soft cloth and a specific cleaner for ceramic glass |
| Spare parts | Available via Atag after-sales service |
| Repairability | Repairability index: 8/10 (according to manufacturer data) |
| Warranty | 2 years |
| Country of manufacture | Netherlands |
Frequently Asked Questions - HI7271E Atag
User questions about HI7271E Atag
0 question about this device. Answer the ones you know or ask your own.
Ask a new question about this device
Download the instructions for your Frying Pan in PDF format for free! Find your manual HI7271E - Atag and take your electronic device back in hand. On this page are published all the documents necessary for the use of your device. HI7271E by Atag.
USER MANUAL HI7271E Atag
The appliance identification card is located on the bottom of the appliance.
Stick the appliance identifi cation card here.
When contacting the service department, have the complete type number to hand.
You will find the addresses and phone numbers of the service organisation on the guarantee card.
instructions for use induction hob
natural_image
Four white circular outlines on a black background with a small red icon and scale bar at bottom (no text or symbols)HI6271E
HI7271E
NL
natural_image
Illustration of a cooking pot with lid and side handles (no text or symbols)natural_image
Illustration of a cooking pot on a stove with upward arrows indicating heating (no text or symbols)
natural_image
Illustration of a cooking pot with crossed black lines indicating resistance or prohibition (no text or symbols)natural_image
Close-up of a circular electronic component with four labeled terminals (A) and a central circular pattern, no readable text or symbols.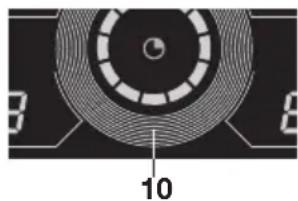
natural_image
Close-up of a circular electronic component with concentric rings and a central hole, labeled with numbers 3 and 8 (no readable text or symbols beyond labels)
natural_image
Abstract circular pattern with concentric rings and a small rectangular shape on the left (no text or symbols)natural_image
Abstract circular pattern with concentric rings and a small 'H' label, no readable text or symbolsnatural_image
Circular mechanical component with four arms and a central hub, no visible text or symbolsKinderslot
natural_image
Digital display showing a stylized 'B' with concentric rings and a circular target-like pattern (no readable text or symbols)Kinderslot inschakelen
natural_image
Symbol of a trash bin crossed with no visible text or labelsTemperature safety 7
Cooking-time limiter 7
Use
Operation of the touch-sensitive buttons 8
Induction cooking 8
Induction sounds 9
Pans 9
Operation
Switching on and power setting 11
Residual heat indicator 11
Boost 11
Switching off 12
Child lock 12
Cooking-timer/alarm 13
Automatic boost function 13
Cooking
Cooking levels 15
Maintenance
Cleaning 16
Faults
General 17
Fault table 17
Technical data
Technical data 19
Environmental aspects
Disposal of the appliance and packaging 20
Introduction
This hob has been designed for the real lover of cooking. Cooking on an induction hob has a number of advantages. It is easy, because the hob responds quickly and can also be set to a very low power level. As it can also be set to a high power level, it comes to the boil very quickly. The ample space between the cooking zones makes cooking comfortable.
Cooking on an induction hob is different from cooking on a traditional appliance. Induction cooking makes use of a magnetic field to generate heat. This means that you cannot use just any pan on it. The section on pans gives more information about this.
For optimum safety, the induction hob is equipped with various temperature protections and a residual heat indicator, which shows which cooking zones are still hot.
This manual describes how you can make the best possible use of the induction hob. In addition to information about operation, you will also find background information to assist you in using this product, as well as cooking tables and maintenance tips.
First read the user instructions carefully and completely before starting to use the appliance, and keep them safely for future reference.
The manual also serves as reference material for service technicians. That is why you should stick the appliance identification card supplied in the space provided at the back of the manual. The appliance identification card contains all the information that the service technician will need in order to respond appropriately to your questions.
Happy cooking!
Control panel

- Cooking level display zone rear left:
- Cooking zone menu rear left
- Cooking zone timer indicator
- Timer display
- Kitchen timer indicator
- Cooking zone menu rear right
- Cooking level display zone rear right
- Cooking level display zone front left
- Cooking zone menu front left
- Slide control (9 Cooking levels + boost P)
- Kitchen timer button/timer button
- Cooking zone menu front right
- Cooking level display zone rear right
- On/Off button
Description

- Cooking zone ∅ 200 / 3 kW
- Cooking zone ∅ 160 / 1.4 kW
- Cooking zone ∅ 200 / 3 kW
- Cooking zone ∅ 160 / 1.4 kW
Read the separate safety instructions before use.
Temperature safety
- Each cooking zone is equipped with a sensor. This sensor measures the temperature of the base of the pan and the sections of the hob to avoid any risk of overheating, for example, a pan boiling dry. In case of temperatures rising too high, the power of the cooking zone/hob is reduced or shut off automatically.
Cooking-time limiter

- If a cooking zone is on for an unusually long time, it will be switched off automatically.
- Depending on the setting you have chosen, the cooking time will be limited as follows:
| Cooking level | The cooking zone switches off automatically after: |
| 1 8 hours | |
| 2 6 hours | |
| 3 5 hours | |
| 4 5 hours | |
| 5 4 hours | |
| 6 1.5 hours | |
| 7 1.5 hours | |
| 8 1.5 hours | |
| 9 1.5 hours | |
| boost (P) 1.5 hours | (zones RA and LV) |
The cooking-time limiter switches the cooking zones off when the above-stated time has elapsed.
Operation of the touch-sensitive buttons
If you are used to different controls, it can take time to get used to operating the hob using the touch-sensitive buttons. For optimum working, place your finger tips flat on the buttons. You don't have to push hard.
The touch sensors have been set in such a way that they only react to the pressure and size of finger tips. The hob can't be operated with other objects and won't, for instance, be switched on if your pet walks over the hob.
Induction cooking
Induction cooking is fast
- To start with you will be surprised by the speed of induction cooking. Especially at higher settings, foods and liquids will come to the boil very rapidly. It is best not to leave pans unattended to avoid them boiling over or boiling dry.

natural_image
Illustration of a cooking pot on a stove (no text or symbols)With induction cooking there is no heat loss and handles stay cool.
The power level adjusts itself.
- In induction cooking, only the zone on which the pan in placed is used. If you use a small pan on a large zone, the power will be adjusted to the diameter of the pan. The power will thus be lower and it will take longer before the food in the pan comes to the boil.

natural_image
Two-panel illustration showing a cooking pot on a stovetop with upward arrows indicating heating and a crossed-out pot on a pan (no text or symbols)Please note
- Grains of sand may cause scratches which cannot be removed. Only put pans with a clean base on the cooking surface and always pick pans up to move them.
- Do not use the hob as a worktop.
• To avoid energy loss, always keep the lid on the pan when cooking.
Induction sounds
Ticking sound
A light ticking sound is caused by the capacity limiter on the front and back zones. A soft ticking sound can also occur at lower settings.
Pan makes sounds
The pan can make sounds during cooking. This is caused by the energy flowing from the hob to the saucepan. This is normal for certain saucepans, particularly at high settings. This is not harmful for the pans or the hob.
Ventilator makes sounds
In order to increase the lifespan of electronic components, the appliance is fitted with a ventilator. If you use the appliance intensively, the ventilator will be switched on and you will hear a humming sound. The ventilator can also make sounds after you have switched off the appliance.
Pans

Pans for induction cooking
Induction cooking requires a particular type of pan.
Please note
- Pans that have already been used for cooking on a gas hob are no longer suitable for use on an induction hob.
- Only use pans that are suitable for electric and induction cooking with:
▶a thick base of a minimum of 2.25 mm;
▶a flat base.
- The best pans are those with the ‘Class Induction’ quality mark.

Tip
You can use a magnet to check whether your pans are suitable. A pan is suitable if the base of the pan is attracted by the magnet.

| Suitable Unsuitable | |
| Special stainless steel pans Earthenware | |
| Class Induction Stainless steel | |
| Solid enamelled pans Porcelain | |
| Enamelled cast-iron pans Copper | |
| Plastic | |
| Aluminium | |

Please note
Be careful with thin enamelled sheet steel pans:
- the enamel may come loose from the steel at high settings if the pan is too dry;
• high power level settings may cause the base of the pan to warp.
Please note
Never use pans with a misshapen base. A hollow or rounded base can interfere with the operation of the overheating protection, causing the appliance to become too hot. This may lead to the glass top cracking and the pan base melting. Damage caused by using unsuitable pans or boiling dry is excluded from the guarantee.
Minimum pan diameter
The minimum diameter for the pan base is 11 cm. The best results are achieved by using a pan with the same diameter as the cooking zone. If a pan is too small the zone will not work.
Pressure cookers
Induction cooking is very suitable for pressure cookers.
The fast-reacting cooking zone brings the pressure cooker to pressure quickly. As soon as you switch a cooking zone off, the dish stops cooking immediately.
Switching on and power setting

natural_image
Close-up of a circular electronic component with four labeled terminals (A) and a central circular pattern, no readable text or symbols.
natural_image
Close-up of a circular electronic component with concentric rings and a central hole, labeled with numbers 3 and 8 (no readable text or symbols beyond labels)
natural_image
Abstract circular pattern with concentric rings and a small rectangular shape on the left (no text or symbols)- Place the pan in the middle of a cooking zone.
- Press the On/Off button (14).
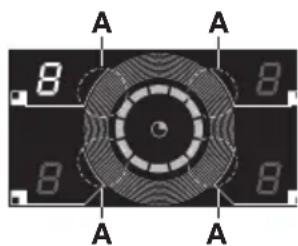
A single beep sounds. - Press the menu button (A) of the desired cooking zone.
A single beep sounds. The display of the selected zone lights up, the other displays are dimmed. - Slide your finger over the slide control (10) to set the desired setting. The cooking zone starts automatically at the level that has been set.
- Set a higher or lower power by sliding with your finger over the slide control.
The cooking zones have 9 levels and a boost level (P).
Pan detection
If the hob doesn't detect a pan with iron content after a power level has been set, the display will show the symbol 'U' and the cooking area will remain cold. If no pan with iron content is placed on the zone within 10 minutes, the cooking zone will switch off automatically.
Residual heat indicator

natural_image
Abstract circular pattern with concentric rings and a small symbol, no readable text or symbols present.After use, the cooking zone used may stay hot for several minutes. As long as the cooking zone is still hot an 'H' will be visible in the display.
Boost
You can use the ‘boost’ function to cook at the highest power level during a short period of time (max.10 minutes).
The cooking zones at the rear right and front left have a boost setting.
After the maximum boost time the power will be reduced to setting 9.
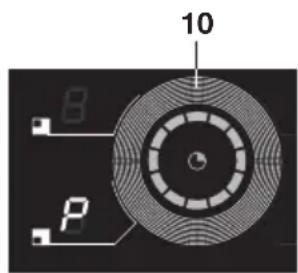
Switching on 'boost'
- Put a pan on a cooking zone and switch the cooking zone on.
- Slide your finger left or right over the slide control (10) until 'P' appears in the display.
The ‘boost’ setting is now selected.
Switching off
Switching off 'boost'
The boost function has been switched on, the display shows level 'P'.
- Select a lower level with the slider (to the left or to the right). In the display you will see a lower level.
Switching off one cooking zone
One cooking zone is switched on. The display shows a power level between 1 and 9, or "P".
- Use the slider to set the cooking zone at '0' (off). The hob switches off after 20 seconds, if all cooking zones are set to '0' and no other process is being used.

natural_image
Circular mechanical component with four terminals and a central hub, labeled with number 14 (no text or symbols on the component itself)Child lock
Switching off all cooking zones
Several cooking zones are active.
- Press the On/Off button (14) to switch off all cooking zones. You will hear an audible signal. All displays are off. The hob is switched off.

natural_image
Digital display showing a large 'B' with concentric rings and a small circular icon, no readable text or symbols present.Activate the child lock
- Press the on/off button (14) for at least three seconds until you hear a beep. For a few seconds the cooking zone display will show 'L'. The child lock is activated.
De-activate the child lock
- Press the on/off button (14) for at least three seconds until you hear a beep. The cooking zone display will show '0'. The child lock is de-activated.
Tip
Set the hob to child lock mode before starting to clean the hob. This will prevent you from switching on the hob by accident.
Cooking-timer/alarm

A cooking-timer can be set for each cooking zone. The hob also has an alarm. Both the cooking-timer as well as the alarm can be set for a maximum of 99 minutes. The alarm works in the same way as the cooking-timer, but is not linked to a cooking zone. If the alarm has been set, it will continue counting down after the hob has been switched off. The alarm can only be switched off when the hob is switched on.

Setting the cooking-timer
- Select the desired cooking zone and set the power level.
- Press the timer/kitchen timer button (11).
- Use the slide control or the timer/kitchen timer button to adjust the desired time.
Using the timer/kitchen timer button the time can be adjusted in intervals of 10 minutes. The time is shown in the timer display (04). The selected cooking zone will switch off automatically once the set time has elapsed.
Setting the kitchen timer
- Press the timer/kitchen timer button (11).
Make sure that all the cooking zones are switched off. - Use the slide control or the timer/kitchen timer button to adjust the desired time.
Using the timer/kitchen timer button the time can be adjusted in intervals of 10 minutes. The time is shown in the timer display (04). An alarm signal will sound once the set time has elapsed.
Automatic boost function
All cooking zones are equipped with an automatic boost function. If the automatic boost function is activated the cooking zone will automatically heat up using the maximum power and will then switch back to the cooking level selected by you. The boost time depends on the selected cooking level (level 1 to 8).
Switching on
- Place the pan in the middle of a cooking zone.
- Press the On/Off button (14).
A single beep sounds.

- Press the menu button (A) of the desired cooking zone.
A single beep sounds. The display of the selected zone lights up, the other displays are dimmed.
- Slide your finger over the slide control (10) to set the desired setting. Hold the slide control for at least 3 seconds at the desired level.
An ‘A’ will appear in the display alternating with the selected cooking level.
The table below shows the cooking levels and the corresponding boost times.
| Cooking level | Boost time (minutes:seconds) |
| 1 0:48 | |
| 2 2:24 | |
| 3 3:36 | |
| 4 5:24 | |
| 5 6:48 | |
| 6 2:00 | |
| 7 2:48 | |
| 8 3:36 | |
| 9 -:- |
Switching off
- Press the menu button of the desired cooking zone.
- Select another cooking level using the slide control. The boost switches off automatically.
Two cooking zones behind each other
- Two cooking zones that are behind each other influence each other. The power is automatically distributed when these cooking zones are used at the same time. This does not have any consequences up to setting 9. Selecting the Boost setting for one of the cooking zones, however, automatically switches the other cooking zone to a lower setting.
- If one of the cooking zones is set to boost and you want to set the other zone to setting 9 or Boost, the cooking zone that is set to boost will automatically be switched to a lower setting.
- Two cooking zones that are beside each other do not influence each other.
Cooking levels
Because the settings depend on the quantity and composition of the contents of the pan, the table below is intended as a guideline only.
Use 'boost' setting and setting 9 to:
- bring food or liquid to the boil quickly;
- 'shrink' greens;
- heat oil and fat;
- bring a pressure cooker up to pressure.
Use setting 8 to:
- sear meats;
- fry fish;
- fry omelets;
- fry boiled potatoes;
- deep-fry.
Use setting 7 to:
- fry thick pancakes;
- fry thick slices of breaded meat;
- fry up bacon;
- fry raw potatoes;
- make French toast;
- fry breaded fish.
Use settings 6 and 5 to:
• cook food through;
• defrost hard vegetables;
- fry thin slices of meat.
Use settings 1 to 4 to:
- simmer bouillon;
- stew meats;
- simmer vegetables;
- melt chocolate;
- melt cheese.
Cleaning

Tip
Activate the child lock before cleaning the hob.
Daily cleaning
- Although food spills cannot burn into the glass, we nevertheless recommend you clean the hob immediately after use.
• For daily cleaning a damp cloth with a mild cleaning agent is best. - Dry off with kitchen paper or a dry tea towel.
Stubborn stains
- Stubborn stains can also be removed with a mild cleaning agent, washing-up liquid, for example.
- Remove water circles and limescale with cleaning vinegar.
- Traces of metals (caused by sliding pans) can be difficult to remove. Special products are available for this.
- Use a glass scraper to remove food spills. Melted plastic and sugar are also best removed with a glass scraper.

Never use
- Never use abrasives. These leave scratches in which dirt and lime scale can accumulate.
• Never use anything sharp such as steel wool or scourers.
General
If you notice a crack in the glass top (however small), switch the hob off immediately, unplug the hob, turn off the fuses or automatic fuses in the meter cupboard or, in the event of a permanent connection, set the switch in the power supply lead to zero. Then contact the Service Department.
Fault table
When in doubt about the proper operation of your appliance, this does not automatically mean there is a defect. Make sure to check the points mentioned below in the table first, or visit our website ‘www.atag.co.uk’. for more information.
| Symptom Possible cause $ Solution | ||
| The fan runs on for several minutes after the hob has been switched off. | The hob is cooling down. Normal operation. | |
| A slight smell is noticeable the first few times the hob is used. | The new appliance is heating up. | This is normal and will disappear once it has been used a few times. Ventilate the kitchen. |
| You can hear a ticking sound in your hob. | A soft ticking sound can also occur at lower settings. | Normal operation. |
| The pans make a noise while cooking. | This is caused by the energy flowing from the hob to the saucepan. | This is normal for certain saucepans, particularly at high settings. This is not harmful for the pans or the hob. |
| You have switched a cooking zone on but the display keeps flashing. A pan detection symbol (U) will appear in the display. | The pan you are using is not suitable for induction cooking or has a diameter of less than 11 cm. | Use a good pan. |
| A cooking zone suddenly stops working and you hear a signal. | The preset time has ended. Switch off the signal by pushing a random button. | |
| The hob is not working and nothing appears in the display. | There is no power supply due to a defective cable or a faulty connection. | Check the fuses or the electric switch (if there is no plug). |
| A fuse blows as soon as the hob is switched on. | The appliance is incorrectly connected. | Check the electrical connections. |
| Error code ER03. The control panel is dirty or has water on it. | Clean the control panel. | |
| Error code E3. Unsuitable pan used. Use a pan suitable for induction cooking. | ||
| Error code E2. Appliance overheated. The appliance has been switched off because of overheating. | ||
| Fault code E6. The appliance has been connected incorrectly and/or the mains voltage is too high. | Have your connection changed. | |
| Other error codes. Defective generator. Contact your service centre. | ||
Technical data
This appliance complies with all relevant CE directives.
| Hob type HI6272E HI7272E | ||
| Induction x x | ||
| Connection 230V - 50Hz | 230V - 50Hz | |
| Number of phases | 2 | 2 |
| Max. power cooking zones | ||
| Middle left | ||
| Front left 3 kW (∅200) 3 | kW (∅200) | |
| Rear left 1.4 kW (∅160) | 1.4 kW (∅160) | |
| Rear right 3 kW (∅200) 3 | kW (∅200) | |
| Front right 1.4 kW (∅160) | 1.4 kW (∅160) | |
| Connected load | ||
| L1 3.7 kW 3.7 kW | ||
| L2 3.7 kW 3.7 kW | ||
| L3 | ||
| Total connected load 71 | 00 W 7100 W | |
| (Built-in) dimensions | ||
| Appliances width x depth | 600 x 510 mm | 700 x 510 mm |
| Build-in height from top of worktop | 56 mm | 56 mm |
| Setting size width x depth | 560 x 490 mm | 560 x 490 mm |
| Minimum distance setting size to back wall | 40 mm | 40 mm |
| Minimum distance setting size to side wall | 40 mm | 40 mm |
Disposal of the appliance and packaging
Sustainable materials have been used during manufacture of this appliance. This appliance must be disposed of responsibly at the end of its service life. The government can provide you with information about this.
The appliance packaging is recyclable. The following materials may have been used:
- cardboard;
• polyethylene film (PE);
• CFC-free polystyrene (PS hard foam).
You should dispose of these materials responsibly and in accordance with government regulations.
natural_image
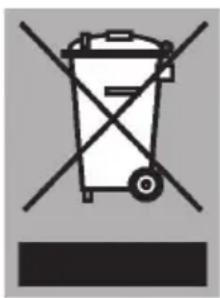
Symbol of a trash bin crossed with no text or numbers, representing waste sorting or disposal (no text present)The product has been marked with a crossed-out dustbin symbol to remind you of the obligation to dispose of electrical household appliances separately. This means that the appliance may not be included with normal domestic refuse at the end of its service life. The appliance must be taken to a special municipal centre for separated waste collection or to a dealer providing this service.
Separate collection of household appliances helps to prevent any potential negative impact on the environment and on human health caused by improper disposal. It ensures that the materials of which the appliance is composed can be recovered to obtain significant savings in energy and raw materials.
CE
Declaration of Conformity
We hereby declare that our products satisfy the applicable European directives, orders and regulations, as well as the requirements stated in the referenced standards.
natural_image
Illustration of a cooking pot with lid and side handles (no text or symbols)natural_image
Illustration of a cooking pot on a stovetop with upward arrows indicating heating and a crossed-out pan on a base (no text or symbols)Attention
natural_image
Close-up of a circular electronic component with four labeled terminals (A) and a central circular pattern, no readable text or symbols.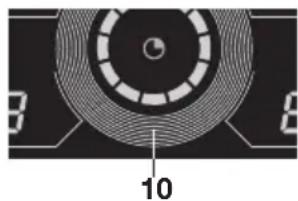
natural_image
Close-up of a circular electronic component with concentric rings and a central hole, labeled with numbers 3 and 8 (no readable text or symbols beyond labels)
natural_image
Abstract circular pattern with concentric rings and a small rectangular shape on the left (no text or symbols)natural_image
Abstract circular pattern with concentric rings and a small 'H' symbol, no readable text or symbols present.natural_image
Circular mechanical component with four arms and a central hub, labeled with number 14 at the bottom (no text or symbols on the component itself)Sécurité enfants
natural_image
Digital display showing a stylized 'B' with concentric rings and a central circular element (no readable text or symbols)natural_image
Symbol of a trash bin with crossed x-marks and a blank base (no text or numbers)natural_image
Illustration of a cooking pot with lid and side handles (no text or symbols)natural_image
Two-panel illustration showing a cooking pot on a stovetop with upward arrows indicating heating and a crossed-out pot on a pan (no text or symbols)natural_image
Close-up of a circular electronic component with four labeled terminals (A) and a central circular pattern, no readable text or symbols.
natural_image
Close-up of a circular electronic component with concentric rings and a central hole, labeled with numbers 3 and 8 (no readable text or symbols beyond labels)
natural_image
Abstract circular pattern with concentric rings and a small rectangular shape on the left (no text or symbols)natural_image
Abstract circular graphic with concentric rings and a small 'H' label, no readable text or symbolsnatural_image
Circular mechanical component with radial grooves and central hub, no visible text or symbolsKindersicherung
natural_image
Digital display showing a stylized 'B' with concentric rings and a circular symbol, no readable text or numbers present.natural_image
Symbol of a trash bin crossed with no text or numbers, representing waste sorting or disposal (no text present)natural_image
Illustration of a cooking pot with lid and side handles (no text or symbols)natural_image
Two-panel illustration showing a cooking pot on a stovetop with upward arrows indicating heating and a crossed-out pot on a pan (no text or symbols)Bemærk
natural_image
Close-up of a circular electronic component with four labeled terminals (A) and a central circular pattern, no readable text or symbols.
natural_image
Close-up of a circular electronic component with concentric rings and a central hole, labeled with numbers 3 and 8 (no readable text or symbols beyond labels)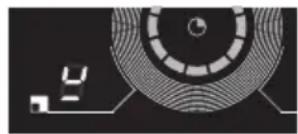
natural_image
Abstract circular pattern with concentric rings and a small rectangular shape on the left (no text or symbols)natural_image
Abstract circular pattern with concentric rings and a small 'H' label, no readable text or symbolsnatural_image
Circular mechanical component with four arms and a central hub, no visible text or symbolsBørnesikring
Sluk for alle kogezoner samtidig
natural_image
Digital display showing a stylized 'B' with concentric rings and a central circular element (no readable text or symbols)natural_image
Symbol of a trash bin with crossed x-marks and a blank rectangular base (no text or numbers)

- Kinderslot inschakelen
- Use
- Operation
- Cooking
- Maintenance
- Faults
- Technical data
- Environmental aspects
- Introduction
- Control panel
- Description
- Read the separate safety instructions before use.
- Temperature safety
- Cooking-time limiter
- Operation of the touch-sensitive buttons
- Induction cooking
- Induction cooking is fast
- The power level adjusts itself.
- Please note
- Induction sounds
- Ticking sound
- Pan makes sounds
- Ventilator makes sounds
- Pans
- Pans for induction cooking
- Tip
- Minimum pan diameter
- Pressure cookers
- Switching on and power setting
- Pan detection
- Residual heat indicator
- Boost
- Switching on 'boost'
- Switching off
- Switching off 'boost'
- Switching off one cooking zone
- Switching off all cooking zones
- Activate the child lock
- De-activate the child lock
- Cooking-timer/alarm
- Setting the cooking-timer
- Setting the kitchen timer
- Automatic boost function
- Switching on
- Two cooking zones behind each other
- Cooking levels
- Use 'boost' setting and setting 9 to:
- Use setting 8 to:
- Use setting 7 to:
- Use settings 6 and 5 to:
- Use settings 1 to 4 to:
- Cleaning
- Daily cleaning
- Stubborn stains
- Never use
- General
- Fault table
- Disposal of the appliance and packaging
- Declaration of Conformity
- Attention
- Kindersicherung
- Bemærk
- Sluk for alle kogezoner samtidig
Brand : Atag
Model : HI7271E
Category : Frying Pan