6349 - Fan heater CALOR - Free user manual and instructions
Find the device manual for free 6349 CALOR in PDF.
| Product type | Wall-mounted fan heater towel dryer |
| Brand | CALOR |
| Model | 6349 |
| Heating power | 2000 W |
| Drying power | 1000 W |
| Dimensions (H x W x D) | 430 x 440 x 100 mm |
| Weight | 3 kg |
| Power supply | 230-240 V, 50 Hz, single phase |
| Electrical class | II (double insulation) |
| Thermostat | Yes, with frost-free setting (maintains >5°C) |
| 24h timer | Yes |
| Functions | Heating, drying, programming, adjustable thermostat |
| Installation | Vertical wall mounting, buttons at top right |
| Use | Bathroom (zones 2 and 3 according to NFC 15-100) |
| Towel drying bar | Removable: low position = heating, high position = drying (1000 W) |
| Maintenance | Soft cloth, vacuum grilles once a year, no abrasive products |
| Safety | Temperature limiter, do not cover, double insulation |
| Spare parts | Power cord replaceable only by approved service center |
| Repairability | Requires special tools, repair by approved service center |
Frequently Asked Questions - 6349 CALOR
User questions about 6349 CALOR
0 question about this device. Answer the ones you know or ask your own.
Ask a new question about this device
Download the instructions for your Fan heater in PDF format for free! Find your manual 6349 - CALOR and take your electronic device back in hand. On this page are published all the documents necessary for the use of your device. 6349 by CALOR.
USER MANUAL 6349 CALOR
with towel drier bar
Badezimmer-Heizlufter
Instructions for use
Gebrauchsanleitung
Mod. 6346 - 6348 - 6349

Français.
Thank you for purchasing this wall-mounted fan heater with towel drier bar. This appliance is specifically protected against splashes .
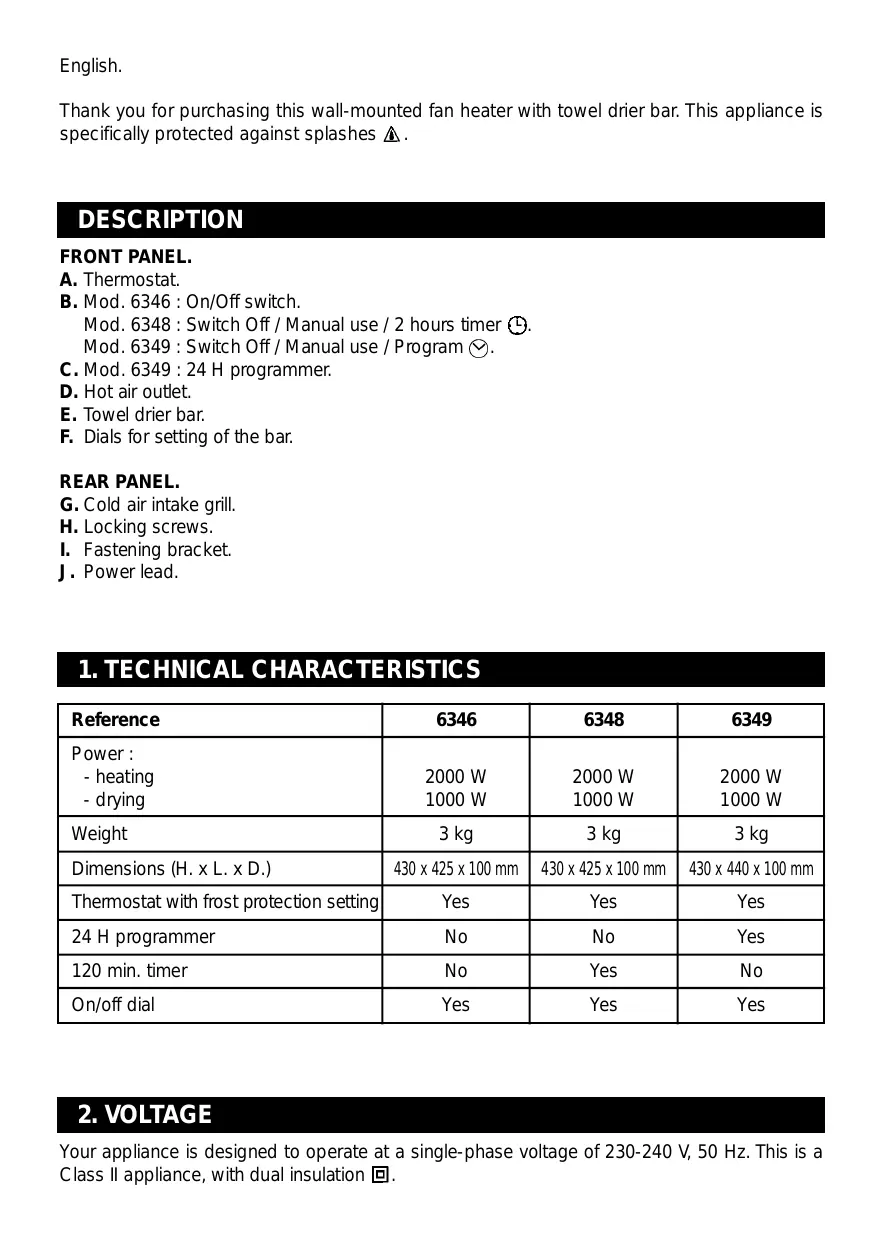
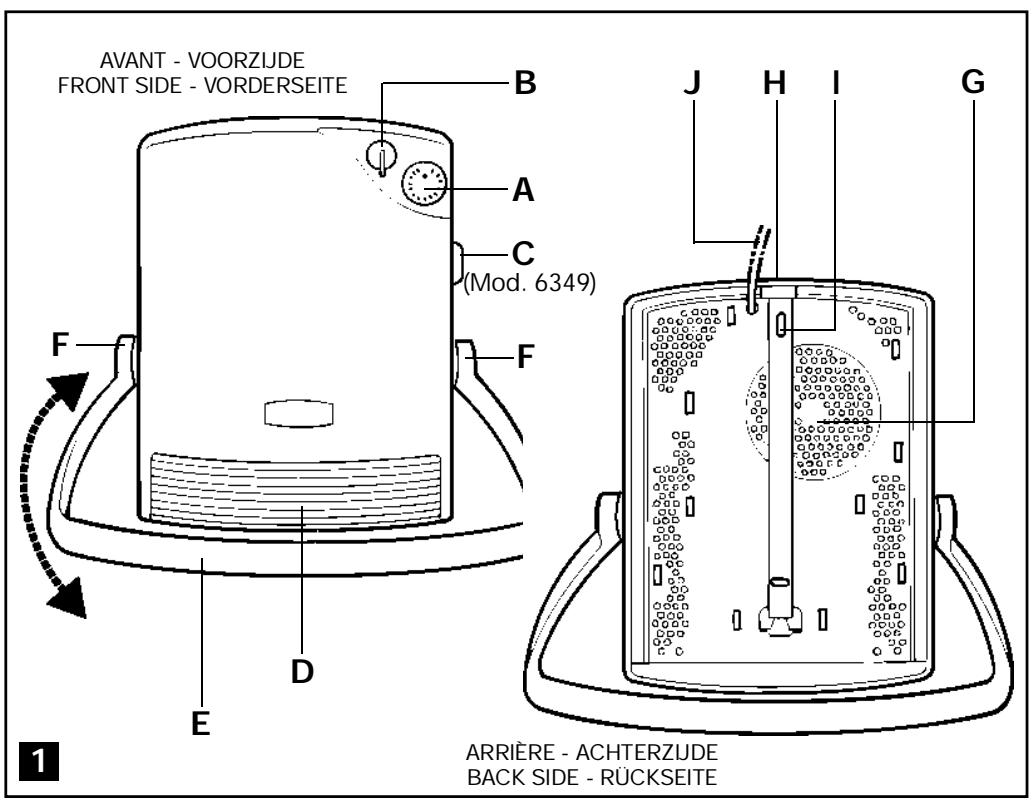
DESCRIPTION
FRONT PANEL.
A. Thermostat.
B. Mod. 6346: On/Off switch.
Mod. 6348: Switch Off / Manual use / 2 hours timer
Mod. 6349: Switch Off / Manual use / Program
C.Mod.6349:24Hprogrammer.
D. Hot air outlet.
E. Towel drier bar.
F. Dials for setting of the bar.
REAR PANEL.
G. Cold air intake grill.
H. Locking screws.
I. Fastening bracket.
J. Power lead.
- TECHNICAL CHARACTERISTICS
| Reference | 6346 | 6348 | 6349 |
| Power : - heating - drying | 2000 W 1000 W | 2000 W 1000 W | 2000 W 1000 W |
| Weight | 3 kg | 3 kg | 3 kg |
| Dimensions (H. x L. x D.) | 430 x 425 x 100 mm | 430 x 425 x 100 mm | 430 x 440 x 100 mm |
| Thermostat with frost protection setting | Yes | Yes | Yes |
| 24 H programmer | No | No | Yes |
| 120 min. timer | No | Yes | No |
| On/off dial | Yes | Yes | Yes |
2. VOLTAGE
Your appliance is designed to operate at a single-phase voltage of 230-240 V, 50 Hz. This is a Class II appliance, with dual insulation
3. WARNINGS
- Do not swing on the towel drier bar.
This appliance is designed for wall-mounted installation (see «9. Installation» chapter). - Do not place it immediately below a wall power socket.
It must be installed so that the dials or other control devices cannot be touched by persons taking a bath or shower.
This appliance is designed solely for domestic use. It cannot therefore be used for industrial applications.
This appliance is only designed for drying items washed in water.
Never insert anything inside the grill.
Observe your appliance when turning it on for the first time.
■ It is normal for a slight odour to be smelt when the appliance is turned on for the first time or after cleaning (dust deposited on the appliance).
It complies with directives 73/23/EEC and 89/336/EEC.
4. SAFETY
IMPORTANT : The indicate «DO NOT COVER» on your appliance means that the air intake and outlet grills must not be blocked during use and that nothing must be able to prevent air from circulating freely, otherwise the appliance dials to «SAFETY» mode.
«SAFETY» mode.
In the event of abnormal heating, a safety limiter automatically cuts out the appliance.
In this case, turn the B dial to 0, eliminate the cause of overheating and, once the temperature of the appliance returns to normal (approx. 15 min.), you can turn the appliance back on by turning dial B to position .
If the fault reappears when you turn the appliance back on, we recommend that you contact an approved service agent.
To cut the power supply to your appliance : turn the On/Off dial B to position 0.
5. USING THE APPLIANCE IN A BATHROOM
Please, comply with applicable legislation.
6. TURNING ON THE APPLIANCE
Position of the towel drier bar : drying or heating mode.
In heating position (fig. 1), the appliance has a power of 2000W .
To put the appliance in towel-drier position, simply raise the bar (fig. 1). When you turn it to an angle of 45^ , the bar locks in towel-drier position. The power is automatically reduced to 1000 W.
To release the bar and return the appliance to heating position, press the 2 lateral pushbuttons at the same time.
To improve the performance of your appliance, avoid stacking towels one on top of another.
■ Wring out your towels thoroughly before hanging them.
■ When you lower the bar to heating position, ensure that the air outlet grill is not blocked by the drying towels.
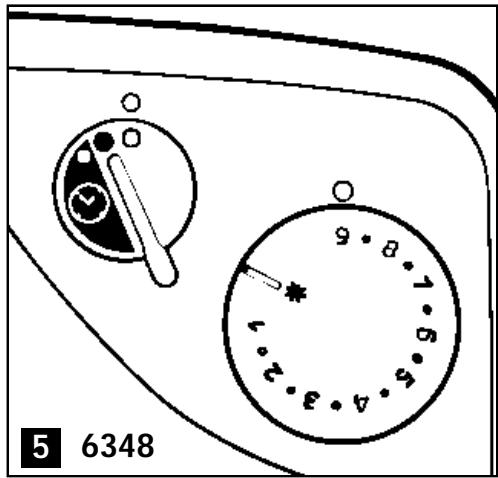
a) Model 6346 (fig. 4).
Turn dial B to position
The appliance then generates 1000 or 2000W , according to the position of the towel-drier bar, «drying» or «heating».
It is then regulated according to the position of the thermostat dial A.
Your appliance will operate until you turn dial B back to position 0 : Off.
b) Model 6348 (fig. 5).
Turn dial B to position
The appliance then generates 1000 or 2000W , according to the position of the towel-drier bar, «drying» or «heating» and will be regulated according to the position of the thermostat dial A.
Your appliance will operate until you turn dial B back to position 0 : Off.
- If you turn dial B to position , the appliance will operate for 2 hours, irrespective of the position of the towel-drier bar and will still be regulated by the thermostat.
- After 2 hours, the appliance cuts out.
To turn it on again, turn the dial to position then back to position if you wish to restart a drying cycle.
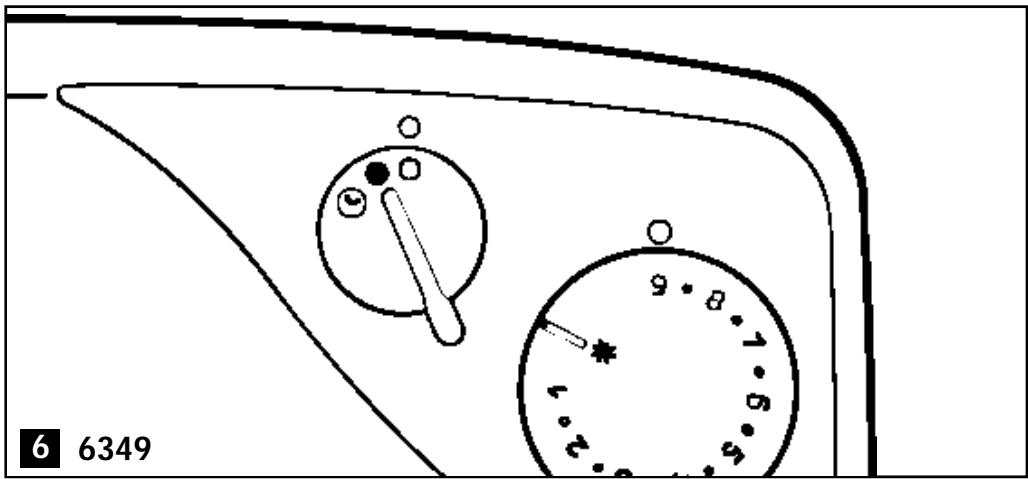
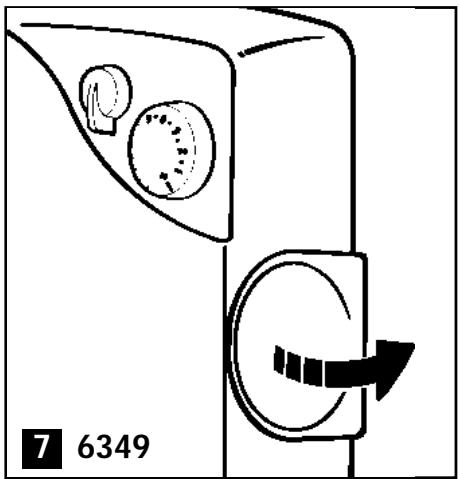
c) Model 6349 (fig. 6).
Your appliance can be turned on manually or by programming.
In both cases, your appliance will generate 1000 or 2000W , according to the position of the towel-drier bar, «drying» or «heating», and will be regulated according to the position of the thermostat dial A.
Turning on the appliance manually.
Turn dial B to position
Your appliance will operate until you turn dial B back to position 0 : Off.
■ Programming the appliance.
Turn dial B to position (fig. 6).
With the programmer, you can programme the operating and stop times in intervals of at least 30 min. over a 24 hour period.
- You must first set the time on the appliance's clock, by turning the programming dial to the right, in order to position the figure representing the time against the mark on the housing (fig. 7 and 8). Then pull the studs outwards to define the required operating periods.
For example : if you wish to programme your appliance to heat your bathroom from 6 a.m. to 8 a.m., pull out the 4 studs located between graduations 6 and 8 (fig. 8).
Accordingly, your appliance will start up every day from 6 a.m. to 8 a.m. and will be regulated according to the thermostat position.
Note: you can stop your appliance manually during programmed operation by positioning dial B on 0 or operate it outside the programmed operating times by positioning dial B on manual operation position , without modifying your daily programming.
7. ADJUSTING THE THERMOSTAT
Your appliance is equipped with an ambient thermostat A which maintains the chosen temperature at a constant level in the room you wish to heat. The maximum position enables continuous operation of the appliance in normal conditions of use. The intermediate positions correspond to the different temperature settings and automatically stop and restart the appliance.
- Position 9 : hotter.
- Position 1 : cooler.
As soon as the required ambient temperature is reached, the appliance stops and restarts automatically to maintain this temperature.
8. FROST PROTECTION SETTING
This position enables you to automatically maintain the temperature above 5^ in a normally insulated room, with a volume of less than 30~m^3 , when the outer temperature is greater than -10^ .
- Turn the thermostat dial A to position .
- Turn dial B to position : On.
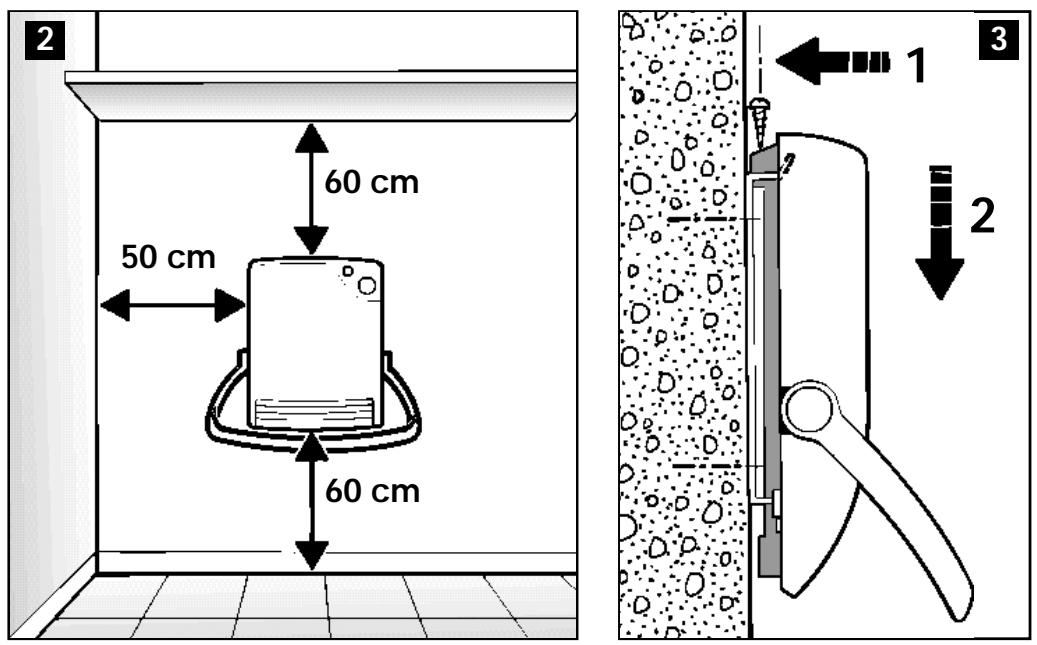
9. INSTALLATION ON THE WALL
Ensure that the appliance is correctly positioned in the right direction, with the control dials in the top right-hand corner.
Installing and connecting the appliance.
■ Your appliance must be installed vertically, in the direction shown in diagram n° 2.
- Connect your appliance to a fixed vertical unit (with the control box on the right-hand side of the appliance) and in accordance with applicable regulations.
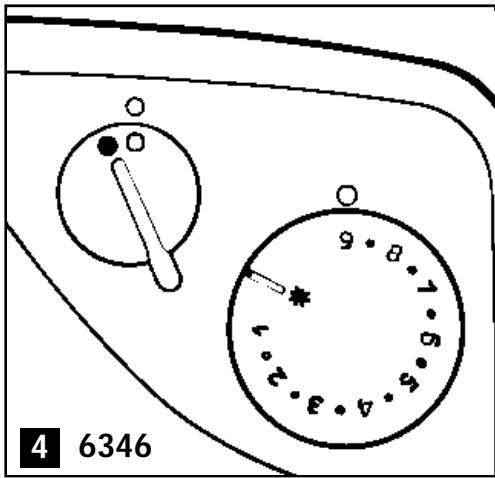
Before installing your appliance, unscrew the wall bracket located on the back of the appliance.
■ Use appropriate means of installation (screws + wall plugs) to install the wall bracket (I) on the wall.
- Secure the wall bracket (I) to the wall, at the required location, respecting the prescribed minimum distances in relation to the floor, walls, etc. (Fig. 2)
In compliance with norms, you must not fit a power plug onto this lead.
When connecting, the lead must be cut, in order to keep no more than the length required for connection. If you are in any doubt consult a qualified electrician. A two-pole circuit-breaker must be installed in your homes electrical installation. The circuit-breaker must have a 3mm contact gap.
■ Hook the appliance in place according to the drawing.
Note the 2 hooking slots located on the back of your appliance :
- place the appliance against the wall, with the upper slot above the wall bracket,
- slide your appliance downwards until it hooks into the 2 upper and lower attachments,
- lock in place using the screw supplied with the installation kit (fig. 3).
If necessary, seek advice from a specialist.
10. MAINTENANCE
The appliance does not require any particular maintenance.
Use a soft cloth to remove dust.
Moisten the cloth to remove stains.
Clean the grills with a vacuum cleaner at least once per year.
For these operations, your appliance must be turned off.
Important : never use abrasive products, which may damage the coating.
■ More thorough cleaning can only be carried out by an approved service agent
This operation is not covered by the guarantee.
Changing the power lead.
If the power lead is damaged, it must be replaced by an approved service centre, as special tools are needed to disassemble this appliance.
- IN THE EVENT OF A PROBLEM
| Problem | Causes | Solutions |
| Your appliance does not heat. | It is not plugged in. | Plug it in. |
| The On/Off dial is on 0. | Turn it to position ⋅. | |
| The thermostat position is set too low compared with the temperature in the room. | Set the thermostat to a higher setting. | |
| In the event of abnormal heating, a safety limiter automatically cuts out the appliance. E.g.: Excessive dust on air vent (G). | Turn the dial to position 0 and eliminate the cause of overheating. When the temperature of the appliance returns to normal, turn the appliance back on, by turning the dial to position ⋅. |
For any other problems, please contact an approved service centre (see enclosed list). Important : special tools are needed to repair this appliance.
Deutsch.
- Position 9: warmer.
- Position 1: wereniger warm.