
T 16 A2 D/HA - Fridge HOTPOINT - Free user manual and instructions
Find the device manual for free T 16 A2 D/HA HOTPOINT in PDF.
| Product type | Refrigerator with freezer compartment |
| Brand | HOTPOINT |
| Model | T 16 A2 D/HA |
| Power supply | 220-240 V ~ 50 Hz |
| Climate class | N (temperate) / SN (subnormal) depending on model |
| Total gross capacity | Approximately 250 L (estimate) |
| Freezing capacity | Up to 4 kg/24h (estimate) |
| Main features | Green operation indicator, red alarm indicator, thermostat, door open alarm, Meat & Fish compartment, Zero degree compartment, automatic defrosting of refrigerator |
| Refrigerant | R600a (isobutane) (estimate) |
| Noise level | Approximately 40 dB(A) (estimate) |
| Energy consumption | Class A+ (estimate) |
| Maintenance and cleaning | Clean with warm water and mild detergent; do not use abrasive products; clean the water drain hole regularly |
| Safety | Mandatory grounding; do not use adapters or extension cords; keep minimum distances from heat sources |
| Reparability | After-sales service number on the rating plate; spare parts available through authorized service |
| General information | User manual available in several languages; manufacturer's warranty |
Frequently Asked Questions - T 16 A2 D/HA HOTPOINT
User questions about T 16 A2 D/HA HOTPOINT
0 question about this device. Answer the ones you know or ask your own.
Ask a new question about this device
Download the instructions for your Fridge in PDF format for free! Find your manual T 16 A2 D/HA - HOTPOINT and take your electronic device back in hand. On this page are published all the documents necessary for the use of your device. T 16 A2 D/HA by HOTPOINT.
USER MANUAL T 16 A2 D/HA HOTPOINT
Instructions for use
Mode d'emploi
Gebruiksaanwijzing
natural_image
Close-up of wooden clothespins and clips, no text or symbols visibleBrugsanvisning
Bruksanvisning
Käyttöohje
natural_image
Black and white photo of multiple glass bottles with black lids, one partially visible in a container (no text or symbols)
natural_image
Black and white close-up of multiple glasses with no visible text or symbolsΟδηγίες χρήσης
natural_image
Close-up of a stainless steel kitchen grater with perforated ventilation slots (no text or symbols visible)Návod k použití
Návod na použitie
natural_image
Technical line drawing of a mechanical assembly with a hook and bracket (no text or symbols)ЗАМЕНА ОБЫЧНОЙ ЛАМПОЧКИ ИЛИ СВЕТОДИОДНОЙ ЛАМПОЧКИ
natural_image
Illustration of a kitchen blender with handle and spout (no text or symbols)natural_image
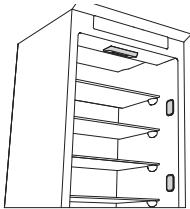
Line drawing of a multi-level refrigerator cabinet with shelves and doors (no text or symbols)
natural_image
Line drawing of a cabinet or storage unit with handle and drawer (no text or symbols)
natural_image
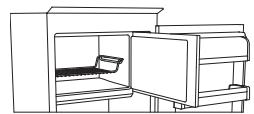
Line drawing of a cabinet with an open door and internal compartments (no text or symbols)Рисунок 1
natural_image
Line drawing of an open refrigerator with a hand pointing to the door (no text or symbols)Рисунок 2
natural_image
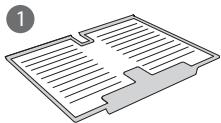
Simple line drawing of a folded paper or plastic sheet with horizontal lines and a shaded base (no text or symbols)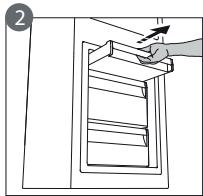
natural_image
Line drawing of a hand placing a tray into a storage unit (no text or symbols)

natural_image
Illustration of hands holding and interacting with a document or notebook (no text or symbols visible)
natural_image
Line drawing of a hand pressing down on a cabinet handle with an arrow indicating the press direction (no text or symbols present)natural_image
Pure electrical circuit lines without any symbolsnatural_image
Pure technical line drawing of a mechanical component with no text or symbolsШАМ ЛАМПАСЫН НЕМЕСЕ ЖАРЫК ДИОД ШАМЫН АУЫСТЫРУ (үлгіге байланысты)
natural_image
Illustration of a kitchen blender with handle and spout (no text or symbols)natural_image
Line drawing of a multi-level refrigerator cabinet with shelves and doors (no text or symbols)
natural_image
Line drawing of a cabinet or storage unit with handle and drawer (no text or symbols)
natural_image
Line drawing of a cabinet with one side shelf open, showing internal compartments (no text or symbols)1-cypet
natural_image
Line drawing of an open refrigerator with a hand pointing to the door (no text or symbols)2-cypet
ЕРІТУ ӘДІСІ МЬЗДАТҚЫШ БӨЛІМІ
(үлгіге байланысты)
natural_image
Pure diagram of a rectangular plate with horizontal lines and a shaded base, no text or symbols present.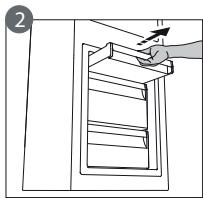
natural_image
Line drawing of a hand placing a tray into a window frame (no text or symbols)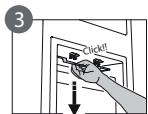


natural_image
Illustration of hands holding and interacting with a document or notebook (no text or symbols visible)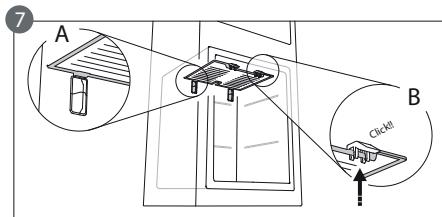
natural_image
Line drawing of a hand pressing down on a cabinet handle (no text or symbols)natural_image
Technical line drawing of a mechanical component with a black arrow pointing to a hanging hook (no text or symbols)natural_image
Illustration of a kitchen blender with handle and spout (no text or symbols)natural_image
Line drawing of a multi-level cabinet or storage unit with shelves and doors (no text or symbols)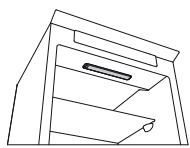
natural_image
Line drawing of a mechanical device with internal components (no text or symbols)
ЯКЩО ПРИЛАД НЕ ВИКОРИСТОВУЄТЬСЯ
natural_image
Line drawing of a cabinet with an open door and internal compartments (no text or symbols)Рис. 1
natural_image
Line drawing of an open refrigerator with a hand pointing to the door (no text or symbols)Рис. 2
РОЗМОРОЖЕННЯ
natural_image
Diagram of a file folder with horizontal lines and a highlighted section (no text or symbols)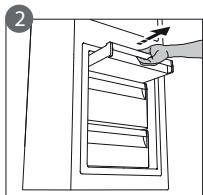
natural_image
Line drawing of a hand placing a ladder into a ladder inside a cabinet (no text or symbols)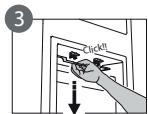
natural_image
Illustration of hands holding and interacting with a document or notebook (no text or symbols visible)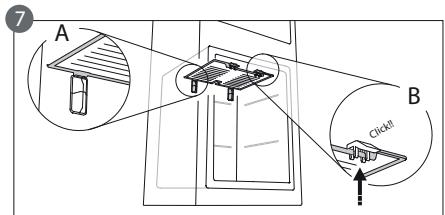
natural_image
Line drawing of a hand pressing down on a cabinet handle with an arrow indicating the press direction (no text or symbols present)flowchart
graph LR
    A["①"] --> B["↓"]
natural_image
Pure diagram of a mechanical component with an arrow indicating direction, no text or symbols presentSOSTITUZIONE LAMPADINA O LED
natural_image
Illustration of a white cylindrical device with a knob and two circular ports, showing internal components (no text or symbols)natural_image
Line drawing of a multi-level cabinet or storage unit with shelves and doors (no text or symbols)
natural_image
Line drawing of a cabinet or storage unit with shelves and drawers (no text or symbols)
IN CASO DI NON UTILIZZO DELL'APPARECCHIO
natural_image
Line drawing of a cabinet with an open door and a small tray inside (no text or symbols)figura 1

natural_image
Line drawing of an open refrigerator with a hand pointing to the door (no text or symbols)figura 2
natural_image
Diagram of a rectangular plate with horizontal lines and a shaded base, labeled with number 1 (no text or symbols on the plate itself)
natural_image
Line drawing of a hand placing a tray into a storage unit (no text or symbols)


natural_image
Illustration of hands holding and exchanging documents (no text or symbols visible)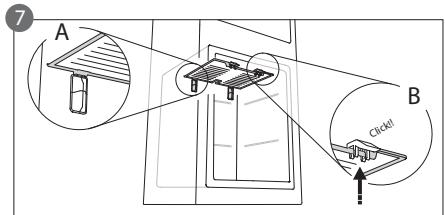
natural_image
Line drawing of a hand pressing down on a cabinet handle with an arrow indicating the press direction (no text or symbols present)flowchart
graph LR
    A["+"] --> B["+"]
natural_image
Pure diagram of a mechanical or structural component with no text, numbers, or symbolsGLÜHLAMPE ODER LED ERSETZEN
(modellabhängig)
natural_image
Illustration of a white cylindrical device with a knob and scroll wheel, showing internal components (no text or symbols)- herkömmliche Glühlampe (max. 25 W)

Glühlampe
oder
natural_image
Line drawing of a multi-level cabinet or storage unit with shelves and doors (no text or symbols)
natural_image
Line drawing of a cabinet or storage unit with shelves and drawers (no text or symbols)
natural_image
Line drawing of a simple kitchen appliance with a side shelf and door (no text or symbols)Abbildung 1

natural_image
Line drawing of an open refrigerator with shelves and door, showing a hand pointing to the door (no text or symbols)Abbildung 2
ABTAUEN
natural_image
Simple line drawing of a folded paper or sheet with horizontal lines and a shaded base (no text or symbols)
natural_image
Line drawing of a hand placing a tray into a storage unit (no text or symbols)


natural_image
Illustration of hands holding and exchanging documents (no text or symbols visible)
natural_image
Line drawing of a hand pressing down on a cabinet handle with a downward arrow (no text or symbols)Instructions for use
Fridge with freezer compartment
| DEUTSCH | Gebrauchsanweisung | Seite 4 |
| FRANÇAIS | Mode d’emploi | Page 10 |
| ENGLISH | Instructions | Page 16 |
| NEDERLANDS | Gebruiksaanwijzing | Pagina 22 |
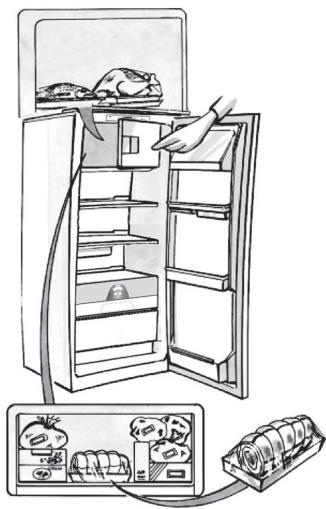
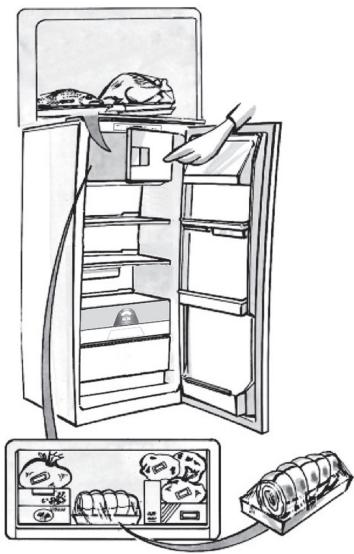
USING FOR THE FIRST TIME
Connect the appliance to the power supply.
In models with electronics, a sound signal may be emitted, which means that the temperature alarm has been activated: press the sound alarm off button. Where provided, position the antibacterial anti-odour filter in the fan as demonstrated in the filter packaging.
Note: After turning the appliance on, you must wait for 4-5 hours for the correct storage temperature to be reached for a normally filled appliance.
MAINTENANCE AND CLEANING OF THE APPLICANCE
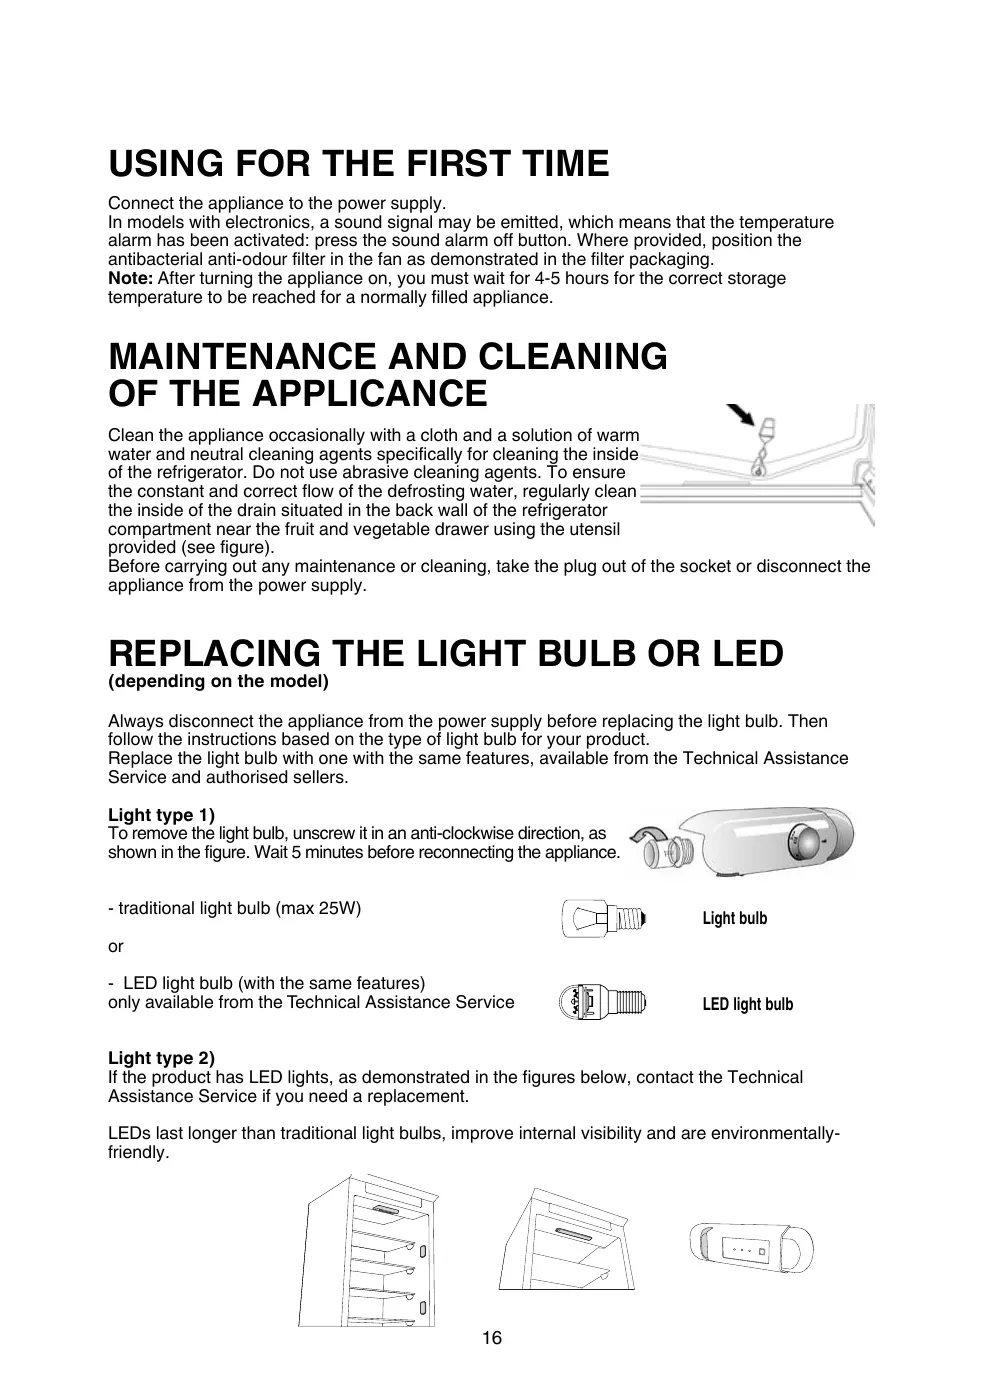
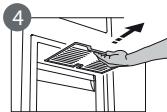
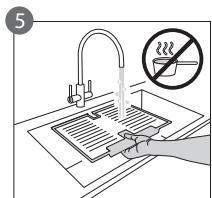
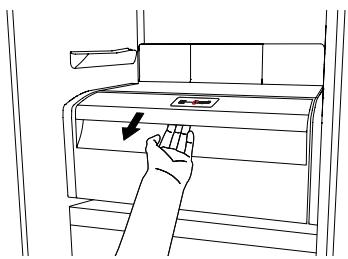
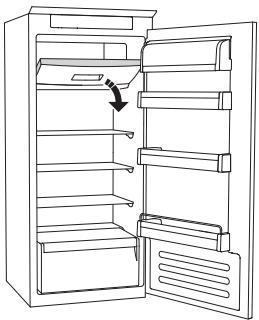
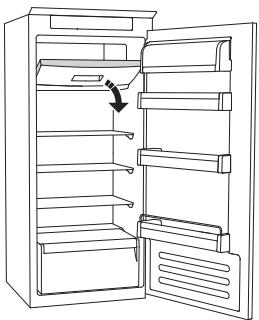
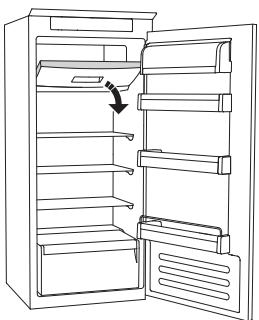
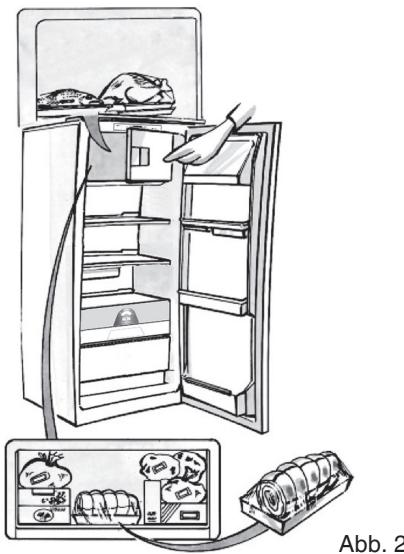
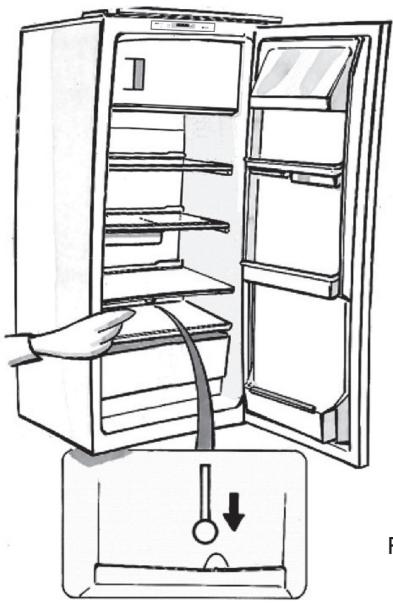
Clean the appliance occasionally with a cloth and a solution of warm water and neutral cleaning agents specifically for cleaning the inside of the refrigerator. Do not use abrasive cleaning agents. To ensure the constant and correct flow of the defrosting water, regularly clean the inside of the drain situated in the back wall of the refrigerator compartment near the fruit and vegetable drawer using the utensil provided (see figure).
natural_image
Pure diagram of a mechanical or structural component with no text, numbers, or symbolsBefore carrying out any maintenance or cleaning, take the plug out of the socket or disconnect the appliance from the power supply.
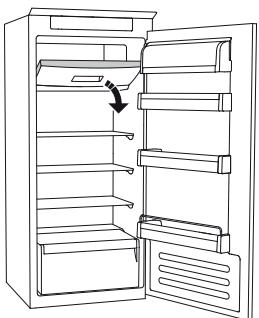
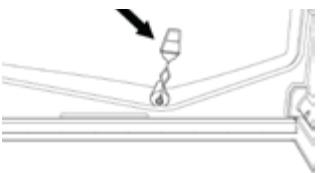
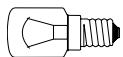
REPLACING THE LIGHT BULB OR LED
(depending on the model)
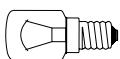
Always disconnect the appliance from the power supply before replacing the light bulb. Then follow the instructions based on the type of light bulb for your product.
Replace the light bulb with one with the same features, available from the Technical Assistance Service and authorised sellers.
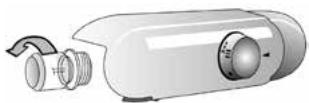
Light type 1)
To remove the light bulb, unscrew it in an anti-clockwise direction, as shown in the figure. Wait 5 minutes before reconnecting the appliance.
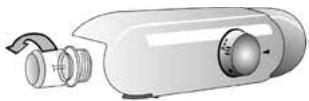
natural_image
Illustration of a cylindrical device with internal components and a curved arrow indicating rotation (no text or symbols)- traditional light bulb (max 25W)
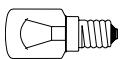
Light bulb
or
- LED light bulb (with the same features)
only available from the Technical Assistance Service
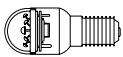
LED light bulb
Light type 2)
If the product has LED lights, as demonstrated in the figures below, contact the Technical Assistance Service if you need a replacement.
LEDs last longer than traditional light bulbs, improve internal visibility and are environmentally-friendly.
natural_image
Line drawing of a multi-tiered refrigerator cabinet with shelves and doors (no text or symbols)
natural_image
Line drawing of a cabinet or storage unit with handle and drawer (no text or symbols)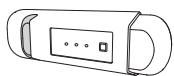
IN THE EVENT OF NON-USE OF THE APPLICANCE
Disconnect the appliance from the power supply, empty it, defrost it (if necessary) and clean it. Keep the doors slightly ajar to let air circulate inside the compartments. By doing this, you avoid the development of mould and bad odours.
IN THE EVENT OF AN INTERRUPTION TO THE POWER SUPPLY
Keep the doors closed so the food stays cold for as long as possible. Do not re-freeze food that has partially defrosted. If there is a prolonged power cut, the black out alarm may also activate (in products with electronics).
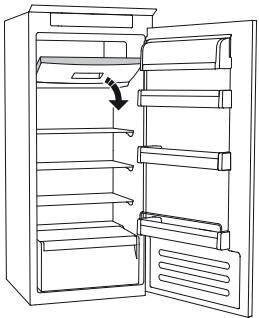
REFRIGERATOR COMPARTMENT
The refrigerator compartment allows for the storage of fresh food and drink.
The refrigerator compartment defrosts completely automatically.
The occasional presence of drops of water on the internal back wall of the compartment is a sign of the automatic defrosting phase. The defrosting water is channelled into a drain and then collected in a container, where it evaporates.
Depending on the model, the product may be equipped with a special “Zero Degrees” compartment, which is ideal for storing fresh meat and fish.
Warning: do not clean refrigerator accessories in a dishwasher.
Note: the ambient temperature, how often the doors are opened and the position of the appliance may affect the internal temperatures in the two compartments. Set the temperatures depending on these factors.
Note: in very humid conditions, condensation may form in the refrigerator compartment, especially on the glass shelves. In this case, it is recommended that you close containers with liquids in (e.g. a pot of stock), wrap up food with a high water content (e.g. vegetables) and turn on the fan, if there is one.
Removing the fruit and vegetable drawer (depending on the model)
Pull the drawer outwards as far as it will go, lift it up and take it out.
To make it easier to remove the fruit and vegetable drawer, it may be necessary to empty (and possibly remove) the two lower door shelves and then continue to remove the drawer.
Fan and antibacterial anti-odour filter (depending on the model)
The fan allows for the even distribution of the temperatures inside the compartments and, consequently, better preservation of the food and reduction of excess humidity. Do not obstruct the ventilation area. The fan can be turned on/off manually (see the Quick Guide); if it is turned on, it operates automatically when necessary.
FREEZER COMPARTMENT
Model with separate freezer compartment
The freezer compartment ✦*** allows for the storage of frozen food (for the period indicated on the packaging) and the freezing of fresh food. The quantity of fresh food that can be frozen in 24 hours is written on the rating plate. Arrange the fresh food in the freezing area inside the freezer compartment (see Quick Guide), leaving enough space around the food packages to allow air to circulate freely. It is advisable that you do not re-freeze food that has partially defrosted. It is important to wrap the food in a way that prevents the ingress of water, humidity or condensation.
Making ice cubes
Fill 2/3 of the ice tray (if available) with water and put it back in the freezer compartment. Do not use sharp or pointed objects to remove the ice under any circumstances.
Removing the drawers (depending on the model)
Pull the drawers outwards as far as they will go, lift them up and remove them. To get more volume, the freezer compartment can be used without the drawers.
Make sure that the door is closed properly after putting the food back on the grilles/shelves.
Models with an internal product compartment
In the freezer compartment you can also freeze fresh food. The quantity of fresh food that can be frozen in 24 hours is written on the rating plate.
How to freeze fresh food:
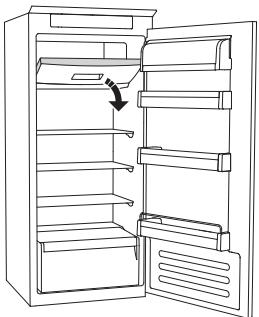
- arrange the food on the grille, if present (figure 1), or directly on the bottom of the compartment (figure 2)
- put the food in the middle of the compartment without it coming into contact with food that is already frozen, keeping a distance of about 20~mm (figure 1 and 2).
natural_image
Line drawing of a refrigerator with an open door and side shelves (no text or symbols)Figure 1

natural_image
Line drawing of an open refrigerator with a hand pointing to the door (no text or symbols)Figure 2
HOW TO DEFROST THE FREEZER COMPARTMENT
(depending on the model)
For frost free models it is not necessary to carry out any defrosting procedures.
For other models, the build up of frost is a normal occurrence.
The quantity and speed of frost accumulation varies depending on the ambient conditions and how often the door is opened. It is advisable to set the temperature colder or, if available, turn on the quick freeze function (see Quick Guide) four hours before removing the food from the freezer compartment, to prolong the preservation of the food during the defrosting phase. To defrost, turn the appliance off and remove the drawers. Put the frozen food in a cool place. Leave the door open to allow the frost to melt. To prevent the water from escaping during the defrost, it is advised that you place an absorbent cloth on the bottom of the freezer compartment and wring it out regularly.
Clean the inside of the freezer compartment and dry it carefully.
Turn the appliance back on and put the food back inside.
STOP FROST SYSTEM
(depending on the model)
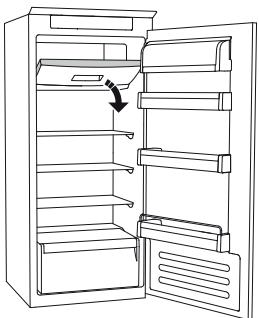
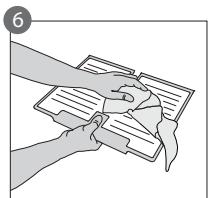
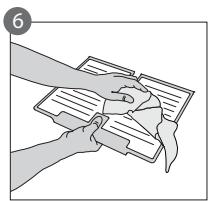
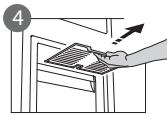
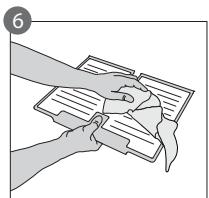
The STOP FROST SYSTEM (available depending on the model) facilitates the defrost procedure for the freezer compartment. The STOP FROST accessory (figure 1) is designed to collect some of the frost that forms in the freezer compartment and it is easy to remove and clean, therefore reducing the time needed to defrost the inside of the freezer compartment.
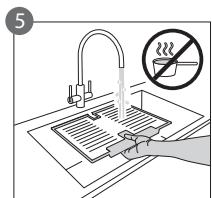
To remove the frost on the STOP FROST accessory follow the cleaning procedure demonstrated below.
PROCEDURE TO CLEAN THE STOP FROST ACCESSORY
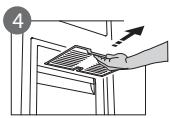
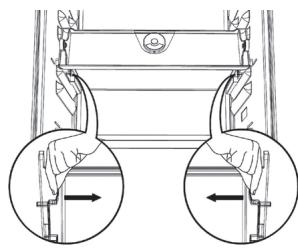
- Open the freezer compartment door and remove the upper drawer (figure 2).
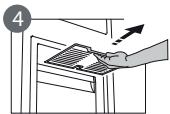
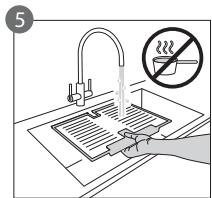
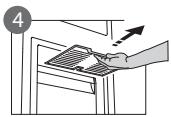
- Unfasten the STOP FROST accessory (figure 3) and remove it (figure 4), taking care not to drop it on the glass shelf below. Note: if the accessory is jammed or difficult to remove, do not keep trying to remove it, but proceed with the complete defrost of the freezer compartment.
- Close the door to the freezer compartment.
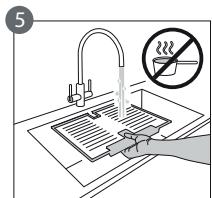
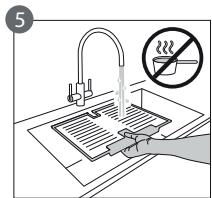
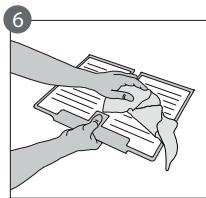
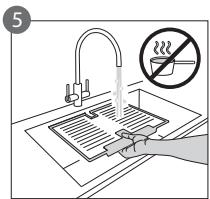
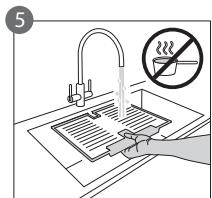
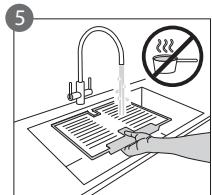
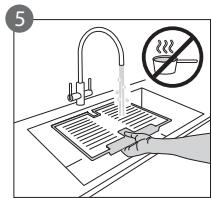
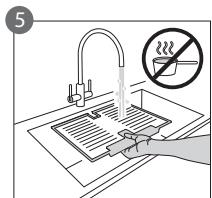
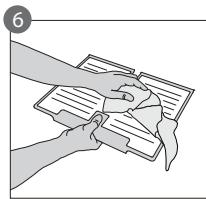
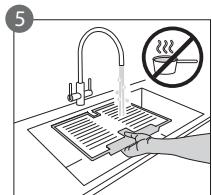
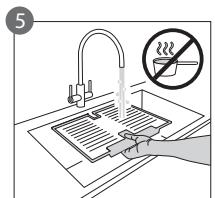
- Remove the frost on the accessory by rinsing it under running (not hot) water (figure 5).
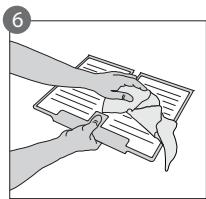
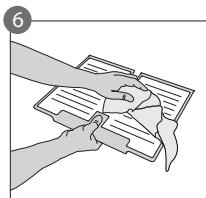
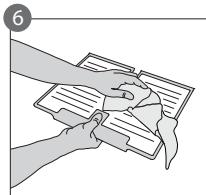
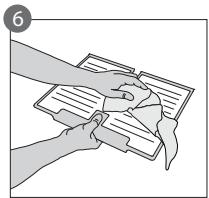
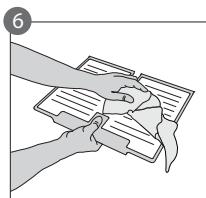
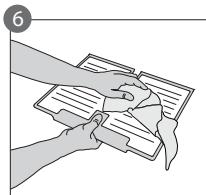
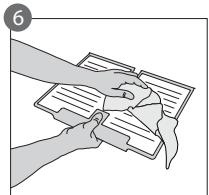
- Let the accessory drip dry and dry the plastic parts with a soft cloth.
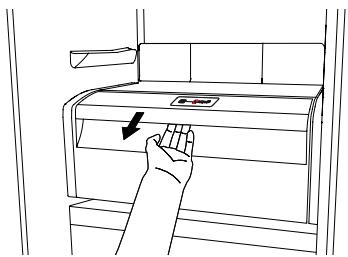
- Reinsert the accessory by placing the back part on the projections shown in figure 7-A, then refasten the handle of the accessory to the clasps above (figure 7-B).
- Reinsert the upper drawer and close the door to the freezer compartment.
It is possible to clean the STOP FROST accessory on its own without completely defrosting the freezer compartment. Cleaning the STOP FROST accessory regularly helps to reduce the need to completely defrost the freezer compartment.
Note: the product specifications, including volume and energy, are calculated without the STOP FROST accessory.
natural_image
Simple line drawing of a folded paper or sheet with horizontal lines and a shaded base (no text or symbols)
natural_image
Line drawing of a hand placing a tray into a storage unit (no text or symbols)


natural_image
Illustration of hands holding and folding a document or notebook (no text or symbols visible)
"ZERO DEGREES" COMPARTMENT
(depending on the model)
The “Zero Degrees” compartment is specifically designed to maintain a low temperature and the correct humidity to preserve fresh food for longer (for example, meat, fish, fruits and winter vegetables).
Humidity control technology coupled with Activ0° provides the best food preservation when the food is not completely packed.
natural_image
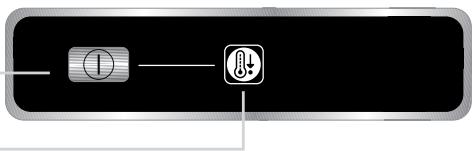
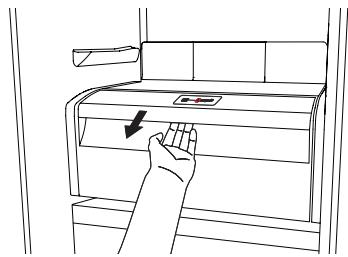
Line drawing of a hand pressing down on a cabinet handle (no text or symbols)Turning on and turning off the compartment
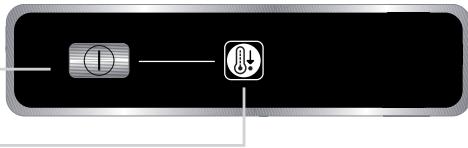
The internal temperature of the compartment is approximately 0^ when the compartment is turned on.
To turn on the compartment, press the button shown in the figure for more than one second until the symbol lights up.
The lit symbol means that the compartment is working. Press the button again for more than one second to turn off the compartment. To turn off the compartment completely, you must remove the drawer.
flowchart
graph LR
    A["+"] --> B["+"]
For the correct functioning of the "Zero Degrees" compartment, it is necessary that:
- the refrigerator compartment is turned on
- the temperature is between +2°C and +6°C
- the drawer in the "Zero Degrees" compartment must be inserted for it to be turned on
- one of the following special functions is not selected: Stand-by, Cooling-Off, Vacation (if present), in this case, remove the food contained in it.
Note:
- if the symbol does not light up when you turn on the compartment, check that the drawer is properly inserted; if the problem persists contact the authorised Technical Assistance Service.
- if the compartment is turned on and the drawer is open, the symbol in the control panel may automatically turn off. The symbol will light up again when the drawer is inserted
- regardless of the state of the compartment, you may hear a faint noise, which you should consider as normal
- when the compartment is not in operation, the temperature inside it depends on the general temperature of the refrigerator compartment. In this case, it is advised that fruits and vegetables that are not sensitive to cold (berries, apples, apricots, carrots, spinach, lettuce, etc.) are stored in it.
Important: if the compartment is turned on and food with a high water content is present, condensation may form on the shelves. In this case, turn the function off temporarily.
Be careful when positioning food and containers that are small in size on the upper shelf of the “Zero Degrees” compartment in order to prevent them accidentally falling between the shelf and the back wall of the refrigerator compartment.
Removing the “Zero Degrees” compartment:
Carry out the following steps:
- to make it easier to remove the compartment, we recommend that you empty (and possibly remove) the lower door shelves
- turn off the compartment
- remove the compartment by rotating it upwards
- remove the white plastic shelf under the compartment
Note: it is not possible to remove the upper shelf and side supports.
To use the “Zero Degrees” compartment again, carefully reposition the white plastic shelf under the compartment before inserting the drawer and turning the function back on.
To have a larger refrigerator volume and to reduce energy consumption, it is recommended that you turn off the “Zero Degrees” compartment and remove the compartment.
Clean the compartment and its components occasionally using a cloth and a solution of warm water (taking care not to submerge the white plastic shelf under the drawer) and neutral cleaning agents specifically for cleaning the inside of the refrigerator. Do not use abrasive cleaning agents.
Before cleaning the compartment (also externally) it is necessary to remove the drawer to disconnect the electrical supply for the compartment.
TECHNICAL ASSISTANCE SERVICE
Before contacting the Technical Assistance Service:
Restart the appliance to check if the problem has been solved. If not, disconnect the appliance again and repeat the procedure after one hour.
If, after having completed the checks listed in the guide for malfunctions and after restarting the appliance, your appliance continues to function incorrectly, contact the Technical Assistance Service, clearly describing the problem and stating:
• the type of malfunction
- the model
- the type and serial number of the appliance (written on the rating plate) - the Service number (if available) (the number that is after the word SERVICE on the rating plate placed inside the appliance)
SERVICE
0000 000 00000
Note:
Reversing the doors of the appliance, if carried out by the Technical Assistance Service, is not considered as a warranty claim.
Nederland Home Product Service (ATAG)
Postbus 249
6920 AE Duiven
natural_image
Pure diagram of a mechanical component with an arrow indicating direction, no text or symbols presentVÝMĚNA ŽÁROVKY ČI KONTROLKY LED
(podle modelu)
natural_image
Illustration of a white cylindrical device with a curved arrow indicating rotation or adjustment, no text or symbols present.natural_image
Line drawing of a multi-tiered storage cabinet or rack unit (no text or symbols)
natural_image
Line drawing of a 3D cabinet or rack structure with no text or symbols
V PŘÍPADĚ NEPOUŽÍVÁNÍ SPOTŘEBIČE
natural_image
Line drawing of a cabinet with an open door and a small tray on the side (no text or symbols)Obrázek 1

natural_image
Line drawing of an open refrigerator with a hand pointing to the door (no text or symbols)Obrázek 2
ODMRAŽOVÁNÍ MRAZICÍHO ODDÍLU
(podle modelu)
natural_image
Simple line drawing of a folded paper or sheet with horizontal lines and a shaded base (no text or symbols)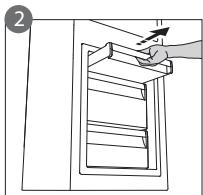
natural_image
Line drawing of a hand holding a rectangular object with horizontal lines, no text or symbols present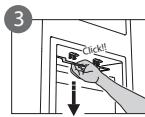

natural_image
Illustration of hands holding a document with lines, no text or symbols present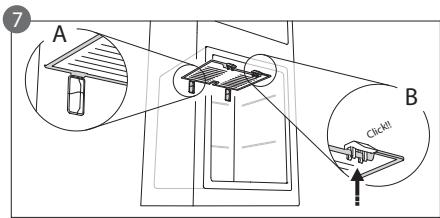
PROSTOR S NULOVOU TEPLOTOU
(podle modelu)
natural_image
Line drawing of a hand pressing down on a cabinet handle (no text or symbols)natural_image
Line drawing of a mechanical component with a hook and arrow indicator (no text or symbols)natural_image
Illustration of a mechanical device with a knob and handle (no text or symbols)natural_image
Line drawing of a multi-level storage cabinet or rack unit (no text or symbols)
natural_image
Line drawing of a cabinet or storage unit with shelves and drawers (no text or symbols)
SI EL ELECTRODOMÉSTICO NO SE UTILIZA
natural_image
Line drawing of a cabinet with an open door and internal compartments (no text or symbols)Figura 1
natural_image
Line drawing of an open refrigerator with a hand pointing to the door (no text or symbols)Figura 2
CÓMO DESCONGELAR EL COMPARTIMENTO CONGELADOR
(según el modelo)
natural_image
Diagram of a file folder with horizontal lines and a highlighted section (no text or symbols)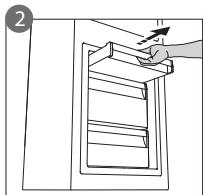
natural_image
Line drawing of a hand placing a ladder into a ladder inside a cabinet (no text or symbols)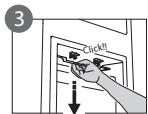


natural_image
Illustration of hands holding and interacting with a document or notebook (no text or symbols visible)
natural_image
Line drawing of a hand pressing down on a cabinet handle (no text or symbols)flowchart
graph LR
    A["①"] --> B["↓"]
natural_image
Pure diagram of a mechanical or structural component with no visible text, numbers, or symbolsnatural_image
Illustration of a cylindrical device with internal components and a curved arrow indicating rotation (no text or symbols)- lâmpada tradicional (máx 25W)
Lâmpada
ou
natural_image
Line drawing of a multi-level cabinet or storage unit with shelves and doors (no text or symbols)
natural_image
Line drawing of a cabinet or storage unit with shelves and drawers (no text or symbols)
natural_image
Line drawing of a two-door refrigerator with an open door and side drawer (no text or symbols)Figura 1

natural_image
Line drawing of an open refrigerator with a hand pointing to the door (no text or symbols)Figura 2
COMO DESCONGELAR O COMPARTIMENTO DO CONGELADOR (dependendo do modelo)
natural_image
Simple line drawing of a rectangular plate with horizontal lines and a shaded base (no text or symbols)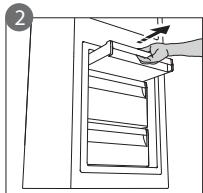
natural_image
Line drawing of a hand placing a ladder into a cabinet (no text or symbols)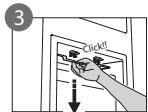

natural_image
Illustration of hands holding a document with lines indicating text, no visible text or symbols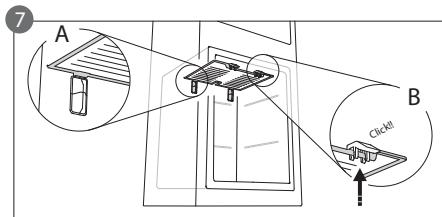
natural_image
Line drawing of a hand pressing down on a cabinet handle with an arrow indicating the press direction (no text or symbols present)flowchart
graph LR
    A["①"] --> B["↓"]
natural_image
Pure diagram of a mechanical component with an arrow indicating direction, no text or symbols presentVALGUSTIPIRNI VÕI LEDI VAHETAMINE
natural_image
Illustration of a white cylindrical device with a curved arrow indicating rotation or movement (no text or symbols)natural_image
Line drawing of a multi-level refrigerator cabinet with shelves and doors (no text or symbols)
natural_image
Line drawing of a cabinet or storage unit with handle and drawer (no text or symbols)
SEADME MITTEKASUTAMISE KORRAL
natural_image
Line drawing of a cabinet with an open door and side table, no text or symbols presentJoonis 1

natural_image
Line drawing of an open refrigerator with shelves and door, showing a hand pointing to the door (no text or symbols)Joonis 2
KUIDAS KÜLMUTUSSEKTSIOONI SULATADA (sõltuvalt mudelist)
natural_image
Simple line drawing of a rectangular plate with horizontal lines and a shaded base (no text or symbols)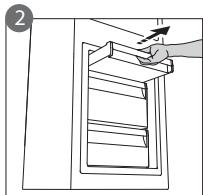
natural_image
Line drawing of a hand placing a tray into a storage unit (no text or symbols)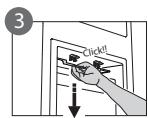

natural_image
Illustration of hands holding a document with lines, no text or symbols present
„NULL-KRAADI“ SEKTSIOON (sõltuvalt mudelist)
natural_image
Line drawing of a hand pressing down on a cabinet handle with an arrow indicating the press direction (no text or symbols present)natural_image
Pure diagram of a mechanical component with an arrow indicating direction, no text or symbols presentELEKTROS ARBA LED LEMPUTÉS KEITIMAS (priklauso nuo modelio)
natural_image
Illustration of a white cylindrical device with a knob and scroll wheel, showing internal components (no text or symbols)natural_image
Line drawing of a multi-level cabinet or storage unit with shelves and doors (no text or symbols)
natural_image
Line drawing of a cabinet or storage unit with shelves and drawers (no text or symbols)
NENAUDOJANT PRIETAISO
natural_image
Line drawing of a refrigerator with an open door and side shelf (no text or symbols)1 pav.

natural_image
Line drawing of an open refrigerator with a hand pointing to the door (no text or symbols)2 pav.
KAIP ATITIRPDYTI ŠALDIKLIO KAMERA –
natural_image
Simple line drawing of a folded paper or document with horizontal lines and a shaded base (no text or symbols)
natural_image
Line drawing of a hand placing a tray into a storage unit (no text or symbols)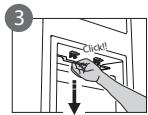

natural_image
Illustration of hands holding a document with lines, no text or symbols present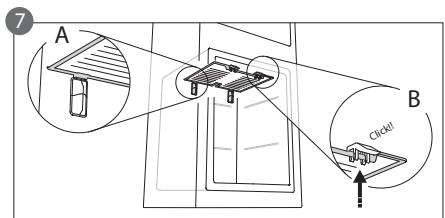
natural_image
Line drawing of a hand pressing down on a cabinet handle with an arrow indicating the press direction (no text or symbols present)flowchart
graph LR
    A["①"] --> B["②"]
natural_image
Pure diagram of a mechanical component with an arrow indicating direction, no text or symbols presentAPGAISMOJUMA SPULDZES VAI GAISMAS DIODES NOMAINA
natural_image
Illustration of a white cylindrical device with a knob and scroll wheel, showing internal components (no text or symbols)natural_image
Line drawing of a multi-level refrigerator cabinet with shelves and doors (no text or symbols)
natural_image
Line drawing of a cabinet or storage unit with handle and drawer (no text or symbols)
JA IERİCE NETIEK LIETOTA
natural_image
Line drawing of a cabinet with an open door and a small tray inside (no text or symbols)- attêls

natural_image
Line drawing of an open refrigerator with a hand pointing to the door (no text or symbols)- attēls
ATKAUSĒŠANA SALDĒTAVAS NODALĪJUMS (atkarībā no modela)
natural_image
Simple line drawing of a folded paper or document with horizontal lines and a shaded base (no text or symbols)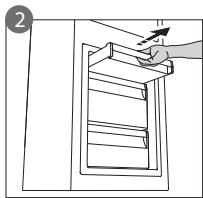
natural_image
Line drawing of a hand placing a ladder into a storage cabinet (no text or symbols)
natural_image
Illustration of hands holding a document with lines, no text or symbols present
natural_image
Line drawing of a hand pressing down on a cabinet handle (no text or symbols)natural_image
Pure diagram of a mechanical component with an arrow indicating direction, no text or symbols presentWYMIANA ŻARÓWKI LUB DIODY LED
natural_image
Illustration of a white cylindrical device with a knob and scroll wheel (no text or symbols)natural_image
Line drawing of a multi-level cabinet or storage unit with shelves and doors (no text or symbols)
natural_image
Line drawing of a cabinet or storage unit with shelves and drawers (no text or symbols)
W PRZYPADKU NIEUŻYWANIA URZĄDZENIA
natural_image
Line drawing of a cabinet with an open door and a small tray inside (no text or symbols)Rysunek 1
natural_image
Line drawing of an open refrigerator with a hand pointing to the door (no text or symbols)Rysunek 2
natural_image
Diagram of a rectangular plate with horizontal lines and a shaded base, labeled with number 1 (no text or symbols on the plate itself)
natural_image
Line drawing of a hand placing a tray into a storage unit (no text or symbols)


natural_image
Illustration of hands holding and exchanging documents (no text or symbols visible)
KOMORA "ZERO DEGREES"
natural_image
Line drawing of a hand pressing down on a cabinet handle (no text or symbols)natural_image
Pure diagram of a mechanical or structural component with no visible text, numbers, or symbolsnatural_image
Illustration of a cylindrical device with a curved arrow indicating rotation or movement (no text or symbols)- Traditionel pære (maks. 25 W)

Pære
eller
natural_image
Line drawing of a multi-level cabinet or storage unit with shelves and doors (no text or symbols)
natural_image
Line drawing of a cabinet or storage unit with shelves and drawers (no text or symbols)
I TILFÆLDE AF SLUKNING AF APPARATET
natural_image
Line drawing of a refrigerator with an open door and side table (no text or symbols)Figur 1
natural_image
Line drawing of an open refrigerator with a hand pointing to the door (no text or symbols)Figur 2
AFISNING AF FRYSEAFDELINGEN
natural_image
Simple line drawing of a folded paper or sheet with horizontal lines and a shaded base (no text or symbols)
natural_image
Line drawing of a hand placing a stack of papers into a container (no text or symbols)


natural_image
Illustration of hands holding and exchanging documents (no text or symbols visible)
natural_image
Line drawing of a hand pressing down on a cabinet handle (no text or symbols)natural_image
Illustration of a white cylindrical device with internal components and a curved arrow indicating rotation (no text or symbols)- perinteinen valopoltimo (maks. 25 W)
tai
natural_image
Line drawing of a multi-level refrigerator cabinet with shelves and doors (no text or symbols)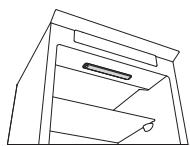
natural_image
Line drawing of a 3D cabinet or storage unit with shelves and doors (no text or symbols)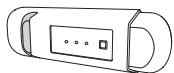
KUN LAITETTA EI KÄYTETÄ
natural_image
Line drawing of a cabinet with an open door and internal compartments (no text or symbols)Kuva 1

natural_image
Line drawing of an open refrigerator with a hand pointing to the door (no text or symbols)Kuva 2
PAKASTINOSASTON SULATTAMINEN
(mallista riippuen)
natural_image
Pure diagram of a rectangular plate with horizontal lines and a shaded base, no text or symbols present.
natural_image
Line drawing of a hand placing a component into a window frame (no text or symbols)
natural_image
Illustration of hands holding documents with lines, no text or symbols present
natural_image
Line drawing of a hand pressing down on a cabinet handle with an arrow indicating the press direction (no text or symbols present)flowchart
graph TD
    A["○"] --> B["↓"]
natural_image
Pure diagram of a mechanical or structural component with no visible text, numbers, or symbolsСМЯНА НА КРУШКАТА НА ЛАМПИЧКАТА ИЛИ НА СВЕТОДИОДНА КРУШКА
natural_image
Illustration of a white cylindrical device with a knob and scroll wheel (no text or symbols)- стандартна крушка на лампичката (макс. 25 W)

natural_image
Line drawing of a multi-level cabinet or storage unit with shelves and doors (no text or symbols)
natural_image
Line drawing of a mechanical device with internal compartments and mounting holes (no text or symbols)
В СЛУЧАЙ НА НЕИЗПОЛЗВАНЕ НА УРЕДА
natural_image
Line drawing of a cabinet with one open door and another closed (no text or symbols)Фигура 1

natural_image
Line drawing of an open refrigerator with a hand pointing to the door (no text or symbols)Фигура 2
natural_image
Simple line drawing of a rectangular plate with horizontal lines and a shaded base (no text or symbols)
natural_image
Line drawing of a hand placing a ladder into a window frame (no text or symbols)

natural_image
Illustration of hands holding a clipboard with lined paper, no text or symbols present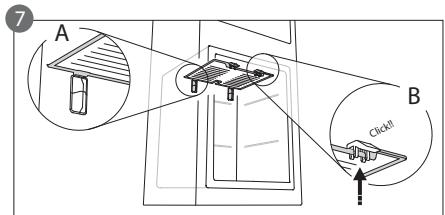
natural_image
Line drawing of a hand pressing down on a cabinet handle with a downward arrow (no text or symbols)natural_image
Pure diagram of a mechanical component with an arrow indicating direction, no text or symbols presentZAMJENA STANDARDNE ILI LED- ŽARULJICE
(ovisno o modelu)
natural_image
Illustration of a white cylindrical device with attached circular ports and a curved arrow indicating rotation (no text or symbols)- standardna žaruljica (maks. 25 W)
Žaruljica
ili
- LED-žaruljica (istih karakteristika)
natural_image
Line drawing of a multi-level cabinet or storage unit with shelves and doors (no text or symbols)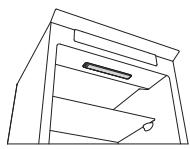
natural_image
Line drawing of a mechanical device with internal components (no text or symbols)
KADA SE UREĐAJ NE KORISTI
natural_image
Line drawing of a refrigerator with an open door and side shelf (no text or symbols)Slika 1

natural_image
Line drawing of an open refrigerator with shelves and door, showing a hand pointing to the door (no text or symbols)Slika 2
NAČIN ODLEĐIVANJA ODJELJKA ZALEĐIVAČA (ovisno o modelu)
Kod modela bez zaleđivanja nije potrebno izvršiti odleđivanje.
Kod drugih modela je pojava leda normalna.
natural_image
Simple line drawing of a rectangular object with horizontal lines and a shaded base, no text or symbols present.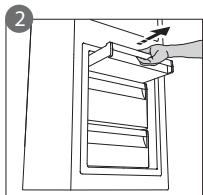
natural_image
Line drawing of a hand placing a ladder into a cabinet (no text or symbols)


natural_image
Illustration of hands holding and exchanging documents (no text or symbols visible)
ODJELJAK “NULA STUPNJEVA” (ovisno o modelu)
natural_image
Line drawing of a hand pressing down on a cabinet handle (no text or symbols)flowchart
graph LR
    A["+"] --> B["↓"]
natural_image
Pure diagram of a mechanical component with an arrow indicating direction, no text or symbols presentÎNLOCUIREA BECULUI SAU A LED-ULUI
natural_image
Illustration of a white cylindrical device with a knob and two attached flanges (no text or symbols)- bec obișnuit (max. 25 W)
Becul
sau
natural_image
Line drawing of a multi-level refrigerator cabinet with shelves and doors (no text or symbols)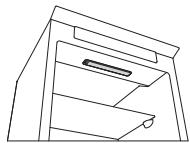
natural_image
Line drawing of a cabinet or storage unit with shelves and drawers (no text or symbols)
DACĂ APARATUL NU ESTE FOLOSIT
natural_image
Line drawing of a cabinet with an open door and a small tray inside (no text or symbols)Figura 1

natural_image
Line drawing of an open refrigerator with a hand pointing to the door (no text or symbols)Figura 2
natural_image
Pure diagram of a rectangular plate with horizontal lines and a shaded base, no text or symbols present.
natural_image
Line drawing of a hand placing a tray into a storage unit (no text or symbols)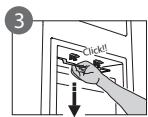

natural_image
Illustration of hands holding a document with lines, no text or symbols present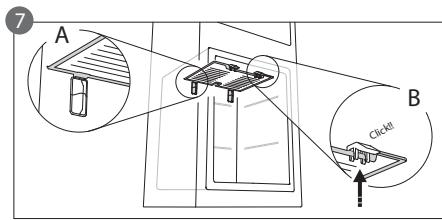
natural_image
Line drawing of a hand pressing down on a cabinet handle with an arrow indicating the press direction (no text or symbols present)flowchart
graph LR
    A["①"] --> B["②"]
natural_image
Pure diagram of a mechanical component with an arrow indicating direction, no text or symbols presentZAMENA SIJALICE ILI LED SIJALICE
(u zavisnosti od modela)
Uvek isključite aparat iz električne mreže pre nego što zamenite sijalicu. Zatim pratite uputstva na osnovu tipa sijalice za proizvod koji posedujete.
Sijalicu zamenite drugom istih karakteristika koju možete da nabavite preko službe za tehničku podršku i od ovlašćenih prodavaca.
Tip svetla 1)
Da biste uklonili sijalicu, odvijte je u smeru suprotnom od smera kazaljke na satu, kao što je prikazano na slici. Sačekajte 5 minuta pre nego što ponovo priključite aparat.
natural_image
Illustration of a white cylindrical device with a knob and scroll wheel, showing internal components (no text or symbols)- standardna sijalica (maks. 25 W)
Sijalica
ili
- LED sijalica (istih karakteristika)
natural_image
Line drawing of a multi-level cabinet or storage unit with shelves and doors (no text or symbols)
natural_image
Line drawing of a cabinet or storage unit with shelves and drawers (no text or symbols)
U SLUČAJU DA SE APARAT NEĆE KORISTITI
natural_image
Line drawing of a double-door refrigerator with an open door and side drawer (no text or symbols)Slika 1

natural_image
Line drawing of an open refrigerator with shelves and doors, showing a hand pointing to the door (no text or symbols)Slika 2
KAKO DA ODLEDITE ODELJAK ZAMRZIVAČA (u zavisnosti od modela)
natural_image
Pure diagram of a rectangular plate with horizontal lines and a shaded base, no text or symbols present.
natural_image
Line drawing of a hand placing a ladder into a storage cabinet (no text or symbols)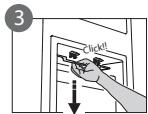
natural_image
Illustration of hands holding and exchanging documents (no text or symbols visible)
ODELJAK „ZERO DEGREES“ (u zavisnosti od modela)
Odeljak „Zero Degrees“ namenski je napravljen tako da održava nisku temperaturu i odgovarajuću vlažnost za duže održavanje svežine hrane (na primer, mesa, ribe, voća i zimskog povrća).
Tehnologija za kontrolu vlage u kombinaciji sa tehnologijom Activ0° omogućava najoptimalnije čuvanje hrane kada hrana nije u potpunosti zapakovana.
natural_image
Line drawing of a hand pressing down on a cabinet handle with an arrow indicating the press direction (no text or symbols present)flowchart
graph LR
    A["①"] --> B["↓"]
natural_image
Pure diagram of a mechanical or structural component with no text, numbers, or symbolsnatural_image
Illustration of a white cylindrical device with internal components and a curved arrow indicating rotation (no text or symbols)natural_image
Line drawing of a multi-tiered refrigerator cabinet with shelves and doors (no text or symbols)
natural_image
Line drawing of a cabinet or storage unit with handle and drawer (no text or symbols)
natural_image
Line drawing of a simple kitchen appliance with a side sink and open door (no text or symbols)Εικόνα 1

natural_image
Line drawing of an open refrigerator with a hand pointing to the door (no text or symbols)Εικόνα 2
natural_image
Simple line drawing of a folded paper or sheet with horizontal lines and a shaded base (no text or symbols)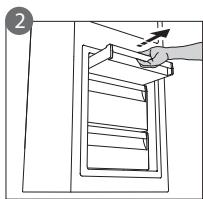
natural_image
Line drawing of a hand placing a tray into a storage unit (no text or symbols)


natural_image
Illustration of hands holding and exchanging documents (no text or symbols visible)
natural_image
Line drawing of a hand pressing down on a cabinet handle with an arrow indicating the press direction (no text or symbols present)natural_image
Close-up of wooden clothespins and clips, no text or symbols visible使用說明
natural_image
Black and white photo of several glass bottles and a small container, no visible text or symbols
natural_image
Close-up of several empty glasses with smooth surfaces, no text or symbols visible
natural_image
Close-up of a metallic kitchen appliance with perforated ventilation slots (no visible text or symbols)natural_image
Pure mechanical diagram showing a hook and bracket assembly without any text, numbers, or symbols更换灯泡或LED
(具体依型号而定)
natural_image
Illustration of a mechanical device with a valve and cylindrical components (no text or symbols)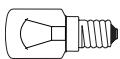
灯泡

LED灯泡
灯泡类型2)
natural_image
Line drawing of a multi-level rack cabinet or storage unit (no text or symbols)
natural_image
Line drawing of a cabinet or storage unit with handle and drawer (no text or symbols)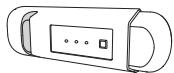
如果不使用电器
natural_image
Line drawing of a cabinet with one open door and a small tray on the side (no text or symbols)图1
natural_image
Line drawing of an open refrigerator with a hand pointing to the door (no text or symbols)图2
如何除霜冷冻室(依型号而定)
对于无霜型号,无需进行任何除霜操作。
对于其他型号,积霜现象是正常的。
natural_image
Simple line drawing of a folded paper or sheet with horizontal lines and a shaded base (no text or symbols)
natural_image
Line drawing of a hand placing a tray into a storage unit (no text or symbols)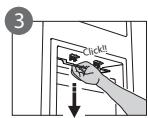


natural_image
Illustration of hands holding and exchanging documents (no text or symbols visible)
“零度”室
(依型号而定)
natural_image
Line drawing of a hand pressing down on a cabinet handle (no text or symbols)开启和关闭“零度”室电源
flowchart
graph TD
    A["+"] --> B["+"]
    B --> C["÷"]
若要使“零度”室正确起作用,需保证:
natural_image
Pure technical line drawing of a mechanical component with no text or symbols更換燈泡或LED
(依機種而定)
natural_image
Illustration of a washing machine with two flanges and a handle (no text or symbols)- 傳統燈泡(最大25W)

燈泡
或
- LED燈泡(功能相同)
需向客戶服務中心取得
LED燈泡
燈泡類型2)
natural_image
Line drawing of a multi-level rack cabinet or storage unit (no text or symbols)
natural_image
Line drawing of a cabinet or storage unit with handle and drawer (no text or symbols)
不再使用本冰箱時
natural_image
Line drawing of a cabinet with an open door and a small tray inside (no text or symbols)圖1

natural_image
Line drawing of an open refrigerator with a hand pointing to the door (no text or symbols)圖2
如何將冷凍室除霜(依機種而定)
無霜機種無需進行除霜。
其他機種在使用時會結霜屬正常情形。
natural_image
Simple line drawing of a folded paper or sheet with horizontal lines and a shaded base (no text or symbols)
natural_image
Line drawing of a hand placing a stack of papers into a container (no text or symbols)


natural_image
Illustration of hands holding and exchanging documents (no text or symbols visible)
「零度」冷藏室
(依機種而定)
natural_image
Line drawing of a hand pressing down on a cabinet handle (no text or symbols)啟動與關閉該冷藏室
當該冷藏室啟動時,內部溫度接近0°。
flowchart
graph LR
    A["+"] --> B["+"]
要讓「零度」冷藏室正常運作,必須:
natural_image
Pure diagram of a hook securing a small object into a channel (no text or symbols)natural_image
Illustration of a white cylindrical device with a knob and handle, showing internal components (no text or symbols)(1 مсобاح من النوع)
natural_image
Line drawing of a multi-tiered refrigerator cabinet with shelves and doors (no text or symbols)
natural_image
Line drawing of a cabinet or storage unit with shelves and drawers (no text or symbols)
natural_image
Line drawing of a cabinet with an open door and a tray, no text or symbols presentالشكل 1

natural_image
Line drawing of an open refrigerator with one door open, showing the lid and front shelves (no text or symbols)الشكل ٢
natural_image
Pure diagram of a mechanical component with parallel grooves and a shaded base (no text or symbols)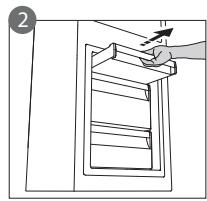
natural_image
Line drawing of a hand placing a tray into a window frame (no text or symbols)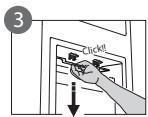
natural_image
Illustration of hands holding documents with a magnifying glass (no text or symbols visible)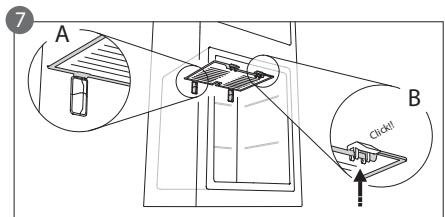
natural_image
Line drawing of a hand pressing down on a cabinet handle with a directional arrow (no text or symbols)Instructions for use
Mode d'emploi
Gebruiksaanwijzing
natural_image
Close-up of white plastic cloths with metal clips and a coiled spring (no text or symbols visible)Brugsanvisning
Bruksanvisning
Käyttöohje
natural_image
Black and white close-up of glass bottles and a cup, no visible text or symbols
natural_image
Black and white close-up of multiple glasses with blurred background (no text or symbols)Οδηγίες χρήσης
natural_image
Close-up of a metallic kitchen appliance with perforated ventilation slots and a handle (no visible text or symbols)Návod k použití
Návod na použitie
natural_image
Line drawing of a hand pressing down on a cabinet drawer with a curved handle (no text or symbols)Temperatureinstellung
natural_image
Technical line drawing of a mechanical assembly with no visible text or symbolsAbb. 1
natural_image
Technical diagram showing two views of a mechanical component with directional arrows indicating movement (no text or symbols present)Abb. 2
natural_image
Line drawing of a hand pressing down on a cabinet with a directional arrow (no text or symbols)natural_image
Diagram showing a device inside a refrigerator with an arrow pointing to the interior (no text or symbols present)Abb. 1
natural_image
Illustration of a refrigerator with food being placed into a rack, showing hands and a close-up of the interior (no text or symbols)| 1-3 | |||
| 4-7 | |||
| 8-12 |
ABTAUEN DES GERÄTS
natural_image
Line drawing of an open refrigerator with a hand inserting a cable to the door, showing internal shelves and a hanging handle (no text or symbols)natural_image
Illustration of a hand inserting a plug into a device with a magnified view of internal components (no text or symbols)Switching on the appliance
- Plug in the appliance
- When the appliance is plugged in, it is normally factory set to a temperature of 5^ C.
Adjusting the temperature
For temperature adjustment, see the enclosed product sheet.
Note:
Ambient air temperature, the frequency of door opening, the introduction of hot food and unsuitable appliance positioning can all affect the internal temperature of the refrigerator, which may differ from that shown on the display.
Storing food the refrigerator compartment:
• Cover food to prevent it drying out
- The distance between the shelves and the rear wall inside the refrigerator ensures the free circulation of air
- Do not place food in direct contact with the rear wall of the refrigerator compartment
- Do not place hot food in the refrigerator
• Store liquids in closed containers
Important:
Storing vegetables with a high water content can cause condensation to form on the glass shelves; this will not affect the correct operation of the appliance.
MEAT & FISH BOX (depending on model)
The Meat & Fish box was designed specially to keep foods fresher for longer, without altering nutritional values or original freshness. Do not store fruit or vegetables in this box, as the temperature may drop below 0^ C, causing water contained in the food to freeze.
Temperature Adjustment
The temperature inside the Meat & Fish box is indicated by the position of the arm on the door of the box, and depends on the general temperature of the refrigerator compartment.
natural_image
Line drawing of a hand placing a button into a drawer with an arrow indicating direction (no text or symbols)We recommend setting the temperature of the refrigerator compartment between +2^ and +6^ . To work out if the temperature inside the Meat & Fish box is correct, refer to the pictures below:
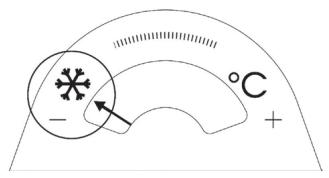
When the arm points to the left, you need to raise the temperature in the refrigerator compartment.
When the arm is in the middle, the temperature is ok.
When the arm points to the right, you need to lower the temperature in the refrigerator compartment.
Important: when the function is activated and foods with a high water content are present, condensation may form on the shelves. In this case, disable the function temporarily.
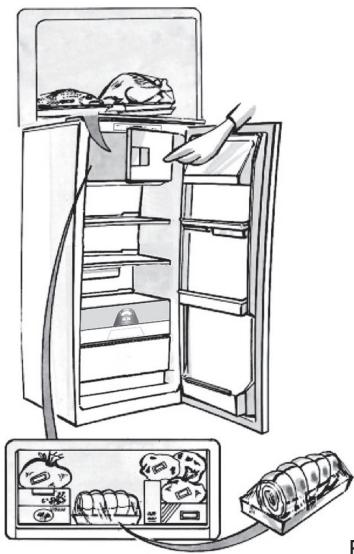
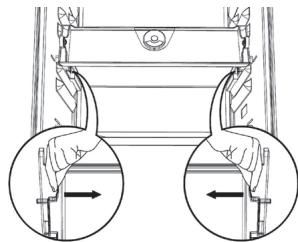
Removing the Meat & Fish compartment:
To ensure correct operation of the product, adequate preservation of food and to optimise energy consumption, it is advisable not to remove the Meat & Fish compartment if the symbol 📁 (see Quick Guide) is not present on the control panel. In all other cases, the Meat & Fish compartment can be removed to obtain more space inside the refrigerator.
Proceed as follows:
- Remove the compartment drawer (Figure 1).
- Remove the drawer cover by releasing the bottom side clips (Figure 2).
To reinstate the Meat & Fish compartment, make sure to refit the drawer cover before inserting the drawer and reactivating operation.
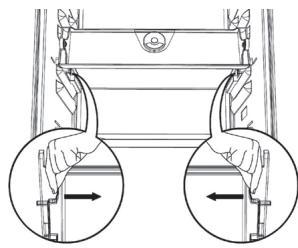
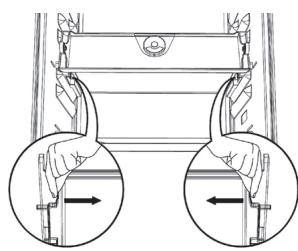
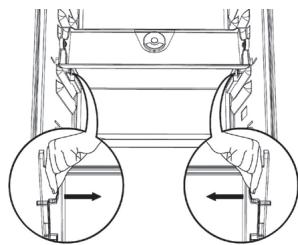
- Press the "Meat & Fish compartment function" button on the control panel for 3 seconds, until the yellow indicator goes off.
To optimise energy consumption, it is advisable to deactivate the Meat & Fish compartment and remove its components (except the shelf above the crisper drawers).
natural_image
Technical line drawing of a mechanical assembly with arrows indicating motion or force direction (no text or symbols)Fig. 1

natural_image
Technical line drawing of a mechanical assembly with two circular inset views showing hand positioning (no text or symbols)Fig. 2
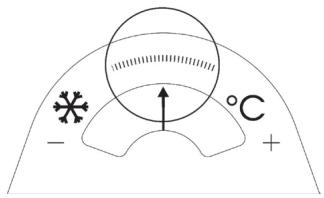
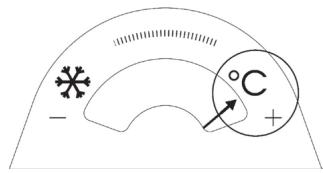
"ZERO DEGREES" BOX (depending on the model)
The “Zero Degrees” box is specifically designed to maintain a low temperature and a suitable humidity level, in order to keep foods fresher for longer (e.g. meat, fish, fruit and winter vegetables).
natural_image
Line drawing of a hand pressing down on a wooden drawer with a directional arrow (no text or symbols)Activating and deactivating the box
The temperature inside the box, when active, is approximately 0^ .
To activate the compartment, press the button shown in the figure for more than 1 second, until the symbol lights up
The symbol lit indicates that the compartment is functioning. Press the button again for more than 1 second to deactivate the compartment
flowchart
graph LR
    A["+"] --> B["&"]
    B --> C["+"]
The following factors are vital for the “Zero Degrees” box to work properly:
- the refrigerator compartment must be switched on
- the temperature of the refrigerator compartment must be between +2°C and +6°C
- the box must be inserted to enable activation
- no special functions must have been selected (Standby, Cooling-Off, Vacation – where applicable).
If one of these special functions has been selected, the “Zero Degrees” box must be deactivated manually, and any fresh food inside it removed. If manual deactivation does not take place, the box will be deactivated automatically after 8 hours.
Note:
- if the symbol does not light up when the box is activated, check that the box is properly inserted; if the problem persists, contact your nearest authorized After-sales Service
- if the box is active and the drawer open, the symbol on the control panel may be deactivated automatically. If the drawer is inserted, the symbol will become active again
- irrespective of the state of the box, a slight noise may be heard: this is normal and is not a cause for concern.
- when the box is not active, the temperature inside it depends on the general temperature inside the refrigerator compartment. In this case, we recommend it is used to store fruit and vegetables which are not sensitive to cold temperatures (fruits of the forest, apples, apricots, carrots, spinach, lettuce, etc.).
Important: If the function is activated and food with high water content is present, condensate may form on the shelves. In this case, temporarily deactivate the function.
When placing small containers and food products on the top shelf of the “zero degrees” compartment, make sure they do not accidentally fall between the drawer and the back of the refrigerator compartment.
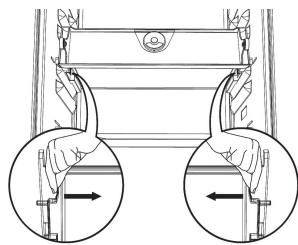
Removing the "Zero Degrees" box:
The “Zero Degrees” box can be removed to create more space inside the refrigerator. In this case proceed as follows:
- to facilitate removal, we recommend emptying (and if necessary, removing) the two lower door trays
- switch off the box
- pull out the drawer and the white plastic shelf underneath the box.
Note: the upper shelf and the side supports cannot be removed.
To restore “Zero Degrees” box operation, make sure you replace the white plastic shelf underneath the box before inserting the drawer and reactivating the function. To optimise energy consumption, we recommend you deactivate the “Zero Degrees” box and remove it.
Clean the box and all its parts regularly, using a cloth and a solution of warm water and neutral detergent specifically formulated for refrigerator interiors (take care not to immerse the white plastic shelf underneath the box in water).
Before cleaning the box (including the outside), remove the drawer so as to disconnect the box from the electricity supply.
Never use abrasive detergents.
HOW TO USE THE FREEZER COMPARTMENT (if present)
The freezer compartment *** can also be used for freezing fresh food. The quantity of fresh food that can be frozen in 24 hours is shown on the rating plate.
Freezing fresh food
- The recommended position for fresh food is that indicated in Fig. 1, if a wire shelf is present, or that in Fig. 2 for models with no wire shelf.
- Place food in the middle of the compartment, making sure it does not touch already frozen food, but is placed at a distance of approx. 20 mm (fig. 1 and 2).
The table alongside shows the recommended maximum storage time for frozen fresh foods.
When purchasing frozen food products:
- Make sure the packaging is not damaged, since the product quality may have deteriorated. If the package is swollen or has damp patches, it may not have been stored under optimal conditions and defrosting may have already begun.
- When shopping, leave frozen food purchases until last and transport the products in a thermally insulated cool bag.
- Place the items in the compartment as soon as you get home.
- If food has defrosted even partially, do not re-freeze it. Consume within 24 hours.
- Avoid, or reduce temperature variations to the minimum. Respect the best-before date on the package.
- Always follow the storage instructions on the frozen food packages.
Making ice cubes
- Fill the ice cube tray 2/3 full and place it in the compartment .
- Do not use sharp or pointed instruments to detach the tray if it is stuck to the bottom of the *** compartment.
- Bend the ice tray slightly to remove the cubes.
natural_image
Diagram showing a device inside a refrigerator with an arrow pointing to the interior (no text or symbols present)Fig. 1

natural_image
Illustration of a refrigerator with doors open and connected to an appliance via cable (no text or symbols)Fig. 2
| 1-3 | |||
| 4-7 | |||
| 8-12 |
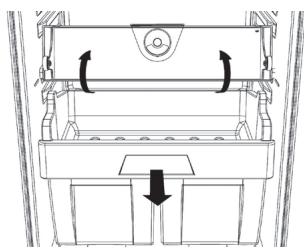
HOW TO DEFROST THE APPLIANCE
Before defrosting the appliance, unplug it or switch off the power at the mains. Defrosting of the refrigerator compartment is completely automatic. Droplets of water on the rear wall of the refrigerator compartment indicate that the periodic automatic defrost cycle is in progress. The defrost water is automatically routed to a drain outlet and into a container from which it evaporates.
Clean the defrost water drain outlet regularly using the tool supplied with the appliance in order to ensure defrost water is removed correctly. (Fig. 1)
Defrosting the compartment (if present)
Defrost the ✝*** compartment once or twice a year or when ice formation is excessive. It is perfectly normal for ice to form. The amount of ice which forms and the rate at which it accumulates will vary depending on ambient conditions and the frequency with which the freezer door is opened. Ice formation is concentrated at the top of the compartment and does not affect the efficiency of the appliance.
If possible, defrost the freezer when it is nearly empty.
- Remove the food from the freezer compartment and group together in a cool place or in a cool bag.
- Leave the door open to allow the frost to melt.
- Clean the interior of the freezer with a sponge and warm water and/or neutral detergent. Do not use abrasive substances.
- Rinse the interior and dry thoroughly.
- Put the food back into the freezer.
- Close the door.
Plug the appliance back in and switch on, following the instructions in chapter “How to operate the refrigerator compartment”. The settings and selections made prior to switching off will be restored.
natural_image
Line drawing of an open refrigerator with a hand inserting a cable to the door, showing liquid level (no text or symbols)Fig. 1
CLEANING AND MAINTENANCE
Before any cleaning or maintenance operation, unplug the appliance from the mains or disconnect the electrical power supply.
- Clean the inside of the refrigerator compartment periodically with a sponge dampened in warm water and/or neutral detergent. Rinse and dry with a soft cloth. Do not use abrasive products.
- The separators must not be washed in water but simply cleaned with a damp sponge.
- Clean the inside of the freezer compartment when defrosting.
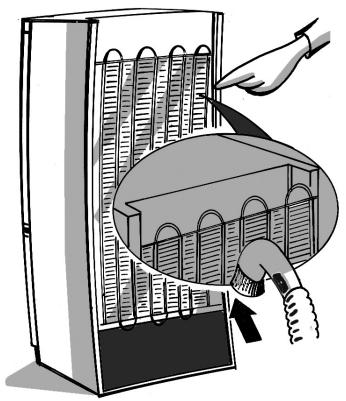
- Clean the air vents and condenser at the rear of the appliance regularly with a vacuum cleaner or brush.
- Clean the outside with a damp cloth. Do not use abrasive products, scourers, stain-removers (e.g. thrichlorethylene acetone) or vinegar.
natural_image
Illustration of a hand inserting a plug into a device with a magnified inset showing internal components (no text or symbols)Prolonged disuse
- Empty the refrigerator.
- Disconnect the appliance from the mains power supply.
- Defrost and clean the interior.
-
In the event of prolonged disuse, leave the appliance door open to prevent mould, odours and oxidation from forming.
-
Clean the appliance.
-
Clean the inside of the low temperature compartment (where present) when defrosting.
- Clean the inside of the refrigerator compartment periodically with a sponge dampened in warm water and/or neutral detergent. Rinse and dry with a soft cloth. Do not use abrasive products.
AFTER-SALES SERVICE
Before contacting the After-Sales Service:
- See if you can solve the problem yourself with the help of the Trouble-shooting guide.
- Switch the appliance off and then on again to check if the problem has been eliminated. If it has not, switch off the appliance again and repeat the operation after one hour.
- If the problem persists after this course of action, contact After-sales Service.
Specify:
-
the type of fault
• the appliance model -
The Service number (the number after the word SERVICE on the rating plate inside the appliance)
- Your full address
- Your telephone number and area code
SERVICE
0000 000 00000
Note:
The direction of door opening can be changed. If this operation is performed by After-sales Service it is not covered by the warranty.
INSTALLATION
- Install the appliance away from heat sources. Installation in a hot environment, direct exposure to the sun or installation near heat sources (heaters, radiators, cookers) will increase power consumption and should therefore be avoided.
-
If this is not possible, the following minimum distances must be respected:
-
30 cm from coal or paraffin stoves;
-
3 cm from electric and/or gas stoves.
-
Fit the spacers (if supplied) on the rear of the condenser positioned at the back of the appliance.
- Install the appliance in a dry, well-ventilated place, and ensure it is level, using the front adjustment feet if necessary.
- Clean the interior.
- Fit the accessories.
Electrical connection
- Electrical connections must be made in accordance with local regulations.
-
Voltage and power consumption are indicated on the rating plate inside the appliance.
-
Regulations require that the appliance be earthed. The manufacturer declines all liability for injury to persons or animals and for damage to property resulting from failure to observe the above procedures and reminders.
- If the plug and socket are not of the same type, have the socket replaced by a qualified electrician.
- Do not use extension leads or adapters.
Disconnecting the appliance
It must be possible to disconnect the appliance by unplugging it or by means of a two-pole switch fitted upline of the socket.
ELECTRICAL CONNECTION FOR GREAT BRITAIN AND IRELAND ONLY
Warning - this appliance must be earthed
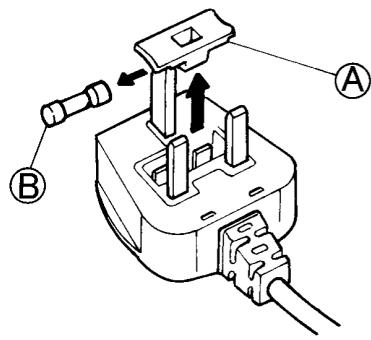
Fuse replacement
If the mains lead of this appliance is fitted with a BS 1363A 13amp fused plug, to change a fuse in this type of plug use an A.S.T.A. approved fuse to BS 1362 type and proceed as follows:
- Remove the fuse cover (A) and fuse (B).
- Fit replacement 13A fuse into fuse cover.
- Refit both into plug.
Important:
The fuse cover must be refitted when changing a fuse and if the fuse cover is lost the plug must not be used until a correct replacement is fitted.
Correct replacement are identified by the colour insert or the colour embossed in words on the base of the plug.
Replacement fuse covers are available from your local electrical store.
For the Republic of Ireland only
The information given in respect of Great Britain will frequently apply, but a third type of plug and socket is also used, the 2-pin, side earth type.
Socket outlet / plug (valid for both countries)
If the fitted plug is not suitable for your socket outlet, please contact After-sales Service for further instruction. Please do not attempt to change plug yourself. This procedure needs to be carried out by a qualified technician in compliance with the manufactures instructions and current standard safety regulations.
COMMENT FAIRE FONCTIONNER LE COMPARTIMENT RÉFRIGÉRATEUR
natural_image
Line drawing of a hand pressing down on a folding cabinet drawer (no text or symbols)natural_image
Technical line drawing of a mechanical assembly with arrows indicating motion or force (no text or symbols)Fig. 1

natural_image
Technical diagram showing two views of a mechanical component with directional arrows indicating movement (no text or symbols present)Fig. 2
flowchart
graph TD
    A["+"] --> B["+"]
    B --> C["÷"]
natural_image
Diagram showing a device inside a refrigerator with an arrow pointing to the interior (no text or symbols present)Fig. 1

natural_image
Illustration of a refrigerator with doors open and connected to an appliance via tubing (no text or symbols)Fig. 2
| 1-3 | |||
| 4-7 | |||
| 8-12 |
COMMENT DÉGIVRER L'APPAREIL
natural_image
Line drawing of an open refrigerator with a hand inserting a cable to the door, showing liquid level (no text or symbols)Fig. 1
NETTOYAGE ET ENTRETIEN
natural_image
Illustration of a hand inserting a plug into a device with a magnified view of internal components (no text or symbols)natural_image
Line drawing of a hand inserting a component into a drawer with an arrow indicating the direction (no text or symbols)Temperatuurinstelling
natural_image
Technical line drawing of a mechanical assembly with arrows indicating motion or force direction (no text or symbols)Afb. 1

natural_image
Technical diagram showing two views of a mechanical component with directional arrows indicating movement or force (no text or symbols present)Afb. 2
natural_image
Line drawing of a hand pressing down on a cabinet handle with a downward arrow (no text or symbols)natural_image
Diagram of a refrigerator with an open door and a close-up inset showing a small object (no text or symbols visible)Fig. 1
natural_image
Illustration of a refrigerator with open doors and a hand inserting food into the refrigerator (no text or symbols)Fig. 2
| 1-3 |  |  |  |
| 4-7 |  | [XX66] |  |
| 8-12 |  | [50K2] | [YB40] |
ONTDOOIEN VAN HET APPARAAT
natural_image
Line drawing of an open refrigerator with a hand inserting a cable to the door, showing liquid level (no text or symbols)Fig. 1
REINIGING EN ONDERHOUD
natural_image
Illustration of a hand using a tool to insert or install a mechanical component into a storage cabinet (no text or symbols visible)KLANTENSERVICE
natural_image
Line drawing of a hand inserting a button into a drawer with a handle (no text or symbols)natural_image
Technical line drawing of a mechanical assembly with no visible text or symbolsFig. 1

natural_image
Technical diagram showing two views of a mechanical component with directional arrows indicating movement (no text or symbols present)Fig. 2
natural_image
Line drawing of a hand pressing down on a cabinet handle with a directional arrow (no text or symbols)flowchart
graph LR
    A["+"] --> B["÷"]
    B --> C["×"]
natural_image
Diagram showing a device inside a refrigerator with an arrow pointing to the interior (no text or symbols present)Fig. 1

natural_image
Illustration of a refrigerator with open doors and a hand inserting food into the refrigerator (no text or symbols)Fig. 2
| 1-3 | |||
| 4-7 | |||
| 8-12 |
CÓMO DESCONGELAR EL APARATO
natural_image
Line drawing of an open refrigerator with a hand inserting a cable to the door, showing liquid level (no text or symbols)Fig. 1
LIMPIEZA Y MANTENIMIENTO
natural_image
Illustration of a hand inserting a plug into a device with a magnified inset showing internal components (no text or symbols)natural_image
Line drawing of a hand pressing down on a folding cabinet drawer with a curved handle (no text or symbols)natural_image
Technical line drawing of a mechanical assembly with arrows indicating motion or force direction (no text or symbols)Fig. 1
natural_image
Technical diagram showing two views of a mechanical component with directional arrows indicating movement (no text or symbols present)Fig. 2
natural_image
Line drawing of a hand pressing down on a cabinet handle with a downward arrow (no text or symbols)flowchart
graph LR
    A["①"] --> B["②"]
natural_image
Illustration of a refrigerator with open doors and a hand inserting food into the refrigerator (no text or symbols)Fig. 2
| 1-3 | |||
| 4-7 | |||
| 8-12 |
COMO DESCONGELAR O APARELHO
natural_image
Line drawing of an open refrigerator with a hand inserting a cable to the door, showing liquid level (no text or symbols)Fig. 1
natural_image
Illustration of a hand inserting a plug into a device with a magnified inset showing internal components (no text or symbols)natural_image
Line drawing of a hand inserting a button into a drawer with a handle (no text or symbols)natural_image
Technical line drawing of a mechanical assembly with arrows indicating motion or force direction (no text or symbols)Fig. 1
natural_image
Technical diagram showing two views of a mechanical component with directional arrows indicating movement (no text or symbols present)Fig. 2
natural_image
Line drawing of a hand pressing down on a cabinet handle with an arrow indicating the press direction (no text or symbols present)natural_image
Diagram showing a device inside a refrigerator with an open door, no text or symbols presentFig. 1
natural_image
Illustration of a refrigerator with an open door and a close-up of its internal appliance connected to a cylindrical device (no text or symbols present)Fig. 2
| 1-3 | |||
| 4-7 | |||
| 8-12 |
COME SBRINARE L'APPARECCHIO
natural_image
Line drawing of an open refrigerator with a hand inserting a piping bag into the refrigerator (no text or symbols)Fig. 1
natural_image
Illustration of a hand inserting a plug into a device with a magnified inset showing internal components (no text or symbols)natural_image
Line drawing of a hand placing a door handle into a filing cabinet (no text or symbols)natural_image
Technical line drawing of a mechanical assembly with no visible text or symbolsEik. 1

natural_image
Technical diagram of a mechanical assembly with two circular inset views showing internal components (no text or symbols)Elk. 2
ΘΑΛΑΜΟΣ «ΜΗΔΕΝ ΒΑΘΜΩΝ»
natural_image
Line drawing of a hand pressing down on a wooden cabinet (no text or symbols)flowchart
graph LR
    A["+"] --> B["+"]
natural_image
Diagram showing a device inside a refrigerator with an arrow pointing to the interior (no text or symbols present)Eik. 1
natural_image
Illustration of a refrigerator with doors open and connected to an appliance via cable (no text or symbols)Eik. 2
| 1-3 | |||
| 4-7 | |||
| 8-12 |
natural_image
Line drawing of a refrigerator with an open door and a hand inserting a cable into it, showing liquid level (no text or symbols)Eik. 1
natural_image
Illustration of a hand inserting a plug into a device with a magnified view of internal components (no text or symbols)natural_image
Line drawing of a hand inserting a component into a drawer with an arrow indicating the direction (no text or symbols)natural_image
Technical line drawing of a mechanical assembly with arrows indicating motion (no text or symbols)Flg. 1
natural_image
Technical diagram showing two hands operating a mechanical device with directional arrows indicating movement (no text or symbols present)Flg. 2
natural_image
Line drawing of a hand pressing down on a wooden cabinet with a directional arrow (no text or symbols)natural_image
Diagram showing a device inside a refrigerator with an arrow pointing to the interior (no text or symbols present)Fig. 1

natural_image
Illustration of a refrigerator with doors open and connected to an appliance via tubing (no text or symbols)Fig. 2
| 1-3 | |||
| 4-7 | |||
| 8-12 |
AVFROSTNING AV APPARATEN
natural_image
Line drawing of an open refrigerator with a hand inserting a piping bag into the refrigerator (no text or symbols)Fig. 1
RENGÖRING OCH UNDERHÅLL
natural_image
Illustration of a hand inserting a plug into a device with a magnified view of internal components (no text or symbols)natural_image
Line drawing of a hand placing a square object into a cabinet drawer (no text or symbols)Temperaturinnstilling
natural_image
Technical line drawing of a mechanical assembly with no visible text or symbolsFig. 1
natural_image
Technical diagram showing two views of a mechanical component with directional arrows indicating movement (no text or symbols present)Fig. 2
natural_image
Diagram showing a device inside a refrigerator with an arrow pointing to the interior (no text or symbols present)Fig. 1

natural_image
Illustration of a refrigerator with doors open and connected to an appliance via tubing (no text or symbols)Fig. 2
| 1-3 | |||
| 4-7 | |||
| 8-12 |
AVRIMING AV APPARATET
natural_image
Line drawing of an open refrigerator with a hand inserting a cable to the door, showing liquid level (no text or symbols)Fig. 1
RENGJ∅RING OG VEDLIKEHOLD
natural_image
Illustration of a hand inserting a plug into a device with a magnified inset showing internal components (no text or symbols)Ved lengre fravær
natural_image
Line drawing of a hand placing a button into a drawer with an arrow indicating direction (no text or symbols)Regulering af temperaturen
natural_image
Technical line drawing of a mechanical assembly with arrows indicating motion (no text or symbols)Fig. 1
natural_image
Technical diagram showing two views of a mechanical component with directional arrows indicating movement (no text or symbols present)Fig. 2
natural_image
Line drawing of a hand pressing down on a cabinet handle (no text or symbols)natural_image
Diagram showing a device inside a refrigerator with an arrow pointing to the interior (no text or symbols present)Fig. 1

natural_image
Illustration of a refrigerator with open doors and a hand inserting food into the refrigerator (no text or symbols)Fig. 2
| 1-3 | |||
| 4-7 | |||
| 8-12 |
AFRIMNING AF SKABET
natural_image
Line drawing of an open refrigerator with a hand inserting a cable to the door, showing liquid level (no text or symbols)Fig. 1
RENG∅RING OG VEDLIGEHOLDELSE
natural_image
Illustration of a hand inserting a plug into a device with a magnified inset showing internal components (no text or symbols)natural_image
Line drawing of a hand placing a square object into a drawer with an arrow indicating the handle (no text or symbols)natural_image
Technical line drawing of a mechanical assembly with no visible text or symbolsKuva 1
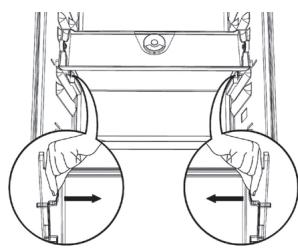
natural_image
Technical diagram showing two views of a mechanical component with directional arrows indicating movement or force (no text or symbols present)Kuva 2
natural_image
Line drawing of a hand pressing down on a wooden cabinet (no text or symbols)natural_image
Diagram showing a device inside a refrigerator with an arrow pointing to the interior (no text or symbols present)Kuvassa 1
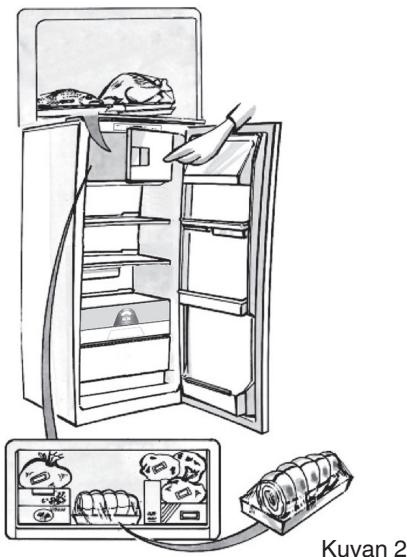
natural_image
Illustration of a refrigerator with open doors and a hand inserting food into the refrigerator (no text or symbols)| 1-3 | |||
| 4-7 | |||
| 8-12 |
LAITTEEN SULATTAMINEN
natural_image
Line drawing of an open refrigerator with a hand inserting a cable to the door, showing liquid level (no text or symbols)Kuva 1
PUHDISTUS JA HUOLTO
natural_image
Illustration of a hand inserting a plug into a device with a magnified inset showing internal components (no text or symbols)natural_image
Close-up of wooden clothespins and clips, no text or symbols visiblenatural_image
Black and white photo of two glass bottles and a cup of clear liquid, no text or symbols visible
natural_image
Close-up of multiple glasses with blurred background (no text or symbols visible)Инструкции за употреба Upute za uporabu Uputstva za upotrebu
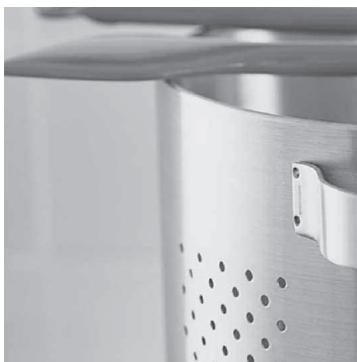
natural_image
Close-up of a metallic kitchen appliance with perforated ventilation slots and a handle (no visible text or symbols)
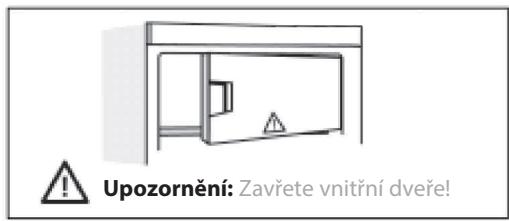
natural_image
Line drawing of an open refrigerator with shelves and doors (no text or symbols)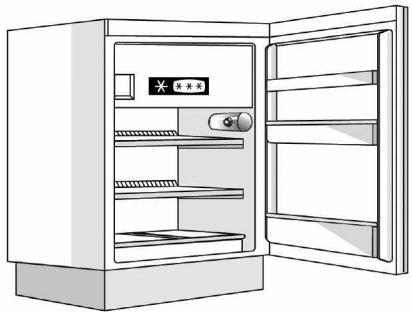
natural_image
Line drawing of an open refrigerator with a door and front panel (no text or symbols)Poznámka:
JAK POUŽÍVAT ODDÍL S NÍZKOU TEPLOTOU
natural_image
Illustration of a refrigerator with an open door and a fish inside, showing the exterior panel (no text or symbols)JAK ODMRAZOVAT A ČISTIT MRAZNIČKU
natural_image
Line drawing of an open refrigerator with shelves and doors (no text or symbols)natural_image
Illustration of a refrigerator with water droplets inside, showing liquid level being poured into the refrigerator (no text or symbols)ČIŠTĚNÍ A ÚDRŽBA
natural_image
Line drawing of a laboratory apparatus with two shelves and a side panel (no text or symbols)RADY K ÚSPOŘE ELEKTRICKÉ ENERGIE
natural_image
Illustration of a cylindrical device with a knob and two flanged ends, showing airflow direction (no text or symbols)OPIS SPOTREBIČA
A. Chladiaci priestor

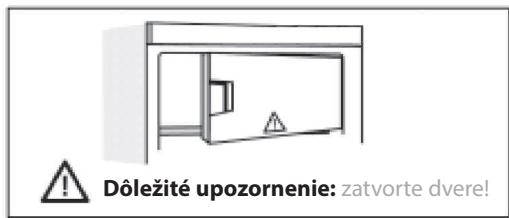
OVLÁDAČE
natural_image
Line drawing of an open refrigerator with shelves and doors (no text or symbols)
natural_image
Line drawing of an open refrigerator with a door and front panel (no text or symbols)Poznámka:
AKO POUŽÍVAŤ PRIESTOR S NÍZKOU TEPLOTOU
Ak je k dispozícii priehradka s nízkou teplotou, je označená hviezdičkami ✱***.
natural_image
Illustration of a refrigerator with an open door and a fish inside, showing the exterior panel (no text or symbols)AKO ROZMRAZOVAŤ A ČISTIŤ PRIESTOR S NÍZKOU TEPLOTOU
natural_image
Line drawing of an open refrigerator with shelves and door (no text or symbols)natural_image
Illustration of a refrigerator with water droplets inside, showing liquid level being poured into the refrigerator (no text or symbols)ČISTENIE A ÚDRŽBA
natural_image
Line drawing of a cabinet or storage unit with shelves and drawers, no text or symbols presentRADY NA ÚSPORU ELEKTRICKEJ ENERGIE
natural_image
Illustration of a cylindrical device with two flanges and a knob, showing airflow direction (no text or symbols)A TERMÉK BEMUTATÁSA
A. Hűtőtér

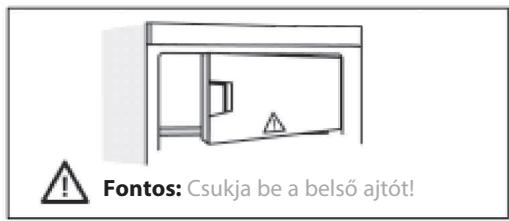
natural_image
Line drawing of an open refrigerator with shelves and doors (no text or symbols)
natural_image
Line drawing of an open refrigerator with doors open and a door, no text or symbols presentAZ ALACSONY HÖMÉRSÉKLETÜ REKESZ MÜKÖDTETÉSE
natural_image
Illustration of a refrigerator with an open door and a fish inside, showing the exterior panel (no text or symbols)natural_image
Line drawing of an open refrigerator with shelves and a door (no text or symbols)natural_image
Illustration of a refrigerator with water droplets inside, showing liquid level being poured into the refrigerator (no text or symbols)natural_image
Line drawing of a laboratory apparatus with two shelves and a side panel (no text or symbols)ENERGIATAKARÉKOSSÁGI TANÁCSOK
natural_image
Illustration of a cylindrical device with two flanges and a knob, showing airflow direction (no text or symbols)DESCRIEREA PRODUSULUI

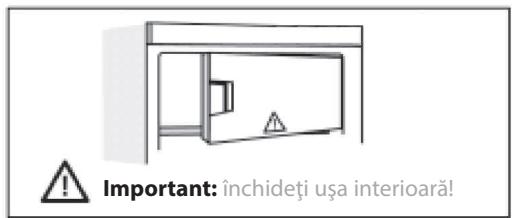
natural_image
Line drawing of an open refrigerator with shelves and doors (no text or symbols)
natural_image
Line drawing of an open refrigerator with a door and front panel (no text or symbols)Notă:
PUNEREA ÎN FUNCTIUNE A COMPARTIMENTULUI LA JOASĂ TEMPERĂTURĂ
natural_image
Illustration of a refrigerator with an open door and a fish inside, showing the exterior panel (no text or symbols)CUM SE DEZGHEAȚĂ ȘI CUM SE CURĂȚĂ COMPARTIMENTUL CÚ TEMPERATURĂ JOASĂ
natural_image
Line drawing of an open refrigerator with shelves and doors (no text or symbols)natural_image
Illustration of a refrigerator with water droplets inside, showing liquid level being poured into the refrigerator (no text or symbols)natural_image
Line drawing of a cabinet or storage unit with shelves and drawers, no text or symbols presentRECOMANDĂRI PENTRU ECONOMISIREA ENERGIEI
natural_image
Illustration of a cylindrical device with two flanges and a knob, no text or symbols presentOPIS PRODUKTU


natural_image
Line drawing of an open refrigerator with shelves and doors (no text or symbols)
natural_image
Line drawing of an open refrigerator with a door open, showing shelves and a front panel (no text or symbols)JAK URUCHOMIĆ KOMORE NISKIEJ TEMPERATURY
natural_image
Illustration of a refrigerator with an open door and a fish inside, showing the exterior view (no text or symbols)ROZMRAŻANIE I CZYSZCZENIE KOMORY ZAMRAŻARKI
natural_image
Line drawing of an open refrigerator with shelves and door (no text or symbols)natural_image
Illustration of a refrigerator with water droplets inside, showing liquid level being poured into the refrigerator (no text or symbols)CZYSZCZENIE I KONSERWACJA
natural_image
Line drawing of a cabinet or storage unit with shelves and drawers, no text or symbols presentnatural_image
Illustration of a cylindrical device with two flanges and a knob, showing airflow direction (no text or symbols)IZSTRĀDĀJUMA APRAKSTS
A, Ledusskapja nodalijums


natural_image
Line drawing of an open refrigerator with shelves and doors (no text or symbols)
natural_image
Line drawing of an open refrigerator with a door and front panel (no text or symbols)Piezīme.
KÄ LIETOT ZEMAS TEMPERATÜRAS NODALIJUMU
natural_image
Illustration of a refrigerator with an open door and a fish inside, showing the exterior panel (no text or symbols)KĀ ATKAUSĒT UN TĪRĪT ZEMAS TEMPERATŪRAS NODALĪJUMU
natural_image
Line drawing of an open refrigerator with shelves and door (no text or symbols)natural_image
Illustration of a refrigerator with water droplets inside, showing liquid level being poured into the refrigerator (no text or symbols)TİRİŞANA UN APKOPE
natural_image
Line drawing of a cabinet or storage unit with shelves and drawers, no text or symbols presentIETEIKUMI ENERGIJAS TAUPİŠANAI
natural_image
Illustration of a cylindrical device with a knob and two flanged tubes, no text or symbols present.GAMINIO APRAŠYMAS

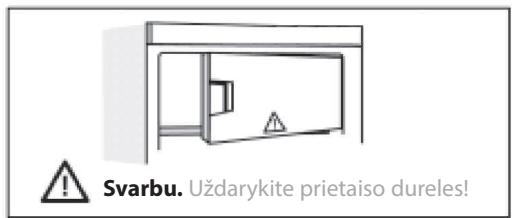
natural_image
Line drawing of an open refrigerator with shelves and doors (no text or symbols)
natural_image
Line drawing of an open refrigerator with a door and front panel (no text or symbols)Pastaba.
KAIP NAUDOTIS ŽEMOS TEMPERATŪROS SKYRIUMI
natural_image
Illustration of a refrigerator with an open door and a fish inside, showing the exterior panel (no text or symbols)KAIP ATITIRPINTI IR IŠVALYTI ŽEMOS TEMPERATŪROS SKYRIŲ
natural_image
Line drawing of an open refrigerator with shelves and doors (no text or symbols)natural_image
Illustration of a refrigerator with water droplets inside, showing liquid level being poured into the refrigerator (no text or symbols)VALYMAS IR PRIEŽIŪRA
natural_image
Line drawing of a cabinet or storage unit with shelves and drawers (no text or symbols)ENERGIJOS TAUPYMO PATARIMAI
natural_image
Illustration of a cylindrical device with two flanges and a knob, no text or symbols presentTOOTE KIRJELDUS
A. Külmikusektsioon

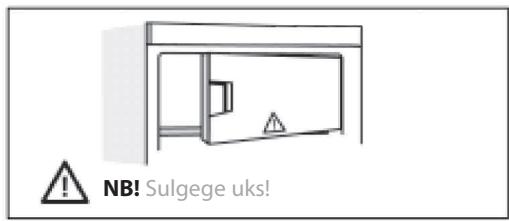
JUHTSEADISED
natural_image
Line drawing of an open refrigerator with shelves and doors (no text or symbols)
natural_image
Line drawing of an open refrigerator with a door and front panel (no text or symbols)Märkus
KÜLMKAMBRI KASUTAMINE
natural_image
Illustration of a refrigerator with an open door and a fish inside, showing the exterior panel (no text or symbols)KÜLMKAMBRI SULATAMINE JA PUHASTAMINE
natural_image
Line drawing of an open refrigerator with shelves and door (no text or symbols)natural_image
Illustration of a refrigerator with water droplets inside, showing liquid level being poured into the refrigerator (no text or symbols)PUHASTAMINE JA HOOLDUS
natural_image
Line drawing of a laboratory apparatus with two shelves and a side panel (no text or symbols)ENERGIA SÄÄSTMINE
natural_image
Illustration of a cylindrical device with a knob and two flanged tubes, no text or symbols present.ОПИСАНИЕ НА ПРОДУКТА

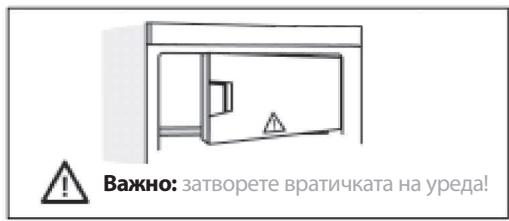
natural_image
Line drawing of an open refrigerator with shelves and doors (no text or symbols)
natural_image
Line drawing of an open refrigerator with a door and front panel (no text or symbols)Забележка:
natural_image
Illustration of a fish inside an open refrigerator with a magnified inset showing its shape (no text or symbols)natural_image
Line drawing of an open refrigerator with shelves and a door (no text or symbols)natural_image
Illustration of a refrigerator with water droplets inside, showing liquid level being poured into the refrigerator (no text or symbols)natural_image
Line drawing of a laboratory apparatus with a tray and storage unit (no text or symbols)natural_image
Illustration of a cylindrical device with two flanges and a knob, no text or symbols presentOPIS PROIZVODA
A. Hladnjak
- Ladica za voće i povrće
- Police / područje polica
- Termostat i svjetlo
- Duboke police u vratima
- Pretinac za boce
- Pomični držač za boce
- Matična pločica (nalazi se sa strane uz ladicu za voće i povrće)
- Posudica za led
- Vrata odjeljka niske temperature
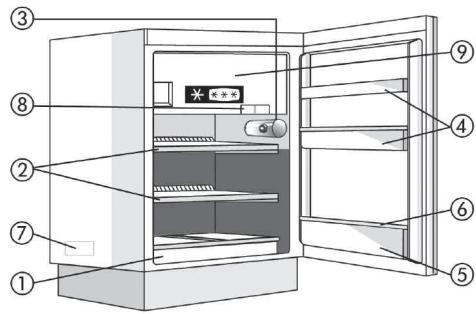
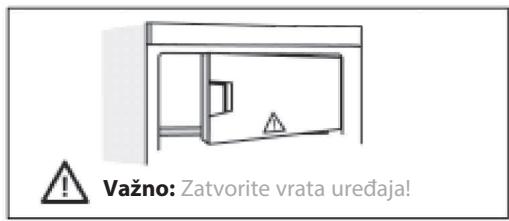
KONTROLE
natural_image
Line drawing of an open refrigerator with shelves and doors (no text or symbols)
natural_image
Line drawing of an open refrigerator with a door and front panel (no text or symbols)Napomena:
temperatura prostorije, učestalost otvaranja vrata i položaj aparata mogu utjecati na temperaturu u unutrašnjosti dvaju odjeljaka.
NAČIN POKRETANJA ODJELJKA NISKE TEMPERATURE
natural_image
Illustration of a refrigerator with an open door and a fish inside, showing the exterior panel (no text or symbols)NAČIN ODMRZAVANJA I ČIŠĆENJA ODJELJKA NISKE TEMPERATURE
Preporučujemo, za optimalan rad, da se odjeljak niske temperature odmrzava najmanje dva puta godišnje ili kada sloj leda na stjenkama dosegne debljinu od oko 3 mm.
natural_image
Line drawing of an open refrigerator with shelves and door (no text or symbols)- Napomena: Za uklanjanje leda ne upotrebljavajte oštre ili šiljate metalne predmete; ne zagrijavajte umjetno odjeljak niske temperature.
NAČIN ČIŠĆENJA HLADNJAKA
natural_image
Illustration of a refrigerator with water droplets inside, showing liquid level being poured into the refrigerator (no text or symbols)ČIŠĆENJE I ODRŽAVANJE
natural_image
Line drawing of a cabinet or storage unit with shelves and drawers, no text or symbols presentSAVJETI ZA UŠTEDU ENERGIJE
- Izbjegavajte izlaganje uređaja vrlo visokim temperaturama i izravnoj sunčevoj svjetlosti i ne postavljajte ga u blizini grijala ili kuhala jer se time povećava potrošnje energije.
- Ne zaklanjajte otvore za ulaz ili izlaz zraka na uređaju.
- Namirnice koje trebate odmrznuti stavite u hladnjak iskorištavajući tako na najbolji način nisku temperaturu zamrznutih namirnica.
- Ograničite koliko je god moguće učestalost i trajanje otvaranja vrata.
• Vruće namirnice ne stavljajte u hladnjak. - Vrata odjeljka niske temperature ne ostavljate otvorenima.
VODIČ ZA UTVRĐIVANJE KVAROVA
1. Uređaj ne radi.
natural_image
Illustration of a cylindrical device with two flanges and a knob, showing airflow direction (no text or symbols)6. Pretjerano stvaranje leda u odjeljku niske temperature.
OPIS PROIZVODA
A. Odeljak frižidera
I. Fioka za čuvanje voća i povrća
2. Police / odeljak sa policama
3. Dugme termostata/svetlo
4. Police u vratima
5. Polica za flaše
6. Držač za flaše koji je moguće ukloniti
7. Natpisna pločica (na bočnoj strani fioke za čuvanje voća i povrća)
8. Posuda za led
9. Vrata odeljka sa niskom temperaturom
B. Odeljak sa sniženom temperaturom ukoliko ✉\*\*\* postoji

Najhladnija zona

Najmanje hladna zona
Napomena: Broj polica i vrsta dodatne opreme mogu da variraju u zavisnosti od modela.
Sve police, police u vratima i korpe je moguće ukloniti.

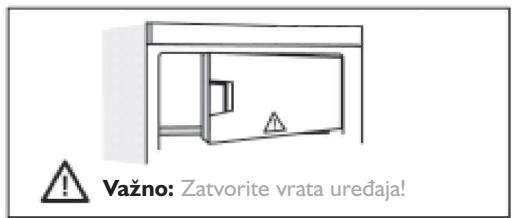
KOMANDE
A. Dugme termostata
B. Prekidač za svetlo
D. Kontrolna tabla termostata
E. Sijalica

KORIŠĆENJE ODELJKA FRIŽIDERA
Ovaj uređaj je automatski frižider ili frižider sa odeljkom sa sniženom temperaturom sa oznakom klase * *** .
natural_image
Line drawing of an open refrigerator with shelves and doors (no text or symbols)
natural_image
Line drawing of an open refrigerator with a door and front panel (no text or symbols)Napomena:
Ambijentalna temperatura, učestalost otvaranja vrata i položaj uređaja mogu da utiču na temperaturu unutar dva odeljka.
Imajte ove faktore u vidu kada podešavate dugme termostata.
KORIŠĆENJE ODELJKA FRIŽIDERA SA SNIŽENOM TEMPERATUROM
Odeljak sa sniženom temperaturom, ukoliko postoji, je odeljak klase ✪***.
Preporučeno vreme čuvanja zamrznute hrane potražite na pakovanju svakog pojedinačnog proizvoda. Prilikom kupovine zamrznutih proizvoda:
natural_image
Illustration of a refrigerator with an open door and a fish inside, showing the exterior panel (no text or symbols)ODMRZAVANJE I ČIŠĆENJE ODELJKA SA SNIŽENOM TEMPERATUROM
Za najbolji učinak, preporučujemo da odeljak sa sniženom temperaturom odmrzavate najmanje dva puta godišnje ili kada led na zidovima dostigne debljinu od oko 3 mm.
natural_image
Line drawing of an open refrigerator with shelves and door (no text or symbols)natural_image
Illustration of a refrigerator with water droplets inside, showing liquid level being poured into the refrigerator (no text or symbols)ČIŠĆENJE I ODRŽAVANJE
- Redovno čistite otvore za ventilaciju i kondenzator na zadnjoj strani uređaja usisivačem ili četkom
- Spoljašnjost čistite mekom krpom
U slučaju dužeg nekorišćenja
natural_image
Line drawing of a cabinet or storage unit with shelves and drawers (no text or symbols)SAVETI ZA UŠTEDU ELEKTRIČNE ENERGIJE
natural_image
Illustration of a cylindrical device with two flanges and a knob, showing airflow direction (no text or symbols)ОПИСАНИЕ ИЗДЕЛИЯ

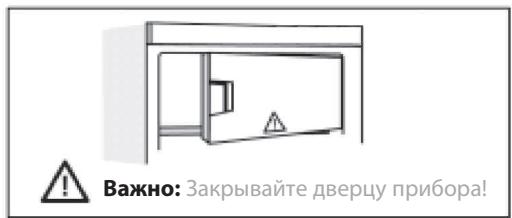
natural_image
Line drawing of an open refrigerator with shelves and doors (no text or symbols)
natural_image
Line drawing of an open refrigerator with a door and front panel (no text or symbols)Примечания:
natural_image
Illustration of a refrigerator with an open door and a fish inside, showing the exterior panel (no text or symbols)natural_image
Line drawing of an open refrigerator with shelves and door (no text or symbols)natural_image
Illustration of a refrigerator with water droplets inside, showing liquid level being poured into the refrigerator (no text or symbols)ЧИСТКА И УХОД
natural_image
Line drawing of a laboratory apparatus with two shelves and a side panel (no text or symbols)natural_image
Illustration of a cylindrical device with two flanges and a knob, no text or symbols presentВажно:

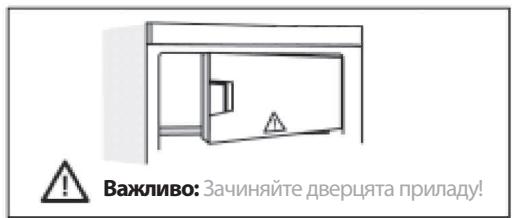
natural_image
Line drawing of an open refrigerator with shelves and doors (no text or symbols)
natural_image
Line drawing of an open refrigerator with a door and front panel (no text or symbols)Примітка:
natural_image
Illustration of a refrigerator with an open door and a fish inside, showing the exterior panel (no text or symbols)natural_image
Line drawing of an open refrigerator with shelves and doors (no text or symbols)natural_image
Illustration of a refrigerator with water droplets inside, showing liquid level being poured into the refrigerator (no text or symbols)natural_image
Line drawing of a laboratory apparatus with two shelves and a side panel (no text or symbols)natural_image
Illustration of a cylindrical device with two flanges and a knob, no text or symbols presentЭНІМ СИПАТТАМАСЫ

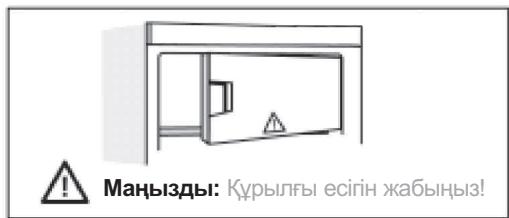
natural_image
Line drawing of an open refrigerator with shelves and doors (no text or symbols)
natural_image
Line drawing of an open refrigerator with doors open and a small door on the door (no text or symbols)ТОМЕНГІ ТЕМПЕРАТУРАЛЫ БОЛІМДІ ПАЙДАЛАНУ ЖОЛЫ
natural_image
Illustration of a refrigerator with an open door and a fish inside, showing the exterior panel (no text or symbols)natural_image
Line drawing of an open refrigerator with shelves and a door (no text or symbols)natural_image
Illustration of a refrigerator with water droplets inside, showing liquid level being poured into the refrigerator (no text or symbols)natural_image
Line drawing of a cabinet or storage unit with shelves and drawers, no text or symbols presentnatural_image
Illustration of a cylindrical device with a knob and two flanged ends, showing airflow direction (no text or symbols)Gebrauchsanweisung Instructions for use Mode d'emploi Gebruiksaanwijzing Istruzioni per l'uso
natural_image
Close-up of white plastic cloths with metal clips and a coiled spring (no text or symbols visible)Brugsanvisning Bruksanvisning Käyttöohje Manual de utilização Instrucciones para el uso

natural_image
Black and white photo of two glass bottles with black lids, one partially filled with liquid (no text or symbols visible)
natural_image
Black and white close-up of multiple glasses with blurred background (no text or symbols)natural_image
Close-up of a metallic kitchen grater with perforated ventilation slots and a handle (no text or symbols visible)Návod k použití Návod na použitie Instrucțiuni de utilizare Инструкции по эксплуатации
| DEUTSCH | Gebrauchsanweisung | Seite 4 |
| ENGLISH | Instructions for use | Page 8 |
| FRANÇAIS | Mode d'emploi | Page 12 |
| NEDERLANDS | Gebruiksaanwijzing | Pagina 16 |
| ESPAÑOL | Instrucciones para el uso | Página 20 |
| PORTUGUÊS | Manual de utilização | Página 24 |
| ITALIANO | Istruzioni per l'uso | Pagina 28 |
| ΕΛΛΑΣ | Οδηγίες χρήσης | Σελίδα 32 |
| SVENSKA | Bruksanvisning | Sidan 36 |
| NORSK | Bruksanvisning | Side 40 |
| DANSK | Brugervejledning | Side 44 |
| SUOMI | Käyttöohje | Sivu 48 |
IHR NEUES GERÄT
The appliance you have just bought, marked by the symbol ✦***, allows the freezing - in of fresh and cooked food, the production of ice cubes and the storage of frozen food. Please read these instructions carefully, as they include a description of your appliance and the useful hints to enable you to achieve the best performances required to freeze fresh food and to store already frozen food.
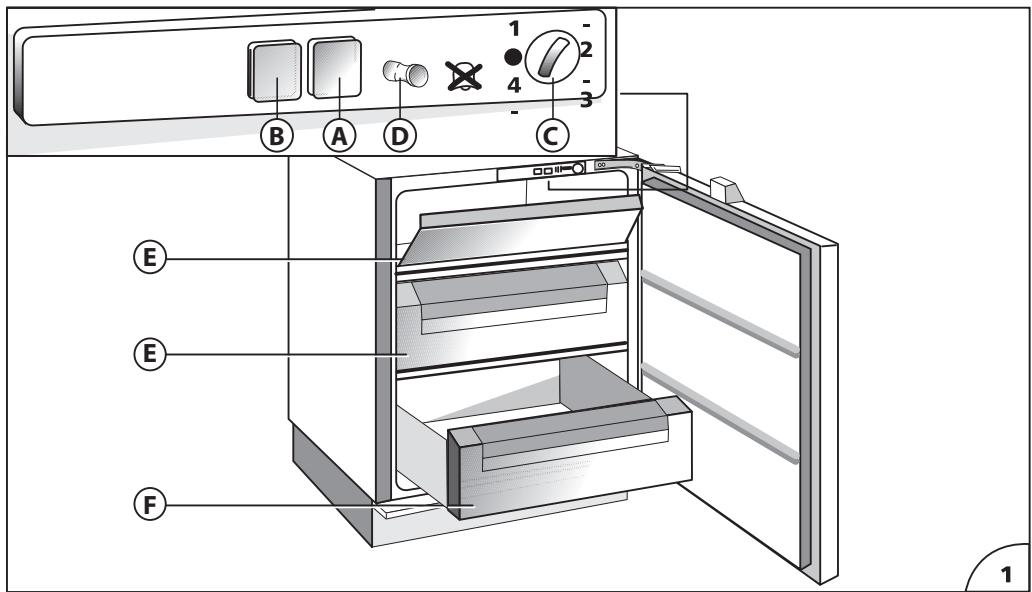
DESCRIPTION OF THE APPLIANCE (Fig. 1)
Control panel
A) Operation control lamp (green light)
B) Temperature control lamp (red alarm light)
C) Temperature control knob (thermostat)
D) Open door alarm switch (if present)
E) Baskets (freezing - in and storage baskets)
F) Storage basket only.
G) Eutectic system: remove from drawer F and insert into the high compartment E to optimise the product's consumption.
Some models are supplied with containers filled with cooling liquid(eutectics).
INSTALLATION
Ensure that the appliance is not damaged. Transit damages must be reported to your dealer within 24 hours of receipt of the appliance. The appliance should not be installed close to heat sources such as cookers, central heating, boilers, sunlight, etc. It must however be located in a well ventilated dry space.
Attention: Accessibility to the plug has to be guaranteed even after installation of the appliance to disconnect it, if required. Alternatively, connect the appliance to the mains by means of a two-pole switching device with contact separation of 3 mm situated in an accessible position.
ELECTRICAL CONNECTION AND OPERATION
Please check that the voltage indicated on the rating plate situated inside the compartment corresponds to the voltage in your home. The earthing of this appliance is compulsory by law. The manufacturer will accept no liability for injury to persons or damage to objects arising from the non observance of this requirement.
When the appliance is plugged in, if the thermostat knob is not set to symbol •, the green and the red lamps (A) and (B) (Fig. 1) light up. The green control light always remains alight and indicates the operation of the appliance. The red control light remains alight until the set operation temperature has been attained. It lights up again when the temperature inside the freezer rises due to frequent or prolonged door opening, and when the appliance has been loaded with fresh food to be frozen.
ADJUSTMENT OF THE TEMPERATURE
The thermostat (Fig. 1) controls the temperature inside the appliance. Position • indicates that the operation of appliance is interrupted. The ideal storage temperature of frozen food for a long time is -18^ . In normal ambient conditions (temperature between +20^ and +25^ ), we suggest you adjust the thermostat control knob to a middle position. To obtain colder or warmer temperatures than -18^ , turn the thermostat control knob to the highest or lowest setting respectively. We remind you that internal temperatures are affected by the location of the appliance, the temperature of the surrounding air, the frequency of the door opening. The setting of the thermostat may have to be varied to allow for these factors. To check the temperature of the food stored, place the thermometer (if delivered) under the food; if it is placed on the food it will indicate the temperature of the air which does not correspond to that of the food stored.
USE OF THE FREEZER COMPARTMENT
This appliance is equipped with an acoustic alarm which sounds when the door is left open (if present).
FREEZING IN (Fig. 2)
The amount of fresh food which can be frozen in a 24 hours period at an ambient temperature of +25°C is stated on the rating plate.
Do not store warm foods in the freezer. Never re-freeze partially or completely defrosted foods. Prepare and wrap foods to be frozen in aluminium or plastic foils or place them in appropriate containers. Label the packets indicating the freezing-in date and the contents. The freezer compartment maintains the storage temperature for 15 hours approx. even in case of power failure.
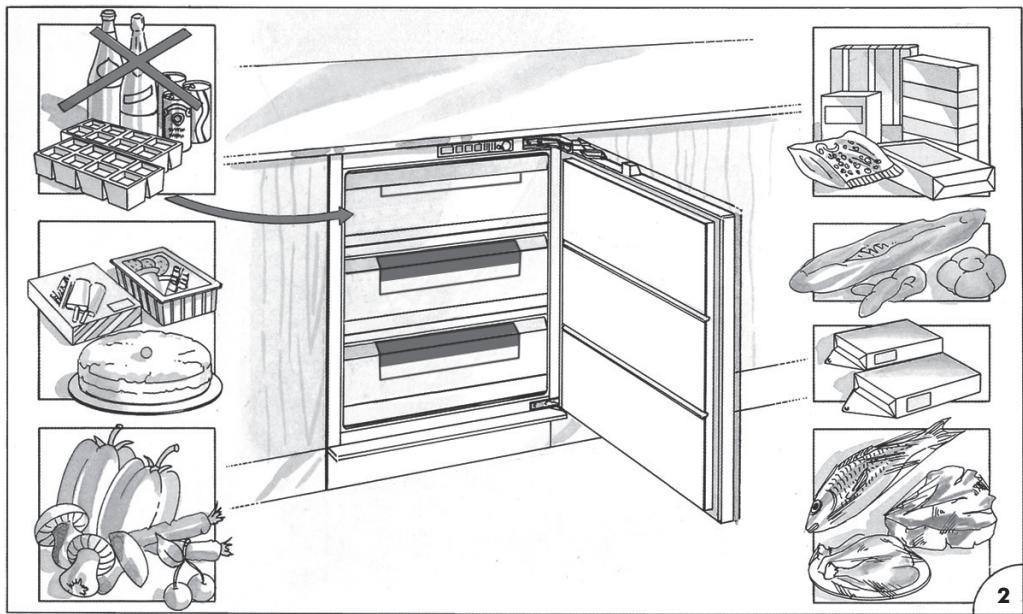
We suggest however you leave the door closed during this time.
Fizzy drinks should not be frozen and some products, such as flavoured water ices, should not be consumed too cold.
Note: Due to the efficiency of the door seal, it is not always possible to open the freezer door immediately after closing it. Wait some minutes before trying to open it.
PRODUCTION OF ICE CUBES
3/4 fill the ice cube trays with water and place them in the low temperature compartment. If the trays stick to the bottom of the compartment, do not detach them with sharp or cutting instruments, which could damage the appliance. Use, if necessary, the handle of a spoon. To allow removal of ice cubes from plastic trays, bend them slightly.
Attention: Do not eat ice cubes or ice lollies immediately after removal from the low temperature compartment as they may give rise to cold burns.
STORAGE OF FROZEN FOOD
When buying frozen food, it is suggested to use thermal bags or cold boxes. They should be the last purchases made and should be well wrapped in newspaper. When home, store them in the compartment, with the least possible delay. In any case these foods have to be used within the date printed on the packet.
THAWING
Here are some basic suggestions:
Raw vegetables: Do not thaw - put straight into boiling water and cook as usually.
Meat (large cuts): Thaw in the refrigerator without unwrapping them. Before cooking, leave at room temperature for some hours.
(Small cuts): Thaw at room temperature or cook directly.
Fish: Thaw in the refrigerator without unwrapping or cook directly before being completely thawed.
Previously cooked food: Re-heat in the oven without removing from its aluminium container.
Fruit: Thaw in the refrigerator.
DEFROSTING
Generally you need to defrost two or three times a year when the layer of frost reaches a 3 mm thickness. We suggest you periodically remove the frost from the freezing plate by means of a plastic scraper. Avoid using sharp or cutting instruments. Defrosting should be carried out when the quantity of food stored is minimum. Wrap the frozen food into several layers of newspaper (or in a cover) and place them in the refrigerator or in a cool place. Adjust the thermostat control knob to position•, disconnect the appliance from the mains and leave the door open. Remove the baskets by pulling forward and up. Do not use commercial defrosting products as they could contain dangerous components. At completion of defrosting, clean and dry the appliance carefully. Reconnect the freezer to the mains supply. Reload the freezer with the frozen food.
MAINTENANCE AND CLEANING
A periodic and proper maintenance will ensure a longer life to your appliance. Disconnect the appliance from the mains supply before any intervention. Clean periodically the appliance with a solution of water and vinegar. Rinse and dry thoroughly. Never use abrasive or detergents. Clean periodically the door gasket with water and dry carefully. Avoid soiling the door gasket with oil or other grease which could damage it. After cleaning, reconnect the appliance to the mains supply.
HINTS FOR HOLIDAYS
If you plan to be away for a long time, disconnect the appliance from the mains, empty and clean the inside. Leave the door open to prevent the appliance from smelling musty. If you plan to be away for a short time, let the appliance operate normally.
SERVICE
The incorrect operation of the appliance is not always due to a fault but it may also result from poor installation or usage. To prevent unnecessary service calls for which you will be charged, we suggest you consult this trouble-shooting guide.
If the red light is on continuously or flashing, the internal temperature is too high.
Check that:
• the door is not properly shut;
- the thermostat control knob is correctly set (see chapter "Adjustment of the temperature");
- the freezer is not near a source of heat;
- there is a large build up of frost on the inner walls;
• the air flow is not restricted.
If the compressor functions continuously. Check that:
• the ambient temperature is too warm;
- the door is not being opened too frequently.
The appliance is excessively noisy. Check that:
• the appliance is level.
The appliance does not operate. Check that:
- the thermostat control knob is not set to position •;
• there is not a power failure; - the plug is making good contact with the supply socket;
- any automatic circuit breakers have tripped or any fuses blown;
- the supply cable is intact (see also Note).
Note: When replacing a damaged supply cord, be sure the new cord is correctly clamped. If you have followed this trouble shooting guide and your freezer still does not work properly, get in touch with your Retailer or Service Agent. State clearly what is wrong and the type and serial number of your freezer.