
CL070DZ - Broom MAKITA - Free user manual and instructions
Find the device manual for free CL070DZ MAKITA in PDF.


| Product Type | Cordless Stick Vacuum Cleaner |
| Brand | Makita |
| Model | CL070DZ |
| Power Source | 18 V Lithium-ion battery (sold separately) |
| Compatible Battery Type | Makita 18 V LXT (BL1815, BL1820, etc.) |
| Runtime (with BL1815 battery) | Approximately 20 minutes |
| Dust Bin Capacity | 0.5 L |
| Weight (without battery) | 2.5 kg |
| Dimensions (L x W x H) | 110 x 20 x 25 cm (approx.) |
| Tube Length | Adjustable from 70 to 110 cm |
| Filtration System | Cyclone filter + washable HEPA filter |
| Suction Modes | Standard and turbo (depending on trigger) |
| Included Accessories | Crevice tool, upholstery brush |
| Main Features | Handheld use, wall mountable, easy bin emptying |
| Noise Level | Approximately 70 dB(A) |
| Filter Maintenance | Wash with cold water every month, dry completely |
| Dust Bin Cleaning | Empty after each use, wash if necessary |
| Safety | Do not vacuum liquids or hot ashes, use only with Makita batteries |
| Available Spare Parts | Filter, bin, tube, nozzle, battery and charger |
| Repairability | Parts available through Makita authorized network |
| Warranty | 1 year (excluding battery) |
Frequently Asked Questions - CL070DZ MAKITA
User questions about CL070DZ MAKITA
0 question about this device. Answer the ones you know or ask your own.
Ask a new question about this device
Download the instructions for your Broom in PDF format for free! Find your manual CL070DZ - MAKITA and take your electronic device back in hand. On this page are published all the documents necessary for the use of your device. CL070DZ by MAKITA.
USER MANUAL CL070DZ MAKITA
GB Cordless Cleaner Instruction Manual
natural_image
Line drawing of a vacuum cleaner with handle and lever (no text or symbols)


010015 010016
1


010022 010023 4
3

010024 774025
5

7
774026 010027
8

9

10

natural_image
Technical line drawing of a mechanical device with a circular component and directional arrow (no text or symbols)11 12
natural_image
Diagram of a hairdryer with internal components and an arrow indicating direction (no text or symbols)77403177403C

13 14

natural_image
Technical line drawing of a mechanical component with labeled parts (no text or symbols present)774033010032
natural_image
Technical line drawing of a mechanical component with no visible text or symbols15 16

natural_image
Technical line drawing of a mechanical device with labeled parts and an arrow indicating direction (no text or symbols present)010034 010028

774036 010017
17 18

0995201 010018
19 20


010019 010020
21 22

natural_image
Line drawing of a hand using a power tool to lift a wooden plank (no text or symbols)23 24
010021 010061

25 26

natural_image
Illustration of a manual pushper emitting motion, no text or symbols present015592 015593

natural_image
Line drawing of a hand holding a tool, no text or symbols present27 28

natural_image
Line drawing of a hand using a tool to clean or brush inside a pan (no text or symbols)010038
010009

29
30
1206608
1205201


1206609 1206610
31 32

33 34
12066121206611
WARNING
- This appliance can be used by children aged from 8 years and above and persons with reduced physical, sensory or mental capabilities or lack of experience and knowledge if they have been given supervision or instruction concerning use of the appliance in a safe way and understand the hazards involved.
- Children shall not play with the appliance. Cleaning and user maintenance shall not be made by children without supervision.
- See the chapter "SPECIFICATIONS" for the type reference of the battery.
- See the section "Installing or removing battery cartridge" for how to remove or install the battery.
- When disposing the battery cartridge, remove it from the tool and dispose of it in a safe place. Follow your local regulations relating to disposal of battery.
- If the tool is not used for a long period of time, the battery must be removed from the tool.
- Do not short the battery cartridge.
- See the chapter "MAINTENANCE" for the appropriate details of precautions during user maintenance.
Explanation of general view
| 1 Battery cartridge | 9 Handle | 17 Cyclone attachment |
| 2 Button | 10 Projection | 18 Full line |
| 3 Switch trigger | 11 Groove of cleaner housing | 19 Dust case |
| 4 Capsule | 12 Nozzle | 20 Button (two locations) |
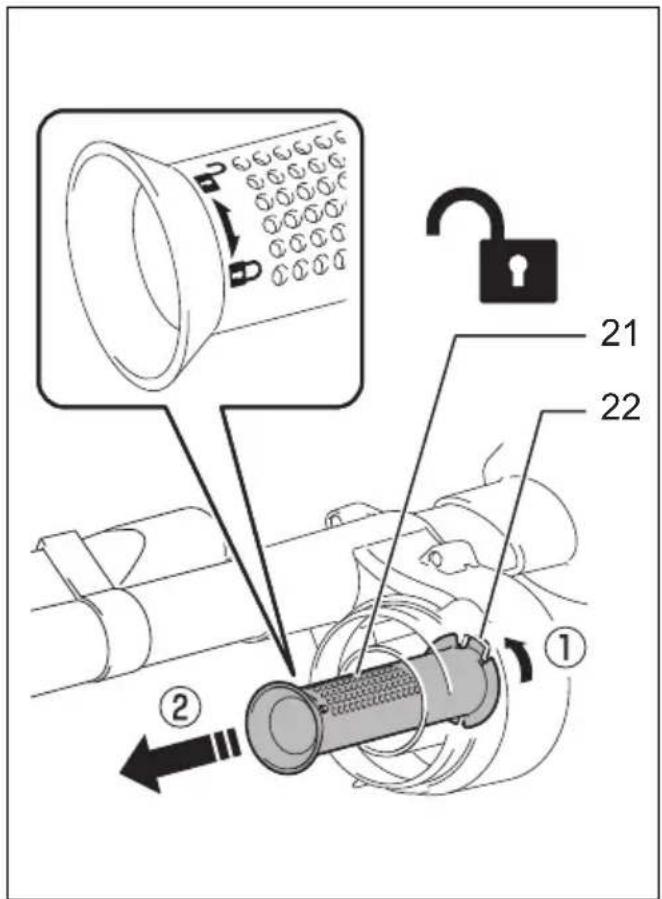
| 5 Suction inlet | 13 Cleaner body | 21 Mesh filter |
| 6 Prefilter | 14 Extension wand | 22 Hook |
| 7 Securing lip | 15 Corner nozzle | 23 Port |
| 8 Filter | 16 Straight pipe |
SPECIFICATIONS
| Model CL070D CL100D | ||
| Capacity 600 mL | ||
| Continuous use Approx. 12 min (BL0715) Approx. 23 min (BL1015K) | ||
| Overall length 966 mm | ||
| Net weight 0.82 kg | 0.88 kg | |
| Rated voltage D.C. 7.2 V | D.C. 10.8 V | |
- Due to our continuing program of research and development, the specifications herein are subject to change without notice.
- Specifications may differ from country to country.
- The weight does not include accessories but battery cartridge(s). The lightest and heaviest combination weight of the appliance and battery cartridge(s) are shown in the table.
Applicable battery cartridge and charger
| D.C.7.2 V Model | Battery cartridge | BL0715 |
| Charger | DC10WA / DC10WB | |
| D.C.10.8 V Model | Battery cartridge | BL1013 / BL1015K |
| Charger | DC10WA |
- Some of the battery cartridges and chargers listed above may not be available depending on your region of residence.
WARNING: Only use the battery cartridges and chargers listed above. Use of any other battery cartridges and chargers may cause injury and/or fire.
ENE017-1
Intended use
The tool is intended for collecting dry dust.
Cordless cleaner safety warnings
WARNING: IMPORTANT! READ CAREFULLY all safety warnings and all instructions BEFORE USE. Failure to follow the warnings and instructions may result in electric shock, fire and/or serious injury.
-
Do not expose to rain. Store indoors.
-
Do not allow to be used as a toy. Close attention is necessary when used by or near children.
-
Use only as described in this manual. Use only manufacturer's recommended attachments.
-
Do not use with damaged battery. If appliance is not working as it should, has been dropped, damaged, left outdoors, or dropped into water, return it to a service center.
-
Do not handle appliance with wet hands.
-
Do not put any object into openings. Do not use with any opening blocked; keep free of dust, lint, hair, and anything that may reduce air flow.
-
Keep hair, loose clothing, fingers, and all parts of body away from openings and moving parts.
-
Turn off all controls before removing the battery.
-
Use extra care when cleaning on stairs.
-
Do not use to pick up flammable or combustible liquids, such as gasoline, or use in areas where they may be present.
-
Use only the charger supplied by the manufacturer to recharge.
-
Do not pick up anything that is burning or smoking, such as cigarettes, matches, or hot ashes.
-
Do not use without dust bag and/or filters in place.
-
Do not charge the battery outdoors.
-
Recharge only with the charger specified by the manufacturer. A charger that is suitable for one type of battery pack may create a risk of fire when used with another battery pack.
-
Use power tools only with specifically designated battery packs. Use of any other battery packs may create a risk of injury and fire.
-
When (the) battery pack is not in use, keep it away from other metal objects, like paper clips, coins, keys, nails, screws or other small metal objects, that can make a connection from one terminal to another.
-
Under abusive conditions, liquid may be ejected from the battery; avoid contact. If contact accidentally occurs, flush with water.
-
Do not use a battery pack or tool that is damaged or modified. Damaged or modified batteries may exhibit unpredictable behaviour resulting in fire, explosion or risk of injury.
-
Do not expose a battery pack or tool to fire or excessive temperature. Exposure to fire or temperature above 130 °C may cause explosion.
-
Follow all charging instructions and do not charge the battery pack or tool outside the temperature range specified in the instructions. Charging improperly or at temperatures outside the specified range may damage the battery and increase the risk of fire.
SAVE THESE INSTRUCTIONS.
ADDITIONAL SAFETY RULES
This appliance is intended for household use.
-
Read this instruction manual and the charger instruction manual carefully before use.
-
Do not pick up the following materials:
-
Hot materials such as lit cigarettes or spark/ metal dust generated by grinding/cutting metal
- Flammable materials such as gasoline, thinner, benzine, kerosene or paint
- Explosive materials like nitroglycerin
- Ignitable materials such as Aluminum, zinc, magnesium, titanium, phosphorus or celluloid
– Wet dirt, water, oil or the like
– Hard pieces with sharp edges, such as wood chips, metals, stones, glasses, nails, pins or razors
– Powder to clot such as cement or toner - Conductive dust such as metal or carbon
– Fine particle like concrete dust
Such action may cause fire, injury and/or property damage.
- Stop operation immediately if you notice anything abnormal.
- If you drop or strike the cleaner, check it carefully for cracks or damage before operation.
- Do not bring close to stoves or other heat sources.
- Do not block the intake hole or vent holes.
SAVE THESE INSTRUCTIONS.
ENC009-9
Important safety instructions for battery cartridge
- Before using battery cartridge, read all instructions and cautionary markings on (1) battery charger, (2) battery, and (3) product using battery.
- Do not disassemble or tamper with the battery cartridge. It may result in a fire, excessive heat, or explosion.
- If operating time has become excessively shorter, stop operating immediately. It may result in a risk of overheating, possible burns and even an explosion.
- If electrolyte gets into your eyes, rinse them out with clear water and seek medical attention right away. It may result in loss of your eyesight.
- Do not short the battery cartridge:
(1) Do not touch the terminals with any conductive material.
(2) Avoid storing battery cartridge in a container with other metal objects such as nails, coins, etc.
(3) Do not expose battery cartridge to water or rain.
A battery short can cause a large current flow, overheating, possible burns and even a breakdown.
-
Do not store and use the tool and battery cartridge in locations where the temperature may reach or exceed 50 °C (122 °F).
-
Do not incinerate the battery cartridge even if it is severely damaged or is completely worn out. The battery cartridge can explode in a fire.
-
Do not nail, cut, crush, throw, drop the battery cartridge, or hit against a hard object to the battery cartridge. Such conduct may result in a fire, excessive heat, or explosion.
-
Do not use a damaged battery.
-
The contained lithium-ion batteries are subject to the Dangerous Goods Legislation requirements.
For commercial transports e.g. by third parties, forwarding agents, special requirement on packaging and labeling must be observed.
For preparation of the item being shipped, consulting an expert for hazardous material is required. Please also observe possibly more detailed national regulations.
Tape or mask off open contacts and pack up the battery in such a manner that it cannot move around in the packaging.
-
When disposing the battery cartridge, remove it from the tool and dispose of it in a safe place. Follow your local regulations relating to disposal of battery.
-
Use the batteries only with the products specified by Makita. Installing the batteries to non-compliant products may result in a fire, excessive heat, explosion, or leak of electrolyte.
-
If the tool is not used for a long period of time, the battery must be removed from the tool.
-
During and after use, the battery cartridge may take on heat which can cause burns or low temperature burns. Pay attention to the handling of hot battery cartridges.
-
Do not touch the terminal of the tool immediately after use as it may get hot enough to cause burns.
-
Do not allow chips, dust, or soil stuck into the terminals, holes, and grooves of the battery cartridge. It may result in poor performance or breakdown of the tool or battery cartridge.
-
Unless the tool supports the use near high-voltage electrical power lines, do not use the battery cartridge near high-voltage electrical power lines. It may result in a malfunction or breakdown of the tool or battery cartridge.
-
Keep the battery away from children.
SAVE THESE INSTRUCTIONS.
CAUTION: Only use genuine Makita batteries. Use of non-genuine Makita batteries, or batteries that have been altered, may result in the battery bursting causing fires, personal injury and damage. It will also void the Makita warranty for the Makita tool and charger.
Tips for maintaining maximum battery life
-
Charge the battery cartridge before completely discharged. Always stop tool operation and charge the battery cartridge when you notice less tool power.
-
Never recharge a fully charged battery cartridge. Overcharging shortens the battery service life.
-
Charge the battery cartridge with room temperature at 10 °C - 40 °C (50 °F - 104 °F). Let a hot battery cartridge cool down before charging it.
-
When not using the battery cartridge, remove it from the tool or the charger.
FUNCTIONAL DESCRIPTION
CAUTION:
- Always be sure that the tool is switched off and the battery cartridge is removed before adjusting or checking function on the tool.
Installing or removing battery cartridge (Fig. 1)
- Always switch off the tool before insertion or removal of the battery cartridge.
- To remove the battery cartridge, withdraw it from the tool while pressing the buttons on both sides of the cartridge.
- To insert the battery cartridge, hold it so that the battery cartridge front shape fits to that of the battery installment opening and slip it into place. Always insert it all the way until it locks in place with a little click. If not, it may accidentally fall out of the tool, causing injury to you or someone around you.
- Do not use force when inserting the battery cartridge. If the cartridge does not slide in easily, it is not being inserted correctly.
Switch action (Fig. 2)
CAUTION:
- Before inserting the battery cartridge into the tool, always check to see that the switch trigger actuates properly and returns to the "OFF" position when released.
To start the tool, simply pull the switch trigger. Release the switch trigger to stop.
ASSEMBLY
CAUTION:
- Always be sure that the tool is switched off and the battery cartridge is removed before carrying out any work on the tool.
Disposing of Dust
CAUTION:
- Empty the cleaner before it becomes too full, or the suction force weakens.
- Be sure to empty out the dust inside the cleaner itself. Failure to do so may cause the filter to be clogged or the motor to be damaged.
In order to drop dust sticking on the filter in the capsule, tap the capsule 4 or 5 times with your hand. (Fig. 3)
Now point suction inlet downwards, turn capsule in direction of arrow in diagram, and disconnect capsule slowly and straight. (Fig. 4)
NOTE:
- Dust may spill out when capsule is opened, so be sure to set a garbage bag beneath capsule.
Remove accumulated dust from inside of capsule and off of prefilter. (Fig. 5)
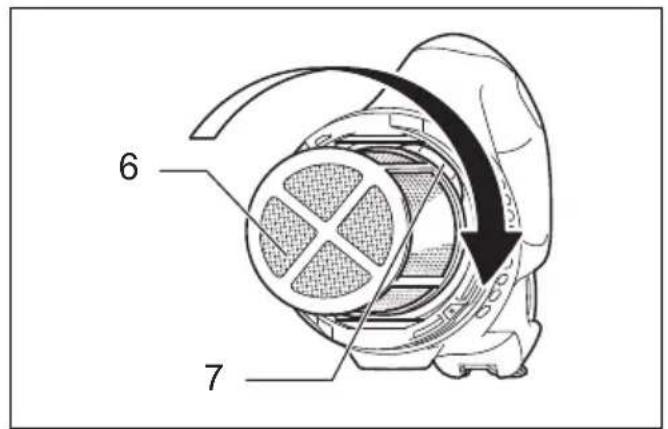
Twist prefilter in direction of arrow to unfasten securing lip from cleaner unit and then pull off prefilter. (Fig. 6)
Clean out fine dust from prefilter. Next, remove filter, and lightly tap to dislodge dust. (Fig. 7)
Reassembly
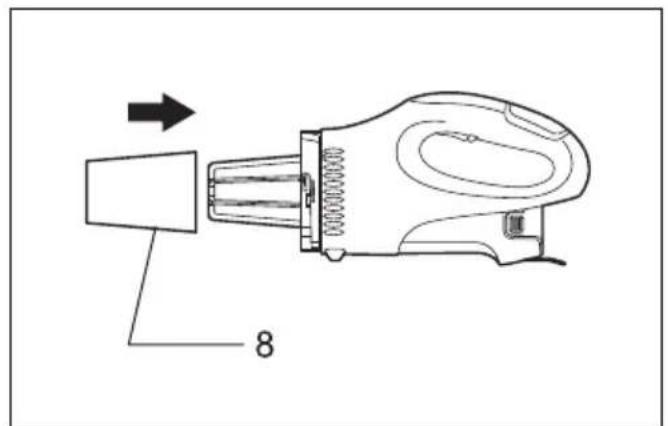
Put on filter until it is fully in position on the cleaner unit. (Fig. 8)
NOTE:
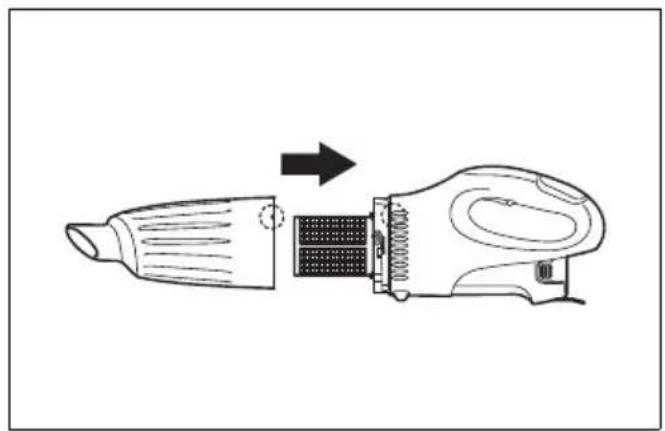
- Make sure filter is put on straight without being peeled back. If filter is put on incorrectly as shown in diagram, dust will get into motor housing, and cause motor failure. (Fig. 9)
Connect prefilter. At this time, make sure to twist prefilter so that securing lip is firmly locked into cleaner unit.
(Fig. 10 & 11)
Connect capsule. Align projection on capsule with projection on handle and then firmly twist capsule in direction of arrow until it is secured. (Fig. 12 & 13)
NOTE:
- Always remove dust ahead of time, as suction power will be reduced if there is too much dust in cleaner.
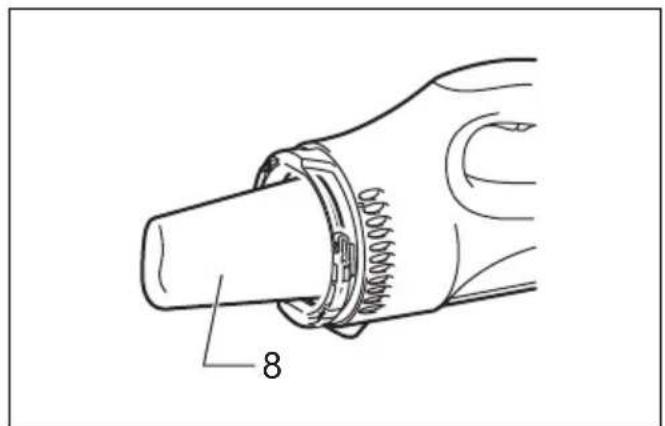
- Always be sure to check that both filter and prefilter are loaded correctly prior to using cleaner. If they are not loaded correctly, dust will get into the motor housing, and cause motor failure.
If the following examples occur, filter and prefilter are not loaded correctly. Reload them correctly to rectify problem.
Problem Examples
Example 1: Only prefilter has been loaded (no filter) (Fig. 14)
Example 2: Only filter has been loaded (no prefilter) (Fig. 15)
Example 3: Filter has been loaded in a peeled back state (Fig. 16)
Example 4: Prefilter's securing lip is not firmly locked into groove of cleaner housing (Fig. 17)
OPERATION
CAUTION:
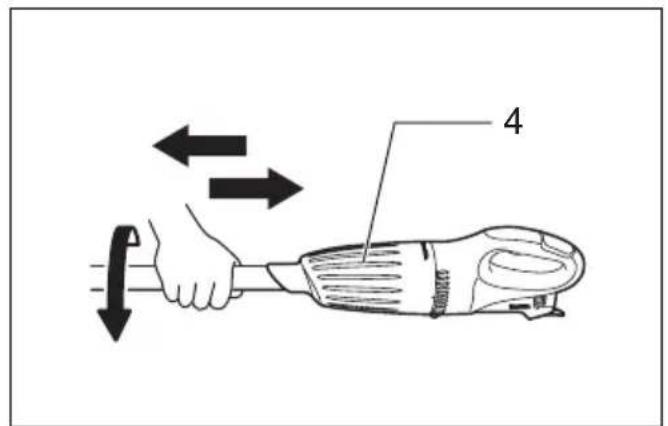
- To connect attachments, such as nozzle, twist-insert attachment in direction of arrow to ensure secure connection during use. To disconnect attachment, twist-extract also in direction of arrow.
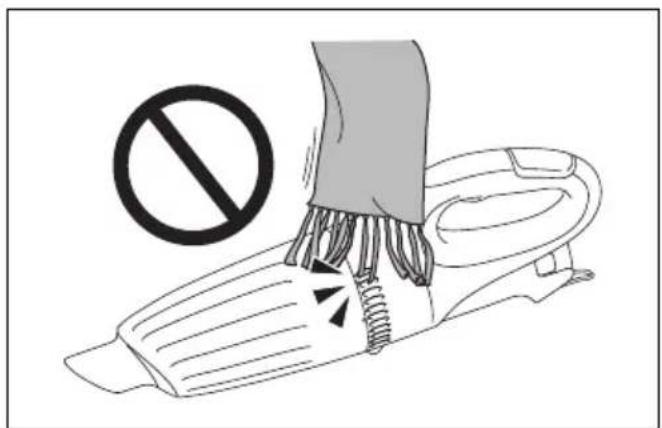
If attachment is twisted in the opposite direction, when being connected or disconnected, capsule may become loose. (Fig. 18) - Keep away end of your hair, scarf, shawl, etc. from the exhaust vents. They may be entangled in the motor and cause injury. (Fig. 19)
Cleaning (Suction)
Nozzle (Fig. 20)
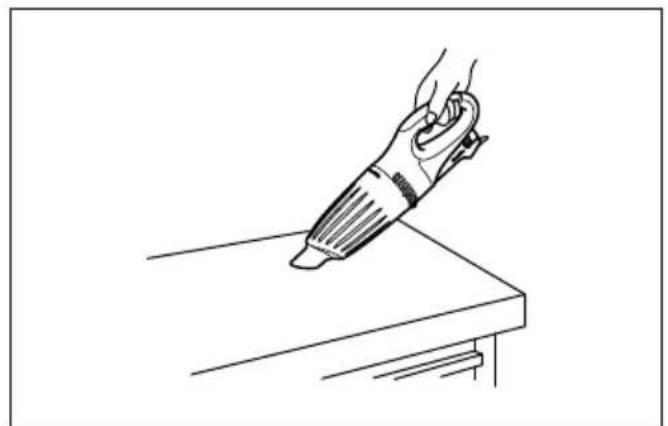
Attach the nozzle to clean off tables, desks, furniture, etc. Nozzle slips on easily.
Nozzle + Extension wand (Straight pipe) (Fig. 21)
The extension wand fits in between the nozzle and the cleaner itself. This arrangement is convenient for cleaning a floor while standing erect.
Corner nozzle (Fig. 22)
Fit on the corner nozzle for cleaning corners and crevices of a car or furniture.
Corner nozzle + Extension wand (Straight pipe) (Fig. 23)
In tight quarters where the cleaner itself cannot squeeze in, or in high places hard to reach, use this arrangement.
Cleaning without nozzle (Fig. 24)
You can pick up powder and dust without nozzle.
MAINTENANCE
CAUTION:
- Always be sure that the tool is switched off before attempting to perform inspection or maintenance.
After use (Fig. 25 & 26)
When storing the cleaner, lock the nozzle head, and hang it from a hook available in the market.
CAUTION:
- Putting the cleaner against the wall without a hook may cause the cleaner to fall down and be damaged.
Cleaning
From time to time wipe off the outside (cleaner body) of the cleaner using a cloth dampened in soapy water. Clean out also the suction opening, dust bag/paper pack mounting area and the dust stopper. (Fig. 27)
CAUTION:
- Never use gasoline, benzine, thinner, alcohol or the like. Discoloration, deformation or cracks may result.
Wash the filter in soapy water when it is clogged with dust and the cleaner power becomes small. Dry it out thoroughly before use. An insufficiently dried filter may cause poor suction and shorten the service life of the motor. (Fig. 28)
Things to Check Before Asking for Repairs
| Symptom Area to be investigated Fixing method | ||
| Weak suction power | • Is capsule full of dust? • Empty dust from capsule.• Is filter clogged? • Dust down or wash filter.• Is the battery cartridge discharged? • Recharge battery. | |
| Not working • Is the battery cartridge discharged? • Recharge battery. | ||
010051
NOTE:
- Do not attempt to repair cleaner by yourself.
To maintain product SAFETY and RELIABILITY, repairs, any other maintenance or adjustment should be performed by Makita Authorized Service Centers, always using Makita replacement parts.
OPTIONAL ACCESSORIES
CAUTION:
- These accessories or attachments are recommended for use with your Makita tool specified in this manual. The use of any other accessories or attachments might present a risk of injury to persons. Only use accessory or attachment for its stated purpose.
If you need any assistance for more details regarding these accessories, ask your local Makita Service Center.
- Extension wand (Straight pipe)
- Nozzle
- Nozzle for carpet
- Shelf brush
- Corner nozzle
- Round brush
- Flexible hose
- Filter
- Prefilter
- Cyclone attachment
- Makita genuine battery and charger
NOTE:
- Some items in the list may be included in the tool package as standard accessories. They may differ from country to country.
Cyclone attachment (Fig. 29)
About the cyclone attachment
Using the cleaner with the cyclone attachment installed reduces the amount of dust that enters the capsule, which helps to prevent the suction force from weakening. In addition, cleaning after use is also simple.
CAUTION:
- Always be sure that the tool is switched off and the battery cartridge is removed before carrying out any work on the tool. If the battery cartridge is left inserted, the cleaner may start unexpectedly and result in injury.
- Clean the mesh filter of the cyclone attachment and the filters of the cleaner unit when they become clogged. Continued use in the clogged condition may result in heating or smoke.
NOTICE:
- When the cyclone attachment is attached, do not use the cleaner in the horizontal or upward facing condition. Doing so may cause the mesh filter to become clogged.
- Always use the cleaner with the filters installed, even when using the cyclone attachment. Using the cleaner without the filters installed may result in a motor malfunction.
NOTE:
- Check that the cyclone attachment, cleaner, and straight pipe are locked properly before use.
- Empty the dust case of the cyclone attachment and the capsule of the cleaner when dust has accumulated. Continued use will result in weakened suction force.
Disposing of dust
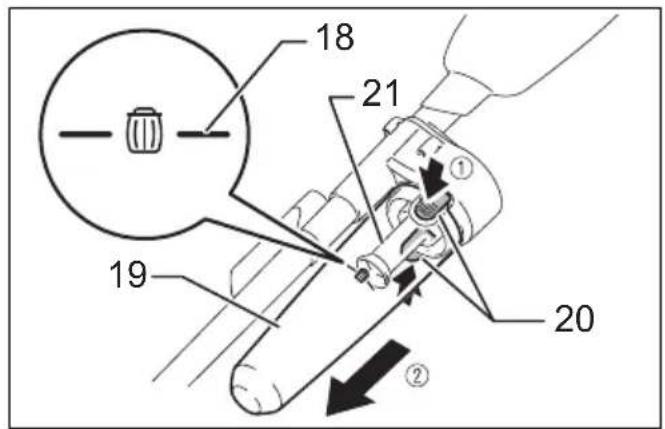
When dust has accumulated up to the full line of the dust case, follow the procedure below and dispose of the dust.
- Hold the dust case firmly, press and hold the two buttons, and remove the dust case. (Fig. 30)
- Dispose of the dust inside the dust case and remove any dust and powder adhered to the surface of the mesh filter.
- Insert the dust case all the way until the two buttons lock with a click. (Fig. 31)
NOTE:
- Check that the cyclone attachment, cleaner, and straight pipe are all firmly connected before restarting operation.
- If the suction force does not recover even after disposing of the dust and cleaning the mesh filter, check whether dust has accumulated in the capsule of the cleaner or clogging has occurred.
Cleaning
When the dust case becomes dirty or the mesh filter is clogged, remove and wash them with water. (Refer to "Disposing of dust" for the removal procedure.)
Dry the parts thoroughly before reinstallation and use. (Fig. 32)
When the mesh filter gets dirty badly, clean it in the following procedures.
- Turn the mesh filter counterclockwise and remove it while the hooks are unlocked. (Fig. 33)
- Remove the dust on the mesh filter and then wash it with water. After that, dry it thoroughly.
- Insert the mesh filter into the base while the hooks are aligned with the port. Turn the mesh filter clockwise until the hooks are locked with a click. Make sure that the mesh filter is installed securely. (Fig. 34)
AVERTISSEMENT
Nettoyage (aspiration)
Buse (Fig. 20)
OPTIONELE ACCESSOIRES
LET OP:
- WARNING
- Intended use
- Cordless cleaner safety warnings
- SAVE THESE INSTRUCTIONS.
- ADDITIONAL SAFETY RULES
- Important safety instructions for battery cartridge
- Tips for maintaining maximum battery life
- FUNCTIONAL DESCRIPTION
- CAUTION:
- Installing or removing battery cartridge (Fig. 1)
- Switch action (Fig. 2)
- ASSEMBLY
- Disposing of Dust
- NOTE:
- Reassembly
- (Fig. 10 & 11)
- Problem Examples
- OPERATION
- Cleaning (Suction)
- Nozzle (Fig. 20)
- Nozzle + Extension wand (Straight pipe) (Fig. 21)
- Corner nozzle (Fig. 22)
- Corner nozzle + Extension wand (Straight pipe) (Fig. 23)
- Cleaning without nozzle (Fig. 24)
- MAINTENANCE
- After use (Fig. 25 & 26)
- Cleaning
- OPTIONAL ACCESSORIES
- Cyclone attachment (Fig. 29)
- About the cyclone attachment
- NOTICE:
- AVERTISSEMENT
- Nettoyage (aspiration)
- Buse (Fig. 20)
- OPTIONELE ACCESSOIRES
- LET OP:
Brand : MAKITA
Model : CL070DZ
Category : Broom