
Row 3.1 - Rowing Machine TUNTURI - Free user manual and instructions
Find the device manual for free Row 3.1 TUNTURI in PDF.


| Brand | Tunturi |
| Model | Row 3.1 |
| Product type | Magnetic rower |
| Dimensions (L x W x H) | 200 x 53 x 50 cm |
| Appliance weight | 28 kg |
| Maximum user weight | 130 kg |
| Resistance type | Magnetic, 16 adjustable levels |
| Braking system | Self-powered magnetic brake |
| Screen | Backlit LCD |
| Display | Time, distance, calories, strokes per minute, heart rate (handlebar) |
| Heart rate sensor | Integrated heart rate handlebar |
| Connectivity | Bluetooth for fitness apps (Tunturi E-Track) |
| Training programs | 12 preset programs |
| Power supply | Batteries (2 x AA) or optional AC adapter |
| Transport | Integrated transport wheels |
| Folding / storage | No (fixed structure) |
| Maintenance | Clean with a damp cloth, lubricate sliding rail if necessary |
| Warranty | 2 years (parts and labor) |
Frequently Asked Questions - Row 3.1 TUNTURI
User questions about Row 3.1 TUNTURI
0 question about this device. Answer the ones you know or ask your own.
Ask a new question about this device
Download the instructions for your Rowing Machine in PDF format for free! Find your manual Row 3.1 - TUNTURI and take your electronic device back in hand. On this page are published all the documents necessary for the use of your device. Row 3.1 by TUNTURI.
USER MANUAL Row 3.1 TUNTURI
It's easy to feel good!
ENGLISH
CONTENTS
| ASSEMBLY | 3 | ||
| EXERCISING | 3 | ||
| USE | 4 | ||
| USER | INTERFACE | ||
| TRANSPORT | AND | STORAGE | |
| MAINTENANCE | |||
| MALFUNCTIONS | |||
| TECHNICAL | SPECIFICATIONS |
WELCOME TO THE WORLD OF TUNTURI EXERCISING! Your choice shows that you really want to invest in your well being and condition; it also shows you really value high quality and style. With Tunturi New Fitness Equipment, you've chosen a high quality, safe and motivating product as your training partner. Whatever your goal in training, we are certain this is the training equipment to get you there. You'll find information about using your exercise equipment and what makes for efficient training at Tunturi's website at WWW.TUNTURI.COM.
IMPORTANT SAFETY INSTRUCTIONS
Read this guide through carefully before assembling, using or servicing your fitness equipment. Please keep the guide somewhere safe; it will provide you now and in the future with the information you need to use and maintain your equipment. Always follow these instructions with care.
NOTE ABOUT YOUR HEALTH
- Before you start any training, consult a physician to check your state of health.
- If you experience nausea, dizziness or other abnormal symptoms while exercising, stop your workout at once and consult a physician.
- To avoid muscular pain and strain, begin each workout by warming up and end it by cooling down (slow pedaling at low resistance). Don't forget to stretch at the end of the workout.
NOTE ABOUT THE EXERCISE ENVIRONMENT
• The equipment is not to be used outdoors.
- Place the equipment on a firm, level surface. Place the equipment on a protective base to avoid any damages to the floor beneath the equipment.
- Make sure that the exercising environment has adequate ventilation. To avoid catching cold, do not exercise in a draughty place.
- In training, the equipment tolerates an environment measuring +10°C to +35°C. The equipment can be stored in temperatures ranging between -15°C and +40°C. Air humidity in the training or storage environment must never exceed 90%.
- Allow at least 100 cm of clearance around the equipment.
NOTE ABOUT USING THE EQUIPMENT
WARNING! Before exercise, always ensure that the front frame is in locked forward position. Always tighten the locking pin before you begin to exercise.
- If children are allowed to use the equipment, they should be supervised and taught to use the equipment properly, keeping in mind the child's physical and mental development and their personality. Also make sure that pet animals keep a safe distance to the product when it is transporting or used for training.
- Before you start using the equipment, make sure that it functions correctly in every way. Do not use a faulty equipment.
- Press the keys with the tip of the finger; your nails may damage the key membrane.
- Never remove the covers.
- Only one person may use the equipment at a time.
- Wear appropriate clothing and shoes when exercising.
- Protect the meter from sunlight and always dry the surface of the meter if there are any drops of sweat on it.
- The equipment has been designed for home use. Further information on warranty terms can be found in the warranty booklet included with the product. Please note that the warranty does not cover damage due to shipping or negligence of adjustment or maintenance instructions described in this manual.
- The equipment must not be used by persons weighing over 135 kg.
- Do not attempt any servicing or adjustments other than those described in this guide. Everything else must be left to someone familiar with the maintenance of electromechanical equipments and authorised under the laws of the country in question to carry out maintenance and repair work.
SAVE THIS INSTRUCTION MANUAL
ASSEMBLY

natural_image
Close-up of a hand adjusting a black and gray medical device with a small metallic component (no visible text or symbols)The rowing machine is shipped in the locked storage position. Push the front tube folded on the frame up and forward. Pull the locking pin up and press the front frame downward simultaneously by the pulley wheel cover. Release the locking pin and ensure that the front frame is in locked forward position. Always tighten the locking pin before you begin to exercise.
CONSOLE
Turn the console carefully away from the front frame so that you can remove the battery compartment cover in the back of the console. Open the battery compartment cover carefully from its lower edge. Press in the tab at the bottom of the cover to unlock it, then lift the cover up. Be careful not to damage the wires. Set the batteries (4 x C) in their place according to the markings in the battery compartment. Reattach the cover and adjust the angle of the console appropriately for exercise. The clock in the console uses always batteries, even when the device is not connected to any power source. Otherwise the clock would reset to zero.
Adjust the console so that it is in an appropriate angle for exercise.
TRANSFORMER
Connect the transformer power cord to a receptacle. Connect the transformer connector to the plug in the front frame. Always disconnect the power cord from the device and the receptacle after you finish. NOTE! Always remove the mains cable from the fitness equipment first, and only then remove it from the power source. Always connect the mains cable to the power source first, and only then connect it to the fitness equipment. Inverted order resets the meter clock display.
Make sure the power cord does not run underneath the equipment.
IMPORTANT! The device is shipped with a loop and a hook for securing the rowing machine properly in the storage position. Choose an appropriate storage site for your rowing machine next to a wall and attach the hook tightly to the wall at the right height. Lift the rowing machine to the storage position in front of the hook. Thread the loop provided with the rowing machine around the cross bar and attach the loop to the hook. Do not climb on the rowing machine when it is in storage position!
EXERCISING
Rowing is a very effective form of exercise. In addition to strengthening the heart and improving circulation, it develops the various groups of large muscles: the back, the abdomen, the arms, the shoulders as well as the pelvis and the legs. Rowing also develops muscular flexibility without exertion of joints, and it is a recommended form of exercise for those who suffer from pains in the neck and shoulder area. Working out using a rowing machine is excellent aerobic exercise, the principle being that the exercise should be suitably light, but of long duration. Aerobic exercise is based on improving the body's maximum oxygen uptake, which in turn improves endurance and fitness. The ability of the body to burn fat as a fuel is directly dependent on its oxygen-uptake capacity.
Aerobic exercise should above all be pleasant. You should perspire, but you should not get out of breath during the workout.
You should exercise at least three times a week, 30 minutes at a time, to reach a basic fitness level. Maintaining this level requires a few exercise sessions each week. Once the basic condition has been reached, it is easily improved, simply by increasing the number of exercise sessions.
Exercise is always rewarding for weight loss, because it is the only way of increasing the energy spent by the body. This is why it is always worthwhile to combine regular exercise with a healthy diet. A dieter should exercise daily - at first 30 minutes or less at a time, gradually increasing the daily workout time to one hour. You should start slowly and at low resistance, because strenuous exercise may subject the heart and circulatory system to excessive strain. As fitness improves, resistance and speed can be increased gradually.
Short sequences at heavy load increase maximum strength and muscular mass, longer sequences at a lighter load trim the body and develop stamina. First find your maximum heart rate i.e. where the rate doesn't increase with added effort. If you don't know your maximum heart rate, please use the following formula as a guide:
220 - AGE
These are average values and the maximum varies from person to person. The maximum heart-rate diminishes on average by one point per year. If you belong to a risk group, ask a doctor to measure your maximum heart rate for you.
We have defined three different heart-rate zones to help you with targeted training.
BEGINNER: 50-60 % of maximum heart-rate Also suitable for weight-watchers, convalescents and those who haven't exercised for a long time. Three sessions a week of at least a half-hour each is recommended. Regular exercise considerably improves beginners' respiratory and circulatory performance and you will quickly feel your improvement.
TRAINER: 60-70 % of maximum heart-rate Perfect for improving and maintaining fitness. Even
reasonable effort develops the heart and lungs effectively, training for a minimum of 30 minutes at least three times a week. To improve your condition still further, increase either frequency or effort, but not both at the same time!
ACTIVE TRAINER: 70-80% of maximum heart-rate Exercise at this level suits only the fittest and presupposes long-endurance workouts.
USE
ADJUSTING RESISTANCE
During exercise you may increase/decrease exercise intensity by pressing the + / - keys. Increase resistance/pulse with the + and decrease resistance/pulse with the - key.
TELEMETRIC HEART RATE MEASUREMENT
The console has a heart rate receiver compatible with Polar equipment, so you can also use Polar uncoded heart rate belts for heart rate measurement. The most reliable heart rate measurement is achieved with a telemetric device, in which the electrodes of the transmitter fastened to the chest transmit the pulses from the heart to the console by means of an electromagnetic field.

NOTE! If you are fitted with a pacemaker, please suit a physician before using a wireless heart rate editor.
If you want to measure your heart rate this way during your workout, moisten the grooved electrodes on the transmitter belt with saliva or water. Fasten the transmitter just below the chest with the elastic belt, firmly enough so that the electrodes remain in contact with the skin while exercising, but not so tight that normal breathing is prevented. Attach the transmitter and adjust the flexible belt to an appropriate tightness below chest level so that the electrodes are in contact with the skin during exercise. If you wear the transmitter and belt over a light shirt, moisten the shirt slightly at the points where the electrodes touch the shirt. The transmitter automatically transmits the heart rate reading to the console up to a distance of about 1 m.
If the electrode surfaces are not moist, the heart-rate reading will not appear on the display. If the electrodes are dry, they must be moistened again. Allow the electrodes warm up properly to ensure accurate heart rate measurement. The transmitter is switched to an active state only when it is being used for measurement. Sweat and other moisture can, however, keep the transmitter in an active state and waste battery energy. Therefore it is important to dry the electrodes carefully after use.
When selecting training attire, please note that some fibers used in clothes (e.g. polyester, polyamide) create static electricity, which may prevent reliable heart rate measurement. Please note that a mobile phone, television and other electrical appliances form an electromagnetic field around them, which will cause problems in heart rate measurement.
ROWING MOTION
natural_image
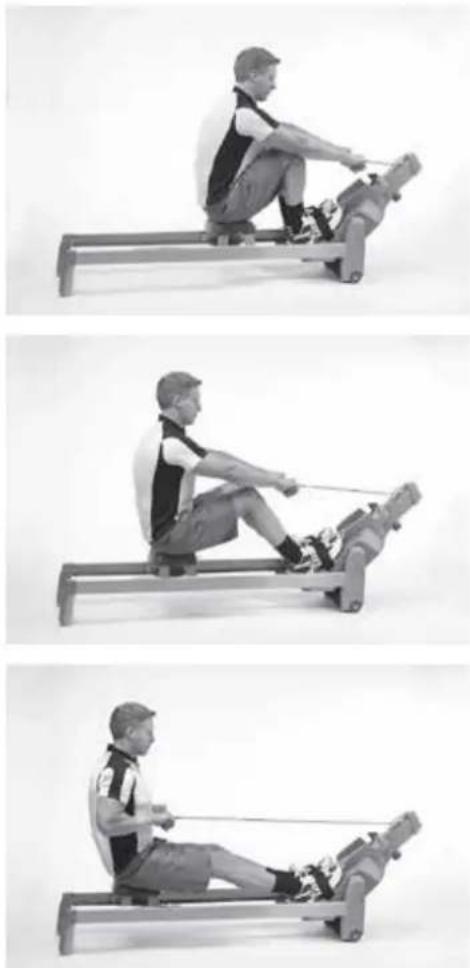
Three-panel sequence showing a person performing rowing exercise on a machine, no text or symbols visibleTighten the footstraps. Take a grip on the bar and start the rowing stroke by leaning slightly forward, with the knees bent and the arms straight. Push yourself backwards straightening your back and your legs simultaneously. Continue the movement until you lean slightly backwards and flex your arms at the same time. Return to the starting position, lean forward and straighten your arms.
BICEPS (ELBOW FLEXORS)

natural_image
Person using a rowing machine on a white background (no text or symbols visible)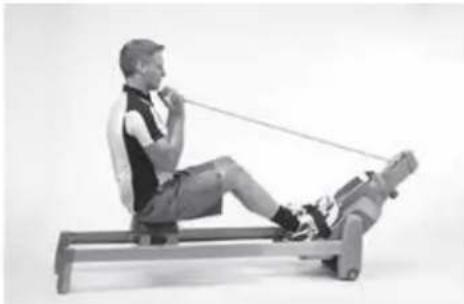
natural_image
Person performing a rowing exercise on a machine (no visible text or symbols)You can develop the biceps while rowing by taking an undergrasp of the bar or in the following way: grasp the bar from underneath, keep your knees straight and your feet under the footstraps. Begin the movement with your arms straight. Bend your arms. You can also develop your biceps by standing in front of the device, grasping either over or under the bar and bending your arms.
TRICEPS (ELBOW EXTENSORS)

natural_image
Two-panel black-and-white photo showing a person performing a resistance exercise on a stationary platform (no text or symbols visible)Sit on the seat with your back towards the front frame and grasp hold of the bar. Straighten your arms and pull the bar over your head.
CHEST MUSCLES

natural_image
Person performing a leg exercise on a reformer machine (no text or symbols visible)
natural_image
Person performing a fitness exercise using a rowing machine (no text or symbols visible)Stand next to the device with a foot between the rails. Pull the bar with the arm bent. Repeat the same with the other arm.
SHOULDERS

natural_image
Two-panel black-and-white photo showing a person performing a rowing exercise using a machine, with no visible text or symbols.Stand in front of the device and grasp over the bar. Pull the bar upward lifting your shoulders and bending your arms. Straighten your back at the same time.
IMPORTANT! Always make sure that the pull wire is not kinked. NOTE! Make sure the wire hook does not fray the wire!
CONSOLE
KEYS
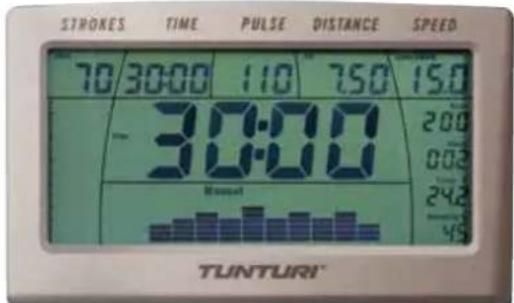
1. SET
Selection of the goal values. The same button is also on the remote control of the pull bar.
2. RESET.
Zeroing the exercising values, ending the exercise and return into main display 3. "+ / -"
Setting the goal values. The same buttons are also on the remote control of the pull bar.
4. RECOVERY
Measuring the recovery heart rate
5. START/STOP
Starting and interrupting the exercise
PULL-BAR BUTTONS
In order to work, the pull-bar buttons require that the device be connected to the line current. The buttons in question only transmit individual keystrokes to the meter; the meter does not recognize longer keystrokes.
If the pull-bar buttons do not work, first check that the device is connected to the line current. After this, reset the remotecontrol function by pressing all three pull-bar buttons simultaneously for five seconds. Then, test the operation of the pull-bar buttons.
Note that there is a battery inside the pull bar. If the pull-bar buttons do not operate, replace the battery, and make sure that you place it in the right direction. Note, however, that in home use, the battery will last several years.

IMPORTANT! When you finish exercising, return the pull to its holder. Never release your grip on the pull bar in middle of a rowing motion!
DISPLAY
The number of pulls/min; there is also a bar below the readout display which indicates pull speed.
2. Exercise duration
00:00-99:59; measuring at 1 second intervals, h1:40-h9:59 measuring at 1 minute intervals.
3. Heart rate during exercise
The symbol of a heart blinks simultaneously with your own heart rate during the exercise. The arrow signs show if the heart rate exceeds or surpasses the set values.
4. Exercise trip length (km/mile)
00.0 - 99.99 km / miles
- Speed (timer for a 500m distance, kmh/ mph) time 0-9.59/500m, 00.0-99.9 kmh / mph
6. Energy consumption
(Kcal Estimated total energy consumption during the
exercise, 0–9999 kcal
7. Clock (Clock)
Real time clock
- Thermometer (Temp C / Temp F)
Measures the room temperature either in Celsius or Fahrenheit
- Hygrometer (Humidity %)
Measures the room humidity, 0-100%.
- Display of main values
The chosen exercise value shows in large numbers in the middle of the console; other values are shown in the upper row displays.
-
Display of an exercise profile The profile of a preprogrammed exercise program.
-
Change of batteries
When the Battery Change symbol is shown, replace the batteries.
TARGET HR -EXERCISE
(CONSTANT HEART RATE)
-
Press + or - key, until the text Target HR is shown under the main number display.
-
Set the desired constant heart rate for the exercise by pressing SET. The display shows the word PULSE and the symbols of a heart and an arrow up / arrow down. You can set the desired heart rate by pressing the "+ / -" keys. Switch to the following stepi by pressing SET.
-
TIME = select the desired exercise duration by pressing the "+ / -" keys. Switch to the following step by pressing the SET key.
-
DISTANCE = select the desired distance by pressing the "+ / -" keys. Switch to the following step by pressing the SET key.
-
KCAL= select the goal value of energy consumption by pressing the "+ / -" keys. Switch back to setting the exercise duration by pressing the SET key.
-
You can start exercising by pressing the START/STOP key. Start rowing and adjust the heart rate level if necessary during the exercise.
-
You can interrupt the exercise by pressing START/STOP ("Over" is shown in the display). The program information stays in the console memory for five minutes. If you resume with training within this time, simply press the START/STOP key again to continue.
-
You can stop exercising by pressing RESET when the console is in the pause mode.
-
If you have set a goal value, the console gives a signal and the displayed value starts blinking after the goal has been reached. Reset the display by first pressing START/STOP and thereafter RESET.
EXERCISE PROFILES
-
After the console is switched on, press + or - key until the display shows a profile code (P1-P8) and the profile form. All profiles are so called standard power profiles: the faster you row, the faster you move forward in distance measured by the meter. All of the preprogrammed profiles are 20 minutes in duration.
-
Select the desired profile by the + / - keys. Press SET to switch to setting the exercise profile duration; with the + / - keys you can set the time in five minutes increments between 10 and 90 minutes.
-
Start exercising by pressing START/STOP. Start rowing. With the +/- keys, you can change the resistance level in the section of the profile you are performing at the moment. The + key increases the resistance; the - key decreases it.
-
You can interrupt the exercise by pressing START/STOP ("Over" is shown in the display). The program information
stays in the console memory for five minutes. If you resume with training within this time, simply press the START/STOP key again to continue.
- You can stop exercising by pressing RESET when the console is in the pause mode. If you complete the whole profile, the console gives a signal tune and the displayed value starts blinking after the goal has been reached. Reset the display by first pressing START/STOP and thereafter RESET.
RECOVERY - MEASURING THE RECOVERY PULSE Measure your recovery pulse rate at the end of the workout.
- To start the measuring of the recovery pulse rate, press RECOVERY. The display also shows the word "Recovery".
- The measuring starts automatically and takes two minutes.
- Upon completion of the measurement, the display shows the recovery rate as a percentage. The smaller the rate, the fitter you are. Please note that your results are in a relation to the pulse level in the beginning of the measurement, and that your results are personal and cannot directly be compared with any other person's results. In order to improve the reliability of recovery pulse measurement, always try to standardize the measurement situation as accurately as possible; start measuring at the same heart rate level as precisely as possible.
- To switch back to the main display by pressing RESET. The console will also automatically switch to the main display one minute after the completion of the measurement.
TRANSPORT AND STORAGE
Move the device according to the following instruction, because lifting the rower incorrectly may strain your back or cause other risk of accidents:
Stand behind the device and grip the rail with one hand and the seat with the other. Tilt the device so that is rests on the transportation wheels. Move the device by wheeling it on transportation wheels. Lower the device onto floor while holding on to the rail and the seat, all the time remaining behind the device.
Transport the equipment with caution over uneven surfaces, for example over a step. The equipment should never be transported upstairs using the wheels over the steps, instead it must be carried. We recommend that you use a protective base when transporting the equipment.
To prevent malfunctioning of the rower, store in a dry place with as little temperature variation as possible, protected from dust.
R3.1 rowing machine may be lifted to an upright space-saving storage position as follows:
-
Loosen the locking pin under the front frame, press the front frame downward slightly and pull the locking pin upward.
-
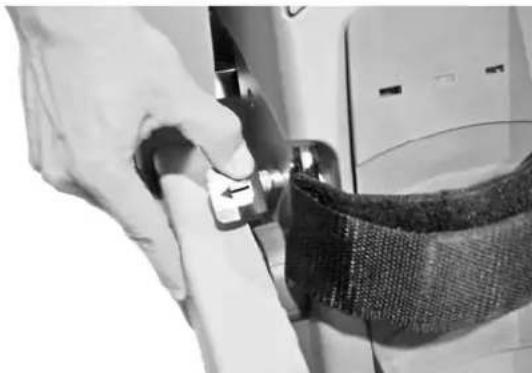
Open the latch on the left hand side by pressing the tab to the side. Lift the front frame up at the same time.
natural_image
Close-up of a hand adjusting a car seatbelt with a black strap (no visible text or symbols)- Lower the front frame carefully in between the rails. Ensure that the front frame is locked.
- Grasp the cross bar at the back of the rowing machine and lift the device to an upright position so that it is supported by the front end support legs.
Store the rowing machine in the storage position against a wall in such a way that the front frame cannot fall on anyone by accident.
natural_image
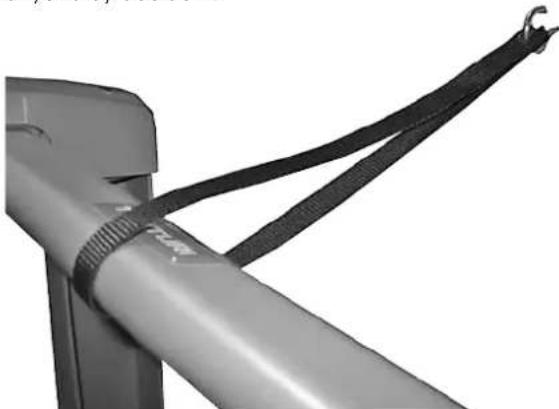
Close-up of a metallic mechanical component with black straps attached, no visible text or symbolsIMPORTANT! The device is shipped with a loop and a hook for securing the rowing machine properly in the storage position. Choose an appropriate storage site for your rowing machine next to a wall and attach the hook tightly to the wall at the right height. Lift the rowing machine to the storage position in front of the hook. Thread the loop provided with the rowing machine around the cross bar and attach the loop to the hook. Do not climb on the rowing machine when it is in storage position!
MAINTENANCE
- The Row 3.1 requires very little maintenance. Check, however, from time to time that all screws and nuts are tight.
- Clean the cycle with a damp cloth. Do not use solvents.
- Never remove the protective covers.
- Clean the inner surfaces of the rail if necessary so that the seat moves as smoothly and quietly as possible. If necessary, you may improve the seat movement by adding paraffin to the surface of the rails..
BATTERY REPLACEMENT
Meter batteries: A warning display reports when the batteries of the meter need to be replaced. Turn the meter carefully outward from the front frame so that you can remove the battery box cover on the back of the
meter. Open the battery box cover carefully from its lower edge. Be careful not to damage the wires. Replace the batteries (4 "C" batteries) in the battery box according to the markings. Replace the cover.
Pull-bar battery: If the pull-bar controls cease to respond completely, replace the battery (3V lithium cell CR2032). Open the cover of the battery box on the back of the pull bar by removing the attachment screw. Replace the battery; make sure you place it in the right direction inside the holder. Replace the cover.
MALFUNCTIONS
Despite continuous quality control, defects and malfunctions caused by individual components may occur in the equipment. In most cases it's unnecessary to take the whole device in for repair, as it's usually sufficient to replace the defective part.
If the equipment does not function properly during use, contact your Tunturi dealer immediately. Always give the model and serial number of your equipment. Please state also the nature of the problem, conditions of use and purchase date.
If you require spare parts, always give the model, serial number of your equipment and the spare part number for the part you need. The spare part list is at the back of this manual. Use only spare parts mentioned in the spare part list.
TECHNICAL SPECIFICATIONS
| Length | 200 | cm | |
| Width | 48 cm | ||
| Height | 56 cm | ||
| Weight | 46 kg |
The meets the requirements of the EU's EMC Directives on electromagnetic compatibility (89/336/EEC). This product therefore carries the CE label.
The Row 3.1 meets EN precision and safety standards (EN-957).
Due to our continuous policy of product development, Tunturi reserves the right to change specifications without notice.
NOTE! The instructions must be followed carefully in the assembly, use and maintenance of your equipment. The warranty does not cover damage due to negligence of the assembly, adjustment and maintenance instructions described herein. Changes or modifications not expressly approved by Tunturi will void the user's authority to operate the equipment!
WE WISH YOU MANY ENJOYABLE TRAININGS WITH YOUR NEW TUNTURI TRAINING PARTNER!
DEUTSCH
CONTENTS
natural_image
Close-up of hands adjusting a medical or robotic device with a clip (no visible text or symbols)natural_image
Three-panel sequence showing a person performing rowing exercise on a machine, no text or symbols visiblenatural_image
Person using a rowing machine on a white background (no text or symbols visible)
natural_image
Person performing a rowing exercise on a machine (no visible text or symbols)natural_image
Person performing a row exercise on a stationary platform (no text or symbols visible)
natural_image
Person performing a resistance exercise on a reformer machine (no text or symbols visible)natural_image
Person performing a Pilates exercise on a reformer machine (no text or symbols visible)
natural_image
Person performing a fitness exercise using a Pilates reformer machine (no text or symbols visible)natural_image
Side profile of a person standing next to a rowing machine (no text or symbols visible)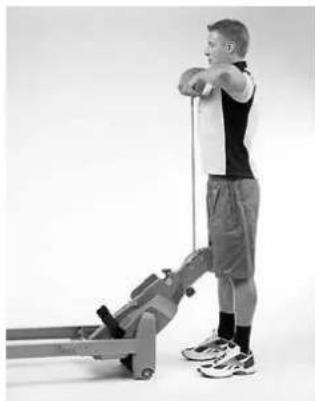
natural_image
Person using a rowing machine for fitness or exercise (no visible text or symbols)natural_image
Close-up of a hand adjusting a small mechanical component with a belt buckle (no visible text or symbols)natural_image
Close-up of a metallic cylindrical object with black straps attached, no visible text or symbolsnatural_image
Close-up of a hand adjusting a wrist brace device (no text or symbols visible)natural_image
Person performing a rowing exercise on a metal platform (no text or symbols visible)
natural_image
Person performing a rowing exercise on a stationary platform (no text or symbols visible)
natural_image
Person performing a rowing machine on a metal platform (no visible text or symbols)natural_image
Person performing a rowing exercise on a Pilates reformer machine (no text or symbols visible)
natural_image
Person performing a rowing exercise on a machine (no visible text or symbols)natural_image
Person performing a row exercise on a stationary platform (no text or symbols visible)
natural_image
Person performing a resistance exercise using a Pilates reformer machine (no text or symbols visible)natural_image
Person performing a resistance exercise using a Pilates reformer machine (no text or symbols visible)
natural_image
Person performing a fitness exercise using a Pilates reformer machine (no text or symbols visible)natural_image
Side profile of a person standing next to a rowing machine, no visible text or symbols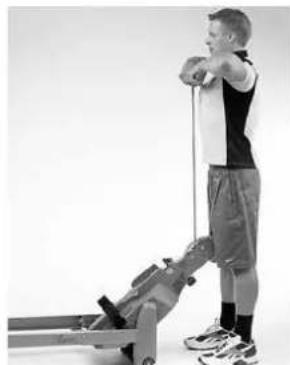
natural_image
Person performing a row exercise using a resistance bar (no text or symbols visible)natural_image
Close-up of a hand adjusting a small mechanical component with a belt buckle (no visible text or symbols)natural_image
Close-up of a metallic mechanical component with black straps and a curved connector (no visible text or symbols)MAINTENANCE
natural_image
Close-up of hands adjusting a medical or robotic device with a clip (no visible text or symbols)natural_image
Person performing a rowing exercise on a machine (no visible text or symbols)
natural_image
Person performing a rowing exercise on a stationary platform (no text or symbols visible)
natural_image
Person performing a rowing machine on a stationary platform (no text or symbols visible)natural_image
Person using a rowing machine on a white background (no text or symbols visible)
natural_image
Person performing a rowing exercise on a machine (no visible text or symbols)natural_image
Person performing a rowing exercise on a machine (no text or symbols visible)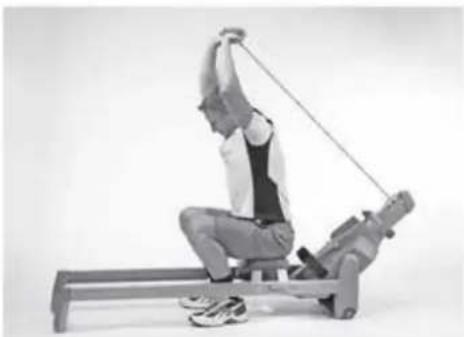
natural_image
Person performing a resistance exercise on a stationary bar machine (no text or symbols visible)natural_image
Person performing a Pilates exercise on a reformer machine (no text or symbols visible)
natural_image
Person performing a fitness exercise using a Pilates reformer machine (no text or symbols visible)natural_image
Side profile of a person standing next to a stationary exercise machine (no text or symbols visible)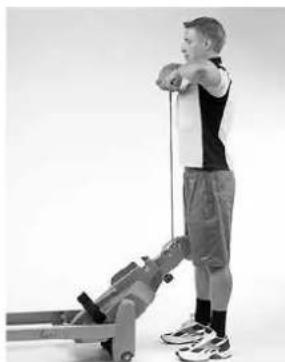
natural_image
Person performing a resistance band exercise using a leg presser machine (no text or symbols visible)OPSLAG EN VERPLAATSEN
natural_image
Close-up of a hand adjusting a small mechanical component with a belt buckle (no visible text or symbols)natural_image
Close-up of a metallic mechanical component with black straps attached (no visible text or symbols)ONDERHOUD
natural_image
Close-up of a hand adjusting a medical or robotic device with a black and gray component (no visible text or symbols)natural_image
Person performing a rowing exercise on a machine (no visible text or symbols)
natural_image
Person performing a rowing exercise on a machine (no visible text or symbols)
natural_image
Person performing a rowing exercise on a Pilates reformer machine (no visible text or symbols)natural_image
Person performing a rowing exercise on a Pilates reformer machine (no text or symbols visible)
natural_image
Person performing a rowing exercise on a machine (no visible text or symbols)natural_image
Person performing a rowing exercise on a machine, no visible text or symbols
natural_image
Person performing a resistance exercise on a stationary platform (no text or symbols visible)natural_image
Person performing a Pilates exercise on a reformer machine (no text or symbols visible)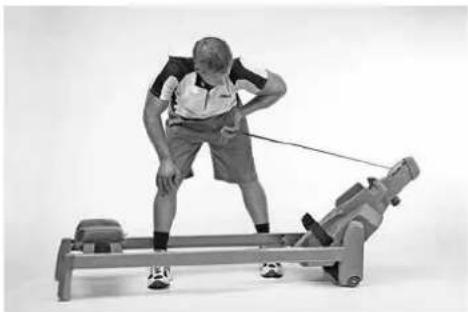
natural_image
Person performing a fitness exercise using a rowing machine (no visible text or symbols)natural_image
Side profile of a person standing beside a stationary exercise machine (no text or symbols visible)
natural_image
Person performing a resistance band exercise using a rowing machine (no text or symbols visible)natural_image
Close-up of a hand adjusting a small metallic component with a belt buckle (no visible text or symbols)natural_image
Close-up of a metallic mechanical component with black straps attached, no visible text or symbolsMANUTENZIONE
natural_image
Close-up of hands adjusting a medical or robotic device with a clip (no visible text or symbols)natural_image
Person using a rowing machine on a metal platform (no visible text or symbols)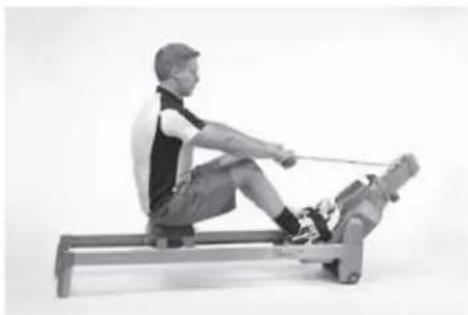
natural_image
Person performing a rowing exercise on a machine (no text or symbols visible)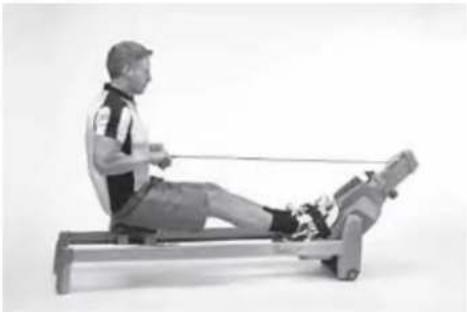
natural_image
Person performing a rowing machine on a reformer machine (no visible text or symbols)natural_image
Person performing a rowing exercise on a Pilates reformer machine (no visible text or symbols)
natural_image
Person performing a rowing exercise on a machine (no visible text or symbols)natural_image
Person performing a row exercise on a stationary platform (no text or symbols visible)
natural_image
Person performing a resistance exercise on a stationary platform (no text or symbols visible)natural_image
Person performing a Pilates exercise on a reformer machine (no text or symbols visible)
natural_image
Person performing a Pilates exercise on a reformer machine (no text or symbols visible)natural_image
Side profile of a person standing beside a stationary exercise machine (no text or symbols visible)
natural_image
Person using a rowing machine on a plain background (no text or symbols visible)natural_image
Close-up of a hand adjusting a car seatbelt with a black strap (no visible text or symbols)TRANSPORT OCH FÖRVARING 54
UNDERHÅLL
TEKNISKA
DATA
VÄLKOMMEN TILL TUNTURIS TRÄNINGSVÄRLD!
natural_image
Close-up of hands adjusting a medical or robotic device with a metallic clip (no visible text or symbols)natural_image
Three-panel sequence showing a person performing rowing exercise on a machine, no text or symbols visiblenatural_image
Person performing a rowing exercise on a stationary platform (no text or symbols visible)
natural_image
Person performing a rowing exercise on a machine (no visible text or symbols)natural_image
Two-panel black-and-white photo showing a person performing a row exercise using a Pilates reformer machine (no text or symbols visible)natural_image
Person performing a resistance exercise on a Pilates reformer machine (no text or symbols visible)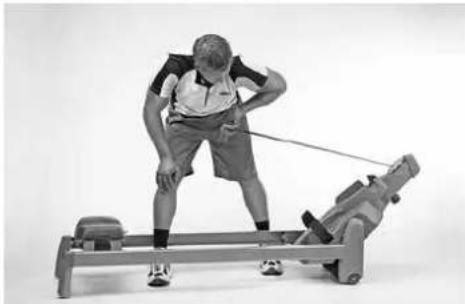
natural_image
Person performing a Pilates exercise on a reformer machine (no text or symbols visible)natural_image
Two black-and-white photos showing a person performing a row exercise using a leg presser machine, with no visible text or symbols.TRANSPORT OCH FÖRVARING
natural_image
Close-up of a hand adjusting a zipper on a device (no visible text or symbols)natural_image
Close-up of a metallic cylindrical device with black straps attached, no visible text or symbolsUNDERHÅLL
natural_image
Close-up of a hand adjusting a black and gray robotic arm (no text or symbols visible)natural_image
Person performing a rowing exercise on a metal platform (no text or symbols visible)
natural_image
Person performing a rowing exercise on a machine (no visible text or symbols)
natural_image
Person performing a rowing exercise on a Pilates reformer machine (no visible text or symbols)natural_image
Person using a rowing machine on a white background (no text or symbols visible)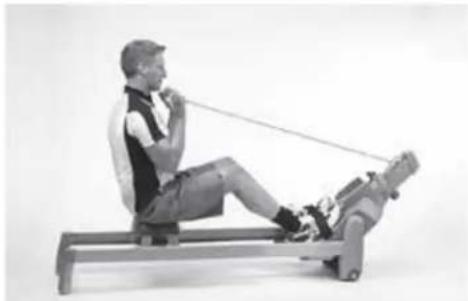
natural_image
Person performing a rowing exercise on a machine (no visible text or symbols)natural_image
Person performing a rowing exercise on a stationary platform (no text or symbols visible)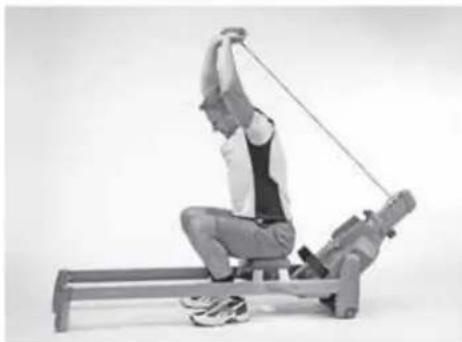
natural_image
Person performing a resistance exercise on a stationary platform (no text or symbols visible)natural_image
Person performing a Pilates exercise on a reformer machine (no text or symbols visible)
natural_image
Person performing a fitness exercise using a rowing machine (no text or symbols visible)natural_image
Person standing beside a stationary exercise machine (no text or symbols visible)
natural_image
Side profile of a person performing a resistance band exercise using a stationary weight machine (no text or symbols visible)natural_image
Close-up of a hand adjusting a small mechanical component with a belt buckle (no visible text or symbols)natural_image
Close-up of a metallic cylindrical object with black straps attached, no visible text or symbolsHUOLTO
PARTS LIST
| 1 User interface 12 Membrane 13 Monitor holder 1- KA 35x12 WN-1411 Screw 14 Foot rest cover 1- M5x14 DIN 7500 Screw 25 Foot rest 26 Plug 2- M5x12 DIN 7985 Screw 27 Knob 19 Sleeve 2- M10x65 DIN 912 Hex socket cap screw 2- M10 DIN 125 Washer 2- M10 DIN 934 Nut 210 Locking lever 1- M5x14 DIN 7500 Screw 211 Frame 112 Pulley 213 Sleeve 214 608 Z Bearing 4- M8x20 ISO 7380 Hex socket cap screw 415 Pulley cover 1- M5x12 DIN 7985 Screw 1- M6x16 DIN 912 Hex socket cap screw 116 Rope 117 Draw bar 118 Handle grip 222 Foot strap bracket 1- M6x35 DIN 912 Hex socket cap screw 223 Foot strap 124 Seat roller frame 125 Sleeve 426 Wheel 4- M8x35 ISO 7380 Hex. socket cap screw 427 Seat 1- M6 DIN 125 Washer 4- M6x14 ISO 7380 Hex socket cap screw 428 Main frame 129 Frame cover, RH 1- Frame cover, LH 1- KA 35x12 WN 1411 Screw 830 Wheel 231 Retainer 232 Rear bracket, LH 1- Rear bracket, RH 1- M5x14 DIN 7500 Screw 633 Rear support cover 2- M5x12 DIN 7985 Screw 434 Foot plug 8- M5x16 DIN 7500 M Countersunk head screw 835 Case cover 1- M5x12 DIN 7985 Screw 4- KA 35x12 WN-1411 Screw 436 Frame under plate 1- M5x12 DIN 966 Countersunk head screw 437 Under plate 1- M5x12 DIN 7985 Screw 238 Brake slacker 1- Lock screw 1- Nylock nut 139 Spring 140 Spring 141 Adjustment wheel 1 | 43 Spring case (incl. 44 - 48) 144 6003 ZZ Bearing 145 Spring hub 146 Spring 147 Damper 148 Spring case cover 1- KA 35x12 WN-1411 Screw 2- M5x30 DIN 912 Hex socket cap screw 649 Axle 150 Flywheel (incl. 51, 52) 151 Magnet 152 6003 ZZ - C3 Bearing 1- 15 DIN 471 Retainer 153 Belt wheel 2- 3x30 DIN 7 Cotter-pin 154 Bearing house 1- M6x12 DIN 603 Lock screw 2- M6 DIN 985 Nylock nut 255 Sensor bracket 156 Speed sensor 1- 3,5x13 DIN 7504-K Screw 257 Spline 158 Label set 159 Servo motor 1- Countersunk head screw 2- Nylon nut 160 Locking lever 161 Knob 162 Spring 163 Bumper 265 DC-Wire 166 Remote control card 167 Remote control cover (incl. 68) 1- KB 22x7WN-1412 Screw 1- KB 30x8 WN-1412 Screw 568 Membrane + 168 Membrane - 169 Bumper 170 Transformer 1- Heart rate belt 1- Owner's manual 1- Warranty booklet 171 Build-in reciever 172 Wire 1 |
TUNTURI®
TUNTURI NEW FITNESS B.V.
P.O. BOX 60001
1320 AA
THE NETHERLANDS
www.tunturi.com
www.tunturi.com
Version 20141001

- ENGLISH
- CONTENTS
- IMPORTANT SAFETY INSTRUCTIONS
- NOTE ABOUT YOUR HEALTH
- NOTE ABOUT THE EXERCISE ENVIRONMENT
- ASSEMBLY
- CONSOLE
- TRANSFORMER
- EXERCISING
- USE
- ADJUSTING RESISTANCE
- TELEMETRIC HEART RATE MEASUREMENT
- KEYS
- SET
- RESET.
- RECOVERY
- START/STOP
- PULL-BAR BUTTONS
- DISPLAY
- Exercise duration
- Heart rate during exercise
- Exercise trip length (km/mile)
- - 99.99 km / miles
- Energy consumption
- Clock (Clock)
- Real time clock
- TARGET HR -EXERCISE
- (CONSTANT HEART RATE)
- EXERCISE PROFILES
- TRANSPORT AND STORAGE
- MAINTENANCE
- BATTERY REPLACEMENT
- MALFUNCTIONS
- TECHNICAL SPECIFICATIONS
- DEUTSCH
- OPSLAG EN VERPLAATSEN
- ONDERHOUD
- MANUTENZIONE
- VÄLKOMMEN TILL TUNTURIS TRÄNINGSVÄRLD!
- TRANSPORT OCH FÖRVARING
- UNDERHÅLL
- HUOLTO
- TUNTURI®
Brand : TUNTURI
Model : Row 3.1
Category : Rowing Machine