
TC-JS 80 - Saw EINHELL - Free user manual and instructions
Find the device manual for free TC-JS 80 EINHELL in PDF.


| Product type | Jigsaw |
| Brand | Einhell |
| Model | TC-JS 80 |
| Power supply | 220-240 V ~ 50/60 Hz |
| Rated power input | 800 W |
| No-load stroke rate | 800 - 3000 min⁻¹ (variable) |
| Stroke length | 20 mm |
| Max. cutting depth in wood | 80 mm |
| Max. cutting depth in steel | 10 mm |
| Bevel cut | Yes, adjustable from 0° to 45° |
| Blade change | Tool-free |
| Splinter guard | Yes |
| Adjustable chip blower | Yes |
| Dimensions (L x W x H) | approx. 240 x 80 x 200 mm |
| Weight | approx. 2.5 kg |
| Power cable length | 2.5 m |
| Protection class | II |
| Sound pressure level LpA | 85 dB(A) |
| Sound power level LwA | 96 dB(A) |
| Vibration (cutting wood) | 6.5 m/s² |
| Supplied accessories | 3 saw blades, hex key, parallel guide, dust extraction adapter |
| Maintenance and cleaning | Clean ventilation slots with a brush; wipe the housing with a damp cloth; do not use harsh chemicals |
| Safety | On/off switch with lock; anti-kickback stop; protection against accidental restart |
| Spare parts and repairability | Spare parts available on Einhell website; repair by authorized service |
| General information | Electrical appliance complies with CE standards; do not dispose of in household waste |
Frequently Asked Questions - TC-JS 80 EINHELL
User questions about TC-JS 80 EINHELL
0 question about this device. Answer the ones you know or ask your own.
Ask a new question about this device
Download the instructions for your Saw in PDF format for free! Find your manual TC-JS 80 - EINHELL and take your electronic device back in hand. On this page are published all the documents necessary for the use of your device. TC-JS 80 by EINHELL.
USER MANUAL TC-JS 80 EINHELL
GB Original operating instructions Jigsaw
-2-



natural_image
Close-up of a sewing machine needle stitching a wooden surface, with no visible text or symbols
natural_image
Close-up of a sewing machine needle stitching metal components on a wooden base (no visible text or symbols)10

D
Gefahr!
When using the equipment, a few safety precautions must be observed to avoid injuries and damage. Please read the complete operating instructions and safety regulations with due care. Keep this manual in a safe place, so that the information is available at all times. If you give the equipment to any other person, hand over these operating instructions and safety regulations as well. We cannot accept any liability for damage or accidents which arise due to a failure to follow these instructions and the safety instructions.
Explanation of the symbols used (see Fig. 10)
- Danger! – Read the operating instructions to reduce the risk of injury.
- Caution! Wear ear-muffs. The impact of noise can cause damage to hearing.
- Caution! Wear a breathing mask. Dust which is injurious to health can be generated when working on wood and other materials. Never use the device to work on any materials containing asbestos!
- Caution! Wear safety goggles. Sparks generated during working or splinters, chips and dust emitted by the device can cause loss of sight.
1. Safety regulations
The corresponding safety information can be found in the enclosed booklet.
Warning!
Read all the safety information, instructions, illustrations and technical data provided on or with this power tool. Failure to adhere to the following instructions may result in electric shock, fi re and/or serious injury.
Keep all the safety information and instructions in a safe place for future use.
2. Layout and items supplied
2.1 Layout (Fig. 1/2)
- Knurled screw for speed control
- Locking button
- ON/OFF switch
- Hexagon key
- Power cable
- Adapter for dust extraction system
- Adjustable soleplate
- Selector switch for pendulum action
9. Dial scale for soleplate
- Guide roller
- Screw for soleplate
- Saw blade (it is not included in delivery)
- Safety guard
- Blade holder
2.2 Items supplied
Please check that the article is complete as specified in the scope of delivery. If parts are missing, please contact our service center or the sales outlet where you made your purchase at the latest within 5 working days after purchasing the product and upon presentation of a valid bill of purchase. Also, refer to the warranty table in the service information at the end of the operating instructions.
- Open the packaging and take out the equipment with care.
- Remove the packaging material and any packaging and/or transportation braces (if available).
- Check to see if all items are supplied.
- Inspect the equipment and accessories for transport damage.
- If possible, please keep the packaging until the end of the guarantee period.
Danger!
The equipment and packaging material are not toys. Do not let children play with plastic bags, foils or small parts. There is a danger of swallowing or suffocating!
• Electronicjigsaw
- Hexagon key
• Adapter for dust extraction system
• Original operating instructions
- Safetyinstructions
3. Proper use
The jigsaw is designed for sawing wood, iron, non-ferrous metals and plastics using the appropriate saw blades.
The equipment is to be used only for its prescribed purpose. Any other use is deemed to be a case of misuse. The user / operator and not the manufacturer will be liable for any damage or injuries of any kind caused as a result of this.
GB
Please note that our equipment has not been designed for use in commercial, trade or industrial applications. Our warranty will be voided if the machine is used in commercial, trade or industrial businesses or for equivalent purposes.
4. Technical data
Mains voltage: 220-240 V \~ 50 Hz Power input: 550 W Stroke speed: max. 3000 min ^1 Stroke height: 20 mm Saw blade width 0.8-1.7 mm Cutting depth, wood: 80 mm Cutting depth, plastic: 20 mm Cutting depth, iron: 10 mm Miter cut: up to 45° (left and right) Protection class: II Weight: 2.1 kg
Danger!
Sound and vibration
Sound and vibration values were measured in accordance with EN 62841.
L_pA sound pressure level ..... 88.6 dB(A) K_pA uncertainty ..... 5 dB L_WA sound power level ..... 99.6 dB(A) K_WA uncertainty ..... 5 dB
Wear ear-muff s.
The impact of noise can cause damage to hearing.
Total vibration values (vector sum of three directions) determined in accordance with EN 62841.
Sawing wood
Vibration emission value a_h=6.1 m/s^2 K uncertainty = 1.5 m/s ^2
Sawing metal
Vibration emission value a_h=6.7 m/s^2 K uncertainty = 1.5 m/s ^2
The stated vibration emission levels and stated noise emission values were measured in accordance with a set of standardized criteria and can be used to compare one power tool with another.
The stated vibration emission levels and stated noise emission values can also be used to make an initial assessment of exposure.
Warning:
The vibration and noise emission levels may vary from the level specified during actual use, depending on the way in which the power tool is used, especially the type of workpiece it is used for.
Keep the noise emissions and vibrations to a minimum.
- Only use appliances which are in perfect working order.
• Service and clean the appliance regularly.
• Adapt your working style to suit the appliance.
• Do not overload the appliance. - Have the appliance serviced whenever necessary.
• Switch the appliance off when it is not in use.
• Wear protective gloves.
Caution!
Residual risks
Even if you use this electric power tool in accordance with instructions, certain residual risks cannot be rules out. The following hazards may arise in connection with the equipment's construction and layout:
- Lung damage if no suitable protective dust mask is used.
- Damage to hearing if no suitable ear protection is used.
- Health damage caused by hand-arm vibrations if the equipment is used over a prolonged period or is not properly guided and maintained.
5. Before starting the equipment
Before you connect the equipment to the mains supply make sure that the data on the rating plate are identical to the mains data.
Warning!
Always pull the power plug before making adjustments to the equipment.
5.1 Safety guard (Fig. 1/Item 13)
- The safety guard (13) protects the user from accidentally touching the saw blade (12) and nevertheless enables you a free view of the cutting area.
GB
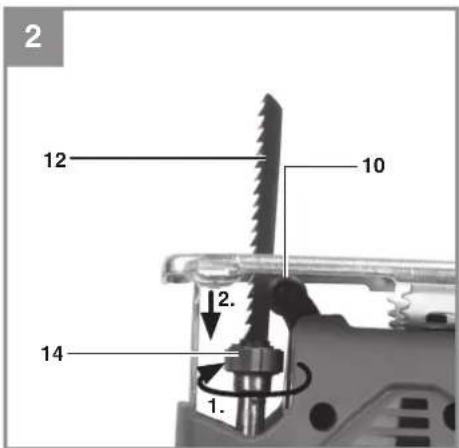
5.2 Changing the saw blade (Fig. 2/Item 12) Danger!
- Pull the mains plug before you fit or replace a saw blade.
- Set the selector switch for pendulum action (8) to position 3. The teeth of the saw blade are very sharp!
- Press the blade holder (14) and insert the saw blade (12) into the blade holder (14) as far as the stop (Fig. 2). The teeth on the saw blade must be pointing forwards.
- Allow the blade holder (14) to slide back to starting position.
- The saw blade (12) must sit in the guide roller (10). Check that the saw blade (12) is securely mounted in the blade holder.
- Follow the instructions above in reverse order to remove the saw blade.
Warning! Hold the saw blade securely while releasing it because otherwise it may jump out of the blade holder.
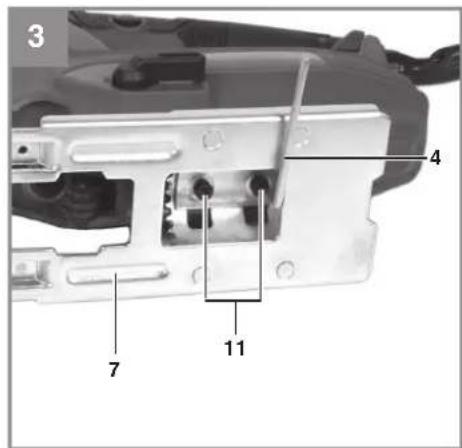
5.3 Setting the soleplate for miter cuts (Figs. 3-4)
- Use the hexagon key (4) to loosen the screws for the soleplate (11) on the bottom of the adjustable soleplate (7) (Figure 3).
- Pull the sole plate (7) backwards slightly. The soleplate can now be swiveled a maximum 45^ to the left and right.
- If the soleplate (7) is pushed back to the front again it will only function in the locking positions at 0°, 15°, 30° and 45°, which are marked on the graduated scale for the soleplate (9) (Figure 4). Move the soleplate into the required position and refasten the screw securing the soleplate (11).
- However, the soleplate (7) is also easily set to another angle. To do so, move the soleplate (7) to the rear, set the desired angle and re-fasten the screw securing the soleplate (11).
5.4 Adapter for dust extraction system (Figure 5/Item 6)
- Connect your jigsaw to a vacuum cleaner using the adaptor for dust extraction (6). This will provide excellent dust extraction on the workpiece. The benefits are that you will protect both the equipment and your own health. Your work area will also be cleaner and safer.
- Dust created when working may be dangerous. Refer to the section entitled "Safety instructions".
- Attach the adaptor (6) as shown in Figure 5,
so that it is securely seated in the housing.
- Fit the vacuum tube of the vacuum cleaner onto the adaptor opening (6). Check that the connections are airtight.
6. Operation
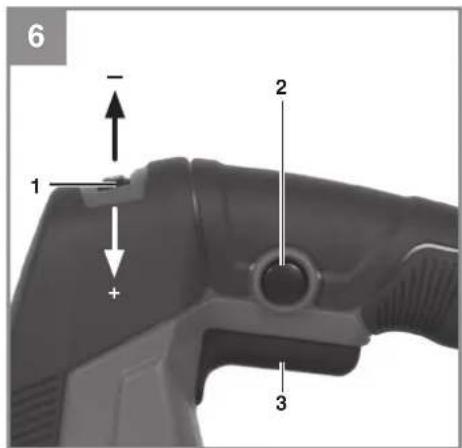
6.1 ON/OFF switch (Fig. 6/Item 3)
To switch on:
Press the ON/OFF switch
To switch off :
Release the ON/OFF switch
6.2 Locking button (Fig. 6/Item 2)
You can lock the ON/OFF switch (3) using the locking button (2) when the equipment is in operation. To switch off the equipment briefly hold down the ON/OFF switch (3).
6.3 Electric speed selector (Fig. 6/Item 1)
You can pre-select the required speed with the speed selector. Turn the speed selector in PLUS director to increase the speed and turn the speed selector in MINUS direction to reduce the speed. The suitable stroke speed is dependent on the relevant material and working conditions.
General rules for cutting speeds for metal cutting work must be complied with here as well.
You can generally use a higher speed with fi ne saw blades whilst coarser saw blades require lower speeds.
Position 1-2 = low stroke speed (for steel)
Position 3-4 = medium stroke speed (for steel, soft metal, plastic)
Position 5-6 = high stroke speed (for softwood, hardwood, soft metal, plastic)
6.4 Setting the pendulum action (Fig. 7/Item 8)
- The strength of the pendulum action of the saw blade (12) can be adjusted using the selector switch for pendulum action (8).
- You can adjust the cutting speed, the cutting performance and the finish to the workpiece you wish to saw.
Set the selector switch for pendulum action (8) to one of the following positions:
GB
Position 0: No pendulum action
Material: Rubber, ceramic, aluminium, steel
Please note: For fine and clean cuts, thin materials (e.g. sheet steel) and hard materials.
Position 1: Small pendulum action
Material: Plastic, wood, aluminium
Please note: For hard materials
Position 2: Medium pendulum action
Material: Wood
Position 3: Large pendulum action
Material: Wood
Please note: For soft materials and sawing along the grain
The best combination of speed and pendulum action depends on the material you wish to saw.
We recommend you to make a trial cut on a waste piece in order to check the ideal settings.
6.5 Making cuts
Important!
For exact, straight and long cuts, we recommend using a saw blade with a thickness of at least 1.5 mm.
- Ensure that the ON/OFF switch (3) is not depressed. Only then should you connect the mains plug to a suitable socket.
- Do not switch on the jigsaw until you have fitted a saw blade.
- Use only saw blades that are in perfect condition. Replace blunt, bent or cracked saw blades immediately.
- Place the saw foot flat on the workpiece you wish to saw. Switch on the jigsaw.
- Allow the saw blade to accelerate until it reaches full speed. Then slowly move the saw blade along the cutting line. Only exert gentle pressure on the saw blade as you do so.
- When cutting metal, apply a suitable coolant along the line you wish to cut.
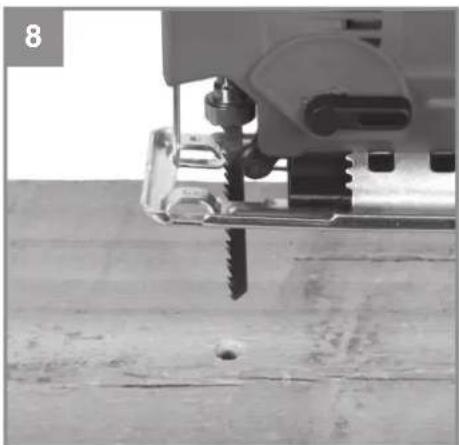
6.6 Sawing out sections (Fig. 8)
Drill a 10 mm hole in the section you wish to saw out. Insert the saw blade into this hole and start to saw out the required section.
6.7 Making miter cuts
- Set the angle on the soleplate (see section 5.3).
- Observe the instructions in section 6.5.
• Cut as shown in Figure 9.
7. Replacing the power cable
Danger!
If the power cable for this equipment is damaged, it must be replaced by the manufacturer or its after-sales service or similarly trained personnel to avoid danger.
8. Cleaning, maintenance and ordering of spare parts
Danger!
Always pull out the mains power plug before starting any cleaning work.
8.1 Cleaning
- Keep all safety devices, air vents and the motor housing free of dirt and dust as far as possible. Wipe the equipment with a clean cloth or blow it with compressed air at low pressure.
• We recommend that you clean the device immediately each time you have finished using it. - Clean the equipment regularly with a moist cloth and some soft soap. Do not use cleaning agents or solvents; these could attack the plastic parts of the equipment. Ensure that no water can seep into the device. The ingress of water into an electric tool increases the risk of an electric shock.
8.2 Carbon brushes
In case of excessive sparking, have the carbon brushes checked only by a qualified electrician.
Danger! The carbon brushes should not be replaced by anyone but a qualified electrician.
8.3 Maintenance
There are no parts inside the equipment which require additional maintenance.
8.4 Ordering replacement parts:
Please quote the following data when ordering replacement parts:
• Type of machine
• Article number of the machine
• Identification number of the machine
• Replacement part number of the part required
For our latest prices and information please go to www.Einhell-Service.com
GB
9. Disposal and recycling
The equipment is supplied in packaging to prevent it from being damaged in transit. The raw materials in this packaging can be reused or recycled. The equipment and its accessories are made of various types of material, such as metal and plastic. Never place defective equipment in your household refuse. The equipment should be taken to a suitable collection center for proper disposal. If you do not know the whereabouts of such a collection point, you should ask in your local council offices.
10. Storage
Store the equipment and accessories in a dark and dry place at above freezing temperature. The ideal storage temperature is between 5 and 30°C. Store the electric tool in its original packaging.
GB

For EU countries only
Never place any electric power tools in your household refuse.
To comply with European Directive 2012/19/EC concerning old electric and electronic equipment and its implementation in national laws, old electric power tools have to be separated from other waste and disposed of in an environment-friendly fashion, e.g. by taking to a recycling depot.
Recycling alternative to the return request:
As an alternative to returning the equipment to the manufacturer, the owner of the electrical equipment must make sure that the equipment is properly disposed of if he no longer wants to keep the equipment. The old equipment can be returned to a suitable collection point that will dispose of the equipment in accordance with the national recycling and waste disposal regulations. This does not apply to any accessories or aids without electrical components supplied with the old equipment.
Please note that batteries and lamps (e.g. light bulbs) must be removed from the tool before it is disposed of.
The reprinting or reproduction by any other means, in whole or in part, of documentation and papers accompanying products is permitted only with the express consent of the Einhell Germany AG.
Subject to technical changes
GB
Service information
We have competent service partners in all countries named on the guarantee certificate whose contact details can also be found on the guarantee certificate. These partners will help you with all service requests such as repairs, spare and wearing part orders or the purchase of consumables.
Please note that the following parts of this product are subject to normal or natural wear and that the following parts are therefore also required for use as consumables.
| Category Example | |
| Wear parts* Carbon brushes, Guide roller, Splinter | guard |
| Consumables* Saw blade | |
| Missing parts |
* Not necessarily included in the scope of delivery!
In the effect of defects or faults, please register the problem on the internet at www.Einhell-Service.com. Please ensure that you provide a precise description of the problem and answer the following questions in all cases:
• Did the equipment work at all or was it defective from the beginning?
• Did you notice anything (symptom or defect) prior to the failure?
• What malfunction does the equipment have in your opinion (main symptom)?
Describe this malfunction.
GB
Warranty certifi cate
Dear Customer,
All of our products undergo strict quality checks to ensure that they reach you in perfect condition. In the unlikely event that this equipment develops a fault, please contact our service department at the address shown on this guarantee card. You can also contact us by telephone using the service number shown. Please note the following terms under which guarantee claims can be made:
-
These guarantee terms apply solely to consumers, i.e. natural persons, who do not want to use this product in connection with either their commercial or other self-employed activities. These guarantee terms regulate additional guarantee services which the undermentioned manufacturer promises to buyers of its new products in addition to their statutory rights of guarantee. Your statutory rights of guarantee are not affected by this guarantee. Our guarantee is free of charge to you.
-
The guarantee services cover only defects due to material or manufacturing faults on the new product which you have bought in the European Union from the undermentioned manufacturer and are limited to either the rectification of said defects or the replacement of the product, whichever we prefer. Please note that only equipment under the brand name "Professional" has been designed for use in commercial, trade or professional applications. For all other products the guarantee is invalidated if the equipment is used within the guarantee period in commercial, trade or industrial applications or for other equivalent activities.
-
Our guarantee does not cover:
-
Damage to the equipment caused by failure to comply with the installation/assembly instructions or by unprofessional installation; damage caused by failure to comply with the operating instructions (e.g. connection to the wrong mains voltage or current type); damage caused by failure to comply with the maintenance and safety regulations; damage caused by exposing the equipment to abnormal environmental conditions; damage resulting from poor care and maintenance.
- Damage to the equipment caused by misuse or incorrect applications (e.g. overloading the equipment or using non-approved attachments or accessories); damage caused by foreign bodies (e.g. sand, stones, dust, ....) getting inside the equipment. Damage in transit; damage caused by force or external influences (e.g. by dropping the equipment).
-
Damage to the equipment or parts of the equipment which is owed to use-related, normal or otherwise natural wear. For example, batteries and battery packs are manufactured with a cycle limit for design-related reasons. Wear is negatively influenced in particular by load demands and charging speeds as well as exposure to heat, cold, vibration and impact.
-
The guarantee is valid for a period of 2 years starting from the purchase date of the equipment. Guarantee claims must be submitted before the end of the guarantee period and within two weeks of the defect being noticed. No guarantee claims will be accepted after the end of the guarantee period. The original guarantee period remains applicable to the equipment even if repairs are carried out or parts are replaced. In such cases, the work performed or parts fitted will not result in an extension of the guarantee period, and no new guarantee will become active for the work performed or for any replacement parts fitted. This also applies if on-site service is used.
-
To assert your guarantee claim, register the defective equipment at: www.Einhell-Service.com. You will need to provide proof of purchase of the new item of equipment. Equipment returned without such proof or without a rating plate are excluded from the guarantee services because of the lack of traceability. If the defect is covered by our guarantee, then either the item in question will be repaired immediately and returned to you or we will send you a new replacement.
-
If you have taken the equipment with you to a different EU country than where you bought it, we will arrange for a local service partner to provide the guarantee services. If you take the equipment outside the EU, the guarantee will not apply.
Of course, we are also happy to offer a chargeable repair service for any defects which are not covered or no longer covered by the scope of this guarantee. To take advantage of this service, please send the equipment to our service address. We draw attention to the restrictions of this guarantee concerning wear parts, consumables and missing parts as presented in the service information included in this operating manual.
Warrantor/ Service:
Einhell UK Ltd, Unit 10, 1st Floor, Champion's Business Park, Arrowe Brook Road, Upton, Wirral, CH49 0UQ
F
Danger!
Stand 1 = klein wipeff ect
Negotovost K_pA .....5 dB
Negotovost K_WA 5 dB
X 2006/42/EC
Annex IV
Notified Body:
Reg. No.:
□2000/14/EC_2005/88/EC
Annex V
Annex VI
Noise: measured L_WA = dB(A) ; guaranteed L_VA = dB(A)
P = kW; L/∅ = cm
Notified Body:
□2012/46/EU_(EU)2016/1628
Emission No.
Standard references: EN 62841-1; EN 62841-2-11; EN IEC 55014-1; EN IEC 55014-2; EN 61000-3-2; EN 61000-3-3
Subject to change without notice
Archive-File/Record: NAPR030434
Documents registrar: Riedel Georg
Wiesenweg 22, D-94405 Landau/Isar
* GB Jigsen - F Sosa a guichal - Soghetto alternativo. - OK/N Stikaw - S Stikesag - CZ PImofozra pla - SK Priamofozra pla - NI Docupaerzaag - E Sterre de veirón - FIN Pistoseha - SLO Vizodna taga - H Surofirdan - RO Fandara pendular vertical - GR Izdy - P Serra tics-lica - HRHIB Ubsina pla - RS Ubsina testera - PL Wyutynaria - TR Dokupaj Testera - RUS Eletrimicačník lodiční - EE Tikasag - LV Figurazová - LT Stiuparpičis - BG Prodvedon tripn - UKR Elektronodačník - MK Yobuda nika - NO Stikesag - IS Ralmags stingsteg

Declaration of conformity
We, Einhell UK Ltd
Champions Business Park, First Floor Unit 10, Arrowe Brook Rd, Upton, Wirral CH49 0AB, United Kingdom
declare the conformity to UK standards and legislation was assessed for:
Jig Saw TC-JS 80/1 (Einhell)
UK legislation
□ Simple Pressure Vessels (Safety) Regulation
□ Electrical Equipment (Safety) Regulation
□ Radio Equipment Regulation
□ Personal Protective Equipment Regulation
□ The Ecodesign for Energy-Related Products and Energy Information Regulation
X The Restriction of the Use of Certain Hazardous Substances in Electrical and Electronic Equipment Regulation
□ Noise Emission in the Environment by Equipment for use Outdoors Regulation
☒ Electromagnetic Compatibility Regulation
□ Measuring Instruments Regulation
□ Pressure Equipment (Safety) Regulation
Annex V
Annex VI
Noise:measuredL ww = dB (A); guaranteed L ww = dB (A)
P = kW; L/∅ = cm
UK Approved Body:
X Supply of Machinery (Safety) Regulation
Annex IV
UK Approved Body:
UKTE Certifi cate No.:
ral, 2023.07.21
Tom Chambers, Managing Director Einhell UK Ltd.
Archive-File/Record: NAPR030434
Article Number: 43.211.57 I.-No.: 21033
Subject to change without notice Wiesenweg 22, 94405 Landau/Isar, Germany
Documents registrar: Riedel Georg

EH 09/2023 (01)
- D
- Gefahr!
- Explanation of the symbols used (see Fig. 10)
- Safety regulations
- Warning!
- Layout and items supplied
- Layout (Fig. 1/2)
- Dial scale for soleplate
- Items supplied
- Danger!
- Proper use
- GB
- Technical data
- Sound and vibration
- Wear ear-muff s.
- Sawing wood
- Sawing metal
- Warning:
- Keep the noise emissions and vibrations to a minimum.
- Caution!
- Residual risks
- Before starting the equipment
- Safety guard (Fig. 1/Item 13)
- Changing the saw blade (Fig. 2/Item 12) Danger!
- Warning! Hold the saw blade securely while releasing it because otherwise it may jump out of the blade holder.
- Setting the soleplate for miter cuts (Figs. 3-4)
- Adapter for dust extraction system (Figure 5/Item 6)
- Operation
- ON/OFF switch (Fig. 6/Item 3)
- To switch on:
- To switch off :
- Locking button (Fig. 6/Item 2)
- Electric speed selector (Fig. 6/Item 1)
- Setting the pendulum action (Fig. 7/Item 8)
- Making cuts
- Important!
- Sawing out sections (Fig. 8)
- Making miter cuts
- Replacing the power cable
- Cleaning, maintenance and ordering of spare parts
- Cleaning
- Carbon brushes
- Maintenance
- Ordering replacement parts:
- Disposal and recycling
- Storage
- Service information
- Warranty certifi cate
- F
- Standard references: EN 62841-1; EN 62841-2-11; EN IEC 55014-1; EN IEC 55014-2; EN 61000-3-2; EN 61000-3-3
- Declaration of conformity
- Jig Saw TC-JS 80/1 (Einhell)
- UK legislation
Brand : EINHELL
Model : TC-JS 80
Category : Saw