
LS3DRGB - Effect machine BeamZ - Free user manual and instructions
Find the device manual for free LS3DRGB BeamZ in PDF.


| Product Type | Effect Machine |
| Model | LS3DRGB |
| Brand | BeamZ |
| Light Source | RGB Laser Diode (Red, Green, Blue) |
| Laser Class | Class 3R / Class 3B (depending on region) |
| Output Power | Approx. 200mW (Red: 100mW, Green: 50mW, Blue: 50mW) |
| Beam Angle | 60° (adjustable) |
| Control Modes | DMX512, Sound-Active, Auto, Master/Slave |
| DMX Channels | 13 channels |
| Number of Patterns | Over 100 built-in patterns |
| Strobe Rate | 0–20 Hz |
| Power Supply | AC 100-240V, 50/60Hz |
| Power Consumption | 30W (max) |
| Dimensions (L x W x H) | 230 x 200 x 150 mm |
| Weight | 2.5 kg |
| Housing Material | Aluminum, ABS plastic |
| Cooling | Active fan cooling |
| Safety Features | Key lock, interlock, emergency stop |
| Operating Temperature | 0°C to 40°C |
| Mounting | Omega bracket with safety cable point |
| Included Accessories | Power cord, DMX cable, user manual, remote control (IR) |
| Maintenance | Clean lens with soft cloth; avoid moisture |
Frequently Asked Questions - LS3DRGB BeamZ
User questions about LS3DRGB BeamZ
0 question about this device. Answer the ones you know or ask your own.
Ask a new question about this device
Download the instructions for your Effect machine in PDF format for free! Find your manual LS3DRGB - BeamZ and take your electronic device back in hand. On this page are published all the documents necessary for the use of your device. LS3DRGB by BeamZ.
USER MANUAL LS3DRGB BeamZ
152.909 LS-3DG Green 3D Laser DMX
152.912 LS-3DRG Red & Green 3D Laser DMX
152.915 LS-3DRGB Red, Green & Blue 3D Laser DMX
GB:
Service and repair
The Laser Show equipment has no major serviceable parts. Repair of electronic-components (transistors, IC's) or changing other parts are not allowed by untrained persons. If there is a problem with the Laser Show equipment, your local service engineer will help you with repair or replacement. We recommend shipping the Laser Show equipment to the manufacturer for reparation.
Attachments:
| 1. Laser Light: | 1PCS |
| 2. Power Cable: | 1PCS |
| 3. User Guide: | 1PCS |
WARNINGS
- Visible and invisible laser-light, direct beam can damage the human eye and the eyes of animals. Do not look at any Laser light directly.
- Do not touch the laser aperture with the hand. When cleaning the laser aperture, please use a soft cloth with alcohol or camera lens paper.
- Do not take apart or modify the equipment. Fire or electrical shock may result.
- In the unlikely event that you hear unusual noise, see smoke, feel excessive heat or smell anything unusual, immediately unplug the power source and contact your retailer. Continued use may result in fires or electrical shock.
- Do not use flammable sprays near this equipment. Also do not spill water, liquids, or flammable liquids on the equipment. If fluids enter this equipment and contact the electrical parts, fires or electrical shock may result. If anything enters the equipment, immediately unplug the power supply and contact your retailer.
Installation
- Carefully inspect your Laser Show equipment after you unpack it. If any damage is evident, such as dents or scratches on the covers or broken knobs, etc., immediately notify your carrier and your local sales distributor.
- Hang up the equipment in a safe place. Ensure there are no barriers in front of the laser aperture.
Features of the product:
- Laser power:
152.909 120mW green laser @ 532nm
152.912 150mW Red laser @ 650nm, 120mW Green laser @ 532nm
152.915 300mW Red laser @ 650nm, 150mW Green laser @ 532nm, 150mW Blue laser @ 447nm
- Scanner system: 15K high speed optical scanner
- Working Modes: Sound Active, Auto run, DMX512 (12 CH), Master/slave mode
- Interface: 3 pins XLR jack for DMX or Maser-Slave linking;
- Input power: AC 100V-240V, 50/60Hz. Rated power: 40W.
- Packing Size: L*W*H=37*29.1*19.9cm; Weight: 4KG
Front and Rear panel view:
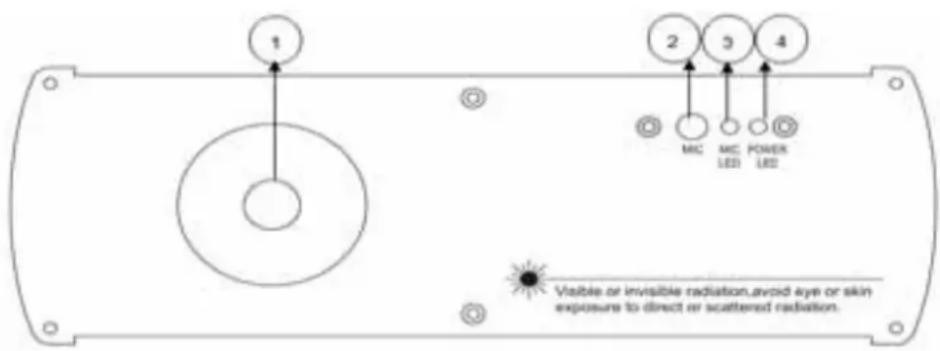
- Laser Aperture
-
Sound active indicator: Blue
-
Sound active microphone
-
Power indicator: Red
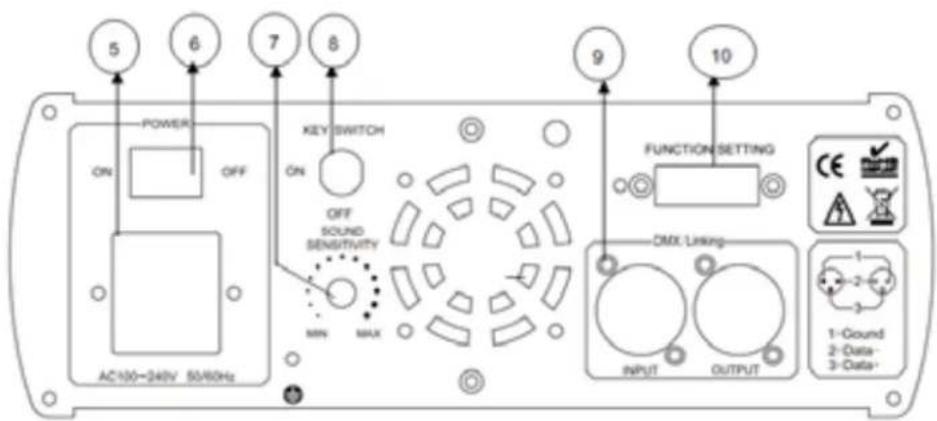
-
Power jack
-
ON/OFF switch
-
Sound sensitivity knob
-
Key lock
-
DMX or linking jack
-
Dipswitch function setting
Function and Setting
| Dip Switch | #1 | #2 | #3 | #4 | #5 | #6 | #7 | #8 | #9 | #10 |
| Sound-to-light | OFF | OFF | ||||||||
| Auto Beam | ON | OFF | ||||||||
| DMX/Slave mode | ON | OFF | ON |
As the above chart, DIP switch setting reference as follows:
Stand alone
(1). Sound active: ALL OFF
(2). Auto beam run: #1 ON
Master and Slave mode
(1). DMX and DMX Slave & Master: #1 and #10 ON
(2). All slave units put #2 ON, when master unit puts #1 ON, then all the units run under auto mode; when master unit puts ALL OFF, then all the units run under sound active mode.
Universal DMX Operation (DMX mode)
This mode allows you to use universal DMX-512 console to operate.
- Install the units in a suitable position.
- Use standard XLR cable to connect your units together via the XLR connector on the rear of the units. For longer cable we suggest a terminator at the last fixture.
- Assign a DMX address to each the unit using dipswitches.
- Turn on all units. Use DMX console to control your units.
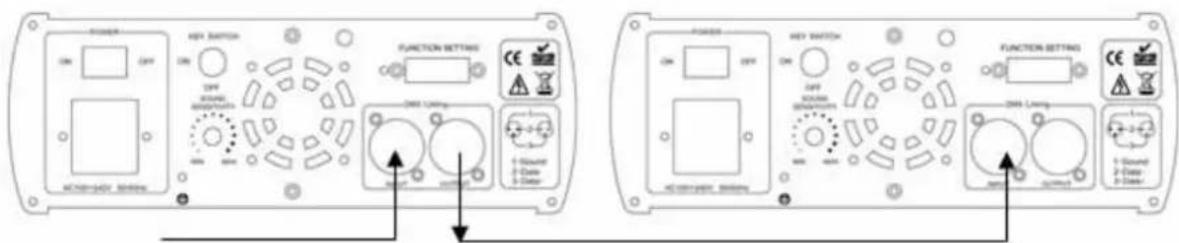
DMX Signal
| CH1 | Mode select | 0~103 | Sound active mode |
| 104~155 | Auto-animation mode | ||
| 156~255 | Static patterns (selection with CH3) | ||
| CH2 | Color select | 0~0 | Laser OFF |
| 1~255 | Colour selection | ||
| CH3 | Pattern select | 0~255 | Selecting patterns |
| CH4 | Y axis moving | 0~127 | Manual up to down moving |
| 128~191 | Auto down moving (under dynamic pattern) | ||
| 192~255 | Auto up moving (under dynamic pattern) | ||
| CH5 | X axis moving | 0~127 | Manual left to right moving |
| 128~191 | Auto right moving (under dynamic pattern) | ||
| 192~255 | Auto left moving (under dynamic pattern) | ||
| CH6 | X axis rolling | 0~127 | Manual rolling |
| 128~255 | Auto rolling (under dynamic pattern) | ||
| CH7 | Y axis rolling | 0~127 | Manual rolling |
| 128~255 | Auto rolling (under dynamic pattern) | ||
| CH8 | Rotation | 0~127 | Manual rotation |
| 128~191 | Auto clockwise rotation (under dynamic pattern) | ||
| 192~255 | Auto counter-clockwise rotation (under dynamic pattern) | ||
| CH9 | Zooming | 0~85 | Auto zooming (+) |
| 86~170 | Auto zooming (-) | ||
| 171~255 | Manual zooming (+/-) | ||
| CH10 | Pattern Size | 0~0 | Normal size |
| 1~255 | 1 is smallest, 255 is biggest | ||
| CH11 | Display dot | 0~0 | Normal display |
| 1~255 | display dot, 255 is best brightness | ||
| CH12 | Drawing | 0~5 | No drawing |
| 6~127 | Auto drawing mode 1 (under dynamic pattern) | ||
| 128~255 | Auto drawing mode 2 (under dynamic pattern) | ||
| CH13 | Stretch | 0~255 | X/Y/Z stretch |
| CH14 | Shake Effect | 0~255 | Combination with channel 13 |
TROUBLE SHOOTING
- If the power supply indicator is off and the laser doesn't work, please check the power supply and the input voltage.
- In Stand-Alone operation, if the power supply indicator is ON and sound active indicator is OFF, but the laser doesn't work.
A. Because sound is too small and cannot activate laser running, please increase the music volume or increase audio sensitivity on rear panel.
B. Please check if unit has been set up in slave mode, or DMX mode.
- In Master-Slave operation, slave units don't function, please check as below.
A. Make sure there's only one master in the chain, and the others are set in slave mode.
B. Make sure to control the units with DMX controller.
C. Make sure to use a good quality power cable and XLR connector.
- In DMX mode operation, the laser is OFF and the DMX signal indicator is unlighted, please check as below
A. Make sure DIP switch #1 and #10 are ON.
B. Make sure to have a good XLR connection.
- In DMX operation, the unit can't be controlled by the DMX console, but the DMX signal indicator is flashing, please make sure the DMX console and unit have the same channel.
- If the output beam direction above is unusual, please restart the unit.
- If the unit is fail, please turn off the unit, and then turn on again after 5 minutes.
After trying the above solution you still cannot sort out the problem, please contact your dealer or our company for service.
This manual contains important laser system safety and operation information. Read and understand all instructions prior to powering on laser unit the first time, to avoid laser eye injury and to avoid breaking the law. Keep this manual in a safe place for future reference.
WARNING DATA
Lasers can be hazardous and have unique safety considerations. Permanent eye injury and blindness is possible if lasers are used incorrectly. Pay close attention to each safety REMARK and WARNING statement in the user manual. Read all instructions carefully BEFORE operating this device.

Attention! Indicates a skill or other useful information for special situations.

Important! Indicates important information to protect personnel from laser incident or injury.

Caution! Prevent damage or injury from incorrect operation.

Laser! Laser safety warming labels.

Recycle To protect the environment, recycle packing material wherever possible.

The projector is for indoor use only, IP20. Use only in dry locations. Keep this device away from rain and moisture, excessive heat, humidity and dust. Do not allow contact with water or other fluids.

Disposal Don't throw this product away just as general trash, please dispose of this product following the abandon electronic product regulations in your area.

The projector must be installed in a location with adequate ventilation, at least 50cm (20 inches) from adjacent surfaces. Be sure that no ventilation slots are blocked.
LASER SAFETY WARNINGS
Potential laser injury hazard exists with this product! Read these instructions carefully, which includes important information about installation, safe use and service!
Caution
- Avoid direct eye contact with laser light. Never intentionally expose your eyes or others to direct laser light..
• This laser product can potentially cause instant eye injury or blindness if laser light directly strikes the eyes. - It is illegal and dangerous to shine this laser into audience areas, where the audience or other personnel could get direct laser beams or bright reflections into their eyes.
- It is an offense to shine any laser at aircraft.
- There are no user serviceable parts inside the unit. Do not open the housing or attempt any repairs yourself. In the unlikely event your unit may require service, please contact your dealer..
- Use of controls or adjustments or performance of procedures other than those specified herein may result in hazardous radiation exposure.
This unit contains high power laser devices internally. Do not open the laser housing, due to potential exposure to unsafe levels of laser radiation. The laser power levels accessible if the unit is opened can cause instant blindness, skin burns and fires.
LASER SAFETY AND OPERATING INSTRUCTIONS
STOP AND READ ALL LASER SAFETY DATA
Laser Light is different from any other light source with which you may be familiar. The light from this product can potentially cause eye injury if not set up and used properly. Laser light is thousands of times more concentrated than light from any other kind of light source. This concentration of light power can cause instant eye injuries, primarily by burning the retina (the light sensitive portion at the back of the eye). Even if you cannot feel “heat” from a laser beam, it can still potentially injure or blind you or your audience. Even very small amounts of laser light are potentially hazardous even at long distances. Laser eye injuries can happen quicker than you can blink.
It is incorrect to think that because these laser entertainment products split the laser into hundreds of beams or laser beam is scanned out in high speed, that an individual laser beam is safe for eye exposure. This laser product uses dozens of mini Watts of laser power (Class 3B levels internally). Many of the individual beams are potentially hazardous to the eyes.
It is also incorrect to assume that because the laser light is moving, it is safe. This is not true. Nor, do the laser beams always move. Since eye injuries can occur instantly, it is critical to prevent the possibility of any direct eye exposure. In the laser safety regulation, it is not legal to aim Class 3B lasers in areas which people can get exposed. This is true even if it is aimed below people's faces, such as on a dance floor.
- Do not operate laser without first reading and understanding all safety and technical data in this manual
- Always set up and install all laser effects so that all laser light is at least 3 meters (9.8 feet) above the floor on which people can stand. See section later in this manual
- After set up, and prior to public use test laser to ensure proper function. Do not use if any defect is detected. Do not use if laser emits only one or two laser beams rather than dozens/hundreds, as this could indicate damage to the diffraction grating optic, and could allow emission of higher laser levels.
- Do not point lasers at people or animals.
- Never look into the laser aperture or laser beams
- Do not point lasers in areas in which people can potentially get exposed, such as uncontrolled balconies, etc.
- Do not point lasers at highly reflective surfaces such as windows, mirrors and shiny metal. Even laser reflections can be hazardous.
• Never point a laser at aircraft, this is a federal offense
- Never point un-terminated laser beams into the sky
• Do not expose the output optic (aperture) to cleaning chemicals
- Do not use laser if the laser appears to be emitting only one or two beams
- Do not use laser if housing is damaged or open, or if optics appear damaged in any way.
- Never open the laser housing. The high laser power levels inside of the protective housing can start fires, burn skin and will cause instant eye injury.
- Never leave this device running unattended.
- The operation of a class 3B laser show laser is only allowed if the show is controlled by a skilled and well-trained operator familiar with the data included in this manual.
- The legal requirements for using laser entertainment products vary from country to country. The user is responsible for the legal requirements at the location/country of use.
• Always use appropriate lighting safety cables when hanging lights and effects overhead.

LASER EXPOSURE WARNING

LASER LIGHT AVOID DIRECT EYE EXPOSURE
GENERAL SAFETY INSTRUCTIONS
Every person involved with installation and maintenance of this device have to:
- Be qualified
● Follow the instructions of this manual
CAUTION! Be careful with your operations. With a high voltage you can suffer a dangerous electric shock when touching the wires!
This device has left out premises in absolutely perfect condition. In order to maintain this condition and to ensure a safe operation, it is necessary for the user to follow the safety instructions and warning notes written in this manual.
Important!
The manufacturer will not accept liability for any resulting damages caused by the non-observance of this manual or any unauthorized modification to the device.
- Please consider that damages caused by manual modifications to the devise are not subject to warranty.
- Never let the power-cord come into contact with other cables! Handle the power-cord and all connections with the mains with particular caution!
● Make sure that the available voltage is not higher than stated on the rear panel.
● Always plug in the power plug least. Make sure that the power-switch is set to off-position before you connect the device to the mains. The power-plug has to be accessed after installing the device. - Make sure that the power-cord is never crimped or damaged by sharp edges. Check the device and the power-cord from time to time.
● Always disconnect from the mains, when the devise is not in use or before cleaning it. Only handle the power-cord by the plug. Never pull out the plug by tugging the power-cord.
- It is essential to connect the yellow/green conductor to earth.
● The electric connection, repairs and servicing must be carried out by a qualified employee.
- Do not switch the fixture on and off in short intervals as this would reduce the laser diode life.
- For replacement, please use fuses of same type and rating only.
- If the device has been exposed to drastic temperature fluctuation, do not switch it on immediately. The arising condensation water might damage your device. Leave the device switched off until it has reached room temperature.
- Do not shake the device. Avoid brute force when installing or operating the device.
- When choosing the installation-spot, please make sure that the device is not exposed to extreme heat, moisture or dust. There should not be any cables lying around. You endanger your own and the safety of others!
● The minimum distance between the fixture and surrounding walls must be more than 50cm.
● Always fix the fixture with an appropriate safety-rope. Fix the safety-rope at the safety-rope only.
● The ambient temperature must be between 10° C to 40° C.
- Please use the original packaging if the device is to be transported.
- Please consider that unauthorized modifications on the device are forbidden due to safety reasons!
CAUTION! Operate the device only after having familiarized with its functions. Do not permit operation by persons not qualified for operating the device. Most damages are the result of unprofessional operation!
CAUTION! If this device will be operated in any way different to the one described in this manual, the product may suffer damages and the warranty void.
BEFORE OPERATION
Unpacking Instructions

CAUTION!
Immediately upon receiving a fixture, carefully unpack the carton, check the contents to ensure that all parts are present, and have been received in good condition. Notify the shipper immediately and retain packing material for inspection if any parts appear damage from shipping or the package itself shows signs of mishandling. Save the package and all packing materials. In the event that a fixture must be returned to the factory, it is important that the fixture be returned in the original factory box and packing.
Proper Laser Set Up & Usage
This fixture has been designed to be hung. It is recommended for safety purposes, your lighting effect are properly mounted using a suitable hanging clamp and safety cable. Items appropriate for safe and effective mounting are easily sourced from your lighting vendor.
International laser safety regulations require that lasers must be operated in the fashion illustrated below, with a minimum of 3 meters (9.8 ft) of vertical separation between the floor and the lowest laser light vertically. Additionally, 2.5 meters of horizontal separation is required between laser light and audience or other public spaces.
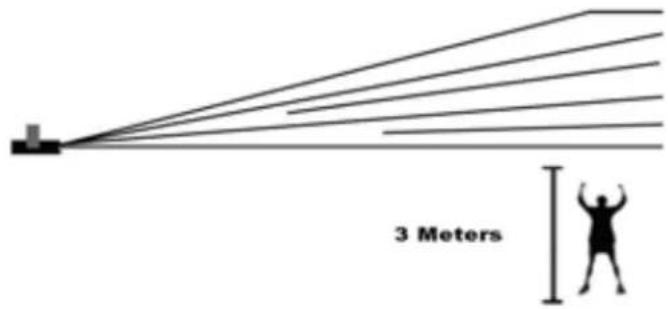
CAUTION:
Use of controls, adjustments, or performance of procedures other than what is specified herein may result in hazardous radiation exposure
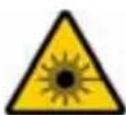
CAUTION: Please consider the respective national norms during the installation! The installation must only be carried out by an authorized employee or dealers!
Rigging the Fixture
- The installation of the fixture has to be built and constructed in a way that it can hold 10 times the weight for 1 hour without any harming deformation.
- The installation must always be secured with a secondary safety attachment, e.g. an appropriate catch net. This secondary safety attachment must be constructed in a way that no part of the installation can fall down if the main attachment fails.
● Make sure the area below the installation place is free from unwanted persons during rigging, de-rigging and servicing. - The operator has to make sure that safety-relating and machine-technical installations are approved by an expert before taking into operation for the first time and after changes before taking into operation another time.
- The operator has to make sure that safety-relating and machine-technical installations are approved by a skilled person once a year.
● The fixture should be installed in the position where persons cannot reach and where persons may walk by or be seated.
CAUTION: When installing the device, make sure there is no highly in inflammable material (decoration articles, etc.) in between a distance of min 0.5 meter.

PRODUCT OVERVIEW
- This device has left out premises in absolutely perfect condition. In order to maintain this condition and to ensure a safe operation, it is necessary for the user to follow the safety instructions and warning notes written in this manual.
● The manufacturer will not accept liability for any resulting damages caused by the non-observance of this manual or any unauthorized modification to the device.
CONTROL & FUNCTION
● Regular breaks during operation are essential to maximize the life of this device as it is not designed for continual use.
- Do not switch the unit on and off in short time intervals
● Always unplug the unit when it is not used for a longer time. Or before replacing the bulb or start servicing.
- In the event of serious operation problems, stop using the fixture and contact your dealer immediately.

Attention
Laser will be output from laser aperture in 5 seconds after the unit is powered on.
MAINTENANCE
• Make sure the area below the installation place is free from unwanted persons during servicing
- Switch off the fixture, unplug the mains cable and wait until the unit has been cooled down.
- Housings, fixations and installations spots( ceiling, truss, suspensions) should be totally free from any deformation
- The mains cables must be in impeccable condition and should be replaced immediately when even a small problem is detected
• In order to protect the fixture from overheat the cooling fans (if any) and ventilation openings should be cleaned monthly.
- The cleaning of aperture glass and scanner mirrors must be carried out periodically to optimize light output. Cleaning frequency depends on the environment in which the fixture operates: damp, smoky or particularly dirty surroundings can cause greater accumulation of dirt on the unit's optics
1) Clean with a soft cloth using normal glass cleaning products.
2) Always dry the parts carefully.
3) Clean the Aperture glass at least once every 30 days
- The interior of the fixture should be cleaned annually using a vacuum cleaner or air-jet.
ATTENTION: We strongly recommend internal cleaning to be carried out by qualified worker!
Specifications subject to change without prior notice.
The availability of particular products may vary by region. Please check with the dealer.
NL:
Inhoud verpakking:
| Dip Switch | #1 | #2 | #3 | #4 | #5 | #6 | #7 | #8 | #9 | #10 |
| Sound-to-light | OFF | OFF | ||||||||
| Auto Beam | ON | OFF | ||||||||
| DMX/Slave mode | ON | OFF | ON |
DIP switch instellingen:
Stand alone :
DMX Signal
| CH1 | Mode select | 0~103 | Sound active mode |
| 104~155 | Auto-animation mode | ||
| 156~255 | Static patterns (selection with CH3) | ||
| CH2 | Color select | 0~0 | Laser OFF |
| 1~255 | Colour selection | ||
| CH3 | Pattern select | 0~255 | Selecting patterns |
| CH4 | Y axis moving | 0~127 | Manual up to down moving |
| 128~191 | Auto down moving (under dynamic pattern) | ||
| 192~255 | Auto up moving (under dynamic pattern) | ||
| CH5 | X axis moving | 0~127 | Manual left to right moving |
| 128~191 | Auto right moving (under dynamic pattern) | ||
| 192~255 | Auto left moving (under dynamic pattern) | ||
| CH6 | X axis rolling | 0~127 | Manual rolling |
| 128~255 | Auto rolling (under dynamic pattern) | ||
| CH7 | Y axis rolling | 0~127 | Manual rolling |
| 128~255 | Auto rolling (under dynamic pattern) | ||
| CH8 | Rotation | 0~127 | Manual rotation |
| 128~191 | Auto clockwise rotation (under dynamic pattern) | ||
| 192~255 | Auto counter-clockwise rotation (under dynamic pattern) | ||
| CH9 | Zooming | 0~85 | Auto zooming (+) |
| 86~170 | Auto zooming (-) | ||
| 171~255 | Manual zooming (+/-) | ||
| CH10 | Pattern Size | 0~0 | Normal size |
| 1~255 | 1 is smallest, 255 is biggest | ||
| CH11 | Display dot | 0~0 | Normal display |
| 1~255 | display dot, 255 is best brightness | ||
| CH12 | Drawing | 0~5 | No drawing |
| 6~127 | Auto drawing mode 1 (under dynamic pattern) | ||
| 128~255 | Auto drawing mode 2 (under dynamic pattern) | ||
| CH13 | Stretch | 0~255 | X/Y/Z stretch |
| CH14 | Shake Effect | 0~255 | Combination with channel 13 |
TROUBLE SHOOTING
| Dip Switch | #1 | #2 | #3 | #4 | #5 | #6 | #7 | #8 | #9 | #10 |
| Sound-to-light | OFF | OFF | ||||||||
| Auto Beam | ON | OFF | ||||||||
| DMX/Slave mode | ON | OFF | ON |
DIP switch Einstellungen:
Stand alone :
| CH1 | Mode select | 0~103 | Sound active mode |
| 104~155 | Auto-animation mode | ||
| 156~255 | Static patterns (selection with CH3) | ||
| CH2 | Color select | 0~0 | Laser OFF |
| 1~255 | Colour selection | ||
| CH3 | Pattern select | 0~255 | Selecting patterns |
| CH4 | Y axis moving | 0~127 | Manual up to down moving |
| 128~191 | Auto down moving (under dynamic pattern) | ||
| 192~255 | Auto up moving (under dynamic pattern) | ||
| CH5 | X axis moving | 0~127 | Manual left to right moving |
| 128~191 | Auto right moving (under dynamic pattern) | ||
| 192~255 | Auto left moving (under dynamic pattern) | ||
| CH6 | X axis rolling | 0~127 | Manual rolling |
| 128~255 | Auto rolling (under dynamic pattern) | ||
| CH7 | Y axis rolling | 0~127 | Manual rolling |
| 128~255 | Auto rolling (under dynamic pattern) | ||
| CH8 | Rotation | 0~127 | Manual rotation |
| 128~191 | Auto clockwise rotation (under dynamic pattern) | ||
| 192~255 | Auto counter-clockwise rotation (under dynamic pattern) | ||
| CH9 | Zooming | 0~85 | Auto zooming (+) |
| 86~170 | Auto zooming (-) | ||
| 171~255 | Manual zooming (+/-) | ||
| CH10 | Pattern Size | 0~0 | Normal size |
| 1~255 | 1 is smallest, 255 is biggest | ||
| CH11 | Display dot | 0~0 | Normal display |
| 1~255 | display dot, 255 is best brightness | ||
| CH12 | Drawing | 0~5 | No drawing |
| 6~127 | Auto drawing mode 1 (under dynamic pattern) | ||
| 128~255 | Auto drawing mode 2 (under dynamic pattern) | ||
| CH13 | Stretch | 0~255 | X/Y/Z stretch |
| CH14 | Shake Effect | 0~255 | Combination with channel 13 |
FEHLERSUCHE
tronios
Sound & Light
CE Declaration of Conformity
Importer:
TRONIOS BV
152.909_152.912_152.915
Product Description: Beamz 3D lasers LS-3 series
Regulatory Requirement: EN 60825-1
| E | N | 5 | 5 | 0 | 1 | 4 | ||
| E | N | 6 | 1 | 5 | 4 | 7 | ||
| E | N | 6 | 1 | 0 | 0 | 0 | - | 3 |
The products meet the requirements stated in the above mentioned Standards. This certificate does not cover the aspects that may be relevant such as performance and fitness for purpose.
Almelo,
11-12-2012
Signature :
Specifications and design are subject to change without prior notice..
www.tronios.com
Copyright © 2013 by TRONIOS the Netherlands


- GB
- SERVICE AND REPAIR
- ATTACHMENTS
- WARNINGS
- INSTALLATION
- FEATURES OF THE PRODUCT
- FRONT AND REAR PANEL VIEW
- STAND ALONE
- MASTER AND SLAVE MODE
- UNIVERSAL DMX OPERATION (DMX MODE)
- TROUBLE SHOOTING
- WARNING DATA
- LASER SAFETY WARNINGS
- CAUTION
- LASER SAFETY AND OPERATING INSTRUCTIONS
- STOP AND READ ALL LASER SAFETY DATA
- LASER EXPOSURE WARNING
- LASER LIGHT AVOID DIRECT EYE EXPOSURE
- GENERAL SAFETY INSTRUCTIONS
- IMPORTANT
- BEFORE OPERATION
- UNPACKING INSTRUCTIONS
- PROPER LASER SET UP & USAGE
- RIGGING THE FIXTURE
- PRODUCT OVERVIEW
- CONTROL & FUNCTION
- ATTENTION
- LASER WILL BE OUTPUT FROM LASER APERTURE IN 5 SECONDS AFTER THE UNIT IS POWERED ON
- MAINTENANCE
- ATTENTION: WE STRONGLY RECOMMEND INTERNAL CLEANING TO BE CARRIED OUT BY QUALIFIED WORKER
- NL
- INHOUD VERPAKKING
- DIP SWITCH INSTELLINGEN
- DIP SWITCH EINSTELLUNGEN
- FEHLERSUCHE
- TRONIOS
- SOUND & LIGHT
- CE DECLARATION OF CONFORMITY
Brand : BeamZ
Model : LS3DRGB
Category : Effect machine