
LMD-1530W - Monitor SONY - Free user manual and instructions
Find the device manual for free LMD-1530W SONY in PDF.


| Product Type | Professional LCD Monitor |
| Brand | Sony |
| Model | LMD-1530W |
| Screen Size | 15 inches (38 cm) widescreen |
| Resolution | WXGA (1280 x 768 pixels) |
| Panel Type | LCD TFT with LED backlight |
| Video Inputs | Composite, S-Video, Component, SDI (option), RGB |
| Video Outputs | Composite, SDI (option) |
| Power | AC 100-240 V, 50/60 Hz, max consumption 45 W |
| Dimensions (W x H x D) | Approx. 355 x 246 x 70 mm (without stand) |
| Weight | Approx. 4.5 kg (without stand) |
| Operating Temperature | 0°C to 40°C |
| Viewing Angle | Horizontal 178°, vertical 178° |
| Main Functions | Underscan, center marker, blue only, color adjustment, multiple inputs |
| Maintenance and Cleaning | Use a soft dry cloth; avoid solvents and abrasive cleaners |
| Safety | Compliant with CE, UL standards; mandatory grounding |
| Spare Parts and Repairability | Contact an authorized Sony service center; parts available upon request |
| General Information | Designed for medical and broadcast applications; VESA mount compatible |
Frequently Asked Questions - LMD-1530W SONY
User questions about LMD-1530W SONY
0 question about this device. Answer the ones you know or ask your own.
Ask a new question about this device
Download the instructions for your Monitor in PDF format for free! Find your manual LMD-1530W - SONY and take your electronic device back in hand. On this page are published all the documents necessary for the use of your device. LMD-1530W by SONY.
USER MANUAL LMD-1530W SONY
Operating Instructions
① Tally lamp
① HDMI IN terminal
G/Y, B/PB, R/PR IN/OUT (BNC type)
Connecting the power cord
To disconnect the power cord

Before operating the unit, please read this manual thoroughly and retain it for future reference.
Owner's Record
The model and serial numbers are located at the rear. Record these numbers in the spaces provided below. Refer to these numbers whenever you call upon your Sony dealer regarding this product.
Model No. ____
Serial No.
Important Safety Instructions
- Read these instructions.
- Keep these instructions.
- Heed all warnings.
- Follow all instructions.
- Do not use this apparatus near water.
- Clean only with dry cloth.
- Do not block any ventilation openings. Install in accordance with the manufacturer's instructions.
- Do not install near any heat sources such as radiators, heat registers, stoves, or other apparatus (including amplifiers) that produce heat.
- Do not defeat the safety purpose of the polarized or grounding-type plug. A polarized plug has two blades with one wider than the other. A grounding-type plug has two blades and a third grounding prong. The wide blade or the third prong are provided for your safety. If the provided plug does not fit into your outlet, consult an electrician for replacement of the obsolete outlet.
- Protect the power cord from being walked on or pinched particularly at plugs, convenience receptacles, and the point where they exit from the apparatus.
- Only use attachments/accessories specified by the manufacturer.
- Use only with the cart, stand, tripod, bracket, or table specified by the manufacturer, or sold with the apparatus.

When a cart is used, use caution when moving the cart/apparatus combination to avoid injury from tip-over.
- Unplug this apparatus during lightning storms or when unused for long periods of time.
- Refer all servicing to qualified service personnel. Servicing is required when the apparatus has been damaged in any way, such as power-supply cord or plug is damaged, liquid has been spilled or objects have fallen into the apparatus, the apparatus has been exposed to rain or moisture, does not operate normally, or has been dropped.
WARNING
To reduce the risk of fire or electric shock, do not expose this apparatus to rain or moisture. To avoid electrical shock, do not open the cabinet. Refer servicing to qualified personnel only.
WARNING
THIS APPARATUS MUST BE EARTHED.
WARNING
When installing the unit, incorporate a readily accessible disconnect device in the fixed wiring, or connect the power plug to an easily accessible socket-outlet near the unit. If a fault should occur during operation of the unit, operate the disconnect device to switch the power supply off, or disconnect the power plug.
CAUTION
The apparatus shall not be exposed to dripping or splashing. No objects filled with liquids, such as vases, shall be placed on the apparatus.
WARNING
Make sure the surface is wide enough so that this apparatus's width and depth don't exceed the surface's edges.
If not, this apparatus may lean or fall over and cause an injury.


This symbol is intended to alert the user to the presence of uninsulated “dangerous voltage” within the product’s enclosure that may be of sufficient magnitude to constitute a risk of electric shock to persons.

This symbol is intended to alert the user to the presence of important operating and maintenance (servicing) instructions in the literature accompanying the appliance.
Attention-when the product is installed in Rack:
1. Prevention against overloading of branch circuit
When this product is installed in a rack and is supplied power from an outlet on the rack, please make sure that the rack does not overload the supply circuit.
2. Providing protective earth
When this product is installed in a rack and is supplied power from an outlet on the rack, please confirm that the outlet is provided with a suitable protective earth connection.
3. Internal air ambient temperature of the rack
When this product is installed in a rack, please make sure that the internal air ambient temperature of the rack is within the specified limit of this product.
4. Prevention against achieving hazardous condition due to uneven mechanical loading
When this product is installed in a rack, please make sure that the rack does not achieve hazardous condition due to uneven mechanical loading.
5. Install the equipment while taking the operating temperature of the equipment into consideration
For the operating temperature of the equipment, refer to the specifications of the Operation Manual.
6. When performing the installation, keep the following space away from walls in order to obtain proper exhaust and radiation of heat.
Lower, Upper: 4.4 cm (1 3/4 inches) or more
For customers in Norway
This equipment can be connected to an IT power distribution system.
For customers in the U.S.A.
This equipment has been tested and found to comply with the limits for a Class A digital device, pursuant to part 15 of the FCC Rules. These limits are designed to provide reasonable protection against harmful interference when the equipment is operated in a commercial environment. This equipment generates, uses, and can radiate radio frequency energy and, if not installed and used in accordance with the instruction manual, may cause harmful interference to radio
communications. Operation of this equipment in a residential area is likely to cause harmful interference in which case the user will be required to correct the interference at his own expense.
You are cautioned that any changes or modifications not expressly approved in this manual could void your authority to operate this equipment.
All interface cables used to connect peripherals must be shielded in order to comply with the limits for a digital device pursuant to Subpart B of part 15 of FCC Rules.
This device complies with part 15 of the FCC Rules. Operation is subject to the following two conditions: (1) This device may not cause harmful interference, and (2) this device must accept any interference received, including interference that may cause undesired operation.
WARNING
Using this unit at a voltage other than 120 V may require the use of a different line cord or attachment plug, or both. To reduce the risk of fire or electric shock, refer servicing to qualified service personnel.
For the customers in Canada
This Class A digital apparatus complies with Canadian ICES-003.
For the customers in Europe
This product with the CE marking complies with the EMC Directive issued by the Commission of the European Community.
Compliance with this directive implies conformity to the following European standards:
• EN55103-1 : Electromagnetic Interference (Emission) • EN55103-2 : Electromagnetic Susceptibility (Immunity)
This product is intended for use in the following Electromagnetic Environments: E1 (residential), E2 (commercial and light industrial), E3 (urban outdoors), E4 (controlled EMC environment, ex. TV studio).
For the customers in Europe
The manufacturer of this product is Sony Corporation, 1-7-1 Konan, Minato-ku, Tokyo, Japan.
The Authorized Representative for EMC and product safety is Sony Deutschland GmbH, Hedelfinger Strasse 61, 70327 Stuttgart, Germany. For any service or guarantee matters please refer to the addresses given in separate service or guarantee documents.
For the customers in the USA
Lamp in this product contains mercury. Disposal of these materials may be regulated due to environmental considerations. For disposal or recycling information, please contact your local authorities or the Telecommunications Industry Association (www.eiae.org).
India only
Disposal of Old Electrical & Electronic Equipment (Applicable in Republic of India)
This symbol indicates that this product shall not be treated as household waste and may not be dropped in garbage bins.
Product owners are advised to deposit their product at the nearest collection point for the recycling of electrical and electronic equipment.
Your co-operation shall facilitate proper disposal & help prevent potential negative consequences/hazards to the environment and human health, which could otherwise be caused by inappropriate waste disposal including improper handling, accidental breakage, damage and/or improper recycling of e-waste.
The recycling of materials will help to conserve natural resources.
For more detailed information about recycling of this product, please contact your local civic office, your household waste disposal service provider or the store where you made the purchase. You may contact our company's toll free number in India for assistance.
This product complies with the "India E-waste Rule 2011". The E-waste Rules, 2011 is an Indian directive aimed at reducing the harmful environmental impact of waste electrical equipment by restricting the use of known hazardous substances. As of 1st May 2012, new electrical and electronic equipment introduced into the market may no longer contain the following chemicals or its specified maximum concentration levels:
Lead, Mercury, Hexavalent Chromium, Polybrominated Biphenyls (PBB) or Polybrominated Diphenylethers (PBDE) - in concentrations exceeding 0.1 weight % and Cadmium - 0.01 weight %, except of exemptions set in Schedule 2 of the aforesaid Rule.
On a Long Period of Use 35
On Cleaning 36
On Moisture Condensation 36
On Repacking 36
On Mounting on a Rack 36
On Fan Error 36
Features 37
Location and Function of Parts and Controls .. 38
Front Panel 38
Input Signals and Adjustable/Setting Items ..... 39
Rear Panel 40
Installing to the Rack 41
Connecting the AC Power Cord 42
Attaching the Input Adaptor 42
Selecting the Default Settings 43
Selecting the Menu Language 44
Using the Menu 45
Adjustment Using the Menus 46
Items 46
Adjusting and Changing the Settings 47
STATUS menu.... 47
COLOR TEMP/BAL menu 47
USER CONTROL menu 48
USER CONFIG menu 48
REMOTE menu 50
KEY INHIBIT menu 51
Troubleshooting 51
Specifications 52
Dimensions 55
Precaution
On Safety
- Operate the unit only with a power source as specified in the “Specifications” section.
- A nameplate indicating operating voltage, etc., is located on the rear panel.
- Should any solid object or liquid fall into the cabinet, unplug the unit and have it checked by qualified personnel before operating it any further.
- Do not drop or place heavy objects on the power cord. If the power cord is damaged, turn off the power immediately. It is dangerous to use the unit with a damaged power cord.
- Unplug the unit from the wall outlet if it is not to be used for several days or more.
- Disconnect the power cord from the AC outlet by grasping the plug, not by pulling the cord.
- The socket-outlet shall be installed near the equipment and shall be easily accessible.
On Installation
- Allow adequate air circulation to prevent internal heat build-up. Do not place the unit on surfaces (rugs, blankets, etc.) or near materials (curtains, draperies) that may block the ventilation holes.
- Do not install the unit in a location near heat sources such as radiators or air ducts, or in a place subject to direct sunlight, excessive dust, mechanical vibration or shock.
Handling the LCD Screen
- The LCD panel fitted to this unit is manufactured with high precision technology, giving a functioning pixel ratio of at least 99.99%. Thus a very small proportion of pixels may be “stuck”, either always off (black), always on (red, green, or blue), or flashing. In addition, over a long period of use, because of the physical characteristics of the liquid crystal display, such “stuck” pixels may appear spontaneously. These problems are not a malfunction.
- Do not leave the LCD screen facing the sun as it can damage the LCD screen. Take care when you place the unit by a window.
- Do not push or scratch the LCD screen. Do not place a heavy object on the LCD screen. This may cause the screen to lose uniformity.
- If the unit is used in a cold place, horizontal lines or a residual image may appear on the screen. This is not a malfunction. When the monitor becomes warm, the screen returns to normal.
- The screen and the cabinet become warm during operation. This is not a malfunction.
On Burn-in
For LCD panel, permanent burn-in may occur if still images are displayed in the same position on the screen continuously, or repeatedly over extended periods.
Images that may cause burn-in
- Masked images with aspect ratios other than 15:9 • Color bars or images that remain static for a long time
- Character or message displays that indicate settings or the operating state
To reduce the risk of burn-in
- Turn off the character displays Press the MENU button to turn off the character displays. To turn off the character displays of the connected equipment, operate the connected equipment accordingly. For details, refer to the operation manual of the connected equipment.
- Turn off the power when not in use Turn off the power if the viewfinder is not to be used for a prolonged period of time.
On a Long Period of Use
Due to the characteristics of LCD panel, displaying static images for extended periods, or using the unit repeatedly in a high temperature/high humidity environments may cause image smearing, burn-in, areas of which brightness is permanently changed, lines, or a decrease in overall brightness.
In particular, continued display of an image smaller than the monitor screen, such as in a different aspect ratio, may shorten the life of the unit.
Avoid displaying a still image for an extended period, or using the unit repeatedly in a high temperature/high humidity environment such as airtight room, or around the outlet of an air conditioner.
To prevent any of the above issues, we recommend reducing brightness slightly, and to turn off the power whenever the unit is not in use.
On Cleaning
Before cleaning
Be sure to disconnect the AC power cord from the AC outlet.
On cleaning the monitor screen
The monitor screen surface is especially treated to reduce reflection of light.
As incorrect maintenance may impair the performance of the monitor, take care with respect to the following:
- Wipe the screen gently with a soft cloth such as a cleaning cloth or glass cleaning cloth.
- Stubborn stains may be removed with a soft cloth such as a cleaning cloth or glass cleaning cloth lightly dampened with water.
- Never use solvent such as alcohol, benzene or thinner, or acid, alkaline or abrasive detergent, or chemical cleaning cloth, as they will damage the screen surface.
On cleaning the cabinet
- Clean the cabinet gently with a soft dry cloth. Stubborn stains may be removed with a cloth lightly dampened with mild detergent solution, followed by wiping with a soft dry cloth.
- Use of alcohol, benzene, thinner or insecticide may damage the finish of the cabinet or remove the indications on the cabinet. Do not use these chemicals.
- If you rub on the cabinet with a stained cloth, the cabinet may be scratched.
- If the cabinet is in contact with a rubber or vinyl resin product for a long period of time, the finish of the cabinet may deteriorate or the coating may come off.
On Moisture Condensation
If the unit is brought directly from a cold place to a warm place, or the unit is warm and the ambient temperature cools suddenly (by air-conditioning, for example), moisture may condense on the surface or inside of the unit, or create a mist residue inside the protection plate if it is installed to the unit.
This is called moisture condensation, and is not a malfunction of the product itself, although it may cause damage to the unit.
Leave the unit in a condensation free area.
If moisture condensation has occurred, turn off the unit and do not use it until moisture condensation has evaporated.
On Repacking
Do not throw away the carton and packing materials. They make an ideal container which to transport the unit.
On Mounting on a Rack
Leave 1U space empty above and below the monitor to ensure adequate air circulation or install a fan to maintain the monitor's performance.
If you have any questions about this unit, contact your authorized Sony dealer.
On Fan Error
The fan for cooling the unit is built in. When the fan stops and the KEY INHIBIT indicator on the front panel blinks for fan error indication, turn off the power and contact an authorized Sony dealer.
Features
The LMD-1530W (15.3-type) is a multiple format LCD monitor for broadcast/professional use featuring a precise image and high performance. Supporting digital/analog main broadcast signals, and HDMI 1) input, it can be used under various lighting conditions.
1) HDMI, the HDMI logo and High-Definition Multimedia Interface are trademarks or registered trademarks of HDMI Licensing LLC.
High brightness LCD panel
Because of precise image, wide viewing angle technology and high speed response, real color image can be reproduced.
Multi-format
The monitor supports the video, Y/C, RGB, component and HDMI input signals.
Both NTSC and PAL color systems are supported, and the appropriate color system is selected automatically.
SDI signals can be available when input adaptor BKM-320D (optional) is used.
HD/SD-SDI signals can be available when input adaptor BKM-341HS (optional) is used.
For more information, see “Video signal formats” (page 54).
External sync input
When the EXT SYNC button is in the on position, the unit can be operated on the sync signal supplied from an external sync generator.
Automatic termination (connector with W-mark only)
The input connector is terminated internally at 75 ohms when nothing has been connected to the output connector. If a cable is connected to the output connector, the internal terminal is automatically released and the signals input to the input connector are output to the output connector (loop-through).
External remote control function
You can directly select the input signal, aspect, etc., by operating the equipment connected to the PARALLEL REMOTE connector.
Monitor stand with tilt function
A monitor stand with tilt function is equipped for desk top use. It shall be removed when mounted on the rack.
Rack mount
The monitor supports the VESA (100 × 100 mm) standard.
It can be mounted on an EIA standard 19-inch rack (using an optional mounting bracket).
For more information, see "Installing to the Rack" (page 41).
Consult with Sony qualified personnel for wall mount installation.
3-color tally lamp
The tally lamp lights in red, green or amber to monitor each input picture and check the on-air mode.
Blue only mode
In the blue only mode, a monochrome display is obtained with all three of the R/G/B picture elements driven with a blue signal. This mode is convenient for chroma and phase adjustments and monitoring of signal noise.
Marker function
SAFETY AREA marker, CENTER MARKER, 16:9 MARKER for the 4:3 aspect ratio or 4:3 MARKER for the 16:9 aspect ratio can be displayed.
Scan setting
You can set the display size to normal scan, over scan or full screen mode.
Select color temperature and gamma mode
You can select the color temperature from among two (HIGH and LOW) settings.
You can select the gamma mode from among five settings.
Aspect setting
You can set the monitor to 4:3 or 16:9 display mode according to the input video signal.
On-screen menus
You can set the appropriate settings according to the connected system by using the on-screen menus.
Select language display
You can select from seven display languages: English, French, German, Spanish, Italian, Japanese, and Chinese.
Key inhibit function
You can inhibit a key function to prevent missing an operation.
I/P mode setting
This unit is equipped with an I/P mode setting function that is used to minimize picture delay due to the signal conversion process.
Location and Function of Parts and Controls
Front Panel

① Tally lamp
You can check the status of the monitor by the color of the tally lamp.
The tally lamp lights in red, green, or amber according to the setting of the REMOTE menu.
② (standby) switch and indicator
Press to turn on the power when this unit is in standby mode. The indicator turns on. Press again to set the monitor in standby mode. The indicator goes out.
③ KEY INHIBIT indicator
Lights when the key inhibit function works.
The indicator blinks when fan error occurs.
For details on the key inhibit, see “KEY INHIBIT menu” (page 51).
④VOLUME buttons
Press the + button to increase the volume or the - button to decrease it.
⑤Menu operation buttons
Displays or sets the on-screen menu.
↑/↓/←/→ (arrow) buttons
Select the menu or make various adjustments.
MENU button
Press to display the on-screen menu.
Press again to clear the menu.
RESET button
Resets the value of an item back to the previous value. This button functions when the menu item is adjusted (displayed) on the screen.
ENTER button
Press to confirm a selected item on the menu.
⑥ASPECT select button
Sets the aspect ratio of the picture, 4:3 or 16:9.
⑦SCAN select button
You can change the scan size of the picture. Press to change the scan size among over (5% over scan), normal (0% scan) and full screen set on the SCAN menu (page 49).
⑧BLUE ONLY button
Press to eliminate the red and green signals. Only blue signal is displayed as a monochrome picture on the screen. This mode is convenient for chroma and phase adjustments and monitoring of signal noise.
⑨EXT SYNC (external sync) button
Press to operate the unit on an external sync signal through the EXT SYNC IN connector.
The EXT SYNC button works when the component/RGB signals are input.
10SDI button
Press to monitor the signal through the OPTION IN connector.
⑪RGB/COMPONENT button
Press to monitor the signal through the RGB/COMPONENT input connector.
⑫HDMI button
Press to monitor the signal through the HDMI IN connector.
13LINE button
Press to monitor the signal through the LINE input connector.
14 Speaker
The audio signal selected by the input select button (10 SDI button, 11 RGB/COMPONENT button, 12 HDMI button, or 13 LINE button) on the front panel is output.
Input Signals and Adjustable/Setting Items
O: Adjustable/can be set ×: Not adjustable/cannot be set
*1 When a component signal (480/60I) is input, this can be switchable.
*2 When a 480/60P or 576/50P signal is input, this can be switchable.
*3 When an interlace signal is input, this can be switchable.
*4 When BKM-320D or BKM-341HS is used, SDI signals can be input.
*5 When a PC signal is input to the HDMI IN connector using a DVI conversion cable, this can be adjusted.
Rear Panel

1 HDMI IN connector
HDMI (High-Definition Multimedia Interface) is an interface that supports both video and audio on a single digital connection, allowing you to enjoy high quality digital picture and sound. The HDMI specification supports HDCP (High-bandwidth Digital Content Protection), a copy protection technology that incorporates coding technology for digital video signals.
Notes
- Use HDMI compliant cable (optional) with HDMI logo.
- Color noise may appear on the edge of the screen depending on the connected device. This is not a malfunction.
②HDMI cable holder
Secures the HDMI cable (∅7 mm or less).

③OPTION IN connector (D-sub 9-pin, female)
Inputs SD-SDI signals when optional Sony BKM-320D is connected. Inputs HD/SD-SDI signals when optional Sony BKM-341HS is connected.
Press the SDI button to select the signal.
Note
Do not connect the equipment other than BKM-320D or BKM-341HS. It causes damage to the unit or the equipment.
④OPTION AUDIO IN connector (phono jack)
Inputs an audio signal if the BKM-320D or BKM-341HS is connected to the OPTION IN connector.
Press the SDI button to monitor the audio signal.
⑤EXT SYNC IN/OUT (external sync) connectors (BNC)
Press the EXT SYNC button to use the sync signal through this connector.
IN connector
When this unit operates on an external sync signal, connect the reference signal from a sync generator to this connector.
Note
When inputting a video signal with jitters, etc., the picture may be disturbed. We recommend using the TBC (time base corrector).
OUT connector
Loop-through output of the IN connector. Connect to the external sync input of video equipment to be synchronized with this unit.
When a cable is connected to this connector, the 75-ohm termination of the input is automatically released, and the signal input to the IN connector is output from this connector.
⑥RGB/COMPONENT connectors
Analog RGB signal or component (Y/P_B/P_R) signal input connectors and their loop-through output connectors.
Press the RGB/COMPONENT button to monitor the signal input through these connectors.
G/Y, B/PB, R/PR IN/OUT (BNC)
These are the input/output connectors for an analog RGB and a component (Y/P_B/P_R) signal. Unless an external sync signal is input, the monitor is synchronized with the sync signal contained in the G/Y signal.
AUDIO IN/OUT (phono jack)
When using an analog RGB or a component signal as a video signal, use these jacks for the input/
output of an audio signal. Connect them to the audio input/output jacks on equipment such as a VCR.
⑦PARALLEL REMOTE connector (modular connector, 8-pin)
Forms a parallel switch and controls the monitor externally.
For details on the pin assignment and factory setting function assigned to each pin, see page 53.
CAUTION
For safety, do not connect the connector for peripheral device wiring that might have excessive voltage to this port. Follow the instructions for this port.
ATTENTION
Line input connectors for Y/C separate, composite video and audio signals and their loop-through output connectors.
Press the LINE button to monitor the signal input through these connectors.
If you input signals to both Y/C IN and VIDEO IN, the signal input to the Y/C IN is selected.
Y/C IN/OUT (4-pin mini-DIN)
These are the input/output connectors for a Y/C separate signal. Connect them to the Y/C separate input/output connectors on equipment such as a VCR, video camera, or another monitor.
VIDEO IN/OUT (BNC)
These are the input/output connectors for a composite video signal. Connect them to the composite video input/output connectors on equipment such as a VCR, video camera, or another monitor.
AUDIO IN/OUT (phono jack)
These are the input/output jacks for an audio signal. Connect them to the audio input/output jacks on equipment such as a VCR.
⑨ AC IN socket
Connect the supplied AC power cord.
Installing to the Rack
1. Remove the screws (4) to remove the stand.

2. Attach the unit to the rack using the mounting bracket.

Connecting the AC Power Cord
1. Plug the AC power cord into the AC IN socket on the rear panel. Then, attach the AC plug holder (supplied) to the AC power cord.
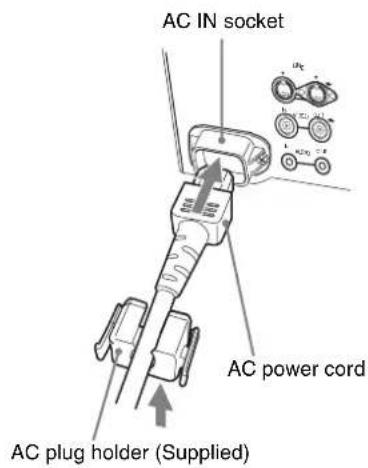
2. Slide the AC plug holder over the cord until it locks.

To disconnect the AC power cord
Pull out the AC plug holder while pressing the lock levers.
Attaching the Input Adaptor
Before attaching the input adaptor, disconnect the power cord.
BKM-320D
BKM-341HS

Note
Do not connect equipment other than BKM-320D or BKM-341HS. It may cause damage to the unit or the equipment.
Selecting the Default Settings
When you turn on the unit for the first time after purchasing it, select the area where you intend to use this unit from among the options.
The default setting values for each area
| COLOR TEMP | COMPONENT LEVEL | NTSC SETUP | ||
| 1NORTH AMERICA LOW BETA7.5 7.5 | ||||
| 2LATIN AMERICAPAL&PAL-N AREA | ARGENTINA LOW SMPTE 0 | |||
| PARAGUAY LOW SMPTE 0 | ||||
| URUGUAY LOW SMPTE 0 | ||||
| NTSC&PAL-M AREA | OTHER AREA LOW BETA7.5 7.5 | |||
| 3AFRICA AUSTRALASIA EUROPE MIDDLE-EAST | LOW SMPTE 0 | |||
| 4ASIA EXCEPT JAPAN | NTSC AREA LOW BETA7.5 7.5 | |||
| PAL AREA LOW SMPTE 0 | ||||
| 5JAPAN HIGH SMPTE 0 | ||||

1 Press the ⏻ (standby) switch.
The power is turned on and the SELECT SETTING screen appears.
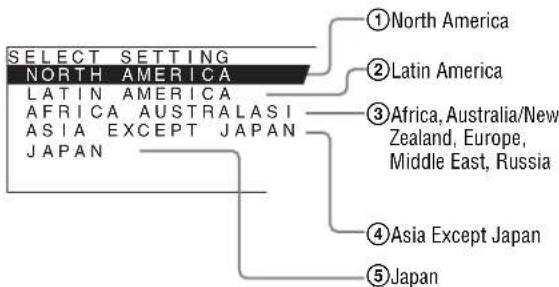
2 Press the ↑ or ↓ button to select the area where you intend to use the unit and press the → or ENTER button.
If you select either ①, ③ or ⑤
The confirmation screen is displayed. Confirm the selected area. When the setting is wrong, press the ← button to return to the previous screen.
SELECT THIS AREA?
NORTH AMERICA
[ENTER]YES
[MENU]NO
If you select either ② or ④
One of the following screens appears. Press the ↑ or ↓ button to narrow the area further and then press the → or ENTER button.
The confirmation screen is displayed. Confirm the selected area. When the setting is wrong, press the ← button to return to the previous screen.
②If LATIN AMERICA is selected:

④If ASIA EXCEPT JAPAN is selected:
Customers who will use this unit in the shaded areas shown in the map below should select NTSC AREA.
Other customers should select PAL AREA.


3 Press the ↑ or ↓ button to narrow the area further and then press the → or ENTER button.
The SELECT SETTING screen disappears and the menu item settings suitable for the selected area are applied.
Note
When you have selected the wrong area, set the following items using the menu.
• COLOR TEMP (on page 47) • COMPONENT LEVEL (on page 48) • NTSC SETUP (on page 48)
See "The default setting values for each area" (page 43) on the setting value.
Selecting the Menu Language
You can select one of seven languages (English, French, German, Spanish, Italian, Japanese, Chinese) for displaying the menu and other on-screen displays.
“ENGLISH (English)” is selected in the default setting. The current settings are displayed in place of the ■ marks on the illustrations of the menu screen.

1 Press the ⏻ (standby) switch to turn on the unit. 2 Press the MENU button.
The menu appears.
The menu presently selected is shown in yellow.

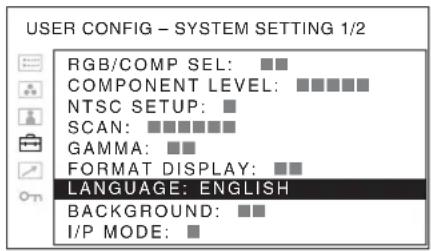
3 Press the ↑ or ↓ button to select SYSTEM SETTING of the USER CONFIG (User Configuration) menu, then press the → or ENTER button.
The setting items (icons) in the selected menu are displayed in yellow.

4 Press the ↑ or ↓ button to select "LANGUAGE," then press the → or ENTER button.
The selected item is displayed in yellow.

5 Press the ↑ or ↓ button to select a language, then press the → or ENTER button.
The menu changes to the selected language.

To clear the menu
Press the MENU button.
The menu disappears automatically if a button is not pressed for one minute.
Using the Menu
The unit is equipped with an on-screen menu for making various adjustments and settings such as picture control, input setting, set setting change, etc. You can also change the menu language displayed in the on-screen menu.
To change the menu language, see "Selecting the Menu Language" on page 44.
The current settings are displayed in place of the ■ marks on the illustrations of the menu screen.

1 Press the MENU button.
The menu appears.
The menu presently selected is shown in yellow.

2 Press the ↑ or ↓ button to select a menu, then press the → or ENTER button.
The menu icon presently selected is shown in yellow and setting items are displayed.
3 Select an item.
Press the ↑ or ↓ button to select the item, then press the → or ENTER button.
The item to be changed is displayed in yellow.
Note
If the menu consists of multiple pages, press ↑ or ↓ button to go to the desired menu page.
4 Make the setting or adjustment on an item.
When changing the adjustment level:
To increase the number, press the ↑ button.
To decrease the number, press the ↓ button.
Press the ENTER button to confirm the number, then restore the original screen.
When changing the setting:
Press the ↑ or ↓ button to change the setting.
Press the ENTER button to confirm the setting.
Notes
- An item displayed in black cannot be accessed. You can access the item if it is displayed in white.
- If the key inhibit has been turned on, all items are displayed in black. To change any of the items, turn the key inhibit to OFF first.
For details on the key inhibit, see “KEY INHIBIT menu” (page 51).
To clear the menu
Press the MENU button.
The menu disappears automatically if a button is not pressed for one minute.
About the memory of the settings
The settings are automatically stored in the monitor memory.
To reset items that have been adjusted
Pressing the RESET button while you are adjusting any of the menu items resets the menu item to the previous setting.
Adjustment Using the Menus
Items
The screen menu of this monitor consists of the following items.
STATUS (the items indicate the current settings.)
For the video input
FORMAT
COLOR TEMP
GAMMA
COMPONENT LEVEL
NTSC SETUP
RGB/COMP SEL
SCAN MODE
Model name and serial number
OPTION
For the DVI input
FORMAT
fH
fV
COLOR TEMP
Model name and serial number
OPTION
COLOR TEMP/BAL
COLOR TEMP
MANUAL ADJUSTMENT
USER CONTROL
CONTROL
USER CONFIG
SYSTEM SETTING
RGB/COMP SEL
COMPONENT LEVEL
NTSC SETUP
SCAN
GAMMA
FORMAT DISPLAY
LANGUAGE
BACKGROUND
I/P MODE
SD PIXEL MAPPING
MARKER SETTING
MARKER ENABLE
MARKER SELECT CENTER MARKER SAFETY AREA MARKER LEVEL
→ REMOTE
PARALLEL REMOTE
1PIN
2PIN
3PIN
4PIN
6PIN
7PIN
8PIN
ON KEY INHIBIT
KEY INHIBIT
Adjusting and Changing the Settings
STATUS menu
The STATUS menu is used to display the current status of the unit. The following items are displayed:
For the video input

• Signal format • Color temperature • Gamma • Component level • NTSC setup • RGB/Component select • Scan mode • Model name and serial number • Option
For the DVI input

- Signal format • fH • fV • Color temperature
- Model name and serial number
- Option
COLOR TEMP/BAL menu
The COLOR TEMP/BAL menu is used for adjusting the picture white balance.
You need to use the measurement instrument to adjust the white balance.
Recommended: Konica Minolta color analyzer CA-210

| Submenu | Setting |
| COLOR TEMP | Selects the color temperature from among HIGH, LOW and USER setting. |
Submenu Setting
| MANUALADJUSTMENT | If you set the COLOR TEMP to USER setting, the item displayed is changed from black to white, which means you can adjust the color temperature.ADJUST GAIN: Adjusts the color balance (GAIN).ADJUST BIAS: Adjusts the color balance (BIAS).COPY FROM: If you select HIGH or LOW, the white balance data for the selected color temperature will be copied in the USER setting. |
USER CONTROL menu
The USER CONTROL menu is used for adjusting the picture.
Items that cannot be adjusted depending on the input signal are displayed in black.
For details of input signal and adjustable / setting items, see page 39.

Submenu Setting
CONTROL You can adjust the picture.
• CONTRAST: Adjusts the picture contrast. • BRIGHTNESS: Adjusts the picture brightness. • CHROMA: Adjusts color intensity. The higher the setting, the greater the intensity. The lower the setting, the lower the intensity. • PHASE: Adjusts color tones. The higher the setting, the more greenish the picture. The lower the setting, the more purplish the picture. • APERTURE: Adjusts the picture sharpness. The higher the setting, the sharper the picture. The lower the setting, the softer the picture. • BACKLIGHT: Adjusts the backlight. When the setting is changed, the brightness of the backlight is changed.
USER CONFIG menu
The USER CONFIG menu is used for setting the system and marker. You can set the display language and so on. Items that cannot be adjusted depending on the input signal are displayed in black.

SYSTEM SETTING
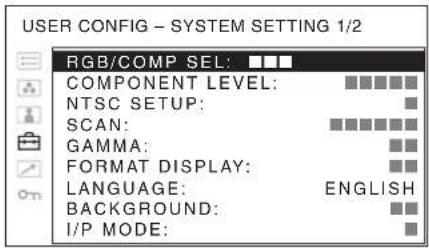

Submenu Setting
| RGB/COMP SEL When a signal input via the RGB/ COMPONENT connector is being monitored, based on the signal being input, select RGB or COMP (component). |
| COMPONENT LEVEL Selects the component level from among three modes. • SMPTE: for 100/0/100/0 signal • BETA0: for 100/0/75/0 signal • BETA7.5: for 100/7.5/75/7.5 signal |
| NTSC SETUP Selects the NTSC setup level from two modes. The 7.5 setup level is used mainly in North America. The 0 setup level is used mainly in Japan. |
Submenu Setting
| SCAN Sets the scan size of the picture.Select from OFF and FULL.The display format changesdepending on the mode selected.(See “Scan mode image” on page50)OFF: Changes between over scanand normal scan.FULL: Changes to over scan,normal scan or full screen. | |
| GAMMA Select the appropriate gammapode. You can select from amongfive settings. When "3" is selected,the setting is roughly same as thegamma mode of the CRT (2.2). | |
| FORMAT DISPLAY Selects the display mode of thesignal format.ON: The format is alwaysdisplayed.OFF: The display is hidden.AUTO: The format is displayedfor about five seconds whenthe input of the signal starts. | |
| LANGUAGE Selects the menu or messagelanguage from among sevenlanguages.ENGLISH: EnglishFRANÇAIS: FrenchDEUTSCH: GermanESPAÑOL: SpanishITALIANO: Italian日本語csc中文:C h i r | |
| BACKGROUND Sets the brightness of the black barsappearing in the upper and lowerpositions of the screen, or on thesides of the screen.OFF: Displays a darker bar(black).ON: Displays a brighter bar(gray). | |
| I/P MODE (picture delayminimum) | Select to set the delay by the pictureprocessing to the minimum levelwhen the signal is input.INTER-FIELD: Performsinterpolation depending onthe movement of the imagesbetween the fields. It takeslonger than “LINEDOUBLER” for processingthe picture. “INTER-FIELD” is the factorysetting.LINE DOUBLER: Theprocessing time is shorter.Performers interpolation byrepeating each line in thedata receiving sequenceregardless of the field. Asthe line flicker is displayedin this mode, it is availablefor checking the line flickerof the telop work and so on. |
Submenu Setting
| SD PIXEL MAPPING Selects SD picture size (pixels) according to input signal format. • COMPOSITE&Y/C: Set to monitor the signal input through the LINE connector (VIDEO IN or Y/C IN connector). • RGB/COMPONENT: Set to monitor the signal input through the RGB/COMPONENT connector. |
| When picture signals in the size of 720 × 576 (50i) (or 720 × 487 (60i)) are input Select 720 × 576 (or 720 × 487). This is the default setting. When 702 × 576 (or 712 × 483) is selected, all sides of the input picture are cut off by several pixels. |
| When picture signals in the size of 702 × 576 (50i) (or 712 × 483 (60i)) or equivalent are input Select 702 × 576 (or 712 × 483). When 720 × 576 (or 720 × 487) is selected, a black border (of several pixels wide) appears around the input picture. |
Scan mode image
| Input | |||
 |  | ||
| Output | OVER SCAN (5% OVER SCAN) |  |  |
| NORMAL SCAN (0% SCAN) |  |  | |
| FULL |  |  | |
MARKER SETTING
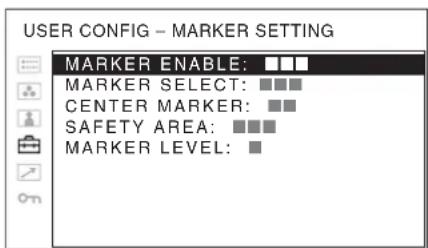
Submenu Setting
| MARKER ENABLE Selects ON to display the marker and OFF not to display. |
| MARKER SELECT When the frame of the film is displayed on the screen, select the aspect ratio according to the film.When 16:9 aspect ratio is selected with the ASPECT select buttonYou can select either 4:3 or OFF.When 4:3 aspect ratio is selected with the ASPECT select buttonYou can select either 16:9 or OFF. |
Submenu Setting
| CENTER MARKER Select ON to display the center mark of the picture and OFF not to display. |
| SAFETY AREA Selects the safe area size for the aspect ratio determined by the button which the aspect function is assigned.You can select from among OFF, 80%, 85%, 88%, 90% and 93%.When the marker is displayed, the safe area for the marker is displayed. |
| MARKER LEVEL Sets the luminance to display the MARKER SELECT, CENTER MARKER and SAFETY AREA.When the setting is low, the marker is displayed dark. |

REMOTE menu
Select the PARALLEL REMOTE connector pins for which you want to change the function.

You can assign various functions to pins 1 to 4 and 6 to 8. The following lists the functions you can assign to the pins.
REMOTE
- (-- - -: No function is assigned.) • LINE • H D M I
- RGB/COMP • 16:9 • 4:3 • NORMAL • OVER • FULL • TALLY R • TALLY G -EXTSYNC
- BLUE ONLY • 16:9 MARKER • 4:3 MARKER • CENTER MARKER • SAFE AREA 80% • SAFE AREA 85% • SAFE AREA 88% • SAFE AREA 90% • SAFE AREA 93%
• SDI
If you use the PARALLEL REMOTE function, you need to connect cables.
For more details, see page 53.
on KEY INHIBIT menu

You can lock the setting so that they cannot be changed by an unauthorized user.
Select OFF or ON.
If you set to ON, all items are displayed in black, indicating the items are locked.
Troubleshooting
This section may help you isolate the cause of a problem and as a result, eliminate the need to contact technical support.
- The display is colored in green or purple → Select the correct input from the RGB/COMP SEL setting in the USER CONFIG menu (page 48).
- The unit cannot be operated → The key protection function works. Set the KEY INHIBIT setting to OFF in the KEY INHIBIT menu.
Specifications
Picture performance
LCD panel a-Si TFT Active Matrix
Picture size 15.3 type
334 × 200, 390 mm
(W/H, Diagonal)
(13 1/4 × 7 7/8, 15 3/8 inches)
Resolution 1280 × 768 dots (WXGA)
Viewing angle (LCD panel specifications)
(up/down/left/right, contrast > 10:1)
89° / 89° / 89° / 89° (typical)
Scan Normal 0%
Over 5%
Aspect 15:9
Display color 16,770,000
Input/output connectors
Input
LINE input connectors
Y/C input 4-pin mini-DIN (1)
VIDEO input
BNC type (1), 1 Vp-p ±3 dB, negative
synchronization
AUDIO input
Phono jack (1), -5 dBu 47 kΩ or higher
RGB/COMPONENT input connectors
BNC type (3)
RGB input 0.7 Vp-p ±3 dB, (Sync On Green,
0.3 Vp-p negative sync.)
Component input
0.7 Vp-p ±3 dB, (75% chrominance
standard color bar signal)
AUDIO input
Phono jack (1), -5 dBu 47 kΩ or higher
OPTION IN connector
D-sub 9-pin (1), female
OPTION AUDIO IN connector
Phono jack (1), -5 dBu 47 kΩ or higher
External synchronized input connector
BNC type (1), 0.3 to 4 Vp-p
± bipolarity ternary or negative
polarity binary
HDMI IN connector
HDMI (1)
PARALLEL REMOTE input connector
Parallel remote
Modular connector 8-pin (1)
Output
LINE output connectors
Y/C output 4-pin mini-DIN (1), Loop-through, with 75 Ω automatic terminal function
VIDEO output
BNC type (1), Loop-through, with
75 Ω automatic terminal function
AUDIO output
Phono jack (1), Loop-through
RGB/COMPONENT output connectors
RGB/Component output
BNC type (3), Loop-through, with
75 Ω automatic terminal function
AUDIO output
Phono jack (1), Loop-through
External synchronized output connector
BNC type (1), Loop-through, with
75 Ω automatic terminal function
Built-in speaker output
0.5 W (mono)
General
Power AC 100 to 240 V, 50/60 Hz
Power consumption
Maximum: approx. 50 W, 1.0 A to
0.5 A
Inrush current (1) Maximum possible inrush current
at initial switch-on (Voltage
changes caused by manual
switching):
63A peak, 0.4A r.m.s. (240V AC)
(2) Inrush current after a mains
interruption of five seconds
(Voltage changes caused at zero-
crossing):
51A peak, 0.3A r.m.s. (240V AC)
Operating conditions
Temperature
0°C to 35°C (32°F to 95°F)
Recommended temperature
20 °C to 30 °C (68 °F to 86 °F)
Humidity 30% to 85% (no condensation)
Pressure 700 hPa to 1060 hPa
Storage and transport conditions
Temperature
-20°C to +60°C (-4°F to +140°F)
Humidity 0% to 90%
Pressure 700 hPa to 1060 hPa
Accessories supplied
AC power cord (1)
AC plug holder (1)
Operating Instructions (1)
CD-ROM (1)
Using the CD-ROM Manual (1)
Optional accessories
Mounting bracket MB-533
SDI input adaptor BKM-320D
HD/SD-SDI input adaptor BKM-341HS
Design and specifications are subject to change without notice.
Note
Always verify that the unit is operating properly before use. SONY WILL NOT BE LIABLE FOR DAMAGES OF ANY KIND INCLUDING, BUT NOT LIMITED TO, COMPENSATION OR REIMBURSEMENT ON ACCOUNT OF THE LOSS OF PRESENT OR PROSPECTIVE PROFITS DUE TO FAILURE OF THIS UNIT, EITHER DURING THE WARRANTY PERIOD OR AFTER EXPIRATION OF THE WARRANTY, OR FOR ANY OTHER REASON WHATSOEVER.
Pin assignment
PARALLEL REMOTE connector
Modular connector (8-pin)
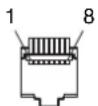
| Pin number Functions | ||
| 1 Designating LINE input signal | ||
| 2 Designating HDMI input signal | ||
| 3 Designating RGB/COMPONENT input signal | ||
| 4 | 16:9 | |
| 5 | GND | |
| 6 | 4:3 | |
| 7 | Selecting | NORMAL |
| 8 | Selecting | OVER |
For details on function allocations, see REMOTE menu (page 50).
Wiring required to use the Remote Control
Connect the function you want to use with a Remote Control to the Ground (Pin 5).
Video signal formats
The unit is applicable to the following signal formats.
| System | Total lines | Active lines | Frame rate | Scanning format | Aspect ratio Signal standard | |
| 575/50I (PAL) | 625 575 25 2:1 interlace 16:9/4:3 | EBU N10(PAL: ITU-R BT.624) | ||||
| 480/60I (NTSC) *1 | 525 483 30 2:1 interlace 16:9/4:3 | SMPTE 253M(NTSC: SMPTE 170M) | ||||
| 576/50P 625 576 50 Progressive 16:9/4:3 ITU-R BT.1358 | ||||||
| 480/60P 525 483 60 Progressive 16:9/4:3 SMPTE 293M | ||||||
| 1080/24P *1 | 1125 | 1080 | 24 | Progressive | 16:9 | SMPTE 274M |
| 1080/25P | 1125 | 1080 | 25 | Progressive | 16:9 | SMPTE 274M |
| 1080/30P *1 | 1125 | 1080 | 30 | Progressive | 16:9 | SMPTE 274M |
| 1080/50I | 1125 | 1080 | 25 | 2:1 interlace | 16:9 | SMPTE 274M |
| 1080/60I *1 | 1125 | 1080 | 30 | 2:1 interlace | 16:9 | SMPTE 274M/BTA S-001B |
| 720/50P 750 720 50 Progressive | 16:9 | SMPTE 296M | ||||
| 720/60P *1 | 750 720 60 Progressive | 16:9 | SMPTE 296M | |||
*1 Also supports frame rate 1/1.001.
Applicable DVI input signals
When a PC signal is input to the HDMI IN connector using a DVI conversion cable
| Resolution | Dot clock (MHz) | fH (kHz) | fV (Hz) |
| 720 × 400 70Hz | 28.322 | 31.469 | 70.087 |
| 800 × 600 56Hz | 36.000 | 35.156 | 56.250 |
| 800 × 600 60Hz | 40.000 | 37.879 | 60.317 |
| 1024 × 768 60Hz | 65.000 | 48.363 | 60.004 |
| 1280 × 768 60Hz | 79.500 | 47.776 | 59.870 |
Note
The sides of the displayed picture may be invisible depending on the input signal.
When an optional input adaptor is connected, the unit is applicable to the following signal formats.
When BKM-320D/BKM-341HS is connected
| Input | |||
| System | BKM-320D | BKM-341HS | Signal standard |
| 575/50I | ○ | ○ | SMPTE 259M |
| 480/60I*1 | ○ | ○ | SMPTE 259M |
| 1080/24PsF*1 | - | ○ | SMPTE 292M |
| 1080/25PsF | - | ○ | SMPTE 292M |
| 1080/24P*1 | - | ○ | SMPTE 292M |
| 1080/25P | - | ○ | SMPTE 292M |
| 1080/30P*1 | - | ○ | SMPTE 292M |
| Input | |||
| System | BKM-320D | BKM-341HS | Signal standard |
| 1080/50I | - | SMPTE 292M | |
| 1080/60I*1 | - | SMPTE 292M | |
| 720/50P | - | SMPTE 292M | |
| 720/60P*1 | - | SMPTE 292M | |
○ : Can be input - : Cannot be input *1 The frame rate is also compatible with 1/1.001.
Dimensions
Front
Rear

Side
Bottom

Unit: mm (inches) Mass: Approx. 5.9 kg (13 lb)


- ① TALLY LAMP
- ① HDMI IN TERMINAL
- CONNECTING THE POWER CORD
- TO DISCONNECT THE POWER CORD
- OWNER'S RECORD
- IMPORTANT SAFETY INSTRUCTIONS
- WARNING
- CAUTION
- ATTENTION-WHEN THE PRODUCT IS INSTALLED IN RACK
- PREVENTION AGAINST OVERLOADING OF BRANCH CIRCUIT
- PROVIDING PROTECTIVE EARTH
- INTERNAL AIR AMBIENT TEMPERATURE OF THE RACK
- PREVENTION AGAINST ACHIEVING HAZARDOUS CONDITION DUE TO UNEVEN MECHANICAL LOADING
- INSTALL THE EQUIPMENT WHILE TAKING THE OPERATING TEMPERATURE OF THE EQUIPMENT INTO CONSIDERATION
- WHEN PERFORMING THE INSTALLATION, KEEP THE FOLLOWING SPACE AWAY FROM WALLS IN ORDER TO OBTAIN PROPER EXHAUST AND RADIATION OF HEAT
- FOR CUSTOMERS IN NORWAY
- FOR CUSTOMERS IN THE U.S.A
- FOR THE CUSTOMERS IN CANADA
- FOR THE CUSTOMERS IN EUROPE
- FOR THE CUSTOMERS IN THE USA
- DISPOSAL OF OLD ELECTRICAL & ELECTRONIC EQUIPMENT (APPLICABLE IN REPUBLIC OF INDIA)
- FEATURES
- LOCATION AND FUNCTION OF PARTS AND CONTROLS
- INSTALLING TO THE RACK
- ADJUSTMENT USING THE MENUS
- TROUBLESHOOTING
- SPECIFICATIONS
- DIMENSIONS
- PRECAUTION
- ON SAFETY
- ON INSTALLATION
- HANDLING THE LCD SCREEN
- ON BURN-IN
- TO REDUCE THE RISK OF BURN-IN
- ON A LONG PERIOD OF USE
- ON CLEANING
- BEFORE CLEANING
- ON CLEANING THE MONITOR SCREEN
- ON CLEANING THE CABINET
- ON MOISTURE CONDENSATION
- ON REPACKING
- ON MOUNTING ON A RACK
- ON FAN ERROR
- HIGH BRIGHTNESS LCD PANEL
- MULTI-FORMAT
- EXTERNAL SYNC INPUT
- AUTOMATIC TERMINATION (CONNECTOR WITH W-MARK ONLY)
- EXTERNAL REMOTE CONTROL FUNCTION
- MONITOR STAND WITH TILT FUNCTION
- RACK MOUNT
- COLOR TALLY LAMP
- BLUE ONLY MODE
- MARKER FUNCTION
- SCAN SETTING
- SELECT COLOR TEMPERATURE AND GAMMA MODE
- ASPECT SETTING
- ON-SCREEN MENUS
- SELECT LANGUAGE DISPLAY
- KEY INHIBIT FUNCTION
- I/P MODE SETTING
- FRONT PANEL
- ② (STANDBY) SWITCH AND INDICATOR
- ③ KEY INHIBIT INDICATOR
- ④VOLUME BUTTONS
- ⑤MENU OPERATION BUTTONS
- MENU BUTTON
- RESET BUTTON
- ENTER BUTTON
- ⑥ASPECT SELECT BUTTON
- ⑦SCAN SELECT BUTTON
- ⑧BLUE ONLY BUTTON
- ⑨EXT SYNC (EXTERNAL SYNC) BUTTON
- SDI BUTTON
- ⑪RGB/COMPONENT BUTTON
- ⑫HDMI BUTTON
- LINE BUTTON
- SPEAKER
- REAR PANEL
- HDMI IN CONNECTOR
- NOTES
- ②HDMI CABLE HOLDER
- ③OPTION IN CONNECTOR (D-SUB 9-PIN, FEMALE)
- NOTE
- ④OPTION AUDIO IN CONNECTOR (PHONO JACK)
- ⑤EXT SYNC IN/OUT (EXTERNAL SYNC) CONNECTORS (BNC)
- IN CONNECTOR
- OUT CONNECTOR
- ⑥RGB/COMPONENT CONNECTORS
- G/Y, B/PB, R/PR IN/OUT (BNC)
- AUDIO IN/OUT (PHONO JACK)
- ⑦PARALLEL REMOTE CONNECTOR (MODULAR CONNECTOR, 8-PIN)
- ATTENTION
- Y/C IN/OUT (4-PIN MINI-DIN)
- VIDEO IN/OUT (BNC)
- ⑨ AC IN SOCKET
- CONNECTING THE AC POWER CORD
- TO DISCONNECT THE AC POWER CORD
- ATTACHING THE INPUT ADAPTOR
- SELECTING THE DEFAULT SETTINGS
- PRESS THE ⏻ (STANDBY) SWITCH
- PRESS THE ↑ OR ↓ BUTTON TO SELECT THE AREA WHERE YOU INTEND TO USE THE UNIT AND PRESS THE → OR ENTER BUTTON
- IF YOU SELECT EITHER ② OR ④
- ②IF LATIN AMERICA IS SELECTED
- ④IF ASIA EXCEPT JAPAN IS SELECTED
- SELECTING THE MENU LANGUAGE
- TO CLEAR THE MENU
- USING THE MENU
- SELECT AN ITEM
- MAKE THE SETTING OR ADJUSTMENT ON AN ITEM
- WHEN CHANGING THE ADJUSTMENT LEVEL
- WHEN CHANGING THE SETTING
- ABOUT THE MEMORY OF THE SETTINGS
- TO RESET ITEMS THAT HAVE BEEN ADJUSTED
- ITEMS
- STATUS (THE ITEMS INDICATE THE CURRENT SETTINGS.)
- FOR THE VIDEO INPUT
- FOR THE DVI INPUT
- COLOR TEMP/BAL
- USER CONTROL
- USER CONFIG
- → REMOTE
- ON KEY INHIBIT
- ADJUSTING AND CHANGING THE SETTINGS
- STATUS MENU
- COLOR TEMP/BAL MENU
- USER CONTROL MENU
- SUBMENU SETTING
- USER CONFIG MENU
- SYSTEM SETTING
- SCAN MODE IMAGE
- MARKER SETTING
- REMOTE MENU
- REMOTE
- ON KEY INHIBIT MENU
- PICTURE PERFORMANCE
- INPUT/OUTPUT CONNECTORS
- INPUT
- OUTPUT
- GENERAL
- HD/SD-SDI INPUT ADAPTOR BKM-341HS
- PIN ASSIGNMENT
- PARALLEL REMOTE CONNECTOR
- WIRING REQUIRED TO USE THE REMOTE CONTROL
- VIDEO SIGNAL FORMATS
- APPLICABLE DVI INPUT SIGNALS
Brand : SONY
Model : LMD-1530W
Category : Monitor