
CM-85B.004A - Coffee machine Haeger - Free user manual and instructions
Find the device manual for free CM-85B.004A Haeger in PDF.


| Product type | Drip coffee maker |
| Brand | Haeger |
| Model | CM-85B.004A |
| Dimensions (L x D x H) | 30 x 20 x 35 cm |
| Weight | 2.5 kg |
| Color | Black / Stainless steel |
| Power supply | 220-240 V ~ 50/60 Hz |
| Power | 950 W |
| Water tank capacity | 1.5 L |
| Carafe capacity | 12 cups (1.2 L) |
| Main functions | Auto shut-off, keep warm, anti-drip, permanent filter |
| Coffee type | Ground |
| Keep warm | Yes, for 40 minutes |
| Auto shut-off | Yes, after 2 hours |
| Anti-drip system | Yes, allows removing the carafe during brewing |
| Water level indicator | Yes, graduated |
| Carafe material | Glass |
| Permanent filter | Included, reusable |
| Maintenance and cleaning | Regular descaling recommended with white vinegar or descaling product |
| Spare parts | Carafe, filter, tank available |
| Repairability | Repairability index of 7.8/10 |
| Warranty | 2 years |
Frequently Asked Questions - CM-85B.004A Haeger
User questions about CM-85B.004A Haeger
0 question about this device. Answer the ones you know or ask your own.
Ask a new question about this device
Download the instructions for your Coffee machine in PDF format for free! Find your manual CM-85B.004A - Haeger and take your electronic device back in hand. On this page are published all the documents necessary for the use of your device. CM-85B.004A by Haeger.
USER MANUAL CM-85B.004A Haeger
natural_image
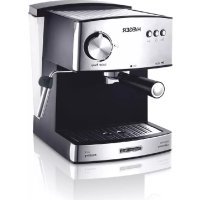
Exterior view of a D'Italia HAEGER coffee maker with control knobs and buttons (no text-heavy elements)D'Italia * CM-850.004A
Instructions Manual


Dear customer
Thank you for having chosen a HÆGER product.
The HÄEGER products have been produced to think about the welfare of the consumer privileging the most raised standards of quality, functionality and assign. We are sure you will be happy with this appliance.
We assume that the user is familiar with the common procedures of household appliances.
Before using the appliance for the first time please read carefully and thoroughly through these operating instructions and the safety advice, completely familiarising yourself with the appliance. Retain these instructions for future reference and pass them on to whoever might acquire the appliance at a future date.
Intended use
The coffee maker is intended exclusively for brewing coffee. This coffee maker is intended exclusively for use in private households. Pay heed to all of the information in this operating manual, especially the safety instructions. All other uses are deemed to be improper and may result in property damage or even in personal injury. We shall not accept liability for damages caused due to improper use of the appliance.
General Safety Instructions
Please read this manual since it contains important information on the safety, use and maintenance of your appliance. Keep it in a safe place for future reference.
- After removing the packaging, make sure the appliance is undamaged. If in doubt, do not use, please contact an authorized service centre.
- Before plugging the coffee maker into the mains supply, check that the voltage corresponds with that stated on the characteristics plate. It is compulsory an earthed socket.
- Place the coffee maker on a flat surface, away from the edge of the work surface to prevent it from falling accidentally.
- This appliance can be used by children aged from 8 years and above if they have been given supervision or instructions concerning the safe use of the appliance understand the hazards involved.
Cleaning and maintenance by the user shall not be made by children unless they are older 8 years and supervised. Keep the appliance and its cord out of reach of children less than 8 years.
- Children should be supervised to ensure that they do not play with the appliance.
- Do not touch the hot surfaces. Use the handles or Knobs.
- Do not operate the appliance with the cable still coiled.
- Don't immerse the appliance, the plug or power cord in water.
- Always remove the plug from the socket whenever the device is not in use, when attaching accessory parts, cleaning the device or whenever a disturbance occurs. Leave it to cool down before putting it away or removing pieces and before cleaning the appliance.
- To switch the coffee maker off, put the ON/OFF switch to "0" position and unplug the appliance.
- Do not let the cable hang over the edge of the table or work-top, nor let it come into contact with hot surfaces.
- Do not switch the appliance on if the cable or the plug is damaged or if it can be detected that the appliance is not working correctly.
- WARNING – Be careful; do not get burned by the steam which is evaporating from the coffee filter.
- Some parts of appliance are hot when operated, so do not touch with hand directly.
- WARNING – To reduce the risk of fire or electric shock, never remove any of the covers. There are no user serviceable parts on the inside. Cable repairs and replacements must be carried out exclusively by a qualified technician.
- This appliance has been designed exclusively for domestic use. For indoor use only. Do not use outdoors.
- If the supply cord is damaged, it must be replaced by the manufacturer, its service agent or similarly qualified persons in order to avoid hazard.
HOUSEHOLD USE ONLY
Overview of the components
-
ON/OFF switch
-
Steam switch
-
Green lamp
-
Water tank cover
-
Top cover
-
Froth device
-
Bottom cover
-
Removable shelf
-
Measuring spoon and tamper
-
Filter handle
-
Coffee/Hot water selector
-
Power red indicator
-
Steam control knob
-
Water tank
-
Steam wand
-
Main body
-
Drip tray
-
Stainless steel filter
-
Filter holder
-
Filter lock bar
Before The First Use
To ensure the first cup of coffee tastes excellent, you should rinse the coffee maker with warm water as follows:
- Open the tank cover and pour water into it, the water level should not exceed the "MAX" mark in the tank. Then close the water tank cover.
Note: The appliance is supplied with a detachable tank for easy cleaning, you can fill the tank with water firstly, and then put the tank into the appliance.
-
Set filter into filter holder (no coffee powder in filter). Make sure the handle of the filter holder aligns with groove in the appliance, then insert the filter holder into the appliance from the "INSERT" position and fix them into coffee maker firmly through turn it anticlockwise until it is at the "LOCK" position.
-
Place a jug on removable shelf. Make sure the steam control knob is switched "OFF" or in "0" position.
Note: The appliance is not equipped with jug, please use yourself jug or coffee cup.
-
Connect to power source, turn the ON/OFF switch to the "1" position. The power red indicator will be illuminated.
-
Keeping the steam switch to the "0" position and switching the coffee/hot water selector to the "1" position the pump will pump water. When there is water flowing out pressing the coffee/hot water selector to the "0" position and waiting for a moment, the appliance begins to be pre-heated until the green lamp is illuminated, it shows the pre-heating is finish. Pressing coffee/hot water selector to the "1" position again, the water will flow out.
-
After water not dropping out any more, you can start brewing.
Note: There may be some noise when pump the water on the first time, it is normal, the appliance is releasing the air in the appliance. After about 20s, the noise will disappear.
Pre-heating
To make a cup of good hot Espresso coffee, we recommend you preheat the appliance before making coffee, including the filter holder, filter and cu p, so that the coffee flavour can not be influenced by the cold parts.
- For preheating please follow the same steps as described in the above paragraph "Before The First Use"
Make Espresso Coffee
- Remove the filter holder by turning it clockwise. Add ground coffee to the filter by using the measuring spoon. One spoon ground coffee can make about a cup of top-grade coffee. Press the ground coffee powder tightly with the tamper.
- Place the filter into the filter holder, make sure the handle of the filter holder aligns with groove in the appliance, then insert the filter holder into the appliance from the "INSERT" position and fix them into coffee maker firmly through turn it anticlockwise until it is at the "LOCK" position.
- Pour out the hot water in the cup. Then place the hot cup (yourself cup) on removable shelf.
- At the time, the green lamp is illuminated, you should press the coffee/hot water selector on the "1" position, and waiting for a moment, there will be coffee flowing out.
Note: During operation, if the green indicator is extinguished, you must close the pump and stop to make espresso coffee. After a few seconds, if the green lamp is illuminated again, you can make espresso coffee continued by pressing coffee/hot water selector to "1" position, the green lamp is cycle ON and OFF to maintain the water temperature is hot enough.
- You should press coffee/hot water selector to "0" position manually when desired coffee is obtained or the colour of coffee changes weak obviously, the red and green indicator go out and the coffee maker stops working, your coffee is ready now.
WARNING Do not leave the coffee maker unattended during making the coffee, as you need operate manually sometimes!
-
After finishing making the coffee, you can take out the filter holder, lock the filter by filter lock bar and pour out the coffee residue.
-
Let them cool down completely, then rinse under running water.
Frothing milk / Make Cappuccino
You get a cup of cappuccino when you top up a cup of espresso with frothing milk.
- Prepare espresso first with container big enough according to the part "Make Espresso Coffee"; make sure that the steam control knob is at the "OFF" or "0" position.
- Press the steam switch to the "1" position, waiting for until the green indicator is illuminated.
Note: During operation, if the green indicator is extinguished, you should turn the steam control knob to “OFF” or “0” position. Press coffee/hot water selector to the “1” position and pump water, after about 30s, close the coffee/hot water selector to the “0” position, then wait for until the green indicator is illuminated and turn the steam control knob in anti-clockwise, the steam will come out again.
- Fill a jug with about 100 ml. of milk for each cappuccino to be prepared, you are recommended to use whole milk at refrigerator temperature (not hot!).
Note: In choosing the size of jug, it is recommend the diameter is not less than 70 ± 5 mm, and bear in mind that the milk increases in volume by 2 times, make sure the height of jug is enough.
- Turn the steam control knob slowly in anti-clockwise, steam will come out from the frothing device.
Note: Never turn the steam control button rapidly, as the steam will accumulate rapidly in short time which may increase the potential of the risk of explosion.
- Insert the frothing device into the milk about two centimetres, froth milk in the way moving vessel round from up to down.
- When the required purpose is reached, you can turn the steam control knob to "OFF" or "0" position.
Note: Clean steam outlet with wet sponge immediately after steam stops generating, but care not to hurt!
- Pour the frothed milk into the espresso prepared; now the cappuccino is ready. Sweeten to taste and if desired, sprinkle the froth with a little cocoa powder.
- Press the ON/OFF switch to the "0" position to cut the power source off.
Note: we recommend you allow the maker to cool down at least for 5 min before making coffee again. Otherwise burnt odour may occur in your Espresso coffee.
Make Hot Water
With this function, you can pre-heat your coffee cup to ensure that the temperature of the coffee will not decrease so as to improve the coffee flavour.
Clean your coffee cup. After drinking coffee, you can directly make hot water with this coffee maker to clean the cups. This makes it more simple and convenient to clean the cups.
- Press the On/Off switch to the "1" position; the Steam switch to "0" position, Coffee/hot water selector to "0" position. The red lamp will be illuminated; waiting for a moment, the green lamp will be illuminated.
- First, turn the steam control knob from "OFF" to "0" position in anti-clockwise. (Turn the knob with at least 135 degree.) Then press coffee/hot water selector to "1" position, and hot water will flow out from the steam wand.
Producing Steam to Heat liquids
The steam wand (without the frothing device) can be used to make hot beverages like drinking chocolate, water or tea.
- Open the tank cover, remove the detachable tank and fill it with desired water, the water level should not exceed the "MAX" mark in the tank. Then place the tank into the appliance properly.
- Replace the tank, then connecting the appliance to power supply source.
- Press the ON/OFF switch to the "1" position, the red lamp is illuminated.
- Turn the steam control knob to "OFF" or "0" position, make the coffee/hot water selector on the "1" position, the pump will pump water, when there is water flowing out, close the coffee/hot water selector to the "0" position immediately, pressing the steam selector to the "1" position and waiting for a moment, the appliance begins to be heated until the green lamp is illuminated, it shows the heating is finish.
- Remove the frothing device from the steam wand.
- Dip the steam wand into the liquid to be heated. Turn the steam control knob in anti-clockwise slowly to start making steam.
- When the required temperature is reached, you can turn the steam control knob to "OFF" or "0" position.
- Press the ON/OFF switch to the "0" position to cut the power source off.
Clean and Maintenance
- Unplug the power cord and let the coffee maker cool down completely before cleaning.
- Clean the housing of coffee maker with moisture-proof sponge often and clean water tank, drip tray and removable shelf regularly under warm running water.
Note: Do not clean with alcohol or solvent cleanser. Never immerse the housing in water for cleaning.
-
Detach the filter holder through turn it anticlockwise, get rid of coffee residue inside, then you can clean it with a cleaner, but at last you must rinse the parts with clear water.
-
Clean all the attachments and dry thoroughly.
Cleaning mineral deposits
To make sure your coffee maker operating efficiently, you should clean away the mineral deposits left every 2-3 months. To do this:
-
Fill the tank with water and descaler to the MAX level (the scale of water and descaler is 4:1); the detail refers to the instruction of descaler. Please use "household descaler". You can use also the citric acid instead of the descaler (the relation is three parts of water and one part of citric acid).
-
Operate the appliance for two cycles following the steps for making espresso and frothing milk and rinse the device with the water /descaler mixture.
-
Following this, and to flush out any traces of descaler or citric acid, operate the coffee maker for a further two cycles but with water only.
Technical Data
Model: CM-850.004A
Power supply: 220 -240V\~, 50 Hz
Power consumption: 850W
Protection class:
Class I
CE Conformity
This device has been tested according to all relevant current CE guidelines, such as electromagnetic compatibility and low voltage directives, and has been constructed in accordance with the latest safety regulations.
This product has been designed, manufactured and marked in compliance with:

- The safety objectives of Low voltage Directive 2006/95/EC;
- The protection requirements of EMC Directive 2004/108/EC.
- Requirement of directive 93/68/EC
This appliance is designed to come into contact with food and is designed in accordance with EC Directive1935/2004/EEC.
The electrical safety of the appliance is guaranteed only if it is connected to an efficient and approved earthing system.
Disposal – Environment policy
Packing

The packaging material is entirely recyclable, and marked with the recycling symbol. Follow local regulations for scrapping. Keep the packaging materials (plastic bags, polystyrene parts, etc.) out
of reach of children, as they are potentially dangerous.
Disposal
This appliance is marked according to the European directive 2012/19/EU on Waste Electrical and Electronic Equipment (WEEE).
By ensuring this product is disposed of correctly, you will help prevent potential negative consequences for the environment and human health, which could otherwise be caused by inappropriate waste handling of this product.

This symbol on the product, or on the documents accompanying the product, indicates that this appliance may not be treated as household waste. Instead it shall be handed over to the applicable collection point for the recycling of electrical and electronic equipment.
Disposal must be carried out in accordance with local environmental regulations for waste disposal. For more detailed information about treatment, recovery and recycling of this product, please contact your local city office, your household waste disposal service or the shop where you purchased the product.
Warranty Declaration
Insofar as claims filed for elimination of deficiencies (applicable laws) are being processed, these shall be handled via the contractual partners. In addition, the distributor provides the following manufacturer's warranty:
-
For this device, the distributor grants a warranty period of 24 months (*), figured from the date of purchase from the dealer; this must be verified by the or receipt, or other similar documents, in accordance with pertinent, existing guidelines.
-
Warranty claims shall be filed via a dealer.
-
The voluntary warranty covers the rectification of any damage or deficiency that occurs during the warranty period and which is demonstrably due to material or production faults.
-
Not included in this voluntary warranty are damage and deficiencies resulting from incorrect connection, from improper handling, from non-observance of the programming instructions or instructions for use, or from force majeure. The voluntary warranty does not cover installation and programming work performed by the dealer. In particular, no claim can be made for installation or programming work to be performed free of charge by the dealer. The voluntary warranty does not cover deficiencies which have a negligible effect on the value or usability of the device. Further costs, such as for installation, transport and travel expenses are expressly excluded from the warranty.
-
It is at the discretion of the distributor to replace the device with an identical one instead of performing repairs. Further claims for damage are not permissible. Any data stored in the device will be lost after repair work or replacement of the device.
-
The voluntary warranty is nullified if changes are made to the product, or when the product is operated in a country for which it was not developed nor produced.
-
Fulfilment of the voluntary warranty presupposes that the device has been packed complete and protected against breaking and impacts (if possible in the original packaging) and shipped with the warranty certificate from the dealer.
-
If testing reveals that there are no grounds for warranty claims, or that the product does not exhibit any deficiencies, the costs for repair work and testing shall be borne by the user. The distributor processing the claim arising from the voluntary warranty is authorized to charge these costs to the user.
-
Services arising from the voluntary warranty affect neither an extension of the warranty period, nor do they mark the beginning of a new term for the voluntary warranty.
-
Warranty claims according to applicable law filed by the end customer shall neither be excluded, nor restricted by this independent manufacturer's declaration.
The user is protected by the guarantee indicated in the Directive 1999/44/CE issue by the European Parliament on 1999, May 25.
(*) Only for European Union countries
Estimado Cliente



- Dear customer
- Intended use
- General Safety Instructions
- HOUSEHOLD USE ONLY
- Overview of the components
- Before The First Use
- Pre-heating
- Make Espresso Coffee
- Frothing milk / Make Cappuccino
- Make Hot Water
- Producing Steam to Heat liquids
- Clean and Maintenance
- Cleaning mineral deposits
- Technical Data
- CE Conformity
- Disposal – Environment policy
- Packing
- Disposal
- This appliance is marked according to the European directive 2012/19/EU on Waste Electrical and Electronic Equipment (WEEE).
- Warranty Declaration
- Estimado Cliente
Brand : Haeger
Model : CM-85B.004A
Category : Coffee machine