
Control Line KM442D - Coffee machine KRUPS - Free user manual and instructions
Find the device manual for free Control Line KM442D KRUPS in PDF.


| Product Type | Drip Coffee Maker |
| Brand | Krups |
| Model | Control Line KM442D |
| Capacity | 10 cups (1.25 L) |
| Power | 1000 W |
| Voltage | 120 V / 220-240 V (depending on region) |
| Dimensions (W x D x H) | 25.4 cm x 25.4 cm x 35.6 cm |
| Weight | 2.5 kg |
| Water Tank | Removable, with water level indicator |
| Carafe | Glass carafe with non-drip spout and ergonomic handle |
| Pause & Serve | Anti-drip function for mid-brew pouring |
| Programmable Timer | 24-hour timer with auto-start |
| Auto Shut-off | Automatic shut-off after 2 hours |
| Filter Type | #4 cone paper filter or permanent gold-tone filter (included) |
| Brew Strength Selector | Yes, mild to strong |
| Keep Warm Function | Yes, via hot plate (automatic) |
| Cleaning Indicator | Descaling light reminder |
| Maintenance | Descaling recommended every 3 months; removable parts dishwasher safe (except carafe top) |
| Safety Features | Overheat protection, boil-dry protection, automatic shut-off |
| Spare Parts Available | Carafe, filter basket, water tank, sealing ring |
| Repairability Index | 8.5/10 (based on similar Krups models) |
| Warranty | 2 years (depending on region) |
| Country of Origin | China |
Frequently Asked Questions - Control Line KM442D KRUPS
User questions about Control Line KM442D KRUPS
0 question about this device. Answer the ones you know or ask your own.
Ask a new question about this device
Download the instructions for your Coffee machine in PDF format for free! Find your manual Control Line KM442D - KRUPS and take your electronic device back in hand. On this page are published all the documents necessary for the use of your device. Control Line KM442D by KRUPS.
USER MANUAL Control Line KM442D KRUPS

SV NO FI DA PT IT ES NL FR EN DE
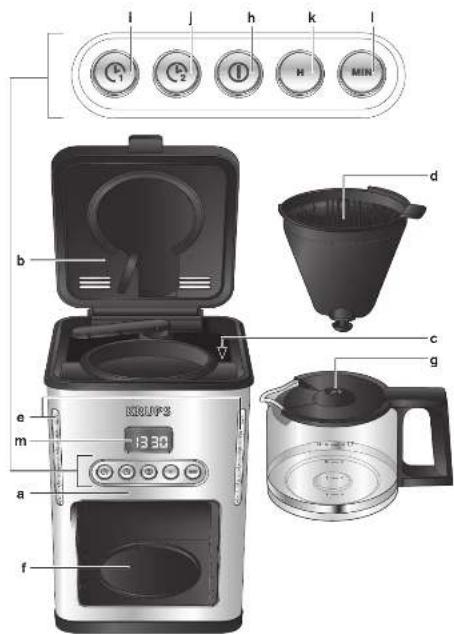

DESCRIPTION
a Main body
b Lid
c Water tank
d Filter holder
CAUTION: the safety precautions are part of the appliance. Read them carefully before using your new appliance for the first time. Keep them in a place where you can find and refer to them later on.
This product has been designed for domestic use only. Any commercial use, inappropriate use or failure to comply with the instructions, the manufacturer accepts no responsibility and the guarantee will not apply.
BEFORE FIRST USE:
■ Remove any packaging, stickers or accessories whether inside or outside of the appliance. ■ When using your filter coffee maker for the first time, do not add coffee and rinse using the equivalent of a jug of water (maximum 1 litre). ■ The glass coffee pot is dishwasher safe but not microwave safe.
SETTING THE TIME:
Follow figures 9 to 12:
- Plug in the coffee maker, the timer (m) will start to flash. ■ Press the "H" button (k) to set the hours. ■ Press the "MIN" button (I) to set the minutes. ■ To scroll faster through the hours and minutes, keep the relevant button pressed down. ■ The setting will automatically validate itself after approximately 5 seconds.
N.B.: You can adjust or change the time. You can adjust the time setting by using the H and Min. buttons.
MAKING COFFEE:
Follow figures 1 to 6:
■ Use only cold water and No. 4 paper filters. ■ The anti-drip system allows you to remove the coffee pot to pour yourself a coffee before the end of the cycle. ■ Replace the coffee pot as quickly as possible to avoid the filter holder from overflowing. ■ Do not exceed the maximum quantity of water. ■ Place the ground coffee directly inside the paper filter. The filter holder has 2 positions - open and closed. Make sure that the filter holder has been properly locked: the arrow and the lock icon must be facing each other. After use, throw away the coffee grounds and rinse the filter holder under running water. ■ The recommended amount of coffee grounds is a level teaspoon (provided) for standard grounds (maximum 7 grams).
Note: The quantity of coffee brewed will be less than the quantity of water poured into the coffee machine; approximately 10% of this water will be absorbed by the ground coffee and filter.
Your coffee maker is equipped with an automatic stop system.
■ The appliance will stop automatically approximately 30 minutes after the end of the cycle. ■ The appliance may also be switched off at any time by pressing the « ⏻ » button (h).
Manual mode:
■ Press the « Ⓞ » button (h), the light will turn on and there will be a “beep” to signal that the coffee maker has started up. ■ To stop the coffee maker, again press the « 📄 » button. The light will turn off and there will be two “beeps”.
Programming mode:
- Your appliance is equipped with two programming buttons 📄, allowing you, for example, to set one time during the week and another at the weekend. The two programming buttons function in the same way. ■ Press the 📊 or 📊, button and the timer will start to flash. If no setting is selected within 10 seconds, the timer will go back to the current time. ■ Enter the time using the “H” (hours) and “MIN” (minutes) buttons. If no other action is taken, the time entered will be automatically saved after approximately 5 seconds. The timer will then go back to the current time. ■ Once programming is complete, the button used will remain lit. ■ You can check or change the programming time whenever you like by once again pressing the or button. ■ At the programmed time, the coffee maker will turn itself on. Buttons 🎨 or 🎨 and « 🎨 » will light up. WARNING: The set program is automatically deactivated at the end of the coffee cycle; however, the set time is saved. Reactivate the set program every day by pressing on the button or . In order to set a different time, please refer to paragraph "Using the appliance in the Program Mode".
■ You can cancel the programming at any time by pressing buttons or for more than 2 seconds.
CLEANING:
Unplug the appliance. Let the appliance cool down before cleaning it. To remove the filter holder, make sure that it is in the correct position (Fig. 7). Throw the coffee grounds and paper filter into the bin (Fig. 8). Clean with a damp cloth or sponge. Never immerse the appliance in water or under running water. The coffee pot, lid, spoon and filter holder are all dishwasher safe.
DESCALING:
Why descale
The scale is naturally deposited in your coffee maker. Descaling preserves the coffee maker and ensures it a longer life. Descaling ensures a consistent quality of coffee. The scale may permanently deteriorate the performance of the machine. The guarantee does not cover appliances which become faulty because the descaling operations have not been carried out regularly.
When to descale
The frequency of descaling depends on the water hardness and the number of coffee cycles. When the following signs are encountered: cycle time lengthened, high evaporation, high level of noise at the end of cycle, stop during the cycle, it signifies that your machine is calcified. The descaling of the coffee maker must be between 20 and 30 cycles or once a month depending on the water hardness.
How to descale your KRUPS coffee maker
Use the KRUPS® descaling solution diluted in 0.5l of water or 250 ml of commercially available white vinegar in half-litre of water. Pour the solution into the water tank (without coffee). Start the cycle (without coffee). After 2 min, manually stop the cycle. Leave it still for an hour. Restart the coffee to complete the cycle. To rinse the machine, run 2 cycles with water but no coffee. Repeat the operation if necessary. The guarantee does not cover coffee makers which are not working or which are working poorly due to failure to descale them.
ACCESSORIES:
Glass coffee pot
TROUBLESHOOTING:
Check:
The connection. That the « » button is lit. That the filter holder has been properly locked into place.
The water takes too long to run through or the appliance is making excessive noise:
Descale your coffee maker.
The appliance is leaking:
■ Make sure that the tank has not been filled above the maximum level.
The filter holder is overflowing or the coffee is coming out too slowly:
■ There are too many coffee grounds. ■ The coffee grounds are too fine and unsuitable for a filter coffee maker. ■ The coffee pot has not been correctly placed on the warming plate. ■ The coffee pot was removed for too long during the preparation cycle or was not correctly placed back onto the warming plate. ■ The paper filter is not fully open or has not been fitted correctly.
Your appliance still does not work?
■ Contact an approved KRUPS service centre. (see the list in the Krups service booklet).
END-OF-LIFE ELECTRONIC OR ELECTRICAL APPLIANCES:

Environment protection first!
i Your appliance contains valuable materials that can be recovered or recycled. Leave it at a local civic waste collection point.
DESCRIPTION
a Main body
b Lid
c Water tank
d Filter holder
SETTING THE TIME:


- DESCRIPTION
- BEFORE FIRST USE
- SETTING THE TIME
- FOLLOW FIGURES 9 TO
- MAKING COFFEE
- FOLLOW FIGURES 1 TO
- YOUR COFFEE MAKER IS EQUIPPED WITH AN AUTOMATIC STOP SYSTEM
- MANUAL MODE
- PROGRAMMING MODE
- CLEANING
- DESCALING
- WHY DESCALE
- WHEN TO DESCALE
- HOW TO DESCALE YOUR KRUPS COFFEE MAKER
- ACCESSORIES
- TROUBLESHOOTING
- CHECK
- THE WATER TAKES TOO LONG TO RUN THROUGH OR THE APPLIANCE IS MAKING EXCESSIVE NOISE
- THE APPLIANCE IS LEAKING
- THE FILTER HOLDER IS OVERFLOWING OR THE COFFEE IS COMING OUT TOO SLOWLY
- YOUR APPLIANCE STILL DOES NOT WORK
- END-OF-LIFE ELECTRONIC OR ELECTRICAL APPLIANCES
- ENVIRONMENT PROTECTION FIRST
Brand : KRUPS
Model : Control Line KM442D
Category : Coffee machine