
40LED1500 - Television SALORA - Free user manual and instructions
Find the device manual for free 40LED1500 SALORA in PDF.


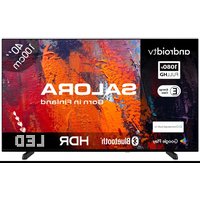
| Brand | Salora |
| Model | 40LED1500 |
| Product type | LED Television |
| Screen size | 40 inches (101.6 cm) |
| Screen resolution | 1920 x 1080 pixels (Full HD) |
| Dimensions (without stand) | 91.7 x 53.4 x 6.2 cm |
| Dimensions (with stand) | 91.7 x 57.5 x 22.0 cm |
| Weight (without stand) | 6.8 kg |
| Weight (with stand) | 7.2 kg |
| Power supply | 220-240 V ~ 50/60 Hz |
| Power consumption (standby) | Less than 0.5 W |
| Typical power consumption | 70 W |
| Connectivity | HDMI (x2), USB (x2), VGA, CVBS, Antenna input, Optical audio output |
| Main features | DVB-T/C/S2 tuner, teletext, parental control, programmable timer, adjustable picture format |
| Smart TV functions | No |
| Care and cleaning | Dust with a soft, dry cloth. Do not use any chemical products. |
| Safety | Do not expose to moisture, do not block ventilation slots, disconnect during storms. |
| Spare parts and repairability | Contact an authorized repairer. Use only original parts. |
| Operating temperature | 5 °C to 35 °C |
| Viewing angle | 178° (horizontal / vertical) |
| Speakers | 2 x 8 W |
Frequently Asked Questions - 40LED1500 SALORA
User questions about 40LED1500 SALORA
0 question about this device. Answer the ones you know or ask your own.
Ask a new question about this device
Download the instructions for your Television in PDF format for free! Find your manual 40LED1500 - SALORA and take your electronic device back in hand. On this page are published all the documents necessary for the use of your device. 40LED1500 by SALORA.
USER MANUAL 40LED1500 SALORA
natural_image
Top-down schematic of a computer monitor layout showing front, top, and side views (no text or labels)1

natural_image
Top-down schematic of a computer room layout with monitor, keyboard, and mouse (no text or labels)2

3

Opmerkingen
Plaatsing van de TV
2
1
natural_image
Simple line drawing of a mechanical setup with a lever and base, no text or symbols present

TV Menu
Ingangsbron

Uit/Laag/Medium/High
| PICTURE | ||
| Picture Mode | Standard | |
| Contrast | 50 | |
| Brightness | 50 | |
| Color | 50 | |
| Tint | 50 | |
| Sharpness | 50 | |
| Color Temperature | Medium | |
| Noise Reduction | Middle | |
Beeldmodus
| Set Password | |
| Lock System | ON |
| TV | |
| MPAA | R |
| Canada English | PG |
| Canada French | G |
| Menu | |
Set password
RISQUE POUR CHOCS ELECTRIQUES NE PAS OUVRIR
natural_image
Warning symbol of a lightning bolt inside a triangle (no text or numbers)External device connection diagram
flowchart
graph TD
    A["DVD"] --> C["Connexion entrée AV"]
    B["Setup top boxes"] --> C
    C --> D["HDMI"]
    D --> E["Connexion entrée HDMI"]
    F["INPUT"] --> G["Video R L"]
    G --> H["Output"]
    I["Input"] --> J["Y Pb Pr"]
    J --> K["Video R L"]
    K --> L["Output"]

Emplacement du TV
Menu TV
Source d'entrée

Automatic Frequency Control
Search
Mod e imag e
Parent control (NTSC)
| Set Password | |
| Lock System | ON |
| TV | |
| MPAA | R |
| Canada English | PG |
| Canada French | G |
| Menu | |
Set password
IMPORTANT
Please read this manual carefully before installing and operating the TV.
Keep this manual handy for further reference
Table Of Contents
Preparations Guide
Safety Information....2
Important Safety Precautions....3
Installed And Connected TV
TV Bracket assemble....4
TV Buttons And Terminal Interface....5
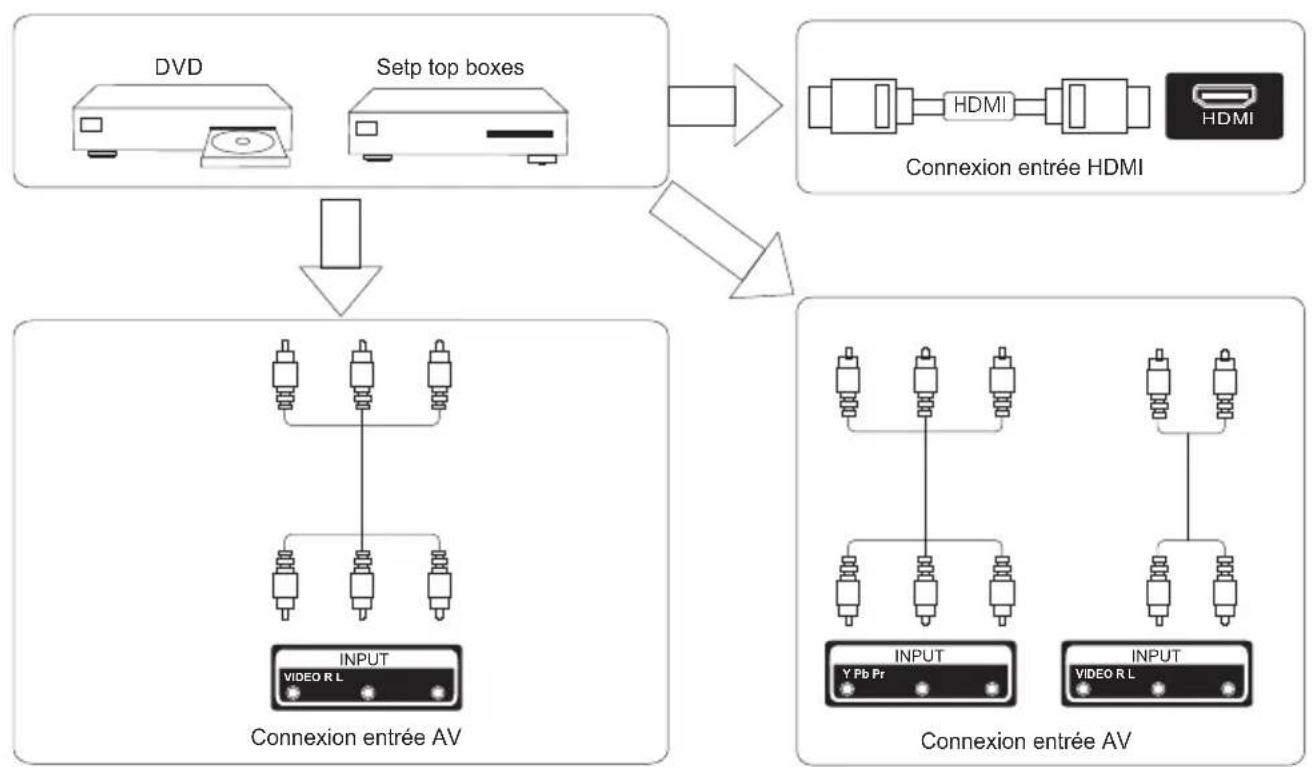
External device connection diagram....6
Install And Connect TV....7
TV Stand installation Instructions....7
TV Menu
Select Input Source....8
Channel Menu....8
Picture Menu....8
Sound Menu....9
Time Menu....9
Option Menu....10
Parent Control.... 10
TV rating....12
Hotel Menu....12
PC Menu
Screen Menu....13
Media Menu
Media Menu....13
Other Information
Help....14
Specifications....15
Remote controller....16
This user manual for reference only
Safety Information
CAUTION
RISK OF ELECTRIC SHOCK DO NOT OPEN
MAY HAVE RISK OF ELECTRIC SHOCK, IF DO ANY CHANGE OR ADJUST. DO NOT OPEN THE BACK CABINET. PLEASE CONTACT SERVICE CENTER FOR ANY PROBLEM

THIS MARK REMIND AND ALERT USER MUST OPERATE THE TV SET CORRECTLY ACCORDING TO THE USER MUANAL. IN CASE ANY DAMAGE.

natural_image
Warning symbol of a lightning bolt inside a triangle (no text or numbers)THIS MARK IS INDIACATE THE TV SET IS SENSITIVE ELECTRONIC PRODUCT. PLEASE AVOID WATER OR WET, INCASE OF FIRE OR ELECTIC SHOCK.DO NOT OPEN THE BACK CABINET. IF ANY PROBLEM.PLEASE CALL NEAREST SERVICE CENTER.
Important Safety Precautions
- Read these instructions.
- Keep these instructions.
- Heed all warnings.
- Follow all instructions.
-
Do not use this apparatus near water.
-
Clean only with dry cloth.
-
Do not block any ventilation openings. Install in accordance with the manufacturer's instructions.
-
Do not install near any heat sources such as radiators, heat registers, stoves, or other apparatus (including amplifiers) that produce heat.
-
Do not defeat the safety purpose of the polarized or grounding-type plug. A polarized plug has two blades with one wider than the other. A grounding type plug has two blades and third grounding prong. The wide blade or third prong are provided for your safety. When the provided plug does not fit into your outlet, consult an electrician for replacement of the obsolete outlet.
-
Protect the power cord from being walked on or pinched, particularly at plugs, convenience receptacles, and the point where they exit from the apparatus.
-
Only use attachments/accessories specified by the manufacturer.
-
Use only with the cart, stand, tripod, bracket, or table specified by the manufacturer, or sold with the apparatus. When a cart is used caution when moving the cart/apparatus combination to avoid injury tip-over.
-
Unplug this apparatus during lightning storms or when unused for long periods of time.
-
Refer all servicing to qualified service personnel. Servicing is required when the apparatus has been damaged in any way, such as power-supply cord or plug is damaged, liquid has been spilled or objects have fallen into the apparatus, the apparatus has been exposed to rain or moisture, does not operate normally, or has been dropped. Warning to reduce the risk of fire or electric shock, do not expose this apparatus to rain or moisture.
-
The apparatus shall be disconnected from the mains by placing the power/standby switch in the standby position and unplugging the power cord of the apparatus from the AC mains receptacle.
-
The socket-out shall be installed near the equipment and shall be easily accessible.
-
This product should never be placed in a built-in installation such as a bookcase or rack unless proper ventilation is provided or the manufacturer's instructions have been adhered to.
-
Apparatus shall not be exposed to dripping or splashing.
-
Do not place any sources of danger on the apparatus (e.g. liquid filled objects, lighted candles).
-
Wall or Ceiling Mounting - The appliance should be mounted to a wall or ceiling only as recommended by the manufacturer.
-
Never place the TV, remote control or batteries near naked flames or other heat sources, including direct sunlight. To prevent the spread of fire, keep candles or other flames away from the TV, remote control and batteries at all times.
-
The USB terminal should be loaded with 0.5 A under normal operation.

TV Bracket assemble
Fix the TV on the wall
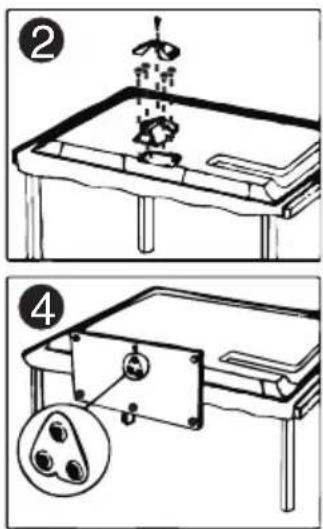
- First, put the TV on the table smoothly and put some soft cloth on the table to avoid scratching the screen.
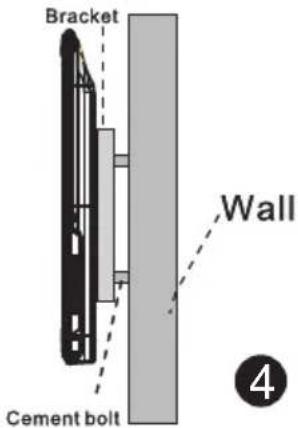
- User the screw driver to take off the screws which are fixed on the bottom stand (the direction of the arrow, refer to the ptoto1). And take off the bottom stand (please take off the screws and bottom stand carefully).
- Make one bracket which can fix on the wall according to the size of arrow direction of photo2 and photo3.
- Drill four holes properly on the wall (the size only for reference) and put into four screws.(optional parts) Drill four holes properly on the wall (the size only for reference) and put into four screws.(optional parts)
- according to the step 4, use the screwdriver to lock the screw on the back of the TV. then hang the TV on the wall.

natural_image
Top-down schematic of a computer monitor layout showing front, top, and side views (no text or labels)1

natural_image
Top-down schematic of a computer room layout with no visible text, numbers, or symbols2

flowchart
graph TD
    A["●"] --> B["●"]
    B --> C["●"]
    C --> D["●"]
    D --> E["●"]
    E --> F["●"]
    style A fill:#fff,stroke:#000
    style B fill:#fff,stroke:#000
    style C fill:#fff,stroke:#000
    style D fill:#fff,stroke:#000
    style E fill:#fff,stroke:#000
    style F fill:#fff,stroke:#000
3
Note:
- The bracket fixed on the wall is optional part.
- when you assemble the TV, there should be no other articles on the around and front and please keep the distance from other articles.
- When assemble the TV, please ask the career man to fix in order to avoid the danger.
- The fixing picture is only for reference.
- Please follow the use manual about bracket assemble to fix the TV.
- Attach the mounting bracket from the VESA compatible wall mounting kit.
TV Buttons And Terminal Interface
TV Buttons
Note: The following is only functional schematic, And the actual position and arrangement of different models may be different.
| VOL+ | VOL- | CH+ | CH- | MENU | SOURCE |
(●):Turn ON/OFF Power.
SOURCE: External Signal Input Selection.
MENU: Display Main MENU And Confirm MENU Item Selection.
CH+/-:Selecting Channel.
VOL+/-:Adjusting Volume.
Terminal Interface
Note: The following are the various terminal interface, the actual position and arrangement, the number of different models may be different.
 | AV inputExternal AV Signal Input AndRelevant Rith/Left Sound Channel |  | EARPHONE outputWhen earphones are plugged in,speakers are disabled |
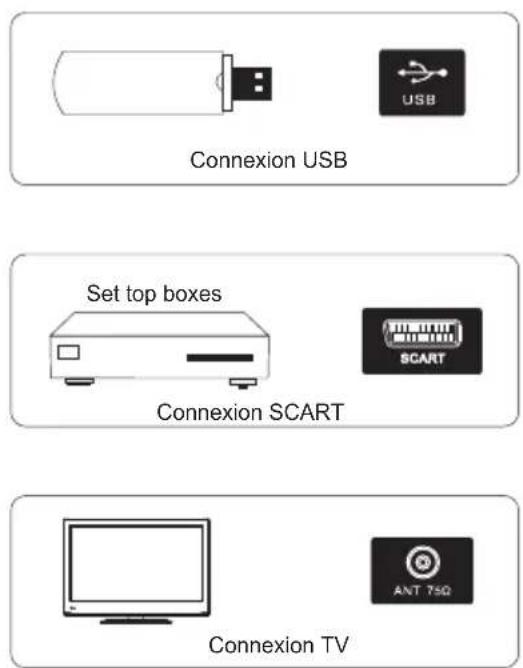
 | AV outputExternal AV Signal output AndRelevant Right/Left Sound Channel(Some models without this interface) |  | USB inputConnect a USB device here to playits media files. |
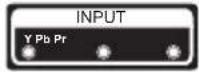 | Y Pb Pr inputConnect to the composite terminal ofyour DVD/VCR(Some models without this interface) | 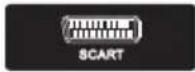 | SCART inputstandard,it supports composite andRGBsignal input.It is a connectionfor european(Some models without this interface) |
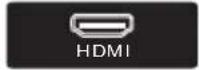 | HDMI inputDigital signal input from HDMI videoconnector. | ||
 | ANT 75Connect the antennal/cadle tv input(75/VHF/UHF) | ||
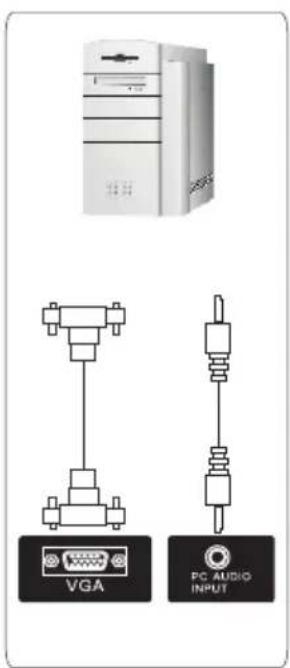
 | VGA inputPC analog signal input | ||
 | PC AUDIO INPUTVGA input and audio input when VGAinput |
External device connection diagram

flowchart
graph TD
    A["DVD"] --> C["Set-top boxes"]
    B["HDMI"] --> C
    C --> D["AV input connection"]
    D --> E["AV input connection"]
    E --> F["Output"]
    style A fill:#f9f,stroke:#333
    style B fill:#ccf,stroke:#333
    style C fill:#cfc,stroke:#333
    style D fill:#fcc,stroke:#333
    style E fill:#cff,stroke:#333
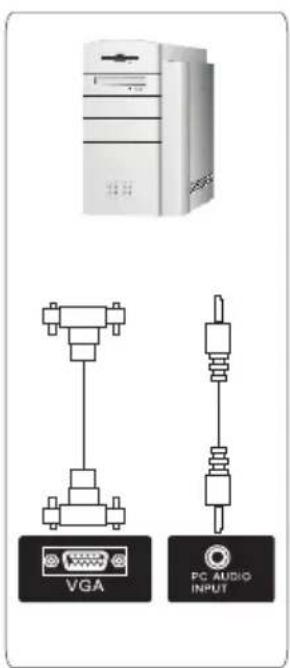

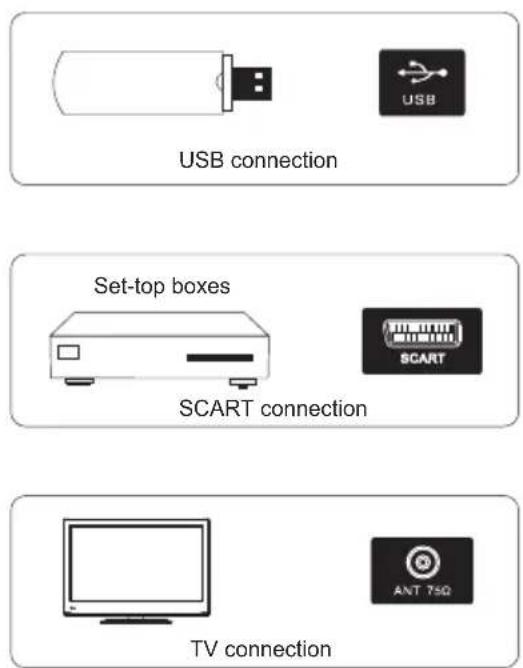
Install And Connect TV

Set your TV
To put your TV in a firm place which can bear the weight of the TV.
To avoid danger, please don't expose the TV near water or heating place (such as light, candle, heating machine), do not block the ventilation at the back of TV.

Connect antenna and power
- Connect the antenna cable to the antenna socket on the back of the TV.
- To plug the power cord of TV (AC 100-240V\~50/60Hz).
Turn on TV
- Press the power button of the TV the indication light will turn to green. if it is on standby mode (the light is red), press the power button on the remote control to turn on the TV.
Note:
Picture for reference purposes only.
TV Stand Installation Instructions
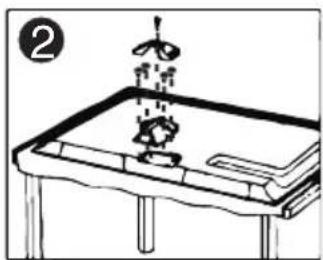
- Open the carton and remove the TV and scattered accessories and base (some models without base).
- to avoid the injury of the TV, covered with a soft mattress, put it on the table, face down on a soft mattress, the base of the neck is fixed on the TV with screws.
3.screw the base and connected to the TV. - the installation is complete.

natural_image
Simple line drawing of a mechanical setup with a lever and base, no text or symbols present

TV Menu
Input Source

Note: The above is for reference only, to prevail any kind
Press SOURCE to display the input source list.
Press ▼/▲ to highlight the input source and press ENTER to confirm.
Press EXIT to hide the On-Screen menu, or it will disappear after seconds. (The way to set the disappeared time: MENU - TIME Menu - OSD Timer)
Channel Menu
NTSC Channel Menu

PAL Channel Menu
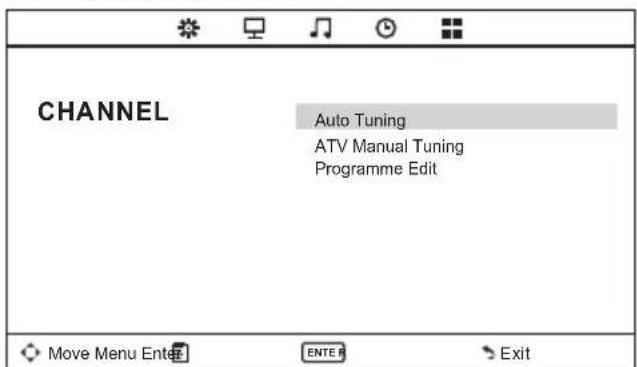
Note: The Channel Menu is available only in TV mode, and the item is the default when pressing MENU, if you want view the Picture/Sound/Time/Option Menu, please press ◀/▶ to select.
Tune Type Cable/Air
Auto Tuning
Auto Tuning will search for available channels and programs. Press▼/▲ to select Auto Tuning, then press OK to start auto search. If you want to stop searching, press MENU or EXIT, and press ▶to confirm or ▶to cancel.

ATV Manual Tuning
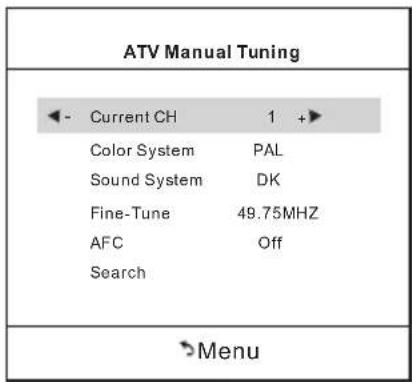
Current CH
Set the channel number
Color system
Select the color system(PAL/SECAM/NTSC)
Sound System
Select the sound system(DK/BG/I)
Fine-Turn
Adjust the frequency of the channel finely.
AFC
Automatic Fine tuning.
Search
Press ENTER to search down from the current frequency, and press ENTER to search up.
TV Menu
Programm Edit

The four colored key is the shortcut key for programming the channel.
First press ▼/▲ to highlight the channel you want to delete or rename or move or skip, then:
Press the Red button to delete the channel.
Press the Green button to enter the
rename state, thenpress ◀/▶to select the word you want to change, and ▼/▲ to select word.
Press the Yellow button to set the channel to moving state.then press ▼/▲ to move it to the position you want to put.
Press the Blue button to skip the select channel. (Your TV set will skip the channel automatically when using CH+/- to view the channels.)
Fav Add or Delete the channel to your faver ate list.
Medium
Gives white colors a neutral tint.
Warm
Gives white colors a red tint.
Noise Reduction
Off/Low/Middle/High
You can clear up the input signal by setting the item.
Sound Menu
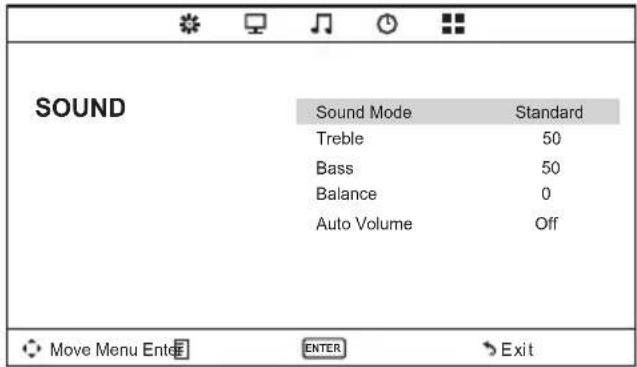
Sound Mode
Standard/Music/Movie/Sports/User/Only in this mode. Treble and Bass can be adjusted.)
Bass
Adjust the low frequency sounds.
Treble
Adjust the high frequency sounds.
Balance
Adjust the level of sound coming from the left and right speakers.
Auto Volume
Press L/R to set or cancel. When set on, it will level out the sound being heard when sudden changes in volume occur during commercial breaks or channel changes.
Adjusting the Bass/Treble/Balance
1 Select Sound Mode as User.
2 Highlight the item and press ▼/▲ to
display the sub-menu, then press

to adjust the value.
TV Menu
Picture Menu

Picture Mode
Highlight the item and Press ENTER or
◀/▶ to enter the sub-menu, that shows the picture mode you can choose:
Dynamic/Standard/Mild/User
Press PMODE on the remote control to select picture mode directly.
Contrast/Brightness/Color/Tint
(NTSC only)/Sharpness
Highlight the item and press, and a
process bar appears, then press to adjust the value.
Press MENU or EXIT to hide the on-screen menu.
Note: Those settings can be adjusted only when the Picture Mode is set to User.
Contrast
Adjust the white level of the picture .
Brightness
Adjust darkness of black sections in the picture.
Color
Adjust the color intensity of the picture.
Tint
Adjust the hue(Red, Green, Blue) of the picture.
Sharpness
Object edges are enhanced for picture detail.
Color Temperature
Select the color temperature that you feel comfortable.
Cool
Gives white colors a blue tint.
Time Menu

Sleep Timer
Select the time in minutes(off, 10min,
180min,240min) that you want the
TV to shut off automatically after you set the time. Cancel by setting it to Off
Auto Sleep
Select the time in hours(off,3h,4h,5h) that you want the TV to remain on after your last operation. Cancel by setting it to Off.
OSD Time r
Select the time in seconds(5s, 10s, 15s, 20s,25s,30s,) that you want the On-Screen Men remain display after your last operation.
Option Menu
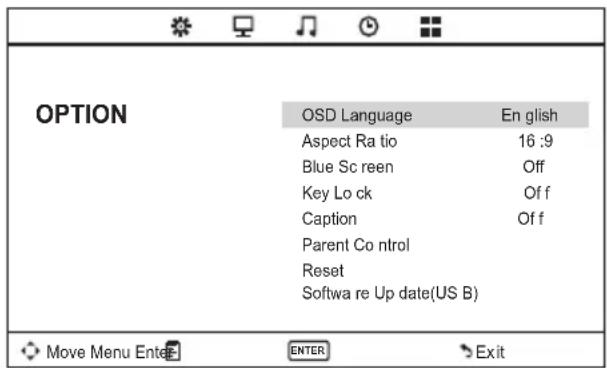
TV Menu
OSD Language
Set the OSD display language.
Aspect Ratio
Select the suitable aspect Ration. (4:3/
16:9/Zoom1/Zoom2).
Blue Screen
Set the background color to blue or black when having no input signal.
Key Lock
Set to prevent it from being used by young children, or other unexpected using.
Caption
Select from below closed-caption modes.
CC1,2,3,4 Displays corresponding caption channels of a analog program. (Usually be set to Cc1 for most programs.)
Text1,2,3,4 Displays corresponding text service channel of a analog program.
Parent Control
For detail please refer to page 7.
Reset
Recall the default setting.
Software Update(USB)
Update your TV set. Select the software in the root of your USB memory, and press ENTERI.
Parent Control(NTSC)
| Set Password | |
| Lock System | ON |
| TV | |
| MPAA | R |
| Canada English | PG |
| Canada French | G |
| Menu | |
Set Password First you should enter the correct old password then enter new password twice.
Lock System
Set the lock system ON or OFF.
TV
The TV rating compose of two aspects: age-based and content-based. Page 9
MAPP
This system defines the rating control which come from MPAA rules.
G
General audience. All ages admitted
PG
Parental guidance
PG-13
Parents strongly cautioned. Some material may be inappropriate for children under 13.
R
Restricted. Children under 17 require accompanying parent or adult guardian.
NC-17
No one 17 and under a admitted.
X
Adult audience only
Canada English The ratings are for programs which are using English rating system.
C
Children
C8+
Children 8 years and older
G
General programming
PG
Parental guidance
14+
Viewers 14 and older
18+
Adult programming
Canada French
The ratings are for programs which are using French rating system.
G
General
8 ans+
Not recommended for younger children
13 ans+
Not recommended for children under age 13
16 ans+
Not recommended for ages under 16
18 ans+
This program is restricted to adults
TV Menu
TV rating(NTSC)

TV-Y
General audience
TV-Y7
Parental guidance suggested
TV-G
Parents strongly cautioned
TV-PG
Restricted
TV-14
No one 17 and under admitted
TV-MA
Adult audience only
FV
Fantasy violence
D
Suggestive dialogue
L
Strong language
S
Sexual situations
V
Violence
Note: The content ratings will crease depending on the level of the age-based rating. For example, a program with a TV-PG V(violence) rating may contain moderate violence, while a TV-14 V(violence) rating may contain intense violence. So locking a higher level option will automatically locking the options that has more sensitive level.
Hotel Menu(Optional)


Hotel Mode
Set hotel mode ON or OFF.
Note: The following settings work only when Hotel Mode is set to be ON.
Source Lock
Lock the input source which you want.
Default Source
Set the default input source when turning on your TV.
Default Prog
Set the default program when turning on your TV.
iMax Volume
Set the max volume that you can adjust.
Channel lock
Lock the channel which you preferred.
Default Volume
Set the default volume for every time you open the TV, the default volume is 20.
Clear Lock
Recall the default settings in hotel mode.
Set Password
Set the password as you like.
PC Menu
Screen Menu
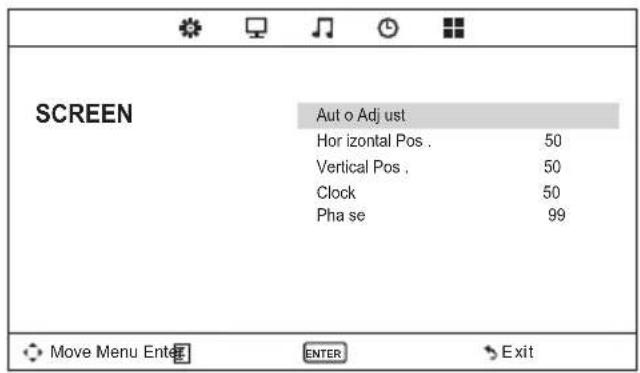
Auto Adjust
Automatically adjust Clock, Phase, H-Position, and V-Position settings.
Horizontal Pos.
Shift the screen up or down.
Vertical Pos.
Shift the screen left or right.
Clock
Adjust the internal sampling clock rate.
Phase
Adjust the internal signal phase.
Media Menu
The color of the icon means whether your TV has detected a USB memory or not. Bule: Yes; Gray: No;
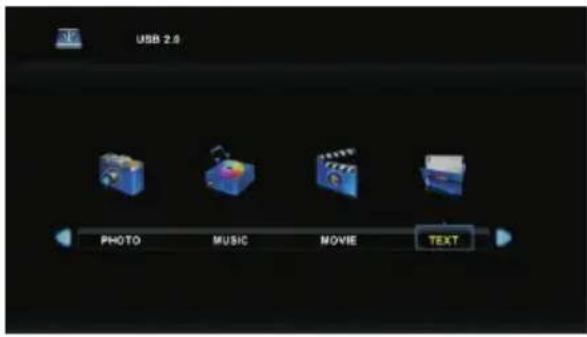
Press ◀/▶ to select Photo/Music/Movie/Text icon and ENTER to enter the USB memory.
Help
| No Power | Check the AC cord of TV is plus in or not. If still no power, please Pull out the plug and replug in after60 seconds. And open the TV again |
| Signal receive not properly | To cause double image or phantom if there has high building or high mountain round TV. You can adjust image effect by manually operation: consult instruction of vernier regulation or change the direction of external antenna.If you use the indoor antenna . under certain circumstance, receive will be more difficult .So you can change the direction of the antenna to adjust the image effect . If can't change image receiving effect either , you have to use external antenna. |
| No picture | Check the antenna at the back of TV is connected properly or not.Try to select other channels and check whether the TV problem itself or not. |
| but,Video is ok without audio | Increase the volume.Check the TV is in mute mode or not , and please press the mute button to make sound resume. |
| Audio is ok, but color error or no picture. | Increase contrast and brightness. |
| snow statics picture and noise | Check the antenna at the back of TV is connected or not. |
| Level broken line | vacuum, such as hair drier, Maybe has electrical appliance interfere-please turn off these kinds of electrical appliance, cleaner and so on. |
| Image or-Dual "simulacrum" The TV no response with the Remote. | Perhaps the location for the antenna is not good. Use the tall beamed antenna can be improved quality of the display image.Operate the remote direct to the remote sensor on the TV. If still no response for the TV, please check if the plastic bag on the remote take or not. And check if the location for the battery is correct. Change the new battery.The TV will shift to the STAND BY if no response from the remote in the few minutes. |
| .NO Video In (PC Mode) | Please check if the display cable connect to the VGA correcte.Please check if there has the bend on the display cable. |
| Vertical twinkling (PC Mode) | Enter the main menu, Use the clock regulator for the Video display noise to eliminate the vertical line. |
| horizontal ripping (PC Mode) | Adjust the Audio sound horizontal in the main menu to clear the horizontal ripping line. |
| The screen is too bright or too dark (PC Mode) | Adjust the contrast ratio or brightness in the main menu. |
| PC Function no response | Check the computer setting in the state of compatible display resolution |
| Ripping line in RCA connecting | Please use good quality connecting cable. |
| Problem still exist | Unplug the power cable and wait for 30 seconds, then connect. If there is some problem with our TV, do not repair it by yourself, please contact with the customer service center. |
Machine Technical Specifications
| Screen Size | TV System | Preset Channel s | Speaker Output |
| 16" | PAL/NTSC | PAL:0-199,NTSC:AIR 2-69CABLE1-125 | 5W+5W |
| 19" | PAL/NTSC | PAL:0-199,NTSC:AIR 2-69CABLE1-125 | 5W+5W |
| 22" | PAL/NTSC | PAL:0-199,NTSC:AIR 2-69CABLE1-125 | 5W+5W |
| 24" | PAL/NTSC | PAL:0-199,NTSC:AIR 2-69CABLE1-125 | 5W+5W |
| 32" | PAL/NTSC | PAL:0-199,NTSC:AIR 2-69CABLE1-125 | 10W+10W |
| 39"/40" | PAL/NTSC | PAL:0-199 NTSC:AIR 2-69CABLE1-125 | 10W+10W |
| 42" | PAL/NTSC | PAL:0-199,NTSC:AIR 2-69CABLE1-125 | 10W+10W |
| 46" | PAL/NTSC | PAL:0-199,NTSC:AIR 2-69CABLE1-125 | 10W+10W |
| 50" | PAL/NTSC | PAL:0-199,NTSC:AIR 2-69CABLE1-125 | 10W+10W |
| Screen Size | power Con sump tion (LED) | power Con sump tion (LCD) | Main accessories |
| 16" | 24W | 36W | User's manual x1Remote controller x1Power cord x1AAA Batteries x2 |
| 19" | 36W | 48W | |
| 22" | 36W | 48W | |
| 24" | 48W | 60W | |
| 26" | 100W | ||
| 32" | 56W/65W/100W | 100W/135W | |
| 39"/40" | 70W/75W | 135W | |
| 42" | 70W | 175W | |
| 46" | 110W | ||
| 50" | 135W | 280W | |

LIFE TIME 60,000 Hrs
Remote Controller
Descriptions of television remote control
- POWER: Turn on the TV or enter standby mode.
2.MUTE: Turn off the sound and turn on when press again.
3.0-9: Figures "0-9" are used to directly input channel number. - -/-- Press this button to enter a program number for different digit. eg. -/---/---
- ☐ Press this button to toggle between the current and the previous programme you were viewing
6.S.MODE: Select the different sound mode directly.
7.SLEEP: Set the sleep time. - MTS: Press to select the MTS mode.(for example, BTSC, MONO, STEREO .eg )MTS ,
9.P.MODE: Select the different picture mode directly. - MENU: Start system menu and return to upper menu.
11.SOURCE: Input source conversion button. - ▲▼ ◀▶ Press ▼▲ button to select items. Press ◀▶ button to adjust it.
- ENTER: To confirm the choice with the highlighted menu item.
- EXIT: Press to exit the OSD menu.
15.INFO: Display the system state information
Battery Installation:
Remove the battery compartment lid on the rear of the remote control by sliding the lid down, then off. Put two AAA batteries inside the battery compartment with their + and - ends aligned as indicated. Do not mix old and new batteries or different types of batteries Replace the battery compartment lid. Slide the lid until you hear it click into place.
Using the Remote Control:
Unless stated otherwise, the remote control can operate all the features of the TV.
Always point the remote control directly at the remote sensor in the front of the TV.
CAUTION:
Batteries installed in the unit should not be exposed to excessive heat such as sunshine, fire and the like.

Remote Controller
Descriptions of television remote control
16.VOL+: Increase the volume.
- ROOT: When playing the photo or VIDEO, if you press ROOT, then it will stop playing and return to the current catalogue, in USB mode.
18.VOL-: Decrease the volume.
19.FR: Press to fast reverse in the USB mode. FAV: Press to add or remove your favorite channels under TV menu
20.PLAY/PAUSE: Press to PLAY/PAUSE in the USB mode. start recording and PAUSE, in USB mode.
CANCEL: When a page is selected in the mode of text, it may take some time before it becomes available, pressing the CANCEL key will return to the TV mode. When the required page is found, the page number will appear at the top of the TV picture, press the CANCEL key to return to the mode of text for you to browse this page.
21.PREV: Press to skip the backward in the USB mode.
FAV+: Press to switch your favorite channels under TV menu
22.STOP: Press to STOP in the USB mode.
INDEX: Request the Index page in Teletext mode.
23.GREEN/RED/YELLOW/CYAN:
Teletex switch of the analog parts Under the menu corresponding to the TV, press the button according to the color display to enter RED:Exchange GREEN:Insert YELLOW:Copy BLUE:Delete
24.CH+: Increase the program.
25.REPEAT: Repeat
26.CH-: Decrease the program.
27.FF: Press to fast forward in the USB mode. FAV-: Press to switch your favorite channels under TV menu
- SUBPAGE: Press to access sub page.
29.NEXT: Press to skip the forward in the storage mode. FREEZE: Image still
30.GOTO:Skip
-
REVEAL: Reveal or Hide the hidden words.
-
SIZE: Change the size of display in Teletext mode.
-
HOLD: HOLD On or Off for current page display.
-
ASPECT: Aspect function.
-
ON/OFF : Switch On or Off the TELETEXT mode.
-
MIX: TV and TXT pictures are mixed together (transparent background)

- Opmerkingen
- Plaatsing van de TV
- TV Menu
- Ingangsbron
- Beeldmodus
- Set password
- Emplacement du TV
- Menu TV
- Search
- Mod e imag e
- IMPORTANT
- Table Of Contents
- Preparations Guide
- Installed And Connected TV
- PC Menu
- Media Menu
- Other Information
- Safety Information
- CAUTION
- RISK OF ELECTRIC SHOCK DO NOT OPEN
- Important Safety Precautions
- TV Bracket assemble
- Fix the TV on the wall
- Note:
- TV Buttons And Terminal Interface
- TV Buttons
- Terminal Interface
- Install And Connect TV
- Set your TV
- Connect antenna and power
- Turn on TV
- TV Stand Installation Instructions
- Input Source
- Channel Menu
- NTSC Channel Menu
- PAL Channel Menu
- Tune Type Cable/Air
- Auto Tuning
- ATV Manual Tuning
- Current CH
- Color system
- Sound System
- Fine-Turn
- AFC
- Programm Edit
- Medium
- Warm
- Noise Reduction
- Sound Menu
- Sound Mode
- Bass
- Treble
- Balance
- Auto Volume
- Adjusting the Bass/Treble/Balance
- Picture Menu
- Picture Mode
- Contrast/Brightness/Color/Tint
- (NTSC only)/Sharpness
- Contrast
- Brightness
- Color
- Tint
- Sharpness
- Color Temperature
- Cool
- Time Menu
- Sleep Timer
- Auto Sleep
- OSD Time r
- Option Menu
- OSD Language
- Aspect Ratio
- Blue Screen
- Key Lock
- Caption
- Parent Control
- Reset
- Software Update(USB)
- Lock System
- TV
- MAPP
- G
- PG
- PG-13
- R
- NC-17
- X
- C
- C8+
- 14+
- 18+
- Canada French
- ans+
- ans+
- ans+
- ans+
- TV rating(NTSC)
- Hotel Menu(Optional)
- Screen Menu
- Auto Adjust
- Horizontal Pos.
- Vertical Pos.
- Clock
- Phase
- Help
- Machine Technical Specifications
- Remote Controller
- Descriptions of television remote control
- Battery Installation:
- Using the Remote Control:
- CAUTION:
Brand : SALORA
Model : 40LED1500
Category : Television