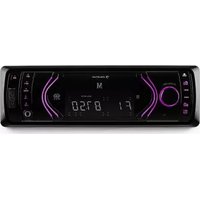
MD-130 - Car radio Auna - Free user manual and instructions
Find the device manual for free MD-130 Auna in PDF.


| Product Type | Car Stereo |
| Brand | Auna |
| Model | MD-130 |
| Form Factor | 1-DIN |
| Dimensions (W x H x D) | 178 x 50 x 100 mm |
| Weight | 0.7 kg |
| Power Supply | 12V DC (negative ground) |
| Maximum Power Output | 4 x 50 Watts |
| RMS Power Output | 4 x 20 Watts |
| Radio Tuner | FM/AM with RDS |
| Playback Media | CD, CD-R, CD-RW, MP3, WMA |
| USB Port | Yes, for MP3/WMA playback |
| AUX Input | 3.5 mm front or rear |
| Bluetooth | No (or optional) |
| Display | LCD with white backlight |
| Remote Control | Included (wired or IR) |
| Equalizer | Preset EQ modes (Rock, Pop, etc.) |
| Security | Detachable front panel |
| Maintenance | Clean with dry cloth; avoid liquids |
| Spare Parts Availability | Contact Auna support or authorized dealers |
Frequently Asked Questions - MD-130 Auna
User questions about MD-130 Auna
0 question about this device. Answer the ones you know or ask your own.
Ask a new question about this device
Download the instructions for your Car radio in PDF format for free! Find your manual MD-130 - Auna and take your electronic device back in hand. On this page are published all the documents necessary for the use of your device. MD-130 by Auna.
USER MANUAL MD-130 Auna


flowchart
graph TD
    A["Main unit"] --> B["Antenna Connector"]
    A --> C["Ignition switch (+)"]
    A --> D["Memory/ back-up"]
    A --> E["Ground (-)"]
    A --> F["Remote"]
    A --> G["Front Left"]
    A --> H["Rear Left"]
    A --> I["Green/Black"]
    A --> J["Violet/Black"]
    A --> K["Grey/Black"]
    A --> L["Front Right"]
    A --> M["White/Black"]
    A --> N["Red (R)"]
    A --> O["White (L)"]
natural_image
Symbol of a trash bin crossed with a diagonal line, no text or labels presentElektroaltgeräte
Congratulations on purchasing this product. Please read and follow these instructions, in order to avoid damaging the item. We do not cover any damages that may arise from improper use of the item or the disregard of the safety instructions.
Important Safety Advice
- Read all instructions before using.
- To protect against a fire, electric shock or personal injury, do not immerse cord, electric plugs or device in water or other liquids.
- Do not expose the appliance to extreme temperatures. The appliance shall be used in moderate climates.
- The use of attachments that are not recommended by the appliance manufacturer may result in fire, electric shock or personal injury.
- Do not open the unit by removing any cover parts. Do not attempt to repair the unit. Any repairs or servicing should be done by qualified personell only.
- Only qualified persons may perform technical work on the product. The product may not be opened or changed. The components cannot be serviced by the user. The manufacturer is not responsible for any radio or TV interference caused by unauthorized modifications.
- The appliance is not a toy. Do not let children play with it. Never let children insert foreign objects into the appliance.
- Never clean the surface of the device with solvents, paint thinners, cleansers or other chemical products. Instead, use a soft, dry cloth or soft brush.
- Save these instructions.
Small objects
Keep small objects (i.e. screws, mounting material, memory cards etc.) and packaging out of the range of children. Do not let Children play with foil. Choking hazard!
Transporting the device
Please keep the original packaging. To gain sufficient protection of the device while shipment or transportation, make sure to put it back in its original packaging.
Cleaning the surface
Do not use any volatile liquids, detergents or the like. Use a clean dry cloth.
Technical Data
Art # 10026868, 10026869
| Power supply DC12V | |
| Power consumption | 10A max. |
| Connections | Stereo RCAAntennaISO |
| Data interfaces | USB, SD, BT, AUX |
| File fomats supported | MP3, WMA |
| File systems supported | FAT16/FAT32 |
| File drives supported | USB/SD/MMC: 32GB max. |
| Scope of delivery | 1 x device1 x RCMounting equipment |
| Dimensions / wight | DIN ISO standard (1 DIN)/ 0.6kgs |
Installation
- Choose the mounting location where the unit will not interfere with the normal driving.
- Before finally installing the unit, connect the wiring temporarily and make sure it is all connected up properly and the unit and the system work properly.
- Consult your nearest dealer if any other modifications of the vehicle are required.
- Install the unit where it does not get in the driver's way and cannot injure any passenger.
• If installation angle exceeds 30 from horizontal, the unit might not give ist optimum performance.

- Avoid installing the unit where it would be subject to high temperature, such as from direct sunlight, or from hot air, from the heater, or where it would be subject to dust, dirt or excessive vibration.
DIN FRONT/REAR-MOUNT
This unit can be properly installed either from „Front“(conventional DIN Front-mount) or „Rear“(DIN Rear-mount installation, utilizing threaded screw holes at the sides of the unit chassis). For details, refer to the following illustrated installation methods.


If you want to take CHASSIS out of the SLIDE BRACKET HOUSING, first remove the PLASTIC TRIM OUT of the both sides away, then insert the two KEY PLATE into left and right side of chassis as above illustration.
Preparing the Remote Control
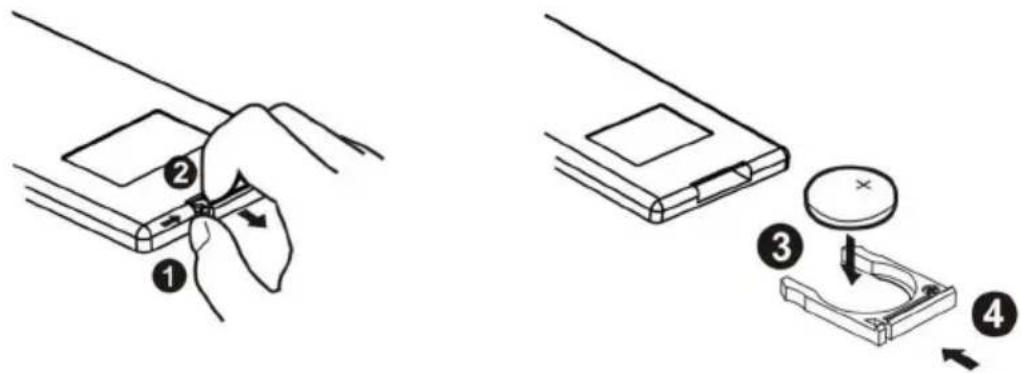
- First push to inside as the direction indicated by the arrow (See 1) and then Remove the battery holder as the direction indicated by the arrow (See 2).
- Replace the battery Set a new battery property with (+)side up as illustrated (See 3).
- Insert the battery holder. Push in the holder to the original position (See 4).
Using the Remote Control
Face the remote control towards the player front face IR mark (remote control signal receiver). Operation angle: About 30 degree in each the direction of the front of the IR mark.
Note :
The lithium cell in the battery compartment of remote control has been secured for transport with a foil. Before initial use please remove this foil so that the remote control is ready for operation.
Connection Diagram

flowchart
graph TD
    A["Main unit"] --> B["Antenna Connector"]
    A --> C["Ignition switch (+)"]
    A --> D["Memory/ back-up"]
    A --> E["Ground (-)"]
    A --> F["Remote"]
    A --> G["Front Left"]
    A --> H["Rear Left"]
    A --> I["Green/Black"]
    A --> J["Violet/Black"]
    A --> K["Grey/Black"]
    A --> L["Front Right"]
    A --> M["White/Black"]
    A --> N["Red (R)"]
    A --> O["White (L)"]
Controls / Overview
Remote Control:
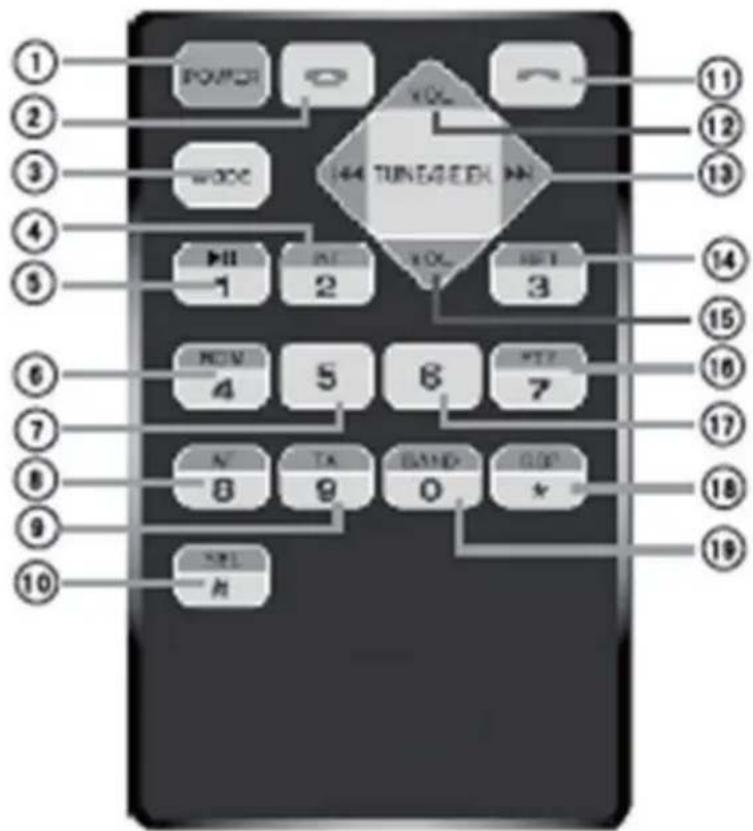
Power (on/off) 1 11 Answer phone (BT)
Hang up (BT phone) 2 12 Vol+
Mode selection 3 13 Scan / Skip / Back
INT / ,2'4 14 Repeat / ,3'
Play / Pause / ,1'5 15 Vol-
Random / ,4'6 16 PTY / ,7'
-10 (skip back 10 tracks) / ,5'7 17 +10 (skip 10 tracks) / ,6'
AF / ,818 18 Clock
TA / ,9' 9 19 Band / ,0'
SEL/RDS10
Front:

Control panel detached:

| Skip back / rewind 1 | 11 Aux | In | |
| Skip / FFW 2 | 12 +10 | (skip 10 tracks) / ,6' | |
| Detach front panel 3 | 13 -10 | (skip 10 tracks back) / ,5' | |
| Mode / PTY / end call/decline incoming call | 4 | 14 | IR sensor for remote control |
| Display 5 | 15 | Power / VOL / SELECT / RDS / Color (multi knob) | |
| Random / ,4' | 6 16 | Mute / Clock | |
| Repeat / ,3' | 7 17 | Band / APS / Answer phone | |
| INT / ,2' | 8 18 | Reset | |
| Play / Pause / ,1' | 9 19 | SD/MMC slot | |
| USB port 10 | |||
Operation
- Skip back / fast rewind
Radio: press to change to previous station; hold to scan band downward. MP3 mode: press to skip back to previous track; hold for fast rewind.
- Skip / fast forward
Radio: press to change to next station; hold to scan band upward. MP3 mode: press to skip track; hold for fast forward.
- Detach front panel: Take the front panel off to prevent from being stolen.
- Mode / PTY / end call/decline incoming call
Press repeatedly to select operation mode (radio / USB / SD / BT / AUX)
a) SD mode and USB mode can only be selected when a corresponding SD card / USB drive is connected/inserted.
b) In radio mode: press and hold to change to PTY mode in order to select stations via num buttons.
c) When in BT hands free mode, press to end calls, respectively decline incoming calls.
- Random / ,4'
Radio: Save current station to preset #4.
MP3 mode: Toggle random mode on/off. In random mode, all available tracks will be played in a random order.
- Repeat / ,3'
Radio: Save current station to preset #3 MP3 mode: Toggle repeat play on/off
- INT / ,2'
Radio: Save current station to preset #2 MP3 mode: Browse through mp3 directory
- Play / Pause / ,1'
Radio: Hold to save current station to preset #1; press for station scan. MP3 mode: Play/pause current track.
• AUX In: Connect external media player via 3.5mm audio cable to play back over the car hifi.
• +10 / ,6'
Radio: Save current station to preset #6 MP3 mode: Skip 10 tracks.
-10 / ,5'
Radio: Save current station to preset #5 MP3 mode: Skip back 10 tracks.
• Power / VOL / Select / RDS / Color (multi button)
a) press to switch the device on; press and hold to switch to standby. b) rotate to adjust the output volume. c) in radio or MP3 modes: press repeatedly to access the settings menus: BAS(+/-), TRE(+/-), BL AUTO, AF (ON/OFF), REG (ON/OFF), TA (ON/OFF), EON (ON/OFF), EQ (ON/OFF) (press to select; rotate to change value, press to quit sub menu)
- Mute / Clock
a) Toggle mute on/off.
b) Press and hold to show current time on display.
c) When clock is displayed, hold to enter clock setting. Set clock by pressing and rotating SELECT (15).
• Band / APS / Answer call
Radio: Press to toggle bands FM1/2/3; hold for automated scan followed by a sequential tuning-in of found stations for a few seconds each.
- Reset: Press to re-set to factory default.
BT Operation
- Activate BT on your smartphone and pair with "IWI Car". If prompted to enter a password, please enter "0000".
- Incoming phone calls and music playback can now be dispatched from the smartphone/tablet/laptop to the car hifi.
• After successful pairing, press MODE (4) to activate the BT-ready state.
- Press 🎨 and use the number buttons to type in a telephone number. Then, press 🎨 again to dial.
• To answer an incoming call. also press .
- Press and hold INT / ,2' (4) to toggle the telephone audio between your phone and the car hifi.
- Press to end calls or decline incoming calls.
Radio Operation
- AF: On initial startup, the radio is in RDS mode (AF).
• REG / TA / EON: Use the multi knob to toggle REG / TA / EON etc. on/off.
• PTY:
In radio mode, press and hold PTY (4), then use the number buttons to save the current station to available presets on bands 1, 2, or 3.
Environment Concerns

natural_image
Symbol of a trash bin crossed with a diagonal line, no text or numbers presentAccording to the European waste regulation 2002/96/EG this symbol on the product or on its packaging indicates that this product may not be treated as household waste. Instead it should be taken to the appropriate collection point for the recycling of electrical and electronic equipment. By ensuring this product is disposed of correctly, you will hep prevent potential negative consequences for the environment and human health, which could otherwise be caused by inappropriate waste handling of this product. For more detailed information about recycling of this product, please contact your local council or your household waste disposal service.
Declaration of Conformity
Manufacturer: CHAL-TEC GmbH, Wallstraße 16, 10179 Berlin, Germany.
This product is conform to the following European directives:
1999/05/EG (R&TTE)
2011/65/EU (RoHS)
CE

- Elektroaltgeräte
- Important Safety Advice
- Small objects
- Transporting the device
- Cleaning the surface
- Technical Data
- Installation
- DIN FRONT/REAR-MOUNT
- Preparing the Remote Control
- Using the Remote Control
- Note :
- Connection Diagram
- Controls / Overview
- Operation
- - Skip back / fast rewind
- - Skip / fast forward
- - Mode / PTY / end call/decline incoming call
- - Random / ,4'
- - Repeat / ,3'
- BT Operation
- Radio Operation
- Environment Concerns
- Declaration of Conformity
Brand : Auna
Model : MD-130
Category : Car radio