
WDNS115BWG - Water dispenser HAIER - Free user manual and instructions
Find the device manual for free WDNS115BWG HAIER in PDF.


| Product Type | Water Dispenser |
| Brand | Haier |
| Model | WDNS115BWG |
| Dispensing Type | Bottom-Load |
| Compatible Bottle Size | 3 to 5 Gallons (11.4 to 18.9 Liters) |
| Water Temperature Settings | Hot (185°F - 195°F) and Cold (39°F - 46°F) |
| Dimensions (W x D x H) | 11.4 x 12.2 x 37.4 inches (29 x 31 x 95 cm) |
| Weight | 22.5 lbs (10.2 kg) |
| Power Supply | 120V, 60Hz, 550W (Heating) / 100W (Cooling) |
| Safety Features | Child Safety Lock, Automatic Shut-Off, Anti-Dry Protection |
| Drip Tray | Removable and Easy-to-Clean |
| Energy Efficiency | Energy Star Certified |
| Maintenance | Clean Every 3-6 Months; Descale Periodically |
| Recommended Cleaning Agent | White Vinegar or Descaler Solution |
| Spare Parts Available | Drip Tray, Water Taps, Filters (Sold Separately) |
| Warranty | 1 Year Limited |
| Certifications | cETLus, NSF 42 (Filter Optional) |
Frequently Asked Questions - WDNS115BWG HAIER
User questions about WDNS115BWG HAIER
0 question about this device. Answer the ones you know or ask your own.
Ask a new question about this device
Download the instructions for your Water dispenser in PDF format for free! Find your manual WDNS115BWG - HAIER and take your electronic device back in hand. On this page are published all the documents necessary for the use of your device. WDNS115BWG by HAIER.
USER MANUAL WDNS115BWG HAIER
Always here to help you
Register your product and get support at
www.philips.com/welcome


natural_image
Close-up of a Philips 34-pin hand saw with three dials and a green indicator light (no text or symbols visible on the device body)PT919
PT866
PT860
PT845
PT739
PT737
PT731
PT730
PT727
PT726
PT725
PT723
PT721
PT720
User manual
PHILIPS

ENGLISH 4
БЪЛГАРСКИ 15
ČEŠTINA 27
EESTI 38
HRVATSKI 49
MAGYAR 60
КАЗАКША 71
LIETUVIŠKAI 83
LATVIEŠU 94
POLSKI 105
ROMÂNĂ 117
РУССКИЙ 129
SLOVENSKY 141
SLOVENŠČINA 152
SRPSKI 163
УКРАЇНСЬКА 174
Introduction
Congratulations on your purchase and welcome to Philips!
To fully benefit from the support that Philips offers, register your product at www.philips.com/welcome.
Please read this user manual, as it contains information about the wonderful features of this shaver as well as some tips to make shaving easier and more enjoyable.
General description (Fig. 1)
1 Protection cap
2 Shaving unit
3 Shaving unit release button
4 Shaver on/off button
5 Shaving head symbol
6 Charging light
7 Charging stand (PT866*/PT739*)
8 Pouch (PT866*)
9 Adapter
10 Cleaning brush
11 Trimmer release slide (PT919/PT866/PT860/PT845/PT739/PT737/PT731 only)
12 Trimmer (PT919/PT866/PT860/PT845/PT739/PT737/PT731 only)
Note: You can find the type number on the back of the shaver.
* only for UK, Holland, Germany, France, Turkey, Sweden, Finland, Norwegia, Denmark, Italy, Portugal, Spain and Greece.
Important
Read this user manual carefully before you use the appliance and save it for future reference.
Danger
- Keep the adapter dry.
Warning
- The adapter contains a transformer. Do not cut off the adapter to replace it with another plug, as this causes a hazardous situation.
- The appliance is not intended for use by persons (including children) with reduced physical, sensory or mental capabilities, or lack of experience and knowledge, unless they have been given supervision or instruction concerning use of the appliance by a person responsible for their safety.
- Children should be supervised to ensure that they do not play with the appliance.
- Always unplug the shaver before you clean it under the tap.

natural_image
Prohibition sign showing a faucet without raindrops, enclosed in a circle (no text)
natural_image
Illustration of a pair of electric shakers with a prohibition symbol (no text or labels)
natural_image
Simple black-and-white icon of a faucet with raindrops falling (no text or symbols)Caution
- Never immerse the shaver in water.
- Do not use the shaver in the bath or in the shower.
- Never use water hotter than 80^ C to rinse the shaver.
- Be careful with hot water. Always check if the water is not too hot, to prevent your hands from getting burnt.
- The shaver is not dishwasher-proof.
- Water may leak from the socket at the bottom of the shaver when you rinse it. This is normal and not dangerous because all electronics are enclosed in a sealed power unit inside the shaver.
- Do not use the shaver, adapter or any other part if it is damaged, as this may cause injury. Always replace a damaged adapter, charger or part with one of the original type.
- Use, charge and store the appliance at a temperature between 10^ C and 35^ C.
- Always place and use the shaver on a surface that is fluid-resistant.
- Only use the adapter, charger and accessories supplied.
- Always put the protection cap on the shaver to prevent damage and to avoid dirt accumulation in the shaving heads.
Compliance with standards
- This Philips appliance complies with all standards and regulations regarding exposure to electromagnetic fields (EMF) and can be safely cleaned under the tap.
General
- The appliance is equipped with an automatic voltage selector and is suitable for mains voltages ranging from 100 to 240 volts.
- The adapter transforms 100-240 volts to a safe low voltage of less than 24 volts.
Charging
PT919/PT866/PT860: It takes approx. 1 hour to fully charge the shaver. PT845/PT739/PT737/PT731/PT730/PT727/PT726/PT725/PT721/PT720: It takes approx. 8 hours to fully charge the shaver.
When you charge the shaver for the first time or after a long period of disuse, let it charge until the charging light lights up continuously.
A fully charged shaver provides up to 50 (PT919/PT866/PT860) or up to 45 shaving minutes (PT845/PT739/PT737/PT731/PT730/PT727/PT726/PT725/PT721/PT720).
The shaving time may be less than 50 (PT919/PT866/PT860) or 45 shaving minutes (PT845/PT739/PT737/PT731/PT730/PT727/PT726/PT725/PT721/PT720) as a result of your shaving behaviour, your cleaning habits or your beard type.
Charge indications
Battery low

natural_image
Diagram of a stylized smiley face with curved lines and a power button, no text or symbols present- When the battery is almost empty (when there are only 5 or fewer shaving minutes left), the charging light starts to flash orange.
- When you switch off the shaver, the charging light continues to flash orange for a few seconds.
Quick charging
- When you start charging the empty battery, the charging light alternately flashes orange and green. After approx. 3 minutes, the charging light continues to flash green. The shaver now contains enough energy for a 5-minute shave.
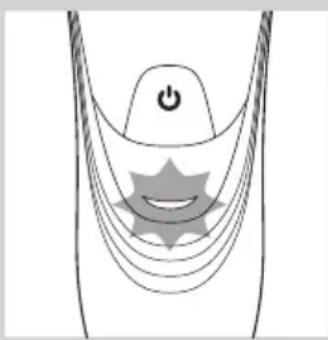
natural_image
Diagram of a medical or electrical device with curved lines and a central power button, featuring a star-shaped symbol (no text or labels)Charging
- When the shaver is charging, the charging light flashes green.

natural_image
Diagram of a curved structure with a central circular element and a power button, no text or symbols presentBattery fully charged
- When the battery is fully charged, the charging light lights up green continuously.
Note: After approx. 30 minutes, the charging light goes out to save energy.
Charging with the adapter
1 Put the small plug in the shaver.
2 Put the adapter in the wall socket.
The charging light shows the charging status of the shaver (see section ‘Charge indications’ in this chapter).
Charging in the charging stand (PT866/PT739 only)
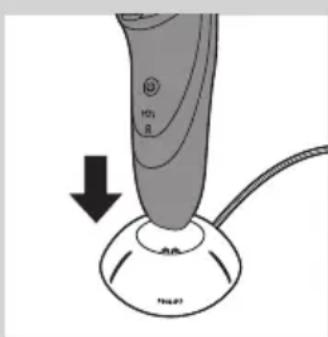
natural_image
Close-up of a medical or electronic device with a black arrow pointing to a circular base (no visible text or symbols)1 Put the small plug in the charging stand.
2 Put the adapter in the wall socket.
3 Place the shaver in the charging stand.
The charging light shows the charging status of the shaver (see section ‘Charge indications’ in this chapter).
Using the shaver
Note: You can also use the shaver directly from the mains. Simply connect the shaver to the mains.
Shaving

natural_image
Illustration of a person using a handheld device to clean another (no text or symbols present)1 Press the on/off button once to switch on the shaver.
2 Move the shaving heads over your skin. Make circular movements.
- Your skin may need 2 or 3 weeks to get accustomed to the Philips shaving system.
3 Press the on/off button once to switch off the shaver.
4 Clean the shaver (see chapter ‘Cleaning and maintenance’).
Trimming (PT919/PT866/PT860/PT845/PT739/PT737/PT731 only)

natural_image
Diagram of a hairdryer with a black arrow indicating the process (no text or symbols present)You can use the trimmer to groom your sideburns and moustache.
1 Press the on/off button once to switch on the shaver.
2 Push the trimmer slide downwards to open the trimmer.
▶You can now start trimming.
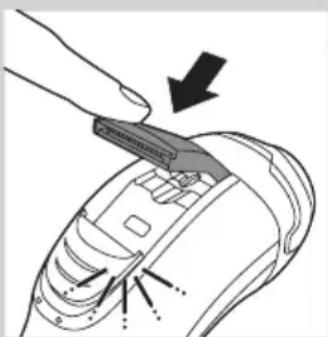
natural_image
Diagram of a device being inserted into a component, showing a tool and arrow indicating direction (no text or symbols present)3 After trimming, close the trimmer and switch off the shaver.
Cleaning and maintenance
Never use compressed air, scouring pads, abrasive cleaning agents or aggressive liquids such as petrol or acetone to clean the appliance.
- Clean the shaver after every shave for optimal shaving performance.
- Regular cleaning guarantees better shaving performance.
- For the best cleaning results, we advise you to use the Philips Cleaning spray (HQ110).
- Be careful with hot water. Always check if the water is not too hot, to prevent your hands from getting burnt.
Note: Water may leak from the socket at the bottom of the shaver when you rinse it. This is normal and not dangerous because all electronics are enclosed in a sealed power unit inside the shaver.
Cleaning the shaving unit under the tap

natural_image
Diagram of a hand holding an open mechanical component with arrows indicating direction (no text or symbols present)1 Switch off the shaver and disconnect it from the mains.
2 Press the release button to open the shaving unit.
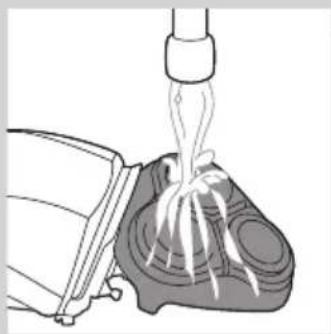
3 Rinse the shaving unit and hair chamber under a hot tap for 30 seconds.
Be careful with hot water. Always check if the water is not too hot, to prevent your hands from getting burnt.

natural_image
Diagram of a hand inserting a plug into a socket with internal tubing (no text or symbols)- Rinse the hair chamber and the inside of the shaving unit.

natural_image
Illustration of a mechanical component with a tool inserted into a housing (no text or symbols)- Rinse the outside of the shaving unit.
4 Close the shaving unit and shake off excess water.
Be careful not to hit the shaving unit against anything while shaking off excess water.
Never dry the shaving unit and the hair chamber with a towel or tissue, as this may damage the shaving heads and the coupling spindles.
5 Open the shaving unit again and leave it open to let the shaver dry completely.
Cleaning the shaving unit with the cleaning brush

natural_image
Diagram of a hand holding an electrical plug socket with internal components and a directional arrow indicating movement (no text or symbols present)1 Switch off the shaver and disconnect it from the mains.
2 Press the release button to open the shaving unit.
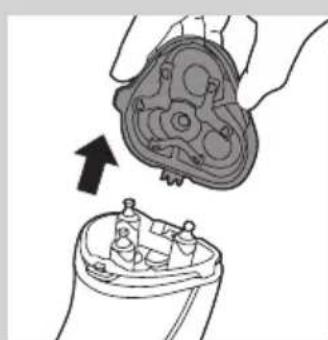
natural_image
Diagram showing a hand holding a mechanical component above a device with internal components (no text or symbols)3 Pull the shaving unit off the shaver.


natural_image
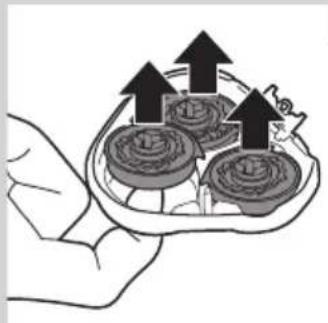
Illustration of a hand holding a tray with three small round objects and upward arrows, no text or symbols present.
natural_image
Illustration of two hands using pipette to apply a mechanical component to a bowl (no text or symbols present)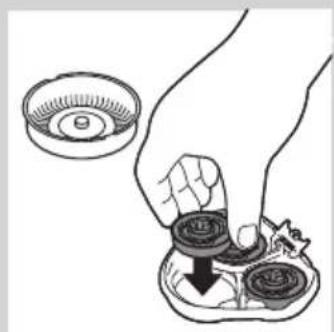
natural_image
Illustration of a hand pressing down on a mechanical component with a magnified inset showing the top part (no text or symbols)
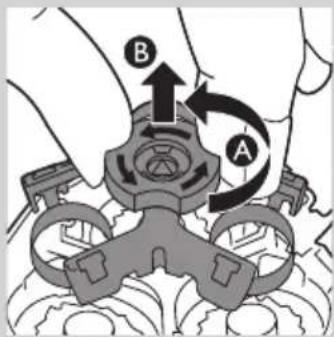
4 Turn the lock anticlockwise (A) and remove the retaining frame (B).
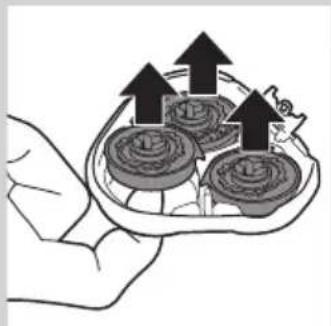
5 Remove and clean one shaving head at a time. Each shaving head consists of a cutter and a guard.
Note: Do not clean more than one cutter and guard at a time, since they are all matching sets. If you accidentally mix up the cutters and guards, it may take several weeks before optimal shaving performance is restored.
- Remove the cutter from the shaving guard and clean it with the brush.
- Clean the inside and outside of the shaving guard with the brush.
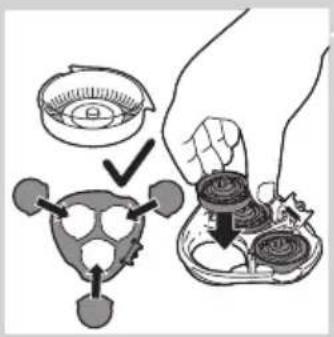
6 Put the shaving heads back into the shaving unit.
Note: Make sure that the projections of the shaving heads fit exactly into the recesses.

natural_image
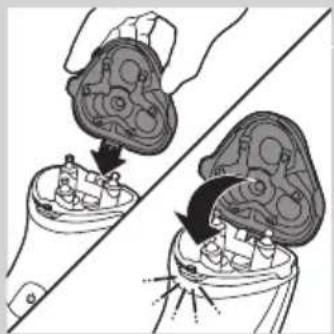
Illustration of a hand holding a device with a close-up view of its internal components (no text or symbols)7 Put the retaining frame back into the shaving unit (A) and turn the lock clockwise (B).
8 Insert the lug of the shaving unit into the slot in the top of the shaver. Then close the shaving unit.
Note: If the shaving unit does not close smoothly, check if you have inserted the shaving heads properly and if the retaining frame is locked.
Cleaning the trimmer with the cleaning brush (PT919/PT866/PT860/PT845/PT739/PT737/PT731 only)
natural_image
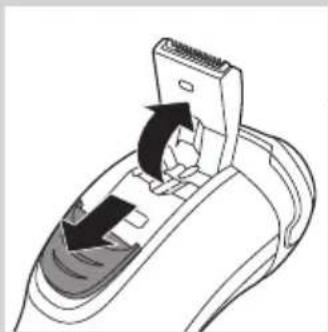
Diagram of a hairdryer with a black arrow indicating the insertion direction (no text or symbols present)Clean the trimmer every time you have used it.
1 Switch off the shaver and disconnect it from the mains.
2 Push the trimmer slide downwards to open the trimmer.
natural_image
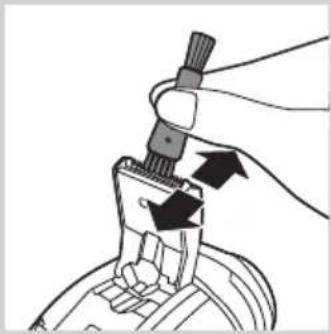
Illustration of a hand holding a tool with arrows indicating motion or force (no text or symbols)3 Clean the trimmer with the short-bristled side of the cleaning brush. Brush up and down along the trimmer teeth.
4 Close the trimmer ('click').

Tip: For optimal trimming performance, lubricate the trimmer teeth with a drop of sewing machine oil every six months.
Storage

natural_image
Diagram of a hand turning a circular component into a base, showing mechanical components (no text or symbols)- Put the protection cap on the shaver after use to prevent damage and to avoid dirt accumulation in the shaving heads.
- PT866 only: Store the appliance and the accessories in the pouch.
Replacement

natural_image
Diagram of a device with internal components and a circular diagram showing rotational flow (no text or symbols)For maximum shaving performance, we advise you to replace the shaving heads every two years.
Replacement reminder
The shaving head symbol will light up to indicate that the shaving heads need to be replaced. Replace damaged shaving heads right away. Only replace the shaving heads with original HQ8 or HQ9 (PT919 only) Philips Shaving Heads.

natural_image
Illustration of a hand holding a mechanical component with arrows indicating direction (no text or symbols)1 The shaving head symbol lights up orange continuously.
2 Switch off the shaver. Disconnect the shaver from the mains.
3 Press the release button to open the shaving unit.
4 Pull the shaving unit off the shaver.

5 Turn the lock anticlockwise (A) and remove the retaining frame (B).

natural_image
Illustration of a hand holding a small bowl with a downward arrow, next to a circular inset showing a lid (no text or symbols)6 Remove the shaving heads and place new ones in the shaving unit.
ENGLISH ^12

Note: Make sure that the projections of the shaving heads fit exactly into the recesses.
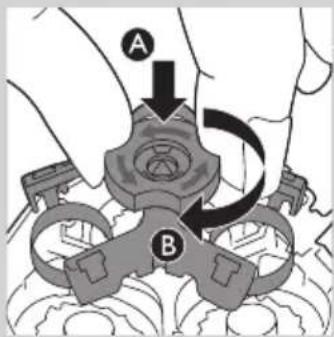
7 Put the retaining frame back into the shaving unit (A) and turn the lock clockwise (B).

natural_image
Illustration of a hand holding a dental implant device with arrows indicating process (no text or symbols)8 Insert the lug of the new shaving unit into the slot in the top of the shaver. Then close the shaving unit.
Note: If the shaving unit does not close smoothly, check if you have inserted the shaving heads properly and if the retaining frame is locked.
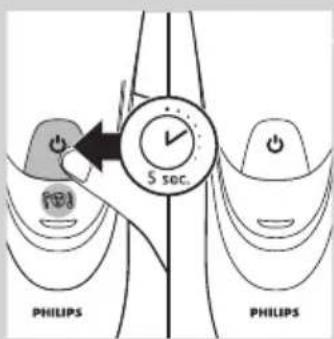
9 Press and hold the on/off button for 5 seconds to reset the replacement reminder on the shaver. The orange light goes out.
Accessories
To retain the top performance of your shaver, make sure you clean it regularly and replace its shaving heads at the recommended time.
Shaving heads
- We advise you to replace your shaving heads every two years. Always replace with HQ8 or HQ9 (PT919 only) Philips Shaving Heads
Cleaning
- Use Cleaning spray (HQ110) to clean the shaving heads thoroughly.

Environment

natural_image
Symbol of a waste bin with crossed lines indicating no waste, and a solid black rectangle below (no text or labels)- Do not throw away the appliance with the normal household waste at the end of their life, but hand them in at an official collection point for recycling. By doing this, you help to preserve the environment.
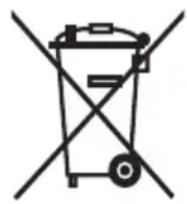
- The built-in rechargeable shaver battery contains substances that may pollute the environment. Always remove the battery before you discard or hand in the shaver at an official collection point. Dispose of the battery at an official collection point for batteries. If you have trouble removing the battery, you can also take the appliance to a Philips service centre. The staff of this centre will remove the battery for you and will dispose of it in an environmentally safe way.
Removing the rechargeable shaver battery
Only remove the rechargeable battery when you discard the shaver. Make sure the rechargeable battery is completely empty when you remove it.
1 Disconnect the shaver from the mains.
2 Let the shaver run until it stops.
3 Undo the screws in the back of the shaver and in the hair chamber.
4 Remove the front panel and the back panel.
5 Bend the 6 hooks aside and take out the power unit.
Be careful, the hooks are sharp.
6 Remove the battery.
Be careful, the battery strips are sharp.
Do not connect the shaver to the mains again after you have removed the rechargeable battery.
Guarantee and support
If you need information or support, please visit www.philips.com/support or read the separate worldwide guarantee leaflet. If there is no Consumer Care Centre in your country, go to your local Philips dealer.
Guarantee restrictions
The shaving heads (cutters and guards) are not covered by the terms of the international guarantee because they are subject to wear.
Troubleshooting
This chapter summarises the most common problems you could encounter with the appliance. If you are unable to solve the problem with the information below, contact the Consumer Care Centre in your country.
Problem Possible cause Solution
| The shaver does not shave as well as it used to. | The shaving heads are damaged or worn. | Replace the shaving heads (see chapter ‘Replacement’). |
| Long hairs obstruct the shaving heads. | Clean the shaving heads one by one (see chapter ‘Cleaning and maintenance’). | |
| You have not inserted the shaving heads properly. | Make sure that the projections of the shaving heads fit exactly into the recesses (see chapter ‘Cleaning and maintenance’). | |
| The shaver does not work when I press the on/off button. | The rechargeable battery is empty. | Recharge the battery (see chapter ‘Charging’) or connect the shaver to the mains. |
| The temperature of the shaver is too high. In this case, the shaver does not work. | As soon as the temperature of the shaver has dropped sufficiently, you can switch on the shaver again. | |
| Water leaks from the shaver after cleaning. | This is normal and not dangerous. | During rinsing some water may collect between the power unit and the housing. After rinsing this water flows out through the socket. The power unit is completely watertight so water cannot reach the electronic parts of the shaver. Your shaver continues to be absolutely safe. |
Въведение
natural_image
Prohibition sign showing a faucet without shower, enclosed in a circle (no text or symbols)
natural_image
Illustration of a pair of electric shakers with a prohibition symbol (no text or labels)
natural_image
Black and white icon of a faucet with raindrops falling (no text or symbols)Внимание
natural_image
Diagram of a curved mechanical or electrical component with a power button and star-shaped symbol (no text or labels)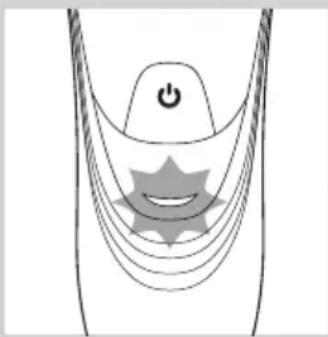
natural_image
Diagram of a stylized smiley face with curved lines and a power button, no text or symbols present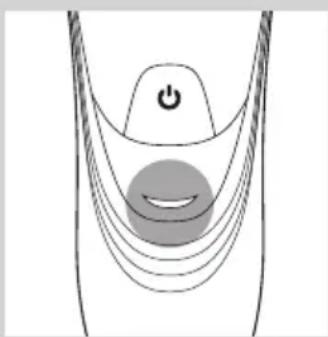
natural_image
Diagram of a curved mechanical or electrical component with a power button and a circular component, no text or symbols present.Изтощена батерия
natural_image
Close-up of a medical or electronic device with a black arrow pointing to a circular component labeled 'Neu9' (no text or symbols on the device itself)natural_image
Illustration of a person using a handheld device to clean another (no text or symbols present)natural_image
Diagram of a hairdryer with a black arrow indicating the process (no text or symbols present)natural_image
Diagram of a hand using a tool to adjust or install a device component, with arrows indicating the process (no text or symbols present)natural_image
Illustration of a hand holding a mechanical component with arrows indicating direction (no text or symbols)natural_image
Illustration of a hand inserting hair into a device with a piping bag above (no text or symbols)natural_image
Illustration of a mechanical device with a tool and tubing, no text or symbols presentnatural_image
Illustration of a hand holding a mechanical component with arrows indicating direction (no text or symbols)natural_image
Diagram showing a hand holding a device with an arrow pointing to a component, and a separate view of a device with internal components (no text or symbols)natural_image
Illustration of a hand holding a tray with three small food items and upward arrows indicating growth or increase (no text or symbols)natural_image
Illustration of three mechanical components: a gear-like device, a bowl with a screw, and a tray with a handle (no text or symbols)natural_image
Illustration of a hand holding a small bowl with a downward arrow, next to a small bowl with a number 9 (no text or symbols)natural_image
Illustration of a dental implant procedure showing two steps: intact and disassembled (no text or symbols present)natural_image
Diagram of a hairdryer with a black arrow indicating direction (no text or symbols)natural_image
Illustration of a hand inserting a plug into a cable (no text or symbols visible)natural_image
Diagram of a hand turning a three-pin electric shaver (no text or symbols)natural_image
Illustration of a hand holding a small electronic device with a circular button labeled '3' (no text or symbols on the device itself)natural_image
Illustration of a hand holding a mechanical component with arrows indicating direction (no text or symbols)natural_image
Illustration of a hand holding a small bowl with a downward arrow, next to a circular container (no text or symbols)natural_image
Illustration of a hand holding a mushroom-shaped object with arrows indicating process (no text or symbols)natural_image
Symbol of a trash bin crossed with no text or numbers, representing waste sorting or disposal (no text present)natural_image
No sign depicting a faucet crossed out by a diagonal line, indicating no pollution or water release.
natural_image
Illustration of a pair of electric shakers with a prohibition symbol (no text or labels)
natural_image
Black and white icon of a faucet with raindrops, enclosed in a square frame (no text or symbols)Upozornění
Modely PT845/PT739/PT737/PT731/PT730/PT727/PT726/PT725/PT721/
natural_image
Diagram of a stylized smiley face with curved lines and a power button, no text or symbols presentnatural_image
Diagram of a medical or electrical device with curved lines and a power button, no text or symbols presentnatural_image
Diagram of a medical device with a power button and a circular button, no text or symbols presentnatural_image
Illustration of a medical or laboratory device with a downward arrow pointing to a circular base (no text or symbols)natural_image
Illustration of a person using a handheld device to clean teeth (no text or symbols present)natural_image
Diagram of a hairpin with an attached connector and black arrows indicating direction (no text or symbols)natural_image
Diagram of a hand using a tool to adjust or install a device component, with arrows indicating the process (no text or symbols present)natural_image
Illustration of a hand holding a mechanical component with arrows indicating direction (no text or symbols)natural_image
Illustration of a shoe being inserted into a socket with liquid flowing out (no text or symbols)natural_image
Illustration of a mechanical component with a piping bag pouring liquid into a housing (no text or symbols)natural_image
Illustration of a hand holding a mechanical component with arrows indicating direction (no text or symbols)natural_image
Diagram showing a hand holding a mechanical component with an arrow pointing to a separate view of a device (no text or symbols present)natural_image
Illustration of a hand holding a tray with coins and upward arrows, no text or symbols presentnatural_image
Illustration of a hand using a tool to clean a mechanical component, with no text or symbols present.natural_image
Illustration of a hand holding two circular objects with a magnified inset showing a small bowl labeled '9' (no text or symbols on objects)natural_image
Illustration of a hand holding a small object with arrows indicating motion or transformation (no text or symbols)natural_image
Diagram of a hairdryer with an arrow indicating direction (no text or symbols present)natural_image
Illustration of a hand holding a tool with arrows indicating motion or force (no text or symbols)natural_image
Diagram of a hand turning a three-pin electric shaver (no text or symbols)natural_image
Diagram of a hairbrush with a circular arrow indicating rotational motion (no text or symbols)natural_image
Illustration of a hand holding a device with an arrow indicating direction (no text or symbols present)natural_image
Illustration of a hand placing a small bowl into a tray with a downward arrow, no text or symbols presentnatural_image
Illustration of a dental implant procedure showing two steps: intact and disassembled (no text or symbols present)natural_image
Symbol of a waste bin with crossed lines indicating no waste, and a solid black rectangle below (no text or labels)natural_image
Prohibition sign showing a faucet crossed out by a diagonal line, indicating no pollution or water release.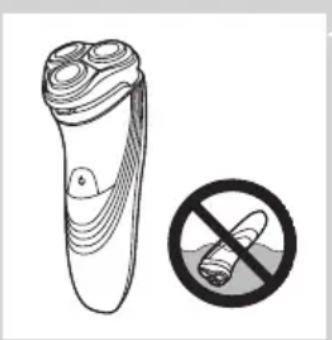
natural_image
Illustration of a pair of electric shakers with a prohibition symbol (no text or labels)Ettevaatust
natural_image
Black and white icon of a faucet with raindrops, enclosed in a square frame (no text or symbols)Vastavus standarditele
natural_image
Diagram of a stylized ear with a power button and star-shaped graphic overlay (no text or symbols)natural_image
Diagram of a curved structure with layered curves and a central star-like shape, no text or symbols present.Laadimine
natural_image
Diagram of a curved structure with a central circular element and a power button, no text or symbols present.Aku on täis laetud
natural_image
Medical device with a downward arrow pointing to a spherical component (no text or symbols visible)natural_image
Illustration of a person using a handheld device to clean another (no text or symbols present)natural_image
Diagram of a hairdryer with an arrow indicating the process (no text or symbols present)natural_image
Diagram of a device being inserted into a component, showing a black arrow indicating the process (no text or symbols present)natural_image
Illustration of a person holding a mechanical component with arrows indicating direction (no text or symbols)natural_image
Diagram of a foot with a foot highlighted, showing internal components and fluid flow from a pipe (no text or symbols)- Loputage karvakambrit ja pardlipea sisemust.

natural_image
Illustration of a mechanical device with a piping bag pouring liquid into a component (no text or symbols)natural_image
Diagram of a hand holding a mechanical component with arrows indicating direction (no text or symbols)natural_image
Diagram showing a hand holding a mechanical component above a close-up of its internal structure (no text or symbols)
natural_image
Illustration of a hand holding a tray with three circular objects and upward arrows, no text or symbols present.
natural_image
Illustration of a mechanical assembly with two parts: one showing a gear-like component being inserted, the other showing a bowl with a handle (no text or symbols)
natural_image
Illustration of a hand holding a small mechanical component with a magnified inset showing a circular component (no text or symbols)
natural_image
Illustration of a hand holding a device with internal components, showing two views of the device (no text or symbols present)natural_image
Diagram of a hairdryer with a black arrow indicating the insertion direction (no text or symbols present)natural_image
Illustration of a hand holding a tool with arrows indicating motion or force (no text or symbols)natural_image
Diagram of a hand turning a circular component into a base, showing mechanical components (no text or symbols)natural_image
Diagram of a hand holding a device with a circular icon and directional arrows indicating rotation (no text or symbols)natural_image
Illustration of a hand holding a mechanical component with arrows indicating direction (no text or symbols)natural_image
Illustration of a hand holding a small bowl with a downward arrow, next to a circular inset showing a lid (no text or symbols)natural_image
Illustration of a hand holding a dental implant device with arrows indicating process (no text or symbols)natural_image
Symbol of a waste bin with crossed lines indicating no waste, and a solid black rectangle below (no text or labels)natural_image
Prohibition sign showing a faucet without raindrops, enclosed in a circle (no text)
natural_image
Illustration of a pair of electric shakers with a prohibition symbol (no text or labels)
natural_image
Black and white icon of a faucet with raindrops falling (no text or symbols)Oprez
- Aparat nikada ne uranjajte u vodu.
- Aparat nemojte koristiti u kadi ili pod tušem.
- Za ispiranje aparata za brijanje nikada ne koristite vodu temperature više od 80 °C.
- Budite oprezni s vrućom vodom. Uvijek pazite da voda ne bude prevruća kako biste izbjegli zadobivanje opeklina na rukama.
- Aparat za brijanje ne može se prati u stroju za pranje posuđa.
- Voda može curiti iz utičnice na dnu aparata prilikom pranja. To je normalno i potpuno bezopasno jer je sva elektronika aparata zaštićena u zatvorenoj jedinici za napajanje unutar aparata za brijanje.
- Aparat za brijanje, adapter ili neki drugi dio nemojte koristiti ako je oštećen jer biste se mogli ozlijediti. Oštećeni adapter, punjač ili neki drugi dio obavezno zamijenite originalnim.
- Aparat koristite, punite i odlažite na temperaturi između 10°C i 35°C.
- Aparat za brijanje uvijek stavljajte i koristite na površini otpornoj na tekućine.
- Koristite isključivo isporučeni adapter, punjač i dodatke.
- Na aparat za brijanje uvijek postavite zaštitni poklopac kako bi se spriječilo njegovo oštećivanje i nakupljanje prljavštine u glavama za brijanje.
Sukladnost standardima
- Ovaj aparat tvrtke Philips sukladan je svim standardima i propisima koji se tiču izloženosti elektromagnetskim poljima (EMF) te se može sigurno prati pod mlazom vode.
Općenito
natural_image
Diagram of a stylized smiley face with curved lines and a power button, no text or symbols presentBaterija je gotovo prazna
- Kada je baterija gotovo prazna (kada preostane samo 5 minuta ili manje vremena za brijanje), indikator punjenja počinje bljeskati narančastom bojom.
- Kada isključite aparat za brijanje, indikator punjenja nastavlja bljeskati narančasto još nekoliko sekundi.
Brzo punjenje
- Kada počnete puniti praznu bateriju, indikator punjenja naizmjenično bljeska narančasto i zeleno. Nakon približno 3 minute indikator punjenja nastavit će bljeskati zeleno. Aparat za brijanje sada ima dovoljno energije za 5 minuta brijanja.

natural_image
Diagram of a medical or electrical device with curved lines and a power button, no text or symbols presentPunjenje
- Dok se aparat za brijanje puni, indikator punjenja bljeska zeleno.

natural_image
Diagram of a curved mechanical or electrical component with a power button and a circular component, no text or symbols present.natural_image
Illustration of a medical or laboratory device with a downward arrow pointing to a circular base (no text or symbols)1 Mali utikač ukopčajte u postolje za punjenje.
2 Adapter ukopčajte u zidnu utičnicu.
3 Aparat za brijanje stavite na postolje za punjenje.
Indikator punjenja naznačuje status punjenja aparata za brijanje (pogledajte odjeljak “Indikatori punjenja” u ovom poglavlju).
Uporaba aparata za brijanje
natural_image
Illustration of a person using a handheld device to clean another (no text or symbols present)natural_image
Diagram of a hairdryer with an arrow indicating the process (no text or symbols present)Trimer možete koristiti za podrezivanje zalizaka i brkova.
natural_image
Diagram of a device being inserted into a component, showing a hand holding a clip and arrow indicating direction (no text or symbols present)3 Nakon podrezivanja zatvorite trimer i isključite aparat za brijanje.
natural_image
Illustration of a hand holding a mechanical component with arrows indicating direction (no text or symbols)1 Isključite aparat za brijanje i iskopčajte ga iz struje.
2 Pritisnite gumb za otpuštanje kako biste otvorili jedinicu za brijanje.
3 Jedinicu za brijanje i spremnik za dlake 30 sekundi ispirite pod mlazom vruće vode.
natural_image
Illustration of a hand inserting a plug into a device with visible internal wiring (no text or symbols)- Isperite spremnik za dlake i unutrašnjost jedinice za brijanje.
natural_image
Illustration of a mechanical device with a pipette dispensing liquid into a component (no text or symbols visible)- Isperite vanjski dio jedinice za brijanje.
natural_image
Illustration of a human head with internal mechanical components and arrows indicating movement or force (no text or symbols)1 Isključite aparat za brijanje i iskopčajte ga iz struje.
2 Pritisnite gumb za otpuštanje kako biste otvorili jedinicu za brijanje.

natural_image
Diagram showing a hand holding a mechanical component with an arrow indicating assembly or adjustment (no text or symbols present)3 Jedinicu za brijanje skinite s aparata.

natural_image
Illustration of a hand holding a tray with three circular objects and upward arrows, no text or symbols present.
natural_image
Illustration of a mechanical assembly with two parts: one showing a gear-like component being inserted, the other showing a bowl with a handle (no text or symbols)
natural_image
Illustration of a hand holding a small mechanical component with a magnified inset showing a circular component (no text or symbols)
natural_image
Illustration of a hand holding a device with a close-up view of its internal components (no text or symbols)7 Vratite okvir za pričvršćivanje u jedinicu za brijanje (A) i okrenite kvačicu za zaključavanje u smjeru kazaljke na satu (B).
8 Umetnite jezičac jedinice za brijanje u utor na gornjem dijelu aparata za brijanje. Zatim zatvorite jedinicu za brijanje.
Napomena: Ako se jedinica za brijanje ne zatvara lako, provjerite jesu li glave za brijanje ispravno umetnute i je li zaključan okvir za pričvršćivanje.
Čišćenje trimera četkicom (samo PT919/PT866/PT860/PT845/PT739/PT737/PT731)

natural_image
Diagram of a hairdryer with an arrow indicating the process (no text or symbols present)Očistite trimer nakon svake uporabe.
1 Isključite aparat za brijanje i iskopčajte ga iz struje.
2 Klizač trimera gurnite prema dolje kako biste otvorili trimer.

natural_image
Illustration of a hand inserting a plug into a connector (no text or symbols)3 Trimer očistite onom stranom četke na kojoj se nalaze kraće dlačice. Zupce trimera četkom prijeđite u smjeru gore-dolje.
4 Zatvorite trimer ("klik").

natural_image
Diagram of a hand turning a three-pin electric shaver (no text or symbols present)natural_image
Diagram of a device with internal components and a circular arrow indicating rotation (no text or symbols)natural_image
Illustration of a hand holding a mechanical component with arrows indicating direction (no text or symbols)1 Simbol glave za brijanje počet će postojano svijetliti narančasto.
2 Isključite aparat za brijanje. Iskopčajte aparat za brijanje iz napajanja.
3 Pritisnite gumb za otpuštanje kako biste otvorili jedinicu za brijanje.
4 Jedinicu za brijanje skinite s aparata.

natural_image
Illustration of a hand holding a small bowl with a downward arrow, next to a circular inset showing a lid (no text or symbols)6 Izvadite stare glave za brijanje iz jedinice za brijanje i stavite nove.
natural_image
Illustration of a hand holding a device with internal components, showing two views of the device (no text or symbols present)8 Umetnite jezičac nove jedinice za brijanje u utor na gornjem dijelu aparata za brijanje. Zatim zatvorite jedinicu za brijanje.
Napomena: Ako se jedinica za brijanje ne zatvara lako, provjerite jesu li glave za brijanje ispravno umetnute i je li zaključan okvir za pričvršćivanje.

natural_image
Symbol of a trash bin crossed with no text or numbers, representing waste sorting or disposal (no text present)- Aparat koji se više ne može koristiti nemojte odlagati s uobičajenim otpadom iz kućanstva nego ih odnesite u predviđeno odlagalište na recikliranje. Time ćete pridonijeti očuvanju okoliša.
natural_image
Prohibition sign showing a faucet crossed out by a diagonal line, indicating no leakage or anti-poaching (no text present)
natural_image
Illustration of a pair of electric shakers with a prohibition symbol (no text or labels)Figyelmeztetés!
natural_image
Black and white icon of a faucet with raindrops, enclosed in a square frame (no text or symbols)natural_image
Diagram of a stylized smiley face with curved lines and a power button, no text or symbols presentnatural_image
Diagram of a medical or electrical device with curved lines and a power button, no text or symbols presentTöltés
natural_image
Diagram of a medical device with a power button and a circular device inside, no text or symbols presentnatural_image
Close-up of a medical or electronic device with a black arrow pointing to a circular base (no visible text or symbols)natural_image
Illustration of a person using a handheld device to clean another (no text or symbols present)natural_image
Diagram of a hairdryer with a black arrow indicating the process (no text or symbols present)natural_image
Diagram of a hand using a tool to adjust or install electronic components, with arrows indicating action (no text or symbols present)natural_image
Diagram of a hand holding an open mechanical component with arrows indicating direction (no text or symbols)natural_image
Diagram of a medical procedure showing fluid flow from a tube into a device (no text or labels)natural_image
Illustration of a mechanical component with a pipette inserted into a housing (no text or symbols)natural_image
Illustration of a hand holding a mechanical component with arrows indicating assembly or force direction (no text or symbols)natural_image
Diagram showing a hand holding a device with internal components, and a close-up of its base component (no text or symbols)natural_image
Illustration of a hand holding a tray with three food items, each marked with upward arrows (no text or symbols)natural_image
Illustration of a mechanical assembly with two parts: one showing a gear-like component being inserted, the other showing a bowl with holes (no text or symbols)natural_image
Illustration of a hand holding a small bowl with a downward arrow, no text or symbols presentnatural_image
Illustration of a dental implant procedure showing two steps: intact and disassembled (no text or symbols present)natural_image
Diagram of a device with a black arrow indicating rotation or movement, showing internal components (no text or symbols)natural_image
Illustration of a hand using a tool to adjust or install a mechanical component (no text or symbols visible)natural_image
Diagram of a hand turning a three-pin electric shaver (no text or symbols)natural_image
Diagram of a hairbrush with a circular arrow indicating rotation (no text or symbols)natural_image
Illustration of a hand holding a mechanical component with arrows indicating direction (no text or symbols)natural_image
Illustration of a hand placing a small bowl into a tray with a downward arrow, no text or symbols presentnatural_image
Illustration of a hand holding a device with a close-up view of its internal components (no text or symbols)natural_image
Symbol of a trash bin crossed with no text or symbols, representing waste sorting or disposal (no text present)natural_image
Prohibition sign showing a faucet without a shower, enclosed in a circle (no text or symbols)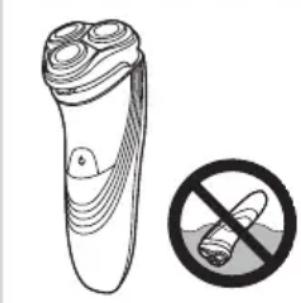
natural_image
Illustration of a pair of electric shakers with a prohibition symbol (no text or labels)
natural_image
Simple black-and-white icon of a faucet with raindrops, no text or symbols present.Ескерту
natural_image
Diagram of a curved surface with concentric bands and a central star-like symbol, no text or labels present.
natural_image
Diagram of a stylized smiley face with curved lines and a power button, no text or symbols present
natural_image
Diagram of a curved mechanical or electrical component with a power button and a circular component, no text or symbols present.Батарея заряды аз
natural_image
Close-up of a medical or electronic device with a black arrow pointing to a circular component labeled 'NeuR' (no text or symbols on the device itself)natural_image
Illustration of a person using a handheld device to clean another's face (no text or symbols present)natural_image
Diagram of a hairdryer with an arrow indicating the process (no text or symbols present)natural_image
Diagram of a hand using a tool to adjust or install a device component, with arrows indicating action (no text or symbols present)natural_image
Illustration of a hand holding a mechanical component with arrows indicating direction (no text or symbols)natural_image
Illustration of a hand inserting a plug into a shoe's ear with visible internal components (no text or symbols)natural_image
Illustration of a mechanical device with a pipette dispensing liquid into a component (no text or symbols)natural_image
Illustration of a hand holding a mechanical component with arrows indicating direction (no text or symbols)natural_image
Diagram showing a hand holding a device with an arrow pointing to a component, and a separate view of a mechanical component (no text or symbols present)natural_image
Illustration of a hand holding a tray with three small food items and upward arrows indicating growth (no text or symbols)natural_image
Illustration of two hands using pipette to clean a mechanical component, with no text or symbols present.natural_image
Illustration of a hand holding a small bowl with a downward arrow, next to another bowl with a magnified inset (no text or symbols)natural_image
Illustration of a dental implant procedure showing two steps: intact and disassembled (no text or symbols present)natural_image
Diagram of a hairpin with a black arrow indicating direction (no text or symbols)natural_image
Illustration of a hand holding a tool with an arrow indicating direction (no text or symbols)natural_image
Diagram of a hand turning a three-pin electric shaver (no text or symbols)natural_image
Diagram of a hairbrush with a magnified inset showing circular arrows indicating rotation (no text or symbols)natural_image
Illustration of a hand holding an open mechanical component with internal gears and a tool, no text or symbols presentnatural_image
Illustration of a hand holding a small bowl with a downward arrow, next to a plate with two circular objects (no text or symbols)natural_image
Illustration of a dental implant procedure showing two steps: opening and cutting (no text or symbols present)natural_image
Symbol of a trash bin crossed with no text or numbers, representing environmental restriction (no text present)natural_image
Prohibition sign showing a faucet without raindrops, enclosed in a circle (no text)
natural_image
Illustration of a pair of electric shakers with a prohibition symbol (no text or labels)
natural_image
Black and white icon of a faucet with raindrops, enclosed in a square frame (no text or symbols)Dèmesio
natural_image
Diagram of a stylized smiley face with curved lines and a power button, no text or symbols presentnatural_image
Diagram of a medical or electrical device with curved lines and a power button, no text or symbols presentIkrovimas
natural_image
Diagram of a medical or surgical device with a power button and curved tubing (no text or symbols)natural_image
Illustration of a medical or laboratory device with a downward arrow pointing to a circular base (no text or symbols)natural_image
Illustration of a person using a handheld device to clean another's face (no text or symbols present)natural_image
Diagram of a hairdryer with a black arrow indicating the process (no text or symbols present)natural_image
Diagram of a hand using a tool to adjust or install a device component, with arrows indicating the process (no text or symbols present)natural_image
Illustration of a hand holding a mechanical component with arrows indicating direction (no text or symbols)natural_image
Illustration of a hand inserting a plug into a device with visible internal wiring (no text or symbols)natural_image
Illustration of a mechanical device with a piping bag pouring liquid into a component (no text or symbols)natural_image
Illustration of a hand holding a mechanical component with arrows indicating direction (no text or symbols)natural_image
Diagram showing a hand holding a mechanical component with an arrow pointing to a separate view of a device (no text or symbols present)
natural_image
Illustration of a hand holding a tray with three circular objects and upward arrows, no text or symbols present.
natural_image
Illustration of a mechanical assembly with two parts: one showing a gear-like component being inserted, the other showing a bowl with a handle (no text or symbols)
natural_image
Illustration of a hand holding a small mechanical component with a magnified inset showing a circular component (no text or symbols)
natural_image
Illustration of a hand holding a device with a close-up view of its internal components (no text or symbols)natural_image
Diagram of a hairdryer with a black arrow indicating the insertion direction (no text or symbols present)natural_image
Illustration of a hand inserting a plug into a connector (no text or symbols)natural_image
Diagram of a hand turning a circular component into a base, showing mechanical components (no text or symbols)natural_image
Diagram of a hairbrush with a magnified inset showing internal structure (no text or symbols)natural_image
Illustration of a hand holding a mechanical component with arrows indicating direction (no text or symbols)natural_image
Illustration of a hand holding a small bowl with a downward arrow, next to a circular inset showing a lid (no text or symbols)natural_image
Illustration of a hand holding a dental implant device with arrows indicating process (no text or symbols)natural_image
Symbol of a waste bin crossed with a diagonal line, representing no waste or disposal (no text or numbers present)natural_image
Prohibition sign showing a faucet without a shower, enclosed in a circle (no text or symbols)
natural_image
Illustration of a pair of electric shakers with a prohibition symbol (no text or labels)levērībai
natural_image
Black and white icon of a faucet with raindrops, enclosed in a square frame (no text or symbols)natural_image
Diagram of a medical or electrical device with curved lines and a central star-like symbol, no text or labels present.natural_image
Diagram of a curved structure with layered curves and a central star-like shape, no text or symbols present.natural_image
Diagram of a curved structure with a central circular element and a power button, no text or symbols present.natural_image
Medical or laboratory device with a downward arrow pointing to a spherical component (no visible text or symbols)natural_image
Illustration of a person using a handheld device to clean another (no text or symbols present)natural_image
Diagram of a hairdryer with a black arrow indicating the process (no text or symbols present)Varat lietot trimmeri, lai koptu vaigubārdu un ūsas.
natural_image
Diagram of a device being inserted into a component, showing tool and internal structure (no text or symbols)natural_image
Diagram of a hand holding an open mechanical component with arrows indicating direction (no text or symbols present)natural_image
Diagram of a hand inserting a plug into a socket with visible internal wiring (no text or symbols)natural_image
Illustration of a mechanical device pouring liquid into a container (no text or symbols)natural_image
Illustration of a hand holding a mechanical component with arrows indicating direction (no text or symbols)natural_image
Diagram showing a hand holding a mechanical component with an arrow indicating assembly or adjustment (no text or symbols present)
natural_image
Illustration of a hand holding a tray with three small round objects and upward-pointing arrows (no text or symbols)
natural_image
Illustration of mechanical components including a gear and two bowls, with no visible text or symbols.
natural_image
Illustration of a hand pressing down on a small bowl with a downward arrow (no text or symbols)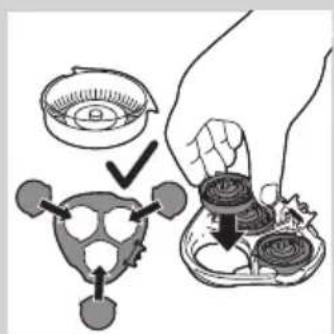
natural_image
Illustration of a hand holding a device with a close-up view of its internal components (no text or symbols)natural_image
Diagram of a hairdryer with an arrow indicating the process (no text or symbols present)natural_image
Illustration of a hand holding a tool with arrows indicating motion or force (no text or symbols)natural_image
Diagram of a hand turning a three-pin electric shaver (no text or symbols)natural_image
Diagram of a hairbrush with internal structure and circular arrow indicating rotation (no text or symbols)natural_image
Illustration of a hand holding a mechanical component with arrows indicating direction (no text or symbols)natural_image
Illustration of a hand holding a small mechanical component with a magnified inset showing a circular component (no text or symbols)natural_image
Illustration of a hand holding a device with arrows indicating process (no text or symbols)natural_image
Symbol of a waste bin with crossed lines indicating no waste, and a solid black rectangle below (no text or labels)natural_image
No sign depicting a faucet crossed out by a diagonal line, indicating no pollution or water release.
natural_image
Illustration of a pair of electric shakers with a prohibition symbol (no text or labels)
natural_image
Black and white icon of a faucet with raindrops, enclosed in a square frame (no text or symbols)Uwaga
natural_image
Diagram of a curved surface with concentric bands and a central star-like symbol, no text or labels present.natural_image
Diagram of a stylized human head with curved lines and a star-shaped symbol inside, no text or labels present.natural_image
Diagram of a curved mechanical or electrical component with a power button and a circular component, no text or symbols present.natural_image
Illustration of a person using a handheld device to clean another (no text or symbols present)natural_image
Diagram of a hairpin with an attached connector and black arrows indicating direction (no text or symbols)natural_image
Diagram of a hand using a tool to adjust or install a device component, with arrows indicating action (no text or symbols present)natural_image
Illustration of a hand holding a mechanical component with arrows indicating direction (no text or symbols)natural_image
Illustration of a hand inserting a plug into a device with visible internal components (no text or symbols)natural_image
Illustration of a mechanical device pouring liquid into a component (no text or symbols visible)natural_image
Illustration of a hand holding a mechanical component with internal gears and a handle (no text or symbols)natural_image
Diagram showing a hand holding a mechanical component with an arrow pointing to a cross-section of a device (no text or symbols present)natural_image
Illustration of a hand holding a tray with three small food items and upward arrows indicating growth (no text or symbols)natural_image
Illustration of three mechanical components: a gear-like device, a bowl with a screw, and a circular base (no text or symbols)natural_image
Illustration of a hand holding a small bowl with a downward arrow, next to a circular container (no text or symbols)natural_image
Illustration of a dental implant procedure showing two steps: intact and disassembled (no text or symbols present)natural_image
Diagram of a hairpin with a black arrow indicating direction (no text or symbols)natural_image
Diagram of a hand turning a three-pin electric shaver (no text or symbols)natural_image
Diagram of a hairbrush with a circular arrow indicating rotation around it (no text or symbols present)natural_image
Illustration of a hand holding an open mechanical component with internal gears and a tool, no text or symbols presentnatural_image
Illustration of a hand placing a small bowl into a container with a downward arrow (no text or symbols)natural_image
Diagram showing two mechanical components with arrows indicating motion or assembly (no text or symbols)natural_image
Symbol of a waste bin with crossed lines indicating no waste, and a solid black rectangle below (no text or labels)
natural_image
No sign depicting a faucet crossed out by a diagonal line, indicating no pollution or water release.
natural_image
Illustration of a pair of electric shakers with a prohibition symbol (no text or labels)
natural_image
Black and white icon of a faucet with raindrops, enclosed in a square frame (no text or symbols)Precauție,
natural_image
Diagram of a curved surface with concentric bands and a central star-like symbol, no text or labels present.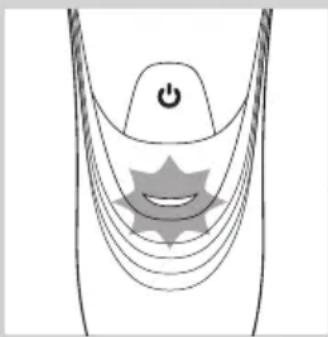
natural_image
Diagram of a stylized human head with curved lines and a star-shaped symbol, no text or labels present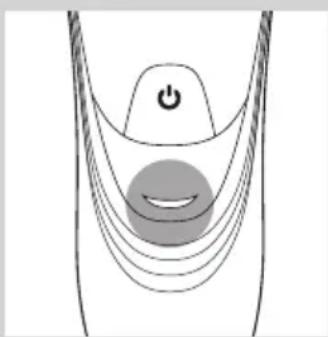
natural_image
Diagram of a curved mechanical or electrical component with a power button and a circular component, no text or symbols present.Baterie descărcată
natural_image
Medical device with a downward arrow pointing to a circular base (no text or symbols visible)natural_image
Illustration of a person using a handheld device to clean another's face (no text or symbols present)natural_image
Diagram of a hairdryer with a black arrow indicating direction (no text or symbols)natural_image
Diagram of a hand using a tool to adjust or install a device component, with arrows indicating action (no text or symbols present)natural_image
Diagram of a mechanical assembly with arrows indicating direction (no text or symbols present)natural_image
Diagram showing a hand holding a mechanical component with an arrow indicating assembly or adjustment (no text or symbols present)natural_image
Illustration of a hand holding a tray with three small food items, each with upward arrows indicating growth (no text or symbols present)natural_image
Illustration of a hand using a pipette to clean a mechanical component, with no text or symbols present.natural_image
Illustration of a hand holding a small bowl with a downward arrow, next to a bowl with a circular lid (no text or symbols)natural_image
Illustration of a hand holding a device with arrows indicating process (no text or symbols)natural_image
Diagram of a hairdryer with a black arrow indicating direction (no text or symbols)natural_image
Illustration of a hand holding a tool with arrows indicating motion or force (no text or symbols)natural_image
Diagram of a hand turning a three-pin electric shaver (no text or symbols)natural_image
Diagram of a hairbrush with a magnified inset showing facial changes (no text or symbols)
natural_image
Illustration of a hand holding a mechanical component with arrows indicating direction (no text or symbols)

natural_image
Illustration of a hand holding a small bowl with a downward arrow, next to a circular object (no text or symbols)
natural_image
Illustration of a dental implant procedure showing two steps: intact and disassembled (no text or symbols present)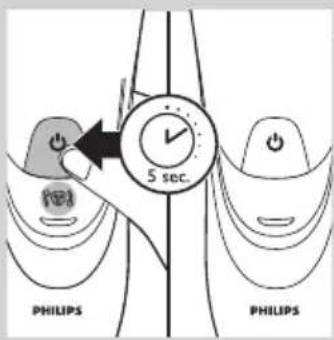
natural_image
Prohibition sign showing a faucet without raindrops, enclosed in a circle (no text)
natural_image
Illustration of a pair of electric shakers with a prohibition symbol (no text or labels)
natural_image
Simple black-and-white icon of a faucet with raindrops, no text or symbols present.Внимание!
natural_image
Diagram of a curved surface with concentric bands and a central star-like symbol, no text or labels present.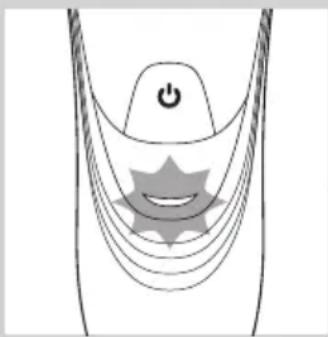
natural_image
Diagram of a stylized human head with curved lines and a star-shaped symbol, no text or labels present
natural_image
Diagram of a curved mechanical or electrical component with a power button and a circular component, no text or symbols present.natural_image
Illustration of a person using a handheld device to clean another (no text or symbols present)natural_image
Diagram of a hairdryer with a black arrow indicating direction (no text or symbols)natural_image
Diagram of a device being inserted into a component, showing tool and alignment arrows (no text or symbols)natural_image
Illustration of a hand holding a mechanical component with arrows indicating direction (no text or symbols)natural_image
Diagram of a medical procedure showing fluid flow from a tube into a patient's ear (no text or labels)natural_image
Illustration of a mechanical device emitting wires from a nozzle (no text or symbols)natural_image
Illustration of a hand holding a mechanical component with arrows indicating direction (no text or symbols)natural_image
Diagram showing a hand holding a mechanical component above a device with an arrow indicating motion (no text or symbols present)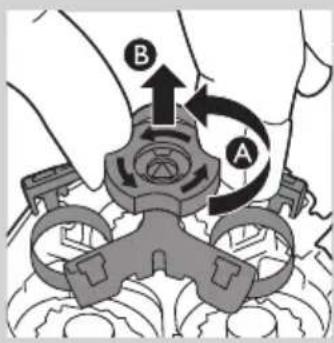

natural_image
Illustration of a hand holding a tray with three circular objects and upward arrows, no text or symbols present.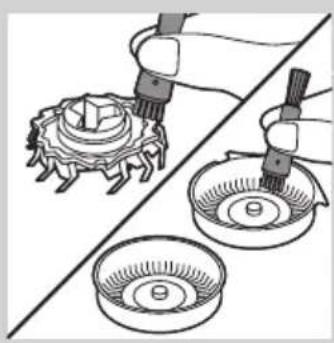
natural_image
Illustration of two hands using pipette to apply a mechanical component onto a bowl (no text or symbols present)
natural_image
Illustration of a hand holding a small bowl with a downward arrow, next to a circular container (no text or symbols)natural_image
Illustration of a hand holding a device with arrows indicating process (no text or symbols)natural_image
Diagram of a hairdryer with a black arrow indicating the process (no text or symbols present)natural_image
Diagram of a hand turning a three-pin electric shaver (no text or symbols)natural_image
Illustration of a hand holding a small object with a magnified inset showing a circular symbol (no text or labels)natural_image
Diagram of a hand holding a mechanical component with arrows indicating direction (no text or symbols present)natural_image
Illustration of a hand placing a small bowl into a tray with a downward arrow, no text or symbols presentnatural_image
Illustration of two dental implant devices with arrows indicating process (no text or symbols)natural_image
Prohibition sign showing a faucet without a shower, enclosed in a circle (no text or symbols)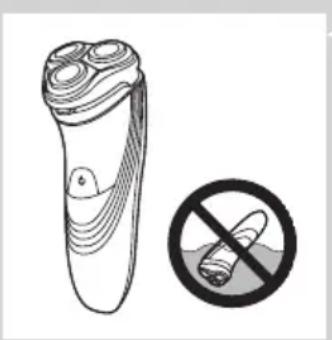
natural_image
Illustration of a pair of electric shakers with a prohibition symbol (no text or labels)
natural_image
Black and white icon of a faucet with raindrops, enclosed in a square frame (no text or symbols)Výstraha
natural_image
Diagram of a medical or electrical device with curved lines and a central star-shaped component, no text or symbols present.natural_image
Diagram of a stylized human head with curved lines and a central star-like shape, no text or symbols present.Nabíjanie
- Pri nabíjaní holiaceho strojčeka bliká kontrolné svetlo nabíjania na zeleno.

natural_image
Diagram of a curved mechanical or electrical component with a power button and a circular component, no text or symbols present.natural_image
Close-up of a medical or laboratory device with a black arrow pointing to a circular base (no visible text or symbols)1 Malú koncovku zasuňte do stojana na nabíjanie.
2 Adaptér pripojte do siet'ovej zásuvky.
3 Holiaci strojček postavte do stojana na nabíjanie.
Kontrolné svetlo nabíjania zobrazuje stav nabíjania holiaceho strojčeka (pozrite si čast', "Ukazovatele nabíjania" v tejto kapitole).
natural_image
Illustration of a person using a handheld device to clean another (no text or symbols present)natural_image
Diagram of a hairpin with an attached clip and black arrows indicating direction (no text or symbols)natural_image
Diagram of a device being inserted into a component, showing a hand holding a clip and an arrow indicating direction (no text or symbols present)natural_image
Illustration of a hand holding a mechanical component with arrows indicating direction (no text or symbols)1 Vypnite holiaci strojček a odpojte ho zo siete.
2 Stlačte uvolňovacie tlačidlo a otvorte holiacu jednotku.
3 Holiacu jednotku a komôrku na chípky oplachujte 30 sekúnd horúcou tečúcou vodou.
natural_image
Diagram of a medical procedure showing fluid flowing from a tube into a patient's ear (no text or labels)natural_image
Illustration of a mechanical device with a tool inserted into a component, showing internal structure (no text or symbols)natural_image
Illustration of a hand holding a mechanical component with arrows indicating direction (no text or symbols)1 Vypnite holiaci strojček a odpojte ho zo siete.
2 Stlačte uvolňovacie tlačidlo a otvorte holiacu jednotku.

natural_image
Diagram showing a hand holding a mechanical component with an arrow pointing to a separate view of a device (no text or symbols present)3 Vytiahnite holiacu jednotku z holiaceho strojčeka.
natural_image
Illustration of a hand holding a tray with three circular objects and upward arrows, no text or symbols present.natural_image
Illustration of a hand using a tool to clean a mechanical component, with no visible text or symbols.natural_image
Illustration of a hand holding a small bowl with a downward arrow, next to a magnified inset showing the lid (no text or symbols)6 Holiace hlavy vložte spät' do holiacej jednotky.

natural_image
Illustration of a hand holding a small object with arrows indicating motion or transformation (no text or symbols)natural_image
Diagram of a hairdryer with an arrow indicating direction (no text or symbols present)natural_image
Hand holding a tool interacting with a mechanical component, showing a black arrow indicating direction (no text or symbols present)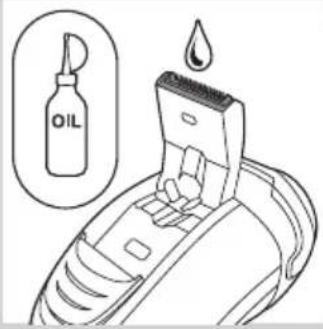
natural_image
Diagram of a hand turning a three-pin electric shaver (no text or symbols)natural_image
Diagram of a hairbrush with a circular arrow and circular symbol indicating rotation or movement (no text or labels)natural_image
Illustration of a hand holding a mechanical component with arrows indicating direction (no text or symbols)natural_image
Illustration of a hand placing a small bowl into a tray with a downward arrow (no text or symbols)natural_image
Illustration of a dental implant procedure showing two steps: intact and disassembled (no text or symbols present)natural_image
Symbol of a waste bin with crossed lines indicating no waste, and a solid black rectangle below (no text or labels)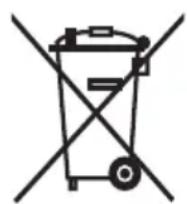
natural_image
Illustration of a pair of electric shakers with a prohibition symbol (no text or labels)Previdno
natural_image
Black and white icon of a faucet with raindrops falling (no text or symbols)Skladnost s standardi
natural_image
Diagram of a stylized smiley face with curved lines and a power button, no text or symbols presentnatural_image
Diagram of a medical or electrical device with curved lines and a central power button, featuring a star-shaped symbol (no text or labels)Polnjenje
- Ko se brivnik polni, indikator polnjenja utripa zeleno.

natural_image
Diagram of a curved structure with a central circular element and a power button, no text or symbols presentBaterija napolnjena
- Ko je baterija napolnjena, indikator polnjenja sveti zeleno.
natural_image
Illustration of a medical or laboratory device with a downward arrow pointing to a circular base (no text or symbols)natural_image
Illustration of a person using a handheld device to clean teeth, separated by a diagonal line (no text or symbols)natural_image
Diagram of a hairdryer with an arrow indicating the process (no text or symbols present)natural_image
Diagram of a device being inserted into a component, showing a hand holding a clip and an arrow indicating direction (no text or symbols present)3 Po striženju zaprite prirezovalnik in izklopite brivnik.
natural_image
Diagram of a hand holding an open mechanical component with arrows indicating direction (no text or symbols)natural_image
Diagram of a medical procedure showing fluid flow from a tube into a device (no text or labels)- Sperite predelek za odrezane dlačice in notranji del brivne enote.

natural_image
Illustration of a mechanical component with a pipette inserted into a housing (no text or symbols)- Sperite zunanji del brivne enote.
natural_image
Illustration of a hand holding a mechanical component with arrows indicating direction (no text or symbols)natural_image
Diagram showing a hand holding a mechanical component with an arrow indicating assembly or transformation (no text or symbols present)3 Brivno enoto odstranite z brivnika.

4 Zaklep obrnite v levo (A) in odstranite nosilni okvir (B).
natural_image
Illustration of a hand holding a tray with three food items, each marked with upward arrows (no text or symbols)natural_image
Illustration of a mechanical assembly with two parts: one showing a gear-like component being inserted, the other showing a bowl with holes (no text or symbols)natural_image
Illustration of a hand holding a small bowl with a downward arrow, no text or symbols present6 Brivne glave namestite nazaj v brivno enoto.
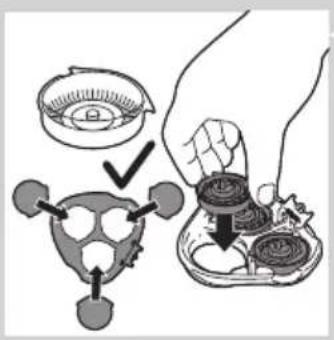
natural_image
Illustration of a dental implant procedure showing two steps: intact and disassembled (no text or symbols present)natural_image
Diagram of a hairpin with an arrow indicating direction (no text or symbols present)natural_image
Illustration of a hand using a tool to adjust or install a mechanical component (no text or symbols visible)natural_image
Diagram of a hand turning a three-pin electric shaver (no text or symbols present)natural_image
Diagram of a hairbrush with a magnified inset showing internal structure (no text or symbols)natural_image
Illustration of a hand holding a mechanical component with arrows indicating direction (no text or symbols)5 Zaklep obrnite v levo (A) in odstranite nosilni okvir (B).
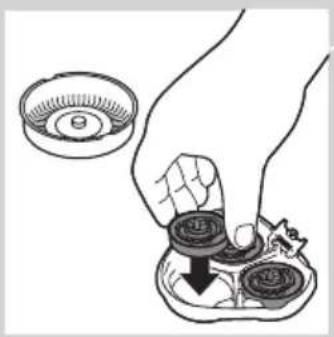
natural_image
Illustration of a hand holding a small bowl with a downward arrow, next to a bowl with a lid (no text or symbols)6 Odstranite brivne glave in v brivno enoto namestite nove.

natural_image
Illustration of a hand holding a device with arrows indicating process (no text or symbols)natural_image
Symbol of a trash bin crossed with no text or symbols, representing waste sorting or disposal (no text present)natural_image
No sign depicting a faucet crossed out by a diagonal line, indicating no pollution or water release.
natural_image
Illustration of a pair of electric shakers with a prohibition symbol (no text or labels)
natural_image
Black and white icon of a faucet with raindrops, enclosed in a square frame (no text or symbols)Oprez
- Nikada ne uranjajte aparat za brijanje u vodu.
- Aparat za brijanje ne koristite u kadi niti pod tušem.
- Za ispiranje aparate za brijanje nemojte koristiti vodu topliju od 80°C.
- Pazite sa vrućom vodom. Uvek proverite da voda ne bude prevruća da biste izbegli opekotine na rukama.
- Aparat za brijanje ne može da se pere u mašini za sudove.
- Prilikom ispiranja može da procuri voda iz utičnice na dnu aparata za brijanje. To je normalno i nije opasno, jer je sva elektronika zatvorena u zapečaćenoj jedinici za napajanje unutar aparata.
- Nemojte koristiti aparat za brijanje, adapter ili neki drugi deo ako je oštećen jer to može izazvati povrede. Ako je adapter, punjač ili neki drugi deo oštećen, obavezno ga zamenite originalnim.
- Upotrebljavajte, punite i odlažite aparat na temperaturi od 10°C do 35°C.
- Uvek postavite aparat za brijanje i koristite ga na podlozi koja je otporna na tečnost.
- Koristite samo adapter, punjač i dodatke koji se nalaze u kompletu.
- Uvek stavite zaštitni poklopac na aparat za brijanje kako biste sprečili oštećenja i izbegli nakupljanje prljavštine na glavama za brijanje.
Uskladenost sa standardima
natural_image
Diagram of a stylized smiley face with curved lines and a power button, no text or symbols presentnatural_image
Diagram of a medical or electrical device with curved lines and a power button, no text or symbols presentnatural_image
Diagram of a medical device with a power button and a circular button, no text or symbols presentnatural_image
Close-up of a medical or electronic device with a black arrow pointing to a circular base labeled 'High' (no text or symbols on the device itself)natural_image
Illustration of a person using a handheld device to clean another's face (no text or symbols present)1 Jednom pritisnite dugme za uključivanje/isključivanje da biste uključili aparat za brijanje.
2 Kružnim pokretima prelazite glavama za brijanje preko kože.
- Vašoj koži će možda trebati 2 do 3 sedmice da se navikne na Philips sistem brijanja.
3 Jednom pritisnite dugme za uključivanje/isključivanje da biste isključili aparat za brijanje.
4 Očistite aparat za brijanje (vidi poglavlje „Čišćenje i održavanje“).
Podrezivanje (samo kod modela PT919/PT866/PT860/PT845/PT739/PT737/PT731)

natural_image
Diagram of a hairdryer with an arrow indicating the process (no text or symbols present)Trimer možete da koristite za podrezivanje zulufa i brkova.
1 Jednom pritisnite dugme za uključivanje/isključivanje da biste uključili aparat za brijanje.
2 Pritisnite klizni prekidač nadole da biste otvorili trimer.
▶Sada možete početi sa podrezivanjem.

natural_image
Diagram of a hand using a tool to adjust or install electronic components, with arrows indicating action (no text or symbols present)3 Nakon podrezivanja, zatvorite trimer i isključite aparat za brijanje.
natural_image
Illustration of a hand holding a mechanical component with arrows indicating direction (no text or symbols)1 Isključite aparat i izvucite kabl za napajanje iz utičnice.
2 Pritisnite dugme za oslobađanje i otvorite jedinicu za brijanje.
3 30 sekundi ispirajte jedinicu za brijanje i komoru za prikupljanje dlaka pod mlazom vruće vode.
Pazite sa vrućom vodom. Uvek proverite da voda ne bude prevruća da biste izbegli opekotine na rukama.

natural_image
Illustration of a hand inserting hair into a device with a piping bag above (no text or symbols)- Isperite komoru za prikupljanje dlaka i unutrašnjost jedinice za brijanje.

natural_image
Illustration of a mechanical device with a pipette dispensing liquid into a component (no text or symbols visible)- Operite spoljni deo jedinice za brijanje.
natural_image
Illustration of a hand holding a mechanical component with arrows indicating direction (no text or symbols)1 Isključite aparat i izvucite kabl za napajanje iz utičnice.
2 Pritisnite dugme za oslobadanje i otvorite jedinicu za brijanje.

natural_image
Diagram showing a hand holding a mechanical component with an arrow pointing to a separate view of a device (no text or symbols present)3 Povucite jedinicu za brijanje sa aparata.

4 Okrenite bravu u pravcu suprotnom od smera kretanja kazaljke na satu (A) i izvadite granični okvir (B).

natural_image
Illustration of a hand holding a tray with three circular objects and upward arrows, no text or symbols present.5 Uklanjajte i čistite jednu po jednu glavu za brijanje. Svaka glava za brijanje sastoji se od rezača i štitnika.

natural_image
Illustration of a hand using a tool to clean a mechanical component, with no visible text or symbols.natural_image
Illustration of a hand holding a small bowl with a downward arrow, next to a magnified inset showing a circular object (no text or symbols)natural_image
Illustration of a hand holding a small object with arrows indicating motion or transformation (no text or symbols present)natural_image
Diagram of a hairdryer with an arrow indicating direction (no text or symbols present)Trimer očistite nakon svake upotrebe.
1 Isključite aparat i izvucite kabl za napajanje iz utičnice.
2 Pritisnite klizni prekidač nadole da biste otvorili trimer.

natural_image
Hand holding a tool interacting with a mechanical component, showing a black arrow indicating direction (no text or symbols present)3 Očistite trimer stranom četke sa kratkim vlaknima. Povlačite četku gore i dole niz zupce trimera.
4 Zatvorite trimer (,,klik“).
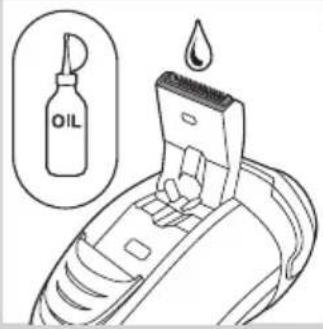
Savet: Za najbolje rezultate podrezivanja, podmažite zupce trimera jednom kapi ulja za šivaću mašinu na svakih 6 meseci.
Odlaganje

natural_image
Diagram of a hand turning a three-pin electric shaver (no text or symbols)- Stavite zaštitni poklopac na aparat za brijanje nakon upotrebe kako biste sprečili oštećenja i izbegli nakupljanje prljavštine na glavama za brijanje.
- Samo PT866: Aparat i dodatke odložite u torbicu.
Zamena

natural_image
Diagram of a hairbrush with a circular arrow and circular symbol indicating rotation or movement (no text or labels)natural_image
Illustration of a hand holding a device with an arrow indicating direction (no text or symbols present)1 Simbol glave za brijanje neprekidno svetli narandžasto.
2 Isključite aparat za brijanje. Isključite aparat iz električne mreže
3 Pritisnite dugme za oslobađanje i otvorite jedinicu za brijanje.
4 Povucite jedinicu za brijanje sa aparata.
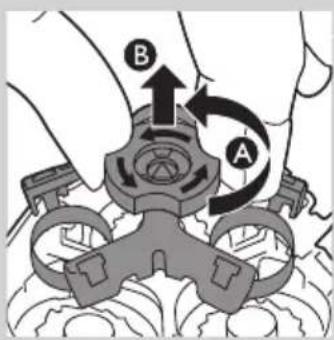
5 Okrenite bravu u pravcu suprotnom od smera kretanja kazaljke satu (A) i izvadite granični okvir (B).

natural_image
Illustration of a hand placing a small bowl into a tray with a downward arrow (no text or symbols)6 Skinite glave za brijanje i u jedinicu za brijanje stavite nove glave.

natural_image
Illustration of a dental implant procedure showing two steps: intact and disassembled (no text or symbols present)natural_image
Symbol of a waste bin with crossed lines indicating no waste, and a solid black rectangle below (no text or labels)
natural_image
Prohibition sign showing a faucet without a shower, enclosed in a circle (no text or symbols)
natural_image
Illustration of a pair of electric shakers with a prohibition symbol (no text or labels)Увага
natural_image
Black and white icon of a faucet with raindrops falling (no text or symbols)PT845/PT739/PT737/PT731/PT730/PT727/PT726/PT725/PT721/PT720:
natural_image
Diagram of a curved surface with concentric bands and a central star-like symbol, no text or labels present.Розряджена батарея
natural_image
Diagram of a stylized human head with curved lines and a star-shaped symbol inside, no text or labels present.Заряджання
natural_image
Diagram of a curved mechanical or electrical component with a power button and a circular component, no text or symbols present.natural_image
Medical or laboratory device with a downward arrow pointing to a circular base (no visible text or symbols)natural_image
Illustration of a person using a handheld device to clean another's face (no text or symbols present)natural_image
Diagram of a hairdryer with a black arrow indicating direction (no text or symbols)natural_image
Diagram of a hand using a tool to adjust or install a device component, with arrows indicating the process (no text or symbols present)natural_image
Illustration of a hand holding a mechanical component with arrows indicating direction (no text or symbols)
natural_image
Diagram of a hand pouring liquid into a mechanical component (no text or symbols visible)
natural_image
Illustration of a mechanical device pouring liquid into a container (no text or symbols)natural_image
Diagram of a mechanical assembly with arrows indicating direction (no text or symbols present)natural_image
Diagram showing a hand holding a mechanical component with an arrow pointing to a component (no text or symbols present)natural_image
Illustration of a hand holding a tray with three small food items, each with upward arrows indicating growth (no text or symbols)natural_image
Illustration of a hand using a pipette to clean a mechanical component, with no text or symbols present.natural_image
Illustration of a hand placing a small bowl labeled '9' into a tray with two circular objects, no text or symbols present.natural_image
Illustration of a dental implant procedure showing two steps: intact and disassembled (no text or symbols present)natural_image
Diagram of a hairdryer with an arrow indicating direction (no text or symbols present)natural_image
Illustration of a hand holding a tool with arrows indicating movement or force (no text or symbols)natural_image
Diagram of a hand turning a three-pin electric shaver (no text or symbols present)natural_image
Diagram of a device with internal components and a circular arrow indicating rotational motion (no text or symbols)natural_image
Illustration of a hand holding an open electrical socket with internal components (no text or symbols)natural_image
Illustration of a hand holding a small bowl with a downward arrow, next to a circular object (no text or symbols)natural_image
Illustration of a dental implant procedure showing two steps: intact and disassembled (no text or symbols present)natural_image
Symbol of a trash bin crossed out by two diagonal lines (no text or numbers present)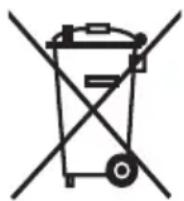


- Always here to help you
- User manual
- PHILIPS
- Introduction
- General description (Fig. 1)
- Important
- Danger
- Warning
- Caution
- Compliance with standards
- General
- Charging
- Charge indications
- Battery low
- Quick charging
- Battery fully charged
- Charging with the adapter
- Charging in the charging stand (PT866/PT739 only)
- Using the shaver
- Shaving
- Trimming (PT919/PT866/PT860/PT845/PT739/PT737/PT731 only)
- Cleaning and maintenance
- Cleaning the shaving unit under the tap
- Cleaning the shaving unit with the cleaning brush
- Cleaning the trimmer with the cleaning brush (PT919/PT866/PT860/PT845/PT739/PT737/PT731 only)
- Storage
- Replacement
- Replacement reminder
- ENGLISH 12
- Accessories
- Shaving heads
- Cleaning
- Environment
- Removing the rechargeable shaver battery
- Guarantee and support
- Guarantee restrictions
- Troubleshooting
- Въведение
- Внимание
- Изтощена батерия
- Upozornění
- Ettevaatust
- Vastavus standarditele
- Laadimine
- Aku on täis laetud
- Oprez
- Sukladnost standardima
- Općenito
- Baterija je gotovo prazna
- Brzo punjenje
- Punjenje
- Uporaba aparata za brijanje
- Čišćenje trimera četkicom (samo PT919/PT866/PT860/PT845/PT739/PT737/PT731)
- Figyelmeztetés!
- Töltés
- Ескерту
- Батарея заряды аз
- Dèmesio
- Ikrovimas
- levērībai
- Uwaga
- Precauție,
- Baterie descărcată
- Внимание!
- Výstraha
- Nabíjanie
- Previdno
- Skladnost s standardi
- Polnjenje
- Baterija napolnjena
- Uskladenost sa standardima
- Podrezivanje (samo kod modela PT919/PT866/PT860/PT845/PT739/PT737/PT731)
- Odlaganje
- Zamena
- Увага
- Розряджена батарея
- Заряджання
Brand : HAIER
Model : WDNS115BWG
Category : Water dispenser