
15422 - Router TRUST - Free user manual and instructions
Find the device manual for free 15422 TRUST in PDF.


| Product Type | Router |
| Brand | Trust |
| Model | 15422 |
| Dimensions (L x W x H) | Approx. 20 x 15 x 3 cm |
| Weight | Approx. 300 g |
| Power Supply | AC adapter 5V / 1A |
| WiFi Standards | 802.11 b/g/n (2.4 GHz) |
| Max Wireless Speed | Up to 300 Mbps |
| Antennas | 2 external antennas |
| Ethernet Ports | 4 LAN 10/100 Mbps ports + 1 WAN port |
| Main Functions | Connection sharing, NAT firewall, DHCP server, parental controls |
| Wireless Security | WEP, WPA, WPA2 (PSK / Enterprise) |
| Maintenance and Cleaning | Unplug then wipe with a dry cloth |
| Spare Parts and Repairability | AC adapter available as spare part |
| Operating Temperature | 0 °C to 40 °C |
| Operating Humidity | 10 % to 90 % (non-condensing) |
| Certifications | CE, RoHS |
Frequently Asked Questions - 15422 TRUST
User questions about 15422 TRUST
0 question about this device. Answer the ones you know or ask your own.
Ask a new question about this device
Download the instructions for your Router in PDF format for free! Find your manual 15422 - TRUST and take your electronic device back in hand. On this page are published all the documents necessary for the use of your device. 15422 by TRUST.
USER MANUAL 15422 TRUST
Installation


Configuration
4

5

→ Log In
6

7


Apply
Wireless Configuration


Make wireless connection with PC/ Laptop

Opening ports (port forwarding)

15

'Destination IP adress':

Trusl
Product information

A: Reset button (use: press 5 seconds with paperclip)
B: Power indicator
C: LAN activity indicators: steady=PC connected / flashing=data transfer
D: Wireless LAN indicator: steady=enabled / flashing=data transfer
E: ADSL sync indicator: Steady=ADSL-OK / flashing=connecting
F: PPP indicator; only lights when connected through PPPoA/PPPoE
G: ADSL line connection
H: LAN (PC) connection
I: Power adapter connections
J: ADSL cable
K: Network cable (Cable to PC)
L: Power adapter
Installation
1 Connect the phone line, phone and ADSL modem to ADSL splitter box as indicated. Connect PC to ADSL modem with the Network cable. (K) (First configuration must be done via the cable)
Note: Splitter not included. For exact details on how to install your ADSL line contact Internet Provider.
2 Connect power adapter (L) to connection (I) and insert power adapter in wall power socket.
3 Modem will power on. Power, LAN and ADSL indicators light.
Configuration
4 Start Internet explorer, type in address bar: http://192.168.1.1 and [press Enter]
Note: If the page can not be found, disconnect and reconnect network cable, restart PC and reset modem. If this does not help, check Internet settings. (Advanced CD manual, page 17 and 18)
5 - Type username admin and password admin
- Click 'Login'
6 - Click 'Setup Wizard'
- Select 'Country'(Country) and 'ISP' (Internet service provider)
- Click 'Next'
7 - Fill in username/ password that you have received from your Internet provider.
- Click 'Apply'
- Wait until the ADSL sync indicator (E) stops flashing. → Internet should now work.
Note: If the ADSL sync indicator does not stop flashing after 30 minutes, contact your internet provider, check your Username / password and other settings.
Wireless configuration
8 1. Click 'Advanced'
-
Click 'Wireless'
-
Click 'Security'
9 Select:
- WPA
- WPA
- Pre Shared Key.
- Fill in a hard-to-guess password and also write it down on a piece of paper.
Click 'Apply', 'RestartAP' and again 'Apply'
Make wireless connection with PC/ Laptop
10 Make sure no network cables are connected to the PC/Laptop anymore and that a wireless network dongle or card is installed correctly.
Vista: Click on indicated taskbar icon and select: connect to a network.
XP: Right click on indicated icon and select: View Available Networks
11 Select the network and click 'Connect'
12 Fill in the password from step 9 and click 'Connect'. → Internet should now work.
Note: If Windows asks for a network location, choose: 'Home' (Home)
Note: If there is no Internet put modem more close to the PC and go through steps 4 to 11 again.
Opening ports ('port forwarding') – Advanced Users only
13 - Click 'Advanced'
- Click 'Port Forwarding'
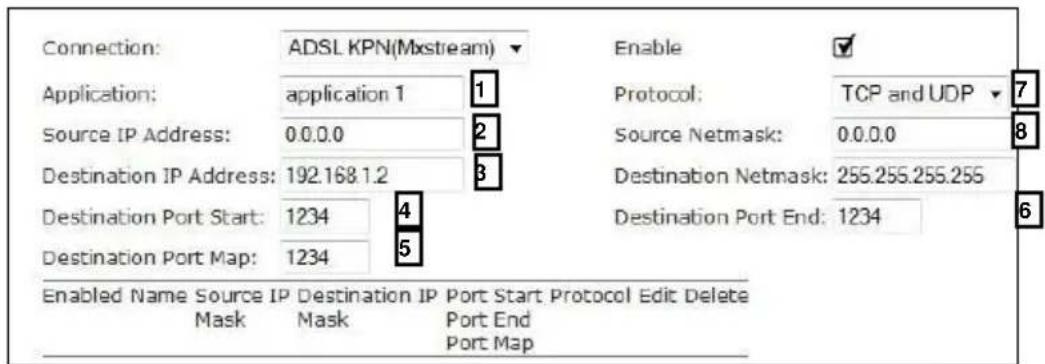
14 Click on 'Custom Port Forwarding'
15 Fill in:
- Name of the program. Like: 'torrent'.
- 'Source IP Address': Normally you should fill in here: 0.0.0.0
- 'Destination IP address': This is the IP address of your PC. Find this address as indicated in step 16.
- 'Destination Port Start': This is the port number you need to open. (12324 is example)
- 'Destination Port Map': Normally you should fill the same number here.
- 'Destination Port End': Normally you should fill the same number here.
- 'Protocol': Select 'TCP and UDP' for best compatibility.
- 'Source Netmask': Normally you should fill in here: 0.0.0.0
- Click: 'Apply' and port should be opened.
Note: Windows Firewall and other software firewalls must also be configured accept the application / open the port. When you start the program, choose to 'Unblock' (Unblock) the program.
Note: See Advanced CD manual, page 71 for in depth information on port forwarding.
16 'Destination IP adress':
- Press the Windows Key + R
- Type: cmd in the box and click OK
- Type: ipconfig and [press Enter]
- IP Address of your PC is indicated with the white arrow in the manual picture.
Notes
General
- If you have an internet subscription that is being paid for by time unit, disconnect the modem after you finish using internet. See manual on CD-ROM. (pages 153 and 156)
- This modem only works on analogue (POTS, PSTN, Annex A) ADSL, ADSL2, ADSL2+ or DSL/TDSL line
- The up- and download speed is very depending on the quality of your home ADSL (telephone) wiring installation.
- The built in firewall is enabled by default. If you want to disable it see the manual on CD-ROM. (page 150)
- Before installation make sure your ADSL line and account are activated.
- This modem is not compatible with SDSL standard.
- To play games over the LAN it must be supported by the game refer to the instructions from the game how to configure it.
- To configure the advanced router options from the modem/router see the English advanced manual on CD-ROM.
- To set the modem to default settings use a paperclip or other pointy object press the reset button (A). All settings including username and password will be lost.
Wireless
- There are an increasing number of wireless products (video, audio, computer, etc.) which work in the same frequency range as this device. It may, therefore, be possible that the functionality of this product is limited by or is limiting for other wireless products. This can only be avoided by paying attention to the distance between products and, where possible, by changing channels.
- Be careful when using wireless devices if you have a pacemaker or are dependent on other life-saving, sensitive electronic equipment, because this device transmits radio signals.
Produktinformationen


Brand : TRUST
Model : 15422
Category : Router