LV 6 Electron - Dishwasher Saivod - Free user manual and instructions
Find the device manual for free LV 6 Electron Saivod in PDF.


| Brand | Saivod |
| Model | LV 6 Electron |
| Product type | Dishwasher |
| Dimensions (H x W x D) | 82 cm x 45 cm x 57 cm |
| Net weight | 30 kg |
| Power supply | 230 V, 10 A, 50 Hz |
| Total power | 1900 W |
| Capacity | 6 place settings |
| Number of programs | 6 programs |
| Available programs | Eco, Intensive, Normal, Quick, Rinse, Glass |
| Water consumption per cycle | 9 L |
| Energy consumption per cycle | 0.78 kWh |
| Energy class | A+ |
| Noise level | 48 dB(A) |
| Special functions | Delayed start, Child lock, Auto shut-off |
| Drying system | Condensation drying |
| Installation type | Built-in or freestanding |
| Tub material | Stainless steel |
| Number of racks | 2 adjustable racks |
| Filters | Self-cleaning triple filter |
| Recommended maintenance | Clean the filter every month, descale every 3 months |
| Repairability index | 8.2 / 10 |
| Spare parts available | Yes, via after-sales service |
Frequently Asked Questions - LV 6 Electron Saivod
User questions about LV 6 Electron Saivod
0 question about this device. Answer the ones you know or ask your own.
Ask a new question about this device
Download the instructions for your Dishwasher in PDF format for free! Find your manual LV 6 Electron - Saivod and take your electronic device back in hand. On this page are published all the documents necessary for the use of your device. LV 6 Electron by Saivod.
USER MANUAL LV 6 Electron Saivod
1.1 SAFETY INSTRUCTIONS
Norms and regulations to be respected
- The dishwasher may only be used to clean household dishes. If the appliance is used for other purposes or in a wrong manner, the manufacturer declines all responsibilities for possible damages.
- For safety reasons, no modifications must be carried out on the appliance.
- Before connecting the appliance to the electric power supply system, check that the power supply at the place of installation is compatible with the electric data indicated on the data tag.
- The installation must be carried out by qualified personnel.
Before running the appliance for the first time
- Make sure the dishwasher was not damaged during transport. Do not hook up the appliance if there is any damage. In case of damage, contact the vendor.
For the safety of children
- Do not allow children to play with the appliance.
- Detergents can cause permanent damage to eyes, mouth and throat.
They should therefore be kept outside the reach of children.
- The water in the dishwasher is not drinkable. Any residues of detergent in the appliance constitute a source of danger for children. They must therefore be kept away from the open dishwasher.
Daily use
- Do not turn on the dishwasher if the electric cable, or the water supply or water drainage pipes are damaged, or if the control board, the work surface or the base are in very bad condition.
- In case of a malfunction, shut off the water supply, then turn off the appliance and pull the electric plug from the outlet. If there is a permanent electric connection, turn off the service switch (if present) or remove the fuse (or fuses).
- To remove the plug from the electric outlet, hold the plug itself and pull; never pull the cable.
- All repairs of the dishwasher must be carried out by specialised personnel. Inappropriate repairs can create a severe danger for the user. For repairs, you should therefore contact our technical customer assistance service or a specialised vendor.
- The replacement of the supply cable must be carried out only by the technical service staff.
- If the pipes and tubes are deteriorated, substitute them with new original parts before hooking up the appliance.
- Do not use detergent substances that could lead to an explosion.
- Do not sit or lean on the open door. The appliance might otherwise tilt over.
- Before adding special dishwasher salt, detergent and rinse aid, make sure that the manufacturer of these substances recommends their use for household dishwashers.
- Always shut off the water supply when the dishwasher is not in use for longer periods of time, e.g., during your vacations.
2 UN PACKING - DISPOSAL
2.1 UNPACKING
Remove the external plastic packaging material, the corner re-enforcements, and the styrofoam base.
Open the door and remove the styrofoam blocks from the inside baskets.
Collect and recycle the packaging materials. This will preserve primary materials and help reduce the amount of waste.
Take the packaging materials to specialised recycling centres.
When the appliance eventually has to be disposed of, it should be made non-functional before eliminating it.

Attention! Some packaging materials (e.g., plastic bags, styrofoam) can be dangerous for children. Children should therefore be kept away from them.
2.2 FINAL DISPOSAL OF APPLIANCE
At the end of its life span, the appliance must be eliminated by a specialised company, respecting all existing laws and regulations.
This will make it possible to dispose of the old appliance while at the same time recuperating and sorting synthetic materials that are fit for recycling, thus contributing to the protection of the environment.
3 GENERAL ADVICE
3.1 WASHING DISHES IN AN ECONOMIC AND ECOLOGICAL WAY
- Don't rinse your dishes under running water before placing them in the dishwasher
- Run the appliance only when it is full, because only like this the process becomes economical and respects the environment.
• Always choose a programme that is adequate for the kind of dishes you want to wash and that corresponds to how dirty they are - You should avoid to use too much detergent, dishwasher salt, and rinse aid. Refer to the dosages recommended in the usage instructions provided by the manufacturers of these substances.
- Make sure that the water softness regulator is set correctly.
3.2 DISHES NOT TO BE WASHED IN THE DISHWASHER
You must not wash in this appliance:
- Cutting boards or small containers in wood
- Plastic objects that are not heat resistant
- Lead crystal
- Objects made from tin or copper
- Dishes or cutlery with glued components
- Old cutlery with heat sensitive glue
- Steel objects that are oxidised easily
- Cutlery with handles in wood, horn, antler, porcelain, or mother of pearl.

When purchasing dishes, cutlery, or glasses, make sure that they are dishwasher resistant.
4 DESCRIPTION OF THE APPLIANCE
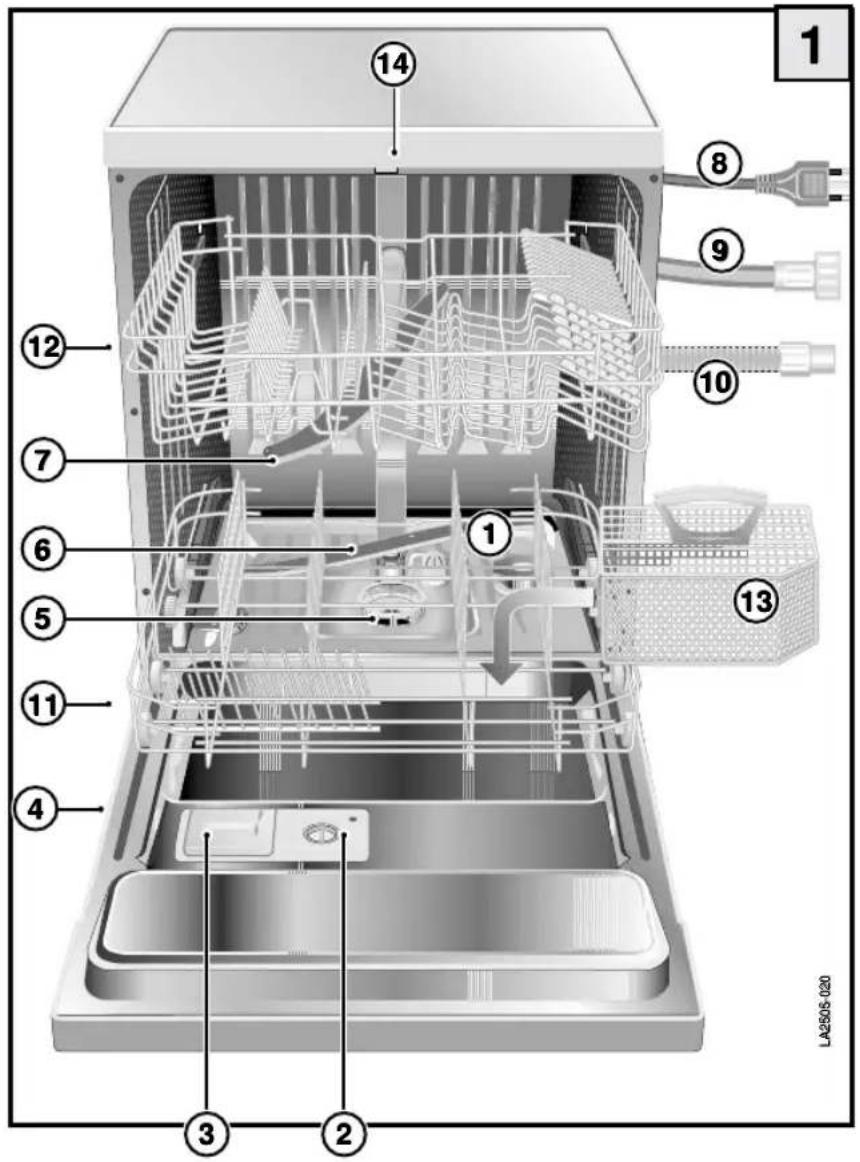
4.1 GENERAL PARTS
1) saltcontainer (IF PRESENT)
2) rinse aid container
3) container for detergent
4) data tag
5) filters
6) lower spray-rotor
7) upper spray-rotor
8) electric cable
9) water supply tube
10) water drainage tube
11) lower basket
12) upper basket
13) cutlery container
14) hook for door closing mechanism
4.2 TECHNICAL DATA
capacity (standard settings): 12
pressure of water supply system minimum pressure: 0.05 Mpa maximum pressure: 1 Mpa

Attention: the necessary characteristics of the electric supply grid are indicated on the data tag.

5 INSTALLATION
5.1 LEEVEELLINGG


Place the appliance in the spot where you want to install it. Use feet P (unscrew or screw in) to regulate (if necessary) the height of each foot to assure that the appliance is in a fully level position.
If the appliance is positioned in a level position, its correct functioning is assured.
Maximum error = 2 degrees
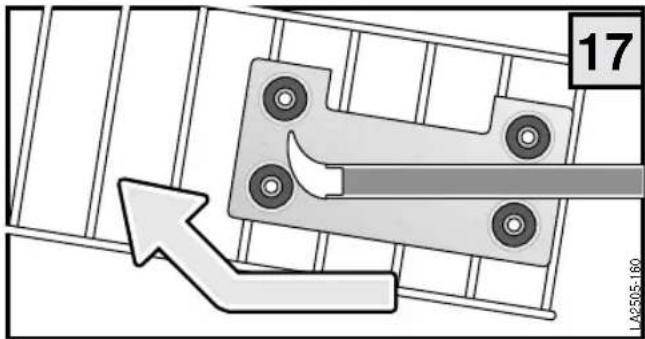
After levelling the appliance, regulate the hook of the door closing mechanism, to assure that the door closes perfectly.
In order to obtain a perfect seal adjust the door (Fig. 2.1 "M") locking device but only after having levelled the machine in its final installation position.
N.B. In versions like (fig. 2.2), the door closing catch "M" is not adjustable.

5.2 WATER CONNECTION
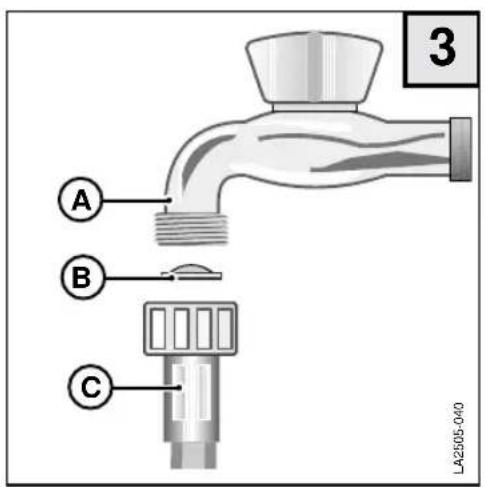
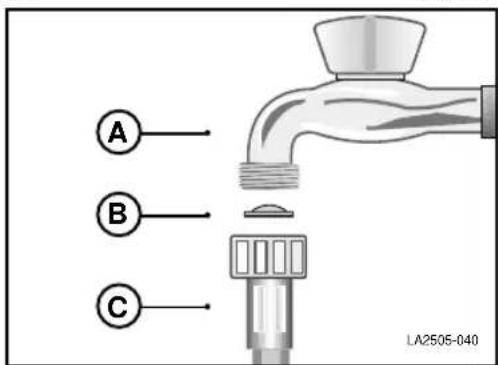
The water supply tube C, which accompanies the dishwasher, makes it possible to connect the appliance to a faucet with a 3/4" attachment.
During the installation, the following instructions must be followed:
- Attach tube C to the cold water faucet A; place filter B (supplied with the appliance) between tube and faucet.
- If the tube is being attached to new pipes that have not been used for a long time, you should let the water run for some time before attaching the tube in order to make sure that dirt and rust residues are eliminated.
• Make sure that the water pressure corresponds to the range indicated on the data tag.
The appliance may be connected to the cold water system. It must not be connected to the hot water system.
5.3 CONNECTIONNOFFDBRANNAAGEEWATER
The curved end of drainage tube T, which is being supplied with your appliance, should be hooked onto the edge of a sink or into a drainage pipe.
A special siphon should be used to prevent bad odours.
During the assembly, the following precautions should be taken:
- the drainage tube must not be bent to avoid blockages;
- the tube's end, relative to the top surface of the dishwasher (fig. 4), must be placed at a height between 32 and 80~cm ;
- the end of the tube must never be immersed in water;
- the drainage tube must not be extended to more than a maximum length of 1 metre. The extension must have the same internal diameter. Furthermore, the maximum height at which the tube's end can be placed (in the case of an extended tube) must be reduced from 80 to 50 cm.
- If you use a drainage pipe, make sure its internal diameter is not inferior to 4 cm.

5.4 ELECTRIC CONNECTIONS
The appliance may only be connected to a properly installed electric outlet with an earth (ground) contact. The connection must be carried out in correspondence with existing laws and regulations and supplementary rules issued by the supplier of electric power.
The tension shown on the data tag must correspond to the power tension of the electric grid at the site of installation.

See data tag for the size and format of the electric outlet to be used.
6.1 BBECOREEUSINGGTTHEEARPPPLAANCE
Before turning on the appliance, make sure that the plug attached to the electric cable is connected to the electric outlet, the water supply tube is connected to the faucet, the faucet is turned on, the drainage tube has been connected according to the instructions.
Opening of the door
Pull the handle forward. The door should open without effort. If you pull the handle while the dishwasher is running, a safety mechanism will turn off the appliance.
Adding special dishwasher salt (only in the salt container version)
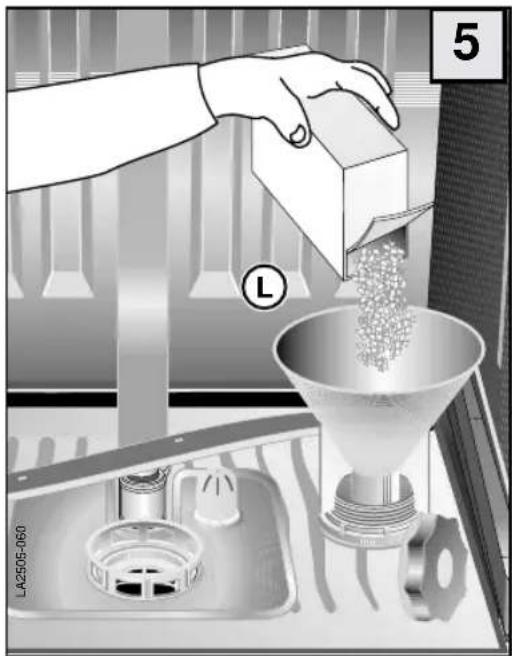
- Open the door and take out the lower basket
- Remove the lid of the salt container by turning it anticlockwise
Only during the first time you carry out this operation: fill about 1/2 litre of water into the salt container
- Use funnel L to fill the special dishwasher salt into the container (use about 1.0-1.5 kg of salt).
- Remove possible salt residues from the opening of the container.
- Put the lid of the container back in its place by turning it clockwise.
- If you don't use the dishwasher immediately after filling the salt container, run the programme pre-wash to rinse away the water and salt particles that spilled over from the container.
For safety reasons we recommend to refill the container after seven wash cycles – always at the beginning of a cycle.

Use only special dishwasher salt. Other types of salt (e.g., regular household salt) often contain substances that do not dissolve completely in water and can therefore obstruct the water softener, thus making it unusable.
Regulation of the water softener system (IF PRESENT)
For the washing process it is better to use soft water (with a low calcium content), to avoid calcium deposits on the dishes and on the inside of the dishwasher. For this reason, the appliance is equipped with a water softener (fig. 6) which is automatically regenerated in regular intervals thanks to the saline solution. The salt consumption for the regeneration process depends on the hardness/softness of the local water that is being used.
To find out the degree of hardness of your water contact your town administration or use a commercial testing kit.
To guarantee an optimal regeneration of the softener it is necessary to set device D according to your local hardness (see table) and to make sure that the salt container is always filled with special dishwasher salt.

| Position of regulation device | French degrees °fH | German degrees °dH |
| 1 | <15 | <8,4 |
| 2 | >15 <25 | >8,4 <14 |
| 3 | >25 <40 | >14 <22,4 |
| 4 | >60 <90 | >33,6 <50,4 |
| >=higher/<=lower | ||

natural_image
3D mechanical component with a downward arrow and circular symbol, no readable text or labelsRefilling of rinse aid
The rinse aid, which is released automatically during the final phase of the wash cycle, guarantees that the dishes dry quickly and prevents the formation of stains and calcium sediments.
Indication of salt level (IF PRESENT)
The green mark under the cap indicates that there is still enough salt in the container. If the green mark is no longer visible, the salt container needs to be refilled with special dishwasher salt.

Only use rinse aids for dishwashers. Other products won't obtain the desired effect.
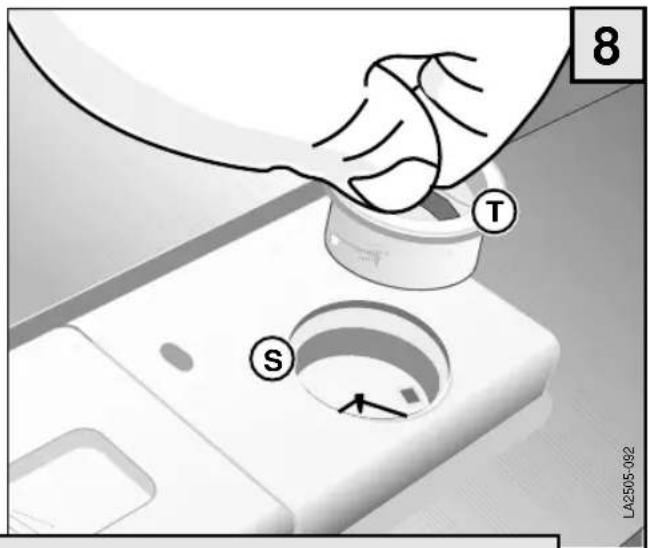
The rinse aid container S is located on the inside of the door.
- Remove the container cap T by turning it _ revolution anticlockwise.
- Fill container with rinse aid up to the broken line. Maximum quantity: about 140 ml.
- Put the cap back in its place.
- Clean off possible residues of rinse aid with a cloth, otherwise too much foam might be produced during the rinsing process.
Indication of rinse aid level
More rinse aid needs to be added when the indicator (located on the container F) is clear (●). When the container is full, the indicator has a dark coloration.

Regulation of rinse aid dosage
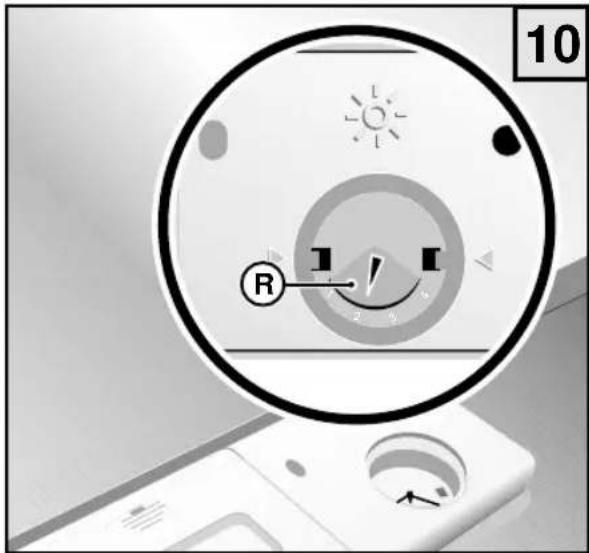
The regulation R of the quantity of rinse aid that is released can be found in the refill opening of the rinse aid container.
It can be adjusted with a screwdriver. The possible settings range from 1 to 4. 1 corresponds to a release of one ml of rinse aid, 4 to four ml, etc. The appliance has been set on 2 (two ml) by the manufacturer.
A full rinse aid container is sufficient for about 50 wash cycles. The quantity of rinse aid to be released should be adjusted when the result of the wash process is not satisfactory.
• Always wipe off with a cloth any rinse aid that spilled over from the container.
It is important to check the level of rinse aid in the container periodically – if possible every 31 wash cycles.
Adding the detergent
IMPORTANT! Do not use detergents in this dishwasher that are made for dish washing by hand! These substances produce large quantities of foam but they do not clean the dishes in a dishwasher. They can even lead to a malfunctioning of the appliance.
You should therefore only use detergents that are specifically made for household dishwashers.
Keep your detergent containers closed and in a dry place.
Only when you use the pre-wash programme no detergent is needed.
During a programme the detergent is automatically taken from the detergent container.
We recommend the use of about 25 g of detergent.
Detergents vary in their strength and efficiency.
You should therefore pay attention to the dosage recommendations of each manufacturer.
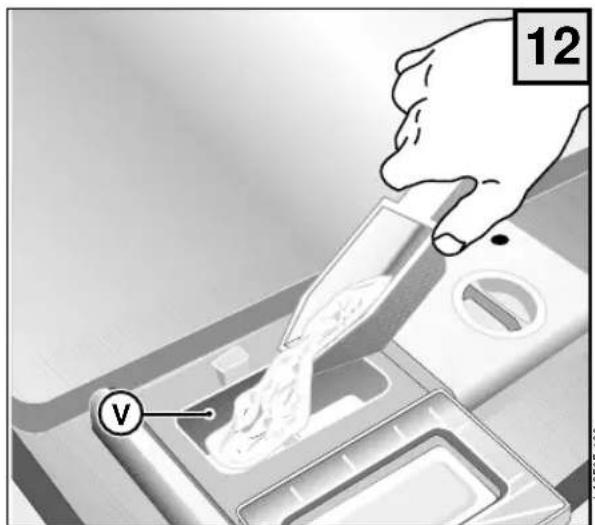
The container for the detergent is located on the inside of the door.
If the lid is closed:
- Push forward closing mechanism P. The lid will open with a "click".
- Fill the detergent into the container V.
- To close the lid, press until you hear a closing "click".
If your dishes are exceptionally dirty, you can also fill some detergent into the indentation of the lid. In this case, fill the indentation up to the edge. This detergent will be available and active during the pre-wash phase.
LA2505-094

LA2505-090
LA2505-100
How to load and unload the dishwasher
There are two dish baskets that allow you to store all different kinds of dishes.
- Remove from the dishes any larger pieces of food to avoid an obstruction of the filter and the development of bad odours.
- If pots and pans are particularly dirty and contain crusts of food (after frying or roasting), soak them in a water bath before washing them in the dishwasher.
Use of the lower basket
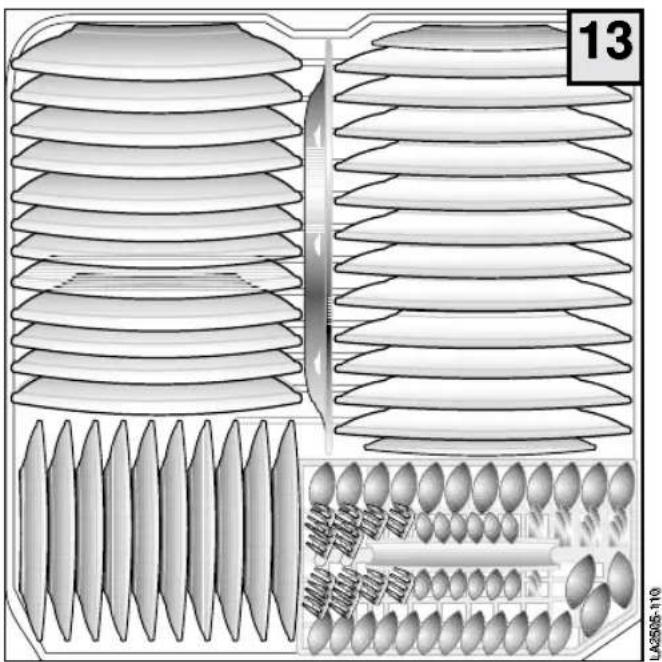
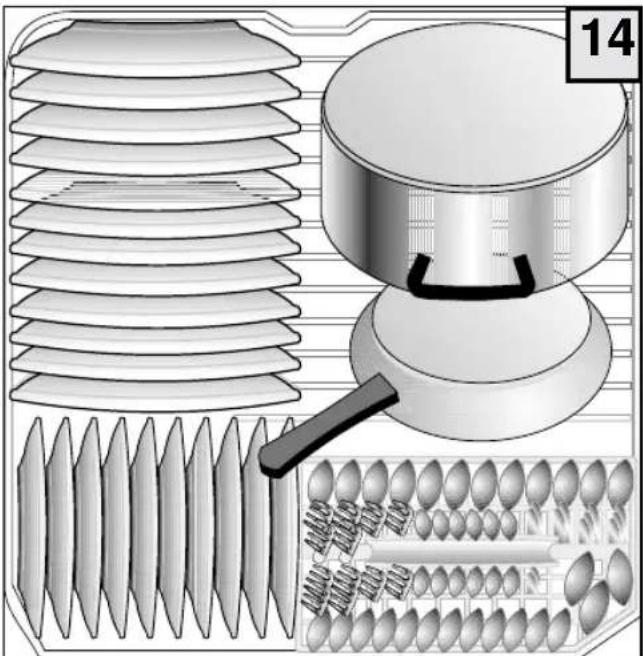
The lower basket is intended to hold dishes that are more difficult to clean, as well as the cutlery basket.
The lower basket holds regular plates, soup bowls, pans, soup tureens, lids, and serving dishes. Flat and deep plates must be placed in a way that leaves some space between the individual plates.
natural_image
Technical illustration of a mechanical component with layered structure and inset view (no text or symbols)All plates must be in a vertical position so that the water can pass freely.
Pans and pots must always be placed upside down. You can choose any kind of loading configuration, but you should make sure that the dirtiest surface of dishes, pots and pants faces the water spray and that the water can flow off without hindrances.

natural_image
Technical illustration of a mechanical assembly with layered components and a labeled component (no readable text or symbols)Cutlery
For best cleaning results, cutlery should be inserted with its handles facing down. Spoons, forks, and knives must be placed in the specific areas of the cutlery basket that are designed for them.

ATTENTION:
Particularly long cutlery, specifically “long knives”, should not be positioned pointing upwards but should be placed horizontally in the top tray or washed by hand.
Use of the upper basket
The upper basket can be pulled out all the way. It holds small and medium sized dishes such as glasses, small plates, tea and coffee cups, small salad bowls, and small pans and pots that are not very dirty. Desert plates must always be placed vertically; glasses, cups, pots and pants must be placed upside down. Light dishes should be held by a support structure so that they don't get thrown around by the water jet. An optimal arrangement of dishes inside the dishwasher will guarantee best washing results, allowing the appliance will be able to develop its full effectiveness.

natural_image
3D rendered diagram of a mechanical assembly with insulators and bolts, no text or symbols presentLA2505-120

Because of the elevated temperature of the water used to wash the dishes and of potential chemical reactions with the detergent, it is recommended not to wash copper or aluminium dishes, cutlery with wood or horn handles, delicate porcelains, or non heat resistant glass or plastic dishes in the appliance. If you possess decorated porcelain, you should test one single piece to make sure that the décor is not being damaged or altered.
Height regulation of the upper basket
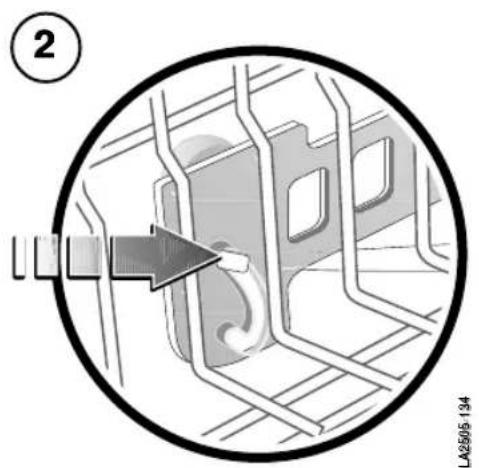
Use the handle on the side (only on left) to regulate the basket's height and inclination.
1 regulation of horizontal position
2 regulation of inclination


Pulling out the upper basket
The upper basket can be pulled out and removed as shown in the figure.
Description of control buttons and indication lights
(Model illustrated in fig. 18)
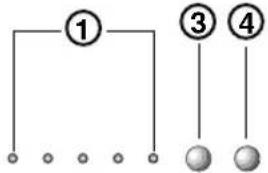
1) Indication programme LED
① - ∼
It is illuminated when the appliance is turned on.
① -ON/OFF
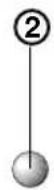
2) On-Off buttons
On/Off – Press this button to turn on the appliance.
3) Programme selection button
4) Start-Stop/Pause programme button
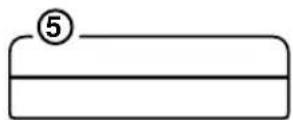
5) Door handle
To open pull forward (an electric safety mechanism turns off the machine when the door is being opened).
flowchart
graph TD
    A["1"] --> B["3"]
    B --> C["4"]
    D["0"] --> E["0"]
    F["0"] --> G["0"]
    H["0"] --> I["0"]
18
Start
After checking the quantities of regeneration salt (only in the salt container version) and of rinse aid, open the water faucet completely, place the dishes in the baskets, fill detergent into the detergent container and add also detergent for the pre-wash (if necessary); then close the front door.
Now proceed as follows:
- Press the "ON-OFF" button ②, "The LED corresponding to the last wash cycle performed lights up".
Wash cycle selection
- When you press the button ③ for the first time, you confirm the wash cycle that corresponds to the flashing LED ①. The next times you press the button, the LED of the programme that corresponds to the wash cycle you intend to select will light up. At the end of the cycle, the selected programme flashes.
Select the programme which you believe is best suited to the types of dishes which need to be washed.
Start Button
Press button ④ with the appliance door shut, the dishwasher wash cycle will start and the LED of the button itself lights up.
Incorrect setting of the programmes (programme change)
• To modify a wash cycle in progress, you must press the Start button④ for approximately 6 seconds; subsequently, the LED of the selected programme begins to flash. The RESET phase will end when the Start button LED goes off. At this point, the appliance is ready to be set again.
- If you forget to put a dish in, you can interrupt the wash cycle (preferably only if it hasn't been running for long) by pressing the Start button ④ which then flashes; open the appliance door and place the dish inside. To restart the appliance, close the door and press the Start button again; the cycle will resume from the point in which it was interrupted.
• To repeat the same cycle, press the programme button ③ and then the Start button ④.
Description of controls and indicator lights (Model illustrated in fig. 18a)
① - ∼ 1) Cycle indicator LED
① -ON/OFF 2) On-Off button
It is illuminated when the appliance is turned on.
3) Cycle select button

Start
After checking the quantities of regeneration salt (only in the version fitted with a salt container) and rinse aid, turn on the water tap completely, place the dishes in the racks, pour the detergent into the detergent dispenser as well as any detergent for the pre-wash (if necessary).
Proceed as follows:
- Press the "ON-OFF" button②, wait until the LED corresponding to the last wash cycle performed lights up.
Wash cycle selection
When you press the button ③ for the first time, you confirm the wash cycle that corresponds to the flashing LED ①. The next times you press the button, the LED of the programme that corresponds to the wash cycle you intend to select will light up. Close the front door to start the wash.
At the end of the cycle, the selected programme flashes.
Select the programme which you believe is best suited to the types of dishes which need to be washed.
Incorrect setting of the programmes (programme change)
• To modify a wash cycle in progress you must open the appliance door, press the Cycle Select button ③ for approximately 6 seconds; subsequently, the LED of the selected programme begins to flash. At this point, close the door; the Reset phase, which lasts approximately 1 minute, will end when the flashing of the LED has slowed down; the appliance is now ready to be set again.
- If you forget to put a dish in, you can interrupt the wash cycle (preferably only if it hasn't been running for long) by opening the front door and placing the dish inside.
To restart the appliance, close the door; the cycle will resume from the point in which it was interrupted.
• To repeat the same cycle, press the cycle selection button③; the LED changes from flashing to being constantly on. At this point, all you need to do is close the front door to start the wash cycle.

Do not open the appliance after a programme has been initiated.
Stop
After the wash cycle the dishwasher will stop automatically and will emit a sound signal of 3 beeps (only for the intermediate version), and the LED for the selected programme will flash. To turn it off, press the button on/off. After each wash cycle, the water faucet must be closed to insulate the appliance from the water supply system.
Table of wash programmes
| Wah cycles | Cycle number | BUTTONS | DETERGENT | Dishes and degree of dirt | Cycle description | |
| ON OFF1 | pre-wash | wash | ||||
| Rinse | P1 | ● | Pans and dishes until the next wash cycle | Short cold wash to prevent food residue from drying up and forming crusts on the dishes | ||
| Rapid | P2 | ● | ● | Little dirty dishes | Main wash2 rinses (1 cold – 1 warm) | |
| Delicate 40°C | P3 | ● | ● | Very dirty delicate dishes | Main wash2 rinses (1 cold – 1 warm) | |
| Normal 55°C (EN 50242) | P4 | ● | ● | ● | Normally dirty dishes | 1 cold pre-wash – Main wash2 rinses (1 cold – 1 warm) |
| Intensive 65°C | P5 | ● | ● | ● | Very dirty dishes (except delicate pieces) | 1 warm Pre-wash – Main wash3 rinses (2 cold – 1 warm) |
7 MAINTENANCE
7.1 CLEANING OF SPAY-ROTORS
The spray-rotors can easily be removed for the periodic cleaning of the jets in order to prevent possible obstructions.
Wash them thoroughly under running water and put them back in their correct position.

natural_image
Illustration of a hand touching a pipeline with scaffolding and a valve, no text or symbols presentTo remove the upper spray-rotor:
Unscrew anticlockwise the support of the spray-rotor.

natural_image
Illustration of a hand using a tool to lift a sink in a kitchen (no text or symbols visible)To remove the lower spray-rotor:
Pull the spray-rotor upwards and take it out.
LA2505-220
7.2 OCEANINGGOFFRICEBS
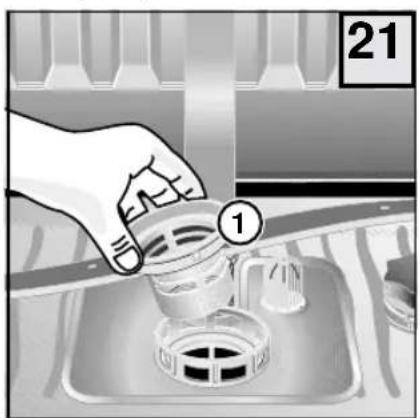
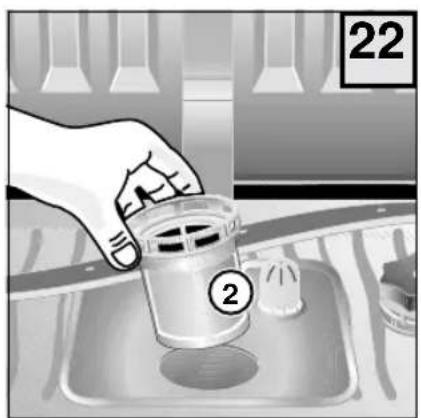
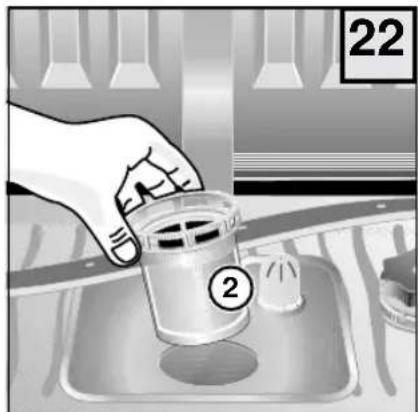
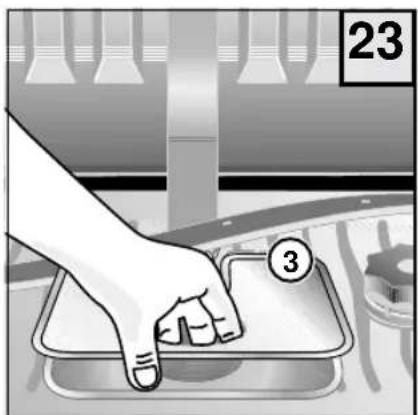
After each wash the filter group should be checked in order to remove possible dirt residues. Proceed as follows:
• take out the central filter 1
- remove the external water filter 2
• take out mobile grid 3.
Clean all these components under running water. It is important to clean all filters thoroughly because the dishwasher cannot function properly with obstructed filters.
We recommend to put the cleaned filters back in their positions immediately to avoid damage to the wash pump.
LA2505-180
natural_image
Illustration of a hand placing a small container into a sink with a numbered label (2), no text or symbols present.LA2505-190

natural_image
Illustration of a hand pressing down on a tray with a numbered circle (3) and number 23 in the corner, no text or symbols present.LA2505-200
7.3 CLEANING OF THE WATER ENTRY FILTER
You should also clean filter B periodically. It is located between the water faucet and the water entry tube.
- Close water faucet A.
- Unscrew attachment piece C, take out filter B, and clean it thoroughly under running water.
- Put the filter back in its place and screw the water entry hose on. Check that there are no water leaks.
7.4 CLEANING OF THE DISHWASHER'S EXTERNAL SURFACES
The dishwasher's surfaces (made of metal, and in the front of plastic) must be cleaned periodically. Use a clean and soft piece of fabric. Never use acids or abrasive detergents.
If you don't use the appliance for long periods of time
If the dishwasher is not being used for extended periods of time, you should proceed as follows:
- run the pre-wash programme twice
- remove the electric plug from the outlet
- disconnect the water supply tube
- leave the door slightly open to avoid the formation of bad odours.
7.5 TABBEECOFFEBRRCOPOCODES - "blasticoversession"
N.B.: Anomalies are signalled in the following way:
All the LEDs remain on, while the LED corresponding to the type of error flashes.
| Error | When this occurs | Checks to carry out | Action to be taken |
| LED 1 | During the water cycle (the program stops) | - Tap closed- Filter of loading tube blocked- Drainage tube flat- Drainage tube broken- Water supply tube bent- Insufficient water pressure | - Reset the dishwasher- Check- Reset the dishwasher- Call the authorised assistance centre- Reset the dishwasher- Verify the water pressure |
| LED 2 | At the end of the cycle | - Repeat the washing cycle | - If the same problem reoccurs, contact the authorised technical assistance centre immediately communicating to them the type of error that is shown. |
| LED 5 | At the end of the cycle | - The drainage tube is bent- The siphon is blocked- The drainage pump is blocked | - Check- Check- Call the authorised assistance centre |
| LED 4 | At the end of the cycle | - The filter grills are blocked- A pot is placed up side down | - Clean the filter grills- Check at the end of the cycle, position the pots correctly during the next wash |
N.B.: Upon contacting the authorised technical assistance centre always communicate the type of error encountered.
7.5 TABLE OF ERROR CODES - "intermediate version"
N.B.: Anomalies are signalled in the following way:
A) All the LEDs remain on, while the LED corresponding to the type of error flashes.
B) A continuous beep sounds until the programme with the error is reset.
| Error | When this occurs | Checks to carry out | Action to be taken |
| LED 1 | During the water cycle (the program stops) | - Tap closed- Filter of loading tube blocked- Drainage tube flat- Drainage tube broken- Water supply tube bent- Insufficient water pressure | - Reset the dishwasher- Check- Reset the dishwasher- Call the authorised assistance centre- Reset the dishwasher- Verify the water pressure |
| LED 2 | At the end of the cycle | - Repeat the washing cycle | - If the same problem reoccurs, contact the authorised technical assistance centre immediately communicating to them the type of error that is shown. |
| LED 5 | At the end of the cycle | - The drainage tube is bent- The siphon is blocked- The drainage pump is blocked | - Check- Check- Call the authorised assistance centre |
| LED 4 | At the end of the cycle | - The filter grills are blocked- A pot is placed up side down | - Clean the filter grills- Check at the end of the cycle, position the pots correctly during the next wash |
| LED 1-2 | At the end of the cycle | - The filter grills are blocked- A pot is placed up side down | - Clean the filter grills- Check at the end of the cycle, position the pots correctly during the next wash |
| LED 1-2 | At the end of the cycle | - Repeat the washing cycle | - If the same problem reoccurs, contact the authorised technical assistance centre immediately communicating to them the type of error that is shown. |
N.B.: Upon contacting the authorised technical assistance centre always communicate the type of error encountered.
8 WHAT TO DO IN CASE OF MALFUNCTIONS
You should first check whether it is possible to rectify some minor problems yourself. Follow these instructions. If you are unable to identify or remove the problem, you should contact the technical client assistance service.
• The programme does not start
- Are the internal fuses broken? Is the dishwasher connected to the electric supply system?
- Is the door closed properly? Press on the door to close it completely.
- No water enters the appliance
- Is the water faucet open?
- Is the filter between the faucet and the water supply tube obstructed? If so, clean the filter.
- Is the water supply tube obstructed? Check the tube.
- The programme indicator does not move on from its starting position
- Is the water faucet completely open?
- Is the filter between the faucet and the water supply tube obstructed? If so, clean the filter.
- Is the water pressure lower than 0.05 Mpa?
- The used water is not removed from the dishwasher
- Is the waste disposal tube obstructed? Check the tube.
- The siphon is obstructed? Check the siphon.
• The dishes are not clean after washing them
- Did you choose an appropriate programme for the type of dishes and the degree of dirt you are dealing with?
- Are the dishes arranged in a way that allows the water-jet to reach all their surfaces?
- Are the dishwasher's baskets overloaded?
- Are the spray-rotors blocked by a dish or some cutlery?
- Are all filters at the bottom of the dishwasher clean? Are they all in their correct position?
- Did you add the correct amount of detergent?
- Is the water discharge tube connected properly?
- Is there still any special dishwasher salt in the appropriate container? (if present) Without salt the water is not being softened.
- Was the water softening system (if present) adjusted according to the local amount of calcium in the water?
• The dishes do not dry or they remain opaque
- Is there any rinse aid left in the appropriate container?
• Glasses and dishes show the formation of lines, spots, and stains or a shiny blue coloration
- During the rinse process too much rinse aid is being released. Adjust the rinse aid release.
• Glasses and dishes show stains of dried water
- During the rinse process too little rinse aid is being released. Adjust the rinse aid release.
Please note:
The appliance was tested and checked by the manufacturer. As a consequence, you may find some traces of water inside. These will disappear after the first use.
natural_image
3D mechanical component with a gear and dollar sign symbol, no readable text or symbols presentnatural_image
Diagram of a mechanical component with layered structure and two separate views showing internal components (no text or symbols)LA2505-110
natural_image
Technical illustration of a mechanical assembly with layered components and a close-up view of a component (no text or symbols)LA2505-112
Besteck
natural_image
3D rendered diagram of a mechanical assembly with insulators and shafts, no visible text or symbolsLA2505-120

natural_image
Illustration of a hand holding a tool near industrial equipment (no text or symbols visible)natural_image
Illustration of a hand adjusting a mechanical component in a kitchen sink (no text or symbols visible)natural_image
Illustration of a hand placing a container into a tray with a numbered label (2), no readable text or symbols present.LA2505-190

LA2505-200
5.3 RACCORDEMENT POUR L'EVACUATION DU PRODUIT NETTOYANT
natural_image
3D mechanical component with a gear-shaped base and directional arrow symbol, no readable text or labelsnatural_image
Technical illustration of a mechanical component with layered structure and abacus arrangement (no text or symbols)
Services
natural_image
3D rendered mechanical assembly with threaded components and cylindrical parts arranged in a grid (no text or symbols)LA2505-120

1) LED indication programmes
natural_image
Hand pressing a button on a cable or cable support structure (no text or symbols visible)natural_image
Illustration of a hand using a tool to press down a sink with a pipe and washers (no text or symbols)natural_image
Hand pouring liquid into a glass container on a kitchen sink (no text or symbols visible)LA2505-180
natural_image
Illustration of a hand placing a small container into a tray with a numbered label (2), no text or symbols present.LA2505-190

natural_image
Illustration of a hand pressing down on a tray with a numbered step 3, no text or symbols presentLA2505-200
7.3 NETTOYAGE DU FILTRE D'ARRIVÉE DE L'EAU
4.2 DATOS TECNICOS
natural_image
3D mechanical component with a gear-shaped base and a downward arrow, no visible text or symbolsnatural_image
Technical illustration of a mechanical component with layered structure and inset showing internal components (no text or symbols)
Cubiertos
natural_image
3D rendered diagram of a mechanical assembly with insulators and housing (no text or symbols)LA2505-120

natural_image
Illustration of a hand pressing a button on a mechanical component, with no visible text or symbols.natural_image
Illustration of a hand using a tool to press down a mechanical component (no text or symbols visible)natural_image
Illustration of a hand placing a plastic cup into a tray with a small container, no text or symbols presentLA2505-190
LA2505-200
7.3 LIMPIEZA DEL FILTRO DE ENTRADA DEL AGUA
4.2 DATI TECNICI
natural_image
3D mechanical component with a downward arrow and dollar sign symbol, no readable text or labelsnatural_image
Technical illustration of a mechanical component with layered structure and inset showing internal components (no text or symbols)Posate
natural_image
3D rendered mechanical assembly with cylindrical components and threaded fasteners (no text or symbols)LA2505-120

natural_image
Diagram of a train track with overhead cable routing and a directional arrow, no readable text or symbols present.natural_image
Illustration of a hand touching a cable with electrical lines and components in the background (no text or symbols)natural_image
Illustration of a hand using a tool to press down a mechanical component (no text or symbols visible)natural_image
Illustration of a hand placing a small container into a tray with a numbered label (2), no text or symbols present.LA2505-190

LA2505-200
7.3 PULIZIA DEL FILTRO D'ENTRATA ACQUA


- SAFETY INSTRUCTIONS
- Norms and regulations to be respected
- Before running the appliance for the first time
- For the safety of children
- They should therefore be kept outside the reach of children.
- Daily use
- UN PACKING - DISPOSAL
- UNPACKING
- FINAL DISPOSAL OF APPLIANCE
- GENERAL ADVICE
- WASHING DISHES IN AN ECONOMIC AND ECOLOGICAL WAY
- DISHES NOT TO BE WASHED IN THE DISHWASHER
- DESCRIPTION OF THE APPLIANCE
- GENERAL PARTS
- TECHNICAL DATA
- INSTALLATION
- LEEVEELLINGG
- WATER CONNECTION
- CONNECTIONNOFFDBRANNAAGEEWATER
- ELECTRIC CONNECTIONS
- BBECOREEUSINGGTTHEEARPPPLAANCE
- Opening of the door
- Adding special dishwasher salt (only in the salt container version)
- Regulation of the water softener system (IF PRESENT)
- Refilling of rinse aid
- Indication of salt level (IF PRESENT)
- Indication of rinse aid level
- Regulation of rinse aid dosage
- Adding the detergent
- How to load and unload the dishwasher
- Use of the lower basket
- Cutlery
- ATTENTION:
- Use of the upper basket
- Height regulation of the upper basket
- Pulling out the upper basket
- Description of control buttons and indication lights
- Start
- Now proceed as follows:
- Wash cycle selection
- Start Button
- Incorrect setting of the programmes (programme change)
- Description of controls and indicator lights (Model illustrated in fig. 18a)
- Proceed as follows:
- Stop
- MAINTENANCE
- CLEANING OF SPAY-ROTORS
- OCEANINGGOFFRICEBS
- CLEANING OF THE WATER ENTRY FILTER
- CLEANING OF THE DISHWASHER'S EXTERNAL SURFACES
- If you don't use the appliance for long periods of time
- TABBEECOFFEBRRCOPOCODES - "blasticoversession"
- N.B.: Anomalies are signalled in the following way:
- TABLE OF ERROR CODES - "intermediate version"
- WHAT TO DO IN CASE OF MALFUNCTIONS
- Please note:
- Besteck
- RACCORDEMENT POUR L'EVACUATION DU PRODUIT NETTOYANT
- Services
- NETTOYAGE DU FILTRE D'ARRIVÉE DE L'EAU
- DATOS TECNICOS
- Cubiertos
- LIMPIEZA DEL FILTRO DE ENTRADA DEL AGUA
- DATI TECNICI
- Posate
- PULIZIA DEL FILTRO D'ENTRATA ACQUA
Brand : Saivod
Model : LV 6 Electron
Category : Dishwasher