
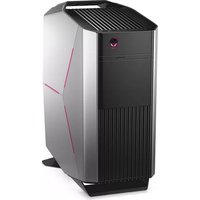
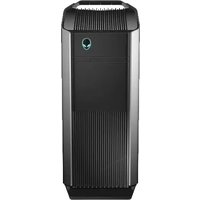
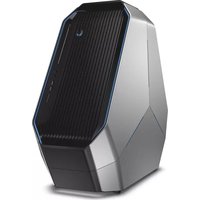
X51 - Desktop computer ALIENWARE - Free user manual and instructions
Find the device manual for free X51 ALIENWARE in PDF.


| Product Type | Desktop Computer |
| Brand | Alienware |
| Model | X51 |
| Dimensions (approx.) | 13.5 x 11.0 x 3.5 in (34.3 x 27.9 x 8.9 cm) |
| Weight | Approx. 17 lbs (7.7 kg) |
| Power Supply | 330W external power brick |
| Processor Options | Intel Core i5/i7 (3rd/4th Gen) |
| Memory | Up to 16 GB DDR3 |
| Storage | 2.5" HDD/SSD (single bay) |
| Graphics | NVIDIA GeForce GTX 760/770 (custom) |
| Operating System | Windows 8.1 / Windows 10 (depending on configuration) |
| Cooling System | Dual fan with liquid cooling option for CPU |
| Lighting | AlienFX RGB zones (programmable) |
| Ports (Front) | 2x USB 3.0, headphone/mic jacks |
| Ports (Rear) | 4x USB 3.0, 2x USB 2.0, HDMI, DisplayPort, eSATA, RJ-45, audio |
| Wireless | 802.11ac Wi-Fi + Bluetooth 4.0 |
| Maintenance | Dust cleaning recommended every 6 months; accessible side panel |
| Security | Kensington lock slot |
| Spare Parts & Repairability | RAM, storage, and power supply are user-replaceable; processor and GPU are soldered or proprietary |
| General Information | Released 2012-2014; compact form factor designed for living room gaming |
Frequently Asked Questions - X51 ALIENWARE
User questions about X51 ALIENWARE
0 question about this device. Answer the ones you know or ask your own.
Ask a new question about this device
Download the instructions for your Desktop computer in PDF format for free! Find your manual X51 - ALIENWARE and take your electronic device back in hand. On this page are published all the documents necessary for the use of your device. X51 by ALIENWARE.
USER MANUAL X51 ALIENWARE
Regulatory model: D05S
Regulatory type: D05S001
Notes, Cautions, and Warnings

NOTE: A NOTE indicates important information that helps you make better use of your product.

CAUTION: A CAUTION indicates either potential damage to hardware or loss of data, and tells you how to avoid the problem.

WARNING: A WARNING indicates a potential for property damage, personal injury, or death.
Information in this document is subject to change without notice.
© 2012 Dell Inc. All rights reserved.
Reproduction of these materials in any manner whatsoever without the written permission of Dell Inc. is strictly forbidden.
Trademarks used in this text: Dell™ and the DELL logo are trademarks of Dell Inc.
Alienware ^® is a registered trademark of Alienware Corporation.
Microsoft ^® , Windows ^® , and the Windows start button logo are either trademarks or registered trademarks of Microsoft Corporation in the United States and/or other countries.
Other trademarks and trade names may be used in this document to refer to either the entities claiming the marks and names or their products. Dell Inc. disclaims any proprietary interest in trademarks and trade names other than its own.
Contents
1 About Your Computer.... 5
Front View 5
Back View 6
Specifications 6
2 Before You Begin....7
Turn Off Your Computer and Connected Devices. 7
Safety Instructions 7
3 Working Inside Your Computer ..... 9
4 System Setup.... 11
Overview 11
Entering System Setup. 11
System Setup Screens 12
System Setup Options 12
Boot Sequence 16
5 Flashing the BIOS 19
6 Contacting Alienware 21
Websites 21
About Your Computer
Front View
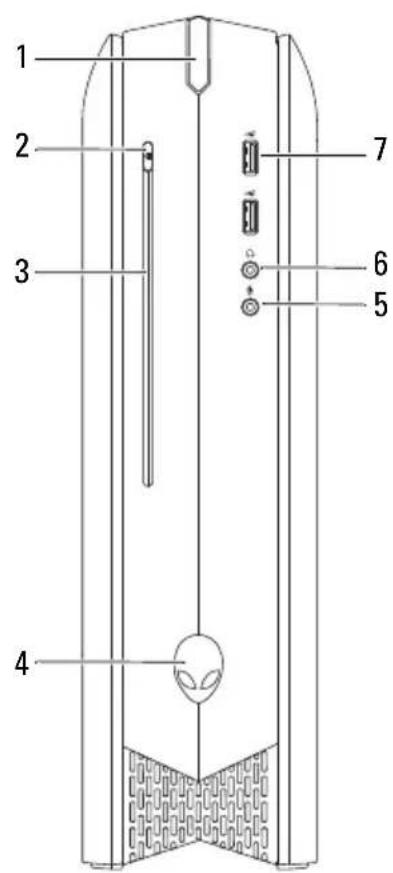
1 power button 2 optical-drive eject button
3 optical drive 4 rotatable AlienHead
5 microphone connector 6 headphone connector
7 USB 2.0 connectors (2)

NOTE: Your Alienware X51 computer supports dual orientation. You can place your computer vertically or horizontally. The rotatable AlienHead allows you to change the direction of the AlienHead depending on the orientation of your computer.
Back View
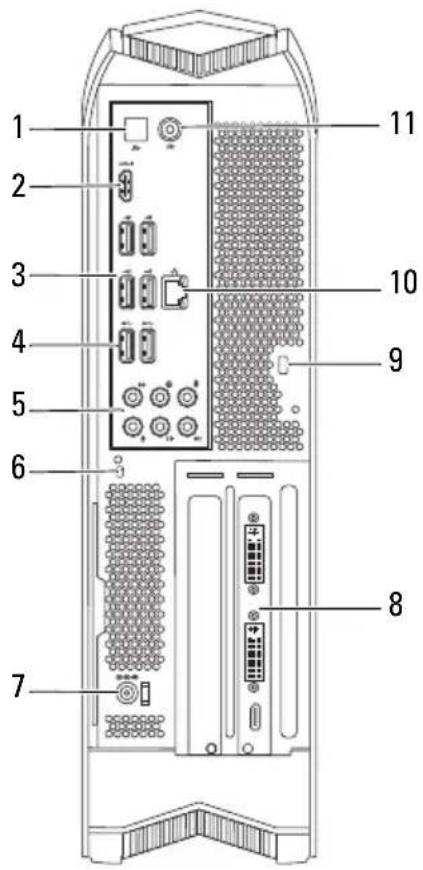
1 optical S/PDIF connector 2 HDMI connector
3 USB 2.0 connectors (4) 4 USB 3.0 connectors (2)
5 audio connectors (6) 6 hard-drive activity light
7 AC-adapter connector 8 discrete graphics card
9 security-cable slot 10 network connector and
network lights
11 coaxial S/PDIF connector
Specifications
For more information on specifications of your computer, see support.dell.com/manuals.
Before You Begin
Turn Off Your Computer and Connected Devices

CAUTION: To avoid losing data, save and close all open files and exit all open programs before you turn off your computer.
1 Save and close all open files and exit all open programs.
2 Click Start and click Shut Down.
Microsoft Windows shuts down and then the computer turns off.

NOTE: If you are using a different operating system, see the documentation of your operating system for shut-down instructions.
3 Disconnect your computer and all attached devices from their electrical outlets.
4 Disconnect all telephone cables, network cables, and attached devices from your computer.
5 Press and hold the power button, while the computer is unplugged, to ground the system board.
Safety Instructions
Use the following safety guidelines to protect your computer from potential damage and ensure your personal safety.

WARNING: Before you begin, read the safety information that shipped with your computer. For additional safety best practices information, see the Regulatory Compliance Homepage at dell.com/regulatory_compliance.

CAUTION: To avoid damaging the computer, ensure that the work surface is flat and clean.

CAUTION: Only a certified service technician is authorized to remove the computer cover and access any of the components inside the computer. See the safety instructions for complete information about safety precautions and protecting against electrostatic discharge.
CAUTION: When you disconnect a cable, pull on its connector or on its pull-tab, not on the cable itself. Some cables have connectors with locking tabs or thumb-screws that you must disengage before disconnecting the cable. When disconnecting cables, keep them evenly aligned to avoid bending any connector pins. When connecting cables, ensure that the connectors and ports are correctly oriented and aligned.
CAUTION: To disconnect a network cable, first unplug the cable from your computer and then unplug the cable from the network device.
NOTE: Ensure that you remove the security cable from the security-cable slot, if applicable.
Working Inside Your Computer

CAUTION: Only a certified service technician is authorized to remove the computer cover and access any of the components inside the computer. See the safety instructions for complete information about safety precautions and protecting against electrostatic discharge.
For information on removing and replacing the internal component of your computer, contact Alienware. See "Contacting Alienware" on page 21.
System Setup
Overview
Use the system setup to:
- get information about the hardware installed in your computer, such as the amount of RAM, the size of the hard drive, and so on
- change the system configuration information
- set or change a user-selectable option, such as the user password, type of hard drive installed, enabling or disabling base devices, and so on

NOTE: Before you change system setup, it is recommended that you note the system-setup screen information for future reference.
Entering System Setup
1 Turn on (or restart) your computer.
2 During POST, when the DELL logo is displayed, watch for the F2 prompt to appear and then press

NOTE: The F2 prompt indicates that the keyboard has initialized. This prompt can appear very quickly, so you must watch for it, and then press
System Setup Screens
The system setup screen displays current or changeable configuration information for your computer. Information on the screen is divided into three areas: the setup item, active help screen, and key functions.
| Setup Item — This field appears on the left side of the system setup window. The field is a scrollable list containing features that define the configuration of your computer, including installed hardware, power conservation, and security features.Scroll up and down the list with the up- and down-arrow keys. As an option is highlighted, the Help Screen displays more information about that option and available settings. | Help Screen — This field appears on the right side of the system setup window and contains information about each option listed in the Setup Item. In this field you can view information about your computer and make changes to your current settings.Press the up-arrow and down-arrow keys to highlight an option. Press <Enter> to make that selection active and return to the Setup Item.NOTE: Not all settings listed in the Setup Item are changeable. |
| Key Functions — This field appears below the Help Screen and lists keys and their functions within the active system setup field. | |
System Setup Options

NOTE: Depending on your computer and installed devices, the items listed in this section may appear, or may not appear exactly as listed.
Main
BIOS Information
Product Information
Build Date Displays the BIOS release date.
Product Name Displays the product name.
BIOS Version Displays the BIOS version number.
Set Service Tag Allows you to enter the service tag of your computer.
Asset Tag Displays the asset tag of the computer.
Memory Information
Total Memory Displays the total memory of the computer.
Memory Available Displays the amount of memory available on the computer.
Memory Technology Displays the type of memory technology used.
Memory Speed Displays the memory speed.
CPU Information
Processor ID Displays the processor identification code.
CPU Speed Displays the processor speed.
Cache L2 Displays the processor L2 cache size.
Cache L3 Displays the processor L3 cache size.
Advanced — Standard CMOS Features
| System Date(mm:dd:yy) | Displays current date. |
| System Time(hh:mm:ss) | Displays the current time. |
| Device Information | |
| SATA Port1 Displays the SATA 1 drive integrated in the computer. | |
| SATA Port2 Displays the SATA 2 drive integrated in the computer. | |
| SATA Port3 Displays the SATA 3 drive integrated in the computer. | |
| Wait for 'F1' If Errors | If enabled, the system will HALT during boot to display system errors. |
Advanced — Advanced BIOS Features
| Bootup Num-Lock Select power-on state for num-lock. | |
| OptionROM Display Screen | Allows you to display or hide the RAID Option ROM screen during POST. |
Advanced — CPU Configuration
| Hyper-threading Technology | If disabled only one thread per enabled core is active. | |
| XD Bit Capability | Enable XD Bit Capability to allow the processor to distinguish between the bits of code that can be executed and the ones that cannot be executed. | |
| Intel(R) SpeedStep tech | If enabled, the processor clock speed and core voltage are adjusted dynamically based on the processor load. | |
| Intel(R) C-State tech | Allows you to enable the number of cores in each processor package. Options 1-5. | |
Advanced — Integrated Devices
| USB Controller Allows you to enable or disable the integrated USB controller. | |
| HD Audio Allows you to enable or disable the integrated audio controller. | |
| Onboard LAN Controller | Allows you to enable or disable the onboard LAN controller. |
| Launch PXE OpROM | Allows you to enable or disable the boot option for legacy network devices. |
| PCH SATAConfiguration | |
| SATA Mode Displays the SATA mode. | |
Advanced — Power Management Setup
| Suspend Mode Sets the energy-saving mode of the ACPI function. |
| AC Recovery Sets what action the computer takes when power is restored. |
| Auto Power On Allows the computer to start up at a certain time. |
| Auto Power On Date Allows you to set RTC Wake Up Date. |
| Auto Power On Hour Allows you to set RTC Wake Up Hour. |
| Auto Power On Minute Allows you to set RTC Wake Up Minut |
| Auto Power On Second Allows you to set RTC Wake Up Secon |
Security
Supervisor Password: Allows you to change the supervisor password.
User Password: Allows you to change the user password. You cannot use the user password to enter the BIOS setup, during POST.
Set Supervisor Allows you to set a supervisor password. Password
Set User Password Allows you to set a supervisor password.
Boot
Set Boot Priority
1st Boot Device Displays the first boot device. Default: USB floppy-drive.
2nd Boot Device Displays the second boot device. Default: USB hard-drive.
3rd Boot Device Displays the third boot device. Default: USB optical-drive.
4th Boot Device Displays the fourth boot device. Default: hard-drive.
5th Boot Device Displays the fifth boot device. Default: optical-drive.
6th Boot Device Displays the sixth boot device. Default: network boot.
7th Boot Device Displays the seventh boot device. Default: UEFI.
Hard Disk Drive BBS Priorities Sets the hard drive boot priority. The items displayed are dynamically updated according to the hard drives detected.
USB Disk BBS Drive Sets the USB drive boot priority. Priorities
CD/DVD ROM Drive BBS Sets the CD/DVD drive boot priority. Priorities
Exit
Provides options to Save Changes and Reset, Discard Changes and Reset, and Restore Defaults.
Boot Sequence
This feature allows you to change the boot sequence for devices.
Boot Options
- Diskette Drive — The computer attempts to boot from the floppy disk drive. If no operating system is on the drive, the computer generates an error message.
- Hard Drive — The computer attempts to boot from the primary hard drive. If no operating system is on the drive, the computer generates an error message.
- CD/DVD/CD-RW Drive — The computer attempts to boot from the optical drive. If no disc is in the drive, or if the disc is not bootable, the computer generates an error message.
- USB Storage Device — Insert the memory device into a USB connector and restart the computer. When F12 Boot Options appears in the lower-right corner of the screen, press
. The BIOS detects the device and adds the USB flash option to the boot menu.

NOTE: To boot to a USB device, the device must be bootable. To ensure that your device is bootable, check the device documentation.
- Network — The computer attempts to boot from the network. If no operating system is found on the network, the computer generates an error message.
Changing Boot Sequence for the Current Boot
You can use this feature to change the current boot sequence, for example, to boot from the optical drive to run Dell Diagnostics from the Drivers and Utilities disc. The previous boot sequence is restored at the next boot.
1 If you are booting from a USB device, connect the USB device to a USB connector.
2 Turn on (or restart) your computer.
3 When F2 Setup, F12 Boot Options appears in the lower-right corner of the screen, press

NOTE: If you wait too long and the operating system logo appears, continue to wait until you see the Microsoft Windows desktop. Then shut down your computer and try again.
The Boot Device Menu appears, listing all available boot devices.
4 On the Boot Device Menu choose the device you want to boot from. For example, if you are booting to a USB memory key, highlightUSB Storage Device and press
Changing Boot Sequence for Future Boots
1 Enter system setup. See "Entering System Setup" on page 11.
2 Use the arrow keys to highlight the Boot menu option and press

NOTE: Write down your current boot sequence in case you want to restore it.
3 Press the up- and down-arrow keys to move through the list of devices.
4 Press plus (+) or minus (−) to change the boot priority of the device.
Flashing the BIOS
The BIOS may require flashing when an update is available or when replacing the system board. To flash the BIOS:
1 Turn on the computer.
2 Go to support.dell.com/support/downloads.
3 Locate the BIOS update file for your computer:

NOTE: The Service Tag for your computer is located on a label at the back of your computer.
If you have your computer's Service Tag:
a Click Enter a Tag
b Enter your computer's Service Tag in the Enter a service tag: field, click Go, and proceed to step 4.
If you do not have your computer's Service Tag:
a Click Select Model.
b Select the type of product in the Select Your Product Familylist.
c Select the product brand in the Select Your Product Line list.
d Select the product model number in the Select Your Product Modellist.

NOTE: If you have selected a different model and want to start over again, click Start Over on the top right of the menu.
e Click Confirm.
4 A list of results appears on the screen. Click BIOS.
5 Click Download Now to download the latest BIOS file.
The File Downloadwindow appears.
6 Click Save to save the file on your desktop. The file downloads to your desktop.
7 Click Close if the Download Complete window appears.
The file icon appears on your desktop and is titled the same as the downloaded BIOS update file.
8 Double-click the file icon on the desktop and follow the instructions on the screen.
Contacting Alienware

NOTE: Dell provides several online and telephone-based support and service options for your Alienware computer. These services may vary by country and product and may not be available in your area.
To contact Dell for sales, technical support, or customer service issues:
1 Go to dell.com/contactdell.
2 Select your region, country, or language.
3 Select the segment for contact.
4 Select the appropriate service or support link based on your need.
5 Choose the method of contacting Dell that is convenient for you.
If you are in the United States, call 1-800-ALIENWARE for help on your Alienware computer.
Websites
For the latest information, FAQ's, and solutions to most common issues, see support.dell.com/Alienware.
- Notes, Cautions, and Warnings
- Contents
- About Your Computer
- Front View
- Back View
- Specifications
- Before You Begin
- Turn Off Your Computer and Connected Devices
- Safety Instructions
- Working Inside Your Computer
- System Setup
- Overview
- Entering System Setup
- System Setup Screens
- System Setup Options
- Main
- Security
- Boot
- Exit
- Boot Sequence
- Boot Options
- Changing Boot Sequence for the Current Boot
- Changing Boot Sequence for Future Boots
- Flashing the BIOS
- Contacting Alienware
- Websites
Brand : ALIENWARE
Model : X51
Category : Desktop computer