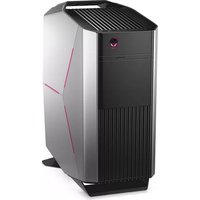
Aurora R6 - Desktop computer ALIENWARE - Free user manual and instructions
Find the device manual for free Aurora R6 ALIENWARE in PDF.


| Product Type | Desktop Computer |
| Brand | Alienware |
| Model | Aurora R6 |
| Processor | Intel Core i7-7700K (4.2 GHz up to 4.5 GHz) |
| Memory | 16GB DDR4 2400MHz (up to 64GB) |
| Storage | 256GB SSD + 1TB HDD |
| Graphics | NVIDIA GeForce GTX 1080 (8GB GDDR5X) |
| Operating System | Windows 10 Home |
| Power Supply | 850W 80+ Platinum |
| Cooling | Alienware Liquid Cooling |
| Dimensions (H x W x D) | 18.5 x 8.9 x 20.3 inches (47 x 22.6 x 51.6 cm) |
| Weight | Approx. 28 lbs (12.7 kg) |
| Front Ports | 2x USB 3.0, 1x USB-C, Headphone/Mic |
| Rear Ports | 4x USB 3.0, 2x USB 2.0, HDMI, DisplayPort, Ethernet, Audio |
| Expansion Slots | 1x PCIe x16, 1x PCIe x4, 2x M.2, 4x SATA |
| Lighting | AlienFX RGB customizable LED lighting |
| Cleaning | Use compressed air for dust; avoid liquids |
| Safety | Do not block vents; use surge protector |
| Spare Parts | RAM, storage, GPU, PSU, fans (user-replaceable) |
| Repairability | Tool-less access to internal components |
Frequently Asked Questions - Aurora R6 ALIENWARE
User questions about Aurora R6 ALIENWARE
0 question about this device. Answer the ones you know or ask your own.
Ask a new question about this device
Download the instructions for your Desktop computer in PDF format for free! Find your manual Aurora R6 - ALIENWARE and take your electronic device back in hand. On this page are published all the documents necessary for the use of your device. Aurora R6 by ALIENWARE.
USER MANUAL Aurora R6 ALIENWARE
Aurora R6 Service Manual
Notes, cautions, and warnings

NOTE: A NOTE indicates important information that helps you make better use of your product.

CAUTION: A CAUTION indicates either potential damage to hardware or loss of data and tells you how to avoid the problem.

WARNING: A WARNING indicates a potential for property damage, personal injury, or death.
Copyright © 2017 Dell Inc. or its subsidiaries. All rights reserved. Dell, EMC, and other trademarks are trademarks of Dell Inc. or its subsidiaries. Other trademarks may be trademarks of their respective owners.
2017 - 01
Rev. A00
Contents
Before working inside your computer.... 12
Before you begin 12
Safety instructions....12
Recommended tools.... 13
Screw list.... 14
After working inside your computer.... 16
Technical overview.... 17
Inside view of your computer.... 18
System-board components.... 19
Removing the stability foot....21
Procedure.... 21
Replacing the stability foot....23
Procedure.... 23
Removing the left-side cover....24
Procedure.... 24
Replacing the left-side cover....26
Procedure.... 26
Removing the right-side cover.... 28
Procedure.... 29
Replacing the right-side cover.... 31
Procedure.... 32
Removing the top-cover assembly.... 34
Prerequisites.... 34
Procedure.... 34
Replacing the top-cover assembly.... 40
Procedure.... 40
Post-requisites....40
Removing the bottom cover.... 41
Prerequisites.... 41
Procedure.... 42
Replacing the bottom cover.... 44
Procedure.... 44
Post-requisites....44
Removing the 3.5-inch hard drive.... 45
Prerequisites.... 45
Procedure.... 45
Replacing the 3.5-inch hard drive.... 48
Procedure.... 48
Post-requisites....48
Removing the 2.5-inch hard drives.... 49
Prerequisites.... 49
Procedure.... 49
Replacing the 2.5-inch hard drives.... 52
Procedure.... 52
Post-requisites....52
Removing the hard-drive cage.... 53
Procedure.... 53
Prerequisites.... 54
Replacing the hard-drive cage.... 55
Procedure.... 55
Post-requisites....55
Removing the power-supply unit.... 56
Prerequisites.... 56
Procedure.... 56
Replacing the power-supply unit.... 63
Procedure.... 63
Post-requisites....63
Removing the processor-cooling assembly...... 64
Prerequisites.... 64
Procedure.... 65
Replacing the processor-cooling assembly...... 67
Procedure.... 67
Post-requisites....67
Removing the coin-cell battery.... 68
Prerequisites.... 68
Procedure.... 68
Replacing the coin-cell battery....70
Procedure.... 70
Post-requisites....70
Removing the memory modules.... 71
Prerequisites.... 71
Procedure.... 71
Replacing the memory modules.... 73
Procedure.... 73
Post-requisites....75
Removing the solid-state drive.... 76
Prerequisites.... 76
Procedure.... 76
Replacing the solid-state drive....78
Procedure.... 78
Post-requisites....79
Removing the graphics card.... 80
Prerequisites.... 80
Procedure.... 81
Replacing the graphics card....83
Procedure.... 83
Post-requisites....83
Removing the processor fan and heat-sink assembly.... 84
Prerequisites.... 84
Procedure.... 84
Replacing the processor fan and heat-sink assembly.... 86
Procedure.... 86
Post-requisites....86
Removing the processor....87
Prerequisites.... 87
Procedure.... 87
Replacing the processor....89
Procedure.... 89
Post-requisites....90
Removing the wireless card.... 91
Prerequisites.... 91
Procedure.... 91
Replacing the wireless card.... 93
Procedure.... 93
Post-requisites....94
Removing the antenna.... 95
Prerequisites.... 95
Procedure.... 95
Replacing the antenna.... 98
Procedure.... 98
Post-requisites....98
Removing the front-chassis fan.... 99
Prerequisites.... 99
Procedure.... 99
Replacing the front-chassis fan.... 102
Procedure.... 102
Post-requisites....102
Removing the top-chassis fan....103
Prerequisites.... 103
Procedure.... 103
Replacing the top-chassis fan....106
Procedure.... 106
Post-requisites....106
Removing the optical drive....107
Prerequisites.... 107
Procedure.... 107
Replacing the optical drive.... 111
Procedure....111
Post-requisites.... 111
Removing the front bezel 112
Prerequisites....112
Procedure....112
Replacing the front bezel.... 115
Procedure....115
Post-requisites.... 115
Removing the power-button board.... 116
Prerequisites....116
Procedure....116
Replacing the power-button board.... 119
Procedure....119
Post-requisites.... 119
Removing the rear trim cover....120
Prerequisites.... 120
Procedure.... 120
Replacing the rear trim cover.... 122
Procedure.... 122
Post-requisites....122
Removing the system board....123
Prerequisites.... 123
Procedure.... 124
Replacing the system board....127
Procedure.... 127
Post-requisites....127
Entering the Service Tag in the BIOS setup program....128
BIOS setup program....129
BIOS overview....129
Entering BIOS setup program....129
System setup options.... 129
Clearing forgotten passwords.... 135
Prerequisites.... 135
Procedure.... 135
Post-requisites....136
Clearing CMOS Settings....137
Prerequisites.... 137
Procedure.... 137
Post-requisites....138
Flashing the BIOS....139
Technology and components.... 140
Audio....140
Downloading the audio driver.... 140
Identifying the audio controller....140
Changing the audio settings....141
Graphics.... 141
Downloading the graphics driver....142
Identifying the display adapter.... 142
Changing the screen resolution.... 142
Rotating the display....143
USB....145
Downloading the USB 2.0 and USB 3.0 driver....145
Identifying the USB drivers....145
Enabling or disabling the USB in BIOS setup program...... 146
Fixing a no-boot issue caused by USB emulation.... 146
Wi-Fi....147
Turning on or off Wi-Fi....147
Downloading the Wi-Fi driver.... 147
Identifying the Wireless drivers....147
Configuring the Wi-Fi....148
Bluetooth....148
Turning on or off Bluetooth....149
Pairing the Bluetooth-enabled devices.... 149
Removing the Bluetooth device.... 150
Transferring files between devices using Bluetooth....150
Hard drive.... 151
Identifying the hard drive....151
Identifying the hard drive in BIOS setup program....152
Chipset.... 152
Downloading the chipset driver....152
Identifying the chipset....152
Memory.... 153
Checking the system memory in Windows....154
Checking the system memory in BIOS setup program.... 154
Testing memory using ePSA.... 154
Processors.... 154
Identifying the processors in Windows....155
Checking the processor usage in the task manager....155
Operating System.... 156
Service Tag location.... 156
Device driver.... 156
Intel Chipset Software Installation Utility.... 157
Video drivers.... 158
Intel Serial IO driver.... 158
Intel Trusted Execution Engine Interface....159
Intel Wireless-AC 8260 Wi-Fi and Bluetooth drivers......160
BIOS overview....161
Boot menu.... 161
Boot menu enhancements.... 161
Timing key sequences....161
System diagnostic lights.... 163
Getting help and contacting Alienware.... 164
Self-help resources.... 164
Contacting Alienware....164
Before working inside your computer

NOTE: The images in this document may differ from your computer depending on the configuration you ordered.
Before you begin
1 Save and close all open files and exit all open applications.
2 Shut down your computer.
Windows 10: Click or tap Start → ⏻ Power → Shut down.

NOTE: If you are using a different operating system, see the documentation of your operating system for shut-down instructions.
3 Disconnect your computer and all attached devices from their electrical outlets.
4 Disconnect all cables such as telephone cables, network cables, and so on, from your computer.
5 Disconnect all attached devices and peripherals, such as keyboard, mouse, monitor, and so on, from your computer.
6 Remove any media card and optical disc from your computer, if applicable.
7 After the computer is unplugged, press and hold the power button for 5 seconds to ground the system board.
Safety instructions
Use the following safety guidelines to protect your computer from potential damage and ensure your personal safety.

WARNING: Before working inside your computer, read the safety information that shipped with your computer. For more safety best practices, see the Regulatory Compliance home page at www.dell.com/regulatory_compliance.
WARNING: Disconnect all power sources before opening the computer cover or panels. After you finish working inside the computer, replace all covers, panels, and screws before connecting to the electrical outlet.
CAUTION: To avoid damaging the computer, ensure that the work surface is flat and clean.
CAUTION: To avoid damaging the components and cards, handle them by their edges, and avoid touching pins and contacts.
CAUTION: You should only perform troubleshooting and repairs as authorized or directed by the Dell technical assistance team. Damage due to servicing that is not authorized by Dell is not covered by your warranty. See the safety instructions that shipped with the product or at www.dell.com/regulatory_compliance.
CAUTION: Before touching anything inside your computer, ground yourself by touching an unpainted metal surface, such as the metal at the back of the computer. While you work, periodically touch an unpainted metal surface to dissipate static electricity, which could harm internal components.
CAUTION: When you disconnect a cable, pull on its connector or on its pull tab, not on the cable itself. Some cables have connectors with locking tabs or thumb-screws that you must disengage before disconnecting the cable. When disconnecting cables, keep them evenly aligned to avoid bending any connector pins. When connecting cables, ensure that the ports and connectors are correctly oriented and aligned.
CAUTION: Press and eject any installed card from the media-card reader.
Recommended tools
The procedures in this document may require the following tools:
• Philips screwdriver
- Flat-head screwdriver
- Plastic scribe
Screw list
The following table provides the list of screws that are used for securing different components to Alienware Aurora R5.
Table 1. Screw list
| Component Secured to Screw type Quantit | y | Screw image | ||
| 3.5-inch hard-drive cage Chassis #6-32 X 1/4" 2 |  | |||
| 2.5-inch hard-drive cage Chassis #6-32 X 1/4" 4 |  | |||
| Power-supply unit hinge Chassis #6-32 X 1/4" 6 |  | |||
| #6-32 X 1/4" BLK | 3 |  | ||
| Power-supply unit Power- | #6-32 X 1/4" 4 |  | ||
| supply unit hinge |  | |||
| Power-supply unit bracket #6-32 X 1/4" 2 |  | |||
| Optical-drive assembly Chassis #6-32 X 1/4" 2 |  | |||
| System board Chassis #6-32 X 1/4" 8 |  | |||
| Top cover Chassis #6-32 X 1/4" 2 |  | |||
| Top I/O assembly Chassis #6-32 X 1/4" | BLK | 4 | ||
| Processor-cooling assembly bracket | Chassis #6-32 X 1/4" BLK | 2 |  | |
| Processor-cooling assembly radiator | Processor-cooling assembly bracket | #6-32 X 1/4" BLK | 4 |  |
| Top-chassis fan assembly Chassis #6-32 X 1/4" 1 |  | |||
| Top-chassis fan bracket Chassis #6-32 X 1/4" BLK | 1 | |||
| Antenna assembly Chassis #6-32 X 1/4" 2 |  | |||
| Power-button board Top cover M3 X 4 2 |  | |||
| Rubber foot Bottom cover | M3 X 4 4 |  | ||
| M.2 SSD card System board | Standoff M2 1 |  | ||
| M2 X 2.5 1 |  | |||
| Optical-drive bracket Optical drive M2 X 2.5 1 |  | |||
| WLAN bracket | System board | M2 X 2.5 1 |  | |
After working inside your computer

CAUTION: Leaving stray or loose screws inside your computer may severely damage your computer.
1 Replace all screws and ensure that no stray screws remain inside your computer.
2 Connect any external devices, peripherals, or cables you removed before working on your computer.
3 Replace any media cards, discs, or any other parts that you removed before working on your computer.
4 Connect your computer and all attached devices to their electrical outlets.
5 Turn on your computer.
Technical overview

WARNING: Before working inside your computer, read the safety information that shipped with your computer and follow the steps in Before working inside your computer. After working inside your computer, follow the instructions in After working inside your computer. For more safety best practices, see the Regulatory Compliance home page at www.dell.com/regulatory_compliance.
Inside view of your computer
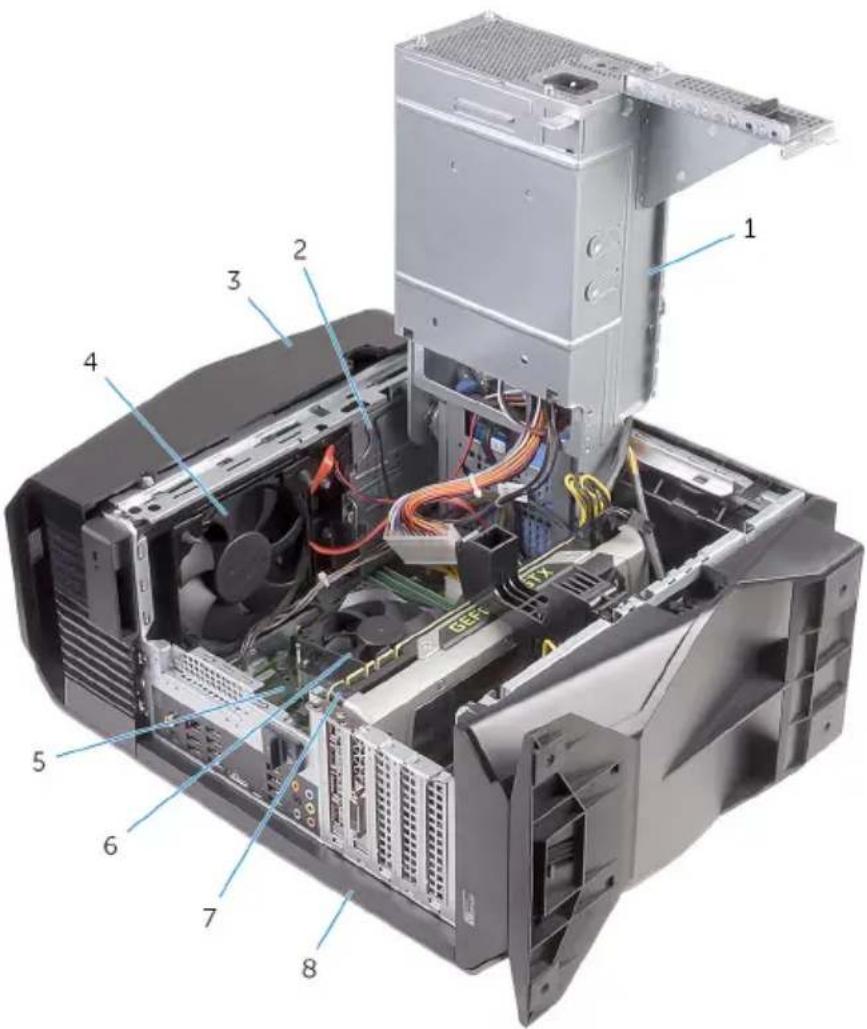
1 power-supply unit 2 optical-drive assembly
3 top cover 4 top-chassis fan
5 system board 6 processor fan and heat-sink
assembly
7 graphics card 8 right-side cover
System-board components
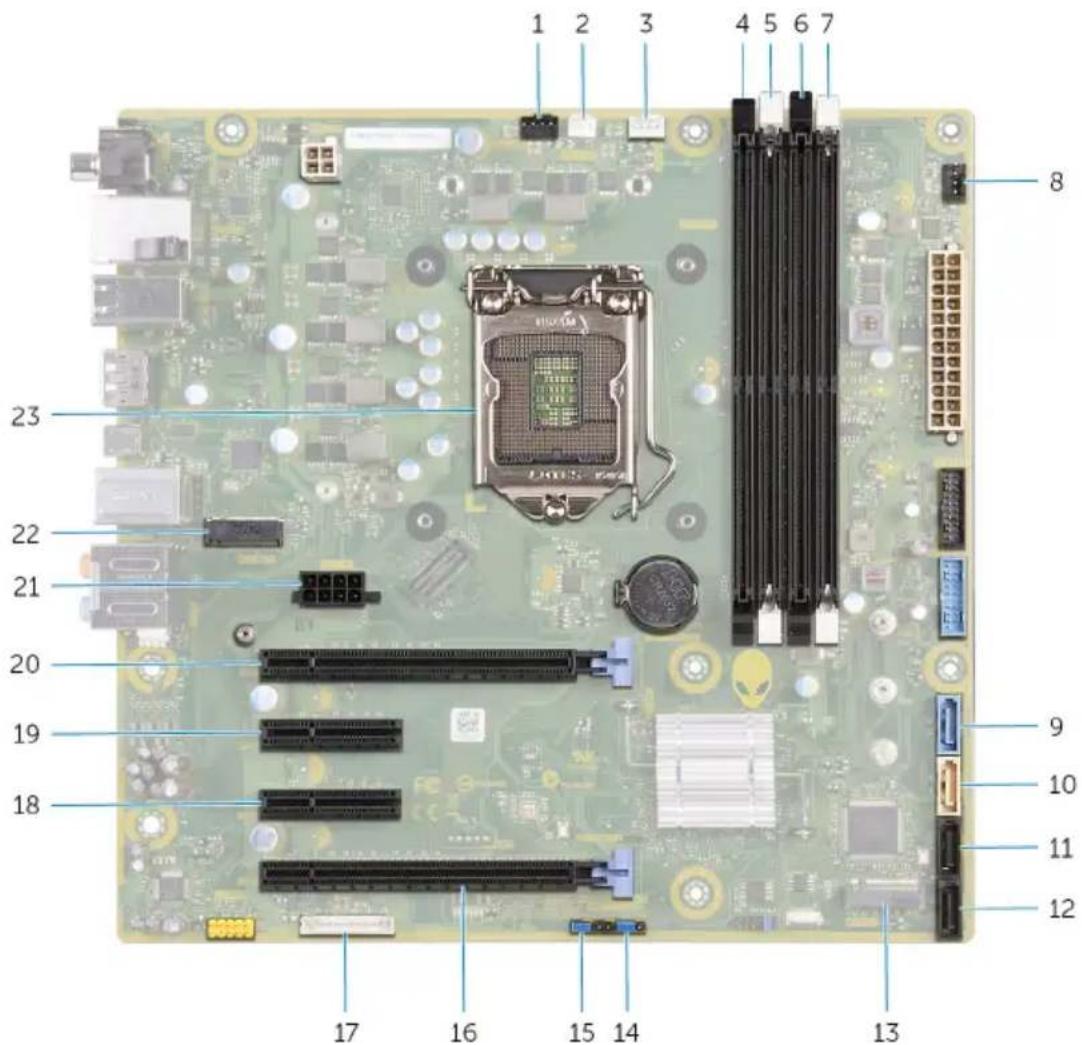
1 top-chassis fan (TOP_FAN) 2 processor-cooling assembly
pump-fan connector
(PUMP_FAN)
3 processor-fan connector
(CPU_FAN)
4 memory-module slot 1 (XMM1)
5 memory-module slot 2 (XMM2) 6 memory-module slot 3 (XMM3)
7 memory-module slot 4 (XMM4) 8 front-chassis fan connector
(FRONT_FAN)
9 SATA 6 Gbps drive connector (SATA1)
10 SATA 6 Gbps drive connector (SATA2)
11 SATA 6 Gbps drive connector (SATA3)
12 SATA 6 Gbps drive connector (SATA4)
13 solid-state drive slot (M.2 SSD) 14 CMOS reset jumper (CMOS JUMPER)
15 Password reset jumper (PASSWORD JUMPER)
16 PCI-Express x16 mechanical/x8 electrical slot (SLOT4)
17 LED controller connector (LED_CONTROLLER)
18 PCI-Express x4 slot (SLOT3)
19 PCI-Express x4 slot (SLOT2) 20 PCI-Express x16 mechanical/x8 electrical slot (SLOT1)
21 graphics-card power connector (GPU_POWER)
22 wireless-card slot (M.2 WIFI)
23 processor socket (CPU1)
Removing the stability foot

WARNING: Before working inside your computer, read the safety information that shipped with your computer and follow the steps in Before working inside your computer. After working inside your computer, follow the instructions in After working inside your computer. For more safety best practices, see the Regulatory Compliance home page at www.dell.com/regulatory_compliance.
Procedure
1 Place the computer on a clean and flat surface with the bottom cover facing up.
2 Pull the securing tab to release the stability foot from the slots on the bottom cover.
3 Lift the stability foot off the bottom cover.
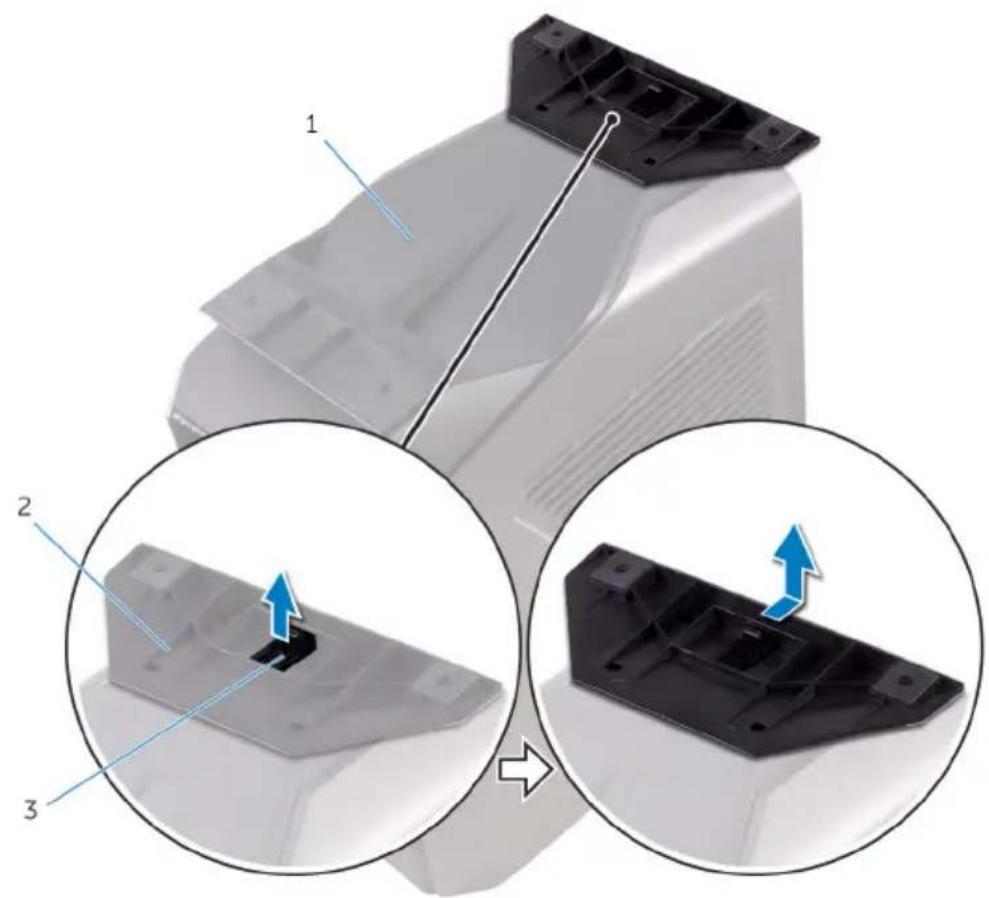
1 bottom cover 2 stability foot
3 security tab
4 Lay the computer on its side.
Replacing the stability foot

WARNING: Before working inside your computer, read the safety information that shipped with your computer and follow the steps in Before working inside your computer. After working inside your computer, follow the instructions in After working inside your computer. For more safety best practices, see the Regulatory Compliance home page at www.dell.com/regulatory_compliance.
Procedure
1 Place the computer on a clean and flat surface with the bottom cover facing up.
2 Align the tabs on the stability foot with the slots on the bottom cover and snap the stability foot to lock it in place.
3 Turn the computer over and place it in upright position.
Removing the left-side cover

WARNING: Before working inside your computer, read the safety information that shipped with your computer and follow the steps in Before working inside your computer. After working inside your computer, follow the instructions in After working inside your computer. For more safety best practices, see the Regulatory Compliance home page at www.dell.com/regulatory_compliance.
Procedure

NOTE: Ensure that you remove the security cable and security screw from the security-cable slot (if applicable).
1 Pull the side-panel release latch.
2 Release the left-side cover away from the chassis and then lift it from the computer.
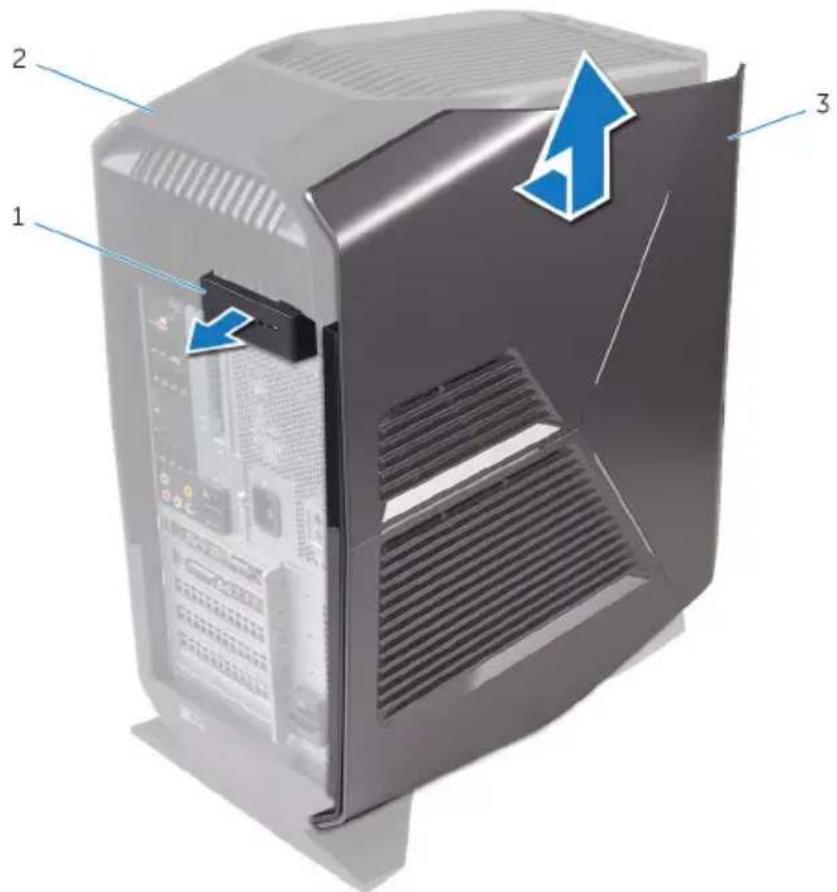
1 side-panel release latch 2 top cover
3 left-side cover
Replacing the left-side cover

WARNING: Before working inside your computer, read the safety information that shipped with your computer and follow the steps in Before working inside your computer. After working inside your computer, follow the instructions in After working inside your computer. For more safety best practices, see the Regulatory Compliance home page at www.dell.com/regulatory_compliance.
Procedure
1 Align the tabs on the left-side cover with the slots on the chassis.
2 Snap the left-side cover to lock it in place.

Figure 1. Replacing the left-side cover
1 chassis 2 slots
3 tabs 4 left-side cover
Removing the right-side cover

WARNING: Before working inside your computer, read the safety information that shipped with your computer and follow the steps in Before working inside your computer. After working inside your computer, follow the instructions in After working inside your computer. For more safety best practices, see the Regulatory Compliance home page at www.dell.com/regulatory_compliance.
Procedure
1 Carefully pry around the edges of the right-side cover from the chassis.
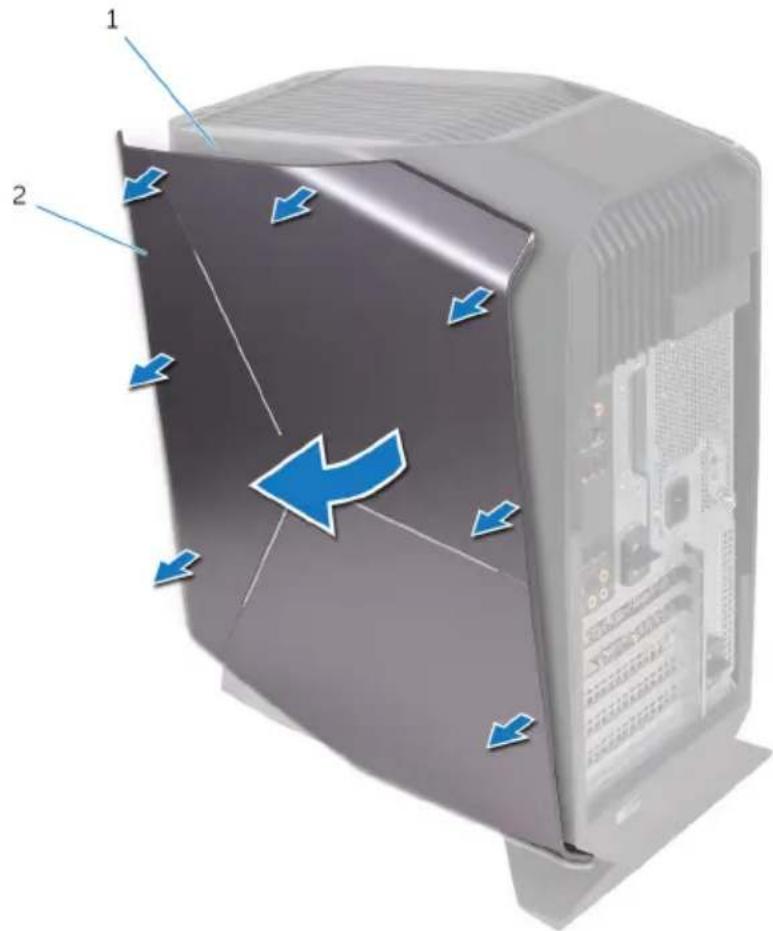
Figure 2. Removing the right-side cover
1 chassis 2 right-side cover
2 Disconnect the lighting cable from the right-side cover.
3 Lift the right-side cover off the chassis.
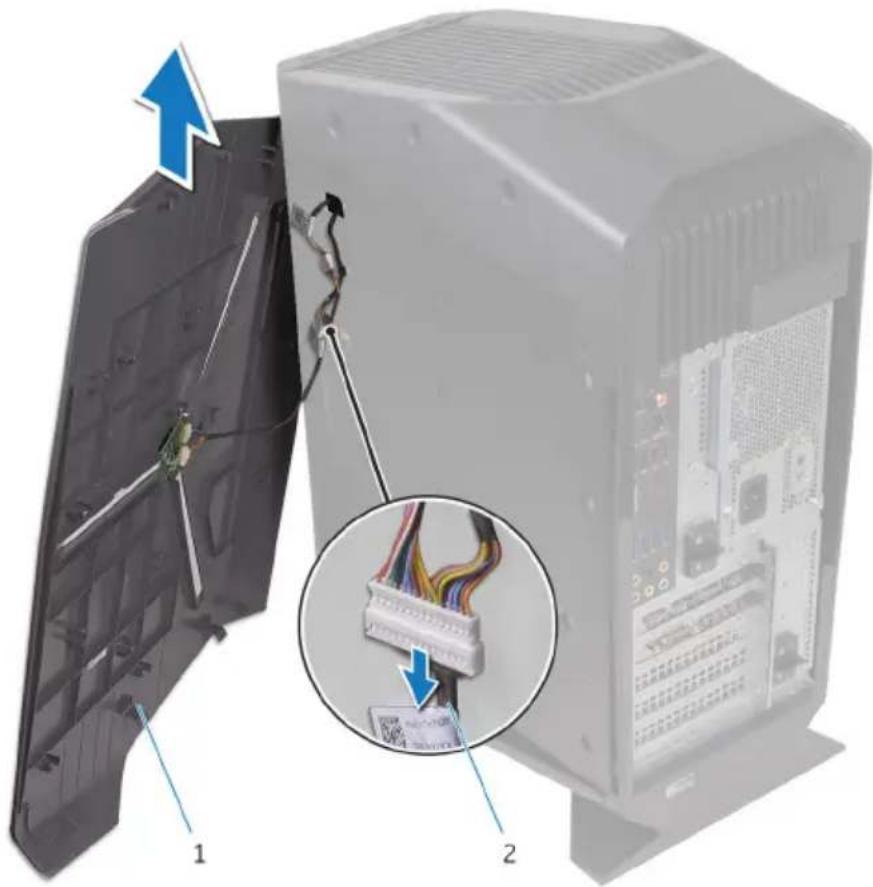
Figure 3. Removing the right-side cover
1 right-side cover 2 lighting cable
Replacing the right-side cover

WARNING: Before working inside your computer, read the safety information that shipped with your computer and follow the steps in Before working inside your computer. After working inside your computer, follow the instructions in After working inside your computer. For more safety best practices, see the Regulatory Compliance home page at www.dell.com/regulatory_compliance.
Procedure
1 Connect the lighting cable to the right-side cover.
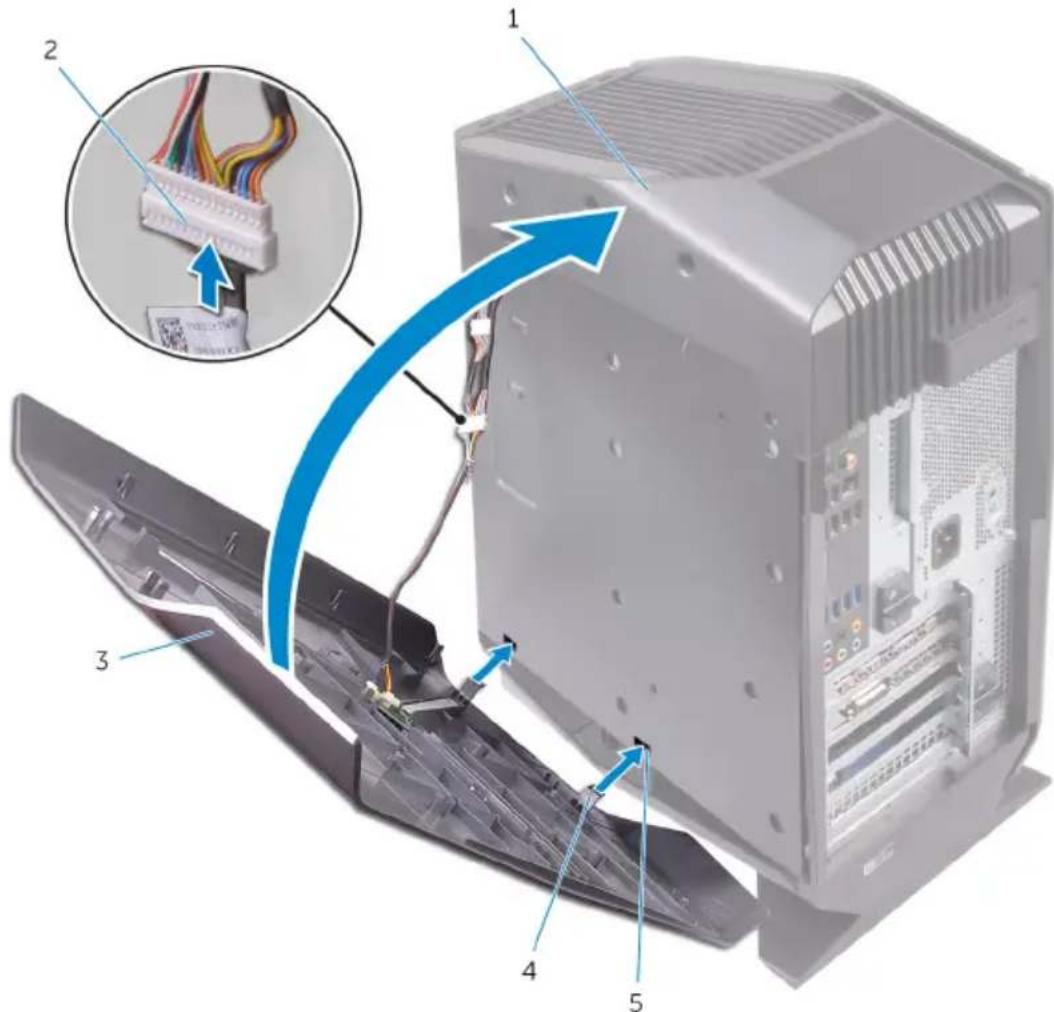
Figure 4. Connecting the lighting cable
a chassis
b lighting cable
c right-side cover
d tabs
e slots
2 Align the tabs on the right-side cover with the slots on the chassis and snap the right-side cover to lock it in place.
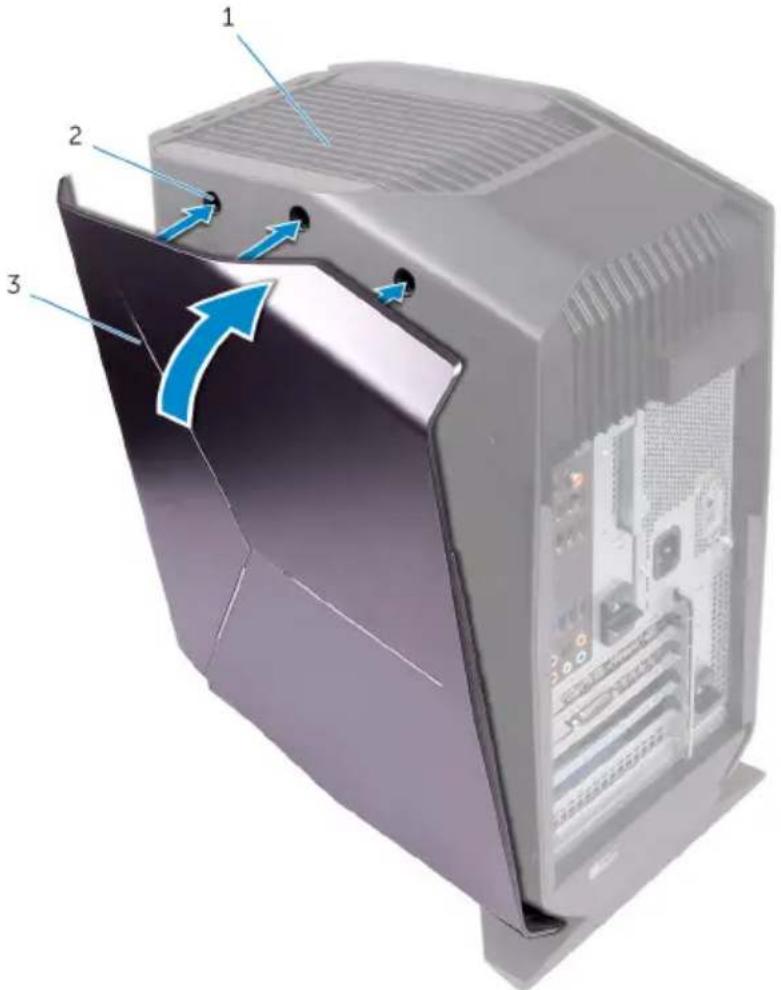
Figure 5. Replacing the right-side cover
a chassis
b slots
c right-side cover
Removing the top-cover assembly

WARNING: Before working inside your computer, read the safety information that shipped with your computer and follow the steps in Before working inside your computer. After working inside your computer, follow the instructions in After working inside your computer. For more safety best practices, see the Regulatory Compliance home page at www.dell.com/regulatory_compliance.
Prerequisites
1 Remove the left-side cover.
2 Remove the right-side cover.
Procedure
1 Remove the screws that secure the top cover to the chassis.
2 Disconnect the lighting cable from the top cover.
3 Slide the lighting cable through the slot on the chassis.

Figure 6. Removing the top cover
1 lighting cable 2 chassis
3 screws (2) 4 top cover
4 Starting from the rear, release the tabs on the top cover from the slots on the chassis.
5 Lift the top cover off the chassis.
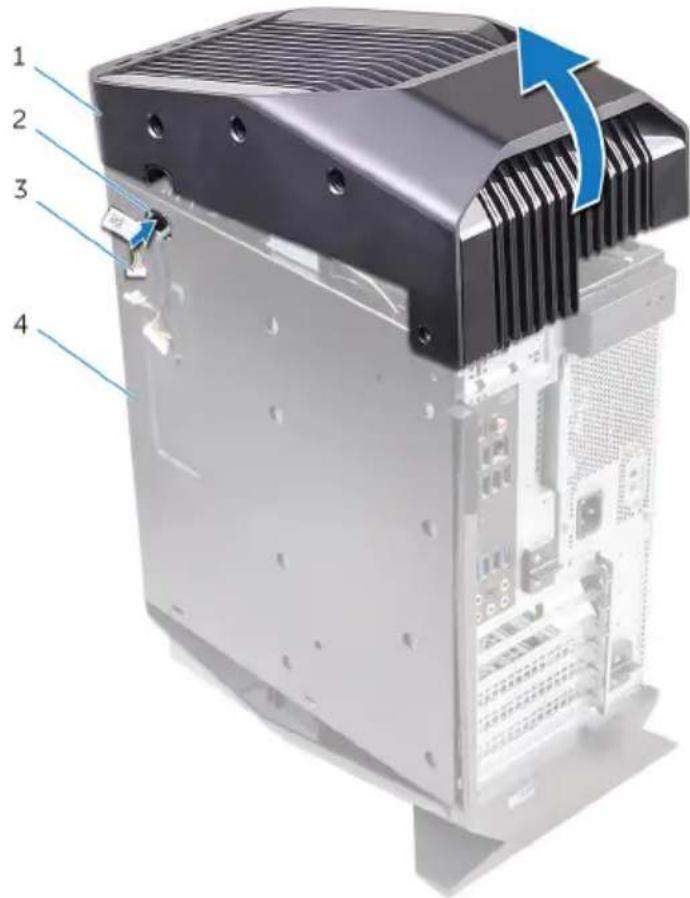
Figure 7. Removing the top cover
1 top cover 2 slot
3 lighting cable 4 chassis
6 Turn the top cover over, release the tabs on the top cover from the slots on the top bezel.

natural_image
Close-up of hands installing or adjusting a black plastic electronic device casing with blue directional arrows indicating internal components (no text or symbols visible)Figure 8. Releasing the top cover from the top bezel
7 Lift the top cover from the top bezel.

Figure 9. Lifting the top cover from the top bezel
a top cover
b top bezel
8 You are left with top bezel and top cover.

natural_image
Exploded view of a black plastic automotive chassis showing internal structure and mounting points (no text or symbols)Figure 10. Top cover and top bezel
a top bezel
b top cover
Replacing the top-cover assembly

WARNING: Before working inside your computer, read the safety information that shipped with your computer and follow the steps in Before working inside your computer. After working inside your computer, follow the instructions in After working inside your computer. For more safety best practices, see the Regulatory Compliance home page at www.dell.com/regulatory_compliance.
Procedure
1 Align the tabs on the top cover with the slots on the top bezel and snap the top cover into place.
2 Slide the lighting cable through the slot on the chassis.
3 Align the tabs on the top cover with the slots on the chassis and snap the top cover into place.
4 Connect the lighting cable to the top cover.
5 Replace the screws that secure the top cover to the chassis.
Post-requisites
1 Replace the right-side cover.
2 Replace the left-side cover.
Removing the bottom cover

WARNING: Before working inside your computer, read the safety information that shipped with your computer and follow the steps in Before working inside your computer. After working inside your computer, follow the instructions in After working inside your computer. For more safety best practices, see the Regulatory Compliance home page at www.dell.com/regulatory_compliance.
Prerequisites
1 Remove the left-side cover.
2 Remove the two 2.5-inch hard-drive cages.
Procedure
1 Press the securing tabs to release the bottom cover from the slots on the chassis.
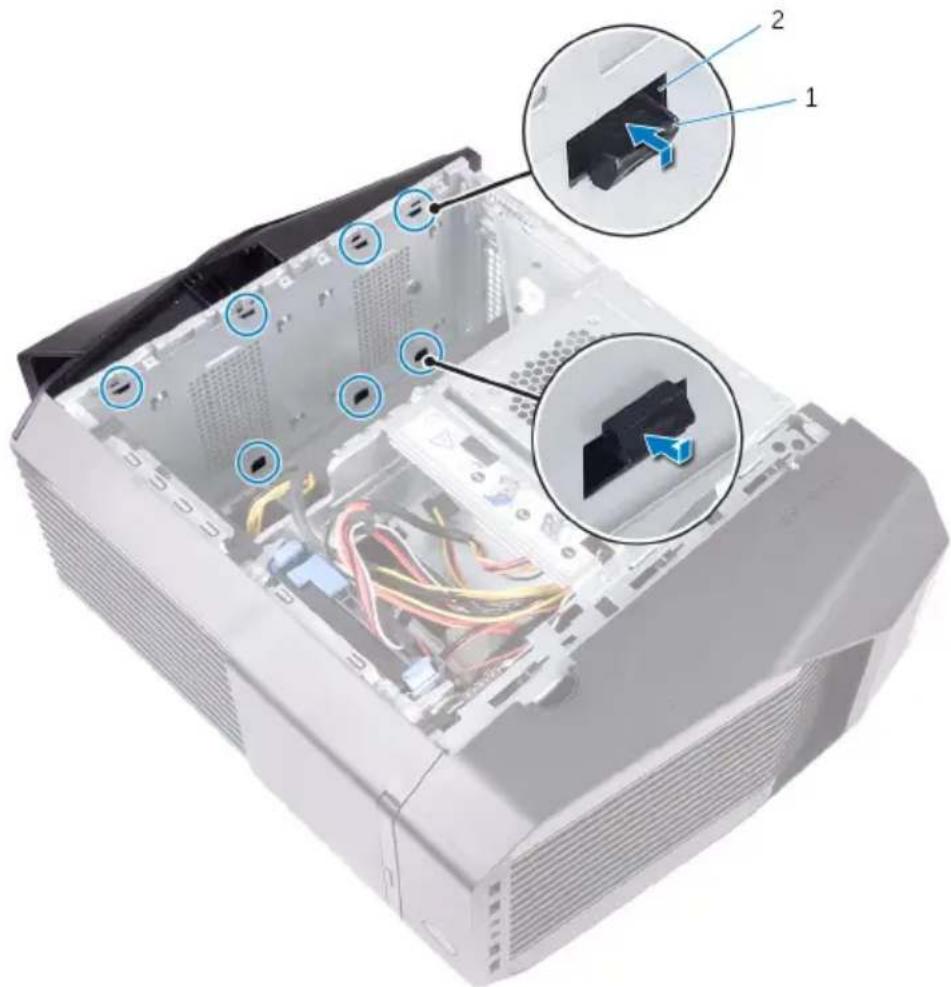
Figure 11. Releasing the bottom cover from the chassis
1 securing tabs (8) 2 slots (8)
2 Tilt the computer towards the front until the base is facing up.
3 Lift the bottom cover from the chassis.

natural_image
Cutaway view of an open computer tower showing internal components and wiring (no text or symbols visible)Figure 12. Removing the bottom cover
4 Tilt the computer back to the upright position.
Replacing the bottom cover

WARNING: Before working inside your computer, read the safety information that shipped with your computer and follow the steps in Before working inside your computer. After working inside your computer, follow the instructions in After working inside your computer. For more safety best practices, see the Regulatory Compliance home page at www.dell.com/regulatory_compliance.
Procedure
1 Tilt the computer towards the front until the base is facing up.
2 Align the tabs on the bottom cover with the slots on the chassis and snap the bottom cover to lock it in place.
3 Turn the computer over and place it in upright position.
Post-requisites
1 Replace the two 2.5-inch hard-drive cages.
2 Replace the left-side cover.
Removing the 3.5-inch hard drive

WARNING: Before working inside your computer, read the safety information that shipped with your computer and follow the steps in Before working inside your computer. After working inside your computer, follow the instructions in After working inside your computer. For more safety best practices, see the Regulatory Compliance home page at www.dell.com/regulatory_compliance.
Prerequisites
Remove the left-side cover.
Procedure
1 Disconnect the data and power cables from the hard drive.
2 Press the release tabs on the hard-drive carrier and slide the hard-drive carrier out of the hard-drive cage.

Figure 13. Removing the hard drive
1 data cable 2 power cable
3 hard-drive cage 4 release tabs
5 hard-drive carrier
3 Pry the hard-drive carrier to release the tabs on the carrier from the slots on the hard drive.
4 Lift the hard drive off the hard-drive carrier.

NOTE: Note the orientation of the hard drive so that you can replace it correctly.
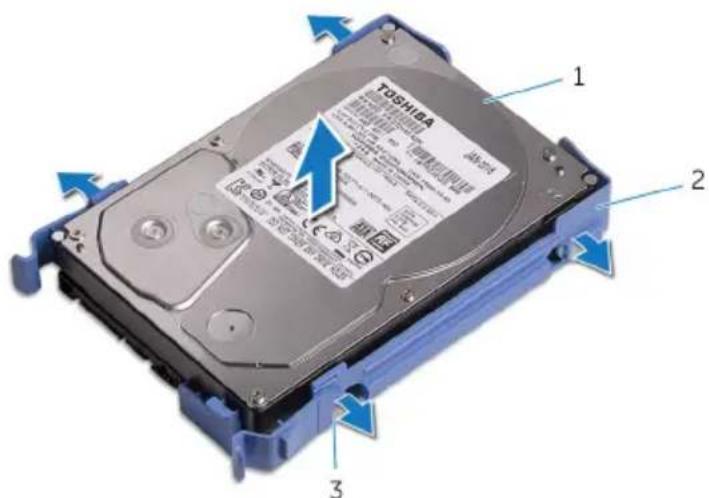
Figure 14. Removing the hard drive from the hard-drive bracket
1 hard drive 2 hard-drive carrier
3 tabs (4)
Replacing the 3.5-inch hard drive

WARNING: Before working inside your computer, read the safety information that shipped with your computer and follow the steps in Before working inside your computer. After working inside your computer, follow the instructions in After working inside your computer. For more safety best practices, see the Regulatory Compliance home page at www.dell.com/regulatory_compliance.
Procedure
1 Place the hard drive into the hard-drive carrier and align the tabs on the carrier with the slots on the hard drive.
2 Snap the hard-drive carrier into the hard drive.
3 Slide the hard-drive assembly into the hard-drive cage until it snaps into place.
4 Connect the data and power cables to the hard drive.
Post-requisites
Replace the left-side cover.
Removing the 2.5-inch hard drives

WARNING: Before working inside your computer, read the safety information that shipped with your computer and follow the steps in Before working inside your computer. After working inside your computer, follow the instructions in After working inside your computer. For more safety best practices, see the Regulatory Compliance home page at www.dell.com/regulatory_compliance.
Prerequisites
Remove the left-side cover.
Procedure
1 Disconnect the data and power cables from the hard drive.
2 Press the release tabs on the hard-drive carrier and slide the hard-drive carrier out of the hard-drive cage.

Figure 15. Removing the hard drive
1 data cable 2 power cable
3 hard-drive cage 4 release tabs
5 hard-drive carrier
3 Pry the hard-drive carrier to release the tabs on the carrier from the slots on the hard drive.
4 Lift the hard drive off the hard-drive carrier.

NOTE: Note the orientation of the hard drive so that you can replace it correctly.
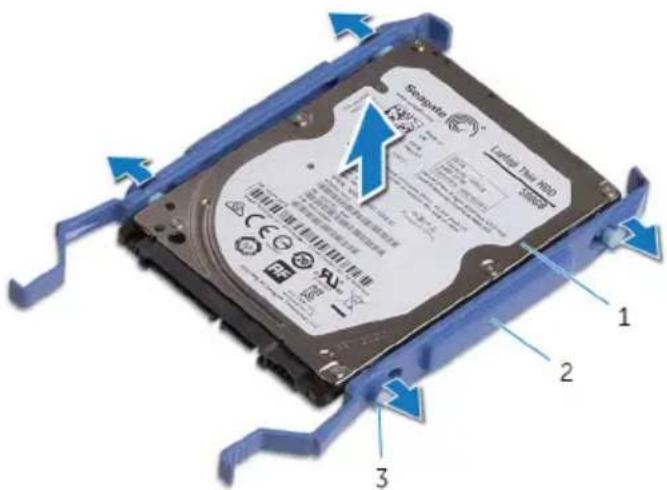
Figure 16. Removing the hard drive from the hard-drive carrier
1 hard drive 2 hard-drive carrier
3 tabs (4)
Replacing the 2.5-inch hard drives

WARNING: Before working inside your computer, read the safety information that shipped with your computer and follow the steps in Before working inside your computer. After working inside your computer, follow the instructions in After working inside your computer. For more safety best practices, see the Regulatory Compliance home page at www.dell.com/regulatory_compliance.
Procedure
1 Place the hard drive into the hard-drive carrier and align the tabs on the carrier with the slots on the hard drive.
2 Snap the hard-drive carrier into the hard drive.
3 Slide the hard-drive assembly into the hard-drive cage until it snaps into place.
4 Connect the data cable and power cable to the hard drive.
Post-requisites
Replace the left-side cover.
Removing the hard-drive cage

WARNING: Before working inside your computer, read the safety information that shipped with your computer and follow the steps in Before working inside your computer. After working inside your computer, follow the instructions in After working inside your computer. For more safety best practices, see the Regulatory Compliance home page at www.dell.com/regulatory_compliance.
Procedure
1 Remove the screws that secure the hard-drive cage to the chassis.
2 Lift the hard-drive cage off the chassis.

Figure 17. Removing hard-drive cage
1 chassis 2 #6-32x1/4" screws (2)
3 hard-drive cage
Prerequisites
1 Remove the left-side cover.
2 Remove the 3.5-inch hard drive.
Replacing the hard-drive cage

WARNING: Before working inside your computer, read the safety information that shipped with your computer and follow the steps in Before working inside your computer. After working inside your computer, follow the instructions in After working inside your computer. For more safety best practices, see the Regulatory Compliance home page at www.dell.com/regulatory_compliance.
Procedure
1 Insert the hard-drive cage into its slot on the chassis.
2 Align the tabs on the cage with the tabs on the chassis.
3 Replace the screws that secure the hard-drive cage to the chassis.
Post-requisites
1 Replace the 3.5-inch hard drive.
2 Replace the left-side cover.
Removing the power-supply unit

WARNING: Before working inside your computer, read the safety information that shipped with your computer and follow the steps in Before working inside your computer. After working inside your computer, follow the instructions in After working inside your computer. For more safety best practices, see the Regulatory Compliance home page at www.dell.com/regulatory_compliance.
Prerequisites
Remove the left-side cover.
Procedure

NOTE: Note the routing of all cables as you remove them so that you can reroute them correctly after you replace the power supply.
1 Lay the computer on the right side.
2 Slide the power-supply unit cage release latches towards the unlock position.

Figure 18. Sliding the power-supply unit cage release latches
1 power-supply unit 2 chassis
3 power-supply unit cage release cage latches (2)
3 Lift the power-supply unit cage while pressing and holding the graphics-card bracket.
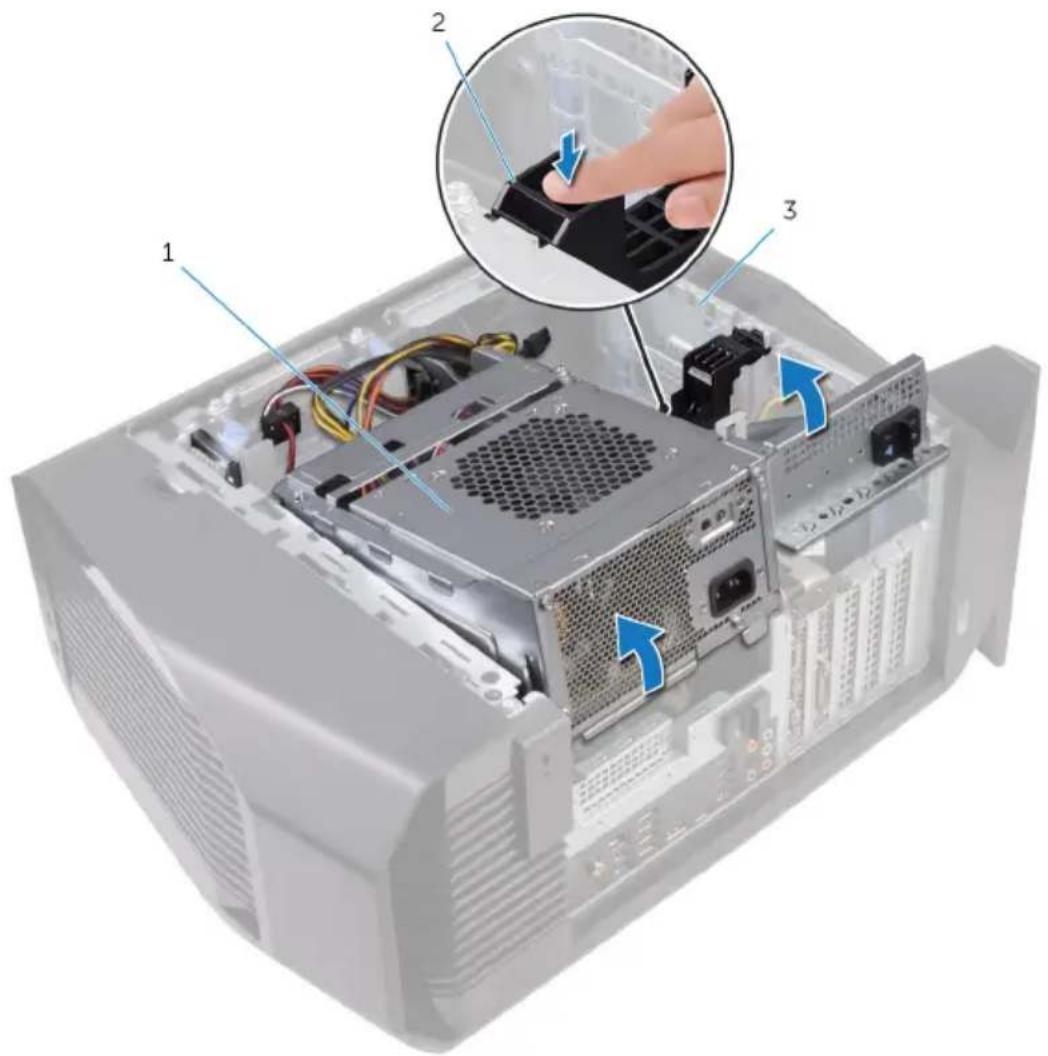
1 power-supply unit cage 2 graphics-card bracket 3 chassis
4 Rotate the power-supply unit cage away from the chassis.
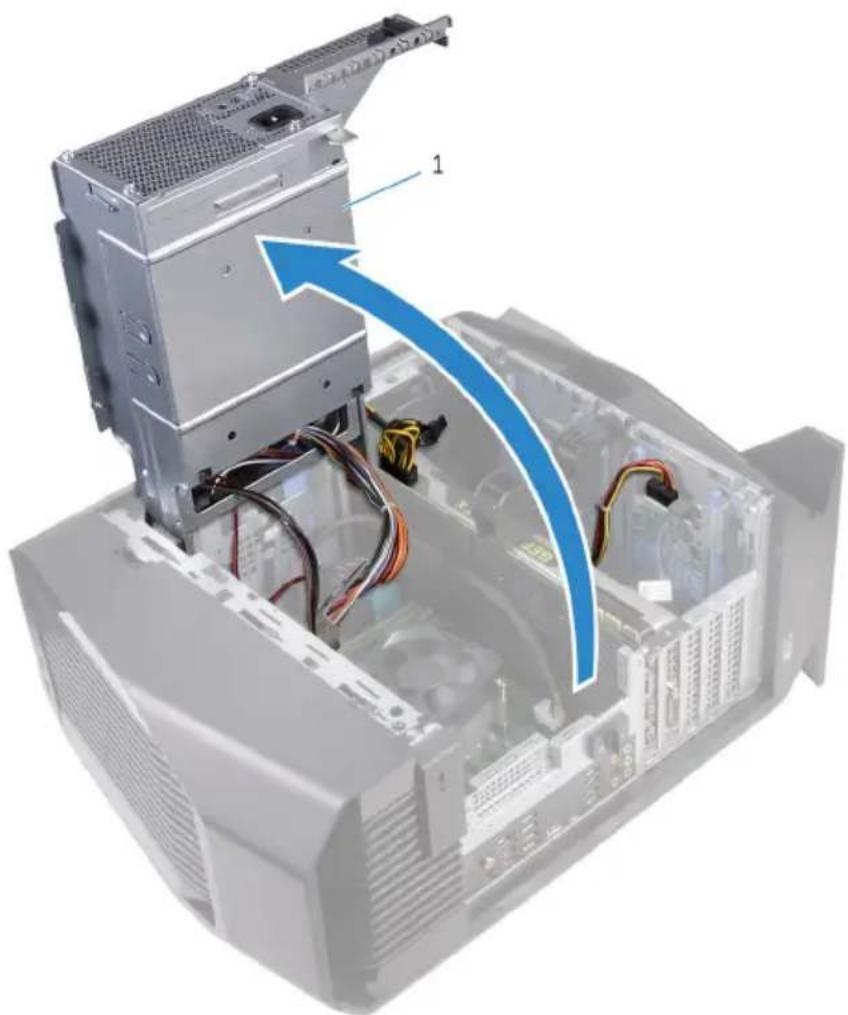
natural_image
Interior view of a computer tower with visible wiring and components, showing a blue directional arrow indicating movement or flow (no text or symbols present)1 power-supply unit
5 Press the releasing clip on the power-cable connectors and disconnect the power cables from the graphics card.
6 Disconnect the power cables from the optical drive and hard drives.
7 Disconnect the processor-power cable and system-board power cable from the system board.

1 power-supply unit 2 hard-drive power cable
3 graphics-card power cables 4 releasing clips (2)
(2)
5 hard-drive power cable 6 processor-power cable
7 optical-drive power cable 8 system-board power cable
8 Rotate the power-supply unit cage towards the chassis until the unit snaps into place.
9 Remove the screws that secure the power-supply unit bracket to the power-supply unit cage.
10 Lift the power-supply unit bracket off the power-supply unit cage.
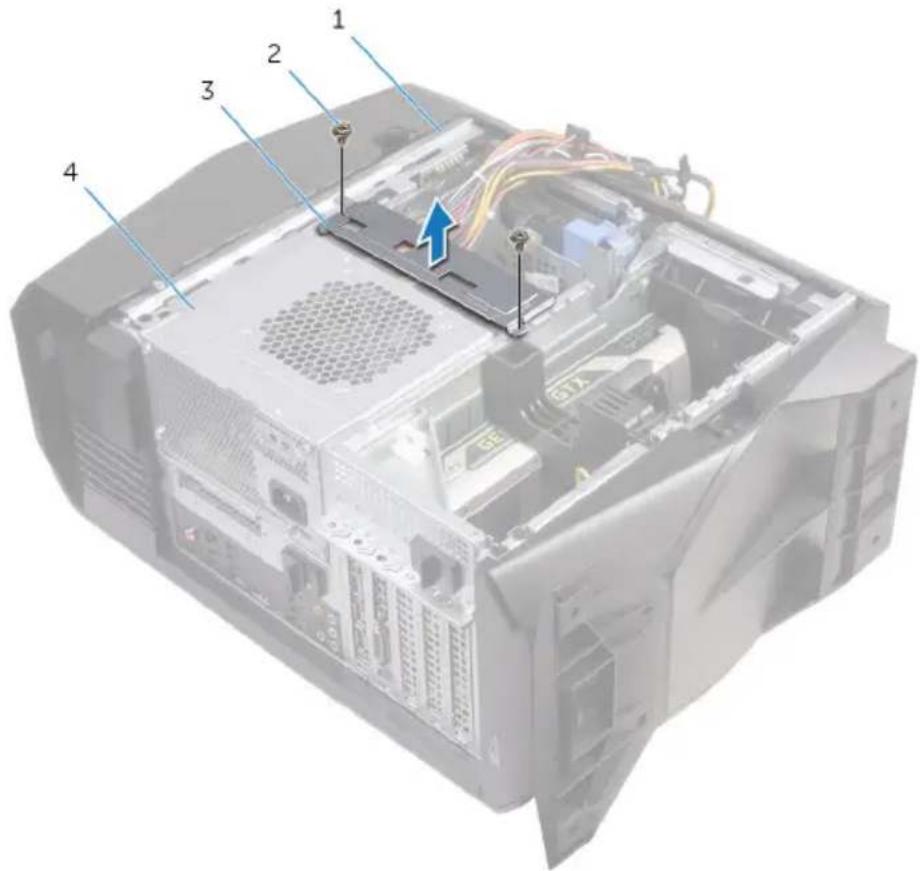
1 chassis 2 screws (2)
3 power-supply unit bracket 4 power-supply unit
11 Remove the screws that secure the power-supply unit to the chassis.
12 Lift the power-supply unit, along with the cables, off the chassis.

1 chassis 2 power-supply unit 3 screws (4)
Replacing the power-supply unit

WARNING: Before working inside your computer, read the safety information that shipped with your computer and follow the steps in Before working inside your computer. After working inside your computer, follow the instructions in After working inside your computer. For more safety best practices, see the Regulatory Compliance home page at www.dell.com/regulatory_compliance.
Procedure
1 Place the power supply on the chassis.
2 Align the screw holes on the power-supply unit with the screw holes on the chassis.
3 Replace the screws that secure the power-supply unit to the chassis.
4 Align the screw holes on the power-supply unit bracket with the screw holes on the power-supply unit cage.
5 Replace the screws that secure the power-supply unit bracket to the power-supply unit cage.
6 Slide the power supply unit release latches towards the unlock position.
7 Lift and rotate the power-supply unit cage away from the chassis while pressing and holding the graphics-card bracket.
8 Connect the power cables to the graphics card, hard drives, and optical drive.
9 Connect the processor-power cable and system-board power cable to the system board.
10 Rotate the power-supply unit cage towards the chassis until the unit snaps into place.
11 Slide the power supply unit cage release latches towards the locked position.
Post-requisites
Replace the left-side cover.
Removing the processor-cooling assembly

WARNING: Before working inside your computer, read the safety information that shipped with your computer and follow the steps in Before working inside your computer. After working inside your computer, follow the instructions in After working inside your computer. For more safety best practices, see the Regulatory Compliance home page at www.dell.com/regulatory_compliance.
Prerequisites
1 Remove the left-side cover.
2 Remove the right-side cover.
3 Remove the top cover.
Procedure
1 Remove the screws that secure the radiator and fan assembly to the radiator and fan cage.

natural_image
Interior view of a computer tower case showing internal components and ventilation duct (no text or symbols)Figure 19. Removing the processor-cooling assembly
1 screws (4) 2 radiator and fan cage
2 Follow the procedure from step 1 to step 4 in "Removing the power-supply unit".
3 Disconnect the processor-cooling assembly cables from the system board.
4 In sequential order (as indicated on the processor cooler), loosen the captive screws that secure the processor cooler to the system board.
5 Lift the processor-cooling assembly along with the cables off the computer.

Figure 20. Removing the processor-cooling assembly
1 processor-cooling assembly 2 processor-cooling
assembly cables
3 system board 4 captive screws (4)
Replacing the processor-cooling assembly

WARNING: Before working inside your computer, read the safety information that shipped with your computer and follow the steps in Before working inside your computer. After working inside your computer, follow the instructions in After working inside your computer. For more safety best practices, see the Regulatory Compliance home page at www.dell.com/regulatory_compliance.
Procedure
1 Slide the radiator and fan assembly into the radiator and fan cage.
2 Align the screw holes on the radiator and fan assembly with the screw holes on the radiator and fan cage.
3 Replace the screws that secure the radiator and fan assembly to the radiator and fan cage.
4 Align the screw holes on the processor cooler with the screw holes on the system board.
5 In sequential order (indicated on the processor cooler), tighten the captive screws that secure the processor cooler to the system board.
6 Connect the processor-cooling assembly cables to the system board.
7 Follow the procedure from step 10 to step 11 in "Replacing the power-supply unit".
8 Replace the screws that secure the radiator and fan assembly to the chassis.
Post-requisites
1 Replace the top cover.
2 Replace the right-side cover.
3 Replace the left-side cover.
Removing the coin-cell battery

WARNING: Before working inside your computer, read the safety information that shipped with your computer and follow the steps in Before working inside your computer. After working inside your computer, follow the instructions in After working inside your computer. For more safety best practices, see the Regulatory Compliance home page at www.dell.com/regulatory_compliance.

CAUTION: Removing the coin-cell battery resets the BIOS setup program's settings to default. It is recommended that you note the BIOS setup program's settings before removing the coin-cell battery.
Prerequisites
1 Remove the left-side cover.
2 Follow the procedure from step 1 to step 4 in "Removing the power-supply unit".
Procedure
1 Using a plastic scribe, press the battery-release lever away from the coin-cell battery until the coin-cell battery pops up.
2 Lift the coin-cell battery out of its socket.

Figure 21. Removing the coin-cell battery
1 battery-release lever 2 plastic scribe
3 coin-cell battery 4 coin-cell battery socket
Replacing the coin-cell battery

WARNING: Before working inside your computer, read the safety information that shipped with your computer and follow the steps in Before working inside your computer. After working inside your computer, follow the instructions in After working inside your computer. For more safety best practices, see the Regulatory Compliance home page at www.dell.com/regulatory_compliance.
Procedure
Insert a new coin-cell battery (CR2032) into the battery socket with the positive side facing up, and snap the battery into place.
Post-requisites
1 Follow the procedure from step 10 to step 11 in "Replacing the power-supply unit".
2 Replace the left-side cover.
Removing the memory modules

WARNING: Before working inside your computer, read the safety information that shipped with your computer and follow the steps in Before working inside your computer. After working inside your computer, follow the instructions in After working inside your computer. For more safety best practices, see the Regulatory Compliance home page at www.dell.com/regulatory_compliance.
Prerequisites
1 Remove the left-side cover.
2 Follow the procedure from step 1 to step 4 in "Removing the power-supply unit".
Procedure
1 Locate the memory-module slots on the system board. For more information, see "System-board components".
2 Push the securing clips away from the memory module.
3 Grasp the memory module near the securing clip, and then gently ease the memory module out of the memory-module slot.

NOTE: Repeat step 2 to step 3 to remove any other memory modules installed in your computer.

CAUTION: To prevent damage to the memory module, hold the memory module by the edges. Do not touch the components on the memory module.
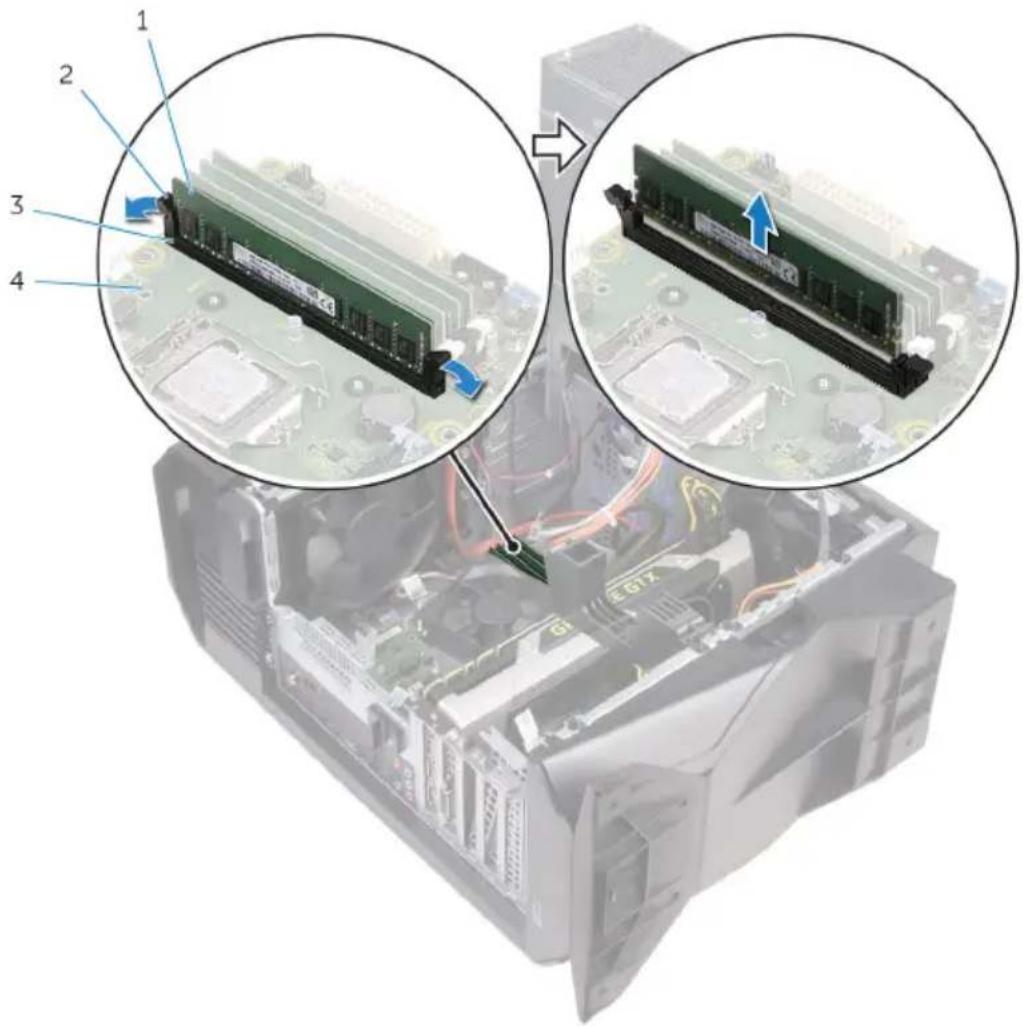
Figure 22. Removing the memory module
1 memory module 2 securing clips (2)
3 memory-module slot 4 system board
Replacing the memory modules

WARNING: Before working inside your computer, read the safety information that shipped with your computer and follow the steps in Before working inside your computer. After working inside your computer, follow the instructions in After working inside your computer. For more safety best practices, see the Regulatory Compliance home page at www.dell.com/regulatory_compliance.
Procedure
1 Ensure that the securing clips are extended away from the memory-module slot.
2 Align the notch on the memory module with the tab on the memory-module slot.
3 Insert the memory module into the memory-module slot and press the memory module down until it snaps into position and the securing clips lock in place.

Figure 23. Replacing the memory module
1 memory module 2 securing clips (2)
3 memory-module slot 4 system board

NOTE: Use slots XMM1 and XMM2 if you need to use two memory modules. For more information, see System-board components.
The following table lists the available memory configuration matrix:
Table 2. Memory configuration matrix
| Configuration | Slot |
| DIMM1 DIMM2 DIMM3 DIMM4 | |
| 8 GB 4 GB 4 GB | |
| 16 GB 8 GB 8 GB | |
| 24 GB 4 GB 4 GB 8 GB 8 GB | |
| 32 GB 8 GB 8 GB 8 GB 8 GB |
Post-requisites
1 Follow the procedure from step 10 to step 11 in "Replacing the power-supply unit".
2 Replace the left-side cover.
Removing the solid-state drive

WARNING: Before working inside your computer, read the safety information that shipped with your computer and follow the steps in Before working inside your computer. After working inside your computer, follow the instructions in After working inside your computer. For more safety best practices, see the Regulatory Compliance home page at www.dell.com/regulatory_compliance.

CAUTION: Solid-state drives are fragile. Exercise care when handling the solid-state drive.

CAUTION: To avoid data loss, do not remove the solid-state drive while the computer is in sleep or on state.
Prerequisites
1 Remove the left-side cover.
2 Follow the procedure from step 1 to step 4 in "Removing the power-supply unit".
3 Remove the graphics card.
Procedure
1 Locate the solid-state drive slot on the system board. For more information, see "System-board components".
2 Remove the screw that secures the solid-state drive to the system board.
3 Slide and lift the solid-state drive off the system board.

1 solid-state drive 2 screw
3 solid-state drive slot 4 system board
Replacing the solid-state drive

WARNING: Before working inside your computer, read the safety information that shipped with your computer and follow the steps in Before working inside your computer. After working inside your computer, follow the instructions in After working inside your computer. For more safety best practices, see the Regulatory Compliance home page at www.dell.com/regulatory_compliance.

CAUTION: Solid-state drives are fragile. Exercise care when handling the solid-state drive.
Procedure
1 Align the notch on the solid-state drive with the tab on the solid-state drive slot.
2 Insert the solid-state drive at a 45-degree angle into the system board.
3 Press the other end of the solid-state drive down and replace the screw that secure the solid-state drive to the system board.
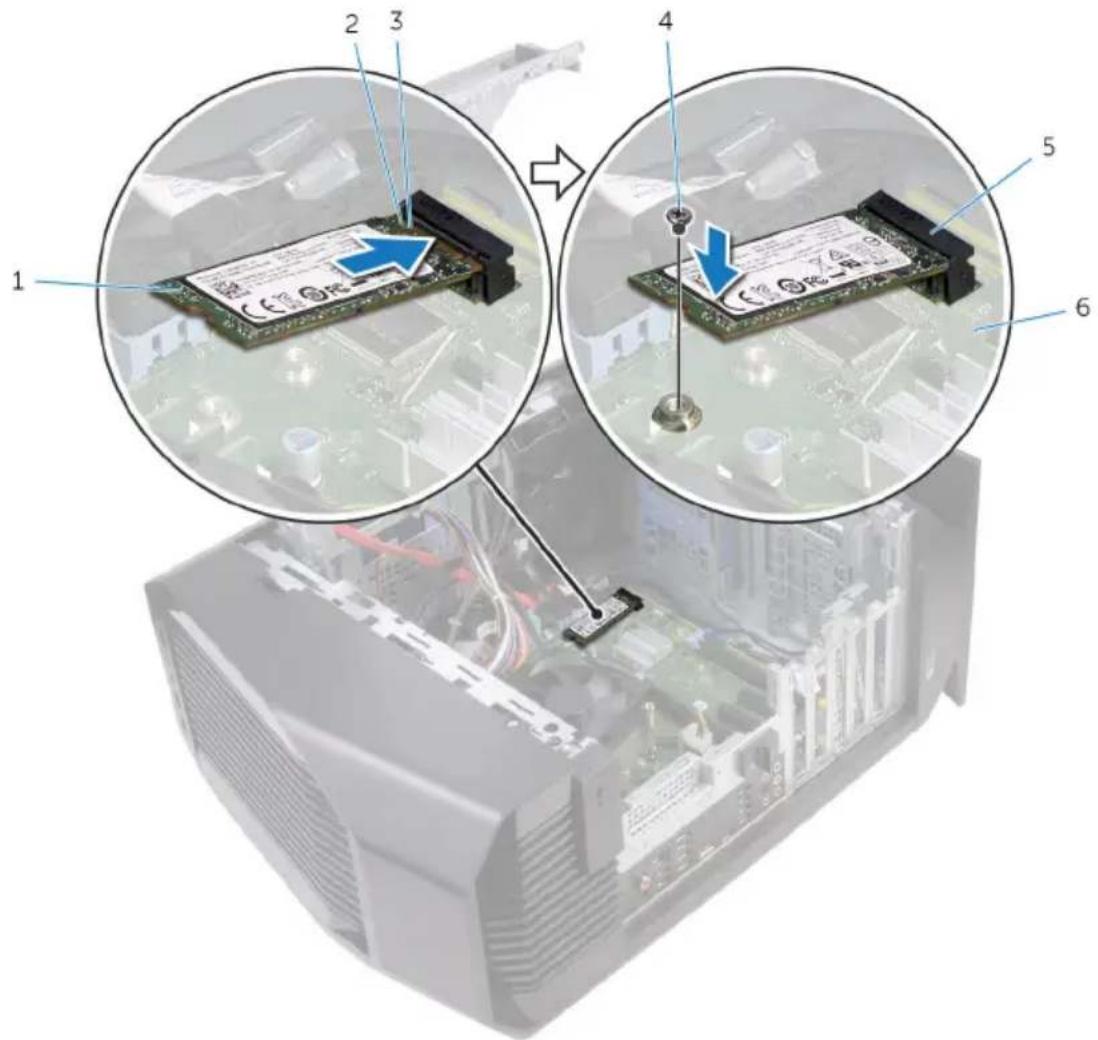
1 solid-state drive 2 notch
3 tab 4 screw
5 solid-state drive slot 6 system board
Post-requisites
1 Replace the graphics card.
2 Follow the procedure from step 10 to step 11 in "Replacing the power-supply unit".
3 Replace the left-side cover.
Removing the graphics card

WARNING: Before working inside your computer, read the safety information that shipped with your computer and follow the steps in Before working inside your computer. After working inside your computer, follow the instructions in After working inside your computer. For more safety best practices, see the Regulatory Compliance home page at www.dell.com/regulatory_compliance.
Prerequisites
1 Remove the left-side cover.
2 Follow the procedure from step 1 to step 4 in "Removing the power-supply unit".
Procedure
1 Lift to release the graphics-card bracket from the chassis.

natural_image
Interior view of an open computer case with visible CPU socket and internal components (no text or symbols)Figure 24. Removing the graphics card
1 graphics-card bracket 2 graphics card
2 Press the releasing clip on the power-cable connectors and disconnect the power cables from the graphics card.
3 Push the securing tab on the PCIe slot away from the graphics card, grasp the card by its top corner, and ease it out of the slot.
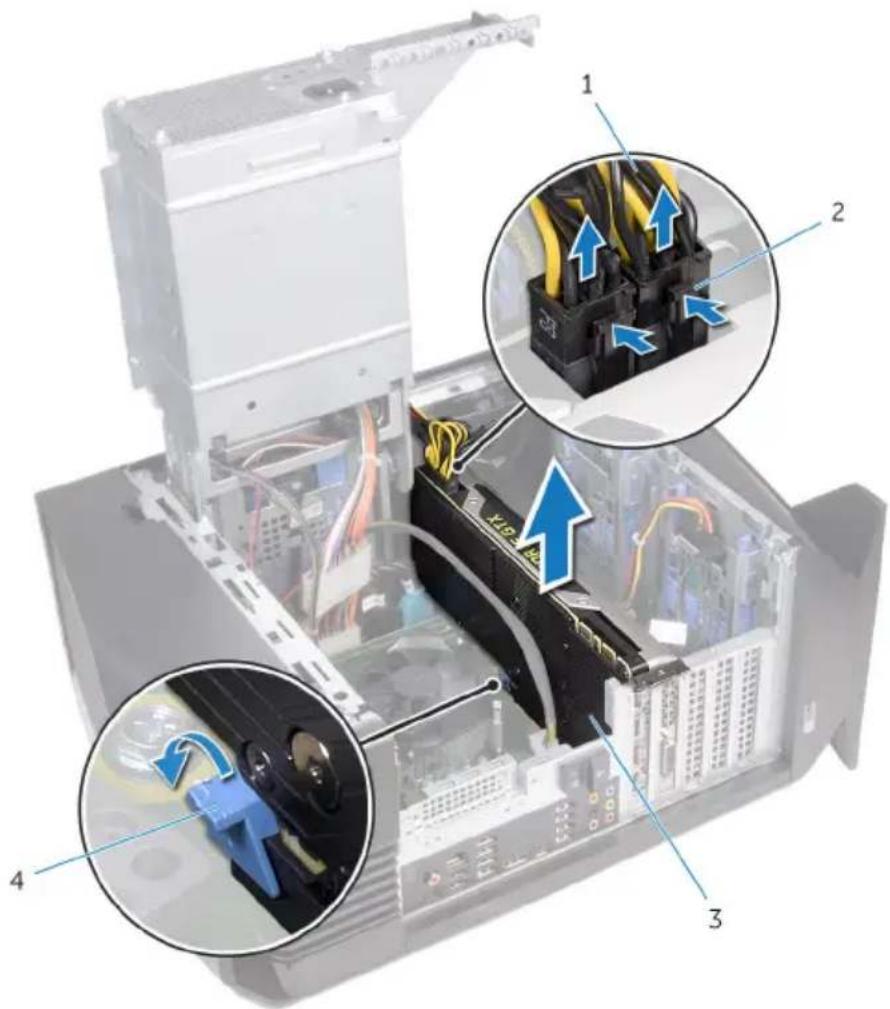
Figure 25. Removing the graphics card
1 power cables 2 releasing clips (2)
3 graphics card 4 securing tab
Replacing the graphics card

WARNING: Before working inside your computer, read the safety information that shipped with your computer and follow the steps in Before working inside your computer. After working inside your computer, follow the instructions in After working inside your computer. For more safety best practices, see the Regulatory Compliance home page at www.dell.com/regulatory_compliance.
Procedure
1 Align the graphics card with the slot on the system board.
2 Place the card into the slot and press down firmly until the graphics card snaps into place.
3 Connect the power cables to the graphics card.
4 Slide the tab on the graphics-card bracket into the slot on the chassis and snap it into place.
Post-requisites
1 Follow the procedure from step 10 to step 11 in "Replacing the power-supply unit".
2 Replace the left-side cover.
Removing the processor fan and heat-sink assembly

WARNING: Before working inside your computer, read the safety information that shipped with your computer and follow the steps in Before working inside your computer. After working inside your computer, follow the instructions in After working inside your computer. For more safety best practices, see the Regulatory Compliance home page at www.dell.com/regulatory_compliance.

WARNING: The heat sink may become hot during normal operation. Allow sufficient time for the heat sink to cool before you touch it.

CAUTION: For maximum cooling of the processor, do not touch the heat transfer areas on the heat sink. The oils in your skin can reduce the heat transfer capability of the thermal grease.
Prerequisites
1 Remove the left-side cover.
2 Follow the procedure from step 1 to step 4 in "Removing the power-supply unit".
Procedure
1 Disconnect the processor-fan cable from the system board.
2 In a non-adjacent sequence, loosen the captive screws that secure the processor fan and heat-sink assembly to the system board.
3 Lift the processor fan and heat-sink assembly off the system board.

Figure 26. Removing the heat sink assembly
1 processor-fan cable 2 captive screws (4)
3 processor fan and heat-sink assembly
Replacing the processor fan and heat-sink assembly

WARNING: Before working inside your computer, read the safety information that shipped with your computer and follow the steps in Before working inside your computer. After working inside your computer, follow the instructions in After working inside your computer. For more safety best practices, see the Regulatory Compliance home page at www.dell.com/regulatory_compliance.
Procedure

NOTE: The original thermal grease can be reused if the original processor and heat-sink assembly are reinstalled together.

CAUTION: If either the processor or the heat-sink assembly is replaced, use the thermal grease provided in the kit to ensure that thermal conductivity is achieved.
1 Place the processor fan and heat-sink assembly on the processor.
2 Align the captive screws on the processor fan heat-sink assembly with the screw holes on the system board.
3 In a non-adjacent sequence, tighten the captive screws that secure the processor fan and heat-sink assembly to the system board.
4 Connect the processor-fan cable to the system board.
Post-requisites
1 Follow the procedure from step 10 to step 11 in "Replacing the power-supply unit".
2 Replace the left-side cover.
Removing the processor

WARNING: Before working inside your computer, read the safety information that shipped with your computer and follow the steps in Before working inside your computer. After working inside your computer, follow the instructions in After working inside your computer. For more safety best practices, see the Regulatory Compliance home page at www.dell.com/regulatory_compliance.
Prerequisites
1 Remove the left-side cover.
2 Follow the procedure from step 1 to step 4 in "Removing the power-supply unit".
3 Remove the processor fan and heat-sink assembly or processor-cooling assembly (as applicable).
Procedure
1 Press the release lever down and then push it away from the processor to release it from the tab.
2 Extend the release lever completely and open the processor cover.
3 Lift the processor off the processor socket.
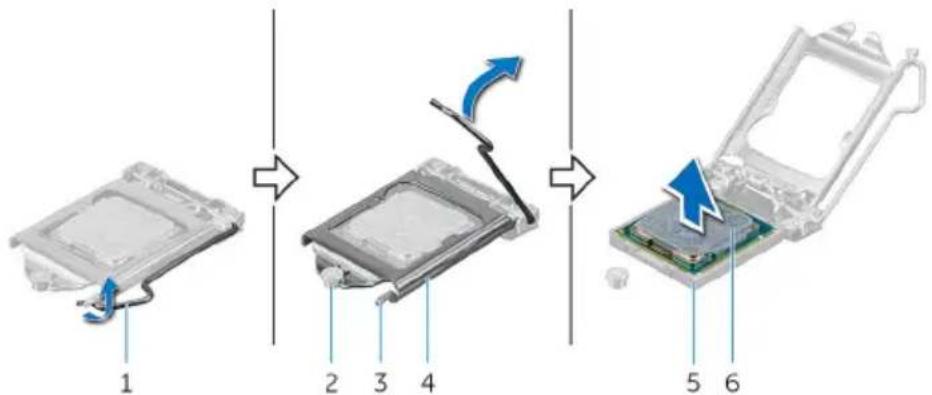
Figure 27. Removing the processor
1 release lever 2 alignment post
3 tab 4 processor cover
5 processor socket 6 processor
Replacing the processor

WARNING: Before working inside your computer, read the safety information that shipped with your computer and follow the steps in Before working inside your computer. After working inside your computer, follow the instructions in After working inside your computer. For more safety best practices, see the Regulatory Compliance home page at www.dell.com/regulatory_compliance.

CAUTION: If either the processor or the heat sink is replaced, use the thermal grease provided in the kit to ensure that thermal conductivity is achieved.

NOTE: A new processor ships with a thermal pad in the package. In some cases, the processor may ship with the thermal pad attached to it.
Procedure
1 Ensure that the release lever on the processor socket is fully extended and the processor cover is fully open.

CAUTION: Position the processor correctly in the processor socket to avoid permanent damage to the processor.
2 Align the pin-1 corner on the processor with the pin-1 corner on the processor socket, and then place the processor in the processor socket.

CAUTION: Ensure that the processor-cover notch is positioned underneath the alignment post.
3 When the processor is fully seated in the socket, close the processor cover.
4 Pivot the release lever down and place it under the tab on the processor cover.

Figure 28. Replacing the processor
1 processor socket 2 processor
3 alignment post 4 tab
5 processor cover 6 release lever
Post-requisites
1 Replace the processor fan and heat-sink assembly or processor-cooling assembly (as applicable).
2 Follow the procedure from step 10 to step 11 in "Replacing the power-supply unit".
3 Replace the left-side cover.
Removing the wireless card

WARNING: Before working inside your computer, read the safety information that shipped with your computer and follow the steps in Before working inside your computer. After working inside your computer, follow the instructions in After working inside your computer. For more safety best practices, see the Regulatory Compliance home page at www.dell.com/regulatory_compliance.
Prerequisites
1 Remove the left-side cover.
2 Follow the procedure from step 1 to step 4 in "Removing the power-supply unit".
Procedure
1 Remove the screw that secures the wireless card to the system board.
2 Lift the wireless-card bracket off the wireless card.
3 Disconnect the antenna cables from the wireless card.
4 Slide and remove the wireless card from the wireless-card slot.

Figure 29. Removing the wireless card
1 wireless-card bracket 2 screw
3 antenna cables 4 wireless-card slot
5 wireless card
Replacing the wireless card

WARNING: Before working inside your computer, read the safety information that shipped with your computer and follow the steps in Before working inside your computer. After working inside your computer, follow the instructions in After working inside your computer. For more safety best practices, see the Regulatory Compliance home page at www.dell.com/regulatory_compliance.
Procedure

CAUTION: To avoid damaging the wireless card, do not place any cables under it.
1 Align the notch on the wireless card with the tab on the wireless-card slot.
2 Slide the wireless card at an angle into the wireless-card slot.
3 Connect the antenna cables to the wireless card.
The following table provides the antenna-cable color scheme for the wireless card supported by your computer.
Table 3. Antenna-cable color scheme
Connectors on the wireless card Antenna-cable color
Main (white triangle) White
Auxiliary (black triangle) Black
4 Place the wireless-card bracket on the wireless card.
5 Replace the screw that secures the wireless card to the system board.
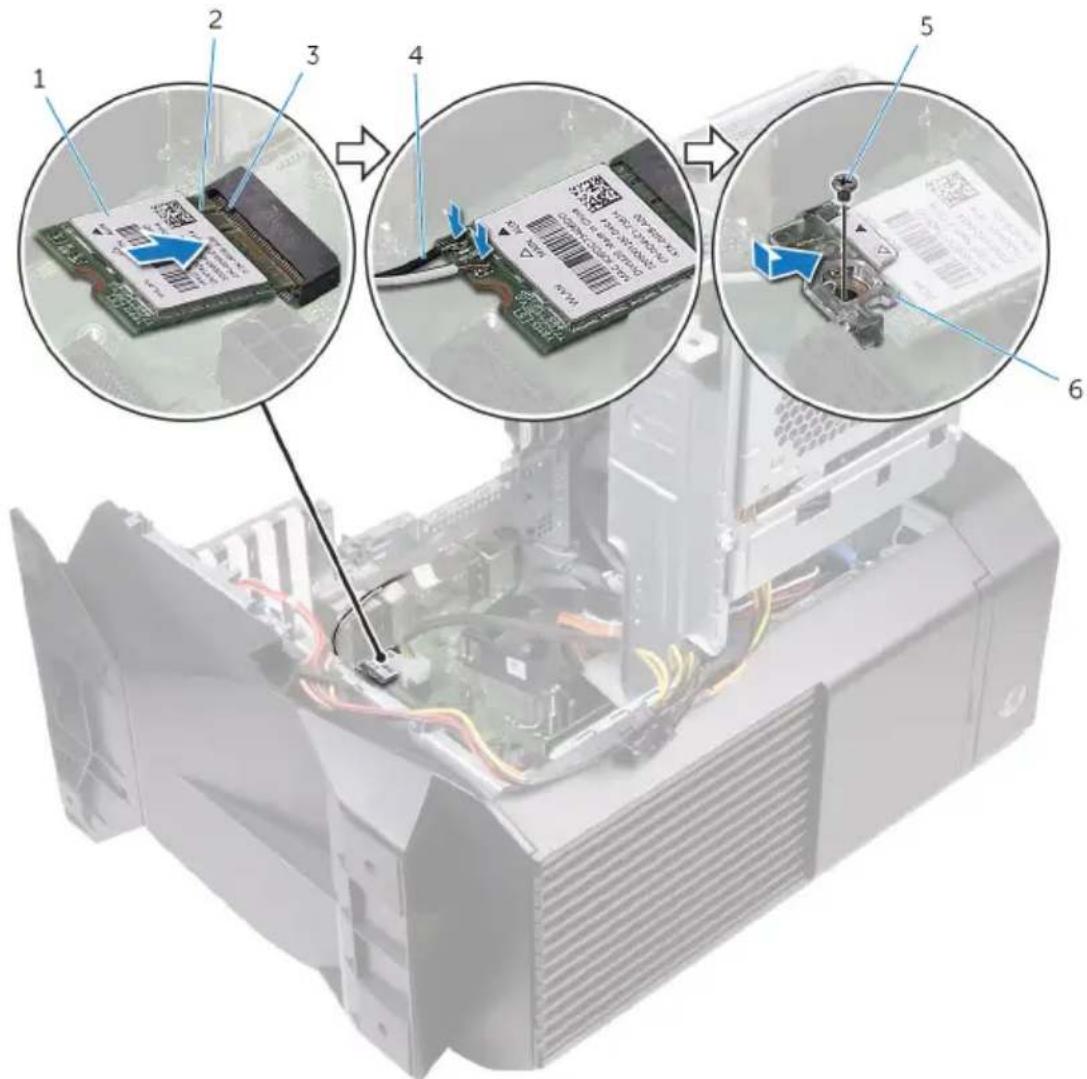
Figure 30. Replacing the wireless card
1 wireless card 2 notch
3 tab 4 antenna cables
5 screw 6 wireless-card bracket
Post-requisites
1 Follow the procedure from step 10 to step 11 in "Replacing the power-supply unit".
2 Replace the left-side cover.
Removing the antenna

WARNING: Before working inside your computer, read the safety information that shipped with your computer and follow the steps in Before working inside your computer. After working inside your computer, follow the instructions in After working inside your computer. For more safety best practices, see the Regulatory Compliance home page at www.dell.com/regulatory_compliance.
Prerequisites
1 Remove the left-side cover.
2 Remove the right-side cover.
3 Remove the top cover.
4 Follow the procedure from step 1 to step 4 in "Removing the wireless card".
Procedure
1 Note the antenna-cable routing and remove the antenna cables from the routing guides inside the chassis.
2 Push down the antenna cables towards the top of the computer through the cable-routing slot on the chassis.

Figure 31. Removing the antenna cables
1 antenna cables 2 routing guides
3 chassis
3 Remove the antenna cables from the routing guides on the chassis.
4 Pry the antenna off the chassis.

Figure 32. Removing the antenna cables
1 antenna 2 antenna cables
3 routing guides
Replacing the antenna

WARNING: Before working inside your computer, read the safety information that shipped with your computer and follow the steps in Before working inside your computer. After working inside your computer, follow the instructions in After working inside your computer. For more safety best practices, see the Regulatory Compliance home page at www.dell.com/regulatory_compliance.
Procedure
1 Adhere the antenna to the chassis.
2 Route the antenna cables through the routing guides on the chassis and slide the cables through the cable-routing slot on the chassis.
3 Route the antenna cables through the routing guides inside the chassis.
Post-requisites
1 Follow the procedure from step 1 to step 3 in "Replacing the wireless card".
2 Replace the top cover.
3 Replace the right-side cover.
4 Replace the left-side cover.
Removing the front-chassis fan

WARNING: Before working inside your computer, read the safety information that shipped with your computer and follow the steps in Before working inside your computer. After working inside your computer, follow the instructions in After working inside your computer. For more safety best practices, see the Regulatory Compliance home page at www.dell.com/regulatory_compliance.
Prerequisites
1 Remove the left-side cover.
2 Follow the procedure from step 1 to step 4 in "Removing the power-supply unit".
3 Remove the graphics card.
Procedure
1 Disconnect the front-chassis fan cable from the system board.
2 Push the tab to release the front-chassis fan from the chassis.
3 Slide and lift the chassis fan off the chassis.

Figure 33. Removing the chassis fan
1 tab 2 front-chassis fan bracket
3 front-chassis fan cable
4 Spread apart the tabs on the front-chassis fan bracket and lift the front-chassis fan along with its cable off the bracket.

natural_image
3D diagram of a computer CPU fan with labeled components (no text or symbols present)Figure 34. Removing the chassis fan
WARNING: Before working inside your computer, read the safety information that shipped with your computer and follow the steps in Before working inside your computer. After working inside your computer, follow the instructions in After working inside your computer. For more safety best practices, see the Regulatory Compliance home page at www.dell.com/regulatory_compliance.
Procedure
1 Align the tabs on the front-chassis fan bracket with the front-chassis fan and press down on the fan until it snaps into position.
2 Align the tabs on the front-chassis fan with the slots on the chassis and slide the fan until it snaps into position.
3 Connect the front-chassis fan cable to the system board.
Post-requisites
1 Replace the graphics card.
2 Follow the procedure from step 10 to step 11 in "Replacing the power-supply unit".
3 Replace the left-side cover.
Removing the top-chassis fan

WARNING: Before working inside your computer, read the safety information that shipped with your computer and follow the steps in Before working inside your computer. After working inside your computer, follow the instructions in After working inside your computer. For more safety best practices, see the Regulatory Compliance home page at www.dell.com/regulatory_compliance.
Prerequisites
1 Remove the left-side cover.
2 Follow the procedure from step 1 to step 4 in "Removing the power-supply unit".
Procedure
1 Remove the screw that secures the top-chassis fan to the chassis.
2 Disconnect the top-chassis fan cable from the system board.
3 Remove the top-chassis fan from the chassis.

Figure 35. Removing the top-chassis fan
1 chassis 2 screw
4 Remove the top-chassis fan cable from the routing guide on the top-chassis fan bracket.
5 Push the rubber grommets through the holes at each corner of the fan to release top-chassis fan from the bracket.
6 Lift the top-chassis fan off the top-chassis fan bracket.
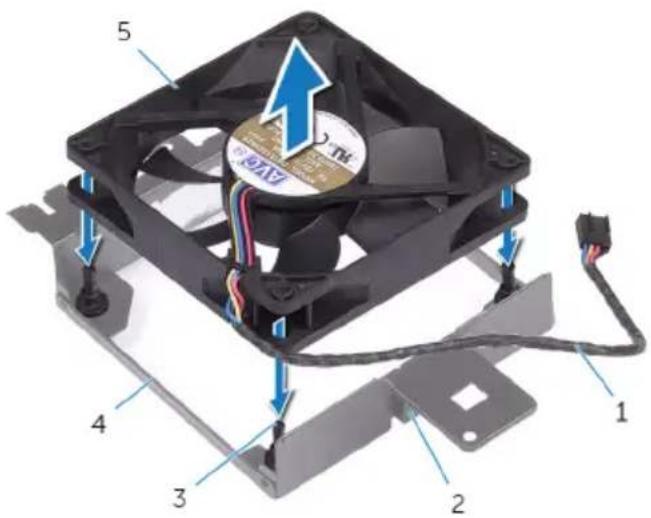
Figure 36. Removing the top-chassis fan
1 top-chassis fan cable 2 routing guide
3 rubber grommets (4) 4 top-chassis fan bracket
5 top-chassis fan
Replacing the top-chassis fan

WARNING: Before working inside your computer, read the safety information that shipped with your computer and follow the steps in Before working inside your computer. After working inside your computer, follow the instructions in After working inside your computer. For more safety best practices, see the Regulatory Compliance home page at www.dell.com/regulatory_compliance.
Procedure
1 Align the holes on the top-chassis fan with the holes on the top-chassis fan bracket.
2 Insert the ends of the rubber grommets through the holes at each corner of the fan.
3 Align the grommets in the fan with the holes at each corner of the top-chassis fan bracket and pull through until they snap into place.
4 Route the top-chassis fan cable through the routing guide on the bracket.
5 Align the tabs on the top-chassis fan with the slots on the chassis and slide the fan until it snaps into position.
6 Replace the screw that secures the top-chassis fan to the chassis.
7 Connect the top-chassis fan cable to the system board.
Post-requisites
1 Follow the procedure from step 10 to step 11 in "Replacing the power-supply unit".
2 Replace the left-side cover.
Removing the optical drive

WARNING: Before working inside your computer, read the safety information that shipped with your computer and follow the steps in Before working inside your computer. After working inside your computer, follow the instructions in After working inside your computer. For more safety best practices, see the Regulatory Compliance home page at www.dell.com/regulatory_compliance.
Prerequisites
1 Remove the left-side cover.
2 Follow the procedure from step 1 to step 4 in "Removing the power-supply unit".
Procedure
1 Disconnect the power and data cable from the optical-drive.
2 Pull the securing tab to release the optical-drive carrier from the chassis.

Figure 37. Disconnecting the power and data cables
1 optical-drive carrier 2 optical drive
3 securing tab 4 power cable
5 data cable
3 Push to slide the optical-drive assembly out through the front of the computer.

natural_image
3D cutaway view of a computer tower showing internal components and wiring (no text or symbols)Figure 38. Removing the optical drive
1 optical-drive assembly 2 chassis
4 Remove the screw that secures the optical-drive bracket to the optical drive.
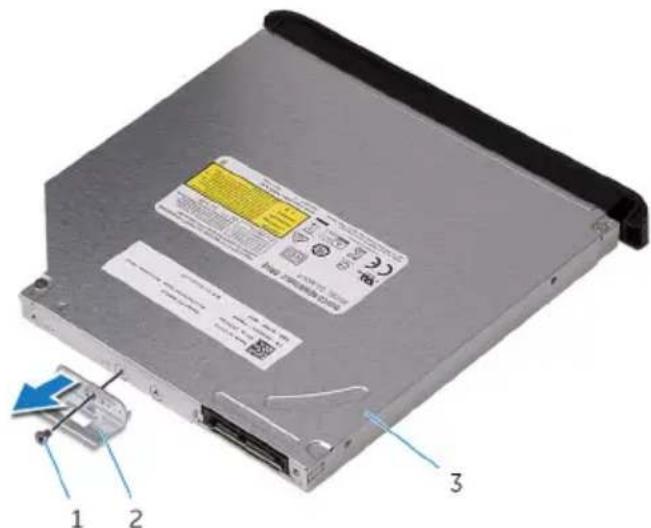
Figure 39. Removing the optical drive
1 screw 2 optical-drive bracket
3 optical drive
5 Gently pull and disconnect the optical-drive bezel from the optical drive.

natural_image
3D rendering of a computer drive chassis with labeled components (1 and 2), showing internal structure and mounting holes (no text or symbols beyond labels)Figure 40. Removing the optical drive
1 optical drive 2 optical-drive bezel
Replacing the optical drive

WARNING: Before working inside your computer, read the safety information that shipped with your computer and follow the steps in Before working inside your computer. After working inside your computer, follow the instructions in After working inside your computer. For more safety best practices, see the Regulatory Compliance home page at www.dell.com/regulatory_compliance.
Procedure
1 Align and snap the optical-drive bezel to the optical drive.
2 Align the screw hole on the optical-drive bracket with the screw hole on the optical drive.
3 Replace the screw that secures the optical-drive bracket to the optical drive.
4 Lift the securing tab and slide the optical-drive assembly through the front of the computer until the securing tab snaps into place.
5 Connect the data and power cables to the optical drive.
Post-requisites
1 Follow the procedure from step 10 to step 11 in "Replacing the power-supply unit".
2 Replace the left-side cover.
Removing the front bezel

WARNING: Before working inside your computer, read the safety information that shipped with your computer and follow the steps in Before working inside your computer. After working inside your computer, follow the instructions in After working inside your computer. For more safety best practices, see the Regulatory Compliance home page at www.dell.com/regulatory_compliance.
Prerequisites
1 Remove the left-side cover.
2 Remove the right-side cover.
3 Follow the procedure from step 1 to step 3 in "Removing the optical drive".
4 Remove the top cover.
Procedure
1 Place the computer in an upright position.
2 Grasp and release the front bezel tabs sequentially from the top, by moving them outward from the front panel.
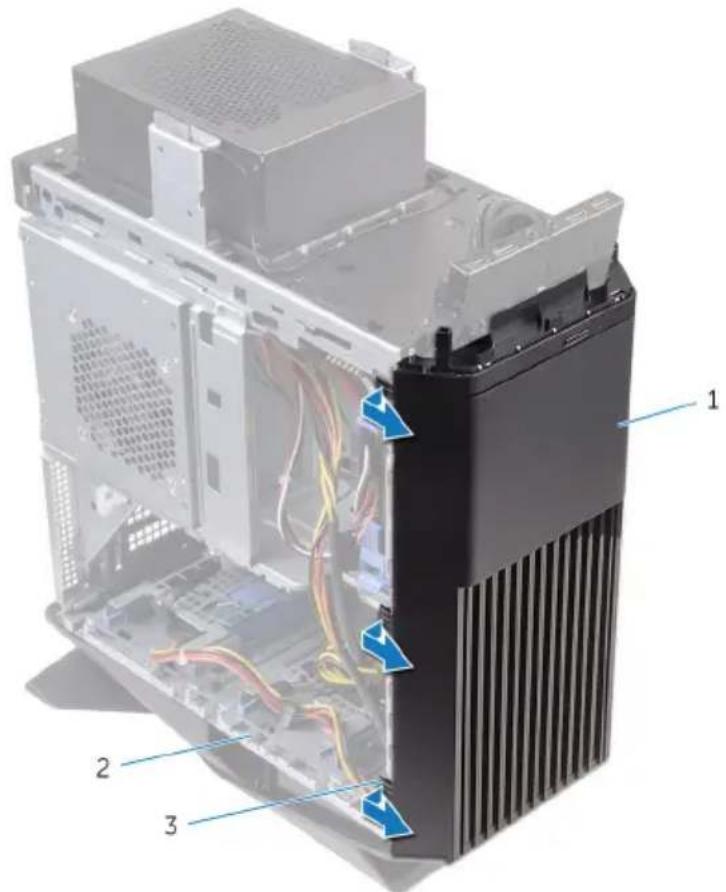
Figure 41. Removing the front bezel
1 front bezel 2 chassis
3 tabs
3 Rotate and pull the front bezel away from the front of the chassis to release the tabs on the front bezel from the slots on the front panel.

Figure 42. Removing the front bezel
1 chassis 2 tabs
3 front bezel
Replacing the front bezel

WARNING: Before working inside your computer, read the safety information that shipped with your computer and follow the steps in Before working inside your computer. After working inside your computer, follow the instructions in After working inside your computer. For more safety best practices, see the Regulatory Compliance home page at www.dell.com/regulatory_compliance.
Procedure
1 Align and insert the front bezel tabs into the front panel slots.
2 Rotate the front bezel towards the chassis until the front bezel tabs snap into place.
Post-requisites
1 Replace the top cover.
2 Follow the procedure from step 4 to step 5 in "Replacing the optical drive".
3 Replace the right-side cover.
4 Replace the left-side cover.
Removing the power-button board

WARNING: Before working inside your computer, read the safety information that shipped with your computer and follow the steps in Before working inside your computer. After working inside your computer, follow the instructions in After working inside your computer. For more safety best practices, see the Regulatory Compliance home page at www.dell.com/regulatory_compliance.
Prerequisites
1 Remove the left-side cover.
2 Remove the right-side cover.
3 Remove the top cover.
Procedure
1 Note the power-button module cable routing and remove the cable from the routing guides on the top cover.
2 Remove the screws that secure the power-button module to the top cover.
3 Lift the power-button module off the top cover.
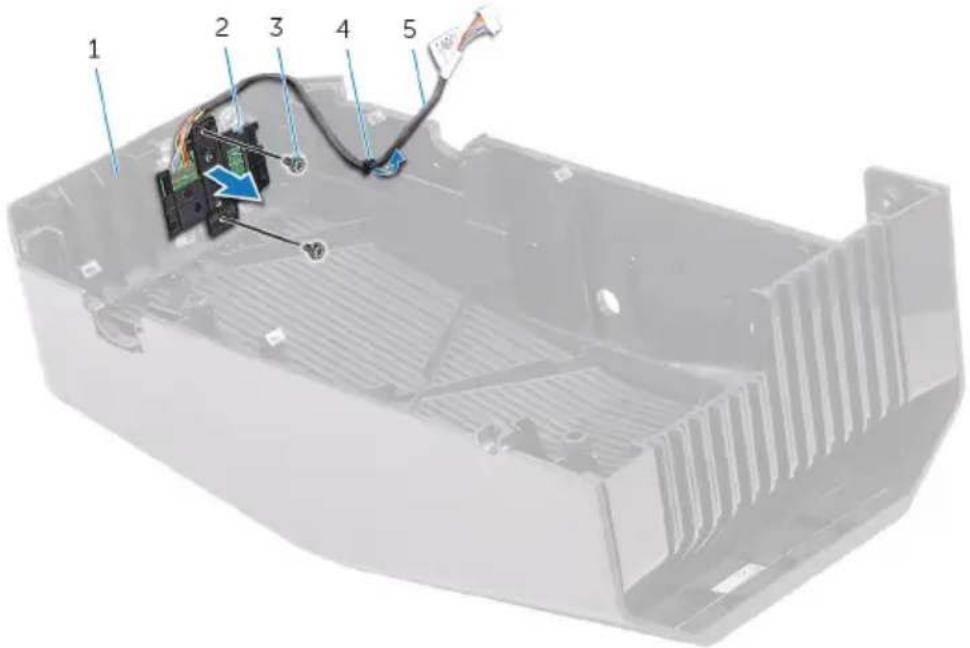
Figure 43. Removing the power-button module
1 top cover 2 power-button module
3 screws (2) 4 routing guide
5 power-button module cable
4 Release the power-button board from under the tabs on the power-button board bracket.
5 Lift the power-button board along with the cable off the power-button board bracket.

Figure 44. Removing the power-button module
1 power-button board bracket 2 power-button board
3 tabs (4) 4 power-button module cable
Replacing the power-button board

WARNING: Before working inside your computer, read the safety information that shipped with your computer and follow the steps in Before working inside your computer. After working inside your computer, follow the instructions in After working inside your computer. For more safety best practices, see the Regulatory Compliance home page at www.dell.com/regulatory_compliance.
Procedure
1 Align and slide the power-button board on the power-button board bracket and snap it into place.
2 Align the screw holes on the power-button module with the screw holes on the top cover.
3 Replace the screws that secure the power-button module to the top cover.
4 Route the power-button module cable through the routing guide on the top cover.
Post-requisites
1 Replace the top cover.
2 Replace the right-side cover.
3 Replace the left-side cover.
Removing the rear trim cover

WARNING: Before working inside your computer, read the safety information that shipped with your computer and follow the steps in Before working inside your computer. After working inside your computer, follow the instructions in After working inside your computer. For more safety best practices, see the Regulatory Compliance home page at www.dell.com/regulatory_compliance.
Prerequisites
1 Remove the left-side cover.
2 Remove the right-side cover.
3 Remove the top cover.
Procedure
1 Place the computer in an upright position.
2 Using the tab, slide and remove the rear trim cover from the chassis.

Figure 45. Removing the rear trim cover
1 chassis 2 rear trim cover
Replacing the rear trim cover

WARNING: Before working inside your computer, read the safety information that shipped with your computer and follow the steps in Before working inside your computer. After working inside your computer, follow the instructions in After working inside your computer. For more safety best practices, see the Regulatory Compliance home page at www.dell.com/regulatory_compliance.
Procedure
Align the tabs on the rear trim cover with the slots on the chassis and snap the cover to lock it in place.
Post-requisites
1 Replace the top cover.
2 Replace the right-side cover.
3 Replace the left-side cover.
Removing the system board

WARNING: Before working inside your computer, read the safety information that shipped with your computer and follow the steps in Before working inside your computer. After working inside your computer, follow the instructions in After working inside your computer. For more safety best practices, see the Regulatory Compliance home page at www.dell.com/regulatory_compliance.

NOTE: Your computer's Service Tag is stored in the system board. You must enter the Service Tag in the BIOS setup program after you replace the system board.

NOTE: Replacing the system board removes any changes you have made to the BIOS using the BIOS setup program. You must make the appropriate changes again after you replace the system board.

NOTE: Before disconnecting the cables from the system board, note the location of the connectors so that you can reconnect the cables correctly after you replace the system board.
Prerequisites
1 Remove the left-side cover.
2 Follow the procedure from step 1 to step 4 in "Removing the power-supply unit".
3 Remove the memory modules.
4 Remove the solid-state drive.
5 Remove the wireless card.
6 Remove the processor fan and heat-sink assembly.
7 Remove the graphics card.
8 Remove the processor.
Procedure

NOTE: Note the routing of all cables as you remove them so that you can reroute them correctly after you replace the system board. For information on system board connectors, see "System-board components".
1 Disconnect all the cables connected to the system-board assembly.

Figure 46. Removing the system board
1 Top panel USB cables (SSUSB)
3 SATA 6 Gbps drive cable (SATA2)
5 front-panel audio cable (F_AUDIO)
7 graphics-card power cable (GPU_POWER)
9 top-chassis fan cable (TOP_FAN)
11 front-chassis fan cable (FRONT_FAN)
2 SATA 6 Gbps drive cable (SATA1)
4 system board
6 LED controller cable (LED_CONTROLLER)
8 processor power cable (ATX_CPU)
10 system-board power cable
2 Remove the screws that secure the system-board assembly to the chassis.
3 Lift the system-board assembly out of the chassis.

Figure 47. Removing the system board
1 chassis 2 system board
3 screws (8)
Replacing the system board

WARNING: Before working inside your computer, read the safety information that shipped with your computer and follow the steps in Before working inside your computer. After working inside your computer, follow the instructions in After working inside your computer. For more safety best practices, see the Regulatory Compliance home page at www.dell.com/regulatory_compliance.

NOTE: Your computer's Service Tag is stored in the system board. You must enter the Service Tag in the BIOS setup program after you replace the system board.

NOTE: Replacing the system board removes any changes you have made to the BIOS using the BIOS setup program. You must make the appropriate changes again after you replace the system board.
Procedure
1 Align the system-board assembly with the slots on the chassis and place the system-board assembly in position.
2 Slide the system-board assembly to engage the latches that secure it to the chassis.
3 Replace the screws that secure the system-board assembly to the chassis.
4 Route and connect the cables that you disconnected from the system-board assembly.
Post-requisites
1 Replace the processor.
2 Replace the graphics card.
3 Replace the processor fan and heat-sink assembly.
4 Replace the wireless card.
5 Replace the solid-state drive.
6 Replace the memory modules.
7 Follow the procedure from step 10 to step 11 in "Replacing the power-supply unit".
8 Replace the left-side cover.
Entering the Service Tag in the BIOS setup program
1 Turn on or restart your computer.
2 Press F2 when the AlienHead logo is displayed to enter the BIOS setup program.
3 Navigate to the Main tab and enter the Service Tag in the Service Tag Input field.
BIOS overview

CAUTION: Unless you are an expert computer user, do not change the settings in the BIOS Setup program. Certain changes can make your computer work incorrectly.

NOTE: Before you change BIOS Setup program, it is recommended that you write down the BIOS Setup program screen information for future reference.
Use the BIOS Setup program for the following purposes:
- Get information about the hardware installed in your computer, such as the amount of RAM and the size of the hard drive.
- Change the system configuration information.
- Set or change a user-selectable option, such as the user password, type of hard drive installed, and enabling or disabling base devices.
Entering BIOS setup program
1 Turn on (or restart) your computer.
2 During POST, when the AlienHead logo is displayed, watch for the F2 prompt to appear, and then press F2 immediately.

NOTE: The F2 prompt indicates that the keyboard is initialized. This prompt can appear very quickly, so you must watch for it, and then press F2. If you press F2 before the F2 prompt, this keystroke is lost. If you wait too long and the operating system logo appears, continue to wait until you see the desktop. Then, turn off your computer and try again.
System setup options

NOTE: Depending on your computer and its installed devices, the items listed in this section may or may not appear.
Table 4. System setup options—Main menu
| Main |
| System Date Displays the current date in mm/dd/yyyy format. |
| System Time Displays the current time inhh:mm:ss format. |
| BIOS Information |
| BIOS Version Displays the BIOS version number. |
| Product Information |
| Product Name Displays the product name. Default:Alienware Aurora R5. |
| Service Tag Displays the service tag of yourcomputer. |
| Asset Tag Displays the asset tag of yourcomputer. |
| Memory Information |
| System Memory Displays the total computer memoryinstalled. |
| Memory Speed Displays the memory speed. |
| CPU Information |
| CPU Type Displays the processor type |
| CPU Speed Displays the speed of theprocessor. |
| CPU ID Displays the processor identificationcode. |
| Cache L1 Displays the processor L1 cachesize. |
| Cache L2 Displays the processor L2 cachesize. |
| Cache L3 Displays the processor L3 cachesize. |
Table 5. System setup options—Advanced menu
| Advanced | |
| Advanced BIOS Features | |
| Intel SpeedStep Allows you to enable or disable IntelSpeedstep Technology. Default: Enabled. | |
| NOTE: If enabled, the processor clock speed and core voltage are adjusted dynamically based on the processor load. | |
| Virtualization Allows you to enable or disable IntelVirtualization Technology feature for the processor. | |
| VT for Direct I/O Allows you to enable or disable IntelVirtualization Technology feature for the Direct I/O. | |
| SATA Operation Allows you to configure the operating mode of the integrated SATA hard drive controller. | |
| Intel Ready Mode Technology Allows you to enable or disable the Intel Ready Mode Technology. | |
| Intel Software Guard Extensions Allows you to enable or disable Intel Software Guard Extensions. | |
| BIOS Recovery from Hard Drive Allows you to enable or disable BIOS Recovery from hard drive. | |
USB Configuration
Front USB Ports Allows you to enable or disable the front USB ports.
Rear USB Ports Allows you to enable or disable the rear USB ports.
Power Options
Numlock Key Allows you to set the status of the Num Lock key during boot to On or Off.
Advanced
Wake Up by Integrated LAN Allow the computer to be powered on by special LAN signals.
AC Recovery Sets what action the computer takes when power is restored.
Deep Sleep Control Allows you to define the controls when Deep Sleep is enabled.
USB Wake Support (S3) Allows you to enable the USB devices to wake the system from Standby.
USB PowerShare (S4/S5) Allows you to charge external devices.
USB PowerShare Wake Support (S4/S5) Allows you to enable front the USB devices to wake the system from S4/S5.
Auto Power On
Auto Power On Mode Allows you to set the computer to turn on automatically every day or on a preselected date. This option can be configured only if the Auto Power On mode is set to Enabled Everyday or Selected Day.
Auto Power On Date Allows you to set the date on which the computer must turn on automatically. This option can be configured only if the Auto Power On mode is set to Enabled 1 to 31.
Auto Power On Time Allows you to set the time at which the computer must turn on automatically. This option can be configured only if the Auto Power On mode is set to Enabled hh:mm:ss.
Performance Options
Overclocking Feature
Core Over Clocking Level Allows you enable or disable the OC level1/level2 setting and adjust the
Advanced
processor flex ratio and voltage in the Customization mode.
Computrace Allows you to enable or disable the Computrace service using the Absolute software.
Core Ratio Limit Override Allows you to set the core ratio limit.
Single Core Allows you to select single core or multiple cores.
Core Voltage Mode Allows you to select between adaptive and override voltage modes.
Core Voltage Offset Allows you to set the override value of core voltage.
Long Duration PWR Limit Allows you to set the turbo mode power limit.
Short Duration PWR Limit Options Allows you to set the turbo mode power limit.
XMP Memory Allows you to set the XMP memory.
Table 6. System setup options—Security menu
| Security | |
| Admin Password Status Displays whether the admin password is set. | |
| System Password Status Displays whether the system password is set. | |
| HDD Password Status Displays if the hard drive password is set. | |
| Admin Password Displays the admin password. | |
| System Password Displays the system password. | |
| HDD Password Displays the hard drive password. | |
| Firmware TPM Displays the firmware TPM. |
Table 7. System setup options—Boot menu
| Boot |
| Boot List Option Displays the available boot devices. |
| File Browser Add Boot Option Allows you to set the boot path in the boot option list. |
| File Browser Del Boot Option Allows you to delete the boot path in the boot option list. |
| Secure Boot Control Allows you to enable or disable the secure boot control. |
| Load Legacy OPROM Allows you to enable or disable the Legacy Option ROM. |
| Boot Option Priorities Displays the available boot devices. |
| Boot Option #1 Displays the first boot device. Default: UEFI: Windows Boot Manager. |
| Boot Option #2 Displays the second boot device. Default: Onboard NIC Device. |
| Boot Option #3 Displays the third boot device. Default: Onboard NIC Device. |
Table 8. System setup options—Exit menu
| Save & Exit |
| Save Changes and Reset Allows you to exit system setup and save your changes. |
| Discard Changes and Reset Allows you to exit system setup and load previous values for all system setup options. |
| Restore Defaults Allows you to load default values for all system setup options. |
| Discard Changes Allows you to exit your changes. |
| Save Changes Allows you to save your changes. |
Clearing forgotten passwords

WARNING: Before working inside your computer, read the safety information that shipped with your computer and follow the steps in Before working inside your computer. After working inside your computer, follow the instructions in After working inside your computer. For more safety best practices, see the Regulatory Compliance home page at www.dell.com/regulatory_compliance.
Prerequisites
1 Remove the left-side cover.
2 Follow the procedure from step 1 to step 4 in "Removing the power-supply unit".
Procedure
1 Locate the password jumper (P215) on the system board.
For information on the location of the Password jumper, see System-board components.
2 Remove the jumper plug from pins 215.
3 Follow the procedure from step 8 to step 9 in "Replacing the power-supply unit".
4 Replace the left-side cover.
5 Turn on your computer and wait until the operating system is completely loaded.
6 Shut down your computer.
7 Remove the left-side cover.
8 Follow the procedure from step 1 to step 3 in "Removing the power-supply unit".
9 Replace the jumper plug on pins 215.

flowchart
graph TD
    A["1 Server Rack"] --> B["2 Data Flow"]
    B --> C["3 Data Flow"]
    style A fill:#f9f,stroke:#333
    style B fill:#bbf,stroke:#333
    style C fill:#bfb,stroke:#333
Figure 48. Clearing forgotten passwords
1 jumper plug 2 P215
Post-requisites
1 Follow the procedure from step 10 to step 11 in "Replacing the power-supply unit".
2 Replace the left-side cover.
Clearing CMOS Settings

WARNING: Before working inside your computer, read the safety information that shipped with your computer and follow the steps in Before working inside your computer. After working inside your computer, follow the instructions in After working inside your computer. For more safety best practices, see the Regulatory Compliance home page at www.dell.com/regulatory_compliance.
Prerequisites
1 Remove the left-side cover.
2 Follow the procedure from step 1 to step 4 in "Removing the power-supply unit".
Procedure
1 Locate the CMOS jumper (P217) on the system board.
For information on the location of the CMOS jumper, see "System-board components".
2 Disconnect the system-board power cable from the system board.
3 Remove the jumper plug from pins 217 and replace it on pins 216 (P216).
4 Wait for 5 seconds.
5 Remove the jumper plug from pins 216 and replace it on pins 217.
6 Connect the system-board power cable to the system board.

flowchart
graph TD
    A["Server Rack"] --> B["Data Unit 1"]
    A --> C["Data Unit 2"]
    A --> D["Data Unit 3"]
    A --> E["Data Unit 4"]
    style A fill:#f9f,stroke:#333
    style B fill:#bbf,stroke:#333
    style C fill:#bbf,stroke:#333
    style D fill:#bbf,stroke:#333
    style E fill:#bbf,stroke:#333
Figure 49. Clearing CMOS settings
1 jumper plug 2 P217
3 P216 4 system board
Post-requisites
1 Follow the procedure from step 10 to step 11 in "Replacing the power-supply unit".
2 Replace the left-side cover.
You may need to flash (update) the BIOS when an update is available or when you replace the system board. To flash the BIOS:
1 Turn on your computer.
2 Go to www.dell.com/support.
3 Click Product support, enter the Service Tag of your computer, and then click Submit.

NOTE: If you do not have the Service Tag, use the auto-detect feature or manually browse for your computer model.
4 Click Drivers & downloads → Find it myself.
5 Select the operating system installed on your computer.
6 Scroll down the page and expand BIOS.
7 Click Download to download the latest version of the BIOS for your computer.
8 After the download is complete, navigate to the folder where you saved the BIOS update file.
9 Double-click the BIOS update file icon and follow the instructions on the screen.
Technology and components
Audio
Alienware Aurora R5is shipped with Realtek ALC3861 for optical S/PDIF output.

NOTE: The audio drivers are already installed when you receive your computer.
Downloading the audio driver
1 Turn on your computer.
2 Go to www.dell.com/support.
3 Click Product support, enter the Service Tag of your computer and then click Submit.

NOTE: If you do not have the Service Tag, use the auto-detect feature or manually browse for your computer model.
4 Click Drivers & downloads → Find it myself.
5 Scroll down the page and expand Audio.
6 Click Download to download the audio driver for your computer.
7 After the download is complete, navigate to the folder where you saved the audio driver file.
8 Double-click the audio driver file icon and follow the instructions on the screen to install the driver.
Identifying the audio controller
1 On the taskbar, click the search box, and then type Device Manager.
2 Click Device Manager.
The Device Manager window is displayed.
3 Expand Sound, video and game controllers to view the audio controller. Table 9. Audio controller status in Device Manager
Before installation After installation


Sound, video and game controllers
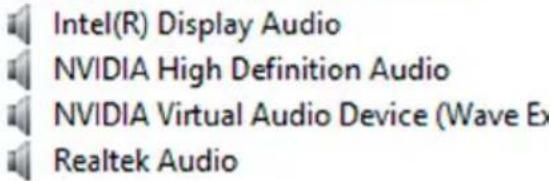
Changing the audio settings
1 On the taskbar, click the search box, and then type Dell Audio.
2 Click Dell Audio and change the audio settings as required.
Graphics
Alienware Aurora R6 is shipped with the following graphics options: Table 10. Video specifications
Integrated:
Controller Intel HD Graphics 630
Memory Shared system memory
Discrete:
Type Up to two PCI-Express X16, single-width/double-width, full length (maximum 10.5 inches)

NOTE: The graphics configuration of your desktop varies depending on the graphics card configuration ordered.
Controller
- AMD or NVIDIA
• Also supports Dual AMD or NVIDIA (SLI)
Memory Up to 12 GB
Downloading the graphics driver
1 Turn on your computer.
2 Go to www.dell.com/support.
3 Click Product support enter the Service Tag of your computer, and then click Submit.

NOTE: If you do not have the Service Tag, use the auto-detect feature or manually browse for your computer model.
4 Click Drivers & downloads → Find it myself.
5 Scroll down the page and expand Video.
6 Click Download to download the graphics driver for your computer.
7 After the download is complete, navigate to the folder where you saved the graphics driver file.
8 Double-click the graphics driver file icon and follow the instructions on the screen.
Identifying the display adapter
1 On the taskbar, click the search box, and then type Device Manager.
2 Click Device Manager.
The Device Manager window is displayed.
3 Expand Display adapters.

Display adapters

Intel(R) HD Graphics 630

NVIDIA GeForce GTX 1070
Changing the screen resolution
1 Right-click on your desktop and select Display settings.
2 Click Advanced display settings.
3 Select the appropriate resolution from the drop-down list.
4 Click Apply.

Rotating the display
1 Right-click on your desktop.
2 Select Graphics Options → Rotation and select from the listed options.

The display can be also rotated by selecting Rotate Display under the Display menu in the NVIDIA Control Panel.
For computers shipped with the AMD video card, the display can be rotated by selecting the required rotation on Rotate Desktop tab in the AMD Catalyst Control Center.

USB
The following table shows the USB ports available in Alienware Aurora R6.
Table 11. USB ports and its location
Ports Location
USB 3.0 Two on the front side
USB 3.0 with PowerShare Two on the front side
USB 2.0 Six on the back panel
USB 3.1 Type-C One on the back panel
USB 3.1 One on the back panel
USB 3.0 Three on the back panel

NOTE: USB 3.0 needs the driver to be installed before it can detect any USB devices.
Downloading the USB 2.0 and USB 3.0 driver
1 Turn on your computer.
2 Go to www.dell.com/support.
3 Click Product support enter the Service Tag of your computer, and then click Submit.

NOTE: If you do not have the Service Tag, use the auto-detect feature or manually browse for your computer model.
4 Click Drivers & downloads → Find it myself.
5 Scroll down the page and expand Chipset.
6 Click Download to download the USB 2.0 or USB 3.0 driver for your computer.
7 After the download is complete, navigate to the folder where you saved the USB 2.0 or USB 3.0 driver file.
8 Double-click the driver file icon and follow the instructions on screen.
Identifying the USB drivers
1 On the taskbar, click the search box, and then type Device Manager.
2 Click Device Manager.
The Device Manager window is displayed.
3 Expand System devices.
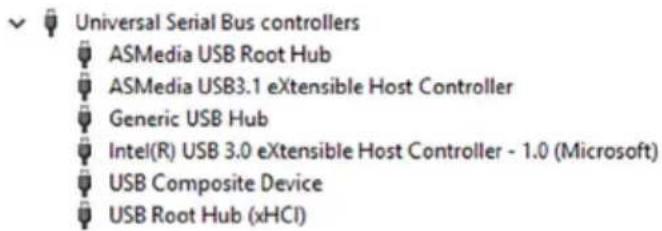
Enabling or disabling the USB in BIOS setup program
1 Turn on or restart your computer.
2 Press F2 when the AlienHead logo is displayed on the screen to enter the BIOS setup program.
The BIOS setup program is displayed.
3 On the Advanced tab, select USB Configuration.
4 Select the Front USB Ports or Rear USB Ports options to enable or disable the ports respectively.
5 Save the BIOS setup program settings and exit.
Fixing a no-boot issue caused by USB emulation
Sometimes the computer does not boot to the operating system when USB devices are connected to the computer during startup. This behavior occurs because the computer is looking for bootable files in the USB devices. Follow these steps to fix the no-boot issue:
1 Turn on or restart your computer.
2 Press F2 when the AlienHead logo is displayed on the screen to enter the BIOS setup program.
The BIOS setup program is displayed.
3 On the Advanced tab, select USB Configuration.
4 Select the USB Boot Support to disable it.
5 Save the settings and exit.
Wi-Fi
Alienware Aurora R6 is shipped with Wi-Fi 802.11b/g/n or Wi-Fi 802.11ac.
Turning on or off Wi-Fi

NOTE: There is no physical switch to enable or disable Wi-Fi. It has to be done through computer settings.
1 Swipe-in from the right edge of the display, or click the Action Center icon on the taskbar to access the Action Center.
2 Click Wi-Fi to turn Wi-Fi on or off.
Downloading the Wi-Fi driver
1 Turn on your computer.
2 Go to www.dell.com/support.
3 Click Product support enter the Service Tag of your computer, and then click Submit.

NOTE: If you do not have the Service Tag, use the auto-detect feature or manually browse for your computer model.
4 Click Drivers & downloads → Find it myself.
5 Scroll down the page and expand Network.
6 Click Download to download the Wi-Fi driver for your computer.
7 After the download is complete, navigate to the folder where you saved the Wi-Fi driver file.
8 Double-click the driver file icon and follow the on-screen instructions to install the driver.
Identifying the Wireless drivers
1 On the taskbar, click the search box, and then type Device Manager.
2 Click Device Manager.
The Device Manager window is displayed.
3 Expand System devices.

Configuring the Wi-Fi
1 Turn on Wi-Fi. For more information, see Turning Wi-Fi on or off.
2 Click the Action Center icon on the taskbar to access the Action Center.
3 Click Wi-Fi, and then click Go to settings.
A list of available networks is displayed.
4 Select your network and click Connect.

NOTE: Type the network security key, if prompted.

Bluetooth
Alienware Aurora R6 is shipped with Bluetooth 4.1/Bluetooth 4.2.
Turning on or off Bluetooth

NOTE: There is no physical switch to enable or disable Bluetooth. It has to be done through the computer settings.
1 Click the Action Center icon on the taskbar to access the Action Center.
2 Click Bluetooth to turn Bluetooth on or off.
Pairing the Bluetooth-enabled devices
1 Turn on Bluetooth. For more information, see Turning on or off Bluetooth.
2 Click the Action Center icon on the taskbar to access the Action Center.
3 Click Bluetooth, and then click Go to settings.
4 Select the required Bluetooth device for pairing.
5 Click Pair to pair the bluetooth devices.
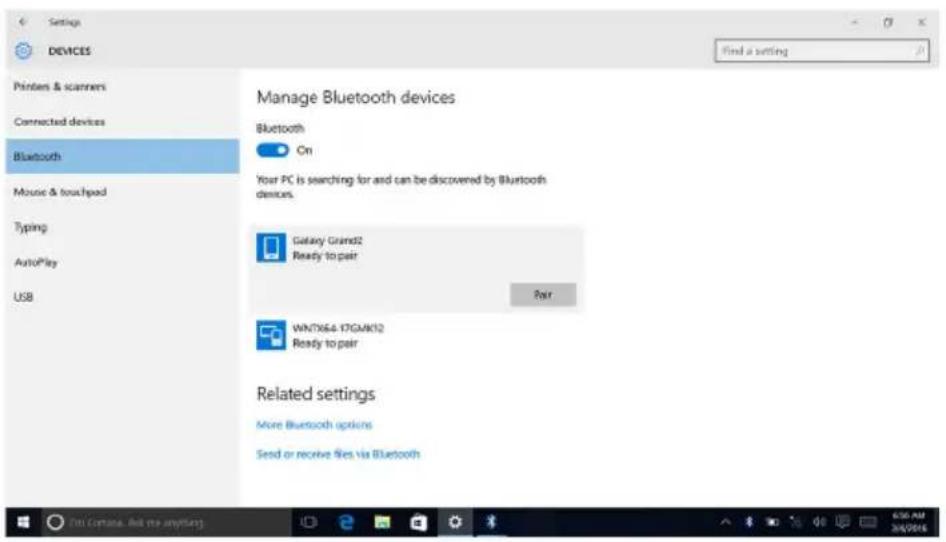
6 Click Yes to confirm the passcodes on both the devices.

Removing the Bluetooth device
1 Click the Action Center icon on the taskbar to access the Action Center.
2 Click Bluetooth, and then click Go to settings.
3 Click the device you want to remove, and then click Remove device.
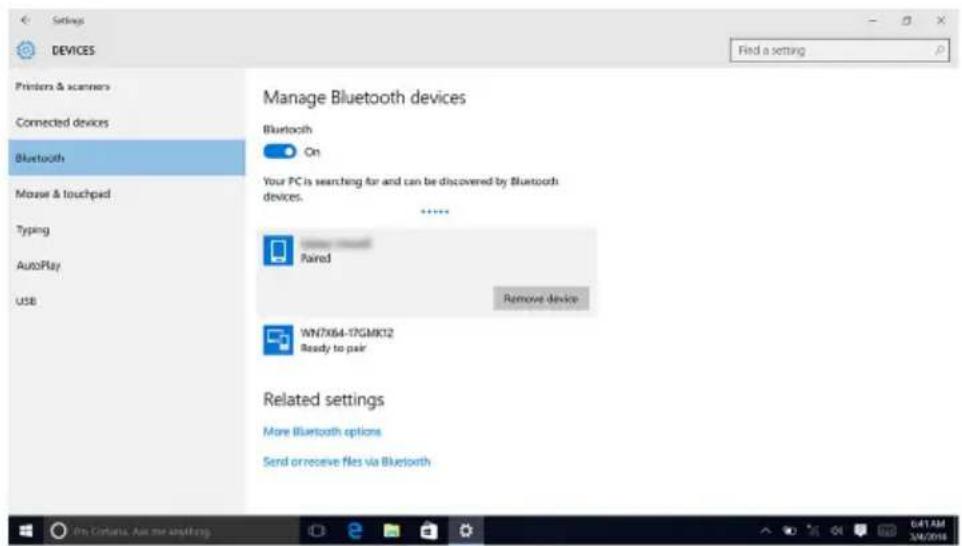
Transferring files between devices using Bluetooth
1 Click the Action Center icon on the taskbar to access the Action Center.
2 Click Bluetooth, and then click Go to settings.
3 Select your Bluetooth device.
4 Click Send or receive files via Bluetooth.
5 In the Bluetooth File Transfer window, click Send files, and then select the file you want to transfer.
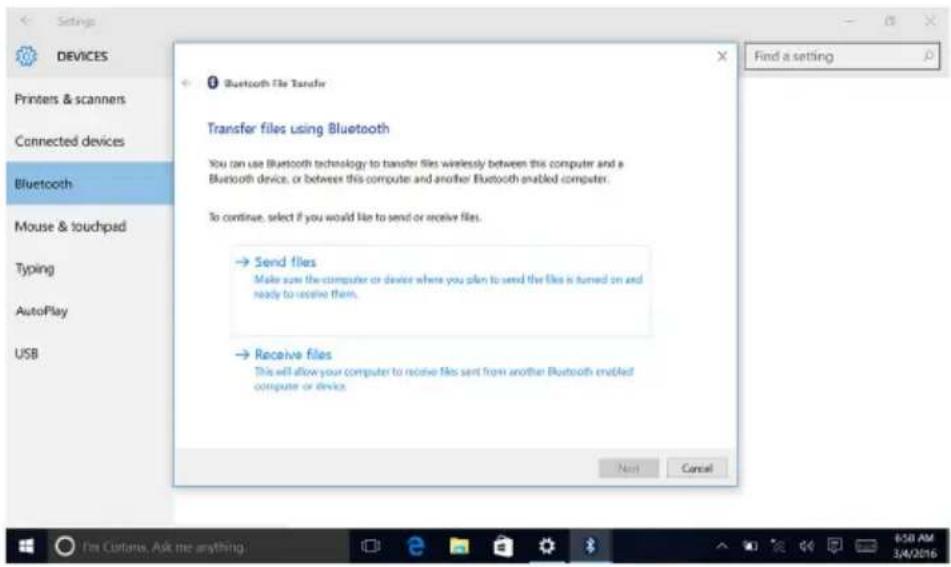
Hard drive
The following table shows the hard-drive options available in Alienware Aurora R6.
Table 12. Hard drive options
| Options Dimensions | |
| SSD One M.2 drive | |
| SATA | One 3.5-inch drive bayTwo 2.5-inch drive bays |
Identifying the hard drive
1 On the taskbar, click the search box, and then type Device Manager.
2 Click Device Manager.
The Device Manager window is displayed.
3 Expand Disk drives.

Identifying the hard drive in BIOS setup program
1 Turn on or restart your computer.
2 Press F2 when the AlienHead logo is displayed on the screen to enter the BIOS setup program.
A list of hard drives is displayed on the Main tab. For more information, see System setup options.
Chipset
Alienware Aurora R6 is shipped with the Intel Z270 chipset.
Downloading the chipset driver
1 Turn on your computer.
2 Go to www.dell.com/support.
3 Click Product support, enter the Service Tag of your computer, and then click Submit.
NOTE: If you do not have the Service Tag, use the auto-detect feature or manually browse for your computer model.
4 Click Drivers & downloads → Find it myself.
5 Scroll down the page and expand Chipset.
6 Click Download to download the chipset driver for your computer.
7 After the download is complete, navigate to the folder where you saved the chipset driver file.
8 Double-click the chipset driver file icon and follow the instructions on the screen.
Identifying the chipset
1 On the taskbar, click the search box, and then type Device Manager.
2 Click Device Manager.
The Device Manager window is displayed.
3 Expand System devices.
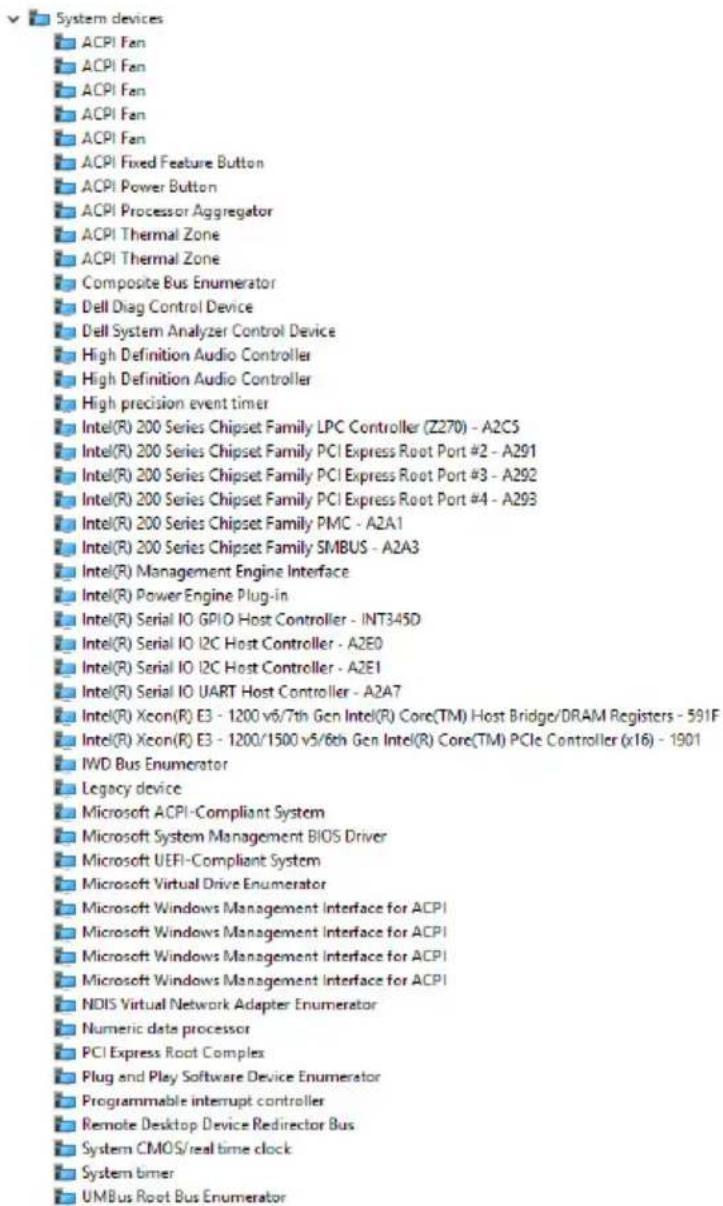
Memory
Alienware Aurora R5 has four DIMM (RAM) slots, which are accessible by removing the left-side cover and rotating the power-supply unit. Your computer
supports 4 GB, 8 GB, 16 GB, 32 GB, and 64 GB DDR4 memory of up to 2133 MHz and up to 2400 MHz with XMP (optional).
Checking the system memory in Windows
1 Click Start
2 Select Settings
3 Click System → About.


Checking the system memory in BIOS setup program
1 Turn on or restart your computer.
2 Press F2 when the AlienHead logo is displayed on the screen to enter the BIOS setup program.
On the Main tab, the memory information is displayed. For more information, see System setup options.
Testing memory using ePSA
1 Turn on or restart your computer.
2 Press F12 after the AlienHead logo is displayed on the screen to access the boot menu.
3 Use the arrow keys to highlight the Diagnostics menu option and press Enter.
4 Follow the instructions on the screen to complete the ePSA Pre-boot System Assessment (PSA).

NOTE: If the operating system logo appears, wait until you see the desktop. Turn off your computer and try again.
Processors
Alienware Aurora R6 is shipped with the following processor options:
- 7^th Generation Intel Core i3
- 7^th Generation Intel Core i5/i5k
- 7^th Generation Intel Core i7/i7k
Identifying the processors in Windows
1 On the taskbar, click the search box, and then type Device Manager.
2 Click Device Manager.
The Device Manager window is displayed.
3 Expand Processors.

Checking the processor usage in the task manager
1 Right-click on the taskbar.
2 Click Task Manager.
The Task Manager window is displayed.
3 Click Performance tab to display the processor performance details.

line
| Metric | Value | | --- | --- | | Utilization | 25% | | Speed | 2.84 GHz | | Maximum speed | 3.50 GHz | | Sockets | 1 | | Cores | 4 | | Logical processors | 4 | | Virtualization | Enabled | | L1 cache | 256 KB | | L2 cache | 1.0 MB | | L3 cache | 6.0 MB |Operating System
Alienware Aurora R6 is shipped with the Windows 10 factory installation.
Service Tag location
The service tag is a unique alphanumeric identifier that allows Dell service technicians to identify the hardware components in your computer and access warranty information.
The Service Tag label is located at the rear of your computer towards the base.
Device driver
A device driver or software driver is a computer program allowing higher-level computer programs to interact with a hardware device. For Alienware Aurora R5,
all driver installation for their devices is similar except that some systems may have more devices than others.
Intel Chipset Software Installation Utility
In the Device Manager, check if the chipset driver is installed.
Install the Intel chipset updates from www.dell.com/support.

Video drivers
In the Device Manager, check if the video driver is installed. Install the video driver update from www.dell.com/support.

Intel Serial IO driver
In the Device Manager, check if the Intel Serial IO driver is installed. Install the driver updates from www.dell.com/support.


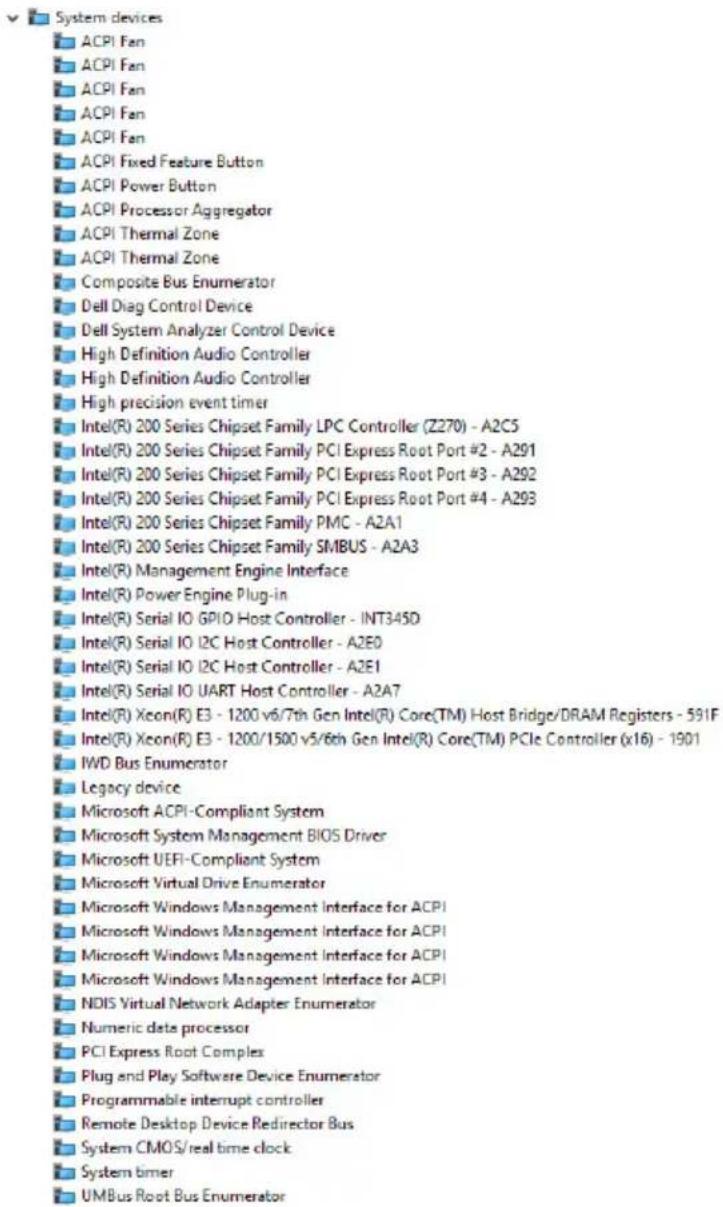
Intel Trusted Execution Engine Interface
In the Device Manager, check if the Intel Trusted Execution Engine Interface driver is installed.
Install the driver update from www.dell.com/support.
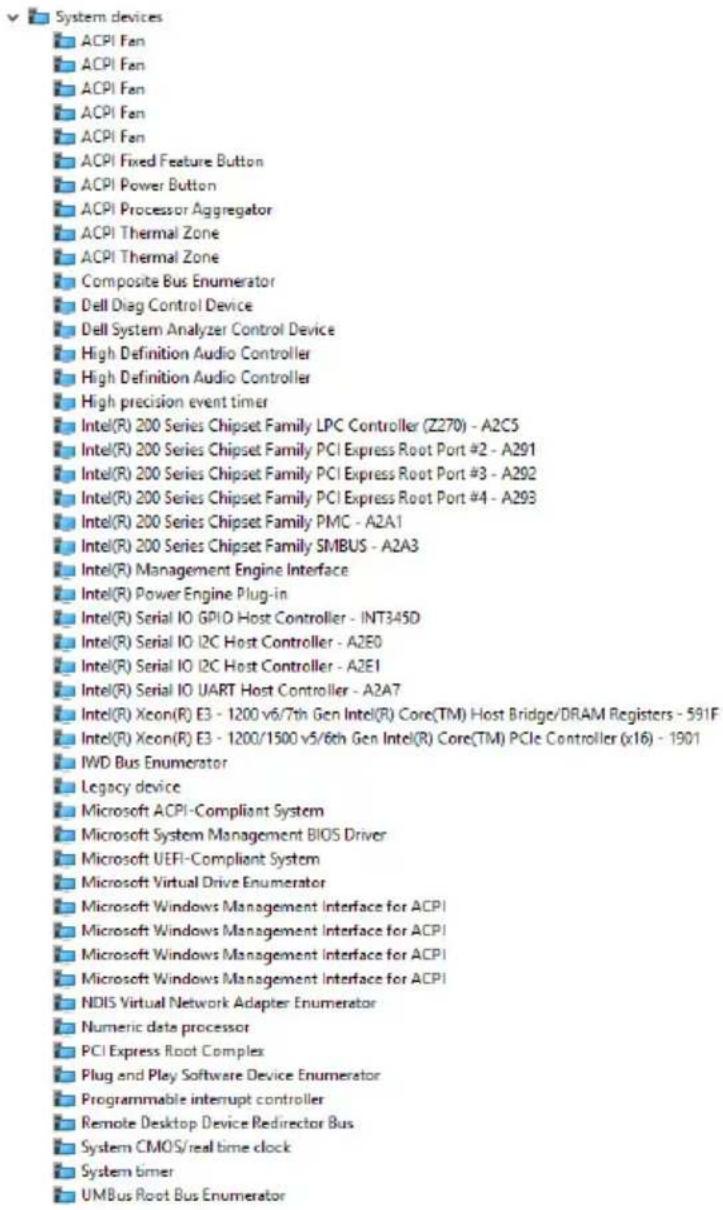
Intel Wireless-AC 8260 Wi-Fi and Bluetooth drivers
In the Device Manager, check if the network card driver is installed. Install the driver updates from www.dell.com/support.
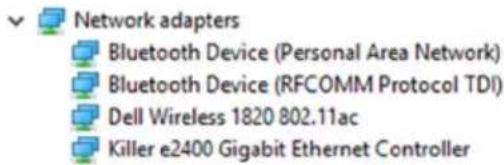
In the Device Manager, check if the Bluetooth driver is installed.
Install the driver updates from www.dell.com/support.

BIOS overview
The BIOS manages data flow between the computer's operating system and attached devices such as hard disk, video adapter, keyboard, mouse, and printer.
Boot menu
The Alienware Area-51 R2 includes a one-time boot menu. By using this feature, you can change the sequence of devices that your computer attempts to boot from, for example, CD-ROM, hard drive, or network.
Boot menu enhancements
The boot menu enhancements are as follows:
- Easier Access — Press F12 to access the boot selection menu.
- User Prompting — The user is prompted to use the keystroke on the BIOS screen
• Diagnostics Options — The boot menu includes the ePSA diagnostic options.
Timing key sequences
The keyboard is not the first device initialized by Setup. As a result, if you press a keystroke too early, the keyboard is locked out. In such case, a keyboard error message is displayed on the screen, and you cannot restart your computer with the Ctrl+Alt+Del key combination.
To prevent the keyboard from locking, wait until the keyboard is initialized completely. The keyboard is initialized if one of the following occurs:
• The keyboard lights flash.
- The F2=Setup prompt appears at the top-right corner of the screen during boot.
System diagnostic lights
The computer POST (Power On Self Test) ensures that it meets the basic computer requirements and the hardware is working appropriately before the boot process begins. If the computer passes the POST, the computer continues to start in a normal mode. However, if the computer fails the POST, the computer emits a series of LED codes in amber color during the start-up.
The following table shows different light patterns and what they indicate.
Table 13. Diagnostics
| Number of Power LED flashes | Problem description |
| 1 System board: BIOS and ROM failure | |
| 2 No memory or RAM detected | |
| 3 System board or chipset error | |
| 4 Memory or RAM failure | |
| 5 CMOS battery failure | |
| 6 Video card or chip failure | |
| 7 CPU failure | |
| 3,6 BIOS recovery image not found | |
| 3,7 BIOS recovery image found but invalid | |
Getting help and contacting Alienware
Self-help resources
You can get information and help on Alienware products and services using these online self-help resources:
Table 14. Self-help resources
| Information about Alienware products and services | www.alienware.com |
| Troubleshooting information, user manuals, setup instructions, product specifications, technical help blogs, drivers, software updates, and so on | www.alienware.com/gamingservices |
| Videos providing step-by-step instructions to service your computer | www.youtube.com/alienwareservices |
Contacting Alienware
To contact Alienware for sales, technical support, or customer service issues, see www.alienware.com.

NOTE: Availability varies by country and product, and some services may not be available in your country.

NOTE: If you do not have an active internet connection, you can find contact information on your purchase invoice, packing slip, bill, or Dell product catalog.
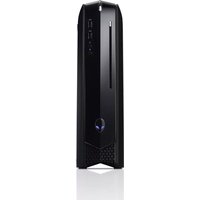
- Aurora R6 Service Manual
- Notes, cautions, and warnings
- Contents
- Before working inside your computer.... 12
- After working inside your computer.... 16
- Technical overview.... 17
- Removing the stability foot....21
- Replacing the stability foot....23
- Removing the left-side cover....24
- Replacing the left-side cover....26
- Removing the right-side cover.... 28
- Replacing the right-side cover.... 31
- Removing the top-cover assembly.... 34
- Replacing the top-cover assembly.... 40
- Removing the bottom cover.... 41
- Replacing the bottom cover.... 44
- Removing the 3.5-inch hard drive.... 45
- Replacing the 3.5-inch hard drive.... 48
- Removing the 2.5-inch hard drives.... 49
- Replacing the 2.5-inch hard drives.... 52
- Removing the hard-drive cage.... 53
- Replacing the hard-drive cage.... 55
- Removing the power-supply unit.... 56
- Replacing the power-supply unit.... 63
- Removing the processor-cooling assembly...... 64
- Replacing the processor-cooling assembly...... 67
- Removing the coin-cell battery.... 68
- Replacing the coin-cell battery....70
- Removing the memory modules.... 71
- Replacing the memory modules.... 73
- Removing the solid-state drive.... 76
- Replacing the solid-state drive....78
- Removing the graphics card.... 80
- Replacing the graphics card....83
- Removing the processor fan and heat-sink assembly.... 84
- Replacing the processor fan and heat-sink assembly.... 86
- Removing the processor....87
- Replacing the processor....89
- Removing the wireless card.... 91
- Replacing the wireless card.... 93
- Removing the antenna.... 95
- Replacing the antenna.... 98
- Removing the front-chassis fan.... 99
- Replacing the front-chassis fan.... 102
- Removing the top-chassis fan....103
- Replacing the top-chassis fan....106
- Removing the optical drive....107
- Replacing the optical drive.... 111
- Removing the front bezel 112
- Replacing the front bezel.... 115
- Removing the power-button board.... 116
- Replacing the power-button board.... 119
- Removing the rear trim cover....120
- Replacing the rear trim cover.... 122
- Removing the system board....123
- Replacing the system board....127
- BIOS setup program....129
- Flashing the BIOS....139
- Technology and components.... 140
- System diagnostic lights.... 163
- Getting help and contacting Alienware.... 164
- Before working inside your computer
- Before you begin
- Safety instructions
- Recommended tools
- Screw list
- After working inside your computer
- Technical overview
- Inside view of your computer
- System-board components
- Removing the stability foot
- Procedure
- Replacing the stability foot
- Removing the left-side cover
- Replacing the left-side cover
- Removing the right-side cover
- Replacing the right-side cover
- Removing the top-cover assembly
- Prerequisites
- Lift the top cover off the chassis.
- Replacing the top-cover assembly
- Post-requisites
- Removing the bottom cover
- Replacing the bottom cover
- Removing the 3.5-inch hard drive
- Replacing the 3.5-inch hard drive
- Removing the 2.5-inch hard drives
- Replacing the 2.5-inch hard drives
- Removing the hard-drive cage
- Replacing the hard-drive cage
- Removing the power-supply unit
- Replacing the power-supply unit
- Removing the processor-cooling assembly
- Replacing the processor-cooling assembly
- Removing the coin-cell battery
- Replacing the coin-cell battery
- Removing the memory modules
- Replacing the memory modules
- Removing the solid-state drive
- Replacing the solid-state drive
- Removing the graphics card
- Replacing the graphics card
- Removing the processor fan and heat-sink assembly
- Replacing the processor fan and heat-sink assembly
- Removing the processor
- Replacing the processor
- Removing the wireless card
- Replacing the wireless card
- Removing the antenna
- Replacing the antenna
- Removing the front-chassis fan
- Slide and lift the chassis fan off the chassis.
- Removing the top-chassis fan
- Replacing the top-chassis fan
- Removing the optical drive
- Replacing the optical drive
- Removing the front bezel
- Replacing the front bezel
- Removing the power-button board
- Replacing the power-button board
- Removing the rear trim cover
- Replacing the rear trim cover
- Removing the system board
- Replacing the system board
- Entering the Service Tag in the BIOS setup program
- BIOS overview
- Entering BIOS setup program
- System setup options
- USB Configuration
- Power Options
- Advanced
- Performance Options
- Clearing forgotten passwords
- Clearing CMOS Settings
- Technology and components
- Audio
- Downloading the audio driver
- Identifying the audio controller
- Before installation After installation
- Changing the audio settings
- Graphics
- Integrated:
- Discrete:
- Controller
- Downloading the graphics driver
- Identifying the display adapter
- Changing the screen resolution
- Click Apply.
- Rotating the display
- Select Graphics Options → Rotation and select from the listed options.
- USB
- Ports Location
- Downloading the USB 2.0 and USB 3.0 driver
- Identifying the USB drivers
- Enabling or disabling the USB in BIOS setup program
- Fixing a no-boot issue caused by USB emulation
- Wi-Fi
- Turning on or off Wi-Fi
- Downloading the Wi-Fi driver
- Identifying the Wireless drivers
- Expand System devices.
- Configuring the Wi-Fi
- Bluetooth
- Turning on or off Bluetooth
- Pairing the Bluetooth-enabled devices
- Removing the Bluetooth device
- Transferring files between devices using Bluetooth
- Hard drive
- Identifying the hard drive
- Identifying the hard drive in BIOS setup program
- Chipset
- Downloading the chipset driver
- Identifying the chipset
- Click Device Manager.
- Memory
- Checking the system memory in Windows
- Checking the system memory in BIOS setup program
- Testing memory using ePSA
- Processors
- Identifying the processors in Windows
- Checking the processor usage in the task manager
- Operating System
- Service Tag location
- Device driver
- Intel Chipset Software Installation Utility
- Video drivers
- Intel Serial IO driver
- Intel Trusted Execution Engine Interface
- Intel Wireless-AC 8260 Wi-Fi and Bluetooth drivers
- Boot menu
- Boot menu enhancements
- Timing key sequences
- System diagnostic lights
- Getting help and contacting Alienware
- Self-help resources
- Contacting Alienware
Brand : ALIENWARE
Model : Aurora R6
Category : Desktop computer