
00053132 - Network card / adapter HAMA - Free user manual and instructions
Find the device manual for free 00053132 HAMA in PDF.


| Product Type | Network Card/Adapter |
| Brand | Hama |
| Model | 00053132 |
| Interface | PCI Express x1 |
| Data Rate | 10/100/1000 Mbps (Gigabit Ethernet) |
| Supported Standards | IEEE 802.3, 802.3u, 802.3ab |
| Connector Type | RJ45 |
| Operating Systems | Windows, Linux, macOS |
| LED Indicators | Link/Activity, Speed |
| Power Consumption | 2.5 W (typical) |
| Dimensions (L x W x H) | 120 x 80 x 20 mm |
| Weight | 50 g |
| Operating Temperature | 0°C to 50°C |
| Storage Temperature | -20°C to 70°C |
| Certifications | CE, FCC |
| Security Features | WOL (Wake-on-LAN), VLAN support |
| Maintenance | Clean with dry cloth; no liquid cleaners |
| Spare Parts | Low-profile bracket (optional) |
| Repairability | Not user-serviceable; contact support |
| Included Accessories | User manual, driver CD (if applicable) |
Frequently Asked Questions - 00053132 HAMA
User questions about 00053132 HAMA
0 question about this device. Answer the ones you know or ask your own.
Ask a new question about this device
Download the instructions for your Network card / adapter in PDF format for free! Find your manual 00053132 - HAMA and take your electronic device back in hand. On this page are published all the documents necessary for the use of your device. 00053132 by HAMA.
USER MANUAL 00053132 HAMA
WLAN USB Stick 450 Mbps

Instruction manual

natural_image
White Hama medical device with attached USB cable, no visible text or symbols on the device bodyTable of Contents
Introduction 3
Introduction 3
Information on this user manual . . .
Copyright 3
Warnings 4
Intended use 4
Liability disclaimer 4
Safety instructions 5
Disposal 5
Description 6
Scope of supply ....
Device elements 6
Function LED 7
Requirements for operation ....
Connecting/disconnecting the device 8
Inserting the USB WLAN stick .....
Removing the USB WLAN stick.....
Installation under Windows .....
Installing the driver and configuration software 9
Configuration under Windows XP, Vista / 7 ...... 17
Starting the configuration programme7
Description of the configuration programme 18
"Available Networks detail view" ..... 19
"Link information detail view" .....20
"Profile List" detail view 22
"Profile configuration". 2 3
"Wi-Fi Protected Setup" 26
Establishing a WLAN connection for XP, Vista / 7 ....30
@connecting with the help of the "Hama Wireless LAN Utility" ..... 3 0
Establishing a WLAN connection for Windows 8 3 3
Deinstalling under Windows XP, Vista / 7 ....36
Deinstalling under Windows 8 ....37
5 Troubleshooting. 38
Appendix 40
*Technical data 40
Support and contact information ....41
For defective products ..... 4 1
Internet/World Wide Web 41
Support hotline - Hama product support
Notes on the EC Declaration of Conformity 41
Operating restrictions....4 1
Introduction
Introduction
Dear Customer,
By purchasing this device, you have decided in favour of a quality product from Hama which corresponds to the latest state of development with respect to technology and functional performance.
Read all the information contained here to quickly familiarise yourself with the device and to be able to make full use of its functions.
We would like to wish you much pleasure while using it.
Information on this user manual
This user manual forms an integral part of the WLAN USB stick and contains important information on the intended use, safety, connection of the device and the configuration of the software.
Keep this user manual in a safe place and pass it on to any future owners of the device.
Copyright
This documentation and the enclosed software is protected by copyright.
Any duplication or reprinting of this documentation, in whole or in part, and the reproduction of the illustrations even in modified form is only permitted with the written approval of the manufacturer.
Hama grants the buyer the non-exclusive right to use the enclosed software for the operation of the device. The Licensee may only make one copy of the software, which is only to be used for backup purposes.
Unless otherwise indicated, all trademarks and logos mentioned are copyrighted trademarks of Hama GmbH.
Microsoft, Windows and the Windows logo are trademarks of Microsoft Corporation. All other product and company names are trademarks of their respective owners.
Warnings
The following warnings are used in this user manual:
CAUTION
A warning of this category indicates potential material damage.
If the situation is not avoided, it may lead to material damage.
▶ Follow the instructions in this warning to avoid material damage.
NOTE
▶ A note contains additional information to simplify the use of the device.
Intended use
This device is intended only for establishing a data connection from a computer with the help of the enclosed software via a WLAN (Wi-Fi network) using a WLAN router or via some other WLAN-compatible device. Any use other than previously stated is considered as improper use.
No claims of any kind will be accepted for damage resulting from use of the device for other than its intended purpose. The risk must be borne solely by the device owner.
Liability disclaimer
All technical information, data and instructions on installation, operation of the device contained in this user manual represent the current status at the time of printing and are based on the best possible knowledge gained by experience and know-how.
The manufacturer assumes no liability for damage or injury resulting from failure to observe the user manual, use for other than the intended purpose, unprofessional repairs, unauthorised modifications or use of non-approved spare parts.
Safety instructions
When using the device, observe the following safety precautions to avoid any damage or injuries:
■ Do not allow children to play with the device. The device and the protective cap can be easily swallowed by children.
- Inspect the device for visible signs of damage before use. Do not use a damaged device.
- Do not open the device. Unauthorised opening and repairs can lead to considerable danger for the user of the device. Only allow qualified persons to carry out repairs. Improper repairs will invalidate the guarantee.
■ Protect the device against moisture and penetration by liquids.
■ Clean the housing of the device with a slightly damp cloth. Do not use any aggressive or abrasive cleaning agents or solvents.
Disposal
CAUTION
Do not dispose of the device as normal household waste. Pay attention to the disposal instructions in the user manual appendix.

Recycling the packaging material for further use saves raw materials and reduces waste. When no longer required, dispose of the packaging materials according to local environmental regulations.
NOTE
▶ Keep the original packaging during the guarantee period in order to be able to pack the device properly in the event of a guarantee claim.
Description
This device is a WLAN network adapter with high data transmission rate for use with the Universal Serial Bus (USB).
The device allows you to connect your computer directly to a WLAN access point or WLAN router. You can also connect your computer to other WLAN devices. This increases mobility and makes use of all advantages of wireless connections, high transmission speed and high-speed connections with maximum operational security.
Scope of supply
As standard, the device is supplied with the following components:
• USB 2.0 docking station
- Driver/instructions CD-ROM
- Short user manual
- WLAN USB stick with protective cap
NOTE
Inspect the contents of the package for completeness and obvious signs of damage. Report incomplete or damaged items to your supplier/retailer immediately.
Device elements

natural_image
White USB device with labeled ports (1 and 2), no visible text or symbols beyond labels1 Housing
2 U SB plug
Function LED
The function LED installed in the device flashes when accessing the network.
Requirements for operation
The following requirements must be met for installation and operation of the device on your computer:
- A free USB port on the computer.
NOTE
▶ A USB 2.0 port is recommended, USB 1.1 functions with a reduced data rate.
- A computer with one of the following operating systems installed:
- Microsoft® Windows 8 (32-bit or 64-bit edition),
- Microsoft® Windows 7 (32-bit or 64-bit edition),
- Microsoft® Windows Vista (32-bit or 64-bit edition),
-
Windows XP(32-bit or 64-bit edition) (Service Pack 3 or higher recommended).
-
Pentium-class computer or notebook (500 MHz CPU or better).
- At least 256 MB RAM and 50 MB free hard disk space.
- A CD-ROM drive.
NOTE
If you wish to connect additional computers to the WLAN, you need additional WLAN USB sticks.
Connecting/disconnecting the device
Inserting the USB WLAN stick
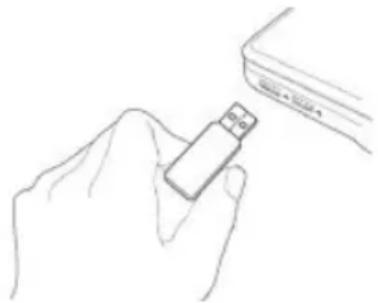
◆ Switch on your computer and insert the device into a free USB port or USB hub connected to the computer.
natural_image
Line drawing of a hand holding a USB flash into a device (no text or symbols)CAUTION
Do not use excessive force when inserting the WLAN USB stick into the port. This could result in damage to the USB port of your computer.
▶ Check whether the USB stick fits the other way round.
CAUTION
The USB port or your laptop can be damaged by the protruding USB stick.
▶ Use the USB docking station supplied for connecting to a laptop.
Removing the USB WLAN stick
◆ After shutting down the computer, pull the USB WLAN stick out of the USB port of the computer.
CAUTION
Possible data loss when writing to a network drive.
If the WLAN USB stick is removed during a data transfer, data may be lost when writing data to the network drive.
▶ Close all open programmes to ensure that all application data has been saved.
▶ Shut down the computer correctly before removing the USB WLAN stick.
Installation under Windows
In order to install the WLAN USB stick onto your computer, the following steps must be performed in the specified order:
1) Install the driver and the configuration software using the installation programme on the CD supplied with the device.
2) Reboot the computer.
3) Insert the WLAN USB stick.
4) Configure the device.
NOTE
Before starting the installation, observe the following instructions:
▶ Use a USB 2.0 port for the optimum performance of the device.
▶ Save all data and close all running application programmes.
▶ If you already have another version of the drivers and configuration software installed on the computer, uninstall these first.
Installing the driver and configuration software
The following describes the installation of the driver and the configuration software for the Windows XP, Windows Vista and Windows 7 and Windows 8 operating systems.
NOTE
The display of the menus may differ according to operating system. The following illustrations relate to a clean installation of the respective operating system.
Place the programme and driver CD supplied into the CD drive of your computers. The installation programme starts automatically.
NOTE
If you have deactivated the autoplay function and the installation programme does not start automatically, start the installation programme by double-clicking the "autorun.exe" file in the main directory on the CD.
Windows 8
Just after inserting the CD-ROM, the following text appears: "Tap to choose what happens with this disk". Click this accordingly.
WINDOWS VISTA / WINDOWS 7/8
▶ Execution of the "autorun.exe" programme under Windows Vista, Windows 7 and Windows 8 must be confirmed manually. Click the "Run autorun.exe" icon.
The main menu of the installation programme is displayed.

flowchart
graph TD
    A["Deutsch"] --> B["English"]
    B --> C["Français"]
    C --> D["More Languages"]
    D --> E["Exit / Beenden / Terminer"]
A - Select language German, English, French
B - Other languages
C - Exit programme
- Select your preferred language for installation by clicking one of the displayed languages (A). For more installation languages, click button (B).
If you wish to cancel the installation, click the "Exit / Beenden / Terminer" (C) button.
NOTE
The following examples are based on the English language version.
The main menu of the installation programme is displayed.

A - Start installation; Windows 8, XP, Vista, 7
B - Display User Guide
C - Download updated drivers
D - Install Adobe Reader
E - Back to the "Welcome" page
◆ Click the button (A) that corresponds to your Windows version to start installing.
To display the more detailed users guide in PDF format, Click the button (B) and subsequently double-click the PDF-file.
NOTE
▶ A PDF reader is required to display the users guide in PDF format. If a PDF reader is not already installed on your computer, you can install from the CD. Click the button (D) for this purpose.
- Click the button (C) to download the latest drivers from the Hama website.
◆ Click the button (E) to return to the "Welcome" page.
The InstallShield Wizard or the device driver installation wizard is loaded after starting the installation.
NOTE
▶ Loading the InstallShield Wizard can take a few seconds. Please wait until the InstallShield wizard has started.
WINDOWS VISTA / WINDOWS 7/8
▶ Under Windows Vista, Windows 7 and Windows 8, click "Continue" respectively "Yes" in the "User Account Control" dialogue.
Further steps during installation under Windows XP/Vista/7
The first page of the InstallShield wizard is displayed.

◆ Read the license agreement.
◆ Click "I accept the terms of the license agreement".
Click "Next".
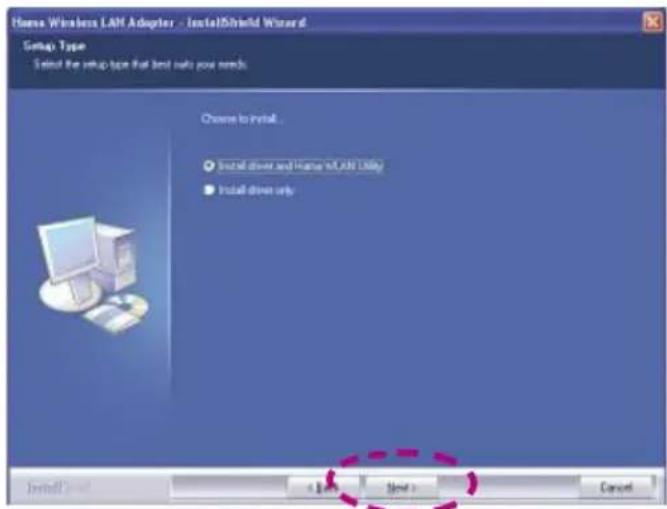
Mark "Install driver and Hama WLAN Utility".
Click "Next".

Mark "Hama wireless LAN configuration tool".
Click "Next".

◆ Click the "Install" button to start the Installation.
The installation files are now decompressed for installation.

The drivers and the configuration software are installed on your computer.
NOTE
▶ Depending on the operating system, several components are installed here.
After completing the installation, the computer must be restarted.

- Click the "Finish" button to finish installing and restart the computer.
Further steps during installation under Windows 8
The opening page of the device driver installation assistant is displayed.

Click "Next".
◆ Wait until the driver has been installed.

◆ Click on the "Finish" button to complete the installation.

Configuration under Windows XP, Vista / 7
Starting the configuration programme
The "Hama Wireless LAN Utility" configuration programme can be executed in a number of ways:
■ Start the programme via Start -> All Programs -> Hama Wireless LAN -> Hama Wireless LAN Utility
■ Start the programme by double-clicking the circled symbol in the taskbar shown below.
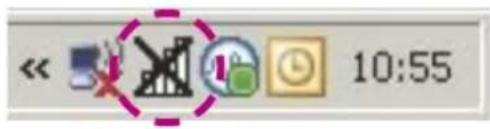
■ Right-click the illustrated symbol in the task bar and select "Launch Config Utility" in the context menu.

Description of the configuration programme
The program parts of the "Hama Wireless LAN Utility" configuration program are described below.
The programme starts with the following view:

A - Display network overview
B - Display link information
C - Display profile list
D - Display current connection information status
E - Switch the transmitter/receiver ON/OFF
F - Display encryption
G - Display connection quality
"Available Networks detail view"
All networks detected within range of the network adapter are displayed in the "Available Networks" detail view.
◆ Click the button "Available Networks" on the opening page of the configuration programme.
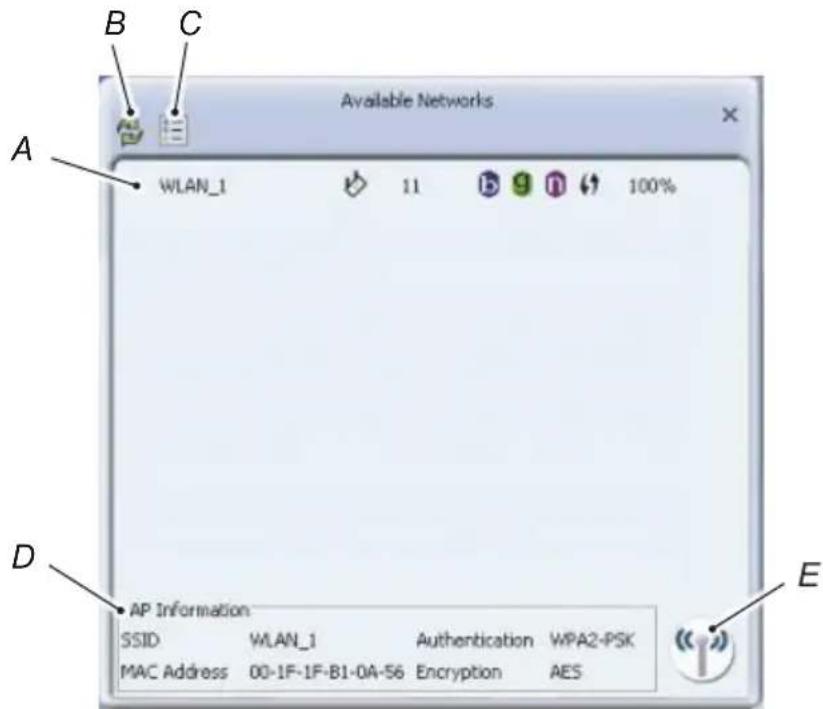
| A | Displays a list of all available networks together with their properties. Double-clicking a network establishes connection to the corresponding wireless network.If the network is encrypted, a window is opened for entering the encryption information. |
| B | R efreshes the display of the available networks. |
| C | Opens the window for configuration of a new profile and copies the known values of the selected network directly to the profile. |
| D | D isplays information on the access point. |
| E | Establishes connection with the selected wireless network.If the network is encrypted, a window is opened for entering the encryption information. |
"Link information detail view"
The "Link Information" detail view displays the "Link Status", "Throughput" and "Statistics".
- Click the button "Link information" on the opening page of the configuration programme.
Link Status
The "Link Status" detail view displays the current status of the network adapter and the connection.
![Link Information Status WLAN_1 <--> 00-1F-1F-B1-0A-54 Extra Info Link is up [Tx Power:100%] Authentication WPA2-PSK Encryption AES Network Type Infrastructure](/content/2026/06/1278985/images/8d627ace450c750fea5f6162356d9321fdd4aecb64b2b180e31722deb121ba13.jpg)
| Status: Displays the | name and the MAC address of the network connection. |
| Extra Info: Displays | the transmitting power connection status of the network adapters. |
| Authentication: | D isplays the network authenticatio |
| Encryption: Displays | the currently selected encryption for the data transfer. |
| Network type: Network connection type: Infrastructure for connection to a router/cess point Ad hoc for direct connection to another WLAN-capable device. | |
Throughput
Transmission information is displayed in the "Throughput" detail view.
◆ Click the button "Throughput" in the upper left corner.

bar
| Metric | Value | | :--- | :--- | | Link Quality (%) | 100 | | Signal Strength 1 (dBm) | -33 | | Signal Strength 2 (dBm) | -33 | | Signal Strength 3 (dBm) | -41 | Transmit Link Speed 450.0 Mbps Throughput 548.768 Kbps Receive Link Speed 450.0 Mbps Throughput 748.080 Kbps| Link Quality: Displays the connection quality. | |
| Signal strength: Displays the current signal strength of the connection. | |
| Transmit: Displays the current transmission speed and throughput. | |
| Receive: | D isplays the current reception throughput. |
Statistics
Details on the transmission and reception statistics are displayed in the "Statistics" detail view.
◆ Click the button "Statistics" in the upper left corner.

| Resets all counters to zero. |
"Profile List" detail view
Connection profiles can be created and managed in the "Profile" detail view.
- Click the button "Profile" on the opening page of the configuration programme.
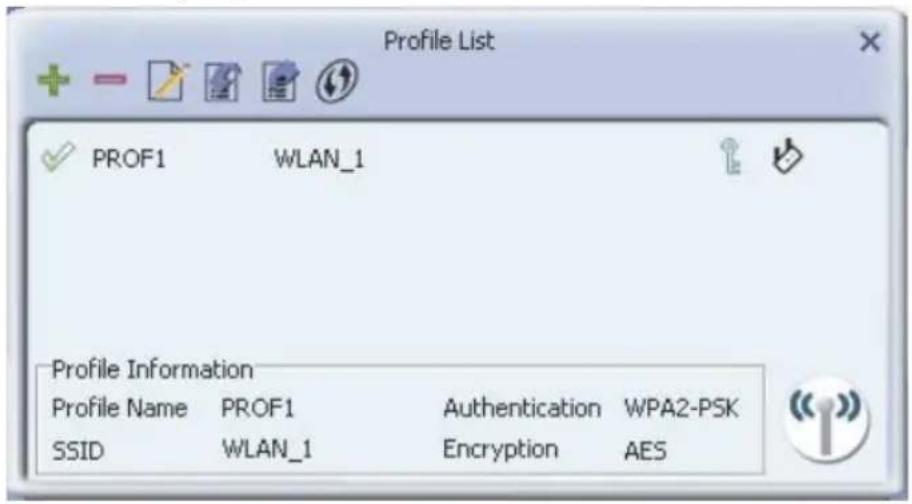
| Profile list: Displays | the list of profiles already created. |
| Profile information: | Display information on the selected profile. |
 | This button allows a new profile to be added. |
 | Deletes the selected profile. |
 | The settings of the selected profile can be edited. |
 | Imports an previously created profile. |
 | Exports the selected profile (e.g., for data backup). |
 | Quick connection to routers or access points that support quick establishment of connection via the WPS function. |
"Profile configuration"
When adding a new profile or editing an existing profile, a new window opens in which the settings for the profile can be made.
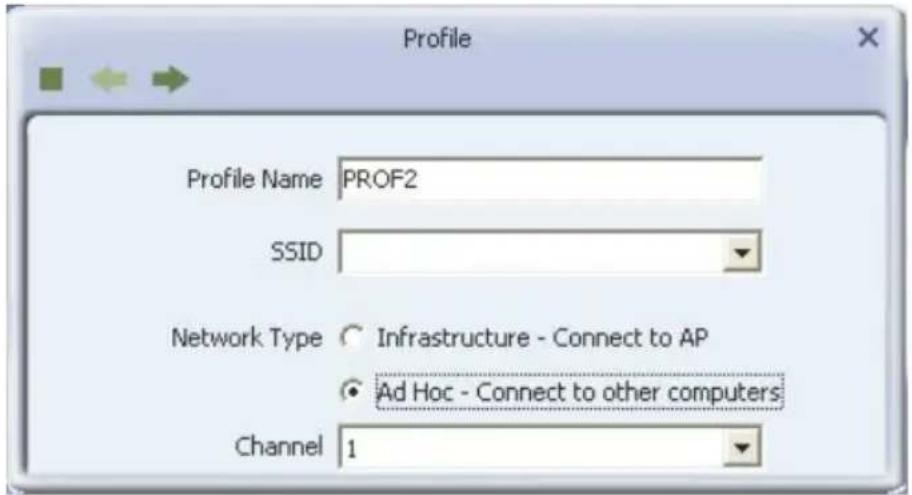
| Profile name: | Name of the profile for easier identificatic For example: "Office" or "Home". |
| SSID (Network name): | The unique network name as it is displayed in the list of available networks. |
| Network type: Select type of network connection: Infrastructure for connection to a router/access point Ad hoc for direct connection to another WLAN-capable device. | |
| Channel: This selection is only available for an ad hoc network. A fixed channel number must be set for the connection. | |
 | Cancel processing. |
 | Return to previous window. |
 | Continue to next window. |
Network authentication

| Authentication: | T he network authentication must match the settings for the network to be connection.The following is available: open, shared,WPA, WPA-PSK, WPA2, WPA2-PSK,802.1x. |
| Encryption: Data encryption must match the settings for the network to be connected. The following is available for connection:TKIP and AES. | |
WEP encryption

| Default Key Select | key 1-4 here. |
| Key format: Select: | Hex (10 or 26 Hex digits) if you use Hex characters (characters from 0-9 and a-f).ASCII (5 or 13 ASCII characters) if you use the ASCII character set (any character). |
| WEP key Enter the | WEP key here:WEP 64-bit ASCII requires 5 charactersWEP 64-bit Hex requires 10 charactersWEP 128-bit ASCII requires 13 charactersWEP 128-bit Hex requires 26 characters |
WPA/WPA2 encryption

| WPA Pre-Shared Key: | Enter the network code for WPA-PSK authentication here that you received from your network administrator. |
"Wi-Fi Protected Setup"
The detail view "Wi-Fi Protected Setup (WPS)" allows quick connection to routers or access points that support the rapid setup of connections using the WPS function.
Two methods connection establishment are supported:
■ PIN entry method (PIN code)
■ Push-button configuration method (via WPS button)
PIN method (PIN)

◆ Select "PIN" for the PIN entry method.
◆ Select the desired router or access point for WPS AP List.
◆ Click the button "Next" button.
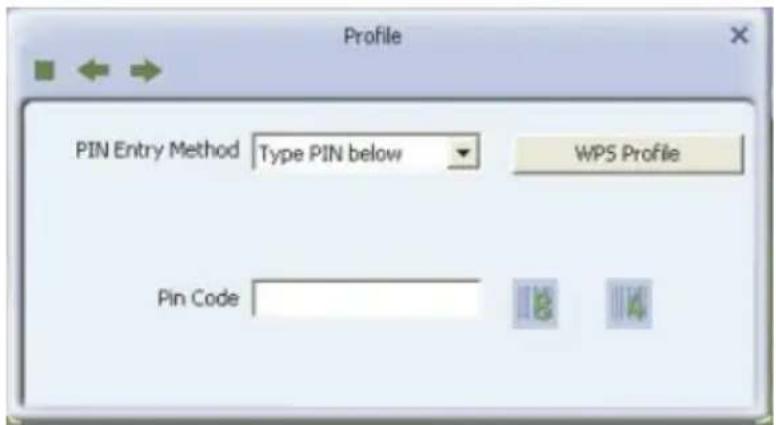
◆ For PIN input, select "Type PIN below".
◆ Enter the PIN code of the router or access point into the PIN-Code field.
◆ Click the button "Next" button.

Begin the PIN entry method by clicking the "Start PIN" button. The connection is automatically established as soon as a router or access point with the entered PIN code is found.
NOTE
Read the documentation on your WPS-compatible router or access point to find out where the PIN code is located.
Push-button configuration method (PBC)
In the case of the push-button configuration method, you must have access to the router or access point because the PBC button must be pressed after searching has started.

◆ Select "Push-Button (PBC)" for the push-button method.
◆ Click the button "Next" button.

◆ Start the push-button method by clicking the "Start PBC" button
◆ Press the PBC button on the router or access point.
The connection is automatically established after the corresponding router or access point is found.
NOTE
The search for the router or access point can take up to a minute.
Consult the documentation on your WPS-compatible router or access point to find out where the PBC button is located.
Establishing a WLAN connection for XP, Vista / 7
Connecting with the help of the "Hama Wireless LAN Utility"
To establish connection to a Wi-Fi network, proceed as follows:
◆ Start the "Hama Wireless LAN Utility" configuration programme.

◆ Click the button "Available Networks" on the upper edge of the window.

◆ Click the network that you want establish connection with.
◆ Click the button: "Add new profile".

◆ Enter a profile name for easy identification (e. g., "Office" or "Home").
◆ Click the button "Next" button.

- Select the network authentication and the type of data encryption for the network. This data is available from the person who set up the wireless LAN.
◆ Click the button "Next" button.

◆ Enter the network code for the network. This data is available from the person who set up the wireless LAN.
◆ Click the button "Next" button.

◆ Activate the "Pre-logon" option if the network connection should take place prior to user logon.
◆ Click the button "Next" button.

◆ Click the button 🔒 "Activate" to activate the profile. Connection to the wireless network of the activate profile is established automatically after the computer is rebooted.
Establishing a WLAN connection for Windows 8
To establish connection with a wireless LAN, proceed as follows:
◆ Click on the following circled symbol in the task bar on the desktop.
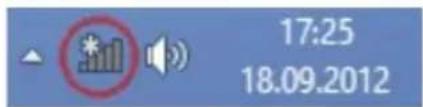
◆ Select the network that you want establish connection with.

Mark the "Connect automatically" option.
◆ Click on the "Connect" button.
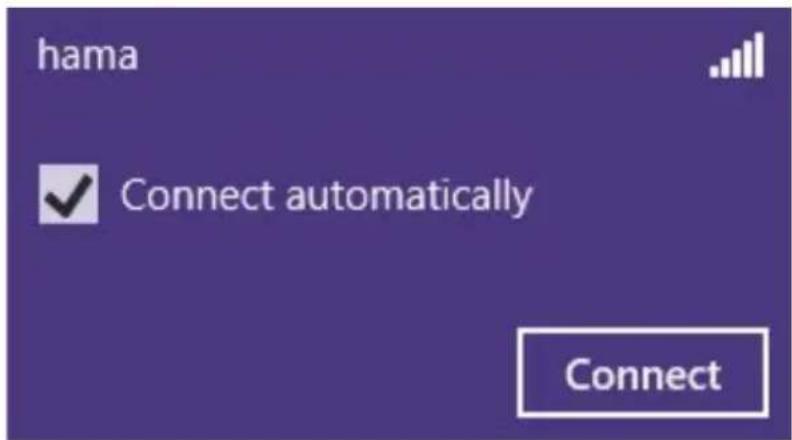
Now enter the network key and subsequently click "Next".

Alternatively, if the following is displayed:
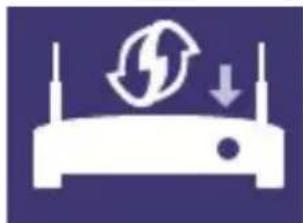
natural_image
Icon of a router with a lightning bolt symbol and download arrow, no text present◆ press the WPS button on the router.
◆ In this case, the connection is established automatically.
Subsequently select the desired network type.
hama

Do you want to turn on sharing between PCs and connect to devices on this network?
No, don't turn on sharing or connect to devices
For networks in public places
Yes, turn on sharing and connect to devices
For home or work networks
Deinstalling under Windows XP, Vista / 7
To uninstall the driver and the configuration programme, proceed as follows:
◆ Click Start ->All Programs-> Hama Wireless LAN -> Uninstall to start deinstallation.
◆ Confirm the confirmation prompt with "Yes". The driver and the configuration programme are uninstalled.
Deinstalling under Windows 8
To deinstall, proceed as follows:
◆ Press the Windows button + X.
◆ Click on "Programs and Features".
Mark "Windows Driver Package - Ralink (netr28ux or netr28u) Net".
◆ Click "Uninstall/Change".
◆ Confirm the confirmation prompt with "Yes".
The driver is uninstalled.
Troubleshooting
The following table will help you locate and eliminate minor faults:
| Problem Possible cause | Remedy | |
| After installation and restart, no symbol appears in the Info section of the taskbar. | Error during installation. | Uninstall programme and drivers and install again. |
| The WLAN USB stick is not recognised when inserted. | WLAN USB stick not inserted correctly. | Insert the WLAN USB stick correctly. |
| The USB port is not functioning. | Test the USB port with another USB device. | |
| Reinstall the manufacturer's chipset driver. | ||
| The WLAN USB stick is recognised when inserted, but has only limited connectivity (Windows XP). | Wrong service pack installed. | Download the latest service pack (Version 3 or higher) from www.microsoft.com and install. |
| The WLAN USB stick is recognised when inserted, but no matching driver is found. | Error during installation. | Uninstall programme and drivers and install again. |
| The desired peer is not shown in the list of available networks. | Peer not switched on. | Switch on peer. |
| Peer out of range of the USB WLAN stick. | Reduce the distance or use a WLAN repeater. | |
| The peer to which a connection is to be made is shown in the list of available networks, but no connection can be made. | The profile settings are not correct. | Check the following settings - Network name (SSID) correct? - Correct network type? - Network authentication correct? - Data encryption correct? - Network code correct (pay attention to capitalisation)? |
| The connection to the peer has been made, but folders interfaced devices cannot be accessed. | The desired resource (folder, drive, printer or Internet connection) has not been shared. | Enable the desired resource for sharing in the network.Information can be found in the 'Help' of the operating system. |
| Limited connectivity. | The network code is not correct. | Check the network code. |
| No IP address allocated. | Automatic assignment of IP addresses is deactivated (DHCP server). | |
| The DHCP server has not yet completed the automatic allocation of the IP address (this can take several minutes). | ||
| Set the IP address manually. | ||
| No IP address allocated. | See "Limited connectivity". | |
| No data can be exchanged an "ad hoc" connection. | Network code, work group or "ad hoc" network name do not match. | Check settings. |
| Channel numbers do not match. | Set the correct channel numbers. | |
| Occasional interference can occur during an "ad hoc" connection. | Possible frequency interference from microwave ovens, DECT telephones, Bluetooth devices or other transmitters. | Change to another channel. |
NOTE
If you cannot resolve the problem with the steps described above, please contact Hama product support.
Appendix
Technical data
| USB port | USB Version 2.0 compatible with USB Version 1.1 (reduced data rate) |
| Supported standards | IEEE 802.11a (54 MBit/s)IEEE 802.11b (11 MBit/s)IEEE 802.11g (54 MBit/s)IEEE 802.11n (450 MBit/s) |
| Supported operating systems | Windows XP (SP3)Windows Vista (32-bit or 64-bit version)Windows 7 (32-bit or 64-bit version)Windows 8 (32-bit or 64-bit version) |
| Frequency band 2.4/5 | GHz |
| Encryption WPA/ WPA2/ WEP 64 and 128-bit | |
| Displays 1 LED (connection/activity) | |
| Antennas 2 integrated and 1 external | |
| Dimensions (LxWxH) 99 x 30 x 15 mm | |
| Weight approx. 30 g | |
| Power supply via USB; no external power supply required | |
| Ambient temperature range (operation) | 0 - 40°C |
| Ambient temperature range (storage) | -25 - 65°C |
| Relative humidity max. | 95% (non-condensing) |
Support and contact information
For defective products
In the event of product complaints, please contact your retailer or Hama product support.
Internet/World Wide Web
Product support, new drivers or production information can be found at www.hama.com.
Support hotline – Hama product support
Tel. +49 (0) 9091 / 502-115
Fax +49 (0) 9091 / 502-272
Notes on the EC Declaration of Conformity
Hama GmbH & Co. KG hereby declares that this device complies with the fundamental requirements and other relevant provisions of the 1999/5/EC directive. The Declaration of Conformity according to the R&TTE Directive 99/5/EC can be found at www.hama.com
Operating restrictions
If channel 36-64 (channels with frequencies 5150MHz - 5350MHz) or the 2.4GHz range in France are used, the device may only be used in closed rooms.

GB Note on environmental protection:
After the implementation of the European Directive 2002/96/EU and 2006/66/EU in the national legal system, the following applies: Electric and electronic devices as well as batteries must not be disposed of with household waste. Consumers are obliged by law to return electrical and electronic devices as well as batteries at the end of their service lives to the public collecting points set up for this purpose or point of sale. Details to this are defined by the national law of the respective country. This symbol on the product, the instruction manual or the package indicates that a product is subject to these regulations. By recycling, reusing the materials or other forms of utilising old devices/Batteries, you are making an important contribution to protecting our environment.


- WLAN USB Stick 450 Mbps
- Table of Contents
- Introduction 3
- Description 6
- Connecting/disconnecting the device 8
- Installation under Windows .....
- Configuration under Windows XP, Vista / 7 ...... 17
- Establishing a WLAN connection for XP, Vista / 7 ....30
- Establishing a WLAN connection for Windows 8 3 3
- Deinstalling under Windows 8 ....37
- Troubleshooting. 38
- Appendix 40
- Introduction
- Information on this user manual
- Copyright
- Warnings
- CAUTION
- NOTE
- Intended use
- Liability disclaimer
- Safety instructions
- Disposal
- Description
- Scope of supply
- Device elements
- Function LED
- Requirements for operation
- Connecting/disconnecting the device
- Inserting the USB WLAN stick
- Removing the USB WLAN stick
- Installation under Windows
- Installing the driver and configuration software
- Windows 8
- WINDOWS VISTA / WINDOWS 7/8
- Further steps during installation under Windows XP/Vista/7
- Further steps during installation under Windows 8
- Configuration under Windows XP, Vista / 7
- Starting the configuration programme
- Description of the configuration programme
- "Available Networks detail view"
- "Link information detail view"
- Link Status
- Throughput
- Statistics
- "Profile List" detail view
- "Profile configuration"
- WPA/WPA2 encryption
- "Wi-Fi Protected Setup"
- PIN method (PIN)
- Push-button configuration method (PBC)
- Establishing a WLAN connection for XP, Vista / 7
- Connecting with the help of the "Hama Wireless LAN Utility"
- Establishing a WLAN connection for Windows 8
- Deinstalling under Windows XP, Vista / 7
- Deinstalling under Windows 8
- Troubleshooting
- Appendix
- Support and contact information
- For defective products
- Internet/World Wide Web
- Support hotline – Hama product support
- Notes on the EC Declaration of Conformity
- Operating restrictions
- GB Note on environmental protection:
Brand : HAMA
Model : 00053132
Category : Network card / adapter